#junit4
Explore tagged Tumblr posts
Visit Tumblr Blog
Explore Tumblr blogs with no restrictions, modern design and the best experience.
Last Seen Tumblr Blogs


Fun Fact
Tumblr has a low social media market share in South America.
Text
JUnit4 Testing in VS-Code
Create the Hello World project here Add the Junit 4 Dependencies Add the Junit 4 dependencies to the pom.xml <?xml version="1.0" encoding="UTF-8"?><project xmlns="http://maven.apache.org/POM/4.0.0" xmlns:xsi="http://www.w3.org/2001/XMLSchema-instance" xsi:schemaLocation="http://maven.apache.org/POM/4.0.0 http://maven.apache.org/xsd/maven-4.0.0.xsd"> <modelVersion>4.0.0</modelVersion>…

View On WordPress
0 notes
Text
Java ecosystem
The folks at ecosyste.ms have analyzed the structure of the open-source software community, grouping packages/projects into ecosystems, for funding purposes. Their "Java" ecosystem is the one I'm most familiar with: https://funds.ecosyste.ms/funds/java
From their list of 200+ "most critical packages", I extracted the ones I care most about: kotlin, junit4, slf4j, gson, guava, logging-log4j2, groovy, jna, jmh, jcommander, and findbugs. While hardly a representative sample, I'm concerned that several of these (junit4, jmh, and findbugs) appear to be unmaintained. I don't understand how sending money to Ecosystems Funds is going to improve these packages.
Jcommander, which I thought was unmaintained, proves on closer inspection to have a 2.0 release (from August) that I missed because it hasn't been uploaded to Maven Central.
2 notes
·
View notes
Text
Android ViewModel Unit Test Tutorial - Android Coding by DMTechnolab
Android ViewModel Unit Test Tutorial – Android Coding by DMTechnolab
Hi guys welcome Android ViewModel Unit Test Tutorial. This post is also part of our Android test series. In this post, we will learn how to test our ViewModels. So far, we have learned how to write unit tests JUnit4 And using the instrumented unit test AndroidJUnit4. We also learned Test writing for cell database. Now, let’s start testing ViewModel. Android ViewModel Unit Test Tutorial I will…

View On WordPress
0 notes
Text
202005 Retrospective

5 月振り返り。
仕事
5 月は出社することもなく終日リモート。開発は自分を除いた開発メンバーにお願いして、私は別のチームとの諸々の折衝やテストを実施する方にシフトしつつある。それもあって、アジャイル開発の QA に興味がある。
アジャイルテストの世界 - Agile Testing Condensed と実例マッピング - kawaguti’s diary
普段は受け入れテスト中心なんだけど、リリースに向けて受け入れテストとは別の軸でテストを作りたいという思いもあって、日々考えているところ。
健康
何年か前から、週の後半になるにつれ眼精疲労と頭痛がセットで来ることがあった。ただ、毎週起こるものでも無かったので、そんなに気にしていなかった。しかし 5 月中旬に 2 週続いてしまったので、いよいよ対策をすることに。リモートになって、平日は外に出なくなってしまったので、近いところを見る時間が増えているのかもしれない。「平日に外に出なくなったことによる弊害」は気になるところではある。
対策は 3 つ。1. 午前中でも部屋のライトを付けること。2. 60 分あたり 5 分程度の休憩をすること。3. 寝る前に蒸気ホットアイマスクをすること。
今週は眼精疲労や頭痛は起きてないので、暫く続けてみる。
運動
先々月から始めた Freeletics は続けている。夕食前に運動するようにしていたが、夕食の時間も日によって早かったりするので、夕食後 2 時間くらい置いてから運動することにした。その結果、毎日運動するようになった。
ただ、日によっては物足りない時もあるので、Freeletics の前に���時間で軽い有酸素運動をができないか検討中。
開発
引き続き Graal/Truffle を使ったクエリエンジン実装を粛々と。今月はフィールド間の値の比較のテストを書きながら進めた。Calcite では型が違うフィールド間の比較を見つけると内部的に CAST を入れるようになっていたので、一部の CAST にも対応した。
ついでに JUnit4 -> JUnit5 に上げた。例外が発生するケースの書き方が大分良くなっている。ただ、JUnit5 は従来とパッケージ名が違うのがツラい…。
サッサと Aggregation の実装に入りたいところだが、まだ論理式等が扱えないので、もう暫くかかりそう。Filter というよりも、式の多様性をどこまでサポートするか、というところが悩ましい。Truflle の node の構成は現状とてもシンプルだが、色んな式をサポートしていくと、その構成も大きく変えなければならない気がする。
英語
今月は何も無し。そろそろマズい…。
本
(Amazon へのリンクにはアフィリエイトの ID が埋まっているので、気になる方はご注意を)

Scalaスケーラブルプログラミング第3版
posted with AmaQuick at 2020.05.31
Martin Odersky(著), Lex Spoon(著), Bill Venners(著), 長尾 高弘(著), 羽生田 栄一(著), 水島 宏太(著) インプレス (2016-09-20T00:00:00.000Z)

¥4,807
Amazon.co.jpで詳細を見る
3 月の課題図書である Scala のコップ本を粛々と。本は Kindle アプリで開いて、もう一方で Jupyter notebook を開き、画面を半々に分けてコードを動かしながら読んでる。9 章まで読了。ほぼ毎日読んでいるものの、この調子だと読み終えるのは 8 月くらいになりそう…。Scala の細かい点まで書かれており、それを求めていたので、個人的には良書だと思う。
Scala のコップ本は 6 章まで終わった。Kindle アプリと Jupyter notebook で画面を半々に分けて、コードを動かしながら読んでる。Kindle 版の評価があまり良くなかったので購入する時に躊躇したが、今のところ全く不満ない。 pic.twitter.com/QfCoxfMcSo
— Masayuki Takahashi (@masayuki) May 10, 2020
音楽
今月は Jungle 月間。特に Chase & Status の『RTRN II JUNGLE』を聴いてることが多かった。ずっと聴いてる。
youtube
出たばかりなのでまだそんなに聴いてないけど、Golden Dubs の『Champagne & Asparagus』も良い。
youtube
Le Mellotron の DJ Set から L'Entourloop。2 人��なんだけど、DJ じゃない方の黒い帽子のオジサンが終始何もしてなくて、このオジサンの動きがひたすら気に��る動画。
youtube
0 notes
Text
API Testing with Karate
You heard it right, we are going to learn on how to create a API Testing suite using Karate, Let’s go.....

So what is Karate ?
Well, Karate is an Automation Framework with which we can perform API Test Automation, mocks, performance-testing and even UI automation into a single, unified framework. Moreover Karate is open source, and it follows Cucumber BDD styled syntax.
Advantages of Karate
Easy to start automating
Even non-programmers can start using Karate with just very minimal learning curve
powerful JSON and XML assertions are inbuilt
you just have to create ‘.feature’ files, no need to create step definitions.
If you're new to programming or automation testing Karate is easy to use since no Java knowledge is required. If this is you, Karate might be the perfect choice for your team.

How to start using Karate?
prerequisite:
Java JDK
Maven
IDE
First you should be creating a project, will be better if its a maven project
Start your IDE, I’ll be using intellij
Create a new maven project
To make use of Karate in the created project, you need two dependencies, and those are
Karate itself
<dependency>
<groupId>com.intuit.karate</groupId>
<artifactId>karate-apache</artifactId> <version>0.6.0</version>
</dependency>
next we need Junit to facilitate Junit testing
<dependency>
<groupId>com.intuit.karate</groupId> <artifactId>karate-junit4</artifactId> <version>0.6.0</version>
</dependency>
that’s it, we have all the basic things to start writing automation tests. That’s simple right, yes it is
For testing purpose I am going to make use of Open source weather API(’https://www.metaweather.com/api/’)
In the newly created project, create a new file called ‘karate-config.js’ in the main src folder then, Create a package and add a feature file in it like I have done below,
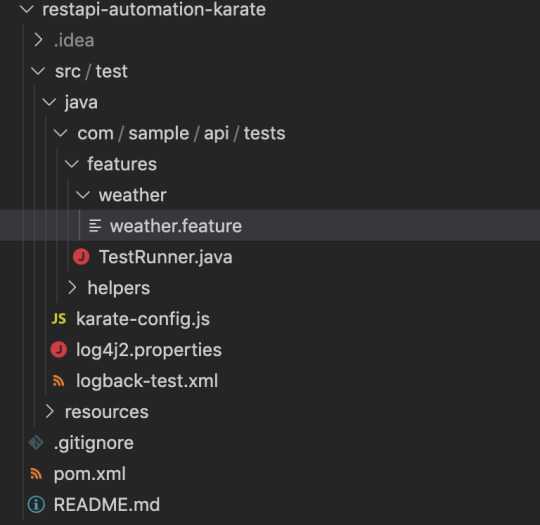
Lets begin our testing by configuring the test suite, for that we need to add our test details(app url, environment details, etc) in “karate-config.js” file. I have added the following details for our test suite,

Whats next ? yes, we can start writing tests..
how to write test using karate ? will it be like rest-assured or jersey ? no.... nothing is complicated in karate, you don’t need to write even a single line of code to write basic tests, then how can we define our tests ? Cucumber feature files.. yeah, you heard me right. We just need to have cucumber feature files.
Shall we write our first test using Karate ?
Our first test is to do a location search and get the lat long details from the API and assert the values.

it’s not big, just normal Cucumber feature file with karate keywords in them.
“path” - this is the place where we give the URL and API Endpoints
“param query” - this is where we can specify URL params
“method” - this is where we need to specify the type of request
“status” - Using this keyword we can assert the response code
Assertions:
And response.city == 'Chennai'
And response.latt_long == '13.05939,80.245667'
assertions are plain simple, you get the entire response json object, which you can traverse and do your assertions, like the ones that I have added in the above script
What we have to do when we need to do complex assertions or request body creation ? Karate covers that as well, you can create your own custom functions either in Java or Javascript and then use those functions within your feature files.. Shall we try one such custom utility function ?
We will make use of the Endpoint “location/search/” and pass lat and long as params, which will give us list of cities that comes under same lat long co-ordinates, and then we can assert the response cities with our custom assertion method. This is how I have written the scenario for this test,

did you see the step which says,
* def responseLength = returnLength(response)
where does this returnLength comes from ? yup, that’s our custom function. Create a utility.js file within your src folder and write the following code in it,
function () {
function returnLength(payload)
{
karate.log(payload.length);
return payload.length;
}
return {
returnLength : returnLength
};
}
Next we need to make sure that Karate knows about this custom function, for that we have to add this utility function in the karate-config.js file, make the following entry in your karate-config file,
config = karate.call('file:src/test/java/com/sample/api/tests/helpers/utility.js',config);
This will make sure that your custom function is known to karate. Thats it, you can call your function in feature files. Easy isn’t it ? yup sooooo easy.
How to execute our test ?
The next big this is execution, Karate makes use of Junit. We need to have a Junit runner class within our project which points to our feature file, nothing more is needed.

instead of cucumberoptions you can see that we are making use of the annotation “KarateOptions” and passing the feature files in it. And then we have a method with @Test annotation in it, which is making use of the Karate runner to execute the tests. And then we have a “generateReport” method which is used to create Cucumber HTML reports,. We can execute this class as an Junit Test, and the results will be in Target folder.

We are done... Simple right ?
I have made use of Karate for our API regression suite, which has around 700 tests in them. We have our tests connected to our CI pipeline and our tests have been very efficient without any flakiness in it. I am so happy that I moved over to Karate from Rest-Assured. Hope you guys will also enjoy by making use of Karate. You can reach out to me if you need help while implementing Karate.
0 notes
Text
Ad-Hoc Labs: Sr. Android Developer

Headquarters: Los Angeles URL: https://www.adhoclabs.co/
Description
We are looking for a remote Android Developer to join a small, committed technical team at Ad Hoc Labs, makers of the Burner & Firewall apps. We empower people to take control over their identity and privacy by giving them fully functional, powerful, and reliable second phone numbers.
As an Android Developer, you will be writing code to build new features, execute user interfaces, and help maintain and improve the current codebase. Since we are a small team, you will also have the opportunity to learn new technologies and contribute directly to the development of a product that millions of people rely on to help protect their privacy.
RESPONSIBILITIES INCLUDE:
Development of native Android app while working on an agile team
Support the entire application lifecycle (concept, design, test, release and support)
Write clean, maintainable native application code for Android
Ensure app performance, quality, and responsiveness
Package apps for deployment to Google Play Store and help with automation tasks
Transform designs into awesome and functional user experiences
Keep up to date knowledge of emerging Android technologies
SKILLS + QUALIFICATIONS:
3+ years with Kotlin or Java and Android SDK
Worked on at least one application published to the Google Play store
Experience with the various means of automated testing (junit4/5, robolectric, espresso)
Experience with modern mobile software design patterns (MVP, MVI, MVVM, etc)
Knowledge of popular 3rd party Android tools and apis
Experience with RXJava, Kotlin Coroutines, Dagger2, AndroidX (lifecycle, workmanager, etc)
Ability to diagnose problems and solve them independently
Experience working with distributed, agile teams
Experience with Google Play Billing is a bonus
WHAT WE OFFER YOU:
Meaningful work on an innovative and growing set of products
Collaborative, cross-functional work culture with an emphasis on autonomy and communication
Health and Dental coverage for employees, dependents & domestic partners
Investment in career development, including training, conferences, and online learning resources
Ad Hoc Labs is committed to building a diverse, inclusive company and encourages applications from candidates of all backgrounds.
Ad Hoc Labs, Inc. is an equal employment opportunity employer and makes employment decisions on the basis of merit. We seek to employ the most qualified person in every job. Ad Hoc Labs, Inc. does not discriminate on the basis of sex, gender (including pregnancy, childbirth, breastfeeding or related medical conditions), gender identity, gender expression, age, color, race, religion, marital status, national origin, ancestry, sexual orientation, physical & mental disability, medical condition, genetic information, military and veteran status, or any other basis protected by federal, state or local law. Applicants with disabilities may be entitled to reasonable accommodation under the terms of the Americans with Disabilities Act and certain state or local laws.
To apply: https://hire.withgoogle.com/public/jobs/adhoclabsco/view/P_AAAAAAFAAAQKQMCq7Vy_Qv
from We Work Remotely: Remote jobs in design, programming, marketing and more https://ift.tt/2TqyA9Y from Work From Home YouTuber Job Board Blog https://ift.tt/2svnMw6
0 notes
Photo

Kurs JAVA – testy jednostkowe Kurs JAVA - testy jednostkowe Naucz się pisania testów jednostkowych JAVA z wykorzystaniem JUnit4 i 5. Dowiedz się jak przygotować kod aplikacji, organizować testy dzięki technikom GWT i unikać zależności wykorzystując Mockito.
0 notes
Text
Unmaintained dependencies
A recent online discussion made me think about all the open-source software (OSS) I use regularly and in particular how much of it might be no longer maintained.
My curiosity was piqued. I decided to list my software dependencies with the dates their last-known releases. Here are the ones that are more than a year old:
2010-05-20 jmf v2.1.1e 2012-01-11 imgscalr-lib v4.2 2013-01-25 org.apache.commons.io v2.4 2021-02-13 junit4 v4.13.2 2022-01-11 jcommander v1.82 2022-04-05 lemur v1.16.0 2022-04-05 lemur-props v1.2.0 2022-04-05 lemur-proto v1.13.0 2022-04-24 Bullet v3.2.5 2023-01-26 sim-math v1.6.0 2023-11-02 jmh v0.7.2 2024-01-01 commons-exec v1.4.0 2024-01-28 jinput v2.0.10 2024-02-29 de.undercouch.download v5.6.0 2024-04-08 actions-gh-pages v4.0.0
While there are many reasons a project might not publish a release for 12 months, it seems to me a valid cause for concern.
#lists#open source#software development#software maintenance#release#should i be concerned#curiosity#dependencies
2 notes
·
View notes
Text
Comment ça marche...les assertions avec AssertJ ?
AssertJ c'est une librairie Java qui vous permet d'ajouter des assertions lors de l'écriture de vos tests unitaires ou d'intégration (oui je fais la différence !!). Ca augmente nettement la lisibilité et la qualité de vos tests.
Il suffit d'ajouter cette lib à votre outil de build préféré (maven ou gradle) et c'est parti !
Ensuite tout ce que vous avez à faire, c'est de rajouter l'import static
import static org.assertj.core.api.Assertions.*;
Ensuite les assertions s'écrivent de cette manière :
assertThat(list).hasSize(9)
Toutes les assertions débutent par assertThat(object). En utilisant, l'autocomplétion de votre IDE, vous aurez toute la liste de ce qu il est possible de faire avec votre objet en question. Et c'est puissant, car on accès à beaucoup de choses très facilement.
Et surtout, ce qui est bien, c'est que vous chainer les assertions de cette manière :
assertThat(liste).hasSize(9) .contains(picsou, donald) .doesNotContain(mickey);
Du coup, en très peu de lignes de codes, on peut tester pas mal de choses tout en ayant un test très lisible du 1er coup d'oeil.
Vous avez également la possibilité de faire vos propres assertions si vous le souhaitez :-)
assertj
N.B : Cette lib était très intéressante avec Junit4,sans doute moins avec Junit5 car elle doit inclure des assertions nativement. Mais j'ai pas encore trop joué avec.
0 notes
Text
Android testing: AWS Device Farm vs Firebase TestLab
It’s been a year since I’ve joined the team in charge of Android automation testing solution on project for one of our respectable clients. It’s handed over to another team now, and time to share the valuable experience has come.
Our job was to automate E2E tests only. And one of the first decisions we had to make, is to choose a serious enough company which provides a service of “renting” all kind of physical devices for the testing purposes. First, we thought of self-hosting solution which could be wired to the Cl pipeline, but we could never provide a device diversity granular enough. Therefore, we started looking for cloud solutions.
Since we needed a solution which supports both, Android and iOS platforms, with a large number of various devices, AWS DeviceFarm singled out, as a solution we could trust to be stable enough, with the responsive support and general ease of use.
AWS DeviceFarm
When using it for the first time, you will probably try out the service through the web UI. There are just a couple of mandatory steps to go through in order to start the test run:
Choose a test type: Instrumentation
Upload test apk
Upload app apk
Choose devices (create a so-called device-pool)
If you don’t need any extra data package to provide, then click run.
And basically, that’s it. The tests will run on a chosen devices and if everything goes well, you’ll see the cumulative pass/fail statistic per device and detailed list of passed and failed tests.
For each test, you’ll be able to get the instrumentation log, logcat and video recording by default.
However, web UI isn’t much of use when the CI pipeline is used, so we have to use either the AWS CLI or some plugin for the build server. We were using the Jenkins which has the support for AWS DeviceFarm communication (through the plugin of course).
It worked very well, at least when it comes to the tests execution. A first huge issue we stumbled upon was the lack of reporting. There is no option to add an email or emails which should receive the testing report. Actually, there is no report at all, not even a digested one which could be forwarded to the client. We were left with the option to allow the access to our AWS project so that the testing results could be checked through the web Ul.
JUnit4 support – Deal breaker
On the Android side, the testing procedure was complicated enough and we had to make a couple of compromises. One of them was to force a strict order of the test execution due to complex and long login procedure in the app.
In order to do so, as a first step, we’ve created a precise test suites. A handy behavior of test suite definition on Android is that test classes will be executed in the order they are defined in the @SuiteClasses annotation.
As a second part, we had to order the tests inside the test classes as well, which we did with the only option available: @FixMethodOrder annotation.
And that was the end of the journey for us with AWS DeviceFarm because they implement JUnit4 only partially, without any support for test suites definition, nor for the FixMethodOrder! Since we were left out of options, we had to abandon the service as we could not run the tests as we wanted to.
Firebase TestLab
Ahead of abandoning the AWS, we had to make sure that we can find a service, still serious enough and with good support which doesn’t have those JUnit4 limitations. We tried the Firebase and it worked.
Through the web UI the setup procedure steps are almost identical to AWS:
Choose a test type: (also instrumentation)
Upload both apk’s
Choose a device
Run.
Observe the test results per device and per test with access to video recording and logs.
Of course, we cannot use the web UI, so we end up using the CLI solution for Firebase: gcloud.
With the gcloud we’re able to define the type of the test, paths to the apk files, result directory and bucket on Google Cloud Storage, and the test-target which besides all standard options like test package or individual test, also accepts the test suite as a target, respecting the order of execution.
Although it works on a similar way as AWS DeviceFarm, Firebase TestLab relies on Google stack and therefore saves all test results into the bucket on Google Cloud Storage, which is awesome as we’re able to access the files directly.
Small note here: in order to define the custom bucket and path per test execution, a payed access to Google Cloud Storage is required. In the case of free storage usage, the test results will be saved under the testlab/random-hash directory, and removed after 90 days. Since we could access the test results directly, we could build the testing report as we wanted to, which is something our client really liked. Still, I’d like to mention that Firebase also doesn’t provide a system reporting solution where we could create only the mailing list in order to have the results delivered. It does have a digested results per device in the console output.
Timeouts:
Although the Firebase gives us the possibility of test suites run, it didn’t come for free. A maximum timeout for test execution is 30 minutes. This is more than enough for 90% of use cases, but in our case having one test suite containing all test classes proved to be a problematic solution as our E2E tests are executing 60+ minutes.
The reason behind this 30 min limit, according to the discussions on Google forums and Slack, is the system stability, so they found the compromise on 30 min. Executing anything longer than that would be interrupted without any results.
We solved this problem by creating many small test suites which are executed one after another, with separate gcloud calls. As a consequence, report generation was even more complex, but possible at least, giving us the working solution at the end.
Comparison:
Here we’ll try to sum up the pros and cons from both services:
CLI simplicity: Firebase
Plugin accessibility: AWS
System reports(mailing list): None
Reports accessibility: Firebase
Digested report: Firebase
Devices choice: AWS (Firebase have a 15-20 different devices)
Up-to-date compatibility: Firebase
Support accessibility: Firebase (almost instant via Slack)
Device remote control: AWS
System stability: AWS (On Firebase we had a lot of “infrastructure failures” on certain devices)
IDE integration: Firebase
iOS support: Both(with the slight advantage to AWS as Firebase XCUITest support is in closed beta at the time of writing)
This list could go on and on, but its goal is not to tell you”You should never use service X”. I wanted to point out to the issues and advantages from the real world example.
Conclusion
A general feeling I get as a user of these services is that there is no large freedom of choice. As our requests and expectations are higher, the walls we hit are higher as well, and it happens much often. The worst thing about it is that you cannot be aware of all these tiny issues when making a decision. Who would think of JUnit4 issues on AWS… but it happens.
Note: These services are used on unlimited payed plans, including the traffic generated on Google Cloud Storage. There was no limitations of service due to free or trial usage.
Stay cautious!
Der Beitrag Android testing: AWS Device Farm vs Firebase TestLab erschien zuerst auf codecentric AG Blog.
Android testing: AWS Device Farm vs Firebase TestLab published first on https://medium.com/@koresol
0 notes
Text
Android testing: AWS Device Farm vs Firebase TestLab
A whole year passed since I started working on Android automation testing solution on the project for a large corporation. The project is handed over to another team now, and it’s time to share the valuable experience.
Our job was to automate E2E tests only. And one of the first decisions we had to make, is to choose a serious enough company which provides a service of “renting” all kind of physical devices for the testing purposes. First, we thought of self-hosting solution which could be wired to the Cl pipeline, but we could never provide a device diversity granular enough. Therefore, we started looking for cloud solutions.
Since we needed a solution which supports both, Android and iOS platforms, with a large number of various devices, AWS DeviceFarm singled out, as a solution we could trust to be stable enough, with the responsive support and general ease of use.
AWS DeviceFarm
When using it for the first time, you will probably try out the service through the web UI. There are just a couple of mandatory steps to go through in order to start the test run:
Choose a test type: Instrumentation
Upload test apk
Upload app apk
Choose devices (create a so-called device-pool)
If you don’t need any extra data package to provide, then click run.
And basically, that’s it. The tests will run on a chosen devices and if everything goes well, you’ll see the cumulative pass/fail statistic per device and detailed list of passed and failed tests.
For each test, you’ll be able to get the instrumentation log, logcat and video recording by default.
However, web UI isn’t much of use when the CI pipeline is used, so we have to use either the AWS CLI or some plugin for the build server. We were using the Jenkins which has the support for AWS DeviceFarm communication (through the plugin of course).
It worked very well, at least when it comes to the tests execution. A first huge issue we stumbled upon was the lack of reporting. There is no option to add an email or emails which should receive the testing report. Actually, there is no report at all, not even a digested one which could be forwarded to the client. We were left with the option to allow the access to our AWS project so that the testing results could be checked through the web Ul.
JUnit4 support – Deal breaker
On the Android side, the testing procedure was complicated enough and we had to make a couple of compromises. One of them was to force a strict order of the test execution due to complex and long login procedure in the app.
In order to do so, as a first step, we’ve created a precise test suites. A handy behavior of test suite definition on Android is that test classes will be executed in the order they are defined in the @SuiteClasses annotation.
As a second part, we had to order the tests inside the test classes as well, which we did with the only option available: @FixMethodOrder annotation.
And that was the end of the journey for us with AWS DeviceFarm because they implement JUnit4 only partially, without any support for test suites definition, nor for the FixMethodOrder! Since we were left out of options, we had to abandon the service as we could not run the tests as we wanted to.
Firebase TestLab
Ahead of abandoning the AWS, we had to make sure that we can find a service, still serious enough and with good support which doesn’t have those JUnit4 limitations. We tried the Firebase and it worked.
Through the web UI the setup procedure steps are almost identical to AWS:
Choose a test type: (also instrumentation)
Upload both apk’s
Choose a device
Run.
Observe the test results per device and per test with access to video recording and logs.
Of course, we cannot use the web UI, so we end up using the CLI solution for Firebase: gcloud.
With the gcloud we’re able to define the type of the test, paths to the apk files, result directory and bucket on Google Cloud Storage, and the test-target which besides all standard options like test package or individual test, also accepts the test suite as a target, respecting the order of execution.
Although it works on a similar way as AWS DeviceFarm, Firebase TestLab relies on Google stack and therefore saves all test results into the bucket on Google Cloud Storage, which is awesome as we’re able to access the files directly.
Small note here: in order to define the custom bucket and path per test execution, a payed access to Google Cloud Storage is required. In the case of free storage usage, the test results will be saved under the testlab/random-hash directory, and removed after 90 days. Since we could access the test results directly, we could build the testing report as we wanted to, which is something our client really liked. Still, I’d like to mention that Firebase also doesn’t provide a system reporting solution where we could create only the mailing list in order to have the results delivered. It does have a digested results per device in the console output.
Timeouts:
Although the Firebase gives us the possibility of test suites run, it didn’t come for free. A maximum timeout for test execution is 30 minutes. This is more than enough for 90% of use cases, but in our case having one test suite containing all test classes proved to be a problematic solution as our E2E tests are executing 60+ minutes.
The reason behind this 30 min limit, according to the discussions on Google forums and Slack, is the system stability, so they found the compromise on 30 min. Executing anything longer than that would be interrupted without any results.
We solved this problem by creating many small test suites which are executed one after another, with separate gcloud calls. As a consequence, report generation was even more complex, but possible at least, giving us the working solution at the end.
Comparison:
Here we’ll try to sum up the pros and cons from both services:
CLI simplicity: Firebase
Plugin accessibility: AWS
System reports(mailing list): None
Reports accessibility: Firebase
Digested report: Firebase
Devices choice: AWS (Firebase have a 15-20 different devices)
Up-to-date compatibility: Firebase
Support accessibility: Firebase (almost instant via Slack)
Device remote control: AWS
System stability: AWS (On Firebase we had a lot of “infrastructure failures” on certain devices)
IDE integration: Firebase
iOS support: Both(with the slight advantage to AWS as Firebase XCUITest support is in closed beta at the time of writing)
This list could go on and on, but its goal is not to tell you”You should never use service X”. I wanted to point out to the issues and advantages from the real world example.
Conclusion
A general feeling I get as a user of these services is that there is no large freedom of choice. As our requests and expectations are higher, the walls we hit are higher as well, and it happens much often. The worst thing about it is that you cannot be aware of all these tiny issues when making a decision. Who would think of JUnit4 issues on AWS… but it happens.
Note: These services are used on unlimited payed plans, including the traffic generated on Google Cloud Storage. There was no limitations of service due to free or trial usage.
Stay cautious!
Der Beitrag Android testing: AWS Device Farm vs Firebase TestLab erschien zuerst auf codecentric AG Blog.
Android testing: AWS Device Farm vs Firebase TestLab published first on https://medium.com/@TheTruthSpy
0 notes
Link
Do you use the #junit5 extension model? Do you like it more than what we had in #junit4? Have you run into any problems? #java #testing https://t.co/ZkjkR6XQsZ
— Igor Stojanovski (@ig0rski) April 7, 2018
http://twitter.com/ig0rski/status/982529113373192192
0 notes
Text
Selenium WebDriver Training with Java and Cucumber in Bangalore
Selenium is a automation testing framework that is utilized to test electronic applications. Selenium is open source and can execute contents in parallel. Selenium enables clients to compose test contents in a few programming dialects, for example, Perl, PHP, Java, C# and so forth however Java is the most famous and generally adjusted programming dialect utilized with Selenium. Selenium can be introduced on various working frameworks like Windows, Linux, and Macintosh. Selenium bolsters all the main programs.
In our Selenium with Cucumber Automation testing, we are embraced another approach towards making an expansive finished approach towards the new roads of testing preparing. Selenium with cucumber web based preparing in view of a behaviour driven development (BDD) stage for making robotization test contents for testing Desktop Web and Android Web, Apps. The significant favorable position of this stage is its capacity to empower drafting and execution of robotized acknowledgment, unit tests. Being a cross-stage, open source based and free of cost testing approach, it has turned out to be exceedingly well known in the business.
Syllabus Covered:
Selenium IDE
Plan and create TestCases for a Shopping Cart Application
Record End-to-End Tests
Selenium RC Server
Selenium WebDriver
Prepare Test Environment: Install JRE and JDK
Set environment variables
Export Script from IDE - JUnit4 with Selenium Web Driver
Download and configure Eclipse
Identifying and building a basic automated test script using
FireBug and FirePath
Intro to JAVA - Enhancing basic automated test script using variables, arrays, functions
Error/Bug reporting in Framework
Automating manual test cases, controlling framework from excel file, using batch execution of multiple test classes
Best practices while developing framework using JUnit4 & TestNG testing frameworks
In-depth discussion of various annotations
Building Data-driven tests scripts fetching data from CSV files
Creating industry standard logs with Log4j and taking screen-shots
Configuring JDBC connections and connecting to MS SQL Server database
Data parameterization of automation RC/Web Driver scripts
Creating Repositories for test scripts with SubVersion (SVN)
TortoiseSVN as a windows client tool for version control
Installing and Configuring Apache ANT
Running Scheduled Batch Test Scripts Using ANT
Creating excellent TestNG XSLT Reports with ANT
Introduction to Maven
Maven installation & configuration
Maven Archetype Build life cycle
Maven POM.xml
Maven profiles and dependency
Executing Selenium tests using ANT and MAVEN
Introduction to Page Objects
Building a Test Framework using Page Objects
Selenium GRID
Learn to build the Selenium GRID environment
Run Selenium WebDriver scripts in parallel using Selenium Grid!
Jenkins - Setting up a continuous integration and a continuous deployment environment
Cucumber - What it is? How can we use it with Selenium Web Driver
Complete 2 hour real Time project on BDD Testing: Cucumber with Selenium
To provide quality Software Testing Training with Live Projects and serve industries by providing trained human resources.
More Visits:
Software Testing Training in Bangalore | Cucumber Training in Marathahalli | Best Selenium Training Institute in Bangalore | Best Selenium Training in Bangalore | Selenium Training in Bangalore | Java Selenium Automation Training in Bangalore | Software Testing Course in Bangalore
0 notes
Text
Automating Electron Applications Using Selenium
Guest Post by Yanir Taflev -- Sr. Customer Success Engineer @ Applitools
A new rising star claiming to take over the world of desktop applications smoothing the rough edges between web, mobile and desktop.
If you still haven’t heard the name Electron - you are going to hear a lot on it in the following years. There are already many applications that are built with Electron, for example: Slack, Atom editor, Visual Studio Code and many others.
Electron is a new way to build cross-platform desktop applications based on the well known Chromium and Node.js engines that are already popular in the industry.
And you guessed right, Electron uses HTML, JavaScript and CSS to build desktop applications. The vision of same codebase for web, mobile and desktop applications has never been closer. When it comes to automation, it was always a chase after the recent platforms, frameworks and technologies, and here again, we are closer than ever to use same automation for all.
Technically speaking, you can automate Electron applications as if they were standard web applications using Selenium Chrome Driver.
So How to Start?
Let’s use the Electron api demos app which can be downloaded here.
First thing to notice, chrome developer tools are already there.

Use alt+cmd+i (or F12 on windows) to bring up the dev tools. Now you can locate elements in the HTML and build css selectors for your own selenium test.
What's Next?
Let’s set up a test in Junit using Java and Selenium. It will be required to set up the path to the actual binary of the application in ChromeOptions object. The rest is as in any other selenium test:
package com.applitools.Full.Electron; import org.junit.After; import org.junit.Before; import org.junit.Test; import org.junit.runner.RunWith; import org.junit.runners.JUnit4; import org.openqa.selenium.By; import org.openqa.selenium.WebDriver; import org.openqa.selenium.WebElement; import org.openqa.selenium.chrome.ChromeDriver; import org.openqa.selenium.chrome.ChromeOptions; import org.openqa.selenium.remote.DesiredCapabilities; import java.util.List; @RunWith(JUnit4.class) public class ElectronApiAppTest { private WebDriver driver = null; @Before public void setup() { ChromeOptions opt = new ChromeOptions(); opt.setBinary("/Users/yanir/Downloads/Electron API Demos.app/Contents/MacOS/Electron API Demos"); DesiredCapabilities capabilities = new DesiredCapabilities(); capabilities.setCapability("chromeOptions", opt); capabilities.setBrowserName("chrome"); driver = new ChromeDriver(capabilities); if (driver.findElements(By.id("button-about")).size() > 0) driver.findElement(By.id("button-about")).click(); } @Test public void test() throws InterruptedException { driver.findElement(By.id("get-started")).click(); List elements = driver.findElements(By.className("nav-button")); for (WebElement element : elements) { element.click(); } } @After public void teardown() { driver.quit(); } }
Now we are good to go. You will notice that, unlike regular web tests, the test is running much faster. That’s due to the fact that the entire application is hosted on the same machine so there is no network latency involved.
Take it to the Next Level: Visual Validation
If you never used visual validation - this is the time. Visual validations will add a layer of coverage to all the visible elements, so you will enjoy a significant reduction in assertions coding and maintenance. Let’s use Applitools to demonstrate how easily it can be achieved (some code ahead):
package com.applitools.Full.Electron; import com.applitools.eyes.selenium.Eyes; import org.junit.After; import org.junit.Before; import org.junit.Test; import org.junit.runner.RunWith; import org.junit.runners.JUnit4; import org.openqa.selenium.By; import org.openqa.selenium.WebDriver; import org.openqa.selenium.WebElement; import org.openqa.selenium.chrome.ChromeDriver; import org.openqa.selenium.chrome.ChromeOptions; import org.openqa.selenium.remote.DesiredCapabilities; import java.util.List; @RunWith(JUnit4.class) public class ElectronApiAppTest { private WebDriver driver = null; private Eyes eyes = new Eyes(); @Before public void setup() { ChromeOptions opt = new ChromeOptions(); opt.setBinary("/Users/yanir/Downloads/Electron API Demos.app/Contents/MacOS/Electron API Demos"); DesiredCapabilities capabilities = new DesiredCapabilities(); capabilities.setCapability("chromeOptions", opt); capabilities.setBrowserName("chrome"); eyes.setApiKey("MY_APPLITOOLS_API_KEY"); driver = new ChromeDriver(capabilities); if (driver.findElements(By.id("button-about")).size() > 0) driver.findElement(By.id("button-about")).click(); } @Test public void test() throws InterruptedException { driver = eyes.open(driver, "Electron API Demos app", "Electron app Smoke test"); eyes.checkWindow("Home page"); driver.findElement(By.id("get-started")).click(); List elements = driver.findElements(By.className("nav-button")); for (WebElement element : elements) { element.click(); eyes.checkRegion(By.cssSelector("main.content"), element.getAttribute("id"), true); } eyes.close(); } @After public void teardown() { driver.quit(); eyes.abortIfNotClosed(); } }
The result will appear in Applitools dashboard:


If something changes in the screens of your the application - it will be discovered by Applitools Eyes visual validation.
For further reading and reference on Applitools go to applitools.com website. To familiarize yourself with Selenium, head to http://www.seleniumhq.org, as well as expert blogs, such as Elemental Selenium by Dave Haeffner.
HAPPY TESTING

0 notes