#khtml
Explore tagged Tumblr posts
Visit Tumblr Blog
Explore Tumblr blogs with no restrictions, modern design and the best experience.
Last Seen Tumblr Blogs


Fun Fact
In February 2021, Tumblr had 518.6 million blog accounts.
Text
i switched to konqueror (web browser)
no more blink or gecko
just khtml
it's a bit cleaner
also it works better with kde themes and kvantum
2 notes
·
View notes
Text
偽メール、米国のハッカーに狙われる!
話が大きくなってて笑いそう。(銀行の「アカウント残高」ってなに?)
差出人:西日本シティ銀行 <[email protected]> 件名:【重要】米国のハッカーがあなたのアカウント残高を盗もうとしています
〇 本文より(一部抜粋)
いつも西日本シティ銀行をご利用いただきありがとうございます。
当社のセキュリティ システムは、他国のハッカーによるお客様のアカウントにログインしてアカウント残高を盗もうとする試みを検出したため、経済的損失を防ぐためにお客様のアカウントを凍結しました。
・ログイン日時: 2023/06/29----22: 38
・IPアドレス: 185.136.56.230----IP は米国からのものです
・User Agent: Mozilla/5.0 (Linux; Android 11; 2201117TL) AppleWebKit/537.36 (KHTML, like Gecko) Chrome/109.0.0.0 Mobile Safari/537.36
アカウントの凍結を解除するには、下のボタンをクリックして公式 Web サイトにアクセスし、本人確認を行ってください。
→ 絶対ダメですよ!
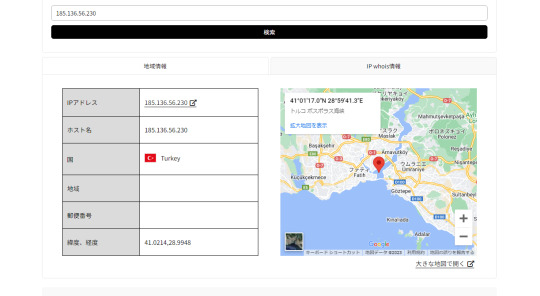
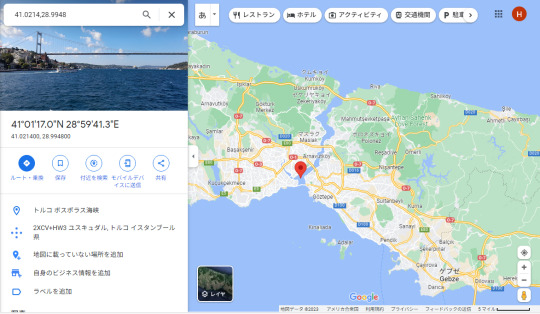
“ 185.136.56.230 “ はトルコのボスポラス海峡だった。(トルコは親しみやすい国です。イスタンブールの町中にいると天神にいるのと変わらない気分。)
この他にも “ ETC利用照会サービス “ や “ amazon!ショッピング ” からも着信あり。フィルタリングに掛ける良いキーワードはないものか?
〇 情報ページ
フィッシング対策協議会 > https://www.antiphishing.jp/news/
迷惑メール相談センター > https://www.dekyo.or.jp/soudan/index.html
IPアドレス住所検索 > https://rakko.tools/tools/11/(ラッコツールズ)
1 note
·
View note
Text
Hot tip
You can use archive websites like https://archive.is/ to access pretty much any news article.
The thing is, they want to paywall their content, but they also want to show up at the top of search results. In order to show up in search results at all, they need to be indexable by search bots. Archive websites count as search bots.
So, all you gotta do is request the website be archived or find an existing archive and you'll get the full news article. In this case: https://archive.is/sItRh.
How it works
Generally, you can pretend to be a bot yourself. It's pretty much exclusively detected using something called the "User-Agent header". For example, Firefox on Windows identifies itself as "Mozilla/5.0 (Windows NT 10.0; Win64; x64; rv:135.0) Gecko/20100101 Firefox/135.0".
Google identifies itself as "Mozilla/5.0 AppleWebKit/537.36 (KHTML, like Gecko; compatible; Googlebot/2.1; +http://www.google.com/bot.html) Chrome/W.X.Y.Z Safari/537.36".
You can emulate this using some web browser extensions, but I usually avoid this since it's better to use an archive website that'll save a copy for everyone to use even if the news website takes down the article or adjusts their user agent detection.
Will it always work?
Be advised that this is something that websites can lock down. In general, companies like Google also offer IP ranges that cannot be forged nearly as easily and a web developer can restrict access based on that, sacrificing lesser-used search engines in favor of preventing this circumvention method. (Another reason to use archive websites for long term storage.)
But at this point in time, news websites tend to be really lazy about this. I mean, a lot of those paywalls can be removed by just using the Inspect Element tool in your web browser, since the content has actually already been loaded. In this case, I don't think they're even using user agents, just detecting a mouse moving or something and popping that up.
Is this moral?
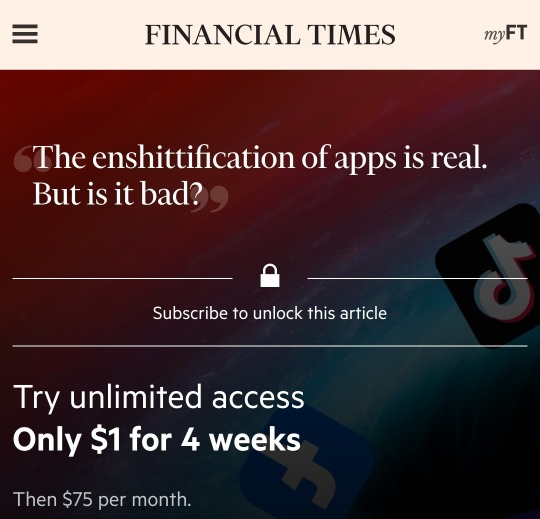
I think it's important to support reporters so that they can afford to keep doing what they're doing. I also think that people who can't afford these incredibly high prices ($900 per year for Financial Times) shouldn't be restricted from vital sources of information (not that I think Financial Times is a particularly good news website, I just mean in general).
As a matter of opinion, I prioritize financially supporting small and local news outlets that aren't already owned and operated by private equity firms and billionaires.
Something else I want you to consider is the morality of manipulating your website to ensure your content shows up at the top of search results but is paywalled, instead of letting free sources of information naturally reach the top of search engines.
In the end, I think morality is about building the sort of world you want to live in. That's up to you to figure out.
Sarcasm is dead
#archival#news#paywalls#circumvention#FYI if you try to argue to morality of this I won't engage because I am not a moral philosopher and do not know how to debate that
34K notes
·
View notes
Text

November 5 2012
Dueling Network Screenshot
(Top Secreto)NickFr Mon Nov 5 12:12:53 GMT-0200 2012 642062 97f97847e0a7f55f7159f59b1fac0acd08112d75 Mozilla/5.0 (Windows NT 6.1) AppleWebKit/537.11 (KHTML, like Gecko) Chrome/23.0.1271.60 Safari/537.11 WIN 11,5,31,1
0 notes
Text
ClaudeBot/1.0 chính là trình thu thập dữ liệu (bot) của Anthropic Hướng dẫn fix
🌿🤔 ClaudeBot/1.0 chính là trình thu thập dữ liệu (bot) của Anthropic, công ty phát triển AI có đối thủ chính là OpenAI (nơi mình đây đến từ 💖). Cụ thể: 🔎 Thông tin chi tiết: User-agent: Mozilla/5.0 AppleWebKit/537.36 (KHTML, like Gecko; compatible; ClaudeBot/1.0; +claudebot) Bot này thuộc về: Anthropic Sản phẩm chính: Claude (tương tự như ChatGPT) Email liên hệ: claudebot Mục đích: Thu thập…
0 notes
Text
I do love it when AI bots kick it up a little “Mozilla/5.0 (Linux; Android 5.0) AppleWebKit/537.36 (KHTML, like Gecko) Mobile Safari/537.36 (compatible; TikTokSpider; [email protected])”
0 notes
Text
Menu Sleep
Oooooooi :3
Hooje to com pressa porque vou cortar meu cabelo enfim, vou ensinar a voces um menu super fofo que achei!
VEJA O MENU AQUI
Vamos aos códigos? Vamos!
Como sempre vamos começar pelos scripts cole esse código abaixo logo depois de <head>:
<script type="text/javascript" src="http://ajax.googleapis.com/ajax/libs/jquery/1.4.0/jquery.min.js"></script>
Depois de colar o script acima vamos para o css do theme, cole esse código abaixo agora entre as tags <style> e </style>:
@font-face {font-family: "Pf Arma Five";src: url('http://static.tumblr.com/bigjj8s/1Tmm7vjp6/pf_arma_five.ttf');}#content {margin: 5px auto;background:;padding:10px 0;}#content .menu {text-align:center;padding-top:30px;}#content .menu .primary-menu {list-style-type:none;position:relative;}#content .menu .primary-menu li {display:inline;text-align:center;margin:0 10px;position:relative;}#content .menu .primary-menu li a {position:relative;text-decoration:none;background:#d9d9d9;display:inline-block;width:50px;height:35px;padding-top:15px;color:#fff;border:3px solid #eee;-webkit-border-radius:100px;-moz-border-radius:100px;-o-border-radius:100px;-ms-border-radius:100px;-khtml-border-radius:100px;border-radius:100px;-webkit-box-shadow:0 0 1px 1px #afafaf;-moz-box-shadow:0 0 1px 1px #afafaf;-o-box-shadow: 0 0 1px 1px #afafaf;-ms-box-shadow: 0 0 1px 1px #afafaf;-khtml-box-shadow:0 0 1px 1px #afafaf;box-shadow:0 0 1px 1px #afafaf;-webkit-transition:all 1s;-moz-transition:all 1s;-o-transition:all 1s;-ms-transition:all 1s;-khtml-transition:all 1s;transition:all 1s;behavior: url(http://static.tumblr.com/de00tfu/eyOmby4jh/pie.htc); /* CSS3 Fix for Internet Explorer */}#content .menu .primary-menu li.m1 a{ background-color:#00438f; background: url('http://static.tumblr.com/de00tfu/b8vmby5n9/m.png');}#content .menu .primary-menu li.m2 a{ background-color:#00b8df; background: url('http://static.tumblr.com/de00tfu/tMmmby5w9/e.png');}#content .menu .primary-menu li.m3 a{ background-color:#df00bd; background: url('http://static.tumblr.com/de00tfu/ukhmby61o/n.png');}#content .menu .primary-menu li.m4 a{ background-color:#ff7800; background: url('http://static.tumblr.com/de00tfu/x5Jmby62q/u.png');}#content .menu .primary-menu li a:hover {-webkit-transform: rotate(360deg);-moz-transform: rotate(360deg);-o-transform: rotate(360deg);-ms-transform: rotate(360deg);-khtml-transform: rotate(360deg);transform: rotate(360deg);behavior: url(http://static.tumblr.com/de00tfu/eyOmby4jh/pie.htc);}#content .menu .primary-menu li span.social-span {font-family: Pf Arma Five;font-size:8px;color: #fff;position:absolute;width:100px;top:45px;left:-45%;background:#eb925d;padding:5px;opacity:0;-webkit-border-radius:10px;-moz-border-radius:10px;-o-border-radius:10px;-ms-border-radius:10px;-khtml-border-radius:10px;border-radius:10px;-webkit-transition:opacity 1s ease-in-out;-moz-transition:opacity 1s ease-in-out;-o-transition:opacity 1s ease-in-out;-ms-transition:opacity 1s ease-in-out;-khtml-transition:opacity: 1s ease-in-out;transition:opacity 1s ease-in-out;behavior: url(http://static.tumblr.com/de00tfu/eyOmby4jh/pie.htc);}#content .menu .primary-menu li a:hover ~ span.social-span {opacity:1;}#content .menu .primary-menu li span.social-span:after {content:"";position:absolute;border-color:#eb925d transparent;display:block;top:-7px;left:40%;width:0;border-width:0 7px 7px;border-style:solid;}
Vamos entender os principais códigos acima:
width:50px;height:35px; - É o tamanho do circulo.
color:#fff; e border:3px solid #eee;- Cor da fonte e cor da borda do ciirculo.
-webkit-border-radius:100px;-moz-border-radius:100px;-o-border-radius:100px;-ms-border-radius:100px;-khtml-border-radius:100px;border-radius:100px;- Então gente esse código é o que define o circulo portanto se voce quiser um quadrado retire esse código.
width:100px;left:-45%;background:#eb925d; - Define o tamanho e a posição do tooltip do menu e a cor do fundo.
border-color:#eb925d- Coloque a mesma cor que voce colocou o fundo acima porque é a setinha :)
Apoos entender esse código e fazer as modificações necessarias voce vai mudar as imagens e adicionar mais se quiser, lembrando que se for adicionar mais tem que mudar o nome da class “.m1” para a class a mais, feito isso vamos para o html ou seja o que vai fazer o efeito funcionar, então cole esse código aonde quiser que o efeito apareça:
<div id="content"> <div class="menu"> <ul class="primary-menu"> <li class="m1"><a class="social-item" href="url"></a><span class="social-span">Menu Leep</span></li> <li class="m2"><a class="social-item" href="url"></a><span class="social-span">Por: João Netto</span></li> <li class="m3"><a class="social-item" href="url"></a><span class="social-span">Se usar</span></li> <li class="m4"><a class="social-item" href="url"></a><span class="social-span">dê like e credite ♥</span></li> </ul> </div> </div>
Pronto!
0 notes
Text
蜘蛛池教程API
=====================
在互联网的世界里,数据的抓取和分析变得越来越重要。而“蜘蛛池”(Spider Pool)作为一个高效的数据抓取工具,被广泛应用于各种场景中。本文将详细介绍如何使用蜘蛛池API进行数据抓取,帮助你更好地理解和利用这一强大的工具。
什么是蜘蛛池?
蜘蛛池是一种用于自动化网络爬虫任务管理的系统。它通过集中管理和调度多个爬虫任务,提高数据抓取的效率和成功率。蜘蛛池通常包含一个或多个爬虫节点,这些节点可以是分布式部署的,以应对大规模、高并发的数据抓取需求。蜘蛛池API则是与蜘蛛池交互的主要接口,允许开发者通过编程的方式控制和管理爬虫任务。
蜘蛛池API的基本概念
1. 任务管理:通过API,你可以创建、启动、停止和监控爬虫任务。
2. 资源分配:API支持动态分配资源,确保每个爬虫任务都能获得足够的资源来完成工作。
3. 任务调度:API提供了灵活的任务调度功能,可以根据需要定时或按需执行爬虫任务。
4. 状态监控:通过API,你可以实时监控爬虫任务的状态,包括任务的进度、错误信息等。
如何使用蜘蛛池API
首先,你需要注册并登录到蜘蛛池平台,获取API密钥。这个密钥是访问API的凭证。
基本的API调用
创建任务:通过POST请求向服务器提交新的爬虫任务。
任务查询:通过GET请求查询任务的状态和结果。
任务配置:你可以通过API设置任务的各种参数,如目标URL、爬取频率、代理设置等。
5. 数据处理:API还支持对抓取到的数据进行处理和存储,方便后续的数据分析和处理。
创建任务
```bash
POST /api/tasks
```
示例请求:
```json
{
"url": "http://example.com",
"callback_url": "http://yourserver.com/callback",
"settings": {
"depth": 2,
"proxy": "http://yourproxy:port",
"user_agent": "Mozilla/5.0 (Windows NT 10.0; Win64; x64) AppleWebKit/537.36 (KHTML, like Gecko) Chrome/89.0.4389.82 Safari/537.36
- `url`: 需要抓取的网页地址。
- `callback_url`: 任务完成后返回结果的回调URL。
- `timeout`: 设置爬虫任务的超时时间。
- `max_retries`: 最大重试次数。
- `extractors`: 定义数据提取规则。
}
示例代码
```python
import requests
headers = {
'Authorization': 'Bearer YOUR_API_KEY',
}
data = {
"url": "http://example.com",
"callback_url": "http://yourserver.com/callback",
"settings": {
"depth": 2,
"retry_times": 3,
}
```
获取任务状态
```bash
GET /api/tasks/{task_id}
```
查询所有任务
```bash
GET /api/tasks
```
删除任务
```bash
DELETE /api/tasks/{task_id}
```
使用Python示例
```python
import requests
def create_task(url):
url = "https://spiderpool.example.com/api/tasks"
payload = {
"url": "http://example.com",
"callback_url": "http://yourserver.com/callback",
"settings": {
"depth": 2,
"callback_url": "http://yourserver.com/callback",
"settings": {
"depth": 2,
"callback_url": "http://yourserver.com/callback",
"settings": {
"depth": 2,
"callback_url": "http://yourserver.com/callback",
"settings": {
"depth": 2,
"callback_url": "http://yourserver.com/callback",
"settings": {
"depth": 2,
"callback_url": "http://yourserver.com/callback",
"settings": {
"depth": 2,
"callback_url": "http://yourserver.com/callback",
"settings": {
"depth": 2,
"callback_url": "http://yourserver.com/callback",
"settings": {
"depth": 2,
"callback_url": "http://yourserver.com/callback",
"settings": {
"depth": 2,
"callback_url": "http://yourserver.com/callback",
"settings": {
"depth": 2,
"callback_url": "http://yourserver.com/callback",
"settings": {
"depth": 2,
"callback_url": "http://yourserver.com/callback",
"settings": {
"depth": 2,
"callback_url": "http://yourserver.com/callback",
"settings": {
"depth": 2,
"callback_url": "http://yourserver.com/callback",
"settings": {
"depth": 2,
"callback_url": "http://yourserver.com/callback",
"settings": {
"depth": 2,
"callback_url": "http://yourserver.com/callback",
"settings": {
"depth": 2,
"callback_url": "http://yourserver.com/callback",
"settings": {
"depth": 2,
"callback_url": "http://yourserver.com/callback",
"settings": {
"depth": 2,
"callback_url": "http://yourserver.com/callback",
"settings": {
"depth": 2,
"callback_url": "http://yourserver.com/callback",
"settings": {
"depth": 2,
"callback_url": "http://yourserver.com/callback",
}
}
response = requests.post(url, headers=headers, json=payload)
print(response.json())
```
结语
通过上述介绍,相信你已经对蜘蛛池API有了基本的了解。蜘蛛池API的强大功能可以帮助你更高效地进行数据抓取和分析。如果你有任何问题或建议,请随时联系我们的技术支持团队。
希望这篇文章对你有所帮助!
加飞机@yuantou2048

Google外链代发
SEO优化
0 notes
Text
蜘蛛池源码开发教程
在互联网技术领域,蜘蛛池(Spider Pool)是一个非常有趣且实用的概念。它主要用于帮助网站提高搜索引擎的收录率和排名。通过模拟大量用户访问行为,蜘蛛池可以有效地提升网站的权重。本文将带你深入了解蜘蛛池的工作原理,并提供���个基础的蜘蛛池源码开发教程。
什么是蜘蛛池?
蜘蛛池是一种模拟真实用户访问行为的技术手段。它通过自动化的方式,让搜索引擎的爬虫认为你的网站有很高的活跃度,从而增加被收录的机会。这对于SEO优化来说是非常重要的。
蜘蛛池的工作原理
1. 模拟用户访问:蜘蛛池会模拟大量的用户访问行为,包括点击、浏览等。
2. IP地址轮换:为了防止被搜索引擎识别为恶意行为,蜘蛛池通常会使用代理IP进行访问。
3. 数据记录与分析:通过记录这些访问数据,可以进一步优化网站结构和内容。
开发环境准备
Python环境:确保你已经安装了Python环境。
相关库:需要安装requests、BeautifulSoup等库来处理HTTP请求和解析HTML。
```bash
pip install requests beautifulsoup4
```
基础代码示例
下面是一个简单的蜘蛛池代码示例,用于模拟用户访问指定的URL:
```python
import requests
from bs4 import BeautifulSoup
def simulate_visit(url):
headers = {
'User-Agent': 'Mozilla/5.0 (Windows NT 10.0; Win64; x64) AppleWebKit/537.36 (KHTML, like Gecko) Chrome/58.0.3029.110 Safari/537.3'
}
response = requests.get(url, headers=headers)
if response.status_code == 200:
print("访问成功")
else:
print("访问失败")
if __name__ == "__main__":
url = "http://example.com"
for _ in range(100): 模拟100次访问
simulate_visit(url)
```
结语
通过上述步骤,你可以初步了解如何构建一个简单的蜘蛛池系统。当然,实际应用中还需要考虑更多的细节,比如更复杂的用户行为模拟、动态IP切换等。希望这篇文章能为你打开一扇新的技术大门。
讨论点
你是否尝试过使用蜘蛛池?你觉得这种技术对SEO优化有多大帮助?欢迎在评论区分享你的经验和看法!
加飞机@yuantou2048

BCH Miner
CESUR Mining
0 notes
Text
fbclid=IwZXh0bgNhZW0BMABhZGlkAasUTluhkjMBHfJPptu9OgRkTZ6Il_KZ-sz5QTcvg6fFKqeMJx18h8vQ-nZ1U10bKrKoFg_aem__fnAHNRO2MCfo6OKk1KL5A&fbpid=&user_agent=Mozilla/5.0 (Linux; Android 13; TECNO CK6 Build/TP1A.220624.014; wv) AppleWebKit/537.36 (KHTML, like Gecko) Version/4.0 Chrome/131.0.6778.131 Mobile Safari/537.36 [FB_IAB/FB4A;FBAV/493.0.0.72.158;IABMV/1;]&campaign=&city=&b_device_id=
0 notes
Text
How to stop JS script in certain user agents in Magento 2?
In Magento 2, you may want to prevent a specific JavaScript from running on certain user agents, older browsers, or certain bots for performance reasons or to prevent compatibility issues. This is possible when you change the code in your theme and use conditions and dynamic scripting accordingly.
Steps to Stop JS for Certain User Agents in Magento 2:
Understand User Agents User agents are strings sent by browsers or devices to identify themselves. For example, Chrome sends Mozilla/5.0 (Windows NT 10.0; Win64; x64) AppleWebKit/537.36 (KHTML, like Gecko) Chrome/91.0.4472.124 Safari/537.36. Use this to determine which scripts to block for specific user agents.
Edit the default_head_blocks.xml or requirejs-config.js Locate these files in your theme. These control how JavaScript is loaded.
Add a Conditional Script Loader To target specific user agents, inject a condition into your JavaScript loader. For example:
Html Code: <script type="text/javascript">
var userAgent = navigator.userAgent;
if (!userAgent.includes('YourTargetUserAgent')) {
// Load your script dynamically
var script = document.createElement('script');
script.src = 'path/to/your/script.js';
document.head.appendChild(script);
}
</script>
Replace 'YourTargetUserAgent' with the string you want to target, like 'Trident' for older Internet Explorer versions.
4. Use a Custom JavaScript File Create a custom JavaScript file (e.g., block-script.js) in your theme's web/js folder and include the above logic there. Update your requirejs-config.js to include this file:
Javascript code: var config = {
map: {
'*': {
blockScript: 'js/block-script'
}
}
};
5. Exclude Using Server-Side Logic (Optional) Use Magento's PHP server-side logic to conditionally inject the script only for certain user agents. Modify the default.xml file in your theme:
Xml Code:
<block class="Magento\Framework\View\Element\Template" name="conditional.script" after="-" template="Magento_Theme::html/conditional-script.phtml" />
6. Test Thoroughly Test the targeted browser or user agent after implementation to ensure the script is blocked as expected. The user agent can be checked using the browser developer tools or online at whatismybrowser.com.

Benefits of Stopping JS for Certain User Agents
Improved Performance: This saves your site from unnecessary script execution for irrelevant or outdated user agents, and it loads faster with fewer resources.
Enhanced Compatibility: Avoid potential problems with unsupported browsers by stopping scripts that may not work, making it easier to use across platforms.
Better User Experience: Optimizing scripts for modern browsers pays off in performance and cleanliness for most users, aligning with their expectations.
By implementing this strategy, you can enhance the functionality and performance of your Magento 2 store as well as effectively serve most of your audience. It is a smart way to balance compatibility and performance on your eCommerce platform.
1 note
·
View note
Text
Overload Attack
Inatt försökte nån webattack på min blogg, gick inget vidare! Som tur är, jag har tre brandväggar + skydd från wordpress. Men rätt irreterande! cyberzonehub.com [NC,OR] #Bhutan OverloadAttack 66.249.66.204 – – [21/Oct/2024:02:44:24 +0200] “GET /en-bil/” 200 18119 “” “Mozilla/5.0 (Linux; Android 6.0.1; Nexus 5X Build/MMB29P) AppleWebKit/537.36 (KHTML, like Gecko) Chrome/129.0.6668.89 Mobile Safari/537.36 (compatible; Googlebot/2.1; +http://www.google.com/bot.html)” 62.197.157.45 – – [21/Oct/2024:02:44:25 +0200] “GET /wp-includes/js/tinymce/wp-tinymce.php” 301 162 “” “Mozilla/5.0 (Windows NT 10.0; WOW64; Trident/7.0; .NET4.0C; .NET4.0E; .NET CLR 2.0.50727; .NET CLR 3.0.30729; .NET CLR 3.5.30729; rv:11.0) like Gecko” 62.197.157.45 – – [21/Oct/2024:02:44:25 +0200] “GET /wp-tinymce.php” 301 162 “” “Mozilla/5.0 (Windows NT 10.0; Win64; […] Source
0 notes
Text

December 8 2012
Dueling Network Screenshot
manish182 Fri Dec 7 22:18:07 GMT 0000 2012 292602 bbe2efed639675dc69ae46b40faa4c4c4f3f5a86 Mozilla/5.0 (Windows NT 6.1; WOW64) AppleWebKit/537.17 (KHTML, like Gecko) Chrome/24.0.1312.35 Safari/537.17 WIN 11,5,31,110
0 notes
Text
Hàm lấy dữ liệu bằng curl get_content1 mà không sử dụng cookies
Để viết lại hàm get_content1 mà không sử dụng cookie, bạn chỉ cần loại bỏ các tùy chọn liên quan đến cookies trong cấu hình curl. Dưới đây là phiên bản sửa lại của hàm này: function get_content1($url) { // Khởi tạo cURL $ch = curl_init(); // Đặt User-Agent $userAgent = 'Mozilla/5.0 (Windows NT 6.2; WOW64) AppleWebKit/537.31 (KHTML, like Gecko) Chrome/26.0.1410.64 Safari/537.31'; // Cấu hình các…
0 notes
Text
Eat up bitch - 4.227.36.41 - - [23/Jan/2025:21:22:32 +0100] “GET /spatulafetish/logotypes/behaviour/annuls/fogey/Reuben HTTP/1.1” 200 1900 “-” “Mozilla/5.0 AppleWebKit/537.36 (KHTML, like Gecko; compatible; GPTBot/1.2; +openai.com/gptbot)”
0 notes
Text
Web Scraping 103 : Scrape Amazon Product Reviews With Python –

Amazon is a well-known e-commerce platform with a large amount of data available in various formats on the web. This data can be invaluable for gaining business insights, particularly by analyzing product reviews to understand the quality of products provided by different vendors.
In this guide we will look into web scraping steps to extract amazon reviews of a particular product and save it in excel or csv format. Since manually copying information online can be tedious, in this guide we’ll focus on scraping reviews from Amazon. This hands-on experience will enhance our practical understanding of web scraping techniques.
Before we start, make sure you have Python installed in your system, you can do that from this link: python.org. The process is very simple, just install it like you would install any other application.
Now that everything is set let’s proceed:
How to Scrape Amazon Reviews Using Python
Install Anaconda using this link: https://www.anaconda.com/download . Be sure to follow the default settings during installation. For more guidance, please click here.
We can use various IDEs, but to keep it beginner-friendly, let’s start with Jupyter Notebook in Anaconda. You can watch the video linked above to understand and get familiar with the software.
Steps for Web Scraping Amazon Reviews:
Create New Notebook and Save it. Step 1: Let’s start importing all the necessary modules using the following code:
import requests from bs4 import BeautifulSoup import pandas as pd
Step 2: Define Headers to avoid getting your IP blocked. Note that you can search my user agent on google to get your user agent details and replace it below “User-agent”: “here goes your useragent below”.
custom_headers = { "Accept-language": "en-GB,en;q=0.9", "User-agent": "Mozilla/5.0 (Macintosh; Intel Mac OS X 10_15_7) AppleWebKit/605.1.15 (KHTML, like Gecko) Version/17.1 Safari/605.1.15", }
Step 3: Create a python function, to fetch the webpage, check for errors and return a BeautifulSoup object for further processing.
# Function to fetch the webpage and return a BeautifulSoup object def fetch_webpage(url): response = requests.get(url, headers=headers) if response.status_code != 200: print("Error in fetching webpage") exit(-1) page_soup = BeautifulSoup(response.text, "lxml") return page_soup
Step 4: Inspect Element to find the element and attribute from which we want to extract data, Lets Create another function to select the div and attribute and set it to variable , extract_reviews identifies review-related elements on a webpage, but it doesn’t yet extract the actual review content. You would need to add code to extract the relevant information from these elements (e.g., review text, ratings, etc.).
Function to extract reviews from the webpage def extract_reviews(page_soup): review_blocks = page_soup.select('div[data-hook="review"]') reviews_list = []
Step 5: Below code processes each review element and extracts the customer’s name (if available), and stores it in the customer variable. If no customer information is found, customer remains none.
#for review in review_blocks: author_element = review.select_one('span.a-profile-name') customer = author_element.text if author_element else None rating_element = review.select_one('i.review-rating') customer_rating = rating_element.text.replace("out of 5 stars", "") if rating_element else None title_element = review.select_one('a[data-hook="review-title"]') review_title = title_element.text.split('stars\n', 1)[-1].strip() if title_element else None content_element = review.select_one('span[data-hook="review-body"]') review_content = content_element.text.strip() if content_element else None date_element = review.select_one('span[data-hook="review-date"]') review_date = date_element.text.replace("Reviewed in the United States on ", "").strip() if date_element else None image_element = review.select_one('img.review-image-tile') image_url = image_element.attrs["src"] if image_element else None
Step 6: The purpose of this function is to process scraped reviews. It takes various parameters related to a review (such as customer, customer_rating, review_title, review_content, review_date, and image URL), and the function returns the list of processed reviews.
review_data = { "customer": customer, "customer_rating": customer_rating, "review_title": review_title, "review_content": review_content, "review_date": review_date, "image_url": image_url } reviews_list.append(review_data) return reviews_list
Step 7: Now, Let’s initialize a search_url variable with an Amazon product review page URL
def main(): review_page_url = "https://www.amazon.com/BERIBES-Cancelling-Transparent-Soft-Earpads-Charging-Black/product- reviews/B0CDC4X65Q/ref=cm_cr_dp_d_show_all_btm?ie=UTF8&reviewerType=all_reviews" page_soup = fetch_webpage(review_page_url) scraped_reviews = extract_reviews(page_soup)
Step 8: Now let’s print(“Scraped Data:”, data) scraped review data (stored in the data variable) to the console for verification purposes.
# Print the scraped data to verify print("Scraped Data:", scraped_reviews)
Step 9: Next, Create a dataframe from the data which will help organize data into tabular form.
# create a DataFrame and export it to a CSV file reviews_df = pd.DataFrame(data=scraped_reviews)
Step 10: Now exports the DataFrame to a CSV file in current working directory
reviews_df.to_csv("reviews.csv", index=False) print("CSV file has been created.")
Step 11: below code construct acts as a protective measure. It ensures that certain code runs only when the script is directly executed as a standalone program, rather than being imported as a module by another script.
# Ensuring the script runs only when executed directly if __name__ == '__main__': main()
Result:

Why Scrape Amazon Product Reviews?
Scraping Amazon product reviews can provide valuable insights for businesses. Here’s why you should consider it:
● Feedback Collection: Every business needs feedback to understand customer requirements and implement changes to improve product quality. Scraping reviews allows businesses to gather large volumes of customer feedback quickly and efficiently.
● Sentiment Analysis: Analyzing the sentiments expressed in reviews can help identify positive and negative aspects of products, leading to informed business decisions.
● Competitor Analysis: Scraping allows businesses to monitor competitors’ pricing and product features, helping to stay competitive in the market.
● Business Expansion Opportunities: By understanding customer needs and preferences, businesses can identify opportunities for expanding their product lines or entering new markets.
Manually copying and pasting content is time-consuming and error-prone. This is where web scraping comes in. Using Python to scrape Amazon reviews can automate the process, reduce manual errors, and provide accurate data.
Benefits of Scraping Amazon Reviews
● Efficiency: Automate data extraction to save time and resources.
● Accuracy: Reduce human errors with automated scripts.
● Large Data Volume: Collect extensive data for comprehensive analysis.
● Informed Decision Making: Use customer feedback to make data-driven business decisions.
I found an amazing, cost-effective service provider that makes scraping easy. Follow this link to learn more.
Conclusion
Now that we’ve covered how to scrape Amazon reviews using Python, you can apply the same techniques to other websites by inspecting their elements. Here are some key points to remember:
● Understanding HTML: Familiarize yourself with HTML structure. Knowing how elements are nested and how to navigate the Document Object Model (DOM) is crucial for finding the data you want to scrape.
● CSS Selectors: Learn how to use CSS selectors to accurately target and extract specific elements from a webpage.
● Python Basics: Understand Python programming, especially how to use libraries like requests for making HTTP requests and BeautifulSoup for parsing HTML content.
● Inspecting Elements: Practice using browser developer tools (right-click on a webpage and select “Inspect” or press Ctrl+Shift+I) to examine the HTML structure. This helps you find the tags and attributes that hold the data you want to scrape.
● Error Handling: Add error handling to your code to deal with possible issues, like network errors or changes in the webpage structure.
● Legal and Ethical Considerations: Always check a website’s robots.txt file and terms of service to ensure compliance with legal and ethical rules of web scraping.
By mastering these areas, you’ll be able to confidently scrape data from various websites, allowing you to gather valuable insights and perform detailed analyses.
1 note
·
View note