#laravel 6 auth
Explore tagged Tumblr posts
Visit Tumblr Blog
Explore Tumblr blogs with no restrictions, modern design and the best experience.
Last Seen Tumblr Blogs


Fun Fact
Premium Tumblr themes are available from anywhere between $9 to $49.
Photo

Blog ب #Laravel 6 & #Vue js part 2 (إضافة vuejs ل projet) | DARIJA قناة البرمجة يالدارجة تقدم دروس متنوعة فمختلف لغات البرمجة بالدارجة المغربية مجانا للجميع مع تحميل الكود... source
#amp#blog#darija#Laravel#laravel 5.3#laravel 6#laravel 6 2019#laravel 6 auth#laravel 6 install#laravel 6 tutorial#laravel 6 vue.js#laravel 6.0#laravel api#laravel arabic course#laravel darija#laravel grafikart#laravel mohamed idbrahim#laravel nova#laravel session#laravel session tutorial#laravel tutorial#laravel ui#laravel vue.js#Laravel6#Part#projet#vue#vuejs#إضافة#البرمجة
0 notes
Text
How to Use Make Auth in Laravel 6 - Code Briefly
https://codebriefly.com/how-to-use-make-auth-in-laravel-6/

How to Use Make Auth in Laravel 6
In this article, we will discuss “how to use make auth in Laravel 6”. Officially Laravel 6 is available now, but some of the changes here, as expected. Because you are reading this article, So I assume you are still not familiar with the Laravel 6. Note that, It’s an LTS version of Laravel. If […]
0 notes
Photo

Laravel 6 Auth Redirection Using redirectTo ☞ http://bit.ly/2B14vmZ #Laravel #Auth #Morioh
#Laravel#Laravel Tutorial#Laravel 5.8#Laravel 5.8 Tutorial#Laravel 6#Laravel 6 tutorial#learn to code#learn code#Codequs#Morioh
1 note
·
View note
Photo

Laravel Tutorial : How to create auth in laravel 6 ☞ http://bit.ly/2SjXY0r #php #laravel
2 notes
·
View notes
Photo

Laravel 6 Auth Redirection Using redirectTo ☞ http://bit.ly/2oBdysd #php #laravel
1 note
·
View note
Photo

Laravel 6 Auth Redirection Using redirectTo ☞ http://bit.ly/2oBdysd #php #laravel
1 note
·
View note
Link
Laravel 6 multiple authentication step by step.
#laravel6#laravel php framework#multi auth#php script#php composer#laravel article#laravel tips#laravel tutorial
1 note
·
View note
Text
How to Create REST API in Laravel7 using Passport

I hope everything is going well for you. I'm going to show you how to create a rest API in Laravel today. We'll build a restful API with Laravel 6 from the ground up. Rest APIs are increasingly widely used in web development. Here, I'll show you how to use a passport to authenticate a rest API in a Laravel 7 application. In this tutorial, I'll teach you how to create restful api authentication in Laravel 7 using eloquent api resources. In Laravel 7, you can easily learn rest api for crud module with authentication. When working with mobile applications, you must use the Rest API. If your programme is intended for both web and mobile platforms, you'll need to create an API for mobile development. Laravel, on the other hand, makes it simple to create APIs. You can easily accomplish it with a passport if you have authentication in your mobile app. Passport in Laravel 7 provides a means to generate auth tokens for verifying users. If you also want to create a rest API for your mobile app, you may follow this guide for step-by-step instructions on how to create a rest API with Laravel 7. If you're a beginner, don't worry; I'll walk you through this guide step by step. This tutorial will teach you how to use the Laravel passport. That is, how to make use of the Laravel passport. I'll use Laravel passport for api authentication in this tutorial, and a simple e-commerce project to generate restful api crud. So, let's get started on our laravel rest api tutorial with a passport example.
Step 1: Install Laravel
I'll walk you through everything step by step. First, we'll create a new Laravel 6 application with the commands below. So, open a terminal OR a command prompt and type the following command: composer create-project --prefer-dist laravel/laravel api
Step 2: Setup Passport
In this stage, we'll use the Composer package management to install passport, so open a terminal and type the following command: composer require laravel/passport Following the successful installation of the package, we must obtain default migration in order to create new passport tables in our database. So, let's run the command below. php artisan migrate The next step is to use the command to install passport. It will generate token keys for security using the passport:install command. So, let's run the command below: php artisan passport:install
Step 3: Passport Configuration
We must configure three things in this step: the model, the service provider, and the auth config file. So all you have to do now is keep track of the changes in that file. The HasApiTokens class of Passport was added to the model. Passport::routes() was added to AuthServiceProvider. We added api auth configuration to auth.php app/User.php namespace App; use IlluminateNotificationsNotifiable; use IlluminateContractsAuthMustVerifyEmail; use LaravelPassportHasApiTokens; use IlluminateFoundationAuthUser as Authenticatable; class User extends Authenticatable implements MustVerifyEmail { use HasApiTokens, Notifiable; protected $fillable = ; protected $hidden = ; } app/Providers/AuthServiceProvider.php namespace AppProviders; use LaravelPassportPassport; use IlluminateSupportFacadesGate; use IlluminateFoundationSupportProvidersAuthServiceProvider as ServiceProvider; class AuthServiceProvider extends ServiceProvider { protected $policies = ; public function boot() { $this->registerPolicies(); } } config/auth.php return , 'api' => , ], ..... ]
Step 4: Create API Routes
Route::post('register', 'APIRegisterController@register'); Route::post('login', 'APIRegisterController@login'); Route::apiResource('/products','ProductController'); Route::group(,function() { Route::apiResource('/{product}/reviews','ReviewController'); });
Step 5: Create Model Migration and Controller and Factory
php artisan make:model Product -fmr php artisan make:model Review -fmr app/Http/Controllers/API/BaseController.php namespace AppHttpControllersAPI; use IlluminateHttpRequest; use AppHttpControllersController as Controller; class BaseController extends Controller { public function sendResponse($result, $message) { $response = ; return response()->json($response, 200); } public function sendError($error, $errorMessages = , $code = 404) { $response = ; if(!empty($errorMessages)){ $response = $errorMessages; } return response()->json($response, $code); } } app/Http/Controllers/API/RegisterController.php namespace AppHttpControllersAPI; use IlluminateHttpRequest; use AppHttpControllersAPIBaseController as BaseController; use AppUser; use IlluminateSupportFacadesAuth; use Validator; class RegisterController extends BaseController { public function register(Request $request) { $validator = Validator::make($request->all(), ); if($validator->fails()){ return $this->sendError('Validation Error.', $validator->errors()); } $input = $request->all(); $input = bcrypt($input); $user = User::create($input); $success = $user->createToken('MyApp')->accessToken; $success = $user->name; return $this->sendResponse($success, 'User register successfully.'); } public function login(Request $request) { if(Auth::attempt()){ $user = Auth::user(); $success = $user->createToken('MyApp')-> accessToken; $success = $user->name; return $this->sendResponse($success, 'User login successfully.'); } else{ return $this->sendError('Unauthorised.', ); } } }
Step 6: Setup database table
Open your migration table and put the code below into it. database/migrations/products.php Schema::create('products', function (Blueprint $table) { $table->bigIncrements('id'); $table->string('name'); $table->text('detail'); $table->double('price'); $table->string('stock'); $table->double('discount'); $table->integer('user_id')->unsigned(); $table->timestamps(); }); database/migrations/reviews.php Schema::create('reviews', function (Blueprint $table) { $table->bigIncrements('id'); $table->integer('product_id'); $table->string('customer'); $table->text('review'); $table->double('star'); $table->timestamps(); });
Step 7: Make relationship between product and review
We must now establish a link between the Product model and the Review model. To make it work, copy and paste the code into your product and review model. app/Product.php namespace App; use AppReview; use IlluminateDatabaseEloquentModel; class Product extends Model { protected $fillable = ; public function reviews() { return $this->hasMany(Review::class); } } app/Review.php namespace App; use AppProduct; use IlluminateDatabaseEloquentModel; class Review extends Model { protected $fillable = ; public function product() { return $this->belongsTo(Product::class); } }
Step 8: Setup factory
Our database table and relationship are now complete. We can now run our migrate command to save that table in our database. So, after you've set up your database, run php artisan migrate and open it up. database/factory/ProductFactory.php use FakerGenerator as Faker; $factory->define(Product::class, function (Faker $faker) { return ; }); database/factory/ReviewFactory.php use FakerGenerator as Faker; $factory->define(Review::class, function (Faker $faker) { return ; }); Our factory setup is now complete. It's now time to add some dummy data. So, open your command prompt and paste the following command lines one after the other. php artisan tinker factory(AppProduct::class,50)->create() factory(AppReview::class,50)->create() exit We now have 50 products and 50 reviews for our products after running this command.
Step 9: Setup Product Controller
Now it's time to get the data for our API from the database. So Open appHttpControllersProductController.php namespace AppHttpControllers; use AppHttpRequestsProductRequest; use AppHttpResourcesProductCollection; use AppHttpResourcesProductResource; use AppProduct; use IlluminateHttpRequest; use IlluminateSupportFacadesAuth; use SymfonyComponentHttpFoundationResponse; class ProductController extends Controller { public function __construct() { $this->middleware('auth:api')->except('index','show'); } public function index() { return ProductCollection::collection(Product::paginate(5)); } public function store(ProductRequest $request) { $product = new Product; $product->name = $request->name; $product->detail = $request->description; $product->price = $request->price; $product->stock = $request->stock; $product->discount = $request->discount; $product->save(); return response(,Response::HTTP_CREATED); } public function show(Product $product) { return new ProductResource($product); } public function update(Request $request, Product $product) { $this->userAuthorize($product); $request = $request->description; unset($request); $product->update($request->all()); return response(,Response::HTTP_CREATED); } public function destroy(Product $product) { $product->delete(); return response(null,Response::HTTP_NO_CONTENT); } public function userAuthorize($product) { if(Auth::user()->id != $product->user_id){ //throw your exception text here; } } }
Step 10: Create Resource Collection
Simply type the following commands to create a product resource and a review resource. php artisan make:resource ProductCollection php artisan make:resource ProductResouce php artisan make:resource ReviewResource Following this command, three files will be added to the app/Http/Resources slug. Why did we build this resource or collection, for example? We can return our api data without this, but if you use Collection or Resource, you can adjust your return data. How did you do it? Look app/Http/Resources/ProductCollection.php namespace AppHttpResources; use IlluminateHttpResourcesJsonResource; class ProductCollection extends Resource { public function toArray($request) { return ]; } } As you can see, the name of our return data field contains information such as name, totalPrice, discount, and so on. You are free to use whatever name you choose. However, if you don't use it, you won't be able to update your outcome data. We may also add other field names to offer more information for a certain data. I hope you can see why we require a resource or collection. app/Http/Resources/ProductResource.php namespace AppHttpResources; use IlluminateHttpResourcesJsonResource; class ProductResource extends Resource { public function toArray($request) { return ]; } } app/Http/Resources/ReviewResource.php namespace AppHttpResources; use IlluminateHttpResourcesJsonJsonResource; class ReviewResource extends JsonResource { public function toArray($request) { return ; } }
Step 11: Create Custom Request
For handling form data, Laravel provides a default Request. However, for a given model, we can utilise a custom request. To make a request, copy and paste the code below. php artisan make:request Product php artisan make:request Review Now go to app/Http/Requests and you'll see two new files. namespace AppHttpRequests; use IlluminateFoundationHttpFormRequest; class ProductRequest extends FormRequest { public function authorize() { return true; //Only authorize user can do this operation if false then unauthorize user can do } public function rules() { return ; } } True or false is returned by the authorize() method. If true, it will only work for authenticated users; if false, it will work for all users. HTML form data was validated using the rules() method. app/Http/Requests/ReviewRequest.php namespace AppHttpRequests; use IlluminateFoundationHttpFormRequest; class ReviewRequest extends FormRequest { public function authorize() { return true; } public function rules() { return ; } }
Step 12: Setup review controller
app/Http/Controllers/ReviewController.php namespace AppHttpControllers; use AppHttpResourcesReviewResource; use AppProduct; use AppReview; use IlluminateHttpRequest; class ReviewController extends Controller { public function index(Product $product) { return ReviewResource::collection($product->reviews); } public function store(ReviewRequest $request , Product $product) { $review = new Review($request->all()); $product->reviews()->save($review); return response(,Response::HTTP_CREATED); } public function update(Request $request, Product $procduct, Review $review) { $review->update($request->all()); } public function destroy(Product $product, Review $review) { $review->delete(); return response(null,Response::HTTP_NO_CONTENT); } } Everything for our rest api development project is now complete. So now you're ready to use Postman to run our Rest Api data. In Laravel, we are now able to operate a full restful api as well as a passport api. So, let's execute our example, so use the command below to run it quickly: php artisan serve Ensure that the following headers are used in the details api: 'headers' => I hope you will like the content and it will help you to learn How to Create REST API in Laravel7 using Passport If you like this content, do share. Read the full article
#laravel7/6passportrestapitutorial#laravel7/6restfulapiauthentication#restapiinlaravel7/6stepbystep#restapiinlaravel7/6tutorial
0 notes
Text
Jwt Secret Key Laravel
Jwt Secret Key Laravel Free
Jwt Secret Key Laravel Download
Secret Key Indonesia
Secret Key Rotom
Throughout this tutorial, we’ll be learning how to authenticate REST APIs using JWT in the latest Laravel 8 version. You will learn how to create a REST API using Laravel 8 with JWT authentication.
Laravel 6 Rest API using JWT Authentication. JWT authentication provides a secure way to transmit data between the client and server using Laravel APIs. In this post, we will look at how we can create a JWT authentication for a Laravel based API. API’s provide a fluent interface to communicate with the different type of services. Step 5 — Generating a JWT Secret Key. After configuring JWT authentication in our Laravel 8 app. We’ll need to generate a JWT secret key in this step. Head over to your terminal and run the following command to generate the JWT secret key: $.
We’ll see how to set up JWT authentication in Laravel 8 and implement a secured REST API using the tymon/jwt-auth package.
Laravel 8 JWT Authentication Tutorial by Example
In this tutorial, we’ll see step by step to implement a REST API with PHP and Laravel 8 with authentication via JWT tokens.
Step 1 — Creating a Laravel 8 Application
Let’s start our tutorial by creating a Laravel 8 application using Composer — the dependency management tool for PHP developers.
Head over to a new command-line interface and run the following command:
Step 2 — Configuring a MySQL Database
After creating your Laravel 8 application using Composer, let’s configure a MySQL database in our second step.
Open the .env file located in the root of your Laravel 8′ application. Next, add the following database configuration information:
Step 3 — Installing jwt-laravel
Now that we have a Laravel 8 application with a MySQL database configured, let’s start implementing JWT authentication by installing the jwt-auth package.
Head back to your terminal and run the following command from the root of your project’s folder:
Step 4 — Setting up JWT Authentication in Laravel 8
At this step, we have a Laravel 8 application with MySQL configured. We also installed the jwt-auth library in the previous step. Now, let’s set up JWT authentication in our application.
Head to the config/app.php file and add JWT providers and aliases as follows:
Next, head back to your terminal and run the following command:
Step 5 — Generating a JWT Secret Key
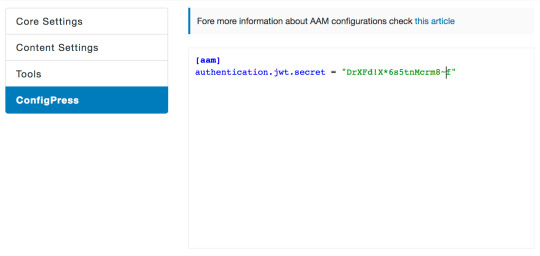
After configuring JWT authentication in our Laravel 8 app. We’ll need to generate a JWT secret key in this step.
Head over to your terminal and run the following command to generate the JWT secret key:
Next, open the vendor/tymon/src/Commands/JWTGenerateCommand.php and update it as follows:
Step 6 — Implementing JWT Authentication in Laravel 8 User Model
After configuring JWT in Laravel 8. In this step, we’ll implement it in the User model.
Open the App/User.php file, and update it as follows:
Step 7 — Implementing the REST API Controller for JWT Authentication
Let’s now implement a Laravel 8 controller for handling JWT authentication in our REST API application.
Head back to your terminal and run the following command to generate a controller:
Next, open the app/http/controllers/JwtAuthController.php file, and add the following methods:
Step 7 — Add Laravel 8 REST API Routes
Now that we have implemented JWT authentication in our Laravel 8 User model. In this step, we’ll proceed to create our REST API routes.
Open the routes/api.php file, and update it as follows:
Step 9 — Serving your Laravel 8 REST API Authentication App
After implementing JWT authentication in our Laravel 8 REST API application, let’s run our local development server using the following command:
Conclusion
Throughout this tutorial, we’ve seen step by step how to implement JWT authentication to secure and protect your REST API endpoints created with PHP and Laravel 8.
This post was originally posted on https://shabang.dev/laravel-8-rest-api-authentication-with-jwt-tutorial-by-example/
Throughout this tutorial, we’ll be learning how to authenticate REST APIs using JWT in the latest Laravel 8 version. You will learn how to create a REST API using Laravel 8 with JWT authentication.
We’ll see how to set up JWT authentication in Laravel 8 and implement a secured REST API using the tymon/jwt-auth package.
Laravel 8 JWT Authentication Tutorial by Example
In this tutorial, we’ll see step by step to implement a REST API with PHP and Laravel 8 with authentication via JWT tokens.
Step 1 — Creating a Laravel 8 Application
Let’s start our tutorial by creating a Laravel 8 application using Composer — the dependency management tool for PHP developers.
Head over to a new command-line interface and run the following command:
Step 2 — Configuring a MySQL Database
After creating your Laravel 8 application using Composer, let’s configure a MySQL database in our second step.
Open the .env file located in the root of your Laravel 8′ application. Next, add the following database configuration information:
Step 3 — Installing jwt-laravel
Now that we have a Laravel 8 application with a MySQL database configured, let’s start implementing JWT authentication by installing the jwt-auth package.
Head back to your terminal and run the following command from the root of your project’s folder:
Step 4 — Setting up JWT Authentication in Laravel 8
At this step, we have a Laravel 8 application with MySQL configured. We also installed the jwt-auth library in the previous step. Now, let’s set up JWT authentication in our application.
Head to the config/app.php file and add JWT providers and aliases as follows:
Next, head back to your terminal and run the following command:
Jwt Secret Key Laravel Free
Step 5 — Generating a JWT Secret Key
After configuring JWT authentication in our Laravel 8 app. We’ll need to generate a JWT secret key in this step.
Head over to your terminal and run the following command to generate the JWT secret key:
Next, open the vendor/tymon/src/Commands/JWTGenerateCommand.php and update it as follows:
Step 6 — Implementing JWT Authentication in Laravel 8 User Model
After configuring JWT in Laravel 8. In this step, we’ll implement it in the User model.
Open the App/User.php file, and update it as follows:
Step 7 — Implementing the REST API Controller for JWT Authentication
Let’s now implement a Laravel 8 controller for handling JWT authentication in our REST API application.
Head back to your terminal and run the following command to generate a controller:
Next, open the app/http/controllers/JwtAuthController.php file, and add the following methods:
Step 7 — Add Laravel 8 REST API Routes
Now that we have implemented JWT authentication in our Laravel 8 User model. In this step, we’ll proceed to create our REST API routes.
Open the routes/api.php file, and update it as follows:
Jwt Secret Key Laravel Download
Step 9 — Serving your Laravel 8 REST API Authentication App
After implementing JWT authentication in our Laravel 8 REST API application, let’s run our local development server using the following command:
Secret Key Indonesia
Conclusion
Secret Key Rotom
Throughout this tutorial, we’ve seen step by step how to implement JWT authentication to secure and protect your REST API endpoints created with PHP and Laravel 8.
This post was originally posted on https://shabang.dev/laravel-8-rest-api-authentication-with-jwt-tutorial-by-example/
0 notes
Text
#6 Belajar Laravel 8 - Sistem Login Laravel UI Laravel 8
#6 Belajar Laravel 8 – Sistem Login Laravel UI Laravel 8
laravel/ui laravel 8 laravel ui laravel 8 template admin lte auth laravel 8 auth laravel ui otentikasi laravel 8 no jetstream. laravel
View On WordPress
0 notes
Photo

Laravel 6! Instalación con Autenticación [ laravel/ui auth] – Tutorial en Español Veamos como instalar Laravel 6 con Autenticación, ahora tenemos un nuevo elemento llamado laravel/ui donde tenemos que seguir algunos pasos ... source
#2019#autenticacion#auth#bluuweb#Curso#desde cero#Español#framework#Instalación#instalar#Laravel#laravel 6#laravel ui#login#programar#tutorial#vistas#vue
0 notes
Photo

Laravel 6 Authentication Tutorial ☞ https://morioh.com/p/2500c28461f1 #Laravel #Authentication #Auth #Morioh
#Laravel#Laravel Tutorial#Laravel 5.8#Laravel 5.8 Tutorial#Laravel 6#Laravel 6 tutorial#learn to code#learn code#Codequs#Morioh
2 notes
·
View notes
Photo

Learn about Laravel 6 Auth Redirection using redirectTo ☞ http://go.codetrick.net/39f277c451 #php #laravel
2 notes
·
View notes
Photo

Learn about Laravel 6 Auth Redirection using redirectTo ☞ http://bit.ly/32chLks #php #laravel
1 note
·
View note
Photo

Learn about Laravel 6 Auth Redirection using redirectTo ☞ http://bit.ly/32chLks #php #laravel
1 note
·
View note
Photo

EMERGE Infotech is a full-fledged digital marketing, IT and E-commerce solution provider. We ensure to deliver unique and impeccable integrated digital marketing strategy to our clients' brand. EMERGE Infotech provides end-to-end digital marketing solution which includes building and launching a new brand from the scratch, promoting the brand and expanding the market. Job Description: 1) Develop, record and maintain cutting edge web-based PHP applications. 2) Develop and maintain code written in core PHP and HTML/JQuery/Bootstrap 3) Build modern, innovative applications with excellent user experience (UX) 4) Ensure HTML, CSS, and shared JavaScript is valid and consistent across applications 5) Prepare and maintain all applications utilizing standard development tools 6) Lead the entire web application development life cycle right from concept stage to delivery and post launch support 7) Refactor, optimize and improve the existing codebase for maintenance and scale 8) Interface with customer and internal teams to gather requirements and develop software solutions 9) Convey effectively all task progress, evaluations, suggestions, schedules along with technical and process issues 10) Document the development process, architecture, and standard components 11) Coordinate with co-developers and keeps project manager well informed of the status of development effort, Keep abreast of new trends and best practices in web development Desired Candidate Profile- - Work experience as a PHP web developer for up-to 3 years - Proficient in PHP, HTML5, JavaScript, CSS, JQuery, Bootstrap- Skilled modern HTML5 design and preparation of themes and layouts - Understanding of mobile first design and development strategies - Knowledge in Node.js, React, AngularJS web development will be a plus - Skilled in MySQL/PostgreSQL/MongoDB database design, writing efficient database queries, fine tuning and improving query performance - Experience with PHP frameworks (CodeIgniter, Laravel, Zend. etc ) - Knowledge in website optimization, SEO and performance tuning - Good understanding of API integration and auth technologies - Ready to join immediately or on short notice Send your resume to [email protected] www.emergeinfotech.com
0 notes