#laravel vue js crud example
Explore tagged Tumblr posts
Visit Tumblr Blog
Explore Tumblr blogs with no restrictions, modern design and the best experience.
Last Seen Tumblr Blogs


Fun Fact
Tumblr.com rank in the US is 25.
Photo

Vue Js and Laravel CRUD Operations in Laravel || Code Explanation || Just Laravel Vue Js CRUD Operations using Laravel. Here I used Vue js, implementing axios for HTTP requests, explaining vue directives like v-if, v-for, vue binding of ... source
#ajax crud laravel#axios in vuejs#axios vue#code#crud#Explanation#just laravel#justlaravel#Laravel#laravel 5.5 vuejs crud#laravel and vuejs#laravel crud#laravel crud tutorial#laravel paypal#laravel paypal api#laravel paypal integration#laravel vue#laravel vue crud#laravel vue js crud#laravel vue js crud example#laravel vue js project#laravel vue.js#Operations#vue#vue axios#vue axios crud#vue crud laravel#vue crud tutorial#vue js#vue js crud
0 notes
Text
Framework Angular
In Todays, Most popular JS Framework are Angular JS and Vue JS. Angular JS and Vue JS are a very user friendly JS Framework and most popular. It provides to manage whole project or application without refresh page and powerful jquery validation.In this post i going to lean how to create CRUD(Create, Read, Update and Delete) application with pagination using Laravel 5. In my previous tutorial i added crud application using Angular JS, if you want to see then click here: Laravel 5.2 and AngularJS CRUD with Search and Pagination Example.Laravel 5.2 and AngularJS CRUD with Search and Pagination Example.
Keywords: Framework Angular
Website: https://www.advicoelocal.com/
1 note
·
View note
Text
Laravel 8 Pagination By Using Vue Js Example
Laravel 8 Pagination By Using Vue Js Example
Today now in this post i will show you how to make pagination in laravel 8 application by using Vue Js. In my last post i was show a Laravel 8 CRUD operation with Vue js. For better know you can visit here How to Create CRUD Operation on Laravel 8 with Vue JS ? Source Code Download From GitHub clickHere. Here i will only show you how we can create pagination by using Vue Js. If we are making…
View On WordPress
0 notes
Text
How to telescope installation and configuration in laravel?
Hello to all! Now in this article, i will talk about laravel telescope installation. i will use how to install telescope laravel? So in this article i will goes to detailed descriptive on telescope installation and configuration step by step. I will look at example of telescope installation and configuration. So Let’s start with laravel telescope tutorial.
So now in this tutorial, i will show you how to telescope installation and configuration in laravel 5.8 ,laravel 6, laravel 7 and laravel 8 version.
Laravel Telescope is a debug assistant for laravel project. Whenever you will write code it is very hard to debug and find the error in your application manually. Telescope will provides access to the requests coming into your application, exceptions, log entries, database queries, model watch, catch, redis, queued jobs, mail, scheduled tasks and more in one place.
So, now here i will give you a very simple step of how to install telescope in your laravel app and also how it looks after install.
Read Also : PHP AngularJS CRUD with Search and Pagination Example From Scratch
Install Laravel Telescope Package
Install telescope for with following command:
composer require laravel/telescope
you can also install for specific environment:
composer require laravel/telescope --dev
Read Also : How to Autocomplete Textbox in Laravel 8 with Ajax?
Install Telescope
after install this package, we have to also install telescope by using following command that will create migration files and configuration file.
php artisan telescope:install
now let’s run following command to create tables for telescope.
php artisan migrate
now you are ready to run telescope. so let’s run project:
php artisan serve
open bellow url
localhost:8000/telescope/requests
Read Also : How to Get Selected Option Text in Vue JS ?
What features provide by telescope?
Requests
Commands
Schedule
Jobs
Batches
Cache
Dumps
Events
Exceptions
Gates
Logs
Mail
Models
Notifications
Queries
Redis
Views
Thanks For reading. Hope it will help you . Also you can follow us on Facebook
0 notes
Link
Vue Laravel CRUD Example Tutorial From Scratch is today’s leading topic.laravel vue js crud example, laravel vue js pagination, laravel vue js tutorial, vue.js laravel blade example, form validation vue js laravel 5, laravel 5 vuejs submit demo
0 notes
Text
Redprint Laravel 6 App Builder CRUD Generator Plus
New Post has been published on https://intramate.com/php-scripts/redprint-laravel-6-app-builder-crud-generator-plus/
Redprint Laravel 6 App Builder CRUD Generator Plus
LIVE PREVIEWGet it now for only $44
email: `[email protected]` password: `super_user`
Intelle Hub Inc. team is totally committed to give you amazing after sales support. If you find a bug/problem and our team cannot provide you with a proper fix you’re eligible for a full refund
Redprint App Builder is your app development flow on steroid! It’s your perfect Laravel CRUD Booster and App Builder. It has everything from it’s own Terminal Emulator, A Very powerful File Browser and Code Editor (!) and lovely and fast ways to build CRUD and Model to Model Relationships.
It can literally save you hundreds of hours of coding and lets you concentrate on what matters most. The application logic and problem solution.
Generate SOLID API with ease!
Rollback/Remove generated CRUD
Code Sniffer in built to make sure your code follows best standard (PSR-0, PSR-2, PSR-4)
Powerful in built Code Editor!
JWT Authentication
Create API Code for SPA real fast
Built on top of Laravel 6.0
Totally unobtrusive. Version control and develop your app just like you do with vanilla Laravel installation! NO BLOATWARE whatsoever.
Generate CRUD following latest Laravel standards.
Namespace support!
Built in Search and Pagination in CRUD. You can specify which fields are searchable.
Image/File upload mechanism in built.
Role/Permission (ACL) and User Management System (UMS) in built.
Model to Model relationship building.
Run all Laravel Commands from GUI.
REDPRINT mode to ensure the system leaves no footprint on production application.
Super fast and optimized!
For repetative tasks like creating a CRUD, you can totally rely on Redprint App Builder. It generates high quality Code to generate your everyday create, read, update, delete interfaces and backend. Redprint App Builder closely follows Laravel best practices. Which means, no garbage code. You’ll fall in love once you take a look at the code! We promise!
The new version ( >1.5.6) can now generate API endpoints for external mobile apps to consume using JWT (JSON web token) ! Or your next SPA web app using Vue JS/React/Angular can consume the API generated by Redprint!
Redprint has its own in built IDE! We know you still need to write your business logic on your own. What about having a complete IDE with syntax highlighting and auto completion enabled right inside the app? It can come extremely handy when you’re a digital nomad and need to change a piece of code without leaving the comfort of your browser. Redprint IDE comes with a file browser and quick file search too! You’ll LOVE it!
With Redprint App Builder, you can tell the system to automatically generate your search system with the CRUD. Again, the code that gets genrated is of high quality and follows DRY. Have a look at the index method.
With a few clicks, you can generate relations between two models. Not only that, it creates the dropdowns on a previously created CRUD that is related! For example, if you are creating a “Has Many” relationship between “Category” and “Products”, your products CRUD form will now “automagically” have a dropdown to select Categories!
How cool is that?
You can now run native Laravel commands from within Redprint! No need to remember all the commands, just go to build-tools, select the command you want to execute, write down the parameter and hit run! Not only that, Redprint already added a command that’s not even in Laravel yet! with `php artisan make:view your_view_name` Redprint will generate a view with basic layout for you!
Redprint comes packed with its own Role Permission Package called “Permissible”. Permissible allows you to define user roles and permission with a weight based role system!
Redprint has its own user management system that comes with Permissible. You can already create, update, delete users, set their permission/roles etc. Gives you a strong boilerplate to quickly start your next project!
Redprint AB is committed to grow and become more powerful. Make your apps more robust and count on Redprint to help you along the way.
Version 1.1.0 | March 1, 2018
Upgraded Laravel version to 5.6 Added more validations to the builder.
Version 1.1.1 | March 4, 2018
More validations to prevent unexpected errors while creating CRUD.
Version 1.2.0 | March 9, 2018
New Unity theme! Upgraded Laravel version (5.6) Namespace Support!
Version 1.4.1 | April 23, 2018
New Unity Blue theme! In built Code Editor! Even faster!
Version 1.4.2 | April 30, 2018
New commands (php artisan migrate, php artisan migrate:rollback, composer dump-autoload etc) on make tools page. Default frontend theme update. General stabistrongty fixes
Version 1.4.4 | May 13, 2018
Customize the form! Give them responsive and cleaner look. More user friendly. Upgraded to latest Laravel release.
Version 1.5.6 | May 31, 2018
Generate API Code! JWT Authentication Set options for ENUM data types. Stability improvement and UI cleanup
Version 1.5.8 | June 11, 2018
NEW! Undo/Remove CRUD CRUD file collection and editing
Version 1.5.96 | June 20, 2018
NEW! PHP Code Sniffer for PSR-1, PSR-2 standard code fixing Generated code has no code-smell! Sniffed and fixed for any indentation or code standard issues.
Version 1.5.97 | June 28, 2018
Validations for defapret value on database fields. Laravel core security patches.
Version 1.6.12 | July 01, 2018
Revamped file browser on dashboard. Now comes with File Search Toolbars on Dashboard file browser for distraction free coding.
Version 1.6.14 | July 01, 2018
Create or Delete files from Dashboard File Browser Small bug fixes in generator for special cases.
Version 1.6.19 | July 17, 2018
- Configuration editor - Fixed a bug on closing open tabs on file browser - More stability fixes and refactoring for performance boost.
Version 1.6.31 | October 11, 2018
- Laravel 5.7 Release!! - Easily translatable! - Fresh new theme and new customization abilities! - Fix bug with relation builder.
Version 1.6.32 | November 01, 2018
- API Controller namespace fix. - Permissible translations fix. - Profile edit fix. - New submit button animations.
Version 2.0.8 | September 15, 2019
- Laravel 6 support! - Edit migration (add new fields) after generating a crud.
LIVE PREVIEWGet it now for only $44
0 notes
Text
Laravel + Vue.js AdminPanel Generator
News / May 11, 2018
Laravel + Vue.js AdminPanel Generator
Laravel and Vue.js are often used together. With more tools on these technologies are released, here’s one of them – presenting to you Vue+Laravel Admin Panel Generator.
Disclaimer: I’m the founder and one of the developers of this tool, and also Laravel-only generator QuickAdminPanel, but the goal in this article is not only to present you the product, but explain what it generates, and how Vue + Laravel work together. Also, you will find an example project with source available on Github.
How does the generator work?
For those who prefer video, here’s a quick demo:
youtube
Now, let’s look at it with more details.
Step 1. You create your panel without coding, just adding menu items and fields.
Step 2. At any point, you can view the generated code, file by file.
Step 3. Then you download the code and install it – locally or on your remote server, with these commands:
composer install php artisan key:generate php artisan migrate --seed php artisan passport:install
Of course, your .env file should be configured at that point.
And then, on the front-end:
npm install npm run dev
Step 4. That’s it; you have your panel.
Step 5. The most important thing: you can change the code however you want, it’s pure Laravel+Vue, without our generator’s package as a dependency. That’s the main difference from packages like Voyager or Laravel Backpack (which are both excellent, by the way!).
What are we generating – structure of the project
After you download the project, you see something like this:
Generated Code: Back-end Laravel
Let’s first analyze the back-end Laravel part, which serves as API:
Here’s routes/api.php file:
Route::group(['prefix' => '/v1', 'middleware' => ['auth:api'], 'namespace' => 'Api\V1', 'as' => 'api.'], function () { Route::post('change-password', 'ChangePasswordController@changePassword')->name('auth.change_password'); Route::apiResource('roles', 'RolesController'); Route::apiResource('users', 'UsersController'); Route::apiResource('companies', 'CompaniesController'); Route::apiResource('employees', 'EmployeesController'); });
You can see apiResource for every CRUD, and also one separate POST for changing the password.
Controllers are namespaces under Api/V1, so here’s our app/Http/Controllers/Api/V1/CompaniesController.php:
namespace App\Http\Controllers\Api\V1; use App\Company; use App\Http\Controllers\Controller; use App\Http\Resources\Company as CompanyResource; use App\Http\Requests\Admin\StoreCompaniesRequest; use App\Http\Requests\Admin\UpdateCompaniesRequest; use Illuminate\Http\Request; class CompaniesController extends Controller { public function index() { return new CompanyResource(Company::with([])->get()); } public function show($id) { $company = Company::with([])->findOrFail($id); return new CompanyResource($company); } public function store(StoreCompaniesRequest $request) { $company = Company::create($request->all()); return (new CompanyResource($company)) ->response() ->setStatusCode(201); } public function update(UpdateCompaniesRequest $request, $id) { $company = Company::findOrFail($id); $company->update($request->all()); return (new CompanyResource($company)) ->response() ->setStatusCode(202); } public function destroy($id) { $company = Company::findOrFail($id); $company->delete(); return response(null, 204); } }
We have a typical resourceful Controller, with one exception – Resources classes, which have been available since Laravel 5.5.
In our case, every resource is a simple conversion to an array, here’s a file app/Http/Resources/Company.php
namespace App\Http\Resources; use Illuminate\Http\Resources\Json\JsonResource; class Company extends JsonResource { /** * Transform the resource into an array. * * @param \Illuminate\Http\Request $request * @return array */ public function toArray($request) { return parent::toArray($request); } }
But you can extend it, adding your logic on top – see more examples here and here.
Finally, Laravel Passport protects all the routes – when installing the project, you need to run this:
php artisan passport:install
As an overall back-end result, every Controller is responsible for that specific CRUD operations called to the API, from Vue.js front-end.
Generated Code: Front-end Vue.js
Now, let’s take a look at front-end part. The main file for this is resources/client/assets/js/app.js, where we initiate the Vue and some libraries:
// ... window.Vue = require('vue') Vue.prototype.$eventHub = new Vue() import router from './routes' import store from './store' import Datatable from 'vue2-datatable-component' import VueAWN from 'vue-awesome-notifications' import vSelect from 'vue-select' import datePicker from 'vue-bootstrap-datetimepicker' import VueSweetalert2 from 'vue-sweetalert2' import 'eonasdan-bootstrap-datetimepicker/build/css/bootstrap-datetimepicker.css' Vue.use(Datatable) Vue.use(VueAWN, { position: 'top-right' }) Vue.use(datePicker) Vue.use(VueSweetalert2) Vue.component('back-buttton', require('./components/BackButton.vue')) Vue.component('bootstrap-alert', require('./components/Alert.vue')) Vue.component('event-hub', require('./components/EventHub.vue')) Vue.component('vue-button-spinner', require('./components/VueButtonSpinner.vue')) Vue.component('v-select', vSelect) moment.updateLocale(window.app_locale, { week: { dow: 1 } }) const app = new Vue({ data: { relationships: {}, dpconfigDate: { format: window.date_format_moment }, dpconfigTime: { format: window.time_format_moment }, dpconfigDatetime: { format: window.datetime_format_moment, sideBySide: true } }, router, store }).$mount('#app')
Next, every CRUD has its own set of components:
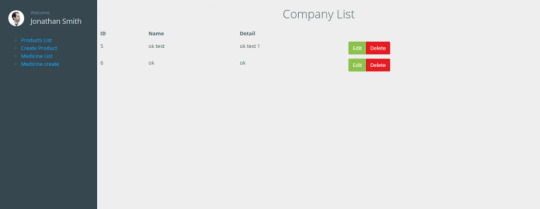
For showing the data table, we’re using vue2-datatable-component – here’s full code of resources/clients/assets/components/cruds/Companies/Index.vue:
<template> <section class="content-wrapper" style="min-height: 960px;"> <section class="content-header"> <h1>Companies</h1> </section> <section class="content"> <div class="row"> <div class="col-xs-12"> <div class="box"> <div class="box-header with-border"> <h3 class="box-title">List</h3> </div> <div class="box-body"> <div class="btn-group"> <router-link :to="{ name: xprops.route + '.create' }" class="btn btn-success btn-sm"> <i class="fa fa-plus"></i> Add new </router-link> <button type="button" class="btn btn-default btn-sm" @click="fetchData"> <i class="fa fa-refresh" :class="{'fa-spin': loading}"></i> Refresh </button> </div> </div> <div class="box-body"> <div class="row" v-if="loading"> <div class="col-xs-4 col-xs-offset-4"> <div class="alert text-center"> <i class="fa fa-spin fa-refresh"></i> Loading </div> </div> </div> <datatable v-if="!loading" :columns="columns" :data="data" :total="total" :query="query" :xprops="xprops" /> </div> </div> </div> </div> </section> </section> </template> <script> import { mapGetters, mapActions } from 'vuex' import DatatableActions from '../../dtmodules/DatatableActions' import DatatableSingle from '../../dtmodules/DatatableSingle' import DatatableList from '../../dtmodules/DatatableList' import DatatableCheckbox from '../../dtmodules/DatatableCheckbox' export default { data() { return { columns: [ { title: '#', field: 'id', sortable: true, colStyle: 'width: 50px;' }, { title: 'Name', field: 'name', sortable: true }, { title: 'Description', field: 'description', sortable: true }, { title: 'Actions', tdComp: DatatableActions, visible: true, thClass: 'text-right', tdClass: 'text-right', colStyle: 'width: 130px;' } ], query: { sort: 'id', order: 'desc' }, xprops: { module: 'CompaniesIndex', route: 'companies' } } }, created() { this.$root.relationships = this.relationships this.fetchData() }, destroyed() { this.resetState() }, computed: { ...mapGetters('CompaniesIndex', ['data', 'total', 'loading', 'relationships']), }, watch: { query: { handler(query) { this.setQuery(query) }, deep: true } }, methods: { ...mapActions('CompaniesIndex', ['fetchData', 'setQuery', 'resetState']), } } </script> <style scoped> </style>
Quite a lot of code, isn’t it? Of course, it could be more straightforward, but we tried to follow the official documentation and best practices, generating code for the cases that could be extended for bigger projects.
Next, we can take a look at Create.vue:
<template> <section class="content-wrapper" style="min-height: 960px;"> <section class="content-header"> <h1>Companies</h1> </section> <section class="content"> <div class="row"> <div class="col-xs-12"> <form @submit.prevent="submitForm"> <div class="box"> <div class="box-header with-border"> <h3 class="box-title">Create</h3> </div> <div class="box-body"> <back-buttton></back-buttton> </div> <bootstrap-alert /> <div class="box-body"> <div class="form-group"> <label for="name">Name</label> <input type="text" class="form-control" name="name" placeholder="Enter Name" :value="item.name" @input="updateName" > </div> <div class="form-group"> <label for="description">Description</label> <textarea rows="3" class="form-control" name="description" placeholder="Enter Description" :value="item.description" @input="updateDescription" > </textarea> </div> </div> <div class="box-footer"> <vue-button-spinner class="btn btn-primary btn-sm" :isLoading="loading" :disabled="loading" > Save </vue-button-spinner> </div> </div> </form> </div> </div> </section> </section> </template> <script> import { mapGetters, mapActions } from 'vuex' export default { data() { return { // Code... } }, computed: { ...mapGetters('CompaniesSingle', ['item', 'loading']) }, created() { // Code ... }, destroyed() { this.resetState() }, methods: { ...mapActions('CompaniesSingle', ['storeData', 'resetState', 'setName', 'setDescription']), updateName(e) { this.setName(e.target.value) }, updateDescription(e) { this.setDescription(e.target.value) }, submitForm() { this.storeData() .then(() => { this.$router.push({ name: 'companies.index' }) this.$eventHub.$emit('create-success') }) .catch((error) => { console.error(error) }) } } } </script> <style scoped> </style>
Edit and Show components for the CRUD are pretty similar, so won’t discuss them here.
In addition to that Vue code, there are many small details and helpers like Sweet Alert, Notifications, Datepickers, and setting/getting relationships data for the forms. I guess I will leave it for you to analyze.
Notice: The choice of Vue.js libraries is pretty subjective, and it was the most challenging part of the project – to choose the Vue libraries to trust. Ecosystem still lacks standards, or 100% trusted open-source – a lot of movement in the market, some libraries are better supported than others. So it’s always hard to guess, and the best libraries will probably change with time, or new ones will appear.
That’s the end of a quick overview of Vue+Laravel QuickAdminPanel, try it out here: https://vue.quickadminpanel.com
Finally, here’s the source of a demo-project with two CRUDs: Companies and Customers.
I hope our generator will not only save you time on writing code but also show you how Vue can work with Laravel. Our way of structuring this code is not the only way, and you can structure your code differently, but we tried our best to stick to standards.
via Laravel News https://ift.tt/2wzPFV6
0 notes
Text
How to Create CRUD Operation on Laravel 8 with Vue JS ?
How to Create CRUD Operation on Laravel 8 with Vue JS ?
Today now in this article i will show you Laravel Vue js CRUD example. Here we will see and also know about how to build Create, Read, Update, and Delete API and then we will know how to consume an APIs to perform CRUD operations in Laravel and Vue JS application. We are know that for the software engineer create, read, update, and delete are not just any simple words. Those are the foundational…
View On WordPress
0 notes
Text
Laravel 5.8 Tutorial From Scratch - e26 - Vue Basics 101 - Laravel
Laravel 5.8 Tutorial From Scratch – e26 – Vue Basics 101 – Laravel
Laravel 5.8 Tutorial From Scratch – e26 – Vue Basics 101 – Laravel
[ad_1]
Vue is a modern Javascript framework that is powerful but yet simple to understand. In this episode, we are covering the basics of Vue by setting up a reusable button component. We will wrap it up by fetching some data from the Laravel backend using Axios.
For the best experience, follow along in our interactive school at h…
View On WordPress
#fetching data in laravel#full stack vue#laravel#laravel 5.8#Laravel API#laravel axios post example#laravel fetching data from database#laravel front end#laravel frontend tutorial#laravel mix#laravel mix 5.8#laravel mix vue#laravel node modules#laravel npm install#laravel vue#laravel vue js crud#laravel vue setup#laravel vue tutorial#laravel vue.js#laravel webpack tutorial#npm run dev#npm run watch laravel#vue#Vue.js#vuejs laravel
0 notes
Link
Follow Unfollow System Example Laravel. Follow Unfollow System in laravel. Follow system in Laravel,laravel 6 follow system, follow unfollow php laravel script, Laravel vue example, laravel vue js tutorials, laravel vue js crud example,laravel 6 vue
0 notes
Link
base64 image validation in laravel, laravel axios get request, the ultimate vuejs and laravel crud tutorial, vue file upload tutorial, laravel vue file upload, vue js file upload laravel, laravel file upload vue, laravel vue axios file upload,laravel vue js crud example, laravel vue js pagination, laravel vue js tutorial, form validation vue js
0 notes