#localhost/phpmyadmin
Explore tagged Tumblr posts
Visit Tumblr Blog
Explore Tumblr blogs with no restrictions, modern design and the best experience.
Last Seen Tumblr Blogs


Fun Fact
If you dial 1-866-584-6757, you can leave an audio post for your followers.
Text
The event management system is a web-based application. The objective of this application is to develop a system that effectively manages all the data related to the various events that take place in an organization. The purpose is to maintain a centralized database of all event-related information. The goal is to support various functions and processes necessary to manage the data efficiently.
Click : https://phpgurukul.com/event-management-system-using-php-and-mysql/
Project Modules
In EMS project we use PHP and MySQL database. It has two modules.
1.Admin Module
2.User Module
Admin Module
Dashboard: In this section, admin can see all detail in brief like listed categories, Sponsors, Total Events, Total Registered Users, Total Booking, Total New Booking, Total Confirmed Booking and Total Cancelled Booking.
Category: In this section, admin manage event category (add and update).
Manage Sponsors: In this section, admin can add sponsors and manage sponsors details (Add/Update/Delete).
Events: In this section, admin manage events (add and update).
Manage Users: In this section, admin can update details of registered users and also block them.
Manage Booking: In this section, admin can manage booking by cancel and confirm it.
News: In this section admin manage news (add and delete).
Website Setting: In this section, admin can update about us and another general website setting.
Admin can also update his profile, change password and recover password.
User Module
In this module there is two types of user guest user and registered user.
Guest User: In this guest user can see only general information like about us, event details,
contact details and news about events.
Registered users can do the following activity
1.Books the events.
2.Update his/her own profile.
3.Change Password.
4.Users can also cancel booking which is not confirmed.
5. Registered user can also recover his/her own password.
How to run the Event Management System (EMS) Project
1. Download the zip file
2. Extract the file and copy ems folder
3.Paste inside root directory(for xampp xampp/htdocs, for wamp wamp/www, for lamp var/www/html)
4. Open PHPMyAdmin (http://localhost/phpmyadmin)
5. Create a database with name ems
6. Import ems.sql file(given inside the zip package in SQL file folder)
7.Run the script http://localhost/ems (frontend)
8. For admin panel
http://localhost/ems/admin (admin panel)
Credential for admin panel :
Username: admin Password: Test@123
Credential for user panel :
Username: test12345 Password: Test@123
0 notes
Text
Panduan Praktis: Memahami Cara Mengakses localhost/phpmyadmin/php
Panduan Praktis: Memahami Cara Mengakses localhost/phpmyadmin/php Hostnic.id – Halo pembaca! Bagaimana kabar kalian hari ini? Semoga kalian dalam keadaan baik-baik saja. Selamat datang di artikel ini yang akan membahas tentang cara mengakses localhost/phpmyadmin/php tanpa menggunakan kode 443326. Kami sangat senang bisa berbagi informasi ini dengan kalian. Jadi, mari kita mulai perjalanan kita…

View On WordPress
0 notes
Text
Como reparar el error de MySQL en XAMPP
Si estas trabajando en el desarrollo de un sitio web o aplicación con un servidor de base de datos, lo mas factible, es que estés usando alguna paquete de desarrollo al estilo XAMPP. Este paquete incluye un servidor web, uno de bases de datos y los interpretes de lenguajes PHP y Perl. Hace poco tiempo, comenzó a aparecer un mensaje de error del gestor de bases de datos incluido por defecto en…
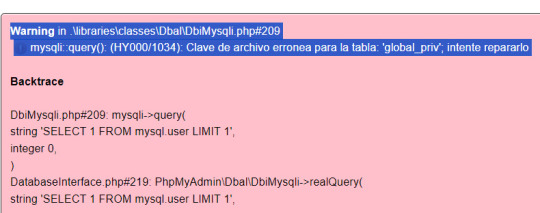
View On WordPress
0 notes
Text
Dairy Farm Shop Management System Using PHP and MySQL

The Dairy Farm Shop Management System (DFSMS) is a web based application that can be accessed over the web. This system can be used to automate the workflow of dairy shop and their invoices.
The project has been planned to be having the view of distributed architecture, with centralized storage of the database. The application for the storage of the data has been planned. Using the constructs of MySQL Server and all the user interfaces has been designed using the PHP technologies. The database connectivity is planned using the “MySQL Connection” methodology. The standards of security and data protective mechanism have been given a big choice for proper usage. The application takes care of different modules and their associated reports, which are produced as per the applicable strategies and standards that are put forwarded by the administrative staff.
Click: https://phpgurukul.com/dairy-farm-shop-management-system-using-php-and-mysql/
Project Modules
DFSMS is a web-based application which manages the products of dairy shop. It has one module i.e. admin who manages all the functions of the dairy shop.
Admin Features :
Dashboard: In this section, admin can see all detail in brief like Total listed categories, companies, products and also see the sales.
Category: In this section, admin can add new categories and edit, delete old categories.
Company: In this section, admin can add new companies and edit, delete old companies.
Product: In this section, admin can add new products and edit old products.
Search: In this section, admin can search for a product then add the product into the cart and generate invoice /receipt.
Invoices: In this section, admin can view all generated invoices/receipts.
Reports: In this section, admin can generate two reports, one is B/w date and another one is for sales.
Admin can also update his profile, change the password and recover the password.
How to run the Dairy Farm Shop Management System Project (DFSMS)
1. Download the zip file
2. Extract the file and copy dfsms folder
3.Paste inside root directory(for xampp xampp/htdocs, for wamp wamp/www, for lamp var/www/html)
4. Open PHPMyAdmin (http://localhost/phpmyadmin)
5. Create a database with name dfsms
6. Import dfsms.sql file(given inside the zip package in SQL file folder)
7.Run the script http://localhost/dfsms
*********************Admin Credential*********************
Username: admin Password: Test@123
PHP Gurukul
Welcome to PHPGurukul. We are a web development team striving our best to provide you with an unusual experience with PHP. Some technologies never fade, and PHP is one of them. From the time it has been introduced, the demand for PHP Projects and PHP developers is growing since 1994. We are here to make your PHP journey more exciting and useful.
Email: [email protected] Website : https://phpgurukul.com
0 notes
Text
Complete PHP Tutorial: Learn PHP from Scratch in 7 Days
Are you looking to learn backend web development and build dynamic websites with real functionality? You’re in the right place. Welcome to the Complete PHP Tutorial: Learn PHP from Scratch in 7 Days — a practical, beginner-friendly guide designed to help you master the fundamentals of PHP in just one week.
PHP, or Hypertext Preprocessor, is one of the most widely used server-side scripting languages on the web. It powers everything from small blogs to large-scale websites like Facebook and WordPress. Learning PHP opens up the door to back-end development, content management systems, and full-stack programming. Whether you're a complete beginner or have some experience with HTML/CSS, this tutorial is structured to help you learn PHP step by step with real-world examples.
Why Learn PHP?
Before diving into the tutorial, let’s understand why PHP is still relevant and worth learning in 2025:
Beginner-friendly: Easy syntax and wide support.
Open-source: Free to use with strong community support.
Cross-platform: Runs on Windows, macOS, Linux, and integrates with most servers.
Database integration: Works seamlessly with MySQL and other databases.
In-demand: Still heavily used in CMS platforms like WordPress, Joomla, and Drupal.
If you want to build contact forms, login systems, e-commerce platforms, or data-driven applications, PHP is a great place to start.
Day-by-Day Breakdown: Learn PHP from Scratch in 7 Days
Day 1: Introduction to PHP & Setup
Start by setting up your environment:
Install XAMPP or MAMP to create a local server.
Create your first .php file.
Learn how to embed PHP inside HTML.
Example:
<?php echo "Hello, PHP!"; ?>
What you’ll learn:
How PHP works on the server
Running PHP in your browser
Basic syntax and echo statement
Day 2: Variables, Data Types & Constants
Dive into PHP variables and data types:
$name = "John"; $age = 25; $is_student = true;
Key concepts:
Variable declaration and naming
Data types: String, Integer, Float, Boolean, Array
Constants and predefined variables ($_SERVER, $_GET, $_POST)
Day 3: Operators, Conditions & Control Flow
Learn how to make decisions in PHP:
if ($age > 18) { echo "You are an adult."; } else { echo "You are underage."; }
Topics covered:
Arithmetic, comparison, and logical operators
If-else, switch-case
Nesting conditions and best practices
Day 4: Loops and Arrays
Understand loops to perform repetitive tasks:
$fruits = ["Apple", "Banana", "Cherry"]; foreach ($fruits as $fruit) { echo $fruit. "<br>"; }
Learn about:
for, while, do...while, and foreach loops
Arrays: indexed, associative, and multidimensional
Array functions (count(), array_push(), etc.)
Day 5: Functions & Form Handling
Start writing reusable code and learn how to process user input from forms:
function greet($name) { return "Hello, $name!"; }
Skills you gain:
Defining and calling functions
Passing parameters and returning values
Handling HTML form data with $_POST and $_GET
Form validation and basic security tips
Day 6: Working with Files & Sessions
Build applications that remember users and work with files:
session_start(); $_SESSION["username"] = "admin";
Topics included:
File handling (fopen, fwrite, fread, etc.)
Reading and writing text files
Sessions and cookies
Login system basics using session variables
Day 7: PHP & MySQL – Database Connectivity
On the final day, you’ll connect PHP to a database and build a mini CRUD app:
$conn = new mysqli("localhost", "root", "", "mydatabase");
Learn how to:
Connect PHP to a MySQL database
Create and execute SQL queries
Insert, read, update, and delete (CRUD operations)
Display database data in HTML tables
Bonus Tips for Mastering PHP
Practice by building mini-projects (login form, guest book, blog)
Read official documentation at php.net
Use tools like phpMyAdmin to manage databases visually
Try MVC frameworks like Laravel or CodeIgniter once you're confident with core PHP
What You’ll Be Able to Build After This PHP Tutorial
After following this 7-day PHP tutorial, you’ll be able to:
Create dynamic web pages
Handle form submissions
Work with databases
Manage sessions and users
Understand the logic behind content management systems (CMS)
This gives you the foundation to become a full-stack developer, or even specialize in backend development using PHP and MySQL.
Final Thoughts
Learning PHP doesn’t have to be difficult or time-consuming. With the Complete PHP Tutorial: Learn PHP from Scratch in 7 Days, you’re taking a focused, structured path toward web development success. You’ll learn all the core concepts through clear explanations and hands-on examples that prepare you for real-world projects.
Whether you’re a student, freelancer, or aspiring developer, PHP remains a powerful and valuable skill to add to your web development toolkit.
So open up your code editor, start typing your first <?php ... ?> block, and begin your journey to building dynamic, powerful web applications — one day at a time.

0 notes
Text
Choose the Right Web Hosting
Thinking of switching web hosting providers but worried about losing your website or breaking something important? You're not alone. Many website owners hesitate to make the move because they’re unsure about how the process works. But the truth is, with the right steps, you can move your website to a new host safely and easily — even as a beginner.
In this guide, we’ll walk you through a simple and safe way to transfer your website, while also helping you choose the right web hosting for long-term success. If you ever need quick assistance, feel free to call +91 9818 62 9898.
Why People Change Web Hosting Providers
Before we dive into the steps, let’s understand why someone might need to move their website:
Slow website performance
Frequent downtime or server issues
Poor customer support
Limited features or outdated technology
High renewal costs
If any of these issues sound familiar, it’s a clear sign that you need to move on and choose the right web hosting provider. For expert help during the switch, call us directly at +91 9818 62 9898.
Pre-Move Checklist: What You Need to Prepare
To ensure a smooth transfer, gather the following:
Access to your current hosting account
Access to your domain registrar
A backup of your website files and database
Login credentials for your new hosting provider
Some time (ideally during non-peak hours)
If you get stuck at any point, just dial +91 9818 62 9898 — our team is here to help.
Step-by-Step Guide to Move Your Website Safely
Step 1: Choose the Right Web Hosting Provider
The first and most important step is to choose the right web hosting for your current and future website needs. Look for:
99.9% uptime guarantee
High server speed
Free migration services
24/7 support
User-friendly dashboard
Not sure which provider is right for you? Get a quick recommendation by calling +91 9818 62 9898.
Step 2: Backup Your Website Files and Database
Always create a full backup before migrating.
For WordPress: Use plugins like All-in-One WP Migration or Duplicator to back up both files and database.
For non-WordPress sites: Download your files via FTP and export your database using phpMyAdmin.
Need help taking a backup? Reach out at +91 9818 62 9898.
Step 3: Upload Files to the New Host
Once your new host is ready, it’s time to upload:
WordPress Users:
Install WordPress on the new host
Import the backup using your chosen plugin
Non-WordPress Sites:
Upload via FTP
Recreate the database and import your .sql file
For technical support, don’t hesitate to call +91 9818 62 9898.
Step 4: Update Database Settings
If your website is database-driven (like WordPress), update the config file with new database credentials.
For WordPress, modify wp-config.php with:
sql
CopyEdit
define('DB_NAME', 'new_db_name'); define('DB_USER', 'new_db_user'); define('DB_PASSWORD', 'new_db_password'); define('DB_HOST', 'localhost');
Not sure where to find these details? We’re one call away at +91 9818 62 9898.
Step 5: Preview the Website on New Host
Before changing your domain settings, preview your site using:
A temporary URL (provided by your new host)
Hosts file modification (advanced users)
Ensure everything works — images load, forms submit, pages function properly. If you see issues, give us a call at +91 9818 62 9898 for quick troubleshooting.
Step 6: Change Domain DNS Settings
Now it’s time to go live.
Log in to your domain registrar
Update the DNS (nameservers) to your new host’s settings
Wait for DNS propagation (can take 24–48 hours)
During this period, avoid editing the website. If you're unsure how to do this, call +91 9818 62 9898 and we’ll walk you through it.
Step 7: Test After DNS Propagation
After DNS has updated, test your site:
Load pages
Test forms
Check mobile responsiveness
Verify email services (if connected to domain)
Pro Tips for a Smooth Migration
Migrate during low-traffic hours
Inform your visitors if there will be downtime
Keep your old host active for at least a week
Clear browser and site cache after the move
Always double-check backups
Need guidance through any of these steps? Talk to our web experts at +91 9818 62 9898.
Final Thoughts
Switching your hosting might feel scary, but it’s easier than it looks — especially when you follow the right steps. The key is to be prepared, follow a structured process, and above all, choose the right web hosting that meets your performance and support expectations.
Whether you're unhappy with your current provider or just want to upgrade, now is the perfect time to make the move. And if you ever feel stuck, don’t worry — just call +91 9818 62 9898, and we’ll guide you every step of the way.
Want expert help with your hosting migration? Call us now at +91 9818 62 9898 and get started without stress.
0 notes
Text
How to Develop a Website Using PHP
How to Develop a Website Using PHP
In today's digital era, websites play a crucial role in business growth and online presence. One of the most widely used server-side scripting languages for web development is PHP (Hypertext Preprocessor). It is open-source, easy to learn, and widely supported by web servers and databases. This guide will walk you through the step-by-step process of developing a website using PHP.

Why Choose PHP for Web Development?
Before diving into the development process, let’s explore some key reasons why PHP is a great choice for website development:
1. Open-Source: PHP is free to use, making it cost-effective for developers.
2. Cross-Platform Compatibility: Runs on Windows, Linux, and macOS without compatibility issues.
3. Database Support: Easily integrates with MySQL, PostgreSQL, and other databases.
4. Scalability: Suitable for both small websites and large-scale web applications.
5. Large Community Support: Extensive documentation and active developer communities for troubleshooting and learning.
Prerequisites for PHP Web Development
To develop a website using PHP, you need the following tools:
1. Text Editor or IDE: VS Code, Sublime Text, or PHPStorm.
2. Local Server: XAMPP, WAMP, or MAMP for running PHP scripts.
3. Database System: MySQL or PostgreSQL for data storage.
4. Web Browser: Chrome, Firefox, or Edge for testing the website.
Step-by-Step Guide to Developing a Website Using PHP
1. Setting Up Your Development Environment
To begin developing a PHP website, follow these steps:
· Install XAMPP (or WAMP/MAMP) to create a local server.
· Using the XAMPP Control Panel, launch Apache and MySQL.
· Navigate to htdocs in the XAMPP directory to store PHP project files.
2. Creating the Project Structure
Organizing your files properly enhances maintainability. A typical PHP project structure:
project-folder/
│-- index.php
│-- config.php
│-- assets/
│ ├── css/
│ ├── js/
│ ├── images/
│-- includes/
│ ├── header.php
│ ├── footer.php
│-- pages/
│ ├── about.php
│ ├── contact.php
│-- database/
│ ├── db_connect.php
3. Writing Your First PHP Script
Create an index.php file and add the following code:
<?php
echo "Welcome to My PHP Website!";
?>
Save the file and access it in the browser by navigating to http://localhost/project-folder/.
4. Connecting PHP with MySQL Database
To manage dynamic content, connect PHP with a MySQL database.
Create a Database
1. Open phpMyAdmin from XAMPP.
2. Create a new database, e.g., my_website.
3. Add a users table with fields id, name, email, and password.
Database Connection Code (db_connect.php)
<?php
$servername = "localhost";
$username = "root";
$password = "";
dbname = "my_website";
$conn = new mysqli($servername, $username, $password, $dbname);
if ($conn->connect_error) {
die("Connection failed: " . $conn->connect_error);
}
?>
5. Creating a User Registration System
A simple user registration form using PHP and MySQL.
Registration Form (register.php)
<form method="POST" action="register.php">
<input type="text" name="name" placeholder="Full Name" required>
<input type="email" name="email" placeholder="Email" required>
<input type="password" name="password" placeholder="Password" required>
<button type="submit" name="register">Register</button>
</form>
Handling User Registration (register.php)
<?php
include 'database/db_connect.php';
if(isset($_POST['register'])) {
$name = $_POST['name'];
$email = $_POST['email'];
$password = password_hash($_POST['password'], PASSWORD_BCRYPT);
$sql = "INSERT INTO users (name, email, password) VALUES ('$name', '$email', '$password')";
if ($conn->query($sql) === TRUE) {
echo "Registration successful!";
} else {
echo "Error: " . $conn->error;
}
}
?>
6. Implementing User Login System
Login Form (login.php)
<form method="POST" action="login.php">
<input type="email" name="email" placeholder="Email" required>
<input type="password" name="password" placeholder="Password" required>
<button type="submit" name="login">Login</button>
</form>
Handling Login Authentication (login.php)
<?php
session_start();
include 'database/db_connect.php';
if(isset($_POST['login'])) {
$email = $_POST['email'];
$password = $_POST['password'];
$result = $conn->query("SELECT * FROM users WHERE email='$email'");
$user = $result->fetch_assoc();
if(password_verify($password, $user['password'])) {
$_SESSION['user'] = $user;
echo "Login successful!";
} else {
echo "Invalid credentials!";
}
}
?>

7. Adding Navigation and Styling
· Use Bootstrap or CSS frameworks to improve UI.
· Include a header.php and footer.php for better navigation.
8. Deploying the PHP Website
Once development is complete, deploy your PHP website using:
· Shared Hosting with cPanel for easy management.
· Cloud Hosting (AWS, DigitalOcean) for high performance.
· Domain & SSL Certificate for a secure and professional website.
Conclusion
Developing a website using PHP is an efficient way to create dynamic and interactive websites. By following this step-by-step guide, you can build a PHP-based website from scratch, implement database interactions, user authentication, and deploy your project successfully. Start your PHP development journey today and create powerful web applications!
#web development#seo services#web designing#social media marketing#graphic design#digital marketing#digitalmarketing#marketing#digitalindia#seo
1 note
·
View note
Text
How to Install XAMPP for Windows 10 - XAMPP WordPress For Beginners
To install XAMPP on Windows 10 and set it up for WordPress, follow these steps:
Step 1: Download XAMPP
Go to the official XAMPP website.
Click on the "XAMPP for Windows" button.
Once the installer is downloaded, locate the .exe file (usually in the Downloads folder).
Step 2: Install XAMPP
Double-click the .exe file to start the installation process.
Choose the components you want to install. For WordPress, you need at least Apache, MySQL, and PHP. These are selected by default, so you can leave them as is.
Choose the installation folder (default is usually fine).
Click "Next" and follow the prompts.
During installation, the installer may ask if you want to start the XAMPP Control Panel. Leave it checked and click "Finish."
Step 3: Start Apache and MySQL
Open the XAMPP Control Panel (it should have opened automatically, or you can search for it in the Start menu).
Click the "Start" button next to Apache (this will run the web server).
Click the "Start" button next to MySQL (this will start the database server).
Make sure both Apache and MySQL show "Running" in green.
Step 4: Install WordPress
Download the latest version of WordPress from the official WordPress website.
Extract the WordPress ZIP file.
Move the extracted folder (the WordPress folder) into the htdocs folder of your XAMPP installation (usually located at C:\xampp\htdocs).
Step 5: Create a Database for WordPress
Open your browser and go to http://localhost/phpmyadmin/.
In the phpMyAdmin dashboard, click on "Databases."
Create a new database for WordPress. Give it a name (e.g., wordpress_db) and click "Create."
Step 6: Configure WordPress
Open your browser and go to http://localhost/wordpress (or the folder name you chose).
The WordPress installation screen should appear.
Select your language and click "Continue."
On the next screen, enter your database details:
Database Name: The name you created (e.g., wordpress_db).
Username: root (default for XAMPP).
Password: Leave this blank (default for XAMPP).
Database Host: localhost (default).
Table Prefix: Leave as wp_ unless you want to change it.
Click Submit and then Run the Install.
Step 7: Complete the WordPress Setup
Fill in the site details (site title, admin username, password, and email).
Click "Install WordPress."
Once the installation is complete, you’ll see a success message. You can now log in to your WordPress dashboard at http://localhost/wordpress/wp-admin.
Final Notes
To stop your server, go to the XAMPP Control Panel and click "Stop" for Apache and MySQL.
If you need to make your local WordPress site public, you'll have to configure port forwarding or use a tool like Local by Flywheel or XAMPP for public access.
#installxampp#xamppforbeginners#xamppwindows10#wordpressinstallation#localserversetup#runwordpresslocally#xamppwordpress#webdevelopment#phpdevelopment#wordpressforbeginners#tutorial2025#localwordpress#xamppsetup#installingwordpress#wordpresssetup#beginnerfriendly#xamppguide#developmenttutorial#learnwordpress#wordpresslocally
0 notes
Text
How to Move Your WordPress Site from Localhost to a Live Server
Developing a WordPress site on localhost is a great way to build and test your website in a controlled environment. However, the real challenge arises when it's time to move the site from your local server to a live hosting environment. If not done correctly, you could encounter broken links, missing images, or even database errors.
In this blog, we'll guide you through a step-by-step process to successfully move your WordPress site from localhost to a live server.

Step 1: Choose the Right Hosting Provider
Your first step is to select a reliable web hosting provider that meets your website’s needs. Look for:
Server Speed: Fast servers for better performance.
Uptime Guarantee: At least 99.9% uptime to ensure availability.
Ease of Use: User-friendly dashboards and tools.
WordPress Support: Hosting optimized for WordPress websites.
Popular options include Bluehost, SiteGround, and WP Engine.
Step 2: Export Your Local WordPress Database
The database is the backbone of your WordPress site. To export it:
Open phpMyAdmin on your local server (e.g., XAMPP or WAMP).
Select your WordPress database.
Click on the Export tab and choose the Quick Export method.
Save the .sql file to your computer.
Step 3: Upload Your WordPress Files to the Live Server
To move your files:
Compress Your WordPress Folder: Zip your local WordPress installation folder.
Access Your Hosting Account: Use a file manager or an FTP client like FileZilla.
Upload the Files: Transfer the zipped folder to your hosting server's root directory (usually public_html).
Unzip the Folder: Extract the files once uploaded.
Step 4: Create a Database on the Live Server
Now, set up a new database on your live hosting server:
Log in to your hosting control panel (e.g., cPanel).
Navigate to the MySQL Databases section.
Create a new database, database user, and password.
Assign the user to the database with full privileges.
Step 5: Import the Database to the Live Server
Open phpMyAdmin in your hosting control panel.
Select the new database you created.
Click the Import tab.
Choose the .sql file you exported from your localhost.
Click Go to import the database.
Step 6: Update the wp-config.php File
To connect your site to the live database:
Locate the wp-config.php file in your WordPress installation.
Open the file in a text editor.
Update the following lines: define('DB_NAME', 'your_live_database_name'); define('DB_USER', 'your_live_database_user'); define('DB_PASSWORD', 'your_live_database_password'); define('DB_HOST', 'localhost'); // Keep this unless your host specifies otherwise.
Save the file and upload it to your server via FTP.
Step 7: Update URLs in the Database
Your localhost URLs need to be replaced with your live site URLs.
Use a tool like Search Replace DB or run SQL queries in phpMyAdmin.
In phpMyAdmin, run the following query: UPDATE wp_options SET option_value = 'http://your-live-site.com' WHERE option_name = 'siteurl'; UPDATE wp_options SET option_value = 'http://your-live-site.com' WHERE option_name = 'home';
Step 8: Test Your Live Website
Once everything is uploaded and configured, check your website by entering its URL in a browser. Test for:
Broken Links: Fix them using plugins like Broken Link Checker.
Missing Images: Ensure media files were uploaded correctly.
Functionality: Verify forms, buttons, and features work as expected.
Step 9: Set Up Permalinks
To ensure proper URL structure:
Log in to your WordPress admin dashboard on the live site.
Go to Settings > Permalinks.
Choose your preferred permalink structure and click Save Changes.
Step 10: Secure Your Live Website
After migrating, secure your site to prevent vulnerabilities:
Install an SSL Certificate: Most hosting providers offer free SSL certificates.
Update Plugins and Themes: Ensure everything is up to date.
Set Up Backups: Use plugins like UpdraftPlus for regular backups.
Conclusion
Moving your WordPress site from localhost to a live server may seem daunting, but by following these steps, you can ensure a smooth and error-free migration. A successful move allows you to showcase your site to the world, engage your audience, and achieve your goals.
Start today and take your WordPress project live with confidence!
0 notes
Text
Zen Cart is a very popular ecommerce website management system. Thousands of businesses are using Zen Cart for their online stores. Hey are you too looking to build your online shopping store with Zen Cart? If yes then this post of mine will surely be a helping pill for you. It is very affordable now to convert any format website design to Zen Cart engine if you hire Professional Zen Cart Developer. In this post I am briefly explaining the process of installing Zen Cart on a local host. Icing the cake; I had also explained the process of installing a new template for the Zen Cart website interface. To make it easy for everyone to follow the steps; I had incorporated the snapshot of the installation process. Quickest Way To Install Zen Cart System And Zen Cart Template On Local Host Installing Zen Cart Management System Download the Zen Cart engine installation file from the website and then copy that zip file to the local host directory with Ryan/ZenCart subfolder. After copying the installation file unzip the package with the help of unzip software. Now go to your Database Management tool. The database management tool can be searched by the name phpmyadmin. Moreover you can directly open the tool by following the http://localhost/phpmyadmin/. Go to the Database Menu. Create a new database. Now open the links to your installation files. As we had save the host directory with Ryan/Zen Cart subfolder; the link to the installation files will be http://localhost/Ryan/ZenCart/. Now the Zen cart welcome window will appear on the screen; click on “click here” to start a fresh CMS installation. In the next screen; you will see the software license window. Select ‘I agree’ checkbox and click ‘Next’. Now the software will check the system configuration and if your system fulfills the software installation requirement you will see green marks. Now scroll down the page and click ‘Install’ button. In the next step you will be asked to provide the database access details. Creating the database is a very crucial stage so follow the below provided instructions carefully. Enter the database access information. In the Database Username field; provide the username that you want for the database. Next field asks for the database password; Leave it blank as per now. Click on the ‘Save Database Settings’ button provided at the down of the page to confirm the changes. In the next step of installation process; you don’t need to perform any action. Just click on the ‘Save System Setting’ Button and move to the next step. Now you will be asked to provide store information. In this step you have to choose ‘Store Demo’ option and then click Save Store Settings. At this step you will be asked to provide the Zen Cart Aceess Details. Enter the Username & Password and Log in to jump to the next step. Got to the root and delete the zc_Install folder from there and also rename the admin folder so security concerns. Till this step you had successfully installed the Zen Cart on your local host. Now you can access the Admin Panel of the application by simply adding the admin folder name. In this example we had save the solder with the name admin123. You can directly access the folder by following the below provided link http://localhost/Ryan/ZenCart/admin123/ After accessing the account; you are advised to change the current password with a much stronger and safe password. Installing The Template For Zen Cart Website Done with the Zen Cart installation process? Now you may require adding some beautiful template to your ecommerce website design. Download the template from the source and then unzip the package. The unzipped files will look like the below provided snapshots. Now got to the theme folder which is named as theme613 in this example. Rename the Admin folder with the actual name of your Admin folder. As for now we are taking the folder name as Admin123 (as in the installation process). Now copy all the content of the theme folder into the root folder of your Zen Cart package.
If System asks for the permission to copy; accept the conditions. Login to the admin panel of your Zen Cart website and TOOLS‡TEMPLATE SELECTION. Click on the edit button and select the theme you want to upload. Click update to confirm the action. Open TOOLS‡ INSTALL SQL PATCHES and then upload the SQL files from the source. You are also advised to backup the database before inserting any installation file. Open the Theme Configuration window and tweak the layout as per you. After doing the edits; click on update button to save the changes. Go to your Home Page and see the template live. Conclusion I hope that this post will help you to hassle free built your online store. Any query? Feel free to share that in the comment section below. Garry is a professional blogger and is currently working with CSSCHOPPER which is a popular Zen Cart Conversion Company. David specializes in topics on CMS, Web Development and SEO.
0 notes
Text
How to deploying Laravel projects on a live server – Complete Step-by-Step Guide
Learn How to deploying Laravel projects on a live server with this comprehensive guide. Step-by-step instructions on setting up hosting, configuring files, and deploying your Laravel app smoothly.Read Laravel Docs
How to deploying Laravel projects on a live server, you’ll need to follow a structured process. Here’s a step-by-step guide to help you:

1. Purchase Domain and Hosting
Make sure you have a domain and a hosting plan. Most shared hosting plans (like cPanel-based ones) or a VPS will work for Laravel, but ensure your server supports PHP and MySQL and meets Laravel’s requirements (PHP version, required extensions, etc.).
2. Prepare Your Laravel Project
Make sure your Laravel project is working locally.
Run the following command to clear any cached configuration and to optimize the project:
php artisan cache:clear
php artisan config:clear
php artisan route:clear
php artisan view:clear
Set up your environment variables (.env file). Make sure they are correctly configured for the live server (e.g., database, mail, and app URL settings).
3. Zip and Upload Your Laravel Project
Compress your entire Laravel project folder (without the node_modules and vendor directories) into a .zip file.
Use FTP (with FileZilla or any other FTP client) or File Manager in cPanel to upload the .zip file to your server. Typically, upload the file to the public_html or a subdirectory within it if you want to run your Laravel app in a subdirectory.
4. Extract the Files
Once uploaded, use File Manager in your hosting control panel to extract the .zip file.
5. Set Up the Public Directory
By default, Laravel’s entry point is the public folder, which contains the index.php file. On a shared hosting server:
Move everything in the public folder (including the .htaccess and index.php files) to the root directory (usually public_html).
Edit the index.php file to update the paths:
Change:
require __DIR__.'/../vendor/autoload.php';
$app = require_once __DIR__.'/../bootstrap/app.php';
To:
require __DIR__.'/vendor/autoload.php';
$app = require_once __DIR__.'/bootstrap/app.php';
This ensures that Laravel can find the necessary files in the correct directory.
6. Set File Permissions
Ensure that the following directories are writable by the server:
/storage
/bootstrap/cache
Use the following command via SSH (if available) or through the hosting file manager:chmod -R 775 storage chmod -R 775 bootstrap/cache
7. Set Up a Database
Create a MySQL database and a user with privileges in cPanel (or via SSH if using VPS).
Update the .env file with your database credentials:
DB_HOST=localhost DB_DATABASE=your_database_name DB_USERNAME=your_database_username DB_PASSWORD=your_database_password
8. Install Composer Dependencies
If you have SSH access:
SSH into your server using a terminal or a tool like PuTTY.
Navigate to your project directory
cd /path/to/your/project
Run Composer to install the dependencies:
composer install --optimize-autoloader --no-dev
If you don’t have SSH access, you can run composer install locally, zip the vendor folder, and upload it to the server.
9. Run Migrations
If you have SSH access, run the following command to migrate the database:
php artisan migrate --force
If you don’t have SSH access, you can run the migrations locally and then export/import the database to the server via phpMyAdmin.
10. Set App Key
Generate a new application key if you haven’t already:php artisan key:generate
Ensure the key is set in the .env file:
Read Full Tutorials
0 notes
Text
Medical Card Generation System using PHP and MySQL

The ‘Medical Card Generations System using PHP and MySQL’ has been designed to override the problem of existing manual system. This web application is supported to eliminate and in some case reduce the hardship faced by manual system. The application is reduced as much as possible to avoid errors while entering the data. It’s also provide message while entering invalid data. No formal knowledge is required for the user to operate this system. Overall we said that ‘Medical Card Generations System’ is user friendly.
Project Modules
In ‘Medical Card Generations System’ we use PHP and MySQL Database. This project keeps the records of medical cards. ‘Medical Card Generations System’ has two module i.e. admin and user.
Admin Module
Dashboard: In this section, admin can briefly view the total medical card created in today’s, yesterday’s and in seven days, total read and unread enquiries.
Medical Card: In this section, admin can manage medical cards (add/delete/update).
Page: In this section, admin can manage about us and contact us pages.
Enquiry: In this section, admin reads the inquiries which are sent by users.
Search: In this section, admin can search a particular medical cards by reference number.
Reports of Medical Cards: In this section admin can view and check medical card details in a particular period.
Click: https://phpgurukul.com/medical-card-generation-system-using-php-and-mysql/
Admin can also update his profile, change the password and recover the password.
User Module
Home Page: User can visit home page.
Medical Card: User can view his/her medical card and take print with the help of their Reference Number.
About Us: User sees the details of .website administrator.
Contact Us: User can contact with website administrator and sent enquiry to them.
Note: In this project, the MD5 encryption method was used.
How to run the Medical Card Generation System Project using PHP and MySQL
1. Download the project zip file
2. Extract the file and copy mcgs folder
3.Paste inside root directory(for xampp xampp/htdocs, for wamp wamp/www, for lamp var/www/Html)
4.Open PHPMyAdmin (http://localhost/phpmyadmin)
5. Create a database with the name mgsdb
6. Import mgsdb.sql file(given inside the zip package in SQL file folder)
7. Run the script http://localhost/mcgs
Click: https://phpgurukul.com/medical-card-generation-system-using-php-and-mysql/
1 note
·
View note
Text
phpmyadminの初期パスワードを設定。ブラウザからログインできるようにする。
phpmyadminインストール直後にブラウザからログインしようとしても mysqli::real_connect(): (HY000/1698): Access denied for user ‘root’@’localhost’ のようなエラーが出て入れない。 これしょっちゅう解決を調べていたのでメモ。 まずはコンソールからMySQLにログイン。 sudo mysql -u root 以下コマンドでrootのパスワードを設定してあげる。 set password for root@localhost=password('xxxxxxxxxxxxxxxxxxx'); これでrootでログインできるはずなのでログイン後好きなユーザーを作ったりできる。

View On WordPress
0 notes
Text
Online Course Registration Free Download

Online Course Registration System is Web-based registration software that helps you to register courses online. It is ideal for schools, educational camps, corporate training programs, and online training programs. It also provides time to time current status information related to courses. It can help for the student need to register by giving necessary details, for the desired course.
Click: https://phpgurukul.com/online-course-registration-free-download/
Project Modules
This Project Divided into two modules
Admin
Student
Admin:
Admin will register the student and provide username; password and pincode.Pincode will be used when a student enrolls for the course. Admin can manage session, semester, departments, course, students, students log Admin Panel. Admin can also add/ delete latest news and updates related to students.
Student:
Student can log in with valid reg no and password provided by admin. Student can enroll for any course and can printout of the registered course.
Online Course Registration System Installation Steps
1. Download and Unzip the file on your local system. 2. Copy onlinecourse and Put this file inside the root directory 3. Database Configuration
Database Configuration
Open PHPMyAdmin Create Database onlinecourse Import database onlinecourse.sql (available inside the zip package) Open Your browser put inside browser “http://localhost/onlinecourse”
****Login Details for admin****
Username: admin
Password: Test@123
****Login Details for Student****
Reg No.:10806121
Password: Test@123 Student Pincode for enroll Course Student: 822894
PHP Gurukul
Welcome to PHPGurukul. We are a web development team striving our best to provide you with an unusual experience with PHP. Some technologies never fade, and PHP is one of them. From the time it has been introduced, the demand for PHP Projects and PHP developers is growing since 1994. We are here to make your PHP journey more exciting and useful.
Email: [email protected] Website : https://phpgurukul.com
0 notes
Text
Navigasi Mudah: Localhost 8080 PhpMyAdmin Explained
Navigasi Mudah: Localhost 8080 phpMyAdmin Explained Halo pembaca Hostnic.id yang terhormat, bagaimana kabar Kamu? Semoga Kamu dalam keadaan baik dan sehat. Selamat datang di artikel ini yang akan membahas tentang Navigasi Mudah: phpMyAdmin Localhost 8080 yang dijelaskan. Artikel ini akan memberikan pemahaman mengenai penggunaan phpMyAdmin pada localhost 8080 agar Kamu dapat dengan mudah…

View On WordPress
0 notes
Text
0 notes