#lumion tutorial
Explore tagged Tumblr posts
Visit Tumblr Blog
Explore Tumblr blogs with no restrictions, modern design and the best experience.
Last Seen Tumblr Blogs


Fun Fact
Tumblr Inc. is funded by 13 investors.
Text
Why Architecture Students Should Learn Rhino 3D Early in Their Career
In today’s competitive architectural landscape, mastering the right tools early can be the difference between standing out or blending in. Rhino 3D, a powerful modeling software known for its precision and flexibility, has become a must-have skill for architecture students. Learning Rhino 3D early in your academic journey not only makes design tasks easier but also gives you a strong edge in both academics and professional practice.
Industry-Relevant Skillset
Rhino 3D is widely used in architecture firms globally, particularly for projects that require complex shapes, accurate modeling, or parametric modeling. Learning Rhino 3D early on makes your skills match what the industry wants. When applying for internships or employment, possessing skills in Rhino 3D tutor for Architects can make your portfolio stand out and indicate that you are already operating at a semi-professional level.

Design Freedom and Flexibility
Unlike most entry-level modeling software, Rhino 3D gives you the ability to design organic, free-form shapes in addition to strict geometries. Whether you're modeling futuristic architecture, intricate furniture, or intricate facades, Rhino doesn't limit you. Rhino enables you to test bold, innovative ideas without technical constraints, allowing you to experiment with your designs early on in your learning.
Smarter Iteration and Visualization
Studio deadlines are merciless. Rhino 3D's intuitive design and adaptable toolset allow you to sketch, model, and refine your concepts quickly. Whether you're working on floor plans or 3D models, Rhino simplifies testing design options and seeing your ideas come to life in real-time. Not only does this enhance your design process but also enable you to communicate more effectively with professors, juries, or clients.
Supports Parametric and Computational Design
Rhino's plug-in, Grasshopper, unlocks the entire universe of parametric design. Learning Rhino early sets you up for further computational architecture skills, enabling you to play around with patterns, environmental analysis, and performance-based design. Students with parametric modeling skills are in high demand by universities and companies alike, making this an invaluable career resource.
Smooth Integration With Other Tools
Rhino 3D Tutorial seamlessly integrates with other well-liked design software such as AutoCAD, Revit, SketchUp, Adobe Suite, and rendering software like V-Ray and Lumion. The cross-platform compatibility enables architecture students to have Rhino as a common design platform. You can model in Rhino and then render, document, or create virtual reality presentations from the same original file.
Create a Professional Portfolio
By employing Rhino from the beginning of your career, your design will demonstrate greater refinement and technical ability. Rhino supports intricate 3D modeling, clean rendering, and precise line work, all of which are portfolio staples. A robust portfolio makes you more competitive for internships, competitions, and graduate school.
In Conclusion
Beginning with Rhino 3D Modeling Tutorials early is not merely a matter of learning software—it's a matter of developing a mindset of precision, creativity, and innovation. For architecture students who aspire to lead rather than follow, Rhino is a tool that gives you the power to stretch the limits of design. The earlier you learn it, the better equipped you'll be for the challenges of the architectural profession.
0 notes
Text
Choosing the Best Software for Interior 3D Rendering
Interior 3D rendering has become a cornerstone of modern interior design, allowing designers, architects, and clients to visualize spaces before they’re built or renovated. The effectiveness of these visualizations largely depends on the software used for creating them. With numerous options available, choosing the right software for interior 3D rendering can be a daunting task. This guide will help you navigate through the essential features, usability, and benefits of the top software options to ensure you make the best choice for your needs.
1. Key Features to Look for in Interior 3D Rendering Software
When selecting software for interior 3D rendering, it’s important to focus on the features that will enhance your workflow and the quality of your renders. Here are some essential features to consider:
Realistic Rendering Capabilities: The software should offer high-quality rendering capabilities, producing photorealistic images that accurately represent materials, lighting, and textures. This is crucial for creating detailed and convincing visualizations that clients can trust.
User-Friendly Interface: An intuitive interface is essential, especially for beginners. Software with a steep learning curve can slow down your workflow, so look for options that are easy to navigate and come with helpful tutorials or user communities.
Library of Materials and Objects: A comprehensive library of pre-made materials, furniture, and objects can save you time and enhance the realism of your renders. The ability to import custom objects and materials is also a plus.
Lighting and Shadow Control: Advanced lighting and shadow controls allow you to create realistic scenes by simulating natural and artificial light sources. This feature is key for achieving accurate interior 3D rendering results.
Compatibility and Integration: Ensure the software is compatible with other design tools and file formats you frequently use. Integration with CAD software, Photoshop, or other 3D modeling tools can streamline your workflow.
2. Top Software Options for Interior 3D Rendering
Now that you know what features to look for, let’s explore some of the best software options available for interior 3D rendering:
SketchUp: SketchUp is a popular choice for both beginners and professionals due to its user-friendly interface and powerful rendering capabilities. Paired with V-Ray or Enscape, it can produce highly realistic interior renders. SketchUp also offers a vast library of pre-made objects and materials, making it easier to create detailed interior designs.
3ds Max: 3ds Max is a powerful tool widely used in the industry for interior 3D rendering. Its robust modeling capabilities, coupled with the V-Ray or Corona Renderer plugins, make it ideal for producing photorealistic interiors. Although it has a steeper learning curve, the results are worth the effort.
Lumion: Lumion is known for its speed and ease of use, making it a great choice for quick and impressive interior renders. It offers a real-time rendering engine, allowing designers to see changes instantly. Lumion is especially useful for creating immersive, walk-through animations and presentations.
Blender: Blender is a free, open-source 3D modeling and rendering software that offers a wide range of features for interior design. With its powerful Cycles and Eevee rendering engines, Blender can produce stunning interior 3D rendering images. Its steep learning curve is offset by a supportive online community and extensive tutorials.
Revit: Revit is particularly useful for interior designers who work closely with architects and need to integrate 3D models into larger building projects. It offers excellent parametric modeling and rendering capabilities, making it ideal for detailed and accurate interior visualizations.
3. How to Choose the Right Software for Your Needs
When choosing the best software for interior 3D rendering, consider the following factors:
Project Scale and Complexity: For complex projects with intricate details, opt for software like 3ds Max or Revit, which offer advanced features and robust performance. For smaller or less complex projects, SketchUp or Lumion might be more suitable.
Budget: Consider your budget when selecting software. While some options like Blender are free, others like 3ds Max and Revit can be costly. Weigh the software’s features against your needs to ensure you’re making a cost-effective choice.
Skill Level: If you’re new to interior 3D rendering, start with software that offers an easier learning curve, such as SketchUp or Lumion. As you gain experience, you can explore more advanced tools like 3ds Max or Blender.
4. Conclusion
Choosing the best software for interior 3D rendering is crucial for delivering high-quality, realistic visualizations that meet your clients’ expectations. By considering the key features, exploring top software options, and aligning your choice with your project needs, budget, and skill level, you can select the perfect tool to enhance your interior design workflow. Whether you’re a beginner or a seasoned professional, investing in the right interior 3D rendering software will set you up for success in creating stunning and effective interior designs.
0 notes
Text
Interior Designing Course in Delhi.
Interior Designing Course Outline
Module 1: Introduction to Interior Design
Overview of Interior Design
History and evolution of interior design
Role of an interior designer
Different fields of interior design (residential, commercial, hospitality, etc.)
Basic Design Principles
Elements of design (line, shape, color, texture, space, form)
Principles of design (balance, contrast, emphasis, rhythm, scale, harmony)
Understanding the Design Process
Project phases (concept, design development, documentation, implementation)
Client interaction and briefing
Module 2: Design Fundamentals
Color Theory and Application
Color wheel and relationships
Psychological effects of color
Creating color schemes
Space Planning
Principles of space planning
Functional and flow planning
Zoning and layout techniques
Furniture Design and Layout
Types of furniture
Ergonomics and human factors
Furniture arrangement principles
Module 3: Materials and Finishes
Introduction to Materials
Types of materials (wood, metal, glass, textiles, etc.)
Properties and applications
Surface Finishes
Paints, wall coverings, and coatings
Flooring options (hardwood, tiles, carpets, etc.)
Ceiling and lighting finishes
Sustainable and Eco-Friendly Materials
Importance of sustainability in design
Green building materials
Certifications and standards (LEED, WELL)
Module 4: Lighting Design
Basics of Lighting
Types of lighting (ambient, task, accent)
Light sources (natural and artificial)
Lighting Techniques
Layering lighting
Creating mood and atmosphere with lighting
Energy-efficient lighting solutions
Lighting Plans and Fixtures
Developing a lighting plan
Types of light fixtures
Selection and placement of fixtures
Module 5: Technical Drawing and Software Skills
Technical Drawing Basics
Orthographic projections (plans, elevations, sections)
Perspective drawing
Detailing and dimensioning
Computer-Aided Design (CAD)
Introduction to CAD software (AutoCAD, SketchUp, Revit)
Basic commands and tools
Creating 2D and 3D drawings
Visualization and Rendering
Introduction to rendering software (V-Ray, Lumion, Enscape)
Creating realistic renderings
Presentation techniques
Module 6: Interior Design Styles and Trends
Historical Styles
Classical, Gothic, Renaissance, Baroque, etc.
Influence of historical styles on contemporary design
Contemporary Styles
Modern, minimalist, industrial, Scandinavian, etc.
Characteristics and applications
Current Trends
Latest trends in interior design
Influences of technology and culture
Forecasting future trends
Module 7: Project Management and Professional Practice
Project Management Fundamentals
Planning and scheduling
Budgeting and cost estimation
Procurement and sourcing
Client Relations and Communication
Effective communication skills
Presenting design proposals
Managing client expectations
Legal and Ethical Considerations
Contracts and agreements
Building codes and regulations
Professional ethics and responsibilities
Module 8: Portfolio Development and Career Preparation
Creating a Professional Portfolio
Selecting and organizing work samples
Layout and presentation techniques
Digital and physical portfolios
Job Search and Networking
Resume and cover letter writing
Preparing for interviews
Networking and building professional relationships
Freelancing and Entrepreneurship
Starting your own design business
Marketing and branding strategies
Managing finances and accounting
Additional Resources
Recommended Reading
"Interior Design Illustrated" by Francis D.K. Ching
"The Interior Design Reference & Specification Book" by Chris Grimley and Mimi Love
Online Tutorials and Courses
LinkedIn Learning
Coursera
Udemy
Course Delivery
Lectures and Demonstrations
Hands-On Projects
Peer Reviews and Critiques
Guest Lectures from Industry Professionals
Assessment and Evaluation
Quizzes and Tests
Project Submissions
Final Portfolio Review
This course structure aims to provide students with a thorough understanding of interior design principles, practical skills, and professional practices, ensuring they are well-prepared for a successful career in interior design.
0 notes
Text
Week 3
1. Reflection
On Tuesday we explore the implementation of vibrations to create a multisensory experience. “Music not impossible” was a very interesting project. However, from my evaluation not all media forms work well with the vests. I feel like the vibrations were not enough to make us feel immersive, while too much vibrations can actually cause irritations for the users. Therefore, I’d prefer to stick with the Capitol Lighting system for my multisensory project.
On Thursday we each had our Pharos trial to be tested at the Capitol and receive feedback from other students and lecturers. My 1st trial was an attempt to achieve serenity through a midnight setting in the middle of a thunderstorm. The objective was to make it simple and subtle. I tried to recreate lighting by having the roof flashing white lighting, not sure if it might be disturbing for the audiences. From this session I have received quality feedback that directly benefits my project progress. One of the feedbacks was to only attack certain parts/sections of the roof, with flickerings of white to create lightning that looks more natural. The more asymmetric the lighting composition is, the more realistic it will be. One powerful way to achieve serenity is to start with other states, then transition into serenity to emphasise even more. Implementation of real lightning: Seeing lightning on the night sky -> flashes revealing the clouds and raindrops for split seconds. I found this idea very interesting, and can use this implementation of lightning to pair my visuals on the projected screen with the lighting design.
2. Research & Inspiration
Academic: 14 PATTERNS OF BIOPHILIC DESIGN | Improving Health & Well-Being in the Built Environment
This is one of my favourite materials that is applicable to a wide range of projects that are related to nature. In order to practise biophilic design and apply it to my project, studying its patterns and principles is beneficial for understanding design opportunities and effectively enhances health, well-being and fosters calm emotions. The process of analysing this material also contributes to my Project proposal presentation. I have chosen “Non-Visual Connection with Nature” and “Connection with Natural Systems” as the main principles to produce the visuals for the screen. While the first pattern tackles the lack of nature in an environment by applying digital methods to replicate nature and bring a sense of calmness to the space, the second pattern is more focused on the seasonal cycle, weathers, … which I can implement its concept to create contents for the projected screen.
Technical: Pharos, 3D softwares
This week I also watched tutorials on the modules to understand the Pharos Designer 2 software. This process serves the purpose of creating our first trial on Thursday. The software was fairly easy to get used to, but from my evaluation I have not explored all of the lighting presets & effects yet.
I also look at how designers create virtual environments using powerful software like Unity, 3ds max or Unreal Engine 5. Having a watch at these design processes and explanations help me to identify strengths and challenges of each software. For now, the safe option for me is to stick with Unity, while I want to explore 3ds max and Lumion for rendering high quality visuals.
3. Project Progress
After deciding to approach the Capitol as the chosen project offer, this week’s progress mainly focused on ideation, conceptualisation and methodology. These steps are being executed as mentioned in the research section above. For the initial idea, my intention is to create a serene journey through the beauty of natural events/climates. The project will be a 3D immersive video projected on the 4K screen, complemented by ambient nature sounds and harmonious lighting design within the theatre.
One of the early progresses being executed is the test trials on Thursday, which is creating a lighting composition based on a soundtrack of thunderstorms. The objective was to make it simple and subtle. I tried to recreate lighting by having the roof flashing white lighting, not sure if it might be disturbing for the audiences. By receiving feedback and evaluating my trials, I am looking forward to the next Capitol session where I will have new different tests for iteration.
0 notes
Text
Lumion Hardware 101: Minimum and recommended requirements for faster 3D rendering performance
In this guide, you can compare your desktop PC or laptop hardware with Lumion’s system requirements, and discover how you can significantly improve your experience.
Lumion is a powerful 3D rendering program that creates detail-rich and realistic visuals of your designs, but in order to get the best performance out of Lumion, you are going to need a fast desktop PC or laptop with a powerful graphics card.
A fast Lumion experience depends heavily on the graphics card (GPU). You will also need a fast processor (CPU) and a lot of computer memory (RAM) and graphics card memory.
Wondering what that means in practice? In this guide, we’ll break down Lumion’s system requirements for optimal 3D performance in three parts:
Check your desktop PC or laptop and see what hardware you currently have
Find out how well Lumion will perform on your current hardware
Explore options to troubleshoot problems and upgrade your hardware
With the aim of providing relevant information for your specific issue or question, we’ve also provided several links at the end of this guide, including a breakdown of the graphics cards and CPUs you may need, what to do if you get a low score in the Lumion benchmark, and how to choose a power supply.
We invite users with hardware issues to check out the Knowledge Base or reach out to us on the Lumion Support Center as performance depends on numerous factors outside Lumion’s control, and we cannot guarantee that a certain hardware setup will always provide expected performance.
Check your PC for Lumion performance
The most accurate method for checking the Lumion performance requirements of your hardware is to use the in-program benchmark.
With the benchmark, you can check the four main components that have the most impact on Lumion performance. These include the graphics card (GPU), the processor (CPU), system memory (RAM) and graphics card memory.
Current Lumion users can run the Benchmark from Lumion’s start screen:

Lumion’s benchmark tool takes a snapshot of your GPU and CPU speed and shows your computer’s maximum system memory (RAM) and graphics card memory.
Not a Lumion user yet? You can test your computer (and test Lumion 9.3) by downloading the free, 14-day trial.
Find out if your desktop PC or laptop is fast enough
Once you know the hardware in your computer, the next step is to see how it compares to Lumion’s minimum or recommended system requirements.
Recommended system requirements
For the best performance running Lumion, we recommend a computer with the following specifications:
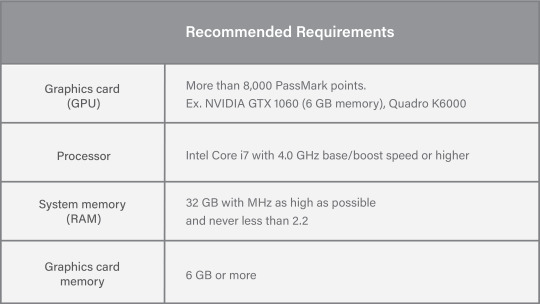
If your hardware meets or exceeds these requirements, you should have a smooth experience when working on large scenes in Lumion’s Build Mode. In the Build Mode, you can check the size of the scene and the frame rate of your computer in the upper-right-hand area of your screen.
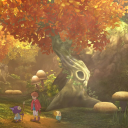
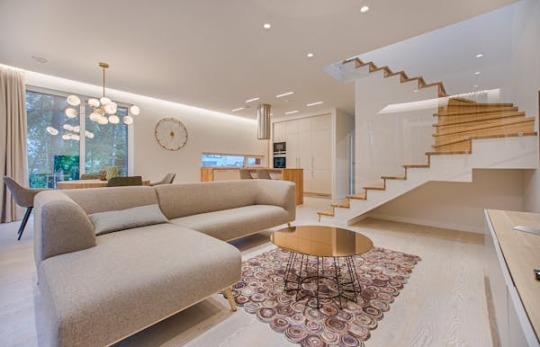
For instance, when moving around the Beach House example scene with a GTX 980 TI graphics card, the frame rate hovered around 18 frames per second (please note that your experience may differ).
With the recommended system requirements, moving around in the scene is fast, smooth and enjoyable.
Additionally, faster hardware allows for a faster rendering time in Lumion. With the recommended system requirements and a GTX 980 TI graphics card, rendering the Beach House scene as a desktop sized image (1920 x 1080) took 19 seconds (please note that your experience may differ).
Render speed with the recommended specifications:
Computer specifications for this render: 1) GTX 980 TI graphics card, 2) i7-6700K processor @ 4.00 GHz, 3) 32 GB RAM and 4) 6 GB of graphics card memory.
Minimum system requirements
You can run Lumion with the minimum system requirements, and anything you do to increase hardware performance toward the recommended requirements will improve your Lumion experience.
If your setup meets only the minimum, you may see some performance issues. This is especially true when working on large and detailed scenes, such as massive urban or rural scenes, 4K videos, and large surfaces featuring the customizable 3D grass or furry materials.
Here are the minimum system requirements:
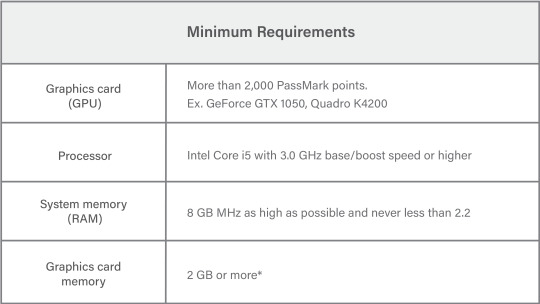
With the same Beach House example scene as earlier, the average frame rate with the minimum system requirements and a GTX 880M graphics card was significantly lower, hovering around 13 frames per second (please note that your experience may differ).
Frame rate with the minimum specifications:

Without a fast enough desktop PC or laptop, you may experience slower render speeds and a laggy frame rate in the Build Mode editor.
Additionally, with the minimum specifications, render speeds can be slower. The Beach House scene as a desktop sized image (1920 x 1080) with a GTX 880M graphics card took 26 seconds (please note that your experience may differ):
Computer specifications for this render: 1) GTX 880M graphics card, 2) i7-4700HQ @ 2.4 GHz, 3) 16 GB RAM and 4) 4 GB graphics card memory
Desktop PC and laptop recommendations
Configuring a powerful workstation to run Lumion at a reasonable price can be a daunting task. That’s why we have a few recommendations for Lumion-capable desktop PCs and laptop computers.
We’ve tried to consider value for money in these examples but we haven’t taken into consideration other criteria, such as computer certifications by other software suppliers or any considerations that your IT department might have.
More importantly, we don’t have any sponsorships from hardware manufacturers and we are not advocating one particular desktop PC or laptop over another.
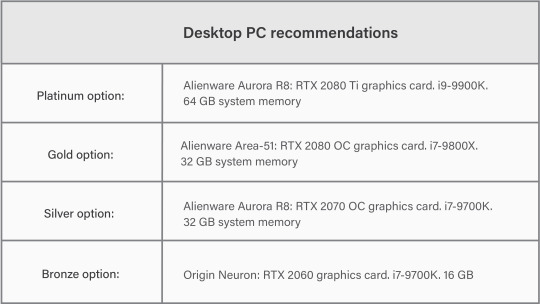
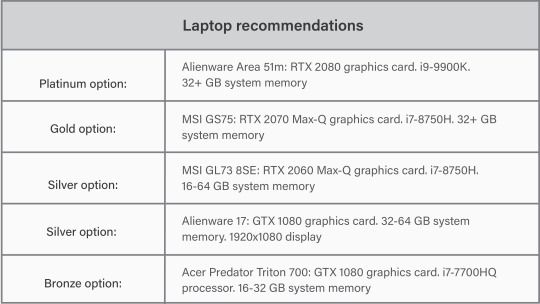
In addition to these examples, you can search for computers with similar specs. This guide to laptop recommendations can also help showcase what a Lumion-capable system may look like.
Get more hardware help
Hardware can be a complicated problem that’s not so fun to deal with. Nevertheless, there are a lot of resources available to help you get a flawless experience when running Lumion.
Here are some helpful resources on the Lumion Knowledge Base that you might be interested in:
What kind of computer does Lumion need?
Which graphics card do you need?
Why is your CPU (processor) score low in the Lumion Benchmark test?
Why is your Graphics Card Score low in the Lumion Benchmark test?
Which power supply do you need?
Don’t see your question here? Check out our system requirements section of the Knowledge Base or reach out to our expert Support Team on the Lumion Support Center.
#lumion#lumion 9#lumion support#3d rendering software#3d rendering performance#lumion tutorial#hardware#desktop#laptop#architecture#architects#rendering#3d rendering#render#best gpu#best cpu#designer#design#interior design#landscape design#interior architecture#landscape architecture#urban planning#civil engineering
2 notes
·
View notes
Text
Dewar e fort Landscape Animation walkrhrough | Architecture Graduatuion Master plan https://youtu.be/slBtxNGUjQ4
youtube
0 notes
Photo

Free Lumion 9 Tutorials https://ift.tt/2XRszXb
1 note
·
View note
Link
Lumion is software based on 3D. This software is specially made for architects. It is very easy to use. So, everybody can use it to make 3D models. Lots of 3D software knowledge does not require to use this Lumion software. It is very popular visualization software for architects.
It also can change the 3D CAD designs into videos, images and online presentation. This software also helps the professionals to add environment elements like plants, animals, objects, different effect. Lumion takes much less time for rendering. Lumion has superfast rendering.
Read more
0 notes
Video
youtube
Rendering with Lumion 11 Animated Phasing Tutorial عربي تاكد انك مشترك في القناة 💯 ومفعل الجرس عشان يوصلك كل جديد 🔔 وما تنساش تعمل لايك للفيديو 👍 شير مشاركة #BIMarabia اشترك في القناة لمتابعة الشروحات الجديدة videos https://www.youtube.com/channel/UCZYaOLTtPmOQX1fgtDFW52Q?sub_confirmation=1 بيم ارابيا https://bit.ly/1TSqEbr Places to find me! https://bit.ly/OcqQ6x https://bit.ly/2nqASDv Wordpress: https://bit.ly/SsszPw Instagram: https://bit.ly/2JY3wZP Twitter: https://twitter.com/BIMarabia November 10, 2021 at 07:03AM by BIMarabia
0 notes
Video
New tutorial is cooming soon Subscribe my channel at YouTube "Visualworks Studio" #instalike #igers #instadaily #architecture #building #architexture #design #minimal #architecturelovers #instagood #exterior #lumion #lumion9 #jasadesain #jasarender #render #3dvisual #3dmax #sketchup #d_signers #cgartistlab #cgrecord #arssketch #render_contest #cgaxis #instarender #arsitekJakarta #cluster #nesianarchitects (at Jakarta, Indonesia) https://www.instagram.com/p/CAXciNvHO0R/?igshid=12w6qryw13y1u
#instalike#igers#instadaily#architecture#building#architexture#design#minimal#architecturelovers#instagood#exterior#lumion#lumion9#jasadesain#jasarender#render#3dvisual#3dmax#sketchup#d_signers#cgartistlab#cgrecord#arssketch#render_contest#cgaxis#instarender#arsitekjakarta#cluster#nesianarchitects
2 notes
·
View notes
Text
Lumion 9.5.0.1 Pro Crack Fully Version +Torrent Free Download
Lumion 9.5.0.1 Pro Crack Fully Version +Torrent Free Download
Lumion 9.5.0.1 Pro Crack Full Setup Keygen Free Torrent 2019
Lumion 9.5.0.1 Pro Crack-это захватывающий и мощный инструмент визуализации, используемый для превращения обычных файлов Sketchup или Revit в шедевр. В основном предназначен для архитекторов первоначально созданный для архитекторов, но теперь Lumion используется тысячами в архитектуре, ландшафтной архитектуре, дизайне и инженерии.…
View On WordPress
0 notes
Text
10 amazing new video tutorials for better, faster rendering in Lumion 9 (part 1)
Learn helpful tips and tricks to quicken your rendering workflows, and pull the most power out of Lumion for heightening the beauty and effectiveness of your renders.
Whether you’re a new user or you’ve been around since Lumion 1, you can improve your rendering processes with 10 new video tutorials covering everything from importing a 3D model to animating objects. You can look at them as the A to Z of Lumion functionality. New users will be given the complete Lumion walkthrough, and existing users will undoubtedly find some new tips and tricks.
Below, you can find the 10 new tutorials available on our YouTube channel, where there are heaps of other tutorials, beautiful rendered videos and more!
Lesson 1 — Getting Started and Importing a Model
youtube
In the first video lesson, you'll learn how to navigate the new, speed-focused interface and instantly import your 3D model from your favorite modeling software.
Lesson 2 — Adding Objects
youtube
In Lumion 9 Pro, you can complete your scenes with over 5,000 objects in the content library, including trees, cars, decorations for interiors and exteriors, people and so much more! In Lesson 2, you'll learn about the content library and how it can help you quickly and effectively create full environments and interiors.
Lesson 3 — Applying and Modifying Materials
youtube
Beautiful materials have the ability to transform bland 3D models into realistic, stunning buildings and structures. In Lesson 3, you'll learn everything you need to know to effectively, and efficiently, apply and modify Lumion materials.
Lesson 4 — Creating Context
youtube
Context is crucial when communicating the intent of your designs. In Lesson 4, you'll learn how you can quickly and effectively create beautiful context around your 3D designs. From urban centers to enthralling forests, you'll be creating jaw-dropping context in no time!
Lesson 5 — Modifying the Weather
youtube
To truly capture your 3D project in its best possible light, then you need to know how to effectively modify the weather conditions in Lumion. In Lesson 5, you'll learn how to quickly change the weather in Lumion to get the ideal environment for your design.
To continue with the 10-part Lumion lessons series, including videos tutorials on images, movies, panoramas, lights and animating objects, head over to part 2.
#lumion#lumion 9#architect#architecture#design#architectural#architectural design#3d#3d render#3d rendering#tutorial#lumion tutorial#video tutorial#3d rendering software#architektura#interior design#landscape architect#urban planning#revit#sketchup#archicad#rhino3d#autocad#autodesk
10 notes
·
View notes
Text
Lumion 8.5 practice night render | learn lumion 8.5 pro tutorial
Lumion 8.5 practice night render | learn lumion 8.5 pro tutorial
Lumion 8.5 practice night render | learn lumion 8.5 pro tutorial
(more…)
View On WordPress
0 notes
Link
Lumion 8.5 Crack is a good Software for design 3d and 4d sketch with a very good graphics.It is targeted at architectural real-time visualization.
0 notes
Link
0 notes
Photo

Lumion Exterior Tutorial https://ift.tt/2YZWXey
0 notes