
Statistics
We looked inside some of the posts by lumionblog-blog and here's what we found interesting.
Average Info
Notes Per Post
30
Likes Per Post
28
Reblog Per Post
2
Reply Per Post
0
Time Between Posts
15 days
Number of Posts By Type
Text
17
Last Seen Tumblr Blogs


Fun Fact
Mobile Tumblr US users spend an average of 4.04 minutes per session on the app.
Text
See ancient Rome brought to life through SketchUp and Lumion
Prof. Matthew C. Nicholls of the University of Reading spent 10 years building a massive, beautifully detailed 3D model of ancient Rome. Now, you can explore the splendor of ancient Roman architecture like never before.
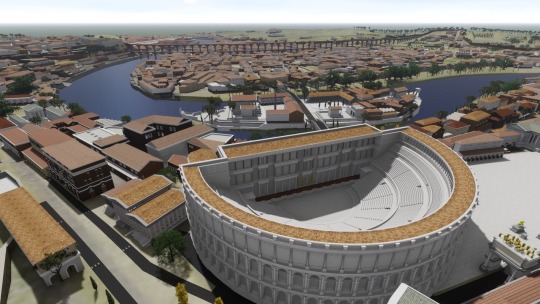
Theatre of Marcellus. Credit: Prof. Matthew Nicholls and the University of Reading.
Rome wasn’t built in a day, and neither was the 3D model of the Eternal City that was created by Matthew C. Nicholls, Professor of Classics at the University of Reading.
Constructed over the course of 10 years in SketchUp, and based on a variety of archeological, literary and other sources, the model of Rome brings students and enthusiasts to the street level of the ancient city. With rich colors, historically accurate details and the sensation of traveling through time, students are able to view ancient Rome’s incomparable architecture in a truly compelling and educational way.
youtube
The Digital Model. Credit: Prof. Matthew Nicholls and the University of Reading.
Whether for classes at the University of Reading, or for the free online course on the website Futurelearn.com, titled “Rome: A Virtual Tour of the Ancient City,” the SketchUp model and the Lumion animations and images pull students right into the heart of the city, allowing them to explore and learn from an intimate point-of-view.
“One of the goals for making this model and using it in my courses is to paint as accurate a picture as possible of the ancient city,” said Prof. Nicholls.

Digital Recreation of the Temple of Saturn. Credit: Prof. Matthew Nicholls and the University of Reading.
From the Colosseum to the Roman forum, the baths of Caracalla to the Pantheon and more, the renders of ancient Rome help students view the ancient city as it once was, full of color, texture and life.
“Rendering is like having a digital SLR camera with all the different buttons to help you get a better photograph, and Lumion is almost like turning it to auto mode and pressing “snap” and you get a nice picture. Most of the time it’s good enough. [Lumion] is such a nice workflow tool like with the sliders to control lighting and the such that you can get better results quicker. I love being in the building environment in Lumion with live navigation driven by the graphics card, and I can fly around in real-time in that.”
In this blog post, we’ll take a look at Prof. Nicholls’ renderings of Rome as it was in the 4th century AD (the model includes buildings from other time periods as well). You will also discover how 3D rendering tools like Lumion can bring ancient cities to life and serve as an integral learning tool.
Building ancient Rome from a variety of sources
Over 10 years ago, Prof. Nicholls first sat down to begin building a 3D model of Rome in SketchUp. His goal was to recreate the ancient city as it looked around approximately 315 CE and then use the model to visually support his classes and aid the educational process for his students.

Example of a building created in SketchUp – the Baths of Caracalla. Credit: Prof. Matthew Nicholls and the University of Reading.
In order to create an accurate as possible model showing even the smallest details of homes, monuments, streets and more, Prof. Nicholls relied on a number of historical sources.
“Every decision I’ve taken as I made the model is based as far as possible on historical evidence. I had to decide what date to set the model, whether to include people, the dirt and grime of the city, trees, colors, and so on,” said Prof. Nicholls.
When creating some of the most well-preserved buildings, there was a lot of historical information available and Prof. Nicholls could refer to archeological elevations, detailed reports, ancient authors who wrote about the building, ancient pictures on coins, inscriptions, reliefs, frescos and so on.
One of his favorite reference sources for the model was the Forma Urbis (203-211 CE), a fragmented marble slab that provides clues about streetscapes, texture, density, building type and building mix.
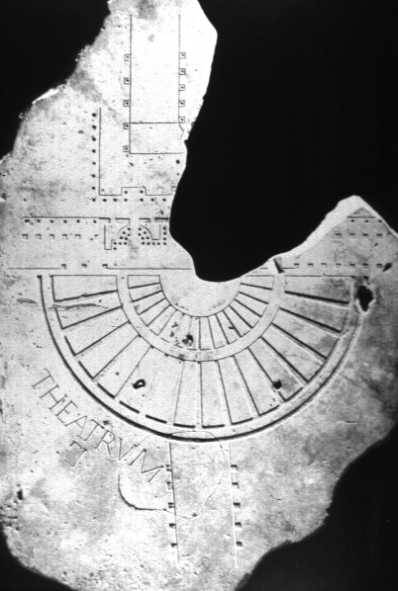
Fragment of the Forma Urbis showing the Theatrum Pompei (photo: Wikimedia Commons).
For the other buildings and the miles and miles of backstreets comprising the bulk of the city, there was little that Prof. Nicholls could use as a reference. And between these two extremes, there can be a lot of guesswork. Nevertheless, by combining all of this source material, he was able to take his findings and then turn them into the comprehensive 3D model.
If you want to learn a little more about the process of creating the model, you can refer to this talk that Prof. Nicholls gave at 3D Basecamp back in 2014.
Teaching ancient Rome with visualizations made in Lumion
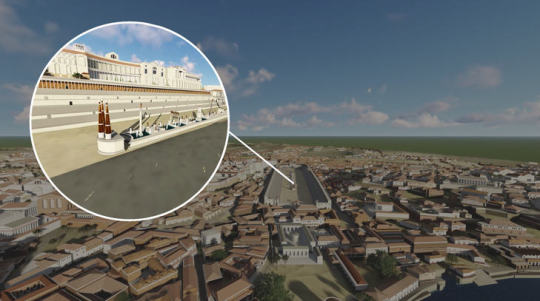
Spanning the entirety of the city, from the roads leading to and from the city to the monuments that are still standing today, the 3D model of Rome is entirely editable, flexible and navigable, and it can be shared between different programs to be used in different ways.
By letting students see and use elements of this model, they can actually discover just how vast the ancient city was. They can zoom down into the finer details of buildings, check out textures and decorations up-close, view the city from above as well as street level, and so on.

Digital reconstruction of the Cloaca Maxima’s outfall into the Tiber. Credit: Prof. Matthew Nicholls and the University of Reading.
Digital reconstruction of the Circus Maximus, with detail of the decorated spina. Credit: Prof. Matthew Nicholls and the University of Reading.
Baths of Trajan with the Colosseum in the background. Credit: Prof. Matthew Nicholls and the University of Reading.
According to Prof. Nicholls, “Nobody experiences a building in a plan view; they experience it as volumes. So with 3D reconstruction, especially with something like Lumion, you can get an almost photo-realistic rendered feeling, with the proper treatment of light, atmospherics, plants moving in the breeze, all of the rest of it. It immediately gives you a sense of what the space is like.”
youtube
“The intention of the model and renders are to give someone the insight into what life was like at that time. So Lumion is a great tool for that. I also use Kubity Go to get people on their phones and other devices to explore the model themselves...when you get into the model and explore it yourself, it adds another layer to the experience.”
Lost but never gone: Lumion as a tool for exploring the ancient world
With the help of Lumion to render the 3D model, you can use interactive, beautiful visuals to take a trip in time and discover what it was like to live in the Eternal City.
youtube
You can explore the model and learn about ancient Rome in the upcoming, free course, titled “Rome: A Virtual Tour of the Ancient City,” available on Futurelearn.com.
#lumion#lumion 9#rendering#3d#3d render#architecture#architectural#architectural design#exterior#urban planning#archilovers#architecturelovers#ancient rome#rome#roman history#civil engineering#future learn#mooc#renderlovers#modeling#sketchup#sketchup model#3d model#3d rendering#3d modeling
5 notes
·
View notes
Text
What do you do if Lumion does not respond to mouse clicks?
To achieve a smoother rendering experience in Lumion, your computer needs a fast graphics card with plenty of memory. If your rendering experience feels sluggish, then you can boost performance with these easy-to-apply tips.

Lumion is a powerful program when it comes to 3D rendering. You can work on massive scenes with hundreds of trees, people, furniture and other context for beautiful rural and urban digital representations.
You can accurately illuminate your models with accurate environmental and artificial lighting fixtures, all while producing incredible interplays of shadows and light. And you can infuse beauty and artistic appeal into your renders with a wide range of effects, including Real Skies, customizable 3D grass, reflections, Hyperlight, precipitation, Print Poster Enhancer, etc.
With the right graphics card and other system hardware, Lumion is designed to handle a great deal. If you can dream it, Lumion can render it.

Compared to a few years ago, expectations in architectural rendering have increased and many architects are modeling with an impressive level of skill, especially with regards to the amount of detail and complexity in their 3D models.
Then, after importing the heavy model into Lumion and building a scene with a large number of objects, such as thousands of trees and vast planes of customizable 3D grass, for instance, your computer may begin to struggle to display everything in real-time.

Fortunately, there are a few ways to boost real-time performance when Lumion isn’t responding to mouse clicks. In this blog article, we’ll go through a couple of techniques for quickly boosting Lumion performance.
This article first appeared on the Lumion Knowledge Base. You can find the original here.
How do you reduce the complexity of a model before importing it in Lumion?
If you try to import a model that is too detailed for your computer, it might take a long time to finish the import process.

To speed up the import process, we recommend the following steps:
Hide surfaces that are unimportant in your 3D/CAD software before importing the model in Lumion.
Export the model via LiveSync rather than via .DAE format as it is faster and requires fewer resources.
Consider splitting up the model in several parts and importing them as separate models in Lumion.
SketchUp
Skimp: This tool reduces the detail level (polygon count) of your model and includes an importer with a texture placement material remap tool.
Material Resizer: This tool checks the material texture sizes in your model and allows you to quickly resize them.
CleanUp3: This tool cleans up and optimizes your SketchUp model.
Revit
The Surface Smoothing slider lets you define the level of detail for curvy surfaces.
Setting it to the maximum value can have a serious impact on the time it takes to import the model as well as on performance and render speeds in Lumion.
For that reason, we recommend setting the slider to the lowest possible value that still ensures that curvy objects look reasonably smooth.
Rhino
Use the Density setting to reduce the smoothness of curvy models before exporting them to Lumion:
Rhino top menu -> File -> Properties -> Mesh -> Custom -> Density -> 0.0
There is more information on the following page: Rhino Mesh Settings.
3ds Max
Use the ProOptimizer modifier in 3ds Max to reduce the detail level of curvy models before exporting them to Lumion.
How do you make Lumion render faster?
Render speed will decrease if your scene is 'too complex' and if your hardware is not powerful enough and/or lacks available System Memory and Virtual Memory.

The symptoms of a 'too complex' scene are that the screen turns white and your PC becomes unresponsive while rendering.
'Too complex' refers to the following variables:
The number of different models you have added to the scene.
The 3D Points number in the top right corner of Build Mode. Click here to see how to reduce this number.
The number and resolution of textures/materials.
The Movie/Photo Effects you're using, in particular, the Sky Light and Hyperlight effects.
How many Reflection Planes you've added in the Reflection Effect.
How many Spotlights are set to Shadows: Dynamic in the scene.
How many Spotlights you have selected in the Global Illumination Effect.
How many large surfaces you have assigned 3D Grass Materials to.
How many Video Textures you have assigned to materials.
To reduce the time it takes to render a Photo or a Clip, you should try to reduce the number of all of the above. And make sure there is enough Virtual Memory.
Please also note that you can shorten render times by reducing the Output quality, the Frames per second and Output resolution.
Example: Rendering a Clip at 1280x720 pixels in 3-star quality and 25 frames per second is a lot faster than rendering the Clip at 3840x2160 pixels in 5-star quality and 60 frames per second.

Alternatively, you could consider upgrading your hardware:
Knowledge Base: What kind of computer does Lumion need?
Knowledge Base: Which graphics card do you need?
Other options for boosting Lumion performance
If you need to boost the framerate even further in Lumion’s Build Mode, please follow these instructions:
1. If you've assigned Reflection Planes to your model in the Reflection Effect, please set the Preview Quality to Low, so that the Planar Reflections are not calculated until you start rendering a Photo or Clip.

2. If you're using 3D Grass Materials, temporarily assign a different material to those surfaces.
3. If you're using Foliage (via the material settings), temporarily turn this off.

4. If you've assigned Video Textures to materials, temporarily remove them from the materials.
5. If you're using a Global Illumination Effect, make sure that the Preview Spotlight GI and shadows setting is turned off.

6. Make the Lumion window smaller and/or reduce the resolution of your monitor (the fewer pixels it needs to render, the higher the framerate).
7. Set the Editor Resolution to a lower percentage than 100% on the Settings screen.
8. Set the Editor Quality to a lower star quality on the Settings screen.
9. Turn off Enable high-quality trees on the Settings screen.
10. Turn off Enable high-quality terrain on the Settings screen.

11. Hide some of the Layers in Build Mode.
12. You might need to hold down the mouse button for a few seconds when you try to click on a button if the FPS number in the Performance Monitor in the top right corner is too low.
13. After clicking on a button, do not move the mouse cursor away.
#lumion#lumion 9#architect#architects#architecture#architectural#architecturaldesign#archilovers#architecturelovers#archdaily#architectureporn#design#interiors#interiordesign#interiorarchitecture#landscape#landscape design#landscape architecture#art#urban planning#civil engineering#render#rendering#architectural rendering#3d#3d rendering#render lovers#3d renders#revit#modeling
2 notes
·
View notes
Text
How to connect people and architecture with your Lumion 3D animations
Property advertising agency, TEN OVER MEDIA, recently won two creative advertising awards with their Lumion videos. Creative Director Mathieu Anfosso sat down with the Lumion team to discuss how he and his twin brother implement a people-first design philosophy and bring out the emotion in property animations.

It was their first animation together, and when twin brothers Remi and Mathieu Anfosso were discussing strategies for how to best show a building, they came across an interesting insight.
“Dude, they all look the same,” said Remi Anfosso, a young film director with a successful background in making videos for the film and TV industry.
“They're completely different! What are you talking about?" responded Mathieu, Creative Director of TEN OVER MEDIA.
Remi shook his head. “To everyone involved in the project, and especially the architects and clients, it may look different. But to the general public, it looks the same.”
This brief conversation between Mathieu and Remi would go on to form their ideas about communicating architecture and why so many 3D animations seem to fall flat.

Pool shot from the Carolina Pines project, by TEN OVER MEDIA.
“Emotion is really missing from 3D marketing videos,” Remi stated on the TEN OVER MEDIA website, “and it is the one thing the audience is interested in.”
From specific shots meant to incite memories to overall themes designed to immerse viewers into a story-driven, emotional world, the entire team at TEN OVER MEDIA have made it a point to put people and personal experience at the heart of architectural animations. The goal is to help audiences connect with property on a close, personal level. When the property is finally built, they hope a person will already feel at home; they hope people will already know what it feels like to enter the space.
vimeo
“Carolina Pines - There’s Room At The Pines,” by TEN OVER MEDIA.
As Mathieu explains, “That’s how we know we’ve hit the mark.”
The team at TEN OVER MEDIA has been producing animations of RV resorts, hotels, resorts, ranches and more, and just this year, the team won two 2019 Muse Creative Awards for their River Run (Platinum Award) and Carolina Pines (Silver Award) projects.

In this blog post, we sat down with Mathieu to discuss TEN OVER MEDIA’s approach to property animation, and how the brothers’ design philosophies have played a significant role in winning both clients as well as the hearts of audiences.
River Run and Carolina Pines: two award-winning videos by TEN OVER MEDIA
With Mathieu as Creative Director and Remi as the Film Director, along with the rest of their team, TEN OVER MEDIA has recently won two 2019 Muse Creative Awards for their recent videos. You can watch the videos below.
Carolina Pines, which won the silver recognition:
vimeo
You can learn more about the Carolina Pines project and see more images and animations here.
River Run, which won the platinum recognition:
vimeo
You can learn more about the River Run project and see more images and animations here.
“Design like you give a damn”
When approaching projects like Carolina Pines and River Run, Mathieu said that the entire process was built off of one company core value — “design like you give a damn.”
According to Mathieu, this is an overriding theme guiding each project from the first client meeting to the moment the videos are rendered in Lumion. “To us, average is unacceptable. Questioning the status quo, pushing boundaries and making a positive impact are part of our standard process.” This includes not only the way the team works but the impact they hope a video will have.

RVs at Carolina Pines, by TEN OVER MEDIA.
“You can produce something and be really proud of it, but it might not have the impact you were hoping for. It can raise eyebrows, it can be any kind of thing, but what’s important to us at TEN OVER MEDIA is really understanding our audience and who we’re talking to. What’s important is to put our egos aside.”
In the Carolina Pines video, for example, the team started off with a lot of material and some general concepts. Right from the start, Mathieu and Remi were discussing how they could integrate some of the concepts.
“One of the main concepts was our goal to create memories that don’t exist yet. We wanted something for everyone that's both nostalgic and fresh. We wanted the property to feel contemporary, upscale, active, charming and a getaway from the sounds of the city.”
All in all, Mathieu said, they wanted something fun to watch. One clear example of these ideas — the philosophy of “design like you give a damn” — was evident during the pool scene of the Carolina Pines video.
vimeo
Carolina Pines - Dive Into the Experience, by TEN OVER MEDIA.
“You're in the pool and it's hot out. You dive into the water, and when you get out, what are you going to do to feel refreshed? You'll go back to your lounge chair and have a sip of your drink with an ‘Ahhh’ feeling. That is what we were trying to show: dive in, sit back, relax and have a good time.”
Especially in property marketing, well-designed videos can be highly effective in showing experiences and connecting with audiences over how they will interact with a building or space. Details such as the swimming pool, the brunch, the towel over the chair and many others, these are all things that can transport a person to the property and show them the type of person they’ll be when they stay there.
And according to Mathieu, “These are the kinds of things that are going to make you remember the property in the end.”
“Keeping it real” — Translating client needs into beautiful animations
In addition to implementing emotional concepts into their Lumion animations, the team at TEN OVER MEDIA also values the idea of “keeping it real.” For Mathieu, this means being authentic to one’s self and with colleagues, clients, contractors and all of the other individuals that must come together when designing and communicating a property.

Front facade of Carolina Pines, by TEN OVER MEDIA.
“When we go on a site visit and meet with the clients,” Mathieu said. “We aim to understand not only the property and the client’s goals, but also the people and where they're coming from. From there, we can build a meaningful relationship that sometimes lasts over a few years. It's probably what we're most proud of.”
In the making of the Carolina Pines video, for instance, Mathieu and Remi flew out to South Carolina to meet with the client. At the time, Remi was on a one-year vegan diet and the client casually mentioned how her daughter was on the very same diet. From this, Mathieu found an opportunity to turn an awkward, business-like introduction into a casual conversation, and, as Mathieu said, “It unlocked something in our conversation.”
From that moment on, their interactions took on a friendly air.
“We were walking around the property, discussing these vegan diets, and all of a sudden the client started talking about life in South Carolina. She mentioned how the folks there are all about their weekend brunches. It’s all about hosting others. The setup. The typical table fabric, and all that stuff, and, you know, we saw a good opportunity to translate that into the video. Now, we have a short brunch setup and scene in the video, and that was an inspiration we got on site.”
vimeo
Carolina Pines RV Resort - A Touch of Upscale and Totally Down Home, by TEN OVER MEDIA.
It is these types of conversations that Mathieu says will have never come up in an email conversation, but it does come up on an informal or casual site visit. “The more casual a conversation becomes,” he said, “the easier it is for the client to talk openly about his/her vision.”
You can see this same idea in the River Run video. Mathieu mentioned that when the TEN OVER MEDIA team was in Colorado on the River Run site visit, the client started talking about how she wanted the video to show scenes reminiscent of Christmastime photographs that sit above a warm fireplace. “This was a huge, huge clue that helped us move the video in the right direction.
"Leave the world better than we found it”
According to Mathieu, every piece of architecture has two lives: one life in the imagination (before it’s built) and a second life in reality (after it’s built). With a philosophy of “leaving the world better than we found it,” the TEN OVER MEDIA team strives to use staging, props, setup, lighting and more to make the imagined building as real as it can be.
“And this wouldn’t be possible without Lumion,” Mathieu said. “Having my brother on board as a film director, Lumion helps build an entire world in 3D. You've seen Carolina Pines — we were able to build a scene with tens of thousands of trees, and the overview shots only show half of the project. I'll be sitting with a big screen next to my brother and we're walking the property in Lumion just like we're walking the real property, and that's when he'll get his ideas so that we can start shooting.”

Birds-eye-view of the River Run project in Colorado, by TEN OVER MEDIA.
“When we start shooting, you never know how a video clip feels until we put it into the editing draft to see if it's really working. At low resolution, exporting that shot takes one minute. We're able to try a shot, export it in a minute, put it into the editing software and check if it's working for the whole video, all in 5 minutes. That's unheard of. It's allowing us to go so much faster.”
“With Lumion, everything is possible,” he continued. “If you can do it in real life, you can do it in Lumion. And that's something we do every day. When we are shooting something with my brother as the film director, we really try to mimic the movements you would do on a movie set. So, if we're doing a crane shot, for example, we can make those crane movements and vibrations in Lumion. We're able to recreate it using all of the tools that Lumion provides. We did some green screening for Carolina Pines, and while Lumion doesn't provide green screening, there are tips and tricks within Lumion that allows you to do that.”

Porch swing at Carolina Pines, by TEN OVER MEDIA.
“If you can do it in real life, you can most likely do it Lumion, and if you can't do it in real life, you can most likely do it in Lumion.”
Thanks to Mathieu Anfosso and the entire TEN OVER MEDIA team for the interview!
#lumion#lumion 9#architect#architecture#architectural#archilovers#architecture lovers#renderlovers#rendering#3d#3d rendering#3d renders#renders#design#architectural design#interior#interiors#property#interior design#interior architecture#landscape#landscape architecture#landscape design#civil engineering#3d modeling#modeling#sketchup#revit#archicad#rhino3d
1 note
·
View note
Text
How to create 3D environmental context from drone images
With the tutorial video and our new e-book, you can learn how to combine drones, photogrammetry software and Lumion to create beautiful, realistic 3D environmental context for your designs.
youtube
When creating and rendering a 3D planned environment, there are many ways to go about it, from modeling it yourself to using features such as OpenStreetMap (OSM) in Lumion. The method you choose, however, will affect the final look and feel of the renders you’re presenting, and one method may be more suitable than another.
Using OSM directly in Lumion, for example, creates white blocks depicting actual building locations, height and volume, but the buildings don’t show any textures and are, for that reason, not very realistic looking.
When you need realistic 3D environmental context to serve as the backdrop of your design, you can combine drone footage with photogrammetry software and then render everything together right in Lumion. Whether you are capturing an infrastructure asset, a planned site location or another environment, using a drone is fast and cost-effective (especially compared to some other methods).
In a new e-book based on the video at the top of this post, we’ll guide you through this process of capturing 3D environmental context. With only a drone, photogrammetry software and Lumion, you can create fairly accurate 3D models of the environment surrounding a planned building location.
You can download the e-book PDF here.
#lumion#lumion9#lumion 9#animation#rendering#architecture#architect#architectural#archilovers#architecturelovers#renderlovers#design#interiors#exteriors#residential#interiordesign#interiorarchitecture#landscape#landscape design#landscape architecture#urban planning#civil engineering#render#3d#3drender#cgi#drones#environment#context#sketchup
0 notes
Text
Capture a cozy feeling with 150+ new objects and materials in Lumion 9.5
With the new library models and materials in Lumion 9.5, it’s now easier than ever to quickly create cozy, enthralling renders for exterior and interior designs.

Lumion 9.5 was released one week ago as a free update for all Lumion 9 and Lumion 9.3 users (including Lumion 9.0.2 and 9.3.1). In this update, you can find over 150+ new materials and models to help bring an attractive, familiar sense of nature into 3D designs. With these additions, Lumion’s ever-growing content library now contains over 5,300+ objects and 1,150+ HD materials.
For interior scenes, the new wood and brick materials and potted plants elicit a welcoming, home-sweet-home feeling. For exterior scenes, the new leafless trees, leafless shrubs, and forest objects create richly detailed, enchanting compositions.

No matter the type of scene you are creating, the new objects and materials in Lumion 9.5 can help furnish your designs with the right mood and connect with your audience on an intimate, emotional level.
In this blog post, we’ll go through the new materials and objects that you can find in Lumion 9.5 Pro. Click here for the complete release notes.
52 high-definition wood and brick materials
When it comes to infusing your designs with a feeling, whether that’s cozy, sophisticated, realistic or artful, the materials you choose will have a significant impact on how your audience interprets your design.
In Lumion 9.5, you can find 52 new materials that are perfect for re-creating a comfortable, home-like mood. Among these new materials, you can find:
16 wood floors
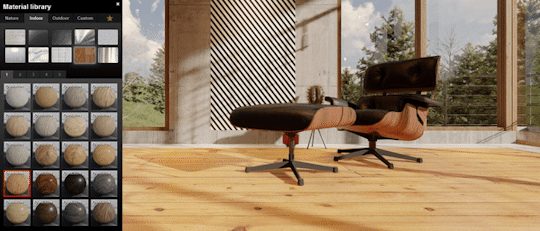
Lumion 9.5 came with a wide range of wood floor materials for interiors and exteriors, and you can find 15 of the new wood floors in the Indoor category and one of the new wood floors in the Outdoor category of the Material library.
12 bricks
Bricks are a great way to show the rugged beauty of interiors and exterior surfaces. Whether for an industrial look or something a little rustic and rural, you can find 12 new brick materials in the Material Library -> Outdoor -> Brick.
In the video below, you can explore the impact that brick materials can have on an interior.
youtube
You can find the new brick materials here:

Three kinds of fine woods
With the three new fine wood materials, available in the Indoor and Outdoor wood categories, you can capture an exotic look with gorgeous textures that draw your audience into the rendered scene.

Fine Wood 22

Fine Wood 28

Fine Wood 16
Two cabin walls
Show off the exquisite beauty of cabins and other, woodsy buildings with the two new cabin wall materials, available in the Material Library -> Outdoor -> Wood.

WallCabin 002

WallCabin004
Some of the other new materials in Lumion 9.5 that aren’t shown in this blog post include:
3 medieval wall bricks
2 steel floors
8 wood planks
4 worn wood planks
One wicker fabric
All of these materials are available in high resolution, and you can tweak them exactly to your liking with customization features such as ‘Weathering,’ ‘Glossiness,’ ‘Coloring,’ ‘Emissiveness,’ etc.
135 nature objects for interiors and exteriors
Location, location, location. The old adage continues to be as important as ever in the world of architectural rendering.
youtube
And in Lumion 9.5, the addition of 135 nature objects can help you infuse a familiar, natural feeling into your designs, tapping into a deeply rooted connection that people have with forests, trees, plants and more. Among these new objects, you can find:
14 leafless trees and shrubs (some Pro only)
Achieving that bare, wintery look requires season-specific objects. Now, with Lumion 9.5, you can create a scene reminiscent of winter with the new 14 leafless trees and shrubs.

You can find these trees and shrubs in the ‘Leafless tree’ category of the Nature object library.
96 types of forest wood (some Pro only)
Rendering an accurate, hyperrealistic forest scene takes a keen eye for the smallest of details. Now, in Lumion 9.5, you can quickly create beautiful, detail-rich forest scenes with the help of 96 new forest objects.

Example of some of the forest objects
These new objects are located in the ‘Forest wood’ category of the Nature object library, and among the 96 new objects, you can find:
Logs
Stumps
Punk woods
Twigs
And more
25 potted plants (some Pro only)
A cozy interior or exterior just wouldn’t be complete without potted plants, from larger cactuses as tall as a person, to the assortment of hanging and stand-up potted plants you’d find in any room of the house.

You can find the new potted plants in the ‘Decorations’ category of the indoor object library.

Invite nature into your designs with Lumion 9.5
The Lumion content library of materials and objects has always been a way to quickly create the environmental context necessary for communicating your designs in a complete, beautiful manner.
Now, with Lumion 9.5, you can enjoy new trees and forest objects to inject a sense of nature into your design. With new wood and brick materials, you can then create a cozy atmosphere. Discover what’s new in Lumion 9.5 with the free trial, available here: https://lumion.com/free-trial.html
If you have Lumion 9.x but you haven’t updated your version yet, you can update your license by checking the Getting Started email in your inbox. Don’t see the Getting Started email?
#lumion#lumion9#lumion 9#architecture#architect#architectural#design#architectural design#interior#interiors#interior design#interior architecture#landscape#landscape design#landscape architecture#render#renders#rendering#3d rendering#render lovers#architecture lovers#archilovers#urban planning#civil engineering#visualization#3d visualization#3d#cad#bim#sketchup
2 notes
·
View notes
Text
Lumion 9.5 is out now!
Mood and feeling are crucial elements of impactful architectural renders, and in Lumion 9.5, you can instantly and easily create a warm, cozy feeling around your design's interiors and exteriors.

Lumion 9.5 was released today as a free update for all Lumion 9.x users. It builds on Lumion’s large content library to help architects quickly visualize their designs with living, beautiful environments and richly detailed materials.
With the addition of new natural objects and materials, Lumion 9.5 helps communicate the cozy feeling of your design and its surroundings faster and easier than ever before.
Apply any of the 52 new wood and brick materials and you’ll immediately set up that warm, home-sweet-home feeling for your interiors and exteriors. You can then invite nature into your design with the 14 new leafless trees and shrubs, 96 forest wood objects (twigs, trunks, logs, punk woods, stumps, etc.) and 25 potted plants.*
With the added benefit of lightning-fast rendering, Lumion 9.5 makes it easy to connect interior and exterior spaces with a consistent mood, while helping you quickly polish the look of your renders with a breathtaking level of realism.
Availability
Lumion 9.5 is a free update for all Lumion 9.x users.
For more information on Lumion 9.5, please visit our Knowledge Base article, “Lumion 9.5: Everything you need to know.”
*Some of the new objects are only available in Lumion 9.5 Pro
#lumion#lumion9#lumion 9#3d#3d rendering#3d rendering software#architecture#architect#architectural#architecturaldesign#architectural design#architectural rendering#architexture#architektura#architectureporn#archilovers#architecturelovers#archdaily#design#interior#interiors#interior design#interior architecture#landscape#landscape design#landscape architecture#urban planning#building#modern design#natural
1 note
·
View note
Text
Just what can you really do with Lumion? Architect Paul Spaltman explains.
“Learn the rules like a pro, so you can break them like an artist.”
Earlier this year, the Lumion team along with Dutch architect Paul Spaltman spoke with over 100+ students from one of the most renowned architecture schools, TU Delft.
You can watch the entire 30-minute presentation here:
youtube
Don’t have time to watch the whole video? In this blog, you can learn some of the basics about Lumion. This includes the benefits that Lumion can offer you as an architect and the speed and ease in which Lumion can support your rendering needs at any stage of the design process.
Old-school visualization vs. modern rendering
Over the past couple of decades, the role of visualization and rendering has dramatically changed across the architectural, engineering and construction industries.
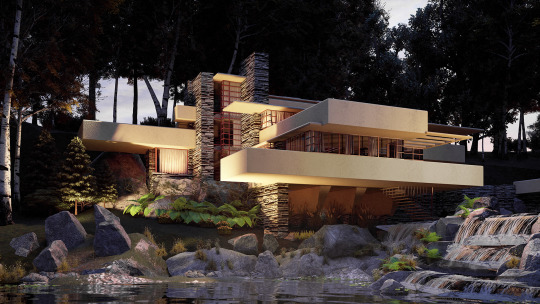
An old-school visualization is what you might expect — a hand-drawn, sketch style depiction of a building. The following sketch of “Fallingwater” by Frank Lloyd Wright is a great example of this type of visualization:

While this is a beautiful drawing and a nice way to present the building, the old-school visualizations were mainly used as the end result of the design process. They weren’t typically involved in processes such as design studies or for interactivity (changing materials on-the-fly to see what looks best, e.g.)
Nevertheless, many architects still use hand-sketching as an important tool for better understanding the design, communicating design ideas and so on.

Many architects will sketch their design ideas and use these sketches for various purposes. Above, you can find a few sketches by Paul Spaltman.
One issue with hand sketching, however, is that it’s often slow and not flexible enough for specialized needs. With a 3D rendering program like Lumion, architects and visualization experts can immediately produce images, videos and VR-ready panoramas for a multitude of visualization needs.
Below is a video clip showing that role rendering has played for Paul Spaltman’s practice. In this clip, Spaltman describes the rapid evolution from old-school visualization to the array of BIM and other applications available today.
youtube
What you can do with Lumion
For Paul Spaltman and his architecture practice, the Lumion workflow looked something like this:

As shown in the image above, Spaltman uses Rhino along with the Grasshopper plugin for the design phase. When moving from the design phase to the construction phase, he uses ArchiCAD and Lumion for a number of applications, such as:
Artist impressions
Sketching
Urban design (with OSM)
Sun studies
360 panorama VR
Digital nature scenes
Materials and colors
Design variations
Movies
In addition to opening up new applications, 3D rendering with Lumion can help you quicken the pace of your modeling and rendering workflows. For example, you can move from here…

...to this render in only 2 hours.

Below, we’ll go through some applications you can achieve in Lumion.
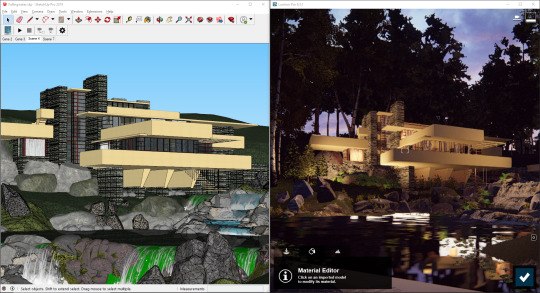
LiveSync
Need to make changes to the model, see different design variations, or simply check out the materials? Through features such as LiveSync, you can make changes to your model on-the-fly and see them visualized immediately in Lumion.

You can listen to a brief explanation of how LiveSync works in the following clip:
youtube
Urban planning & town design
For urban planning and town design, you can use features like OSM to quickly build urban or rural context. Another option is to stitch together images from a drone with photogrammetry software.

No matter how you want to create urban context, Lumion provides several options so that you can surround designs with realistic objects, captivating lighting, and more.
Lighting
With advanced lighting and shadow technologies such as Sky Light 2 and Real Skies, Lumion can also be an instrumental tool when showing and discussing the project’s lighting.

Within seconds, you can change the environmental lighting as well as artificial lights to help you understand the complete lighting profile of your designs, from the soft, golden hues of daybreak to the pitch black of night.
Street views
If you’re in the early stages of the design process and you want to see what your design will look like from the eyes of a bystander, you can use Lumion to get a fairly accurate idea of the street view with realistic lighting, context and mood.

Materials and textures
Visualizing materials in a beautiful, high-quality way is essential for many types of projects. By using Lumion for presenting or evaluating materials, you can easily get a feeling for the impact your material choices will have.

Additionally, because of the range of high-quality materials available in Lumion’s large content library, you can easily show an exact representation of your design without having to endure the frustration of hunting for or making your own materials.
Shared dreams
In the following video clip, Paul Spaltman discusses some projects he has done with local communities in Suriname. You can read more about the Suriname project in this article published by ArchDaily.
youtube
Digital nature
One other benefit of Lumion is its ability to easily and quickly render digitized nature scenes in a beautiful, captivating way. Here are a few examples from the presentation:


Design research
Lumion is not only suitable for presentations. It can also be an extremely helpful tool for design research, such as when you need to check out certain parts of your building, see how the lighting interacts with the spaces, explore the views that future inhabitants will have from balconies, etc.

Styles for every phase of the architectural and design process
There are a lot of options to create different styles in Lumion. For instance, when you’re early in the design phase and you don’t want to talk about materials or colors, you can use a sketch or another artistic style to keep the conversation focused.

Later in the process, you can instantly switch to a more detailed style by using some of the Styles presets in Lumion.
360 panoramas and VR
You can also use Lumion for VR with devices such as the Oculus Go and most other VR headsets.

And the best part — making a 360 panorama requires only a few clicks and about a minute of rendering time.
The Lumion workflow
In this section, Paul Spaltman shows an example of a Lumion workflow, from importing the 3D model to adding the final effects and rendering.
The video clip below is about 10 minutes:
youtube
Creativity, not technology
The architecture and design industry has changed significantly in the past few decades, and new technologies and rendering techniques are spearheading this change.
By including Lumion as the go-to 3D rendering tool, architects and designers can take advantage of multi-purpose, easy-to-use visualization technology that serves to empower creativity, not stifle it.
And that’s just what Lumion sets out to do.
#lumion#lumion9#lumion 9#architect#architecture#architectural#architecturaldesign#architectural design#archilovers#architecturelovers#architexture#design#interior#interiors#interiordesign#interiorarchitecture#landscape#landscapedesign#landscape architecture#BIM#Construction#VR#3D#render#rendering#3D rendering#architecture rendering#visualization#digital art
1 note
·
View note
Text
How to optimize your 3D model for faster Lumion performance
Want to speed up your Lumion performance? Follow these helpful, 3D model optimization tips to reduce the size of your models and improve your real-time rendering experience in Lumion.
Imagine you created an incredibly detailed 3D model of your latest design. The model includes complex, intricate details such as beautiful, carefully selected nature objects and highly realistic materials and textures.
These details have made the model quite heavy and, while Lumion is certainly capable of handling large models with ease, sometimes the model can become so huge that it ends up slowing down the performance in Lumion’s real-time editor.
So, what can you do to reduce the model size and improve your Lumion experience?
When exporting your model from your 3D modeling software, such as SketchUp (above left), reducing its complexity may improve performance in Lumion.
One possibility is to optimize your 3D model by implementing efficient modeling techniques or reducing the model’s polygon count, all without negatively impacting the visual quality of your model.
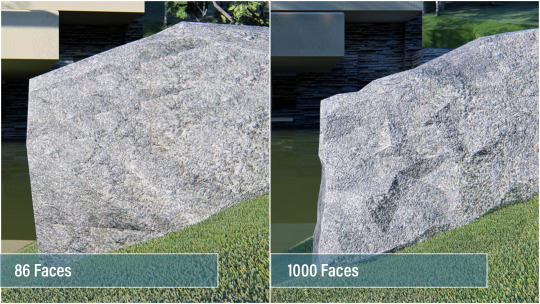
Low-polygon model on the left, high-polygon model on the right. It’s pretty easy to spot the difference in quality.
In this blog post, we’ll take you through a crash course on 3D model optimization and how you can reduce the size of your 3D models for faster performance in Lumion. Please note that this article focuses on SketchUp, Revit and ArchiCAD models, though some of the tips you’ll learn here can apply to your modeling software.
What are polygons in 3D objects?
All 3D objects, also known as 3D models, are built up of polygons. These are triangular surfaces with three points (also known as vertices or 3D points), and in every 3D object, these polygons contain certain information associated with it, such as the texture, light and shadow mapping, and more.

Polygons in a detailed rock model (SketchUp).
Typically, 3D objects with a higher polygon count will look better (extrusions, beveled edges, chamfer edges, etc), but these high-detail models will demand more performance from your computer. Furthermore, inefficient 3D object building can lead to huge polygon counts for a little improvement in detail. For instance, one tree can include 2,000 polygons while another, similar-looking tree can contain over 20,000 polygons (if it is inefficiently built). If these trees are just background items, then you may be creating a very heavy scene in Lumion, unnecessarily.
Here is an example of how polygons are used in 3D objects, and how they can vary widely:
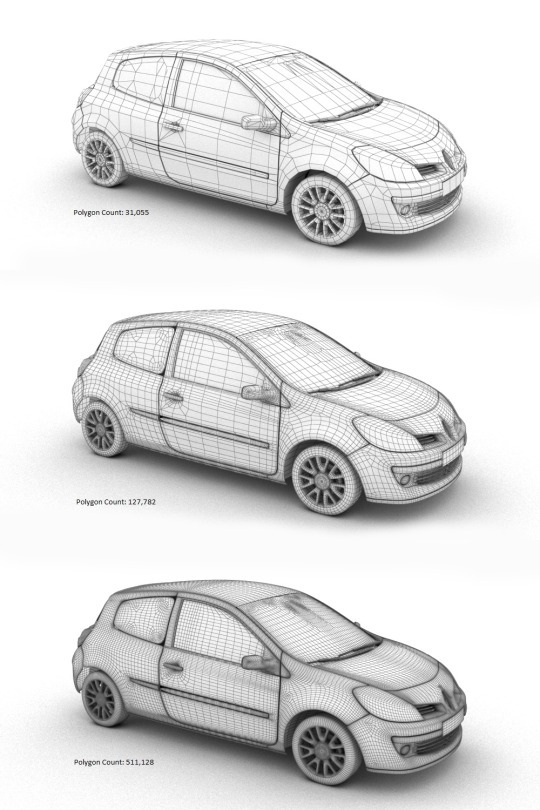
Above: The same object with three different polygon counts.
When all is said and done, the trick when optimizing a 3D model is to reduce polygon count without impacting the overall look and accuracy of the model. You should try to reach a middle ground, balancing the quality of your model and its size.
Lumion Tip: Improve real-time performance by putting models into layers
One tip to quickly improve your Lumion performance is to import your models separately and assign them to layers in Lumion.
For instance, instead of importing the entire model from SketchUp (with furniture, curtains and other objects), you can import the building structure and rock objects separately and assign them to layers in Lumion’s editor.

Adding the imported terrain increased the size of the Lumion scene from 17.1 million 3D points to 23.5 million 3D points.
By putting these models into layers, you can control when they appear in the editor. That way, if you’re only working on the building, you can temporarily hide the layer with the terrain so that you can have better performance when working on the building. In the GIF above, you can see an increase in the model size (and the performance requirements of your hardware) when turning on the layer containing the imported objects and terrain.
How to optimize your 3D model in SketchUp
When importing very large (more than 20 MB) models from external 3D CAD software, SketchUp recommends that you run the model through a poly reducer. Within SketchUp, there are different types of plugins and third-party software to reduce a model’s polygon count. One extension that comes with an array of useful organic modeling tools, including a polygon reducer, is the Artisan extension for SketchUp.
With the Artisan plugin ($39 for a permanent, single-seat license), you can take advantage of multiple tools that allow you to subdivide and smooth your model, paint, adjust vertices, and reduce polygons.

In this GIF, you can see the Artisan “Reduce Polygon” tool in action. Click the tool and you can choose the percentage of polygon reduction, from 10% to 90%.
Another plugin that came as a suggestion from SketchUp is Skimp, a SketchUp polygon reducer ($65 per year for a standard license). By downloading and installing Skimp, you can easily reduce the number of faces and polygons in your model while maintaining the visual appearance.

Some other SketchUp model optimization tips include:
Use simple textures
Texture size can have a significant impact on the size of your Lumion model. For instance, in a recent test, we found that a 16K by 16K texture increased the Lumion model file by 1 GB.
Hide geometry
Hide geometry that you don’t need and control the visibility of the geometry with layers. Whether you use layers in SketchUp or Lumion, make sure to use them effectively for improved performance.

Additionally, another tip is to use normal maps or bump maps to create the illusion of 3D geometry with the added benefit of reducing the poly count of the 3D model. You can watch a video about this topic by Mike Brightman here.
How to optimize your 3D model in Revit
Within Revit, there are several helpful resources about reducing polygon count and optimizing your 3D model before exporting it for rendering in Lumion. For instance, in the guide titled, “About Limiting Model Geometry Before Exporting,” the author discusses how you can reduce the amount of model geometry and its underlying data.
To limit the model geometry before exporting, there are three ways to go about it, including:
Managing the visibility of views
Turn off the visibility of graphics and for categories of elements in the view. This can mean turning off interior elements of a building or the surrounding landscape topography, for instance.
Exporting section boxes
By using the section box tool for the 3D view, you can tell Revit to only export items within the section box. This can be particularly helpful for large models.
Specifying the detail level of your model with LiveSync
Another way to influence the model’s geometry is through the Lumion LiveSync for Revit plugin. Instead of setting up a live connection, you can use LiveSync to determine the level of detail in your model before exporting it as a Collada (.DAE) file.
By clicking on “Export” button in the LiveSync Add-In, you will see an “Export to Lumion” box with options such as “Insertion Point,” “Surface Smoothing” and a few others.
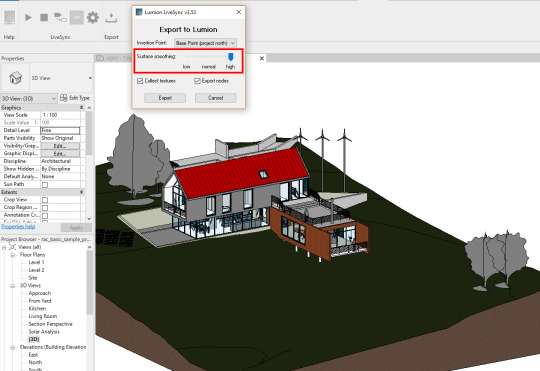
LiveSync’s “Export” and “Surface Smoothing” feature lets you determine the amount of detail in the exported model.
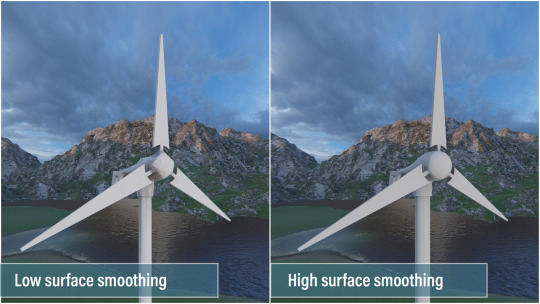
The “Surface smoothing” slider determines the complexity of your model as well as the look of curved surfaces. Low surface smoothing, for instance, results in a lighter, less complex model; high surface smoothing results in a heavier, more complex model. You can see the results in the image below:
How to optimize your 3D model in ArchiCAD
So far, we’ve discussed model optimization tips for SketchUp and Revit. The next and final modeling software we’ll look at in this post is ArchiCAD.
As a rule-of-thumb, you’ll want to limit the amount of 3D geometry in your ArchiCAD design by following these four tips:
Use Lumion trees as opposed to ArchiCAD trees
Use Lumion objects as opposed to imported objects
Try to not multiply layouts. Multiplying one layout with different variations can result in a massive, high-poly model.
Avoid the Morph Smoothing function, if possible.
To see how many polygons are in your ArchiCAD model, you can download the Polygon Counting Tool add-on. The Polygon Counting Tool can help you control the number of 3D polygons in your model and it can also display the number of 3D polygons grouped by element types (walls, slabs, doors, windows, objects, etc.).

Polygon Counter Tool. Source: helpcenter.graphisoft.com
After downloading and installing this add-on, you can change the level of detail (LOD) of certain library parts in the project. The different LOD options include detailed, simple, custom and off.
One final tip with ArchiCAD model optimization involves placing grass on a large Mesh. By using smaller meshes, or cutting a large mesh into smaller meshes, you can improve performance in Lumion.
Expand possibilities with faster, stress-free Lumion performance
No matter the 3D modeling software that you use, there are always some tricks you can use to optimize the size of your model for better performance in Lumion.

And as always, it’s important to make sure that you have the right hardware for the best experience in Lumion. You can read our 101 hardware guide here.
#lumion#lumion 9#architect#architecture#architectural#architectural design#architects#archilovers#architecture lovers#design#interior#interior design#interior architecture#landscape#landscape design#landscape architecture#urban planning#civil engineering#rendering#render#3d rendering#3d#renders#modeling#3d model#model optimization#fallingwater#frank lloyd wright#revit#sketchup
1 note
·
View note
Text
5 weeks to deadline with the help of Lumion
Architect Hilbrand Wanders from the Rotterdam-based architecture firm, Studio AAAN, discusses how they recently won a design competition and how Lumion helped them do it.

The Wantijhof Dordrecht development, designed by Studio AAAN.
In late 2018, Dutch architect Hilbrand Wanders and his colleagues at the Rotterdam-based Studio AAAN were invited to participate in a design competition for a 36-apartment city block in the city of Dordrecht, The Netherlands.
The catch — the four-person team had only five weeks to submit a proposal outlining their designs in a clear, compelling manner.
With such a tight deadline ahead of them, the architects at Studio AAAN applied multiple techniques to quickly communicate with one another, their client and the other relevant parties. Earlier in the design process, they were able to discuss and evaluate the designs in real-time via hand sketching, while in the final week, they created beautiful 3D renders made in Lumion focusing on a more pragmatic vision of the design’s form, materials, context, feeling and more.

The Wantijhof Dordrecht project shows a contemporary building block designed with historic Dordrecht features and a modern twist.
“With the help of programs such as SketchUp and Lumion,” said Wanders, “We were able to expose and solve crucial design problems, make decisions and present the winning competition entry.”
In this blog post, we’ll take a look at the Wantijhof Dordrecht project and explore how hand sketching, 3D modeling with SketchUp and rendering with Lumion can be essential tools in the architect’s toolbox for quick, effective communications.
Overview of the Wantijhof Dordrecht project
In cooperation with the Nederlandse Bouw Unie (NBU), the Wantijhof Dordrecht competition called on several architects to provide designs for a vacant plot along the waterside of Dordrecht, a beautiful city with an 800-year history in the south of the Netherlands. The brief included 36 housing units, a parking garage and several commercial units. The designs also needed to show attractive spaces for semi-public green inner courts and to create a delicate balance between a large-scale waterside project with a small-scale, urban low-rise structure.
One of the challenges of this project, according to Wanders, was deciding how and where to design the parking structure while maintaining the integrity of the lush, green inner courts.

Keeping the green interior from becoming the building’s parking lot was a challenge that Studio AAAN was faced with solving.
To solve this, the architects designed the parking lot under a raised deck around the garden, hiding it from public view. The end result was a series of lively, well-designed facades supporting pleasant views from the apartments.
From initial sketches to 3D renders in five weeks
Because Wanders and the architects at Studio AAAN were invited to submit a proposal at a fairly late stage of the competition, they had only five weeks to go from ideation to a full, comprehensive proposal complete with plans, sections, renders and more.
The competition was broken down into two phases:
- Phase 1 (one week after the invitation) - Phase 2 (five weeks after the invitation)
With the Phase 1 deadline only a week away after they were invited to join the competition, Studio AAAN got to work right away making hand-drawn plans and sections.

Early sketch of the Wantijhof Dordrecht project.
Studio AAAN passed this first stage of the competition (along with five other firms) with some hand-drawn concept designs, but there were still some significant problems with the design that needed to be addressed. The next step was to create a 3D model in SketchUp to better measure surfaces and to test the building volume.
“If we had more time, we would have made maquettes,” Wanders said, “Instead, we decided to test the building’s volume in SketchUp. Developing the floor plans and sections was ongoing, with the goal of getting the building to function as a machine.”

SketchUp model of the Wantijhof Dordrecht project.
While this work was being produced through SketchUp, the 3D views and elevation plans were sketched by hand in order to get really quick results and to discuss the plans with the client.
With only one week away from the Phase 2 deadline, and with Lumion available to him at this point, Wanders was able to set up the scene and create images in Lumion.

The Lumion renders were used in the final week before the competition deadline, showing different views of the building and how local residents can interact with the spaces.
In the end, the architects at Studio AAAN created several exterior renders. These images, quickly produced, were used both as part of the competition entry (they won!) as well as on the website to market the project and start looking for buyers.
How 3D rendering with Lumion can support design development and client communications
3D rendering with Lumion can be instrumental in providing architects with an in-depth, immersive view of their project’s form, materials, feeling etc, and it can also support powerful external communications, such as with clients and other audiences.
For Studio AAAN and the Wantijhof Dordrecht project, seeing the project materialized in Lumion helped with a decision to introduce the right materials and colors for the project.

Additionally, by using Lumion in combination with SketchUp, the architects at Studio AAAN were able to rapidly put together a compelling design proposal showing multiple views of the project with a focus on context, light, materials and more.
Create and communicate with Lumion
The Wantijhof Dordrecht project was Studio AAAN’s and Hilbrand Wanders first time using Lumion, and while Wanders explained that he felt like a beginner, he was nevertheless able to quickly import materials, tweak them and set up a detail-rich scene.
“I love Lumion because it makes 3D rendering a part of the architect’s toolbox, and not a service provided by an external party,” Wanders said.
Whether you’re facing a short deadline or you need a powerful visualization tool to help you step into your project and feel the space, Lumion helps you get the job done better, faster and easier. To try Lumion for yourself, you can register for the free, 14-day trial at Lumion.com/free-trial.html.
#lumion#lumion9#architect#architecture#architectural#architecturaldesign#archilovers#architecturelovers#renderlovers#archdaily#design#buildingdesign#residential design#home#apartment#render#3d#3d rendering#sketchup#modeling#hand sketch#landscape#landscape design#landscape architecture#urban planning
2 notes
·
View notes
Text
Building a sense of place: objects in Lumion 9
In Lumion 9 Pro, there are 634 new HD objects* available to help you quickly create compelling renders that simulate reality. You can find hundreds of new interior objects as well as nature objects, vehicles and people, among others.

Whether designing a building, an interior or a landscape, many architectural projects are intricately connected to their surroundings. Detailed environments and lifelike scenes can help viewers make sense of your design and experience it in a much more personal way.
Some renders, for instance, often need to communicate the real-life location where a building is planned to be built, while other renders demonstrate a vision of what a room might feel like for the people who will live there.

When creating scenes in Lumion and showing what your project will look like after it’s built, you can save time and energy by using the large content library of beautiful, high-resolution 3D objects available right in Lumion. And the best part is that adding these objects to your scene is virtually instantaneous. Simply search for the object in the content library and place it in your scene.
In Lumion 9 Pro, you can find 634 new HD objects for interiors, exteriors, landscapes, urban scenes and more. These include:
459 indoor objects ranging from high-quality kitchen appliances to seating, desks, storage items and other home furnishings.
91 new trees, plants and rocks from around the globe, including variations in shape and size.
30 new, high-quality animated 3D people, including men, women, elderly people, bicyclists and more.
10 new vehicle models, including HD cars, sports cars and SUVs
And several others
With these new objects, the total amount of objects in the Lumion 9 Pro content library is 5,259. Continue reading below for a detailed overview of some of these objects.
459 new interior objects in Lumion 9 Pro
While Lumion 9 Pro came with a slew of new objects for all types of scenes, the majority of new objects are specifically for interiors.

Whether you’re rendering new kitchen designs or you just need to make a living room look “occupied” when communicating a private new build to a client, the new interior objects can help you create a beautiful interior down to the very last detail.
Even for exterior renders, such as an apartment building with a lot of windows, you can quickly fill in the interiors to heighten the lived-in feeling of a building.
Kitchens
Creating a modern, sophisticated kitchen has never been easier. Lumion 9 Pro made a point to give users almost all of the objects they would need to quickly and effectively build realistic kitchens.
For this reason, there are almost 150 new kitchen-related items for you to add to your scenes, including HD cabinets, refrigerators and more.

You can demonstrate various cooking surfaces, cooker hoods and cooktops...

...and you can even set the table with these nice new food items and other accessories.

In addition to all of the wonderful new kitchen items, you can benefit from a wide selection of other interior objects, including:
Decorations

Seating

Couches

Tables

Lighting

91 new nature objects in Lumion 9 Pro
The environment around a building can have a huge impact on its look and feel. In some cases, you have to be precise when rendering the trees, plants, rocks and other nature and environmental objects. From some projects, you may simply need a suggestive environment to give the audience an idea about the design’s surroundings.
In Lumion 9 Pro, you can find 91 new nature objects, including trees, plants, rocks and more.
Some of the plants that you can find include:
Rosaceae (Roses)

Agave americana (American aloe), Sansevieria trifasciata (Snake Plant/Mother-In-Law's Tongue), Monstera deliciosa (Swiss Cheese Plant)

Verbena bonariensis (Purpletop vervain), Iberis sempervirens (Evergreen Candytuft), Ajuga reptans (Common Bugle)

Some of the trees that you can find include:
Cordyline australis (Cabbage tree)

Archontophoenix alexandrae (Alexandra Palm)

Fraxinus excelsior (European Ash)

Acer campestre (Field Maple)

Washingtonia robusta (Mexican fan palm)

For more information on the plants and trees in Lumion 9 Pro, visit the post on the Lumion Support Center.
30 new animated people in Lumion 9 Pro
Adding 3D people to your renders can help audiences step into your project and view the spaces from a very personal perspective. All of a sudden, you can provide insights into how the spaces might be used or how a building or home will interact with a local community, and it becomes much easier for audiences to grasp onto these high-level concepts with 3D people that they can vicariously inhabit.
Among the 30 new animated people, you can find men and women performing different activities, such as riding a bicycle…

...talking on the phone…

...or simply idling about.

10 new HD transport objects in Lumion 9 Pro
Cars, cars and more cars! Lumion does a superb job at rendering vehicles, and in Lumion 9 Pro, you can take advantage of 10 awesomely beautiful HD vehicles, from alluring sports cars to family-friendly SUVs.

This render above shows four of the new vehicles, including the SUV HD 002 (red), SportsCar HD 005 (white), SUV HD 005 (light blue) and Car HD 009 (blue).
Quickly breathe life into your renders with the extensive content library
Whether you need to show an exact representation of your project or you need to give audiences a window to see the real-life possibility of your design, filling up your scenes with beautiful 3D objects is quick and easy.
*Lumion 9 Pro comes with 634 new objects; Lumion 9 comes with 190 new objects.
#lumion#lumion9#architect#architecture#architectural#archilovers#architexture#design#interiorarchitecture#landscapearchitecture#interior design#landscape design#3d model#3d render#rendering#3drendering#3drenderingsoftware#urban planning#civil engineering#kitchen#bedroom#living room#residential#commercial#residential design
0 notes
Text
Lumion Hardware 101: Minimum and recommended requirements for faster 3D rendering performance
In this guide, you can compare your desktop PC or laptop hardware with Lumion’s system requirements, and discover how you can significantly improve your experience.
Lumion is a powerful 3D rendering program that creates detail-rich and realistic visuals of your designs, but in order to get the best performance out of Lumion, you are going to need a fast desktop PC or laptop with a powerful graphics card.
A fast Lumion experience depends heavily on the graphics card (GPU). You will also need a fast processor (CPU) and a lot of computer memory (RAM) and graphics card memory.
Wondering what that means in practice? In this guide, we’ll break down Lumion’s system requirements for optimal 3D performance in three parts:
Check your desktop PC or laptop and see what hardware you currently have
Find out how well Lumion will perform on your current hardware
Explore options to troubleshoot problems and upgrade your hardware
With the aim of providing relevant information for your specific issue or question, we’ve also provided several links at the end of this guide, including a breakdown of the graphics cards and CPUs you may need, what to do if you get a low score in the Lumion benchmark, and how to choose a power supply.
We invite users with hardware issues to check out the Knowledge Base or reach out to us on the Lumion Support Center as performance depends on numerous factors outside Lumion’s control, and we cannot guarantee that a certain hardware setup will always provide expected performance.
Check your PC for Lumion performance
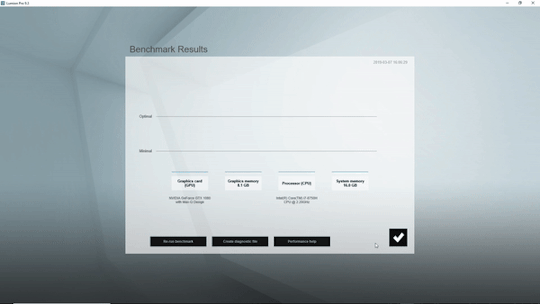
The most accurate method for checking the Lumion performance requirements of your hardware is to use the in-program benchmark.
With the benchmark, you can check the four main components that have the most impact on Lumion performance. These include the graphics card (GPU), the processor (CPU), system memory (RAM) and graphics card memory.
Current Lumion users can run the Benchmark from Lumion’s start screen:

Lumion’s benchmark tool takes a snapshot of your GPU and CPU speed and shows your computer’s maximum system memory (RAM) and graphics card memory.
Not a Lumion user yet? You can test your computer (and test Lumion 9.3) by downloading the free, 14-day trial.
Find out if your desktop PC or laptop is fast enough
Once you know the hardware in your computer, the next step is to see how it compares to Lumion’s minimum or recommended system requirements.
Recommended system requirements
For the best performance running Lumion, we recommend a computer with the following specifications:
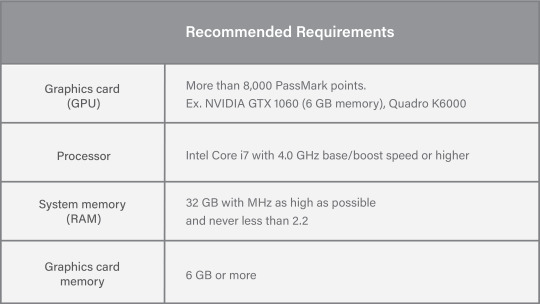
If your hardware meets or exceeds these requirements, you should have a smooth experience when working on large scenes in Lumion’s Build Mode. In the Build Mode, you can check the size of the scene and the frame rate of your computer in the upper-right-hand area of your screen.
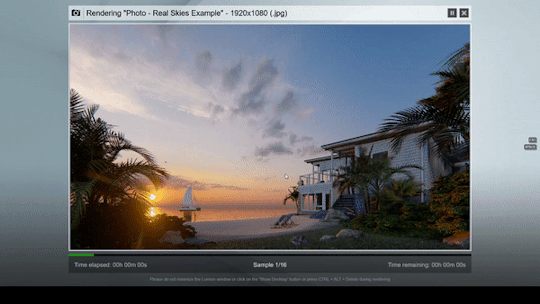
For instance, when moving around the Beach House example scene with a GTX 980 TI graphics card, the frame rate hovered around 18 frames per second (please note that your experience may differ).
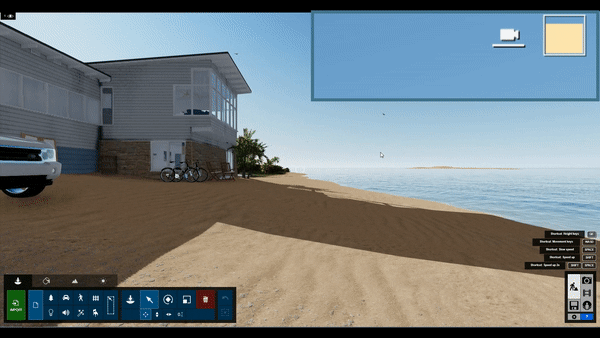
With the recommended system requirements, moving around in the scene is fast, smooth and enjoyable.
Additionally, faster hardware allows for a faster rendering time in Lumion. With the recommended system requirements and a GTX 980 TI graphics card, rendering the Beach House scene as a desktop sized image (1920 x 1080) took 19 seconds (please note that your experience may differ).
Render speed with the recommended specifications:
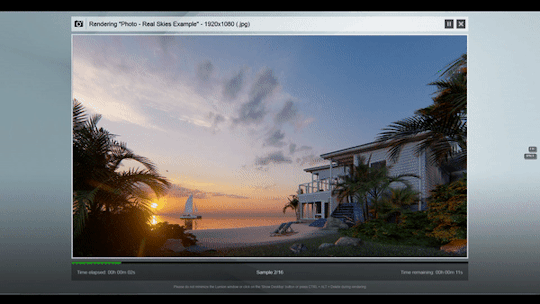
Computer specifications for this render: 1) GTX 980 TI graphics card, 2) i7-6700K processor @ 4.00 GHz, 3) 32 GB RAM and 4) 6 GB of graphics card memory.
Minimum system requirements
You can run Lumion with the minimum system requirements, and anything you do to increase hardware performance toward the recommended requirements will improve your Lumion experience.
If your setup meets only the minimum, you may see some performance issues. This is especially true when working on large and detailed scenes, such as massive urban or rural scenes, 4K videos, and large surfaces featuring the customizable 3D grass or furry materials.
Here are the minimum system requirements:
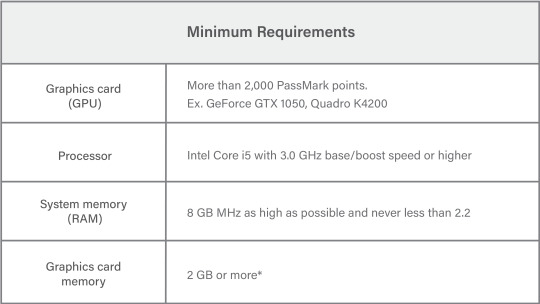
With the same Beach House example scene as earlier, the average frame rate with the minimum system requirements and a GTX 880M graphics card was significantly lower, hovering around 13 frames per second (please note that your experience may differ).
Frame rate with the minimum specifications:

Without a fast enough desktop PC or laptop, you may experience slower render speeds and a laggy frame rate in the Build Mode editor.
Additionally, with the minimum specifications, render speeds can be slower. The Beach House scene as a desktop sized image (1920 x 1080) with a GTX 880M graphics card took 26 seconds (please note that your experience may differ):
Computer specifications for this render: 1) GTX 880M graphics card, 2) i7-4700HQ @ 2.4 GHz, 3) 16 GB RAM and 4) 4 GB graphics card memory
Desktop PC and laptop recommendations
Configuring a powerful workstation to run Lumion at a reasonable price can be a daunting task. That’s why we have a few recommendations for Lumion-capable desktop PCs and laptop computers.
We’ve tried to consider value for money in these examples but we haven’t taken into consideration other criteria, such as computer certifications by other software suppliers or any considerations that your IT department might have.
More importantly, we don’t have any sponsorships from hardware manufacturers and we are not advocating one particular desktop PC or laptop over another.
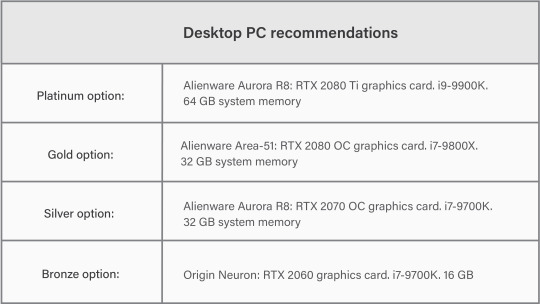
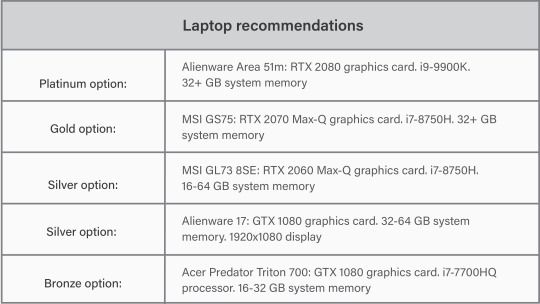
In addition to these examples, you can search for computers with similar specs. This guide to laptop recommendations can also help showcase what a Lumion-capable system may look like.
Get more hardware help
Hardware can be a complicated problem that’s not so fun to deal with. Nevertheless, there are a lot of resources available to help you get a flawless experience when running Lumion.
Here are some helpful resources on the Lumion Knowledge Base that you might be interested in:
What kind of computer does Lumion need?
Which graphics card do you need?
Why is your CPU (processor) score low in the Lumion Benchmark test?
Why is your Graphics Card Score low in the Lumion Benchmark test?
Which power supply do you need?
Don’t see your question here? Check out our system requirements section of the Knowledge Base or reach out to our expert Support Team on the Lumion Support Center.
#lumion#lumion 9#lumion support#3d rendering software#3d rendering performance#lumion tutorial#hardware#desktop#laptop#architecture#architects#rendering#3d rendering#render#best gpu#best cpu#designer#design#interior design#landscape design#interior architecture#landscape architecture#urban planning#civil engineering
2 notes
·
View notes
Text
LiveSync your Vectorworks model in Lumion 9.3
With the new LiveSync for Vectorworks plugin, you can immediately create beautiful, impactful experiences from your 3D models.

Lumion 9.3 was released last Monday as a free upgrade for Lumion 9 users, and it included a batch of exciting new features to help architects create an impactful, sensorial experience in their 3D designs.
Also new in Lumion 9.3 was LiveSync for Vectorworks, a plugin that enables a live, real-time synchronization with Vectorworks 2019 SP3.
With only a click, you can synchronize your Vectorworks 3D model with Lumion and begin dressing the model with elegant materials and objects from Lumion’s extensive content library. Instantly, you’ll get a feeling for what your model will look like in its real-life setting, whether that’s in the center of an urban metropolis or a picturesque rural environment.

Example of a LiveSync workflow
Keep reading below to learn about the Lumion LiveSync for Vectorworks plugin, but if you’re looking for information about Lumion 9.3, check out our article on the Knowledge Base: Lumion 9.3: Everything you need to know.
How to download and install LiveSync for Vectorworks
Before you start LiveSyncing all willy-nilly, the first step is to make sure you have the compatible software: Lumion 9.3 (or newer versions*) and Vectorworks 2019 SP3 (or newer versions).
Lumion 9 users can upgrade to Lumion 9.3 for free. If you are a Lumion 9 user, then you should've received the Getting Started email with a download link. Click here if you haven’t received that email.
With the right software, you can begin downloading and installing the LiveSync for Vectorworks plugin. Watch the tutorial below for a complete overview of this process:
youtube
Download the LiveSync for Vectorworks plugin here.
Automatic model import
Now that you’ve successfully installed the LiveSync plugin, you can begin simultaneously modeling and rendering, all while seeing your live Vectorworks model in Lumion’s compelling scene editor.

When you hit the “play” button on the LiveSync plugin, Lumion automatically imports your Vectorworks model. Continue working on and modifying your project even after you turn off LiveSync, and easily save the Lumion file for future rendering or development.
See your building while you build it
One of the main advantages of LiveSync for Vectorworks is its ability to immediately visualize changes to your Vectorworks model’s form and shape. Modify the shape of your model and you’ll see these changes taking place, in real-time, in Lumion’s breathtaking, expressive environment.

As you continue modeling in Vectorworks, you can simultaneously view your project in Lumion surrounded by an immersive, fully featured landscape (mountains, water, grass). This can be especially helpful when you want to see how changes to the design affect elements such as light and shadow, and it can provide invaluable insight when solving design problems.

Real-time materials synchronization
Beautiful materials can make any design 'pop', and with over 1,000 materials available in Lumion’s extensive content library, it’s easier than ever to show the intricate and beautiful textures of your designs.

By adding high-resolution materials to your Vectorworks model, it’s like breathing life into your design. Suddenly, while looking at a static image or an animation, you can imagine the rough texture of the walls, the feeling of grass, and so on.
Live point-of-view synchronization
The new LiveSync for Vectorworks feature also enables live point-of-view synchronization. Turn it on and immediately adopt the Vectorworks camera perspective, making your work easier, faster and more enjoyable.

LiveSync re-connection rules for Vectorworks 2019 SP3 and newer
In general, visualization is an iterative process and it’s rare that you’ll finish the 3D design and render all in one day. For this reason, the Lumion LiveSync for Vectorworks plugin has made it easy to re-connect your Vectorworks model to your Lumion project.
Here are a few of the rules when re-connecting these two programs.
Rule #1: Your Vectorworks model has the same file name and location
If you haven’t changed the Vectorworks file name and location, then Lumion will resume the LiveSync connection the next time you load your Lumion scene and click on “Start LiveSync” in Vectorworks.
For example:
Day 1
Filename: MyModel_001.VWX
File location: C:\ drive
Day 2
Filename: MyModel_001.VWX
File location: C:\ drive
How to re-connect:
Open both the Lumion scene and the MyModel_001.VWX in Vectorworks, and click on “Start LiveSync.”
Rule #2: Your Vectorworks model has a new file name and/or location
If you have saved your Vectorworks file under a new name (and the first 5 characters of the name are different) and/or if you have saved the Vectorworks file in a new location, you will have to do the following:
Save the .VWX file (where you normally save it)
Export a .DAE file with the same name and location as the .VWX file
Re-import the model in the Lumion scene with the .DAE file you just exported
The next time you click on “Start LiveSync” in Vectorworks, Lumion will know that you want to use the Vectorworks project in the same location (and with the same name) as the .DAE file you imported.
For example:
Day 1
Filename: MyModel.VWX
File location: C:\
Day 2
Filename: MyNewModel.VWX
File location: D:\
How to re-connect:
Re-import the new .DAE file before clicking on “Start LiveSync” in Vectorworks.
Rule #3: Your Vectorworks model has a new name in the same location
If you have saved the Vectorworks file in the same location but under a new name, and at least 5 consecutive characters of the new name match the old name (saved from the last time the LiveSync connection was running), then Lumion will provide an option to re-connect via LiveSync.
For example:
Day 1
Filename: MyModel_001.VWX
File location: C:\
Day 2
Filename: MyModel_002.VWX
File location: C:\
How to re-connect:
While in Lumion, you can re-connect LiveSync by selecting the model and clicking on the Re-connect to LiveSync button in the Object Options panel in the top right corner.
Get Lumion 9.3 to explore new opportunities for enhancing your workflows
LiveSync for Vectorworks is a new feature in Lumion 9.3, now available as a free upgrade for Lumion 9 users. Want to test the new LiveSync functionality as well as all of the compelling, visually powerful features in Lumion 9? Start your 14-day free trial today.
*Lumion 8.5 will work with LiveSync for Vectorworks, although this functionality is not officially supported or guaranteed.
#lumion#lumion 9#architecture#livesync#real-time#real-time rendering#architectural#archilovers#architecturelovers#architexture#archidesign#archdaily#design#interior#interiors#interior design#landscape#landscape design#interior architecture#landscape architecture#urban planning#civilengineering#modern design#modern home#style#rendering#3d#3d rendering#3d rendering software#modeling
4 notes
·
View notes
Text
Lumion 9.3 is available now
Discover how Lumion can enhance the real-time rendering experience with improvements to LiveSync, now available for Vectorworks 2019 SP3.

Lumion 9.3 was released today as a free upgrade for Lumion 9 users. It builds on the stunning capability of Lumion 9 to produce beautiful renders with ease and speed unparalleled by any architectural software.
Lumion 9.3 also creates a smoother real-time rendering experience with improvements to the LiveSync functionality, compatible with Revit, SketchUp, ArchiCAD, Rhino and, now, Vectorworks.
And with the ability to immediately fit right into your current workflow, this version can open the door to a more productive, more enjoyable design and visualization experience.

Want to see how Lumion can enhance your workflows?
By downloading the free trial, you can instantly capture your 3D designs in beautiful, photorealistic lighting with breakthrough features such as Real Skies and Sky Light 2. For a heightened sense of landscape realism, assign the customizable 3D grass to any surface, or form strong connections between buildings and their surroundings with the atmospheric rain and snow.
Learn more about what’s new in Lumion 9.3 below.
What’s new in Lumion 9.3
Improved LiveSync performance
Lumion 9.3 comes with some exciting improvements to the LiveSync functionality.

From the ability to transfer camera angles from your 3D/CAD software to Photo slots in Lumion, to smoother LiveSync workflows when changing from Build Mode to Photo or Movie Mode, the improved LiveSync allows a faster, more intuitive real-time rendering experience.
New LiveSync for Vectorworks 2019 SP3
Vectorworks is the complete solution for the architect’s design process, and the new LiveSync for Vectorworks feature pulls Lumion’s exceptional real-time rendering technology into the mix.

With only a click, you can synchronize your Vectorworks 3D model with Lumion, allowing you to dress your model with elegant materials and objects from an expansive content library. Instantly, you can see your model in its real-life setting, whether that’s in the center of an urban metropolis or a picturesque rural environment.
For more info about LiveSync for Vectorworks, you can sign up for a webinar with Michael Brightman on March 25th at 11 A.M. MST.
How to install the LiveSync for Vectorworks plugin
The LiveSync for Vectorworks plugin is compatible with Vectorworks 2019 SP3 and newer versions.
To install the LiveSync for Vectorworks plugin, check out the following tutorial:
youtube
Availability
Lumion 9.3 is now available as free upgrade for Lumion 9 users. The LiveSync plugin is free for everyone.
#lumion#lumion9#lumion9.3#lumion 9#architect#architecture#architectural#rendering#livesync#design#landscape#interior#interior design#interior architecture#landscape design#landscape architecture#modern design#archilovers#architecturelovers#sketchup#revit#archicad#vectorworks#3d#3d rendering#3d rendering software#render#modeling#3d model
0 notes
Text
Sensing architecture: new materials in Lumion 9 Pro
With 112 new materials available in Lumion 9 Pro, including the customizable 3D grass and the new furry materials, you can quickly add photorealistic textures to heighten the realism of your designs.
Materials are the backbone of any beautiful render. They can make the difference between a flat, 2D-looking structure and a standout visual where audiences can see your design and say, “I can see and feel exactly what this building will look like!”

Grass, pavement and other external materials can equip audiences with familiar features so they can better understand your project.
Materials can move your audience from simply looking at your designs to sensing them. The feeling of being at home provides a whole new level of sensorial experience. Your audience will feel the warmth of the wood, they will hear the echo of shoes on tile, and their senses will be able to grasp any of the details of your render.

It’s easier to imagine the experience of being in this bathroom with the dark wood walls and stone floor. Wooden material: “Woods PlanksWorn 023 VAR1 3K” in Lumion 9 Pro.
Searching for, downloading and creating materials can be a time-consuming activity, and if you’re tired of scrounging the web for materials, don’t search any longer. In Lumion 9 Pro, you can find 1,120 materials* for:
Interiors (curtains, fabrics, metals, woods)
Exteriors (bricks, stone, concrete, roofing, etc)
Landscapes (grass, rocks, land)
And more!
Continue reading below for a detailed overview of the new, photorealistic materials available in Lumion 9 Pro.
Two reasons to use Lumion materials
Lumion can be used for a huge variety of needs. Perhaps you want to demonstrate the way light reflects off the building’s materials during a presentation to your client, or you need to show the review board what the project is supposed to look like.

Which do you prefer? With Lumion, you can present different options to your client for an effective dialogue about materials.
No matter how you plan on using the renders, the 1,120 materials available in Lumion 9 Pro’s content library allow you to instantly heighten your audience’s ability to connect with the design on a deeper, more intimate level.
Instant access to a wide variety of materials
One problem with materials is availability. Many projects, such as a private new build home for a client or a competition for the city, require precision in your renders, which often means that the materials you show might be the materials that you must use during construction.
youtube
With a total of 1,120 options available right at your fingertips, as well as customization features that allow you to change the normal map, color, reflectivity, age, foliage and more, Lumion offers a wide variety of materials so that you can easily find the right material for a specific need.
Consistent high quality
Sourced from different agencies and individuals, including Poliigon, the Lumion materials consistently provide a high-quality, realistic look and feel to all the surfaces in your design. This includes any water or grass surfaces, as well as concrete, wood, metal, plastic, fabric, and more.

This is especially helpful if you quickly need some renders to show a specific detail or, for example, to make a point. For instance, if you and your colleague are wondering whether to use concrete or wood, you can quickly render out a couple of options showing these materials in their best possible light, making the decision process substantially easier while heightening your own confidence over your decisions.
New materials available in Lumion 9 Pro
Below, we’ll go through some of the new materials available in Lumion 9 Pro.
The lived-in look of fabrics and curtains
Whether you’re an interior designer or you need to decorate the interior of your model for your renders, you can connect with audiences by showing realistic interiors with a lived-in look.
In Lumion 9 Pro, you can help your audiences understand what an interior might feel like with new fabrics (including cashmere, muslin and printed rugs)...

Pillows with the new “Fabric Wrinkled 005 3k” material
...new rugs...

...and new wallpaper materials.

The marvel of marble stone
From the smooth, endearing feeling of stone floors underneath your feet, to the sheer grandeur of stone buildings, the 14 new stone materials in Lumion 9 Pro bring a sense of solidness and longevity to your designs. Plus, these new stone materials can easily adapt to a wide diversity of architectural forms.

Marble 011 2K

Marble 031 3K

Marble 051 2K

Marble 053 3K
The unique charisma of brick
Brick buildings and interiors are uniquely charismatic, and this material speaks to the architect’s eye for beauty and craftsmanship.
With 8 new brick materials in Lumion 9 Pro, you can ensure that your brick buildings and structures show the deep color and rough, rigid texture of this versatile material. You can find a few examples below:

Bricks NewSavannaGrey 002 2K

Bricks IndustrialPastoralRed 001 2K

Bricks WhiteWashedChoppy 001 2K
The old beauty of cobblestone
Cobblestone is one of those materials that, when used correctly, it can immensely enhance the beauty of walkways, pavements, roads or any area where it’s installed.

Cobblestone 33 2K

Cobblestone 21 3K

Cobblestone Arches 003 2k
The natural aura of wood
When using wood for interiors or exteriors, it can form an instant connection between the built world and the natural one, and with the 15 new wood materials in Lumion 9 Pro, you can easily infuse a sense of natural beauty.

Wood Fine 018 VAR1 3K

Wood Flooring 042 2k

Wood Flooring 028 VAR1 2K
Give your design the benefit of evocative materials with Lumion 9 Pro
The new materials in Lumion 9 Pro come with exceptionally detailed textures, and they are all completely customizable with respect to color, glossiness, reflectivity, age, scale, and so on. In other words, there is no limit to what you can accomplish by dressing up your design in Lumion materials.
Discover benefits in speed without ever sacrificing quality by getting Lumion 9 Pro today.
*Lumion 9 Pro has 1,120 materials. Lumion 9 has 1,017 materials.
#lumion#lumion9#lumion 9#architect#architecture#architectural#archilovers#architecture lovers#design#interior design#interior architecture#landscape#landscape drawing#materials#floors#wallpapers#fabric#textures#render#3drender#urban planning#urbandesign#landscape architect#revit#sketchup#archicad#rhino
1 note
·
View note
Text
Design it live: How Lumion 9 and Rhino 6 take real-time rendering to new heights
LiveSync is one of Lumion’s most popular and celebrated features. Now, in Lumion 9, Rhino users can also take advantage of simultaneous modeling and rendering, seeing their designs in the context of Lumion’s stunning, real-world editor.

Architecture is anything but a linear process.
It’s pretty rare that an architect will sketch a design, build a 3D model, render some images and get the client, all in that specific order. More likely, the architect will sketch, start building a 3D model, discover some problems in the model, return to sketching, try a few renderings, go back to the model, render some more, get feedback from client, iterate the model again, create some more renderings, present to the client, etc.
Now, with LiveSync for Rhino available in Lumion 9, all Rhino users can bring modeling and rendering into the same screen space, providing a clear, real-time view of your design in the context of the real world.
Activate the LiveSync for Rhino plugin and you can instantly heighten your workflow efficiency when adapting the design. Moreover, you’ll be able to make more informed design decisions during internal reviews, and you’ll be delivering impressive, polished client presentations in no time.
In this blog post, we’ll go through the basics of LiveSync for Rhino, from showing you how to download and install the plugin, to providing some camera and usage tips. Let’s dig in!
How to download the LiveSync for Rhino plugin
The first thing to keep in mind is that LiveSync for Rhino is only available for Rhino 6 and newer versions. If you have a previous version, then the LiveSync plugin won’t work.
You can download the LiveSync for Rhino plugin from Food4Rhino, available here. Simply click on the green download button to begin the download.
Here is a brief gif going through this process:

The next step is to install the plugin for your Rhino 6 license.
How to install the LiveSync for Rhino plugin
Now that you’ve downloaded the LiveSync for Rhino plugin, the next step is to make sure that you’ve closed Rhino. This step is important as it helps the plugin installer while greatly reducing the possibility of hiccups and other potential problems.
After closing Rhino, locate the plugin you downloaded. Remember, the LiveSync for Rhino installer is an .RHI file and the file name may be something like Lumion_LiveSync_for_Rhino6_(VERSION).rhi.

Once you’ve located this file, click on it to launch the installer.
A screen should pop up saying, “Rhino Package Installation Wizard.”

Here, you can choose whether to install the LiveSync for Rhino plugin for just you (based on your specific Rhino account and license) or for anyone who uses the computer with the Rhino and Lumion software installed. Choose the option best suited for you and hit ‘Next’ to begin the installation.
You will get another popup saying that the plugin was installed and that it will be available the next time you start Rhino.

So, open up Rhino and start Lumion!
Are you having installation issues? Refer to this helpful guide here.
How to launch LiveSync for Rhino
If LiveSync for Rhino was properly installed, you should be able to see the plugin on your Rhino interface. Feel free to move it to the ideal location for you. In the screenshot below, you can see that we moved the plugin so that it’s part of the Rhino toolbar.

To start LiveSync for Rhino, simply open your Rhino model and choose the ‘Perspective’ view, as this one allows you to fully rotate and move the 3D model.
Next, open a new scene in Lumion and give yourself the best viewing angle to see both programs simultaneously. If you have one monitor, you can split the screen as shown in the gif below.

If you have two monitors, you can place Lumion on one screen, and Rhino on another.

You can start the synchronization, connecting your Rhino model to the Lumion 3D environment, by hitting the “Play” button of the LiveSync plugin. In just a few seconds, your 3D model should be imported into Lumion.

Now, as you continue to modify your model in Rhino, the modifications will be rendered automatically in Lumion.
How to view changes to the model
Lumion can import all sorts of CAD files and 3D models, from Collada (.DAE) to SketchUp® (.SKP) to Autodesk® (.FBX & .DWG & .DXF) to 3ds Max (.MAX & .OBJ) and many others, including Rhino models, but it doesn’t let you actually modify the model. With LiveSync, however, you can view changes to your 3D model instantaneously.
For instance, after importing the model into Lumion, you notice that the rock you modeled was too large. So how can you quickly fix this without having to re-import or re-connect the model to your Rhino scene?
Simple. Change the rock’s size in Rhino and it’ll be automatically rendered in Lumion’s editor.

You can also move objects in Rhino and they will move accordingly in Lumion, and you can hide objects in Rhino and the objects will (you guessed it!) hide in Lumion.
How to reconnect the 3D model to Lumion
There are going to be times when you’ll need to create another version of your Rhino model and save the model as a new file. However, the next time you go to start LiveSync with your previously built Lumion scene, you may discover that the model can’t be automatically reconnected.
Fortunately, as long as the first 5 letters of the model’s file name are the same (e.g. “Project_A,” “Project A_V1,” “Project A_V2”, etc), LiveSync will be able to locate the original file. If this is the case, you can reconnect the model by following these steps:
Step 1: Locate the triangle with the “Reconnect” symbol, or simply click on the model.

Step 2: In the model’s properties, click on the same “Reconnect” symbol.

LiveSync should re-establish the connection, allowing you to go about your work as normal.
TIP: How to save the materials layout
Although it’s rare, there is the possibility that reconnecting the LiveSync model will result in a loss of the material assignments in your Lumion scene.
And re-assigning those materials will be a time-consuming pain.
For this reason, before you reconnect the Rhino model to your Lumion scene, it can help to be cautious and save the material set beforehand. This way, if you do lose your materials, re-loading them will just take seconds.
You can save the scene’s material set by following these steps:
Select the “Materials Editor” button in the Lumion editor.
Click on one of the materials in your scene.
Locate the “ Properties” window in the upper right-hand area of your screen.
Select the “Save materials set” option and save the materials to an easy-to-find location.

If your model loses its material settings, you can load the materials set quite easily. Simply follow the steps above, but instead of selecting the “Save materials set,” click on “Load materials set” and open the .mtt materials file.
Now that you’ve got things going, here are a few “nice to know” facts about the LiveSync for Rhino plugin.
Nice to know #1: adding objects to the synced scene
Renders often look best when they have a real-looking environment surrounding the model. If the project is for a suburban neighborhood, then objects you’d typically see in suburban environments should surround the building you’ve designed. The same applies to rural, mountainous, oceanfront and any other type of property location.

Lumion has over 5,200+ objects in its massive content library, including everything from trees and landscaping elements to interior furnishings and more. Many of these models come with a very high level of quality, and so it’s often advised to use Lumion trees, for instance, instead of syncing the trees you may have downloaded and inserted into your Rhino model.
Nice to know #2: adding materials to the synced model
Adding any of Lumion’s 1,000+ customizable materials can have a substantial impact on the beauty and realism of your render. For instance, imagine you want to test a few water types for the swimming pool. With LiveSync, it’s easy to see how various material choices affect the look and feel of your design.

Nice to know #3: syncing the camera
LiveSync also enables camera synchronization between the viewpoint in Rhino and Lumion. This means that when you move the camera in Rhino, the camera in Lumion follows suit. By playing with the field-of-view, you can create some fairly interesting views.

While the camera synchronization is an amazing tool for keeping your field-of-view ordered and comfortable, you may need to disconnect it when modifying the model in Rhino. By disconnecting only the camera, it’s much easier to make changes to the model while keeping the Lumion camera in the same position.
Nice to know #4: building with effects
To view your project through a more realistic or conceptual/artistic lens, you can combine LiveSync with the Build with Effects feature in Photo Mode.
To view your project with all of the photo effects, click on Photo Mode and start setting up and stylizing the scene with effects. When you’re ready, simply click on the “Build with Effects” button in the upper left-hand area of the editor screen.

Reconnect LiveSync (if it is disconnected), and you can continue the LiveSync experience with the added benefit of realistic and artistic effects.
TIP: Keep in mind that you will likely need to adjust the focal length of the camera in Lumion so that it matches with the camera view in Rhino. Generally, changing the Lumion focal length to 35mm will solve this issue.
LiveSync with realistic effects

LiveSync with artistic effects

Using LiveSync with Build with Effects is great for getting the insight necessary to make important decisions about the project’s evolving design. It can show how the different lighting profiles throughout the day will impact the building’s exterior.
Even if you’re not using LiveSync to make design decisions, it can simply act as the fortune teller’s crystal ball — letting you see what your design would look like down the road, after it’s built in its real-life location. In other words, LiveSync helps you bring your design to life.
Model while you render; render while you model
LiveSync for Rhino is one of the most popular features in Lumion 9 and it’s available in both the Pro and Norm versions. With this addition to the LiveSync repertoire, you can now enjoy real-time 3D rendering with SketchUp, Revit, ArchiCAD and Rhino.
For more information about LiveSync or other Lumion 9 features, you can visit the What’s New page.
#lumion#lumion9#architect#architecture#architectural#instadesign#renderlovers#architectural design#archilovers#architecturelovers#architectureporn#rendering#render#renders#3d#3d render#design#interior design#landscape design#landscape architecture#interior architecture#revit#sketchup#archicad#rhino#autocad#autodesk#archdaily#real-time#building
3 notes
·
View notes
Text
Go from a 3D model to a beautiful render in under 30 minutes
Only have 30 minutes before your renders are due? From the unique lean scene-building workflow to the assortment of one-click features and effects, Lumion 9 can help you communicate the beauty of your designs faster than any other 3D rendering program out there.

Not everything goes to plan, and when deadlines are sprung upon you, seemingly out of nowhere, it can be helpful to have the right tools.
For instance, imagine you’ve spent the past few weeks designing a new-build house for a meticulous client. You’ve finished all of the basic architectural drawings and you built a 3D model in SketchUp. But then, the senior architect comes up to you (her face is pale and you know something is troubling her) and exclaims, “The client just called and he will be here in 30 minutes. We need one decent render, ASAP!”
One option is to simply collapse like a marionette without strings, repeating “I give up…” Or, with the help of a 3D rendering tool like Lumion 9, you can sit back, relax and say, “Sounds good boss!”
So you open up Lumion and SketchUp (or your favorite modeling software) and get started. Let’s see an example of what this could look like and how you can go from a 3D model to a final render in 30 minutes or less.
Importing the 3D model
There are several ways to import your 3D model into Lumion. For one, you can simply import a model using the green “IMPORT” button in the lower left-hand corner of the Build Mode interface.
You can also import your 3D model with LiveSync, allowing you to simultaneously model and render. Currently, LiveSync in Lumion 9 is only available for Revit, SketchUp, ArchiCAD and Rhino. For the Lake House, we initiated LiveSync between SketchUp and Lumion.

The import placed the building at 0, 0, 0, which is unfortunately right within the landscaping of this scene. In this case, you can quickly raise the object by selecting the building and hitting the M key and then the H key (this allows you to change the height of your object).

And lastly, you can start adding materials to give the scene some life.

Modifying your model with LiveSync
Let’s say you used LiveSync for SketchUp to import your 3D model into Lumion. While inspecting the scene in Lumion’s editor, you notice a serious error in your model: the wooden porch isn’t aligned correctly.
Fortunately, with LiveSync, design iteration is quick and easy:

When you have an issue with the 3D model’s design, materials or anything else, LiveSync enables fast and automatic rendering so that you can instantly view what you fixed in your modeling software.
Lean scene-building workflow
As a short overview, some of the new elements of the lean scene-building workflow in Lumion 9 include:
Tabs are arranged horizontally (Objects, Materials, Landscape and Weather).
“Place” and “Move” are now combined into one, intuitive object mode.
Selecting objects now happens in the Build mode so that you can cycle between objects without losing sight of your model and its environment.
You can select an object by clicking on the node or the object itself.
Once you place an object, it’s already selected so that you can start doing adjustments immediately.
If you hold down the F key while you’re rotating a model, you can make the orientation of that model match the surface that the cursor is pointing at.
You can instantly get a better perspective on any object in your scene by double-right-clicking.
Do you love a group of objects you want to use again and again? It’s now possible to save and load object group arrangements as a Lumion Group file (.LSG9).
And several others…
Want to learn more about the new workflow? Check out Mike Brightman’s tutorial about the new interface:
youtube
The new Lumion 9 interface comes with many more time-saving features, helping you build a beautiful, living scene in no time at all. Additionally, you have multiple hotkeys that will adjust your model before you place it. These include:
Use the R key to rotate before placing a model.
Use the H key to change height before placing a model.
Use the L key to adjust the size before placing a model.
Adding trees with mass and cluster placement
Want to add a large number of objects all at once? For the Lake House render, we were able to create the full-looking forest scene in just a few minutes using the Mass Placement and Cluster Placement tools.
Scene without trees

Mass Placement

Cluster Placement

Scene with trees

Replacing several objects
After placing an object, you can start adjusting some of its properties with the new advanced properties option in the upper-right corner of the Lumion editor. Many of these previously buried buttons are now readily available on-screen.

Did you add a large number of trees, only to find out they were the wrong trees? Well, the first thing is to not panic, because by coupling the “Replace Selection” command with the new library interface, you can easily replace all of the trees in under a minute.
Simply click on a node or the object itself to select it and hold CTRL to add more objects to the selection. Or, in the Advanced Properties tab, you can click on “Select All Identical Objects” or “Select All Objects in Category” to instantly select a large number of objects. Once you have selected the objects you want to replace, click on the “Replace Selection” button.
Here is how to replace one type of tree (in gif form):

These small refinements in the Lumion interface will make your workflow much smoother, more intuitive, and more enjoyable. At the same time, you’ll save tons of time producing standout scenes!
Preparing the look and feel of your render
Let’s recap. So far, we’ve used LiveSync to import the 3D model of the Lake House. After adding materials and while reviewing the design, however, we noticed a mistake with the patio and fixed it. Next, with the help of the lean scene-building workflow and tools such as Mass Placement and Replace Selection, we were able to quickly build a full, realistic scene that reflects the building’s real-life site location.
At this stage, about 25 minutes have passed and you only have 5 minutes to go before the client arrives. Fortunately, Lumion’s assortment of Photo, Movie, and Panorama effects can streamline the “render beautification” process.
If you want to go straight from Scene to Beautiful Render, here is the method with the fewest steps possible:
Starting here

Add a Realistic Style

Add a Real Sky

Don’t forget your reflections and (if applicable) 2-point perspective!

Render

Final Result

One problem with using a pre-configured effect (such as the Realistic Style) is that you get a pre-configured render. This is not suitable for many firms who want to show the unique style of their designs.
Luckily, this workflow serves as a launchpad for quickly getting unique, stylistic renders ideal for your projects and your firm. After adding the Realistic Style, for example, you already have the foundations for a beautiful render that you can modify and adjust to suit your needs.
Your launchpad to amazingly fast rendering
Whether for Styles, Real Skies, the customizable 3D grass, or any of the pre-configured effects and features, you can use them as a starting point for amazingly fast rendering.
Give your designs the attention and beauty they deserve, and never waste a second, by adding Lumion to your firm’s workflows!
Order Lumion today: https://lumion.com/buy.html
#lumion#lumion9#architect#architecture#architectural#architexture#archilovers#architecturelovers#landscape architect#interior architecture#design#architectural design#render#rendering#3d#3d rendering#3d model#CAD#Revit#sketchup#archicad#vectorworks#rhino3d#building#interior#landscape#landscaping#landscape design#interior design#luxury homes
0 notes
Text
10 amazing new video tutorials for better, faster rendering in Lumion 9 (part 2)
To access the first five videos of the 10-part Lumion 9 tutorial series, including rendering lessons about objects, materials, context and weather, make sure to check out Part 1.
Lesson 6 — Creating Images
youtube
Lesson 6 demonstrates how to create absolutely breathtaking images in Photo Mode. Whether realistic or conceptual, creating amazing images of your 3D project requires just a few steps and can be done in minutes!
Lesson 7 — Creating Movies
youtube
Ever wanted to sit in the director's chair? In Lesson 7, you'll learn how quick and easy it is to create cinematic, fully amazing animations. Capture the hearts and minds of your audience, and discover the impact that animated renders can have on your clients!
Lesson 8 — Creating 360 Panoramic Images
youtube
Immerse yourself into the beauty of your 3D projects. In Lesson 8, you'll learn how to create outstanding panoramic images right in Lumion. Whether for the Oculus Go, HTC Vive, you can quickly create 360° images and transport your clients to the heart of your designs.
Lesson 9 — Using Lights
youtube
Shadows, Hyperlight, Sky Light, oh my! In Lesson 9, you'll learn how to quickly create light objects and use lighting features and effects to capture the real beauty of your 3D project.
Lesson 10 — Animating Objects
youtube
Truly bring some life and energy into your Lumion 9 videos! In Lesson 10, you'll discover how to animate objects in your Lumion scene, including cars, people, birds, the sun, doors opening, and clouds.
Capture the beauty of your design, without losing a second of your time
With the right guidance, mastering Lumion doesn’t require too much time, and these 10 lessons can be applied to whatever project you might be working on, from residential to interiors to landscapes and more.
Looking to add Lumion 9 to your architectural and design workflows? If so, you can upgrade to Lumion 9 or buy a new license here.
#lumion#lumion 9#architect#architecture#architectural#architectural rendering#render#renders#3d#3d rendering software#3d architectural software#video tutorials#lumion tutorials#tutorials#exteriors#interiors#design#interior design#interiordecor#landscape#landscape design#urban planning#revit#sketchup#archicad#autodesk#vectorworks#rhino3d
5 notes
·
View notes