#machine embroidery applique design
Text
Chicken Embroidery Applique
Have you heard? The bird is the word… I mean Chicken embroidery applique designs!
New! Chicken embroidery applique designs. Stitch out 8 blocks featuring different chicken portraits and a chicken coop. You will fall in love with these new chicken designs. There is a chicken for everyone in this design set.
“I made a funny, son and you’re not laughin’” Foghorn Leghorn
PS: If you don’t know who…
#chicken embroidery applique#chicken machine embroidery#Embroidered chickens#Embroidery designs#funny chicken embroidery#Sue Brown
0 notes
Text
Embroidery machine Tips for wonderful applique
Applique Magic with Your Embroidery Machine: Tips for Stunning Results
Embroidery machines unlock a world of creative possibilities, and applique adds a delightful dimension to your projects. By fusing fabric pieces onto a background fabric, you can create vibrant designs, personalized gifts, and charming home decor. But achieving flawless applique with your machine requires specific techniques and knowledge. Fear not, embroidery enthusiasts! This guide delves into essential tips to help you master applique and transform your machine into a tool for stunning fabric art.
Preparing the Perfect Canvas: Fabrics for Applique Success
The foundation for beautiful applique lies in the fabric choices. Here's what to consider:
Background Fabric: Opt for a stable woven fabric that can withstand the heat and pressure of embroidery stitching. Cotton woven fabrics like quilting cottons or poplin are excellent choices. Avoid stretchy materials that may distort during embroidery.
Applique Fabrics: The possibilities are endless! Choose fabrics that complement your design and add visual interest. Popular options include felt, wool, cotton, and even lightweight synthetic fabrics. Test different fabrics on a scrap piece before incorporating them into your project to ensure they adhere well and handle embroidery stitching without fraying.
Pro Tip: Starch the background fabric lightly to provide extra stability and prevent puckering during applique stitching.
Interfacing Your Applique Shapes: Adding Strength and Stability
For a professional finish and to prevent fraying, interfacing your applique shapes is crucial. Here are some interfacing options:
Fusible Webbing: This is a popular choice for small to medium-sized applique shapes. Apply the fusible webbing to the backside of your applique fabric following the manufacturer's instructions, then iron it onto your pre-cut applique pieces.
Heat n' Bond Lightweight: This interfacing provides slightly more structure than fusible webbing and is ideal for intricate applique details or slightly heavier fabrics.
Non-Fusible Interfacing: Use this for larger applique shapes that require additional stability. Adhere the interfacing to the back of your applique fabric with a temporary fabric adhesive spray or glue stick, then stitch around the shape's edges to secure it in place.
Remember: Choose the interfacing weight and type based on the applique fabric's weight and overall design complexity.
Tools of the Trade: Essential Supplies for Machine Applique
Embroidery Machine: With various applique stitch options (satin stitch, blanket stitch, zigzag stitch, etc.), your machine is your creative partner.
Stabilizer: Use a water-soluble stabilizer for raw-edge applique or a tear-away stabilizer for applique with a satin stitch finish. Stabilizers prevent the background fabric from puckering and ensure smooth stitching.
Fabric Scissors: Sharp fabric scissors are essential for precise cutting of applique shapes. Consider investing in dedicated applique scissors with a small, pointed tip for intricate details.
Fabric Marking Pen: Use a heat-soluble or water-soluble pen to mark placement lines for your applique pieces on the background fabric.
Embroidery Hoop: Choose a hoop size that comfortably accommodates your entire applique design.
Adhesives: Temporary spray adhesive or glue sticks can be helpful for positioning applique pieces before stitching them in place.
Mastering the Art of Cutting: Techniques for Flawless Applique Shapes
Templates: Create paper or cardboard templates for your applique shapes. Trace the templates onto your chosen applique fabric and cut them out.
Die Cutters: For precise and consistent shapes, especially with intricate designs, invest in embroidery applique dies and a compatible die-cutting machine.
Heat Cut Tools: Some machines offer built-in heat cutting capabilities. Utilize these if your machine has this feature to directly cut your applique shapes from the chosen fabric.
Important Note: Always reverse your applique shapes if the design features text or lettering to ensure it reads correctly after being stitched onto the background fabric.
Choosing the Right Stitch: Embracing the Power of Applique Stitches
Embroidery machines offer a variety of stitches ideal for applique. Here are some popular options:
Satin Stitch: This is a go-to stitch for creating a smooth, decorative edge around your applique shapes. Experiment with different stitch widths to achieve the desired effect.
Blanket Stitch: This stitch offers a more casual finish while still securing the applique piece in place. It's a good choice for adding a touch of texture to your projects.
Zigzag Stitch: This stitch provides a secure hold for applique pieces and can be used for both straight and curved edges.
Decorative Stitches: Many machines offer specialized decorative stitches that can enhance the visual appeal of your applique. Explore the options available on your machine and experiment with creative stitch combinations.
Tip: When selecting an applique stitch, consider the size and intricacy of your design, as well as the desired finished look.
The Magic Touch: Stitching Strategies for Flawless Applique
Now that you've chosen your perfect applique fabrics, mastered cutting techniques, and selected the ideal stitch, it's time to bring your design to life! Here are some essential stitching strategies for flawless applique with your embroidery machine:
Securing Your Applique:
Temporary Adhesive: For added control and to prevent applique shapes from shifting during stitching, use a small amount of temporary spray adhesive or a glue stick to secure the applique pieces onto the marked positions on your background fabric.
Placement Hooping: When using a hoop, ensure the applique pieces lay flat and wrinkle-free within the hooping area. Avoid excessive tension that might distort the shapes.
Stitch Order and Overlap:
Start from the Center: Begin stitching from the center of your applique design and work your way outwards. This approach minimizes any puckering or distortion around the edges.
Stitch Overlap: When using a satin stitch or other decorative stitch for the applique edge, ensure the stitches slightly overlap the raw edge of the applique fabric. This encloses the fabric edge and prevents fraying.
Compensate for Stitch Density: Dense applique stitches can cause the applique piece to shrink slightly. To counteract this, consider using a slightly larger applique shape compared to the final desired size in your design.
Advanced Applique Techniques:
Reverse Applique: This technique involves stitching the applique shape onto the background fabric, then carefully cutting away the excess background fabric from within the stitched outline. This creates a unique, layered effect.
In-the-hoop Applique: Some embroidery machines offer specialized in-the-hoop applique features. These may involve cutting and fusing applique shapes directly within the hooping frame using the machine's capabilities. Explore your machine's manual to see if it offers such functionalities.
Finishing Touches:
Trimming Excess Threads: Carefully trim any loose threads or jump stitches with sharp embroidery scissors.
Pressing (Optional): For a crisp, professional finish, lightly press your completed applique project from the backside using a cool iron setting appropriate for the fabric types used.
By following these tips and practicing your applique techniques, you'll be well on your way to creating stunning, personalized projects with your embroidery machine. Remember, experimentation is key! Don't be afraid to try different applique fabrics, stitches, and design elements to discover your own unique style.
Bonus Tip: Invest in a magnifying lamp for close-up work while stitching intricate applique details.
With a little practice and these helpful insights, you can transform your embroidery machine into a powerful tool for creating beautiful and captivating applique masterpieces. Happy stitching!
Discover Our Collection of Applique designs Here
Read the full article
0 notes
Text


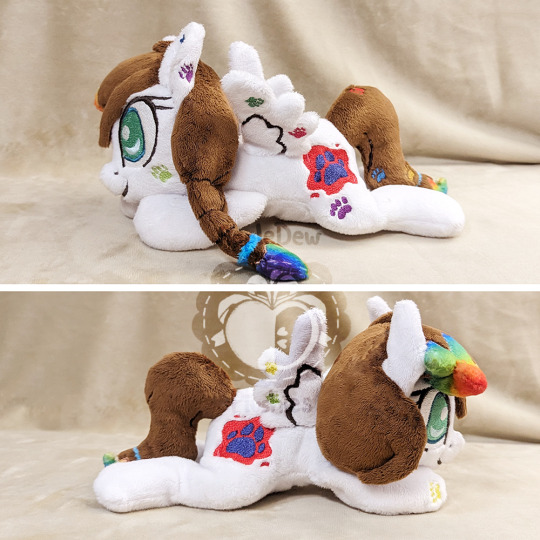
This is Zero the Cccat! Made for X3NO42 on Twitter back around the end of 2023. :)
This plush is made entirely with custom dyed minky. Details on this plush were machine embroidered and appliqued. Unfortunately I do not recall the total length of the plush, but the base body was at least 24 inches long, including the tail was probably about 40+ inches. gradient on the body was hand dyed and touched up with dry brushing.
I will say it how it was-- this absolutely beautiful character and design broke me (and literally broke my sewing machine! Like, very literally knocked it off my work table and needed to buy a new one the next morning.🤣😭 ) I have so many mixed feelings about this little one, aggressively revolving around how proud I am of completing them and trying new techniques all the way to seeing that I don't feel like I did justice to them with some intense disappointment. I will let those be the only negative words on this gorgeous project and lay them to rest. ❤
The WHOLE body was custom dyed, save for the main pink color of the head and belly to chest ( creamy yellow). I split the body into a few pieces since different gradients were applied-- Tail, Back Legs, Torso/Trunk, Chest, and Arms and head(that didn't require dyeing). The underside of the tail was dyed as a long strip like the top side.
Just about every piece of this plush was embroidered or had embroidery details! I used some lovely pearlescent thread for the sparkles!
Nothing much else to add without rambling, but the two little orbs were refreshing to make after this sweetheart was completed! <3
Ko-fi: https://ko-fi.com/appledew
Trello queue: https://trello.com/b/FZKSnMo7/plushie-commission-to-do-list
Twitter: https://twitter.com/AppleDew_
Instagram: https://www.instagram.com/apple.dew
Tumblr: http://appledew.tumblr.com/
Furaffinity: http://www.furaffinity.net/user/appledew
deviantArt: https://www.deviantart.com/appledew
11 notes
·
View notes
Text
I thought you guys might like to see my new leggings (and my freshly-painted toes)! 🥂
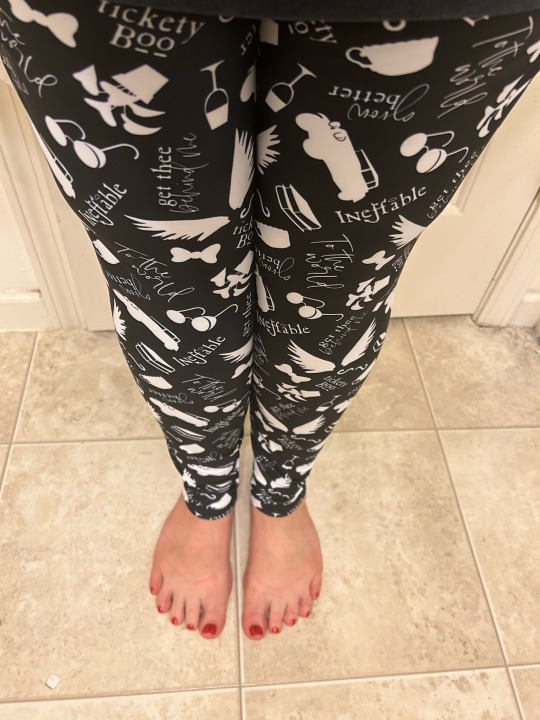
They are INSANELY comfy. I have not washed them yet. They are available in size S-5x and can buy them for yourself at:
To the world! 🥂

#good omens#good omens 2#gomens#ineffable lovers#ineffable husbands#ineffable spouses#ineffable wives#ineffable partners#aziraphale x crowley#aziracrow#No I don’t own this shop and stand to gain nothing from this#I’m just that in love with them#and supporting small business!!
35 notes
·
View notes
Text
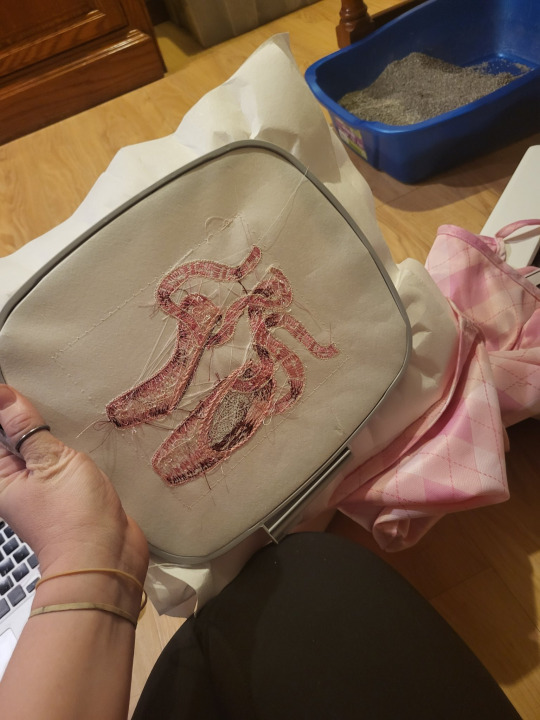
Machine embroidery tutorial: Shaded pointe shoes.
I know from working in a sewing machine store that a lot of people are intimidated by machine embroidery. So, I made this pattern the other day, and let's go into how I stitched it out.
Embroidery does not need to be this hard. If you've never used the embroidery part of your sewing machine before, stick some cheap stabilizer in the hoop with some fabric, grab a random pattern from inside your machine, and run all or part of it. Once you do this, you will be much less afraid of it. Some brands of machines will include some stabilizer and fabric for you to run an initial test on.
So, let's get into something more complicated. There's a few things that we're going to do to make this more complicated. The first is the surface that we're embroidering on. I'm using a dress from Five Below, which is made of a knit fabric without a whole lot of stretch. The surface that you embroider on does impact how you want to set up the design. I also want to do the embroidery very close to the bottom edge of the dress, so it's won't fit in the whole hoop. The third difficult thing about this design is that there's a machine applique in the very start. This applique will let you embroider this on a fabric that isn't pink, and the shoes will stay pink.
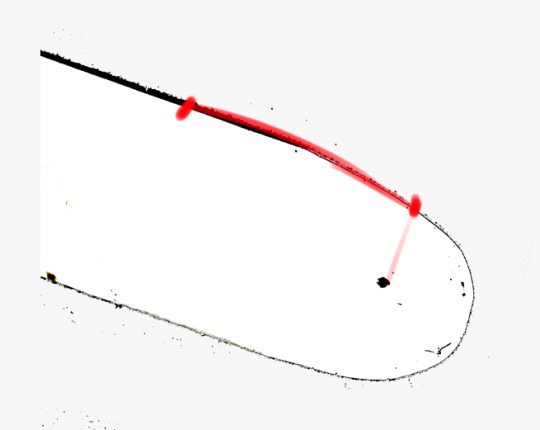
Regarding the applique, I've been told that it's small enough that you could cut up an actual pointe shoe and use the satin from that, if you want to. I don't have a shoe on me, since I don't dance (I just do the costumes). But, if you're making a gift for someone who dances on a level where they're throwing away dead pointe shoes instead of keeping them in a memory box, it could be a fun addition. Here is a template to show you how big the pieces need to be. Important: do not cut out the appliques using this template. The machine will cut them out for you later. You can use this template to know if the pieces of fabric you are using for your applique will be big enough. You want your pieces to be larger than this template, but they don't need to be significantly larger.

The first problem that we're going to deal with is the fact that the dress has a small amount of stretch in it. We don't want the section of the dress that has our embroidery to stretch at all. At best, it'll look bad, and at worst, it'll destroy the whole embroidery. To stop the area with the embroidery from stretching, we're fusing a fusible non-showing mesh stabilizer onto the area to be embroidered. I'm doing this design in 6x6 hoop, so I got a piece that was about 8x8 and fused it on the area.
When you're using fusible stabilizer, you want to iron it on from the fabric side. Some nylon meshes will melt if you iron them, but most importantly you want the face of the fabric to be perfectly smooth.
When the design is done, this stabilizer will remain in the design forever. This stops the design from stretching, even when the garment is worn or washed. The mesh is light and flexible enough that it doesn't drastically change the way the fabric moves.

The next thing we need to do is add stabilizer to the hoop. Embroidery machines put a lot of stress on the fabric, and so it's not usually possible to embroider without stabilizer. In this case, we're also using the stabilizer to hold the fabric, since we can't get it in our hoop.
This is two layers of soluble tear-away stabilizer. If I'm using tear-away, I always use lightweight tear-away. Using multiple layers of tear-away will put less stress on the stitching when you rip it away, because you rip one layer at a time. This requires less force than ripping a thicker layer away all at once. We're using tear-away because we don't want to keep all this stabilizer in the design. The specific one I'm using is a tear-and-wash stabilizer, where the extra bits of tear-away can be washed out of the finished design.
The other thing that I did while the iron was still hot was to press the pink satin that I'm going to use for my applique. Applique is much easier if the fabric you're using isn't wrinkled.

We're going to pop the hoop into the machine. Now is a good time to go into your machine's manual and find out where the basting line setting is. Bernina, Viking, and Pfaff all make this super easy, and Baby Lock and Brother do not. For Brother and Baby Lock, it's often in the "embroidery edit" mode. If it really gives you trouble, tell me what hoop you need it for, and I'll make you a version of this file with a predone basting line.
Some people like to spray-baste into the hoop. I do not like this, because it makes your hoop and your machine all ugly and coated in spray shit. If you are one of those people who likes spray, 100% take the hoop outside to spray! It's not good for your body and you'll get overspray glue all over your shit. If you're not a person who spray-bastes, do not become one.
Some people like to use tacky or sticky tear-away for this. That's a completely fine and valid option, but that shit is expensive. Basting line is cheap. A general stabilizer rule is that you can cheap out on tear-away and cut-away, go mid-price on fusible, and buy a good brand of tacky or wash-away. This is because it's pretty hard to fuck up cut-away stabilizer, but also pretty hard to make a good stabilizer that's also tacky and n'gones when you need it to. Since I have 200 things I'd rather do with $86 than buy a roll of stabilizer, I just use the basting program for 99% of my embroideries.
Before you run the design, flip through your color blocks. Make sure that your design starts with five blocks of the same color. If your machine decides to "help" you and merge the color blocks together, this won't work properly.
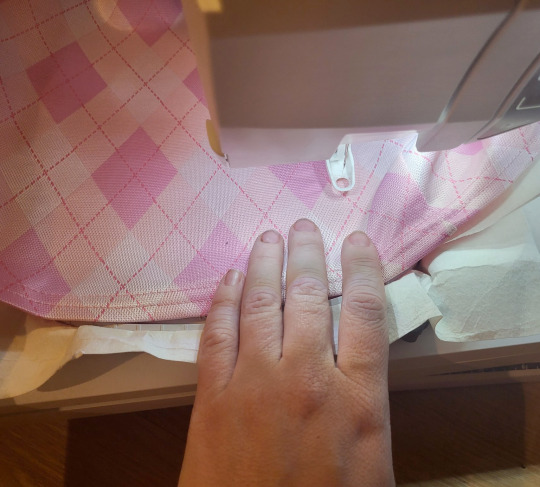
Now, put your fabric in the hoop, wherever you want the final design to go. I lined the hem up with the bottom of my hoop. Run your basting line, holding your fabric flat on the hooped stabilizer. You might need to pause and unpause the machine several times to move your hand and keep the fabric flat. Remember that as long as your hand is flat on the fabric, and you have a presser foot on your machine, you can't hit your fingers with the needle. Despite what this image shows, I often hold the fabric down with my whole hand in the center of the hoop.
Floating the fabric like this, instead of hooping, also allows you to line the fabric up very precisely. It's hard to hoop something 100% straight, but it's pretty easy to float it 100% straight.
Another advantage of floating with a basting line is that the line will show you exactly where the design is going to go. If you don't like where it's going to go, you only have about 50 stitches to rip out so that you can change the location. You'll know that your embroidery unit will have enough space to move. All hail the basting line.

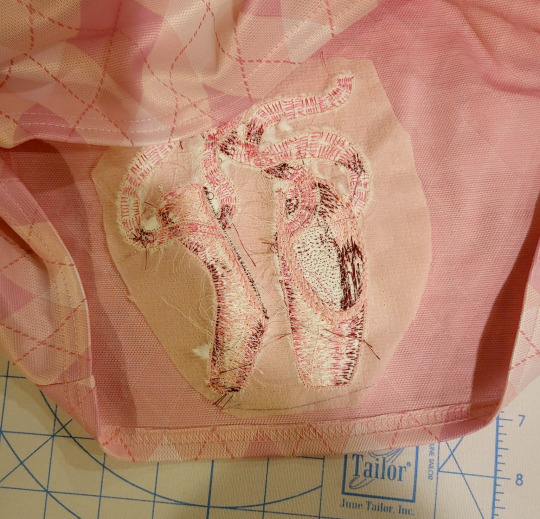
The machine is going to sew an outline, and then stop. This is showing you where to place your applique fabric.
A good general rule is that any time a pattern sews an outline and then stops, you're supposed to put fabric down there. If your pattern does this, and you're not sure why, see if there's any instructions that tell you what applique fabric to use where.
If your machine sewed this outline and then kept going, make sure you have color block merge turned off, and that you're not in monochrome mode.
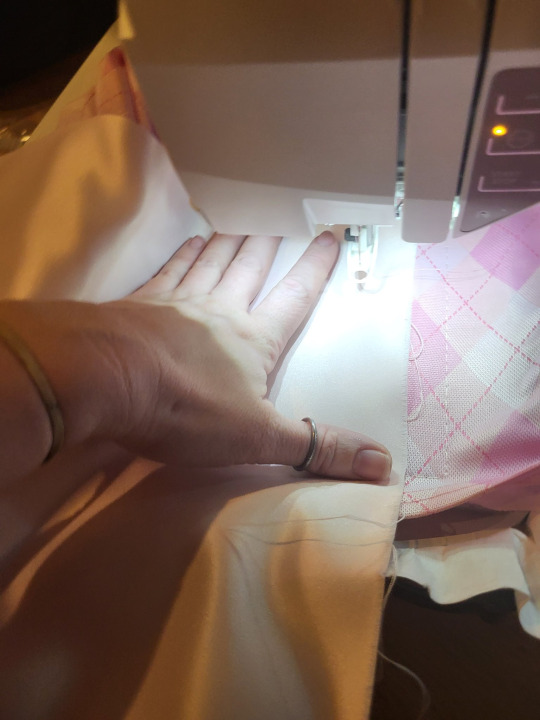
Just like when you were basting your garment onto the hoop, you're going to hold the applique fabric over the outlined area, and keep it there while your machine runs the next color.

Once the machine has sewn the applique fabric down, you'll want to trim away the excess. I use some very small curved scissors for this, since the curve lets me get very close to the stitching line. Generally, you want to be as close as possible to that line.
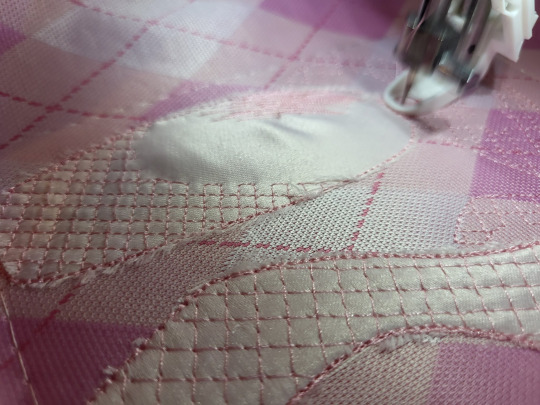
Once you have your applique fabric sewn in, you can more or less just watch the machine and change the colors when it asks you to. You'll see that I have a bulge in my applique fabric on the lefthand shoe. This isn't ideal, but since this design has so much stitching, it all got flattened down in the end.
You'll see that there's a lot of crosshatching on the surface before the colors go on. This is to stabilize the fabric and keep it in place when the big feathered stitches start. These stitches also sew the stabilizer to the back of the fabric, which means that if your fusible mesh starts to lose fusion, it'll still be completely sewn down.
If your machine has manual tension, you'll want to lower it after the crosshatching layers are done. You can change it after color block 5.

The reason that you're lowering your tension is that these stitches are particularly lorge and lomg, and that means the machine can pull just a bit harder than normal when it moved form place to place.
If your machine doesn't cut jump stitches (the long stitch the machine leaves when it jumps from one section of embroidery to another), you will want to trim them between color blocks, instead of waiting until the end.
If you're watching this stitch out and going, "Wait, I was told my machine embroidered at 1200 stitches per minute! This isn't going at 1200 stitches per minute! What gives?" well, I'll tell you. Your machine's stitch speed was rated by the absolute fastest that the machine head can go. It doesn't actually take into account how fast the embroidery unit can move. Since these are longer stitches, the embroidery unit can't move fast enough to keep up with the machine going 1200 stitches a minute, so the machine has to slow down to deal with the e-unit's speed.
If you did this correctly, the back of your embroidery will not be sewn to the front of your embroidery, and you'll have something that looks like this.

You'll need to cut your bobbin thread about every 10 stitches in your basting line. This is pretty easy, because the stitches are so big. I do this from the back side because the stabilizer protects the fabric from my scissors.
Then, flip it over and rip out your tear-away, one layer at a time. You'll notice that my back side is really ugly. This is because Viking and Pfaff don't cut the bobbin thread between jump stitches. In the old days, this meant that they jammed and locked up significantly less than other brands, but now there's things like wiper feet and tail-clearing programs that work a lot better. No, there's no way to activate bobbin jump cuts. If there was, I'd have done it by now.
Now, using your iron if you need to, peel back the extra fusible mesh and trim around your design. You can get closer to it than I did here. I'm just lazy.
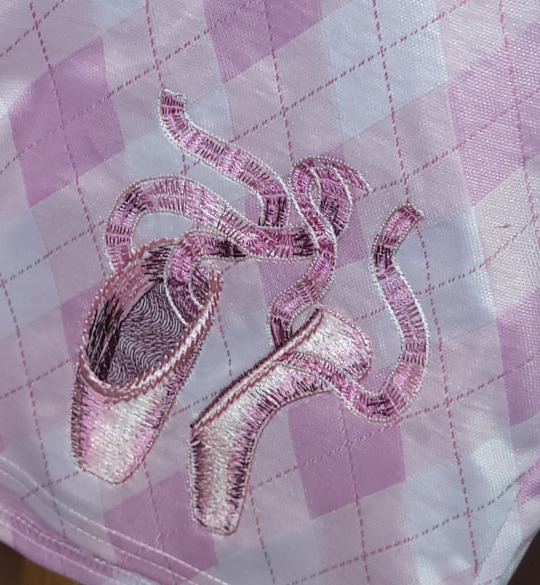
If you're using polyester embroidery thread, you get some pretty good results by sticking a press cloth over the design and ironing it. This will make sure the threads line up and stay extra shiny.

And that's important because polyester thread already doesn't have the same luster as rayon thread. It's more sparkly than lustrous. However, some brands of thread are just easier to work with. When we're testing machine problems in my store, we test with isacord, since it's the least likely to have problems, so we can rule out thread problems. But man, I just think it's so ugly. I used polyester for this design, because it's long stitches on a garment, and I need that strength, but I'm not happy about it.
Anyway, there you go, that's the basics of a somewhat complex machine embroidery pattern.
I'm considering making a separate blog for embroidery stuff. I'm really tired of the embroidery industry charging for tutorials like this or instructions on the embroidery software (looking at you, Floriani Total Control University DVD for $218), but this blog isn't really for my vendetta against the embroidery industry.
#machine embroidery#tutorial#not lolita#applique#pointe shoes#ballet shoes#you know that moment in welcome to the black parade where they modulate and it's just such a good moment
40 notes
·
View notes
Text
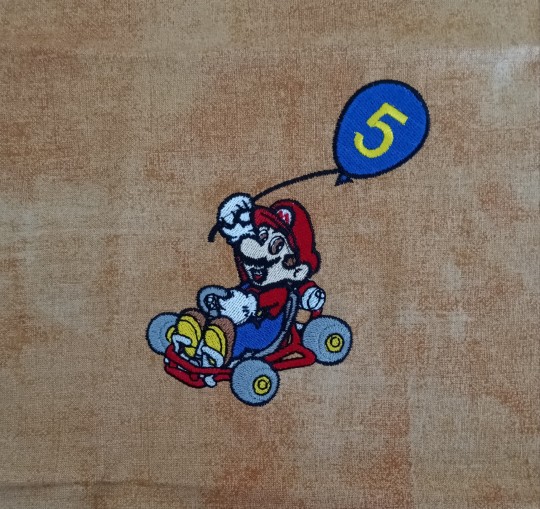
It's Halloween! It's my Neifling's Birthday!
This year's theme is Mario Kart.
First of all, every year my Niefling gets an embroidered piece of fabric that will go into a quilt one day. (Probably a 13th birthday gift, but we could hold off for 18.)
Secondly, I have the designs from a vintage Babylock Design Card for actual, legit, licenced Mario Bros. designs for my embroidery machine. (Mwahahaha!)
Here's this year's creation:
For the Mario costume, I provided the hat, the overalls and some ideas for a mustache. I found out that I still have some fuzzy 'staches in my makeup collection! For my brother's Luigi costume, I loaned him my overalls and found a Luigi hat online.
But little Mario should have a nifty red shirt, right?

The younger Niefling isn't 2 yet, so this might be the last year that the older one gets to determine the younger kid's costume. I made a hat and vest for Toad.

The Mum was planning a princess Daisy costume, but it's 30 degrees (F) out there. But the Neifling really wanted a Piranha Plant, so I'm going to embroider a yellow T-shirt for her:

For myself, I'm going to represent the Grow-Big Mushroom, with a modified version of my Mushroom Fairy costume. Last night I designed and stitched out an in-the-hoop applique pattern on a red sweatshirt. (I'm planning layers. Many Layers.)

Seen here with Photobomb Cat, AKA Big Business, AKA Lincoln.
And now Mumma has informed me that shed rather be the star! That's easy, and fantastic, so I better get to work. Pictures of my personal costume will be posted later. (Sorry, no shots of the kiddos; their parents don't approve of online posting. I support that position wholeheartedly.)
10 notes
·
View notes
Text
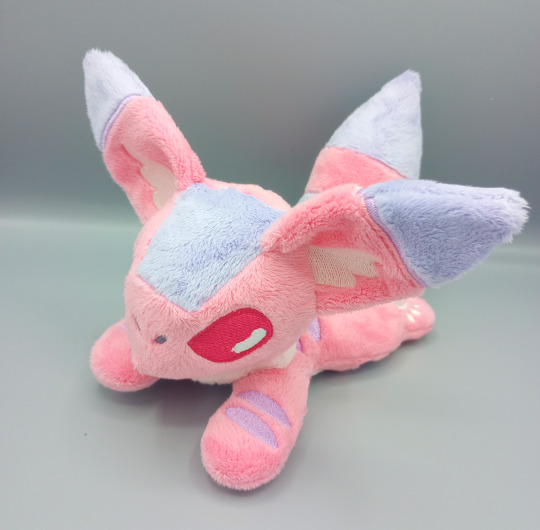


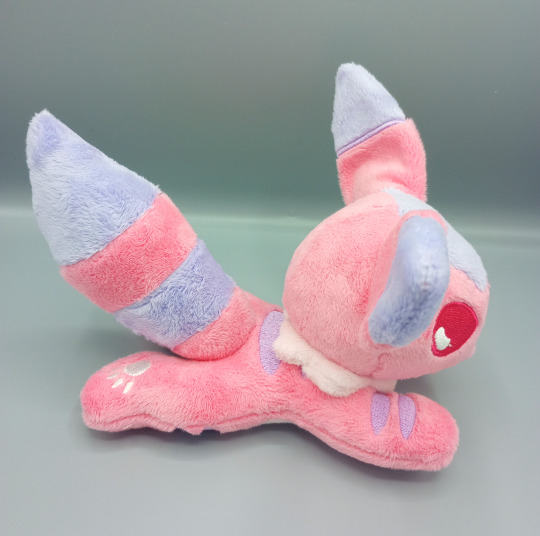

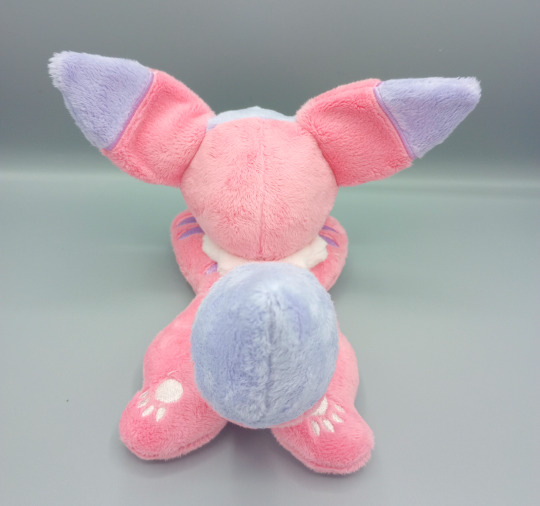
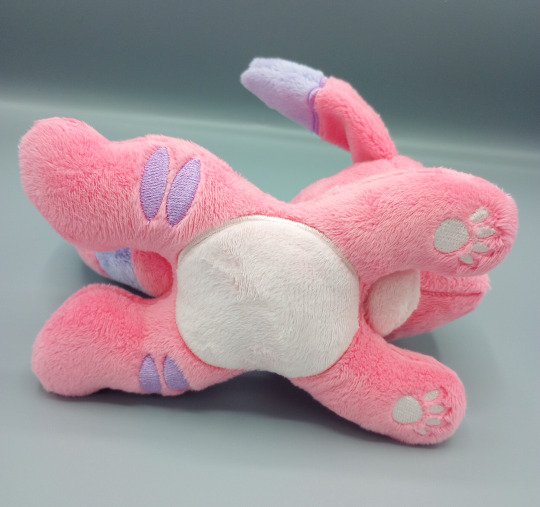
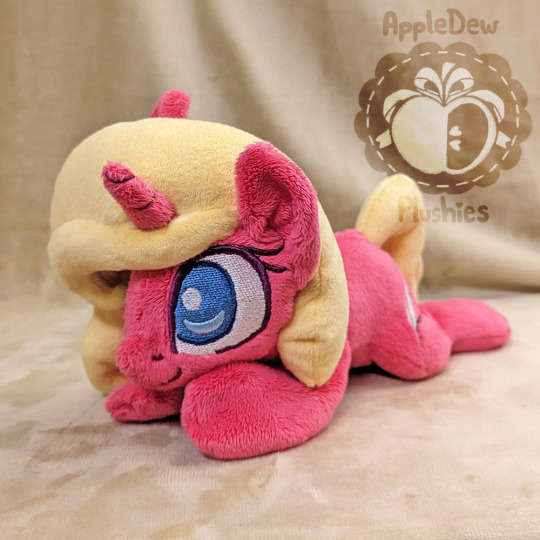
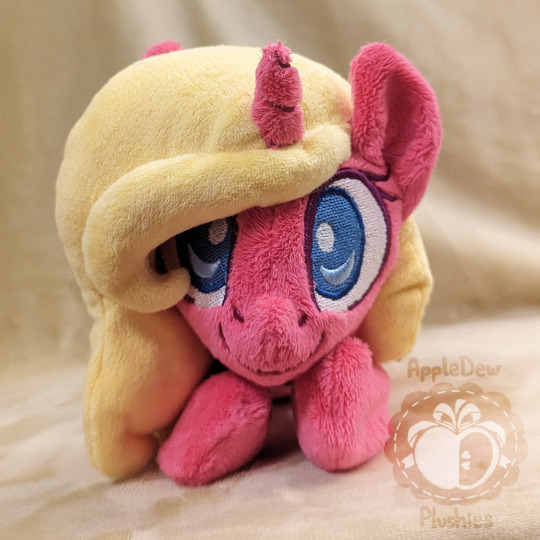
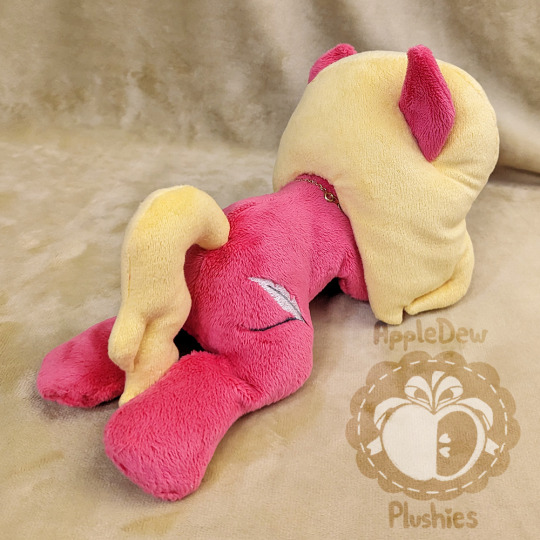
Teto's design looks so good in pretty pastels! This was my first time trying a beanie-style plush, and it was harder than it seemed haha It actually took longer to finish him than some of my larger plush! It was probably the amount of embroidery and applique! I'd love to make more beanies sometime (maybe Pokemon designs or ponies!)
Pink Teto was part of my pink Ghibli collection! It has already been adopted, but look out for another Ghibli collection at some point! He is made of soft minky with a machine embroidered face, paws, markings and ears. He is approximately 7" long and 6" tall. Pattern by @sewdesune.
Ko-fi ✪ Instagram ✪ Twitter ✪ Facebook ✪ Etsy
#studio ghibli fanart#plushies#kawaiicore#nausicaä of the valley of the wind#studio ghibli#teto#pinkcore#plushcore#plushblr#stuffed animals#kawaii#mtkp
10 notes
·
View notes
Text
Free Embroidery Files
Hi all!
In the Google Drive link I have provided you will find machine embroidery files digitalized by yours truly! All the patterns are made to fit a 4 x 4 hoop or larger. Not all files are physically stitched out, but all are run through a realistic simulator. In the drive, any files marked with "*" means they have been tested. If you run across issues with any of the files please PM me so I can fix them! Thanks!
Files named something like "x minky embroidery" means different colours of fabric are appliqued on then satin stiched around to give a clean finish. Files named something like "x full embroidery" means the design is fully stitched out on the embroidery machine, with no need for different colours of fabric.
For all keychains once done embroidering cut a slit in the back of the second fabric piece that was stiched on top so you can flip the finished piece inside out. If you have any questions feel free to reach out.
Happy embroidering!
Many of the files are pokemon from pokemon cafe remix, but if you have suggestions I'm all ears! Just shoot me a PM :]
cavernzone's free embroidery files
4 notes
·
View notes
Text
I received a small sample of threads by Aurifil when I renewed a subscription to a quilt magazine last year. The first time I used the thread was for a friend's quilt (finished the top) and this stuff is phenomenal. Zero lint, strong stitches, sharp seams, no tangling, and fell in love with it. Buuuut this stuff isn't cheap. At all. I dream of having their entire collection of thread, but that's a long way down the road. This here? $160 Each spool has 1422 yards/1300 meters, which is nearly twice more than the spools of Gutterman I use (Gutterman is the best affordable thread Joann Fabrics offers IMHO).
For piecing, you want to use 50 wt thread with an 80/12 size needle. The larger the number for piecing thread, the more fine it is. 28 wt is really thick, 80 wt is very fine. The thread needs to fit the needle, or you'll end up with torn threads, tangling, and skipped stitches. For 50 wt, 80/12 is best.
For quilting, it depends on what kind of quilting you're doing and the look you want. Pearl Cotton is very thick and adds serious boldness, but you need an embroidery needle because the threads are too thick for a standard handsewing or quilting needle. The standard thread weight is 28 wt, which makes for a more visible bolder look than finer threads. I prefer variegated threads done with my machine because the tension never breaks the thread, whereas I end up breaking the thread when handquilting. Thread made for handquilting also tends to be stiff, and only tangles if cut too long (18 inches is recommended, but I tend to cut 24 inches). Using a thread wax, like Thread Magic, prevents tangling and bearding (batting coming through the sewing stitches), and it also makes the thread pass through the layers very smoothly.
My dream is to have Aurifil's enter 50 wt solid spools collection, and their entire 28 wt collection (which includes variegated) buuuut that's really expensive. I'm talking over $2k worth of thread. I'll be happy with just a collection of Aurifil's neutral colors 50 wt collection.
Here are the link to their full 28 wt threads. It's $1800 USD aka waaaaaay outta my price range.
Here's the link to their 50 wt collection of neutral colors. It's $160 USD, which is outta my price right as well.
My favorite, more affordable, brand for piecing and handquilting is Gutterman. 100% cotton, low lint, good color selection (when Joann Fabrics has it in stock), and 800 meters per spool. The dream, however, is Aurifil.
Here's a link to Aurifil's info website. You'll learn a lot about thread that way.
As for needles, this is what I use. I have enough needles to last several years. They're sharper the more well known brand Shmetz, and I absolutely love these.
16 notes
·
View notes
Text
#1 Agency specializes in high-quality machine embroidery digitizing services

Odd Infotech #1 Agency specializes in high-quality machine embroidery digitizing services, including logo digitizing, applique digitizing, 3D puff digitizing, and anime designs digitizing. With a team of skilled professionals, we ensure precise and detailed conversion of your designs into machine-readable formats, catering to diverse embroidery needs.
Whether you require intricate logo embroidery, unique applique designs, textured 3D puff effects, or vibrant anime-inspired artwork, our services are tailored to bring your vision to life with precision and finesse.
Choose Odd Infotech #1 Agency for top-notch embroidery digitizing solutions that elevate the aesthetics of your projects.
#digitization#digital art#logo design#digital illustration#the amazing digital circus#apparel#embroidelicious#digital painting#embroideryart#embroidery
2 notes
·
View notes
Text
DIY Felt Bag
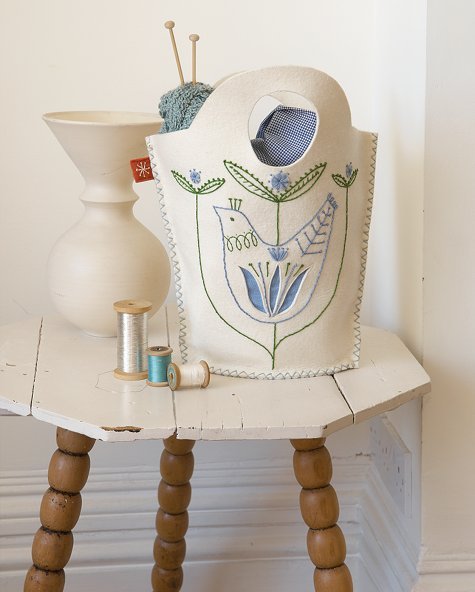
Project by Clare Youngs:
i’ve had the book scandinavian needlecraft (cico books, 2010 $19.95) sitting on my couch for a few weeks now, just drooling over all the projects i’d like to attempt (and will probably never fully finish). author clare youngs has gathered together some of the most delightful home craft projects ranging from firewood holders + christmas stockings to pillows and curtain tie-backs. but today i’m thrilled to be sharing the full how-to from my favorite project (which is on the cover of the book): a scandinavian-style felt bag with embroidered bird. marny at cico was kind enough to share the templates with us so you can make the project using these instructions online. if this project gets the gears in your head turning, you’ll love the rest of the book- you can pick up a copy right here for $19.95. thanks again to marny and clare for sharing this project with us!
Materials:
1. Template (Download the template here)
2. 40×18 inch cream colored felt (choose a thickness that works for you- but keep in mind you’ll want it fairly thick to give the bag support and shape)
3. small piece of blue cotton fabric to go behind the cut-outs
4. small piece of blue felt for the applique
5. 3.5 x 1.5 inch orange felt for label
5. dressmaker’s carbon paper
6. blue and green stranded embroidery floss (cotton)
7. Sewing machine
Steps:
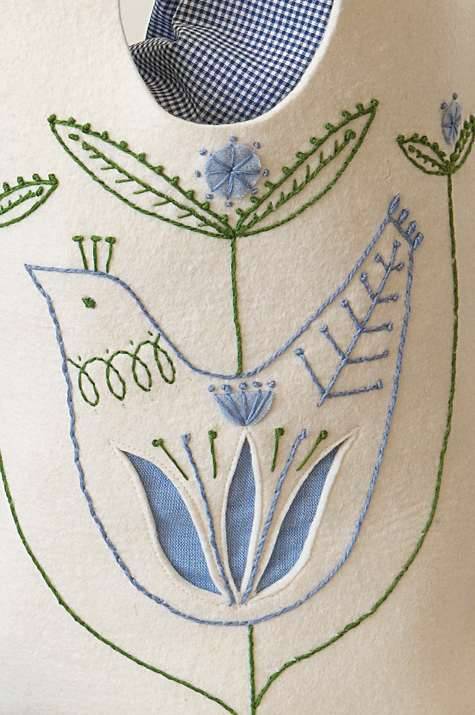
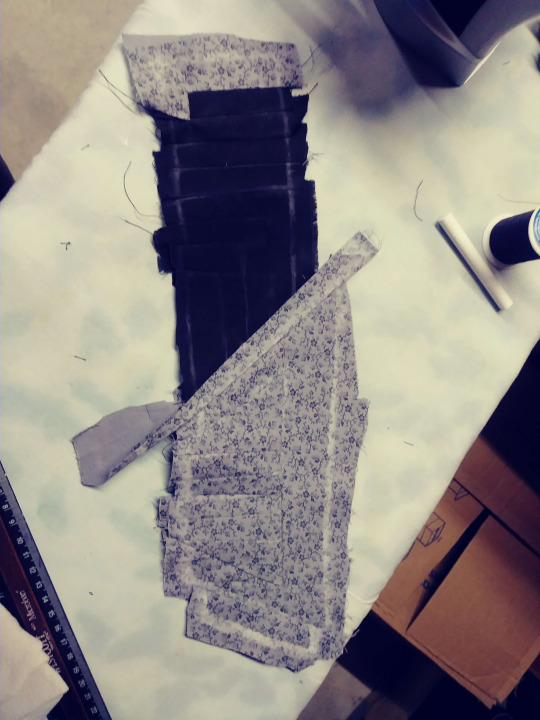
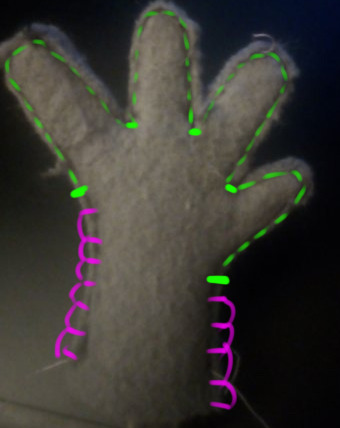
1. Print out and enlarge the bag template by 250 percent. Transfer the bag shapes to thick cream felt and the applique shapes to the thin blue felt, and cut out. Using dressmaker’s carbon paper, transfer the stitch guide (on the template) to the front panel of the bag. Cut out the three leaf sections from the front panel.
2. Place the blue cotton fabric behind the cut-out leaf section. Pin it in place, making sure that it is free of wrinkles. Using thread that matches the felt, machine topstitch around each cut out leaf shape, stitching close to the edge.
3. Pin, then slipstitch the four blue felt applique pieces in position. Following the stitch guide on the template, embroider the design in blue and green embroidery floss (cotton).
4. Choose your own motif, or stitch a small star (as pictured) onto the orange felt fabric used as the label. Stitch it to the right hand side of the label, leaving 1/2 inch of felt to tuck into the side seam.
5. Fold the label in half lengthwise and sew up each long side close to the edge.
6. With wrong sides together, pin the front and back panel of the bag together along the side edges, inserting the label in the top seam 3/4 inch down from the top left edge.
7. Pin the base to the bottom of the bag and baste (tack) it in place. using the blue embroidery floss (cotton), work the decorative cross stitch around the sides and base of the bag. Bring the needle out a the top of one side seam on the right side, about 1/8 inch down from the top of the bag and 1/4 inch in from the side. Take the needle over the top of the bag and back through the same hole. Make evenly spaced diagonal stitches all down the side seam and around the base. Fasten off, then work the second seam in the same way.
8. Come back the other way, making diagonal stitches that slant in the opposite direction so that they cross over on the joined edge. You’re done!
4 notes
·
View notes
Photo

I procrastinated figuring out how to use my fancy new sewing machine SO hard i made a quilt design about it, and then started making the quilt, with the sewing machine, so i think i’m procrastinating so hard it’s coming back around into productivity? this is wayyyy too fucking ambitious for my first quilt and i have no idea what the fuck i’m doing but! that will not stop me!
originally the design was much larger and for a queen size, and then i got out a yardstick and realized that’s way too fucking big so i downsized the scale and moved things around and added more buy’cese, i’m not sold on the background color and i’m prob not going to embroider the crusader’s emblem or the vizsla emblem like i had planned bc it stands out too much, but i was thinking of stitching the mythosaur symbol down the vertical sides, but i could also do lines of “bic cuyir te ara” since i’m already gonna be hand stitching so much goddamn mando’a
i’m pretty sure i can program custom embroidery patterns into my fancy machine (which is the whole thing i’m procrastinating about so finishing all the buy’cese will force me to find out) so i want to do the resol’nare in gold, but i don’t think anything with gold filament is gonna be strong enough for that so i may do yellow and embroider a bit in gold filament just to get around that, and then i’m still sorting through what patterns i wanna do across the quilt, i was thinking random concentric squares of lines of text, that way i could do kote darasuum around where cody is and a much bigger one spreading from the taung at the bottom with a version of dha werda verda (still haven’t figured out which one to use), but then i don’t know what to do about the rest of the quilt, and like do i really want to hand stitch everything in mando’a characters (resigned)
so obviously what i’m using here is a mix of different canons with some fanon sprinkled in (sue me, canon mandalor the uniter fucking sucks, basic bitch buy’ce, so i replaced that one with the irl dude’s mandalorian oc of the same title bc quite frankly it’s more meaningful to the fandom and it looks fucking sick), some of them had very little canon material to work with so i tried my best to wing it (tarre vizsla didn’t really have a buy’ce per se so i’m still debating using matte black for that one), some i picked bc they looked cool and not because they’re relevant, some i left out purposefully

i started with the darksaber, because i thought “it’s smaller and just a bunch of straight lines, how hard can it be?” but it turns out needle-point turn on all those stupid tiny corners is, in fact, a new layer of hell i had previously remained oblivious to, but i still did it, and it’s only a little wonky
ok so the quality is shit, but it’ll look real nice when i fucking needle-point turn applique this shit to the top layer and then detail it all in silver when i’ve got all the sandwich together, and i’m real fucking proud of myself for getting the first bucket done, and it even mostly lays flat!

i’ve got this stupid shiny black fabric i’m using for all the visors and it is definitely painful as hell to work with but god does it look nice
#quilting#mandalorian#mando'a#nobody i know cares about star wars enough for me to ramble about my stupid quilt#the person im making this for isn't even gonna get all the cool little easter eggs i'm utting into this shit#does he know how to conjugate verbs in mando'a!!?? no! but i do!#like the gods all have eyes in their visors#mandalor the lesser being placed by hod ha'ran the trickster god bc he was a sith puppet#oooog but i don't know what i'm going to do with the original mand'alor one#maybe take some gold lines to it after i've attached the base to the quilt?#program some embroidery lines before i sew it to anything?#there is no way in hell i'm cutting up all those tiny ass pieces and then sewing them all together#that wouldn't even be visible at the end and really it needs to be a lot more visually striking for what it is#ooo maybe i could stitch the jedi code translated into mando'a over tarre vizsla and the darksaber#like the fact that it would go under the resol'nare is perfect
8 notes
·
View notes
Text
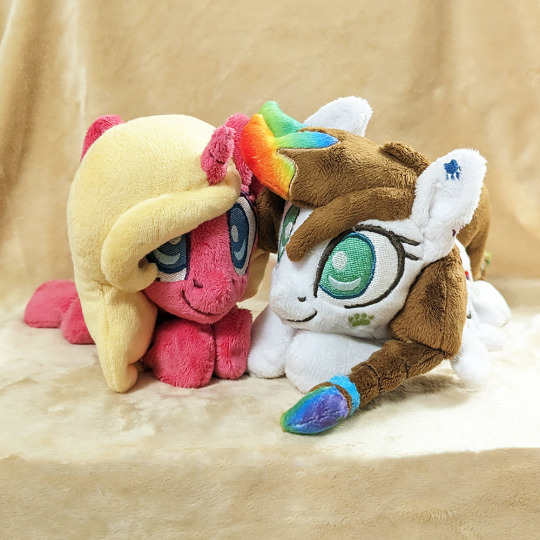

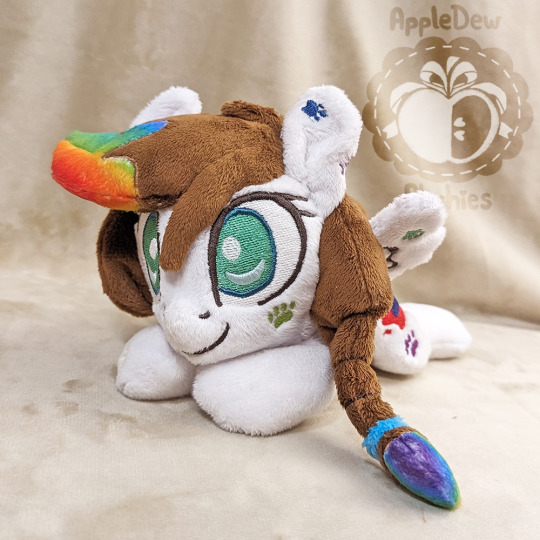

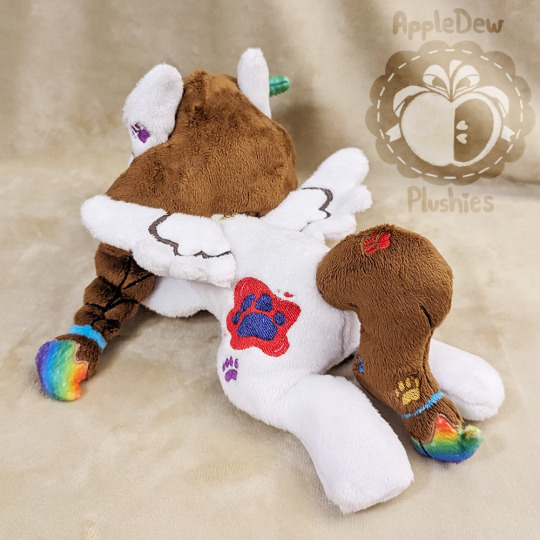


Here is Artistic Feather and Splatterpaw!
Made for an anonymous user!
Both plush are made with minky, short pile minky and custom printed minky. They lay at about 10 inches from the tip of the nose to the back legs. Details are machine embroidered and appliqued. The necklaces are removable using a small clasp on the necklace.
Fun facts!
Embroidery on Splatterpaw (the white pony) took quite a bit of planned on editing, specifically the paw print details on the body and tail!
Artistic Feather was one of the simplest plush designs i've made in a while!
Both have a matching necklace with charms. :)
-----------------------
Ko-fi: https://ko-fi.com/appledew
Trello queue: https://trello.com/b/FZKSnMo7/plushie-commission-to-do-list
Twitter: https://twitter.com/AppleDew_
Instagram: https://www.instagram.com/apple.dew
Tumblr: http://appledew.tumblr.com/
Furaffinity: http://www.furaffinity.net/user/appledew
deviantArt: https://www.deviantart.com/appledew
20 notes
·
View notes
Text
Doom mood mood doom plush making detailed guide!
(as it turned out I only lost the patterns of tail and some of clothes so I will make another post lately after I remember how i construct quaternion pants)
I design these patterns using metric system!
List of materials:
White fabric 40x160 centimeter (i recommend use plush or fleece);
Small pieces of black, light blue, red, yellow, green and blue fabric for face shade, nose, cheeks and ears (can be dyed from scrapes of main fabric or probably painted on ready fabric details, but it will make fabric rough);
6-strand thread for embroidery (black or dark blue for whiskerks, mouth, legs and tail details, light blue for face shade and red for cheeks);
Spool of white thread for magic to be happen;
Piece of red velcro for eyes and eyelids (realy painfull to handsew, so if eyelids not neccesary you can use same fabric as for applique);
34 fuzzy wires (four for each arm and leg and two for tail);
9 cotter pins, 18 two cantimeters disks for joints and 18 shim rings (to protect disks from pins abrasion);
Not neccesary: clear super glue to secure arm stitches (dont use 5-second type, it soaks really deep into fabric and can ruin whole detail);
Toy stuffing (not sure how it properly called at english but i use 100% polyester one)
List of instruments:
Sewing macnine not really neccesary, i use it only for applique lines, but saves a lot of time if you can do all things with it;
Pins or sewing clips (not neccesary, you can use basting stitches as well);
Soap shard/tailor chalk/graphite pencil to mark details at fabric (pen or marker can soak into right side of fabric);
Pliers to twist cotter pins;
Handsew needles, small ones for sewing and bigger ones for embroidery;
Fabric scissors or craft knife.
(sorry if i dont mentioned something it there, only now i realized how many things it required)

[Note: pattern is A4 size!]
Preparing:
Arrows shows fur direction for plush or fur fabric; if you use something else you can ignore them, but be careful with fabric direction! Some can be elastic at one direction and none at another, so if you make two details at different directions it can deform really badly when you start stuffing them!

Fold your main fabric right sides inside and lay every detail to make sure you have enough of it; add seam allowance if you decide to sew it in machine!
Sewing:
[Note: for handsew i mainly use blanket stitch, except for some parts]
[Second note: pin/clisp/bastsew everything before sew it!!!]
Head:
Starting from ears: cut out inside or ear detail (dont add any seam allowance!) add some one milimeter seam allowance at stripers; then sew all stripes together and after it pin inside of main detail and start sewing it in!
[note: you can use this method for cheeks too!]

Start sew inner and outer details from top edge to middle of bottom, them turn it out; for stuffing i use EVA foam details, holofiber is okay too! After stuffing, close the bottom edge with ladder stitch and leave small side gap to sew it in place later!
For cheeks i use different technique; first i pin details into place, then sew it with running stitch and after that i lined them with zigzag stich.

[Note: i try macnine finish which takes 10 minutes and handsewing one which takes ?3 hours? cant really say]
After that start sew all head and muzzle darts, directing from inside to fabric edge; sew ear into red dart first and only after that close this dart; then sew two details of head at each other, but so far only from muzzle edge to top dart!

Sew muzzle details to each other, leaving flat side open and then attach it to head.
Then you can applique face shade (overlay dart) and eyes! For nose i sew with ladder stitch small circle from black fabric (not included at pattern) which ovelray muzzle darts.
Connect head details from bottom muzzle to neck dart, then stuff muzzle and after embroidy mouth and dot whiskers with handsew zigzag.
For whiskers tie a knot at tread, pull it out into right side of fabric, tie another knot closely to fabric to secure it at place at after that tie third knot to length you want; cut tread off and secure it with superglue (optionally)

After that remove stuffing from muzzle, sew head details together from bottom dart to neck mark and from top edge to cheeks dart, turn head out and stuff it! Add a cotter pin joint at middle of neck line, secure it with piece of rubber so it won't fall inside and close everething with ladder stitch!

Head is complete! It always the trickiest part.
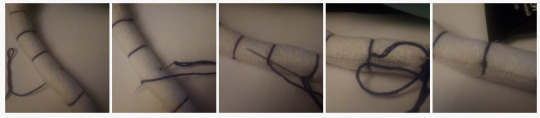
Tail:
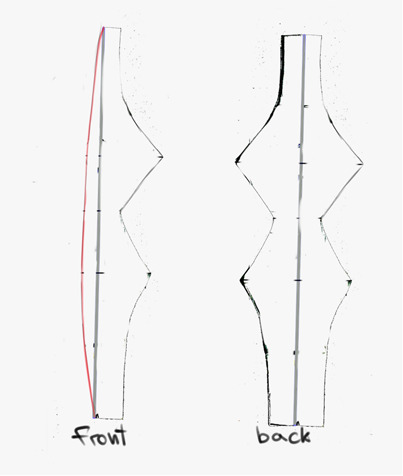
I lost tail pattern, so you need to make your own! Basically it just two long curved details (it can be just thin and long stripe of fabric folded together and sewed)
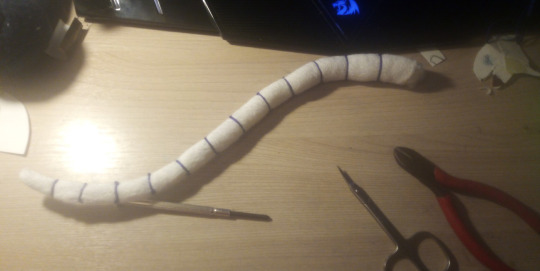
For idk-how-to-call-it-sorry tie a knot at thread, pull it troughth both seams and return to knot, hook thread with needle, and tie second knot; after that cut thread and secure it with glue.
Hands:
[Note: add seam allowance at fingers even if you handsew it!]
Most simple parts, but have some moments; sew two details together, but leave enough place on top to work with pliers later:
For fingers instead of blanket stich use very short running stitch! Be sure to do some between fingers! It most important part.
After that trim fingers seam allowance as much as you cant without cutting stitches and secure it with clear superglue (i hear somebody uses for this techique special fabric glue, but i never seen it my city).
After glue full dried carefully turn out whole hand.
Fold fuzzy wires end twice, so it will not impale troughth fabric and form a skeleton armature and push it slowly into whole arm, make sure it got at every finger; add stuffing on whole arm.

Legs:
Similar to hands, first sew two details together, leave bottom edge and some gap at top opened; after that sew feet detail into bottom edge.
[Note: you can add some fusible interlining at feet to make it more stability]
Method for leg fingers are same as for tail, will make another post if nedeed!
Body and assembling:
Body consists of five details: back, two fronts and two sides:
[Note: before start sewing mark watermarks and cotter pins dots at side details!]
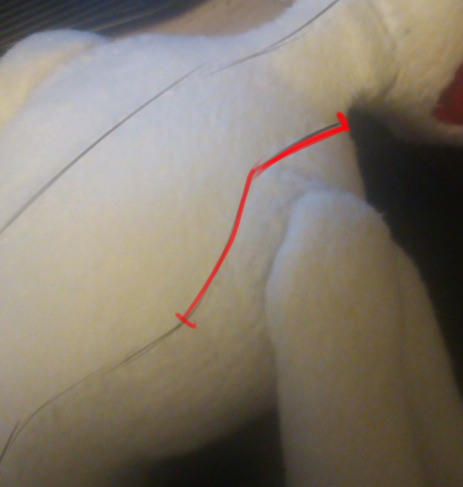
Dont cut darts from sides, just sew it inside with ladder stitch; sew two front at curve edge and connect thinnier edge to thinnier edge of back! Sew sides, connecting watermarks to corners to middle, add leg pins dots joints and impale them troughth finished legs, bead a disk and shim ring, them start twisting pin dot into a spiral, placing its end at shim ring, not at disk! Twist second at same way at try to rotate leg: if it too loose unbend pin dot and try again!

After all legs have been attached ladder stitch tail and continue sew body to a gap between shoulder line and neck at one side, attach finished arms in the same way as legs, cut circle the size of disks and sew it into neck edge, attach finished head, add stuffing to body and close it with ladder stitch!!!
[Note: regural holofiber is slippery and can slip off from neck, i think using small unpolstery foam shavings only at neck be better!]
And thats all for now!
#plush#doom mood mood doom#sparklecare#i write it for eleven hours straight i wish it worth it#tutorial
15 notes
·
View notes
Text
Today, a customer asked how to make a patch on an embroidery machine.
So

Me, yesterday: "So machine embroidery isn't just plopping the file into the machine and walking away while it does it. Making DecaKumya took me multiple hours of actively doing applique work and babysitting the sewing machine, not counting the time it took me to make the file and select threads."
Me, at work: "Oh yeah, and from this point you plop the design in the machine, and now, as long as you're here when it beeps, you can pretty much go do something else."
Both. Both are true.
(Part a. I know my skill level and am okay challenging myself. I know my customer's skill level and show them things they can handle without worrying. If they get the machine they were looking for, and they like machine embroidery the same way I do, they will eventually be challenging themselves with more complex things
(Part b. Generally, when you're using embroidery files from professionals, they're digitized better than what I do. The file for DecaKumya requires me to repeatedly turn on and off the jump cut feature, because I didn't digitize that properly. It also needs some finessing in a certain spot because I didn't put underlay in the collar because I forgot that the software doesn't do it for you on spiral or radial fills because you're not supposed to use spiral or radial fills in the way that I use them. This means a design from a brand known for making good embroidery files will be much easier to run than the decakumya file is.
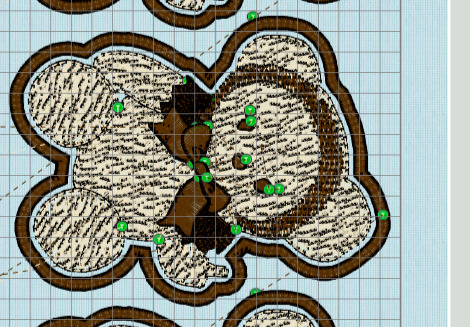
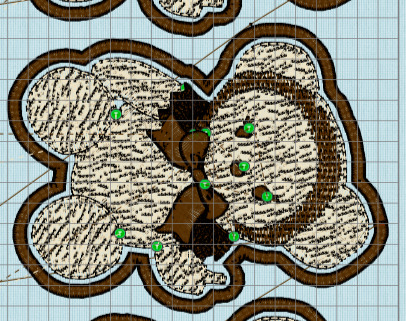
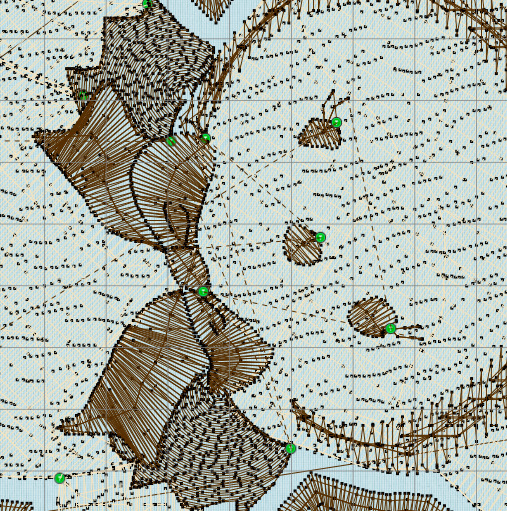
(I literally had to press "delete all trim commands" and then "automatically add trim commands" to make all my problems go away, and for some reason I just did not do that. Each green dot there is a trim command, and you want to have as few of those as possible. The machine likes to fuck up on trim commands, and each trim command uses way more thread than just a jump stitch. So, when you're digitizing things like a proper person, you'll remove those jump cuts or add a bridging stitch under some other stitching, instead of having four cuts in the space of 1/8".
(I also used a really dense spiral fill in the collar to make it look like the crocheted lace they use for her collar IRL. This is cool, except that the software doesn't expect you to ever set the density on a spiral fill to be so dense that you can't see the space under it. It probably surprises no one that I do not use the tools in the software in the specific way they were intended to be used. This means that it doesn't do automatic underlay, which is a web of stitching underneath a filled section. The purpose of underlay to support the fabric before dense topstitching is placed on it. All the dense spiral fill with no lattice underneath to hold it can distort the felt used in the patch, and cause the stitching to sink in. The proper way to handle this is either to DIY your own lattice or to just use the digitizing tools how the good lord intended and not do weird stuff.
says the girl making the patches of a beloved lolita icon giving you a rude hand gesture.
)
30 notes
·
View notes
Text
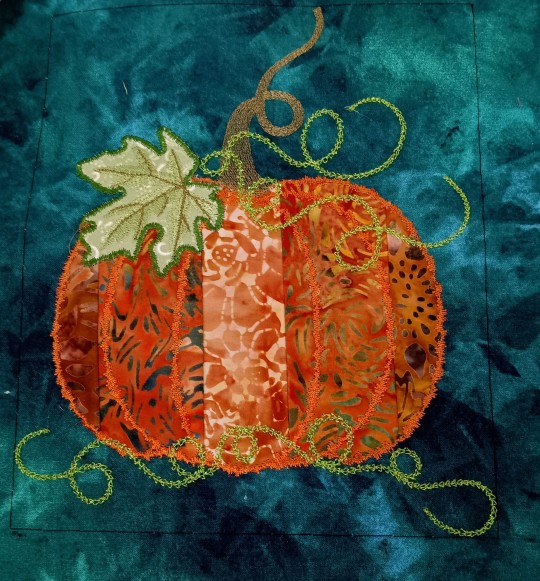
I'm incredibly pleased with these. This is a "Scrappy" project, using up bits and bobs. It's about 9-10 inches tall.
A coworker gifted me with her leftover batik strips from a fall project. I hate to see Batiks go to waste so I set them aside.
Then I found this design from Floriani, with it's strange satin stitches and put it up on the 6 Needle Embroidery machine at work.
I pieced the orange pieces together first, then used the pieced fabric as the applique fabric. I dug up green scraps for the leaves.

I made this one first, and the coworker who gave me the scraps fell in love with it, so I made her another. Then I made the one at the top, with metallic thread for the vines, and she begged me for a second one.
So she's got two, and I have two. I think I want to make a table runner with these blocks pieced in at the ends.
I want to do one in silvers and slate blues with iridescent metallic thread for the vine, as a Cinderella/Fairytale version.
13 notes
·
View notes
Last Seen Blogs

minomaria
Mino oceano

mintclan
WARRIORS - A NEW SIGHT

rpcdocs
🧾

breedtheseed
Breed
Get Him Pregnant

pxssionatex
{ If you say so ;;