#makecode
Explore tagged Tumblr posts
Visit Tumblr Blog
Explore Tumblr blogs with no restrictions, modern design and the best experience.
Last Seen Tumblr Blogs


Fun Fact
US Tumblr user growth rate is estimated to slow down to 4.1%.
Text

my beloved
#microsoft makecode arcade#makecode arcade#makecode#msma#msma status bar#microsoft makecode arcade status bar#makecode arcade status bar
3 notes
·
View notes
Text
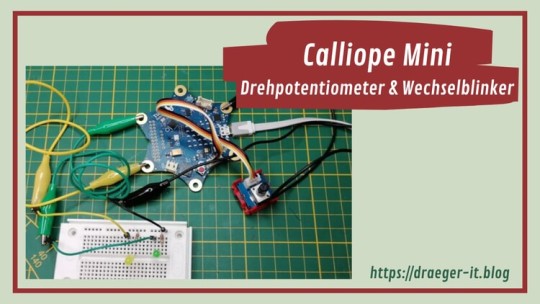
Calliope Mini - Wechselblinker mit Drehpotentiometer

In diesem Beitrag möchte ich dir zeigen, wie du einen Wechselblinker am Calliope Mini aufbaust und die Frequenz mit einem Drehpotentiometer steuerst.
Im letzten Beitrag Calliope Mini - LEDs mit Drehpotentiometer steuern habe ich dir bereits gezeigt, wie du die Helligkeit einer LED mit einem Drehpotentiometer am Calliope Mini steuern kannst.
Benötigte Ressourcen für den Aufbau der Schaltung
Für den Aufbau der Schaltung benötigst du: - einen Calliope Mini*, - ein Micro-USB Datenkabel*, - zwei 5 mm LEDs*, - zwei 220 Ohm Widerstände*, - ein Grove Drehpotentiometer* Modul inkl. Grove Kabel, - drei Breadboardkabel* (grün, gelb, schwarz), männlich - männlich, 10 cm, - drei Krokodilklemmen* Hinweis von mir: Die mit einem Sternchen (*) markierten Links sind Affiliate-Links. Wenn du über diese Links einkaufst, erhalte ich eine kleine Provision, die dazu beiträgt, diesen Blog zu unterstützen. Der Preis für dich bleibt dabei unverändert. Vielen Dank für deine Unterstützung!

Aufbau des Calliope Mini
Damit wir zunächst wissen, wo wir unsere Komponenten an den Mikrocontroller Calliope Mini anschließen k��nnen, schauen wir uns einmal den Aufbau an. Du erkennst, dass dieser an den Ecken über zwei Pins für die Stromversorgung verfügt und vier Pins für den Anschluss von analogen / digitalen Sensoren / Aktoren.
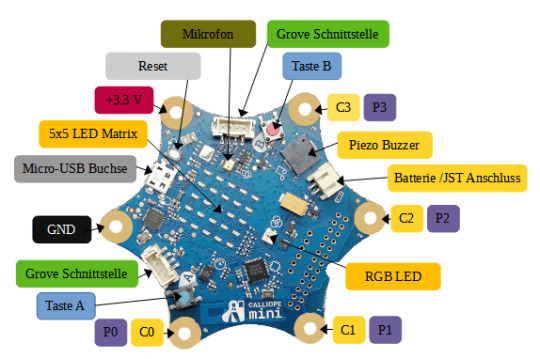
Aufbau des Calliope Mini Jedoch kann in der Programmierumgebung MakeCode nicht jeder Pin verwendet werden, somit müssen wir einen der beiden Grove Adapter verwenden. In diesem Beispiel klemme ich den das Grove Drehpotentiometer Modul an den Grove Adapter beim Button B an und habe diesen somit mit dem Pin C16 verbunden.
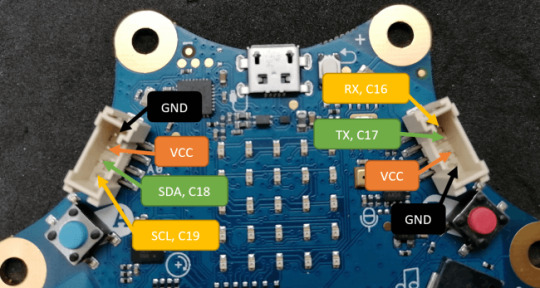
Pinout der Grove Schnittstellen am Calliope Mini 1.3
Aufbau der Schaltung und programmieren in MakeCode
Im nachfolgenden YouTube-Video zeige ich dir, wie du die Schaltung am Calliope Mini aufbaust und in MakeCode programmierst. https://youtu.be/7B-bQkiB2uo
Aufbau der Schaltung - Wechselblinker mit Drehpotentiometer am Calliope Mini
Bauen wir zunächst einmal die Schaltung wie folgt auf.

Schaltung - Calliope Mini mit Drehpoti zum steuern des Intervalls eines Wechselblinkers Aus der Grafik können wir nun folgenden Anschlussplan entnehmen: BauteilCalliope MiniLED, grünPin 1LED, gelbPin 2GND- / GNDDrehpotentiometerC16
Programmieren in MakeCode
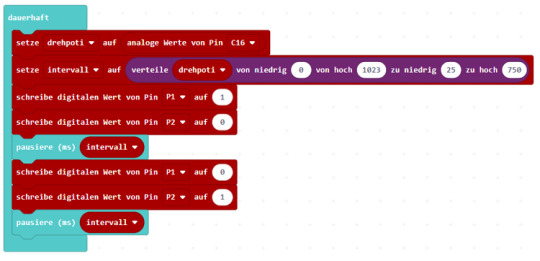
MakeCode - Calliope Mini, Wechselblinker mit Drehpotentiometer
Download
Das kleine Projekt findest du hier nun als ZIP-Datei zum Download. Du musst lediglich die Datei entpacken und die HEX-Datei per Drag'n Drop auf deinen Mikrocontroller ziehen. Calliope Mini - Wechselblinker mit DrehpotentiometerHerunterladen Read the full article
0 notes
Text
The First Three Microbit Projects
0 notes
Text
So, Microsoft has been doing something...
Have to say, only because I just spent the last 2 hours playing around on this. Make your own gameboy game? YES and music? YES do I know anything about making either NO. When I say they have pictures to help I mean, they do animals and click-sound for reference.
Color me incredibly intrigued. I'll finish a game... okay maybe intro, lets be real, and see how it goes. Love this so much.
Microsoft - MakeCode
0 notes
Text
game. play it or don't idk
you need a mouse (not a trackpad) to play it properly.
i'd reccomend selecting the controls option the first time and then the cutscene the second playthrough
0 notes
Text
I wish I wasn’t too lazy to code/ not that good at it, I really want to make a Hawaii part II fangame (idk about the legalities there though)
#I could probably use scratch or makecode arcade since they’re both really easy/made for kids#but the procrastination monster…#I might talk more about my ideas concerning this though
0 notes
Text
Another throwback guys. Except this one isn't Sun and Moon themed.
So I really got around during COVID. I made a ton of things. Not just physical but also coding. And I was in a class at the time, and I was tasked with making a game. Not a hard one persay. But it had to be good enough to present to middle schoolers. And so, with my two-week timeframe to make a MakeCode Arcade game, that I did follow instructions for, for the most part, that is. The boss fight, which looks crappy now but it was my Roman empire when I was younger, I had made it mostly on my own so yk I was proud.
Anyway so basically I am doing summer school classes and I'm doing comp sci and well I was like 'I used to make a lot more than just circles' and well a friend helped me log into my old account and now I'm here. So now I'm posting for nostalgic purposes because if I lose it on my computer at least it will be on my account.
#fyi two kids won 100 dollars for beating this game#two middle school kids#afterwards i had to go around#and help these older kids do coding things#it was so awkward#but this is my baby#and technically#because i wrote the code#this is going under:#buzzywrites#because technically it's writing#if anyone plays it lmk i want to know if it still works#MakeCode arcade#coding#platformer#2d platformer#this thing is.. wow almost 4 years old#so dont judge guys#also B in code is technically e on your keyboard#so keep that in mind yall
0 notes
Text
someone on line for the bathroom gave me a QR code for the game they made and I think it’s so cool
Would totally check it out!!! Just putting it out here. Didnt get their name but hey if you’re on tumblr you complimented my pins and I hope Brian liked your thousands of bracelets you gave him
16 notes
·
View notes
Note
Hi it's the guest666 that got jumped by the entire lobby again. I've met more whimsy people after getting my partner into the game. So far my updates on playing is that shedletsky mains apparently really love beating up killers. I fear I also really like saw noob in a way that may be a lil less than normal and he's all I've been drawing.
the way you feel about sawnoob is how i feel about medkit phighting
ive drawn him at least 5 times this month, my rdrama pfp used to be medkit (before i decided on the hatred theme), i have a minecraft skin of him, and i plastered him all over my microsoft makecode arcade tutorial projects
6 notes
·
View notes
Text
In Progress Game Backgrounds

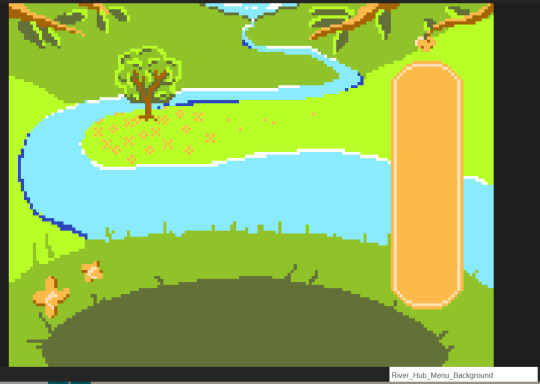
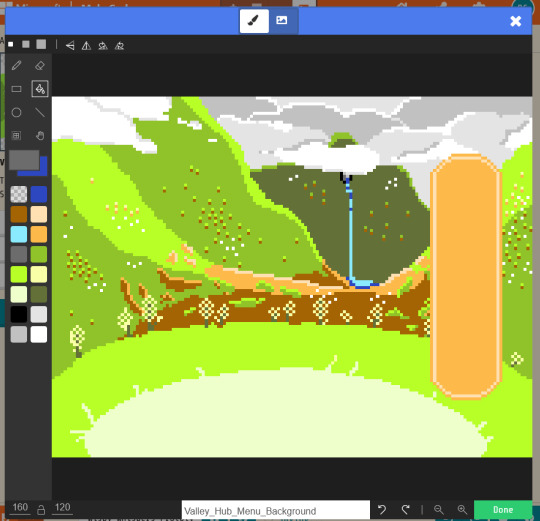
I'm using Makecode Arcade to create a small self care game inspired by dæmonism and pets apps! Here are a look of a couple of the backgrounds you can choose from in game, the Desert, River, and Valley. It was so difficult to work with such a limited ruleset, the final game must be under a certain size, there are only 15 colours, and the screen size is 160x120 pixels, so things can't be too detailed, but I've had so much fun using trial and error and learning to code too.
4 notes
·
View notes
Text
I made a game as a coding example for kids with this exact premise years back
It was inspired by that other Tumblr post about how a roomba outside has no natural predators

This is so sad they won't let it outside and it can't forget what it saw 💔
22K notes
·
View notes
Text
Calliope Mini 3 Tutorial: JacDac Sensoren und Aktoren - Ein praktischer Workshop für Anfänger
In diesem neuen Beitrag präsentiere ich dir die Calliope Mini Startbox mit JacDac Sensoren & Aktoren. In dieser Box findest du alles, was du für spannende Projekte am Calliope Mini 3 benötigst, ausgenommen den Mikrocontroller! Du bekommst diese im offiziellen Shop unter Jacdac Erweiterungen StartKit A für derzeit 49,95 € zzgl. Versandkosten. https://youtu.be/CD8PCHjmaRE Disclaimer: Die in diesem Tutorial verwendete Calliope Mini 3 Startbox mit JacDac Sensoren und -Aktoren wurde mir freundlicherweise von der Firma Calliope gesponsert. Trotz dieser Unterstützung bleibt meine Meinung zu den Produkten und den hier vorgestellten Inhalten unabhängig und basiert auf meinen eigenen Erfahrungen und Einschätzungen. Für diesen Beitrag benötigst du den neuen Mikrocontroller, da die Vorgängermodelle über keine JacDac Schnittstelle verfügen.
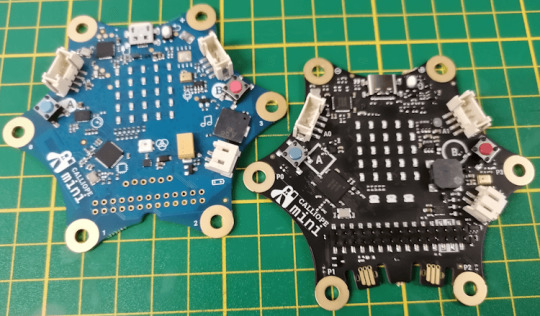
Calliope Mini 1.3 & Calliope Mini 3
Was ist die JacDac Schnittstelle und wie funktioniert diese?
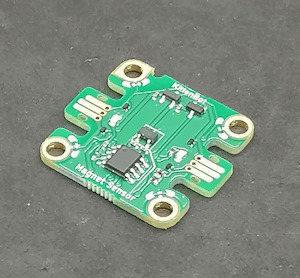
Die JacDac-Schnittstelle ist so konzipiert, dass sie eine nahtlose Integration von Sensoren und Aktoren mit dem Calliope Mini 3 ermöglicht. Die Magie liegt darin, dass die Geräte automatisch erkannt werden, ohne dass du komplizierte Konfigurationen durchführen musst.

Chip mit Informationen zum Sensor auf einem Magnset Sensor mit JacDac Schnittstelle Dies geschieht, weil die JacDac-Schnittstelle ein standardisiertes Protokoll verwendet, das es den Sensoren und Aktoren ermöglicht, sich selbst zu identifizieren, sobald sie an den Calliope Mini 3 angeschlossen werden. Jeder Sensor und Aktor verfügt über einen eingebauten Chip, der dem Calliope Mini 3 mitteilt, welche Art von Gerät angeschlossen ist und welche Funktionen es bietet. Durch diese automatische Erkennung wird die Verwendung von Sensoren und Aktoren deutlich vereinfacht, insbesondere für Anfänger. Du musst dir keine Gedanken über komplizierte Konfigurationen oder Treiberinstallationen machen. Stattdessen kannst du dich darauf konzentrieren, deine Ideen in die Tat umzusetzen und kreative Projekte zu realisieren.
Was ist in der Startbox A enthalten?
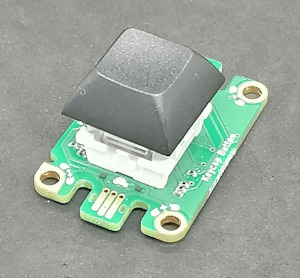
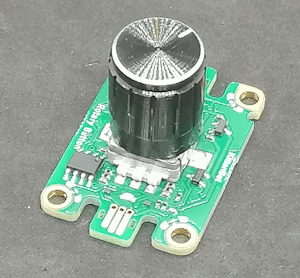
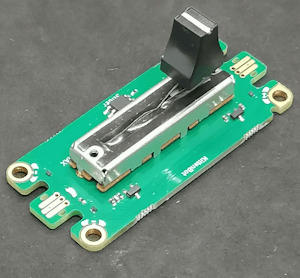
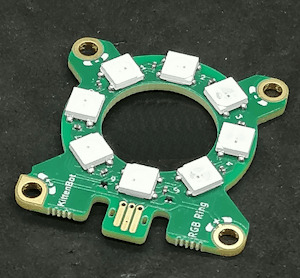
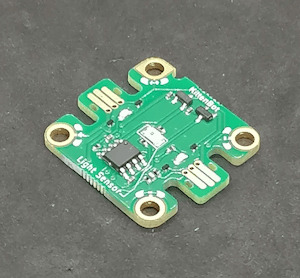
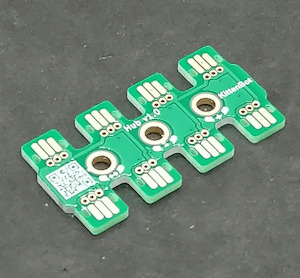
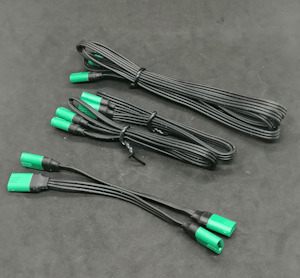
In dieser Startbox A findest du nachfolgende Sensoren & Aktoren: - zwei Taster, - einen Drehregler, - einen Schieberegler, - ein RGB-Ring, - ein Magnetsensor, - ein Lichtsensor, - ein Hub, - Kabel in diversen Längen
Du benötigst quasi nur noch einen Calliope Mini 3 und einen PC zum Loslegen.
Erster Schritt - Upload eines leeren Programmes mit dem JacDac Service
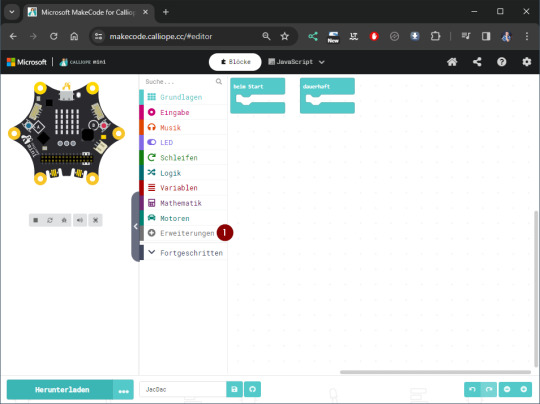
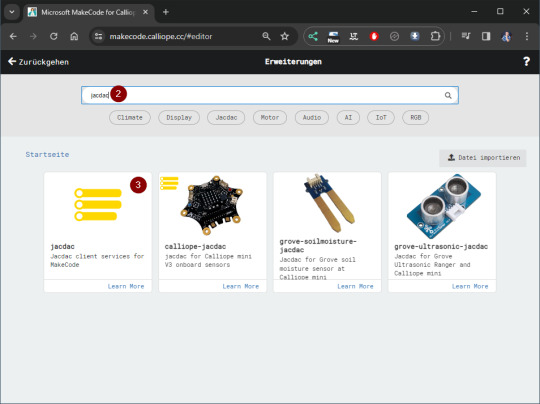
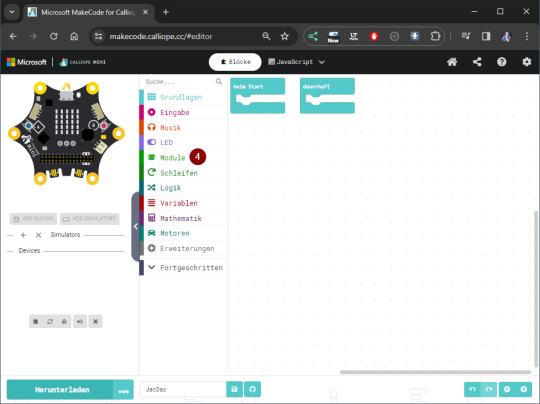
Bevor wir in MakeCode mit den JacDac Sensoren arbeiten können, müssen wir zunächst ein leeres Programm mit dem JacDac Service auf den Calliope Mini 3 hochladen. Dazu wird der Mikrocontroller via USB an den Computer angeschlossen und im Browser (Google Chrome) gekoppelt. In MakeCode navigieren wir zu den Erweiterungen (1) und suchen dort nach "jacdac" (2). Aus den Suchergebnissen wählen wir nun den JacDac Client (3) aus. Wenn diese Erweiterung hinzugefügt wurde, dann sollten wir den Eintrag Module (4) sehen.
Dieses leere Programm müssen wir jetzt auf den Calliope hochladen und können danach JacDac Sensoren & Aktoren anschließen.
Aufbau einer kleinen Schaltung mit JacDac am Calliope Mini 3
Kommen wir jetzt zum interessanten Teil des Beitrages und bauen eine kleine Schaltung am Calliope Mini 3 auf. Taster via JacDac am Calliope Mini 3 anschließen und programmieren in MakeCode Im ersten Schritt möchte ich den mechanischen Taster nutzen, um am Calliope Mini die 3 RGB LEDs durchzuschalten. Der Calliope hat zwar zwei Taster und somit müsste man keinen zusätzlichen verwenden, jedoch bietet sich dieses kleine Beispiel als Einstieg an, da man hier bereits bekanntes auf den Taster anwenden kann.
Der Taster verfügt über zwei JacDac Schnittstellen, somit können wir diesen nicht nur mit dem Calliope verbinden, sondern an diesen noch weitere Sensoren / Aktoren anschließen. Dem Set liegen Kabel in verschiedene Längen bei und damit verbinden wir jetzt den Taster mit dem Calliope.
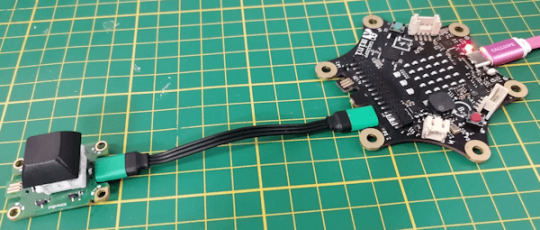
Calliope Mini 3 mit Taster über JacDac Schnittstelle verbunden
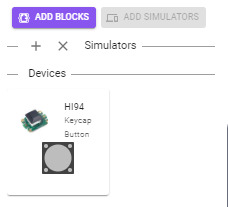
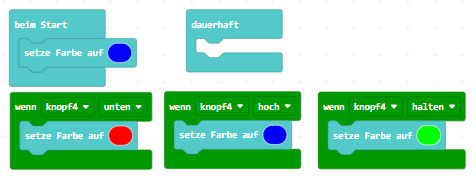
Sobald wir den Taster an den Calliope angeschlossen haben, wird dieser in MakeCode angezeigt. Um jetzt die passenden Blöcke zum Auswerten der Aktion am Taster zu erhalten, müssen wir noch auf die Schaltfläche "ADD BLOCKS" klicken. Unter dem Menüpunkt Module findest du jetzt den Knopf bzw. den Taster mit seinen Blöcken. Den Block "wenn knopfX..." kennst du sicherlich schon von den Tastern des Calliope jedoch hat dieser drei Status, unten, gedrückt und halten.

Das kleine Programm zum Steuern der RGB LED Leiste am Calliope Mini 3 sieht wie folgt aus:
Im oben verlinkten YouTube Video zeige ich dir noch eine weitere Schaltung mit dem 8bit RGB LED Ring und dem Schieberegler.
Fazit zur Startbox A mit JacDac Sensoren & Aktoren für den Calliope Mini 3
Die Startbox enthält vieles, was du für einen Einstieg in die Erstellung von kleinen Projekten mit JacDac Sensoren & Aktoren benötigst. Besonders in Verbindung mit MakeCode und dem Calliope Mini 3 ist es sehr einfach für Anfänger diese Komponenten zu programmieren. Da die JacDac Schnittstelle nicht speziell für den Calliope Mini 3 entwickelt wurde, kannst du dieses Set auch nutzen um mit anderen Mikrocontroller wie den BBC micro:bit oder einen speziellen RP2040 Mikrocontroller zu programmieren. Das Set kostet bei Calliope im Shop der Zeit knapp 50 € jedoch ist dieses vergleichsweise mit anderen Shops sehr günstig und somit ist dieses Angebot ggf. auch für andere Mikrocontroller interessant. Read the full article
0 notes
Text
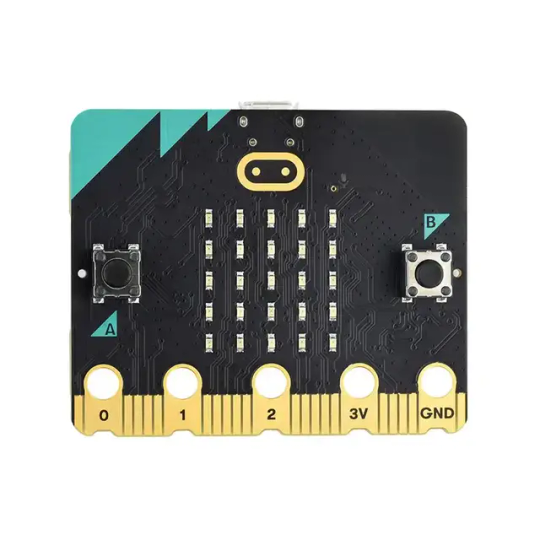
Python Development Board for BBC Micro Bit V2 Go Default shipment is ESD Packing.Only motherboard,if you need with kit,talk with us to the detail list you wish. Board Version:V2 Specification of the board: Processor:NRF52833 Memory:512KB Flash,128KG RAM Extral Chip Specification:NXP KL27Z,32KB RAM 4 GPIO,I2C,2.4Ghz,/BLE. Version:5.0 Power:Micro USB DC5V Input,3V Battery Input or Battery Case Input. Working Current:200mA Sensor:ST LSM 303 Support Program via C++,Makecode,Python,Scratch Size:5*4cm There is old version available,like V1.5,price cheaper,contact us to talk if interested. We not only wholesale this motherboard,but also available for other development board View here to know more about our company business Read the full article
0 notes
Text
fangame i never decided to finish because FUCK MAKECODE ARCADE THAT SITE IS UNUSABLE

6 notes
·
View notes
Text
If anyone is learning to code just for funsies and you also have $25 burning a hole in your pocket, I personally highly highly recommend buying a Circuit Playground Express from Adafruit. It’s a microcontroller like an Arduino, with a bunch of sensors and some RGB lights and buttons and such built in, so you can learn to use a bunch of inputs/outputs while only needing the one product (plus a usb cord).
The Express can be run on code through the free Arduino code IDE (using a variant of C++); MakeCode which is block-based or can do JavaScript or Python; CircuitPython (also does Python); or code.org CA Discoveries which I know absolutely nothing about. So lots of ways to learn, all free! If you know you wanna do Arduino coding only there’s also the slightly cheaper Circuit Playground Classic with less sensors that’s Arduino IDE only.
There are a ton of tutorials and projects on the Adafruit website and elsewhere that you can follow to learn about and use the Playground, and it’s perfect for someone like me who likes having physical applications for my coding. I won’t write too much about it but I do answer dms :)
please learn how to code
like, if you're bored today, and not doing anything,
learn a little bit of coding please
#also it has alligator clip pads instead of breadboard pins like an Arduino does which I prefer#and you can sew it onto something! it and a lot of Adafruit stuff are ‘wearables’ which I think are fun#I’m not a company shill or anything I’ve just had really good experiences with their stuff#it really tickles my particular type of low-level hobbyist fancy#plus my first Arduino was their circular sewable Lilypad which I think is discontinued:(
34K notes
·
View notes