#makerbot replicator 5
Explore tagged Tumblr posts
Visit Tumblr Blog
Explore Tumblr blogs with no restrictions, modern design and the best experience.
Last Seen Tumblr Blogs


Fun Fact
69% of Tumblr users are millennials.
Photo

My babies
(VMMM Summer 2015) by Janae Lisa Odenat
#makerbot#makerware#makerbot desktop#makerbot replicator#makerbot replicator 5#makerbot replicator 2x
0 notes
Text
...Does it count as an April Fools joke on yourself if you stayed up till 5 AM trying to get a Ciclop 3d scanner to work, only to wake up at the crack of noon, get it actually working because all it needed was some natural light, and then be barely able to function the rest of the day even as you realize the scans aren’t even as good as the MakerBot Replicator at the local Makerspace?
Because, if so, APRIL FOOLS ON ME!
6 notes
·
View notes
Link
For just $444.72 Engineered to provide redefined usability, quality, performance , dual extruders It can provide you an unforgettable step-by-step learning experience of the 3D printer from scratch. As long as you have a passion for creativity, you can not afford to miss this product Suitable for a wide range of customers, young or old, professional or amateur etc. Multiple 3D printing filament supportable, support ABS / PLA / wood / nylon PVA / PP / luminescent Type: Complete Machine Platform board: Aluminum Alloy Nozzle quantity: Double Nozzle diameter: 0.4mm Nozzle temperature: 220 - 230 Degree Celsius Product forming size: 225*145*150MM Layer thickness: 0.15-0.4mm Memory card offline print: SD card LCD Screen: Yes Platform temperature: Room temperature to 110 degree Supporting material: ABS,Flexible PLA,PLA Material diameter: 1.75mm Language: English File format: G-code,STL Model supporting function: Yes XY-axis positioning accuracy: 0.011mm Z-axis positioning accuracy: 0.02mm Voltage: 110V/220V,110V/230V Host computer software: ReplicatorG Packing Type: Assembled packing System support: windows xp windows7 8 10 Connector Type: SD card,USB Certificate: CE 11.000 Package weight: 11.085 kg Packing Contents: 1 x CTC 3D Dual Extruders Desktop LCD Screen Printer Disclaimer: 1. Please read and follow the user manual carefully before you assemble or operate the 3D printer. 2. Modification and customization of the 3D printer is strictly forbidden. We will take no responsibility for any problems resulting from modifications. 3. Always use the correct AC voltage for your region. 4. Please do not place the the 3D printer near flammable/combustible materials, or any heat sources. 5. Use the 3D printer only in properly ventilated areas. Maintain a safe distance from the printer.
0 notes
Text
The Downfall of the Great 3d Printing Monopoly
Kevin Mardirossian
45094953
I have been 3d printing for several years, and have made it a focus of mine. I am a mechanical engineering student and I use my skills and resources in 3d printing to aid several projects which I am a part of, including the aerodynamics subteam of Anteater Racing. I recently designed, manufactured, and programmed an innovative 3d printer meant to increase my capabilities to print unique prototypes and models which contain multiple materials and/or colors, and have to withstand the conditions associated with engineering applications. I have spent countless hours researching all aspects of the past, current, and future 3d printing industry, and have met with several professionals in the field. For these reasons and more, I was inspired to cover this ever-expanding field for this project.
First off, a little background: although most people have only become familiar with 3d printing in the past few years, the technology has been around since the 1980s. One of the first 3d printers was made by Chuck Hull, who saw the potential in his invention and patented the design in 1984. This kind of 3d printer took a UV sensitive resin and selectively cured it layer by layer to build up solid shapes from a vat of liquid resin. This technology is called SLA, which stands for Stereolithography Apparatus. With his patent in hand, Hull founded the company 3D Systems, the first 3d printing company. 4 years after Hull’s filing, S. Scott Crump filed a patent for a new kind of 3d printing, Fused Deposition Modelling, or FDM. FDM printers deposit heated thermoplastics in computer-generated paths one layer at a time to create 3d objects. You can think of this like laying down a layer of hot glue in the shape of a square, then laying down another layer of hot glue on top of that, and so on… S. Scott Crump and his wife Lisa Crump founded Stratasys in 1989. The third and final 3d printing process we will cover was patented in 1994. This method used layers of fine powders and selectively melted them together, it then laid down another layer of powder which was selectively melted on top of the previous. This process, called Selective Laser Melting/Sintering, or SLS/SLM, was the first to be able to print metal objects. Unlike FDM and SLA, SLS machines can be capable of printing virtually anything in a powdered form. This includes metals such as inconel, steel, stainless steel, and aluminum, though SLS machines can also print plastics like nylon. The last part of this story took place in 2002 when 3D Systems acquired the patent for SLS printing, thus cementing 3D Systems and Stratasys as the only two companies allowed to sell 3d printers.
It is clear from the previous paragraph that a massive monopoly had formed. These vastly different manufacturing processes were owned by only two companies. This meant that they could charge whatever they wanted for their machines, and they were not heavily incentivized to put money into innovating their technologies. They could simply continue selling their products for massive profits without losing money to research and development, as long as their customers remained happy. For two decades 3d printers were only used by massive corporations who could afford their tens, or even hundreds, of thousands of dollars price tags.. Advancements were made slowly, and for the most part the technology in the 3d printing space remained stagnant. In spite of this, company profits and stock prices steadily grew, that is, until 2009.
In 2009 the most important patent pertaining to the 3d printing industry expired, opening the door to new competition. Several patents on details about specific 3d printing technologies remained, but the overarching patent preventing any FDM 3d printing technology being sold, had expired. A revolution was about to begin, but the groundwork had been set in 2005. Adrian Bowyer and his team at the University of Bath conceived the idea for a self replicating rapid prototyping machine, or more simply, a 3d printer which could print parts for another 3d printer. This project, dubbed the RepRap project, was completely open source so engineers around the world could try their hand at reinventing rapid prototyping machinery. Because Bowyer did not sell any of his team’s designs they were not infringing on any patents, and as long as nobody profited off their printers. These RepRap machines were about the size of a modern desktop laser printer, much smaller than the industrial, double wide refrigerator size machines produced by Stratasys and 3D Systems. The RepRap movement grew over the coming years and led to the creation of the first commercial 3d printer kit which was available to more than just multi-million dollar corporations. Makerbot was founded in 2009, just as the FDM patent expired. Their first printer sold was a RepRap style kit which could be assembled and operated by makers around the globe. Makerbot grew rapidly and began to manufacture their own pre-built printers for industrial prototyping engineers and teachers who wanted a 3d printer in the classroom. This created a contrast between the cheap self-assembled kits, and the pre-assembled units which were meant to be turn-key for customers who were willing to pay a lot more for a polished product.
The industry was expanding with the introduction of desktop 3d printers spawned by the expiration of the key patent which kept the technology under the control of a monopoly. We can see this radical change in the market from the graph depicting the stock prices of SSYS (Stratasys) in orange and DDD (3D Systems) in blue.
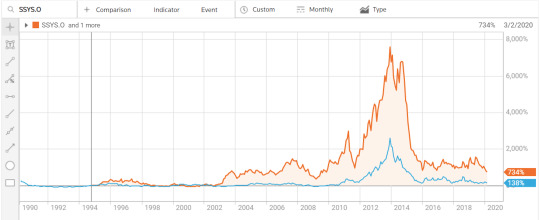
The graph above is very interesting because Stratasys’s stock increases between late 2008 and 2010, but as more competitors began riding on the backs of the RepRap movement and entered the market, the stock took a steep drop leading into 2011, though it quickly rebounded. Because the market for SLA and SLS printers, which 3D Systems controlled the market in, was more difficult to enter, DDD continued its steady growth as media attention and business interest in 3d printing increased. SLA and SLS 3d printers are far more complex than FDM printers, and require more research and development to create a functioning product, and even more time and money to make those products reliable and easy to use.
More and more 3d printer companies began flooding the market with cheaper printers in the $1000 range, far cheaper than the $10,000-$500,000 machines previously sold by the industry’s behemoths. 3D Systems and Stratasys responded by trying to innovate, leading to lower cost and/or more capable machines in an effort to maintain business interest in their products. For the next few years SSYS and DDD saw tremendous growth because the wide coverage of 3d printing in the media, and their track record for producing proven and trusted products which were worth the increased costs. In an attempt to buy up the desktop 3d printer space, Stratasys acquired Makerbot in 2013. This move soured the reputation of Makerbot for the maker community. A company born out of the liberation of a once locked down industry sold out to become part of the multinational corporation which held the keys which prevented them from existing. Makerbot continued to sell products under their own brand name, though they adopted many business practices and technologies from Stratasys.
Stratasys and many other 3d printer brands have successfully utilized the razor and blade model by selling the 3d printers themselves for reasonable prices, but then selling the plastic required to produce 3d objects at a tremendous mark ups. Kilograms of common plastics normally sold for around $5 are being sold for $50, or even up to $500 in Stratasys’s case. And because these proprietary material cartridges come with embedded microchips, much like an the ink cartridges for an inkjet printer, you can’t simply refill used cartridges or buy third party materials. Once you buy a printer which only accepts proprietary materials, you’re locked in for the lifetime of that printer. So if you’ve paid $100,000 for a printer, it is in your best interest to continue paying $500 for each material cartridge until you can recoup the cost of the printer. This is one reason Stratasys has been able to keep a steady flow of money coming in from customers long after machines have been sold. As competition takes away from their machine sales, they are still making money from their material and customer service sales, both of which are required to keep the machines running.
As more time passes, and more patents once held by the two major 3d printing corporations expire, competition in the market continues to rise. Printers are getting better, cheaper, more reliable, and more cost effective for corporations and individuals alike. The monopoly once entirely controlled by two companies has faded away, and the market is slowly trending toward a lower equilibrium price, a fate made clear by Stratasys’s recently released line of cheaper printers. Because of free market competition the future looks good for consumers as prices go down and quality goes up, but compromises will have to be made if Stratasys and 3D Systems hope to remain afloat.
0 notes
Photo

Day 17 | What I am working on. #marchmeetthemaker I am constantly trying to streamline my workflow, either tools, techniques or organization. I am currently 3D printing a series of modular small tool organizers that will interface with any of my machines or tasks. . I’ve thrice tried to learn 3D printing and be knowledgable about this addictive additive manufacturing. The first time was back in 2014 when I bought a MakerBot Replicator 2, it was on sale at a Winners in Calgary, a buddy picked it up for me and I got it transported back to Winnipeg. I tried to get along with it but when the print failed for the 5-6 time, I gave up and put it aside. . The second time was when I was redoing my shop, and I noticed the Rep 2 sitting in a corner. In a fit of wanting to use what I have…I tried again. This time with a bit more success and a project in mind. I printed a slingshot or two (which was what I was making at the time) and it was ok. Again, with limited knowledge, online resources I set it aside. . Fast forward to about…a month ago. I had already moved out to my awesome basement studio space and my old studio was now empty. I set up the Rep 2 (by now is Stone Age tech in 3D printing) and I was determined to make it work. With limited success, but success overall. I decided I would learn much more about the fine tuning of 3D printing. I had previously purchased a Prusa I3 kit but never actually assembled it. Why? Not sure…it was a 7-8 hour project I hadn’t consider until now. Needless to say, the Prusa i3 MK3 is a lightsaber compared to the hammer that is the Replicator 2. . With the internet at my finger tips, open source software in my eye sockets and an unlimited supply to functional objects to print…I was set. Add another skill feather to my cap. I might need to get ta bigger hat…. #makersgonnamake #3dprinting #prusai3MK3 #prusa (at Winnipeg, Manitoba) https://www.instagram.com/p/BvHaVqUhLzN/?utm_source=ig_tumblr_share&igshid=128nmqdoo3gp4
0 notes
Text
Witch Lights Work Diary, Monday; April 17, 2017
Last time, I had just done a full-scale test of the new Witch Lights harness, only to find that the voltage on the far end of the harness was 3.6 volts, too little for the cheap PIR sensors I was using to work properly. I had my hopes pinned on a new set of PIR sensors from SeeedStudio, which are rated to operate with 3-5 volts.
Last week, the new sensors arrived. The Witch Lights are still snaking down my house's stairwell and into the living room, so I took the time to hook up the new LED strips I had just soldered. And on turning the lights on… they browned out.
Great.
Slowly disconnecting and reconnecting each LED strip informed me that two of the four LED strips were bad somehow, and will need to be re-soldered. Somehow, both of them passed my QC testing, but still fail when they're hooked up to the actual harness. Fantastic. Spare LED strips were dragged out, and the offending strips set aside for further punishment investigation.
With LEDs hooked up and running, I was able to confirm the results from the earlier test: the 5 volt PIR motion sensor on the far end starts to go berserk within a few seconds of boot-up, and the lights animate constantly. OK, fair enough.
Time to do some surgery: I extracted the circuit board from the far-end motion sensor housing, and wired the new motion sensor into it. Moment of truth time. Turn the lights on, and…
It worked!
The new 3 volt motion sensors operate just fine in the 3.6 volts provided by the wiring harness, as advertised. The lights no longer trigger randomly, they trigger when a heat source (like my cats) walk by either motion sensor.
Hooray!
Of course, the new PIR sensors are a funny shape, and don't fit into the housings I designed around the original sensors. The next day, I spent a few hours in Solidworks with a pair of calipers, and designed a new housing. Some hours later, I had a new housing sitting on the bed of my original Makerbot Replicator. The new sensor press-fits into the housing. I installed the new housing with no problems, and now I have a fully-assembled, functional set of Witch Lights in my living room.
Which only left the bad LED strips. Grr. Fine, off we go to the workbench. Now, what worries me is, I have an Arduino Uno with a cable hookup that connects to the LED strips once the wireless cables are soldered on. That Uno runs a test animation on the strip. I've been operating under the assumption that if there's a short circuit, the LED strip will brown out when connected to the Uno, and the animation won't play. I used this to test all my strips after soldering.
Turns out, nope. The bad LED strips pass that test just fine. That does not give me the warm fuzzies, let me tell you. So the only real test of the LED strips is to connect them to a fully-deployed wiring harness. Which means I don't get the living room back any time soon.
Update Saturday; May 13, 2017
OK so since I started this entry, I have re-tested and re-worked the LED strips. I ran them continuously for about 16 hours (two battery charges worth), with no problems. That's as good a test as I can devise, so I have to sign off on them, but I'm still wary. This means the second, new set of Witch Lights is fully functional, with its own set of LEDs, ready to deploy. I put away the LED strips and coiled up the wiring harness. It will stay that way until I start reprogramming the Arduino with new code, hopefully in the next month or so.
That left the original Witch Lights, which had the same wiring flaw as the second strand; at critical points, ribbon cable was used as a shortcut to pulling wire. That led to them malfunctioning and constantly animating at Firefly 2016. My goal is to fix this issue before Firefly 2017, on July 4th.
I pulled the wiring harness out from under the Makerbot table, and slowly, laboriously took it apart into segments. It wasn't until I had the conduit laid out on the floor, ready for the wire pull, that I found out that I didn't have enough wire left. Damn. So that was a delay of a few days waiting for wire to come from Jameco.
Once the wire came, I wasted no time in pulling the power lines through the conduit, and started to reassemble the harness. That's a slow process because every time you connect conduit to one of the 3D-printed housings, you have to continuity test the wires to make sure that there's an unbroken chain from the Arduino and power source all the way through the wiring harness. Well, after connecting a long, complicated segment of the harness, the sensor wire failed the continuity test. Somewhere in the harness, a wire had come loose from a screw terminal.
Well, fuck.
I resigned myself to a long search. Then I found the loose wire in literally the first place I looked. OK, I was owed a break on this project I suppose. I accept the good luck. After reconnecting the wire, the harness passed continuity tests. I was able to reassemble the rest of the harness without issue. When it was fully assembled, I plugged in a battery and turned it on, then measured the voltage at the far end of the harness: 5.17 volts.
Huh.
And the debug LEDs on the Arduino tell me that the Witch Lights aren't animating constantly, but are only triggered when I activate the infrared motion sensors.
That's without LEDs hooked up. I don't know what their power drain will do to the voltage at the sensor on the far end. So next up is to do a full-scale deploy of the original Witch Lights, down the stairs and into the living room. My long-suffering wife will love that, but with any luck it will only be for a day, until I can confirm that the lights are working as designed.
After that, I can focus on the software improvements. Right now, if the lights are animating, the Arduino processor is locked up, and it can't respond to any further motion until the lights are done playing their animation. My hope is that, with the help of my friend Jim (a much more experienced programmer who knows C++ and can handle complicated object-oriented code), we can have animation code this summer that can display multiple sprites at once, and respond to motion while animating the lights at the same time.
Both the current and in-development code for the Witch Lights are on github, at https://github.com/jdimauro/witch-lights along with documentation of the build process.
And now, it's time to test the Witch Lights and see if the re-wiring was successful. Wish me luck.
3 notes
·
View notes
Text
Big Parts on Small Printers

**Updated 15/May/17**
So some of you might know that I do almost all my printing on my 3-year-old MakerBot Replicator 2X. It’s been a real workhorse and continues to serve me well (knock on wood). However, one of its shortcomings (reads: constraints) for the Ultrascope Explorer build is the machine’s build volume. I know, I know... the 2X is still bigger than many others out there. Because of the limitations I’ve had some of the parts printed for me by my local 3D Printing supply shop. I try to avoid this when I can because of the time it can sometimes take.
When I started building my first Ultrascope a few years ago, the design was a bit smaller because the original plan called for a 4 inch (100 mm) primary mirror. Even though some of the pieces wouldn’t fit (under normal circumstances), creative arrangement aloud me to still get them made.

I realize that most hobbyists aren’t using supersized printers with volume to spare. Thankfully the cost to size ratio is changing in our favor as the industry matures. That said, it doesn’t help us today.
Let’s look at Hexagon 5 as an example of a part that too big to fit in the build volume of most printers.

I took a look at the part in Onshape and figured that I could likely cut it into three pieces while still maintaining the strength needed. I made the new pieces 15 mm taller to accommodate the new overlapping joints.

I’m running a test batch starting tonight (18/Apr/17) to see if the bits will work together the way I’d hope.

I’d love to hear your feedback and/or suggestions to make to project and design better.
Update: 19/Apr/17
The first print of what I’m calling Hex 5-A came out great.


Now I just need to print Hex 5-B and 5-C and do a test fit.
Update: 20/Apr/17
After attaching some OpenBeam, it’s clear (to me, not so clear in the picture) that some minor changes need to be made.

Update: 12/May/17
I had to print Hex 5-B a few time before I got a complete part. I had five failed/ ghost prints before switching filament (which gave me a perfect part on the first try). I realized I was using the last of an ABS spool that was more than two-years old. The rest of it is now in the trash so I don’t make that mistake again. New Best Practice: Take a silver Sharpie and date your filament spools.

I cleaned it up and added it to Hex 5-A. It fit great, but the nuts and cap screws gave me a bit of trouble when I tried to line them up in the makerbeam. My guess is user error since I didn’t have any problems once things were tight.

Update: 15/May/17
I finished printing the test pieces yesterday and I’m happy to report that they fit quite well. I never printed hex 5-C, just 5-A, and 5-B twice. If you want to print these for yourself, you can get the .STL files on my MODs section of Wevolver.

More to come
Project by The Open Space Agency Designed using OnShape Hosted on Wevolver
Modification Files are housed on Wevolver
Other project pictures on INSTAGRAM Frequent mini-updates on Twitter
4 notes
·
View notes
Text
The 10-Minute Teacher Show: Top Ten Shows for February 2017
10MT: The 5-day a week show for busy but remarkable teachers
From the Cool Cat Teacher Blog by Vicki Davis
Follow @coolcatteacher on Twitter
Thank you for your support of the 10-Minute Teacher Podcast. From the amazing guests to all of you listening and reviewing, thank you all so much for making this dream possible! Hear all of the past episodes of the 10-Minute Teacher Archive. And the top 10 shows for February are:
A Song for Teachers by Jim Forde (Episode #11)
5 Ideas for Improving Student Writing with Jennifer Serravallo (Episode #10)
Dave Burgess Talks Student Engagement (Episode #16)
Tech Tools to Try in 2017 with Jennifer Gonzalez (Episode #20)
Awesome Apps for iPads in the Elementary Classroom with Karen Lirenman and Kristen Wideen (Episode #1)
The 6 Most Motivating Sketchnotes in Education Today with Sylvia Duckworth (Episode #6)
Simple Ways to Find Your Teaching Blindspots with David Guerin (Episode #4)
The Breakout EDU Box: The Teaching Experience that Has Everyone Talking with Adam Bellow (Episode #8)
The Lemonade War that Motivated a Whole School to Read with Ryan Kaczmark (Episode #18)
5 Ideas for Using Game Based Learning in Your Classroom Today with Michael Matera (Episode # 5)
Remember that every show has links and a transcript. People are starting to use these transcripts and I hope it helps those of you researching, wanting to quote the shows, or those with accessibility needs!
Thank you to our sponsors for the month of February, SMART Learning Suite (see my demo with Smart lab), PowerSchool Learning LMS, the Makerbot Mini Replicator+ 3D Printer, and Bloomz.
GiveAway Winners
Thank you to the authors and my friends at MakerBot for giving away a Makerbot Mini Replicator+ 3D Printer.Thank you for all of you who left reviews for the show! I appreciate that you’re telling your friends. Here are the winners for February!
February 2 Frank @Mindful-Teacher winner of “Innovate with iPad” book by Karen Lirenman and Kristen Wideen
February 6 Casey @cjkorder winner of “Explore like a Pirate” by Michael Matera
February 6 Jenny @jennynitchals winner of Mystery Box Game Software by Michael Matera
February 7 Crystal @crystalia1 winner of “Sketchnotes for Educators” by Sylvia Duckworth
February 8 Susan @sneal winner of “140 Twitter Tips for Educators” by Billy Krakower
February 9 Sherri @SherriH75 winner of a Breakout EDU Kit by Adam Bellow and Breakout EDU
February 11 Sherry @sherryN2reading winner of “School Administrator to School Leader” by Brad Johnson
February 15 Tom @loudlearning winner of “The Writing Strategies Book” by Jennifer Serravallo
February 15 Jim @jim7962 winner of a MakerBot Mini Replicator+ by Makerbot!
February 24 Mike @mpetty39, Nicole @guysbride, and Lauren @LIS_Poncsak winners of a Dave Burgess book of their choice. See all of the books he has published here!
The post The 10-Minute Teacher Show: Top Ten Shows for February 2017 appeared first on Cool Cat Teacher Blog by Vicki Davis @coolcatteacher helping educators be excellent every day. Meow!
from Cool Cat Teacher BlogCool Cat Teacher Blog http://www.coolcatteacher.com/10-minute-teacher-show-top-shows-february-2017/
0 notes
Photo

I have been printing for many years on the MakerBot Replicator 2, It did a great job but it cost me $2,500.00 and has a very small build volume. The CR-10S5 has over 5 times the build volume! I just got this machine last night and today I am printing things with a print quality I have never seen before. Said differently the print quality of this machine is off the charts! I am a real buyer and am not affiliated with this seller or Creality. Cura 3 is so easy and has the S5 setting built into it!!!! Ok a few bad things. My machine bed, not the glass plate but the bed was scared a bit. I sanded the nicks down with fine sandpaper. You will need to go to youtube for the best instructions on how to put this together without messing it up. Take your time watch at least 2 videos on assembling the Creality CR-10 first. Be extremely gentle with this large frame when removing and setting up, because of its size it can be tweaked easily. In closing, I am so impressed.
0 notes
Video
youtube
Buy it on Amazon - http://ift.tt/2ClBpO4 - Cheap 3D Solutech Real Black 3D Printer PLA Filament 1.75MM Filament, Dimensional Accuracy +/- 0.03 mm, 2.2 LBS (1.0KG) - 100% USA -- Click the link to buy now or to read the 146 4 & 5 Star Reviews.Subscribe to our Channel: https://www.youtube.com/channel/UCnGaxXcRVcVQlbo7LYtXGXg?sub_confirmation=1 Like us on Facebook for videos, pictures, coupons, prizes and more - http://ift.tt/2wCDdi2 Cheap 3D Solutech Real Black 3D Printer PLA Filament 1.75MM Filament, Dimensional Accuracy +/- 0.03 mm, 2.2 LBS (1.0KG) - 100% USA Works awesome. No issue. just remove the small blue tab from the side when printing or it will eventually fire across the room like a small gunshot. ... Reviewer : Amazon Customer I always try to use Solutech filament. When printing items, I need something I know will work dependably and always work correctly. Once the vacuum sealed package is opened, if I remove the spool from the printer, I store them in a Rubber Maid container that contains desiccant. ... Reviewer : RCC1 Click http://ift.tt/2ClBpO4 to buy now on Amazon or to read more reviews. High compatibility: 3D Solutech PLA Filamet is compatible with nearly all 3D printers, including RepRap derivatives and those from MakerBot (such as the Replicator and Replicator 2), Ultimaker, Bits from Bytes, Airwolf3D, Makergear, Printrbot, Bukobot, Type A Machines, and many others. 3D Solutech engineered its Professional 3D Printer filament to strict tolerances and the highest quality standards, ensuring trouble-free operation with your 3D printer and superior results. 3D Solutech PLA filament is the choice of engineers, designers, and anyone else into 3D printing who demands the best. 100% USA I love this PLA. It bonds much better then my previous filaments I had got for free with my printer. I print mine around 195F-200F and it seems to works great at that temp. It does seem like it takes an extra couple seconds to harden, but that is no issue, just something to be aware of when removing it from the build plate. The black is REALLY BLACK, it looks great. ... Reviewer : Rob Click http://ift.tt/2ClBpO4 to buy now on Amazon or to read more reviews. ***Let Us Know What You Think… Comment Below!!*** Watch my other review Videos – https://www.youtube.com/channel/UCnGaxXcRVcVQlbo7LYtXGXg See other products on http://ift.tt/2xhK4Ru Subscribe to our Channel: https://www.youtube.com/channel/UCnGaxXcRVcVQlbo7LYtXGXg?sub_confirmation=1 Like us on Facebook for videos, pictures, coupons, prizes and more - http://ift.tt/2wCDdi2 #3D Solutech, #3D Solutech Real Black 3D Printer PLA Filament 1.75MM Filament, Dimensional Accuracy +/- 0.03 mm, 2.2 LBS (1.0KG) - 100% USA This is a review video for : B00ME7CV7C Manufacture : 3D Solutech Thanks for watching! http://ift.tt/2xhK4Ru Related Videos in Channel
0 notes
Video
youtube
Buy it on Amazon - http://ift.tt/2ClBpO4 - Buy 3D Solutech Real Black 3D Printer PLA Filament 1.75MM Filament, Dimensional Accuracy +/- 0.03 mm, 2.2 LBS (1.0KG) - 100% USA -- Click the link to buy now or to read the 146 4 & 5 Star Reviews.Subscribe to our Channel: https://www.youtube.com/channel/UC34yudB5hvLGFwHHPVXKwtg?sub_confirmation=1 Like us on Facebook for videos, pictures, coupons, prizes and more - http://ift.tt/2wCDdi2 Buy 3D Solutech Real Black 3D Printer PLA Filament 1.75MM Filament, Dimensional Accuracy +/- 0.03 mm, 2.2 LBS (1.0KG) - 100% USA Works awesome. No issue. just remove the small blue tab from the side when printing or it will eventually fire across the room like a small gunshot. ... Reviewer : Amazon Customer I always try to use Solutech filament. When printing items, I need something I know will work dependably and always work correctly. Once the vacuum sealed package is opened, if I remove the spool from the printer, I store them in a Rubber Maid container that contains desiccant. ... Reviewer : RCC1 Click http://ift.tt/2ClBpO4 to buy now on Amazon or to read more reviews. High compatibility: 3D Solutech PLA Filamet is compatible with nearly all 3D printers, including RepRap derivatives and those from MakerBot (such as the Replicator and Replicator 2), Ultimaker, Bits from Bytes, Airwolf3D, Makergear, Printrbot, Bukobot, Type A Machines, and many others. 3D Solutech engineered its Professional 3D Printer filament to strict tolerances and the highest quality standards, ensuring trouble-free operation with your 3D printer and superior results. 3D Solutech PLA filament is the choice of engineers, designers, and anyone else into 3D printing who demands the best. 100% USA I love this PLA. It bonds much better then my previous filaments I had got for free with my printer. I print mine around 195F-200F and it seems to works great at that temp. It does seem like it takes an extra couple seconds to harden, but that is no issue, just something to be aware of when removing it from the build plate. The black is REALLY BLACK, it looks great. ... Reviewer : Rob Click http://ift.tt/2ClBpO4 to buy now on Amazon or to read more reviews. ***Let Us Know What You Think… Comment Below!!*** Watch my other review Videos – https://www.youtube.com/channel/UC34yudB5hvLGFwHHPVXKwtg See other products on http://ift.tt/2xhK4Ru Subscribe to our Channel: https://www.youtube.com/channel/UC34yudB5hvLGFwHHPVXKwtg?sub_confirmation=1 Like us on Facebook for videos, pictures, coupons, prizes and more - http://ift.tt/2wCDdi2 #3D Solutech, #3D Solutech Real Black 3D Printer PLA Filament 1.75MM Filament, Dimensional Accuracy +/- 0.03 mm, 2.2 LBS (1.0KG) - 100% USA This is a review video for : B00ME7CV7C Manufacture : 3D Solutech Thanks for watching! http://ift.tt/2xhK4Ru Related Videos in Channel
0 notes
Text
#gallery-0-5 { margin: auto; } #gallery-0-5 .gallery-item { float: left; margin-top: 10px; text-align: center; width: 33%; } #gallery-0-5 img { border: 2px solid #cfcfcf; } #gallery-0-5 .gallery-caption { margin-left: 0; } /* see gallery_shortcode() in wp-includes/media.php */
Lulzbot-3D-printer
MakerBot Replicator 2
Afinia 3D Printer and Prints
makerbot digitizer 3d scanner
3d scanner compare
High-precision 3D scanning at an unbeatable price: Experience the innovative DAVID LASERSCANNER 3D scanning system!
This package contains everything you need to set up your own 3D scanner. Just hold the laser in your hand and sweep the laser line over the object you wish to scan: a sculpture, a face, anything at all. DAVID LASERSCANNER will immediately generate a 3D model in your PC, capturing even fine surface details of less than 0.2 millimeter.
Simply scan all sides of the object separately, including top and bottom. The software will semi-automatically align and fuse all scans to create a textured all-round model!
The results may be stored and used in various standard 3D file formats (OBJ, STL, PLY), e.g. for computer animations, games, virtual 3D environments, product presentations, works of art, archeology… The limits are set only by your imagination!
Technical specification • Scansize: 10 – 300 mm • Resolution/Precision: Up to 0.2 mm • Scanning time: 10 – 60 sec • Mesh density: Up to 1,000,000 vertices per scan • Export formats: OBJ, STL, PLY
System requirements • Standard-PC (32/64 bit – Windows XP, Vista, 7, 8, 10) • 3D graphics adapter • Two available USB ports • Recommended: Dual-core processor, 2 GHz, 4 GB RAM, NVIDIA or AMD graphics processor DAVID 3D SCANNER PRO software on USB Flash Drive High-resolution 2-megapixel webcam (Full HD) with autofocus and stand Red line laser module (650nm, Class 1 laser) with adjustable focus, including battery Calibration panels (for object sizes up to 40cm) with base plate and right angle fixings [amz_corss_sell asin=”B00D20QEO6″]
DAVID Starter-Kit-2 High-precision 3D scanning at an unbeatable price: Experience the innovative DAVID LASERSCANNER 3D scanning system! This package contains everything you need to set up your own 3D scanner.
0 notes
Text
Los 3 proyectos de impresoras 3d de crowdfunding
Las plataformas como Kickstarter siguen siendo el mejor lugar para obtener enormes reducciones de costos en las primeras impresoras 3D y equipo de impresión en 3D.
Easily Build’s New Nine es una impresora FDM de bajo costo que promete las mejores características de impresoras mucho más caras e ingeniería de innovaciones de diseño de bajo costo. Supuestamente 3 veces más rápido que las impresoras en su rango de precio, New Nine Equipado con características útiles como un amortiguador de masa pendiente de patente para reducir la agitación y mantener la precisión durante la impresión.
La impresora dispone de un lecho de impresión calentado, una boquilla de alta temperatura y un eje X contrabalanceado, entre otro bits y bobinas.
La empresa, fundada por Rory Korathu-Larson, está compuesta por ingenieros, educadores y geeks creativos que están comprometido a entregar una nueva plataforma de desarrollo de código abierto para la comunidad de impresión 3D.
El D2K Insight de Mayc Creation se describe como una impresora 3D basada en LCD personal de alto rendimiento y una manera asequible de producir objetos 3D de alta calidad. La compañía con sede en Hong Kong ya ha puesto algunas que otras impresoras, incluyendo el D2K Iluminar, aunque como muchos tipos de productos, nadie está muy seguro de quién está haciendo el D2Ks. El enlace de LinkedIn de Mayc desde su web oficial te lleva a la página de una empresa de diseño web aparentemente no relacionada.
Si está dispuesto a asumir un riesgo en un D2K, los beneficios son supuestamente bastante grandes. La máquina ofrece características como un estabilizador de eje Z y la exactitud de garantizar engranaje hueco de separación de huecos. La impresora ofrece un nivel de cama super rápido, mientras que un dispositivo de pantalla táctil LCD de 5 pulgadas independiente hace que el control de la impresora sea sencillo. La impresora también puede ser controlada por el teléfono inteligente o navegador web.
Muchas personas han señalado que las impresoras 3D son muy adecuadas para hacer juguetes, incluso en casa. Las impresoras 3D como el XYZPrinting Da Vinci Jr e incluso el MakerBot Replicator Mini apuntan al merado de los niños, mientras que Mattel tuvo que posponer el lanzamiento de su amable impresora ThingMaker 3D.
La Toybox ya cuenta con un creciente catálogo de más de 500 juguetes disponibles para la impresión inmediata, y es la primera impresora 3D fácil de usar para que los niños diseñen e impriman sus propios juguetes.
Toybox tiene unas especificaciones técnicas, y la tinta especial de la impresora no es tóxica y biodegradable. El volumen de construcción pequeño es adecuado para el propósito de la impresora.
La entrada Los 3 proyectos de impresoras 3d de crowdfunding aparece primero en Imprime3dbarato.
from Imprime3dbarato http://ift.tt/2izImph via IFTTT
0 notes
Text
MakerBot Warm Gray PLA Filament (XXL Spool)
MakerBot Warm Gray PLA Filament (XXL Spool)
Do not miss this chance to get this product on most inexpensive worth.
Pros:
The very best and most constant PLA filament on your MakerBot 3D Printer
Assured to haven’t any heavy metals, phthalates, or BPA
Comprehensively high quality examined at each 100-micron and 200-micron layer resolutions
Simple to make use of and performs nicely on most prints
Requires MakerBot Filament Case and MakerBot Replicator Z18
Get this MakerBot Heat Grey PLA Filament (XXL Spool)
MakerBot Filament is one of the best and most constant filament for MakerBot Replicator 3D Printers.
MakerBot PLA Filament is a bioplastic constituted of corn. All its dyes are FDA-approved as meals secure and it’s assured to haven’t any heavy metals, phthalates, or BPA.
Each filament colour is comprehensively high quality examined at each 100-micron and 200-micron layer resolutions to confirm that the filament will carry out each function that MakerBot MakerWare and MakerBot Desktop software program supply.
If you’re new to 3D printing, MakerBot PLA Filament is an efficient materials to start out with as a result of it’s straightforward to make use of and performs nicely on most prints.
Requires MakerBot Filament Case. Suitable the MakerBot Replicator Z18.
Glass Temp: 60-65 C (140-149 F)
Melting Temp: 150-160 C (302-320 F)
Nozzle Temp: 230 C (446 F)
Spool Diameter: eight.5 in
Spool Width: 7 in
Spool Hub Gap: 1 in
Filament Diameter 1.75 mm
Internet Weight: 10 lbs
It’s all the time higher to purchase MakerBot Heat Grey PLA Filament (XXL Spool) from the the chief on this eCommerce trade. They’ve proved their means in delivering high quality service after shopping for unbelievable merchandise from them.
YouTube Video
The post MakerBot Warm Gray PLA Filament (XXL Spool) appeared first on IPCAMVOX.
from MakerBot Warm Gray PLA Filament (XXL Spool)
0 notes
Text
Home 3D printers take us on a goading venture into another measurement Testing a Printrbot and a Makerbot prompts grief, disturbance, and problems.
This begun off as an audit of the Printrbot Simple, an ease 3D printer by the general population at Printrbot in California. Printrbot initially came to fruition through a Kickstarter crusade by a person named Brook Drumm. The purpose was to manufacture a moderate 3D printer that ordinary family units could buy and use—instead of the $2,000+ that most other home 3D printers go for.
Ars Senior Business Editor Cyrus Farivar as of late invested some energy out at the Printrbot workshop in Lincoln, and keeping in mind that he was out there, Brook Drumm and the other Printrbot people offered to send a survey unit to Ars. I volunteered to put the Printrbot through its paces from the point of view of somebody who's just ambiguously mindful of home 3D printing as an innovation. Before getting my hands on the Printrbot Simple, I'd never at any point seen a home 3D printer some time recently.
What I found as I dove in was a pit without a last—an outright yawning Stygian pit of alternatives and tweaking and adjustments and interminable re-printing. To possess and utilize a 3D printer is to end up plainly enmeshed in a steady stream of tinkering, tweaking, and overhauls. It feels a great deal like owning a venture auto that you should ceaselessly torque on to keep it running right. Practically from the minute I got the Printrbot out of the crate and printing, I needed to begin the tweaking. What's more, as an aggregate 3D printing newb, it truly soured me on the Printrbot and on the whole idea of minimal effort 3D imprinting as a rule. "Most likely," I thought, "this disappointment is on account of I'm cutting my teeth on a $299 3D printer proposed for early adopters. Most likely a higher-end 3D printer is simpler!"
Thus keeping in mind the end goal to perceive how a higher-end home 3D printer works, I wound up possessing a significantly more costly, a great deal more amazing looking Makerbot Replicator 2. That gadget costs $2,200 rather than the Printrbot Simple's $299. The initial couple of things I printed out with the a great deal more costly gadget were astonishing. It resembled leaving the venture auto in the carport and driving the Lexus to work—you get in, press the catch, and go. In any case, then, after maybe 20 hours of print time, the issues began. Fiber would neglect to encourage. The printer would stop up. The printer delivered spaghetti rather than genuine models, destroying overnight print occupations. I needed to supplant the plunger-based fiber extruder with another spring-stacked variant to beat a plan imperfection. I got myself re-leveling the construct plate and dismantling and reassembling the extruder far more than I at any point needed to do with the little Printrbot. The greater part of that was as fun as it sounds.
The Makerbot wasn't ending up being a costly yet dependable Lexus. It was ending up being a costly and you-better-possess two-since one-will-dependably be-broken 1970s-time Jaguar. It wasn't quite recently disappointing—it was really chafing. In the event that I had paid $2,200 out of my own pocket for the Makerbot, I would have been painfully enticed to drive up to New York and indulgence the thing through the windows of Makerbot's office.I made a stride back and reassessed before I devastated a couple of thousand dollars worth of Ars Technica property. My desires, it turns out, were driven by energy and buildup. They were likewise distressfully miscalibrated—practically as miscalibrated as the thrice-condemned manufacture plate. You're not going to utilize both of these 3D printers, shoddy or costly, to dash off single piece high-loyalty complex develops. They're not going to construct you another house or another PC or even another console. We're still at the, absolute starting point of the home 3D printing unrest, and things are simply (but scarcely) getting off the ground.
Before thoroughly ruining all the succulent subtle elements, how about we rewind a bit and run somewhat more profound with each of these 3D printers. To begin with up is the one estimated so that a typical individual may practically lift it up as a spur of the moment purchase: the Printrbot Simple.
The Printrbot: so basic, anybody can do it!
"The Printrbot Simple is my mission to get the cost down to a moderate level for the regular family unit," Printrbot originator Brook Drumm told Ars. Accordingly, Printrbot's items can be bought as packs. 3D printing lovers have the chance to gather the gadget themselves (and conceivably introduce mods as they do as such). We decided on a preassembled Printrbot Simple, which expands the price tag from $299 to $399.It's great that we got the preassembled one, since assembling the Printrbot Simple appears to be a multi-hour errand in case you're not especially great at building stuff. (Unfortunately, my aptitudes don't develop much past PCs and the infrequent piece of Ikea furniture.) As much as quitting get together abuses the "producer soul," it implied that we could make a plunge and instantly get our survey on.
The printer's laser-cut wood segments and zip-tie get together loan it an enchanting carport assembled look; it's sufficiently smaller that it would seem that a favor work area toy. The Printrbot folks made an awesome showing with regards to with the get together, wrapping the wire packs and conveniently cutting off the zip-ties. The bot touched base with a little test question as of now set up on the print bed as evidence that it was tried before it transported out to me. The bed additionally had two or three swatches of blue 3M painter's tape connected. As I later took in, this was to make it less demanding to isolate printed 3D models from the bed. Indeed, even with that, the test rectangle required an astounding measure of torque (and some help from a putty blade) to get it pulled free.3D printers "print" in three measurements by warming and expelling a thin piece of fiber, most normally PLA or ABS plastic. So as to do their printing, a 3D printer should have the capacity to move its extruder tip to any point inside the printing field. The Printrbot Simple uses pulleys and teflon string for its X and Y tomahawks—the print bed is pulled forward and backward underneath the extruder tip by engine and pulley, and the print arm on which the extruder tip is mounted is sawed forward and backward over the print bed with another engine and pulley. The third hub, the vertical Z pivot, is tended to through a worm adapt and since quite a while ago strung pole. The whole print arm rides the pole upward as layers are printed.The Printrbot's documentation suggests downloading and printing an adjustment solid shape or something comparable as a simple initial step to guarantee everything works accurately. To do that, you should download and introduce an application to print with. I ran with Printrbot's suggestion of Repetier Host. It's accessible for numerous stages, and all the more essentially, it's free.
The procedure for printing a 3D demonstrate with the Printrbot begins with really finding something to print, and one of the least demanding approaches to do that is to hit up Thingiverse, a vault of 3D models appropriate for printing. Per Printrbot's proposal, I got the 5 mm alignment 3D square. Models arrived in an assortment of record arrangements, yet STL is a typical one that Repetier Host can read. I stayed with that.
Repetier Host required a touch of designing to work with the Printrbot. I needed to give the application data on the Printrbot's print bed measurements, the temperature I needed its extruder to keep running at, the stature at which the print head ought to sit over the printer bed, and various different things. Luckily, the Printrbot's documentation had all the required parameters—I simply needed to bolster them into the application. From that point onward, you should "home" the bot. This implies physically situating the print overnight boardinghouse go to compare with the sources of the X, Y, and Z tomahawks. More costly 3D printers naturally handle this progression, however to begin printing with the Printrbot, you need to do it without anyone else's help. The documentation said to move the print bed to the "front left" position; lamentably, there was no undeniable approach to tell which sides were implied by "front" and "left." I took a figure and wound up being off-base—utilizing Repetier Host's manual run catches brought about expected go in the Y hub however granulating when I attempted to move the X hub. I slid the print bed over to the opposite side, re-homed, and attempted once more, this time with free and right development on each of the three axes.After I got Repetier Host completely arranged, I imported my alignment solid shape demonstrate and practically set it on the print head. The following stride was to "cut" the model. All the real shopper arranged 3D printers, including the Printrbot, do their printing by means of combined testimony displaying. They soften plastic and expel that liquefied plastic through a print head as a thin string and afterward lay that string down in layers to develop whatever it is they're building. "Cutting" a 3D model is the procedure by which the 3D printing application made sense of what number of layers will be important to assemble the model, and it next maps out the developments of the print head in each layer. All the more absolutely, in any event on account of Repetier Host, cutting deciphers the 3D display document into G-code, which is an assembling programming dialect comprising of guidelines that the 3D printer follows up on (move the head such a variety of millimeters, bolster fiber at such a rate, thus on).After cutting, I energetically rubbed my hands together and squeezed the print catch, prepared to watch my first live 3D print. It was really not what I was expecting: the Printrbot's stepper engines sprung up and moved the print head about with semi melodic buzzings and hummings. The print head started haphazardly expelling spaghetti-like streamers of plastic with no clear reasonable purpose. I let it keep running for a moment, then I drop the employment. I was clearly missing something.
Some looking around in discussions uncovered that I was running into the first of numerous arrangement pitfalls with 3D printing: the underlying tallness of the print head must be set painstakingly. The head must sit with sub-millimeter accuracy at a certain stature over the print bed—slightly not as much as the width of the expelled fiber.
0 notes
Text
3D Printing Will Change How We Build Fabricate Speed Parts
CTL + P for Performance?
When new technology shows up, it’s up to a hot rodder to see if it’s worth working into our way of building cars. As each newly accepted tech becomes the norm, a new wave of thinking bounces through our heads. The last time we saw this was in the 1980s when the billet craze took hold of everything from Deuces to Tri-Fives; machined aluminum parts became the hot ticket during the smooth and pastel 1980s aesthetic, bringing a new dimension to custom fabrication. Nowadays, billet aluminum components (whether by hand or CNC) are standard practice for speed and style parts. New tech doesn’t replace the old—you still see manual lathes and vertical mills churning in shop corners despite the rise of CNC—but it’s always worth a look to see if we can bring new capabilities to the table..
Such is the case with 3-D printing, and it has spread like wildfire since 2010. Even though the technology has been around since the late-1980s, the proliferation of low-cost Fused Deposition Modeling (FDM) printers has produced a spectrum of machines, from DIY kits to massive metal-printing monoliths. FDM is a process that extrudes plastic filament through a heated nozzle to draw a cross section layer by layer until a part is drawn from the bottom up. Unlike traditional machining processes (which remove material to create a shape), Additive Manufacturing (AM) allows complex geometries to be created with ease because there’s no bulky tool snaking around complex curves and crevices. FDM is the de facto process for desktop 3-D printing, although Stereo Lithography—using UV-sensitive resin that’s hardened as a laser or projector draws each layer while the part is pulled out of the vat of resin—predates FDM while offering higher-resolution prints (albeit at a substantially higher cost.)
We wanted to try two fabrication processes that relied heavily on tooling: composites and metal casting.
We’ve seen simpler parts like cupholders, cellphone mounts, and suspension bushings printed, but we wanted to dive deeper, incorporating 3-D printing into the larger universe of fabrication. During SEMA 2016, Edelbrock preached about its adoption of other AM processes to quickly print ready-to-pour sand molds, solitary cylinder-head runners for prototype flow testing, and other innovative uses in tooling and manufacturing. Seeing a water-jacketed cylinder head appear out of thin air piqued our interests, so we began digging into two fabrication processes where 3-D printing brings something new to the table: composites and metal casting.
Designing the Part
Part of desktop 3-D printing’s rise came from lower barriers in 3-D design software, namely cost and user-friendliness. TinkerCAD, Fusion360, and other freeware modeling software boils computer-aided design (CAD) down into a simpler toolset. We recommend you start there. We won’t get into the depths of 3-D modeling here—the internet is filled with information and how-to’s. Our best advice is that no matter what you do, there’s always the “undo” button—learning through trial by error is not frowned upon! Within a few nights, we were comfortable turning cardboard-aided design templates into proper CAD models.
Here are the final cast-aluminum part (left) and release-agent-coated, 3-D-printed pattern (right). Just about anything you can print can be turned into metal—even complex parts like intake manifolds and cylinder heads.
However, there are some considerations when modeling for 3-D printing. A new layer needs surface under it to build upon; any downward-facing surface is subject to distortion (thanks, gravity) or, worst case, the extruded filament collapses before bridging a gap over thin air. In general, 3-D printing software (also known as slicing software, as it slices your solid 3-D model into layers for printing) is usually clever enough to build disposable supports where needed, but the extra material is not always desirable because it’s tricky to remove from hard-to-reach places. 3D printing takes practice and a few failed prints until you are familiar with your specific machine and what it’s capable of producing. Also, FDM leaves behind a plastic grain, which, like woodgrain, has an effect on where the part is strong, so object orientation while printing should always be considered and may require an occasional low-resolution test run.
Lastly, be mindful of material shrinkage during production: for instance, in aluminum casting you may see from 3 to 5 percent of dimensional shrinkage between the CAD model and final aluminum piece. This can be compensated for by rescaling the model before printing. Some shapes will want to curl off the build plate while cooling, so larger rafts or circular tabs can be used to help prevent a failed print.
Automated Fabrication
One of the most common questions when showing off a printed part is, “How long does it take?” Print times vary from machine to machine and part to part. Factors like the machine’s maximum travel speeds (which can be increased to a point before quality degrades), the layer height selected (think of it as resolution), infill density (3-D printed parts are often hollow, with a simple internal structure for support, saving material and time), and the part’s geometry/tool path.
To fit the 12.5-inch-wide part on our Makerbot’s 11.60-inch-wide build plate, we printed the model in two parts. Each printed layer is a cross section, stacked higher and higher until the part is finished.
The shell halves used in our cast-aluminum gauge pod took about 15 hours to print, while the NACA duct in our fiberglass example took less than 9 hours. Both final parts were printed with a high-resolution 0.01mm layer height, though for quicker, rougher prints the machine can use up to a 0.04mm layer height. While these are considerable chunks of time, they’re not chunks of your time. While the machine is humming away, you can be out fabricating, racing, or relaxing. Many machines, like our Makerbot Replicator+, can also be daisy-chained together to create printing farms for small-scale mass production. How long does it take to carve a wood pattern? A lot longer.
Endless Answers to Build
While consumer-friendly desktop printers have gone off like an atom bomb recently, the technology would not have steady footing if it weren’t for a collective of tinkerers, engineers, coders, and students adopting the technology early. Thanks to community-supported websites like Thingiverse.com and GrabCAD, there are thousands of free CAD files available that can be printed. Everything from airfoils to turbo flanges, NACA ducts (and more) can be quickly downloaded and printed on your own machine. Of course, that’s only the tip of the iceberg, as just about anything you can draw in CAD can be turned into reality while you churn out nine-to-five work—this is how we ended up with our one-off, cast-aluminum gauge pod. Between the spectrum of repositories and your own imagination, there’s not much that can’t be brought into the physical world with the help of 3-D printing.
Brain to Bench
Seeing a one-off project through design, production, and completion brings a certain satisfaction that can’t be found on the shelf with a price tag attached.
We took our cardboard template to paper to sketch out the profile, and a quick test print physically proved our design.
We started with a cardboard template that set the side view of our gauge pod relative to the curvature of the windshield and dash as our only real physical constraints. For width, we measured between the trapezoidal cluster and glovebox door of our daily driven 1969 CST/10, which allowed us to carry four 2-1/16-inch gauges. To give it style, we aped the stock cluster’s trapezoidal design, but inverted it so the gauge pod would take on the dash’s natural lines.
In CAD, we were able to confirm our internal clearances by drawing 2-1/16×2-inch cylinders to simulate our gauges and ensure there was enough room to install and wire a full set. From there, we kept tweaking the shape until we were happy with the dimensions and look.
Because our final part was larger than our MakerBot’s generous 11.6-inch-wide build surface, we split the 3-D model down the center and printed the whole part in two halves. Once printed, it was trivial to superglue the halves together, and with light sanding, the seam was all but hidden. For longer prints, the model can be split into any number of subsections to maximize your printer’s available build volume with larger parts.
Once printed, hand-sanding the part begins to remove the subtle stripping left between layers—extruded filament lays down in a squished oval shape, which is just the nature of the beast in FDM 3-D printing. This is important for both composites and casting, as both processes require the printed part (be it a mold for fiberglass/carbon-fiber or a pattern for casting) to be cleanly released, and any surface texture creates substantial friction when removing molds and patterns.
John Fell—owner of the Allison V12-powered Cream Puff race boat featured in the Dec. 2016 issue of HRM—at Buddy Bar Casting showed us the ropes of sandcasting. The part was poured from 3080 aluminum. We’ll also revisit home casting down the road as our own project cars progress.
From here, you can begin either process as you would traditionally, but now the tooling has been simplified so complex shapes can be quickly printed and turned into usable patterns or molds with a few clicks. This gauge pod is a simple example of what you can create for casting, and our molded NACA duct serves as a small look at what can be tackled in composites. But what if you could draw a custom turbo manifold for a motor with less aftermarket support or recreate a missing piece of unobtainium trim on a restoration?
After a quick polish, a touch of paint, and some classic Auto Meters, our gauge pod looks at home atop our dash. We passed our wiring through the original dash speaker grille and used small neodymium magnets to keep it attached with no dash modifications.
Stay tuned to HOT ROD for more 3-D printing adventures as we create new problems in our projects to solve.
Makerbot Replicator+: Our Thoughts
Makerbot is a household name in 3-D printing, though the company has struggled with corporate growing pains over the last few years. The fifth-generation Replicator is MB’s stab at the professional market. The machine is optimized for PLA filament, a low-temp, organic plastic that’s incredibly forgiving to print. PLA’s disadvantages are in its strength (more brittle than ABS plastic) and in its temperature resistance (direct sunlight will soften and warp parts severely), but for prototyping or pattern/mold-making, this is not an issue. The removable, flexible build plate is a nice addition, providing solid traction for first-layer adhesion while making removal a snap with a few gentle twists of the plate. This saves the need to lay down sacrificial materials (tape or glue) or crudely prying to remove the part. Overall, the machine’s performance was satisfactory, with only a few failed prints—something that’s bound to happen while learning the ropes. The included software was easy to use, with plenty of tools to solve common 3-D printing quirks.
What we liked: Ease of use, dimensional accuracy to CAD drawing, one of the largest build volumes available, fast print speeds, remote monitoring via built-in camera.
What we didn’t like: Price (for a PLA-only machine at this price bracket, competitors are more flexible), lack of Z-axis offset adjustment in the printer’s menus, proprietary filament spool size, and G-Code format.
Budget-friendly alternatives?
Prusia i3
MonoPrice Select series
Wanhao Duplicator
XYZprinting Da Vinci series
M3D Micro
(Note: We have not tested these, but they come highly recommended at time of publishing.)
Printing a header mockup kit in bulk took 15 hours.
We asked for 50mm—good ’nuff for government work!
The post 3D Printing Will Change How We Build Fabricate Speed Parts appeared first on Hot Rod Network.
from Hot Rod Network http://www.hotrod.com/articles/3d-printing-will-change-build-fabricate-speed-parts/ via IFTTT
0 notes