#might add banana for more viscosity next time
Text
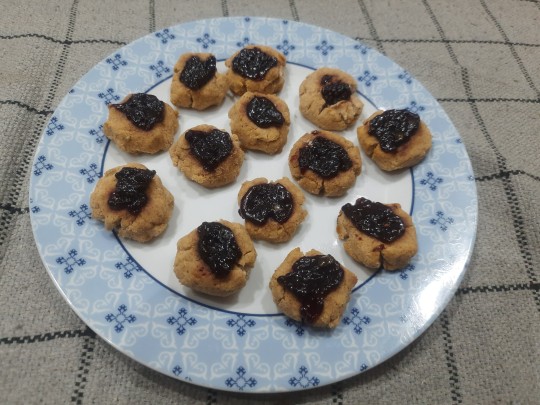
the almond milk pulp cookieses!! slightly cinnamon flavored due to artistic liberties while making the milk
#the taste is 10/10 but the consistency is a little dry#might add banana for more viscosity next time
6 notes
·
View notes
Link
Ice cream can be a cool treat on a warm day. But eat it too slowly and you could soon have a sticky mess on your hands. Researchers have searched for ways to slow ice cream’s melting. Now they report some success.
Tiny particles from the ground-up stems of banana plants can help a scoop of ice cream keep its shape longer, they report. The engineers presented their findings March 21 at a meeting of the American Chemical Society in New Orleans, La.
Ice cream is a complex mixture of fat droplets, water, sugar, air bubbles and ice. All of these ingredients can affect how quickly or slowly ice cream melts, explains Jorge Velásquez Cock. He’s a chemical engineer and graduate student at Pontifical Bolivarian University in Medellín, Colombia. There, he uses chemistry to improve the texture and taste of ice cream.
Fat is especially important. The number of fat droplets in ice cream helps determine how quickly it will start to drip. Lower fat recipes will lead to ice cream with fewer fat droplets. These ice creams tend to “collapse” into a drippy mess faster than higher-fat versions. Fat droplets create obstacles for water to move around as the ice crystals melt, Velásquez Cock explains. That “increases the viscosity of the mixture,” he notes. Viscosity is a measure of how easily a liquid flows. Liquids with high viscosity (such as ketchup) flow more slowly than those with a low viscosity (such as water).
But on a warm day, even high-fat ice creams can turn soupy in minutes. Velásquez Cock suspected some new ingredient might extend how long your ice cream remains firm. And to find it, he turned to the garbage can.
Thickening the mix
Velásquez Cock lives near a banana-growing region of Colombia, a nation in South America. Bananas grow in bunches from towering plants that look like trees. A thick stalk attaches each banana bunch to the plant’s trunk. Banana growers consider these woody stalks as garbage.
Finding ways to recycle banana wastes has been part of Velásquez Cock’s research. The stalks are rich in cellulose. It’s a molecule that helps make plant cells stiff. Indeed, wood pulp is a major source of cellulose. That chemical is what makes tree branches and stems so strong.
Cellulose has many uses outside of plants. It’s an ingredient in paper, cellophane and certain types of fabric. It’s also used in some foods. Cellulose molecules stretch out and take up more space as they dissolve in water. This allows them to increase the thickness or viscosity of a liquid. That’s why food scientists sometimes add cellulose to sauces or salad dressings — it can impart a thick, creamy texture.

Scientists extracted tiny plant fibers from a part of the banana stem (red circle) called the rachis.
CREDIT: Adrian Pingstone/Wikimedia Commons, adapted by L. Steenblik Hwang
Velásquez Cock wanted to test whether cellulose from banana stalks might help keep ice cream from turning soupy. He used a special machine to extract tiny bits of cellulose from ground-up banana stalks. The width of each piece was less than a thousandth the width of a human hair.
For the next step, Velásquez Cock worked with his advisor, Robin Zuluaga Gallego, and with Douglas Goff, a food scientist at the University of Guelph in Canada. The trio added the banana plant bits to ice creams with differing amounts of fat. Then they compared how fast the ice creams melted. Those with cellulose held their shape longer than ice creams without the particles. And among those with cellulose, fat content seemed to greatly affect melt rate.
Most ice cream is about 10 percent fat, by weight. (Low-fat ice creams may have just half as much; rich ice creams may contain around 15 percent fat.) “We saw the biggest differences with the normal fat ice cream,” says Velásquez Cock. Adding cellulose particles at 20° Celsius (68° Fahrenheit) increased by 20 minutes the time it took 120 milliliters (about a half cup) of normal-fat ice cream to start melting. The researchers performed the experiments in a closed chamber with no air movement. Just to be clear, that’s not like leaving it on a countertop. Under these artificial conditions, it usually takes that much ice cream a little more than two hours to turn completely liquid, Velásquez Cock notes. In the real world, “Air currents or wind can affect melting behavior in unaccounted ways,” he points out.
Like all ice cream, the new creation did eventually melt into a soupy puddle. But the added cellulose, he says, meant “you can enjoy a little bit longer.”
17 notes
·
View notes
Text
The 5-Step Guide to Tasting Homebrew Like a Pro

Drinking and tasting are different. Sure, they can happen simultaneously, but critical tasting is a routine designed to produce results, rather than entertainment or enjoyment. Of course, a taster can enjoy the process — but it’s not the objective.
The purpose of critically tasting beer is to evaluate and improve it. Whether your goal is to improve your beer, or to create a high-scoring style in a homebrew competition, how you approach tasting can have a direct impact on your results.
Whatever the goal, all homebrewers should have a standard tasting method. Follow the five-step guidelines below and you’ll be tasting like a pro in no time.
1. Establish a Routine
As athletes repeat rituals before competing — Micheal Phelps does those arm swings before each swimming race, and Serena Williams reportedly listens to the theme from “Flashdance” before each match — learned triggers can enhance our ability to perform. They instantly switch the brain into “game time” mode.
In beer tasting, triggers can be a little less conspicuous — something that would be comfortable and non-disruptive at a judges table or in a quiet test room. One example, from personal experience, is holding the cup in your right hand if you’re left handed, or vice versa — this sends a message to the brain that what you’re holding isn’t just any cup of beer.
Other examples of physical triggers are swirling the beer counterclockwise instead of clockwise, using a special grip (say, three fingers instead of four), or sniffing your forearm or shoulder before you begin. It may sound silly, but it works. The more practiced the trigger, the more it becomes second nature and gets you ready to taste and evaluate.
2. Sniff Strategically
Instead of just smelling a beer in front of you, you can employ several types of sniffs to ensure you’re sensing the full range of aromas.
First, sniff from far away, while the glass is about six inches away from your face. No need to be dramatic about it — just be sure to register what is there as you’re bringing the glass toward you, because some aromas are more apparent at a distance. Once the glass is close to your nose, take a few short sniffs. (I do three every single time — routine!)
Keeping sniffs to less than a second long does a few things: It gives your senses several chances to register different smells; keeps your nasal passages from drying out, which can affect their sensitivity; and avoids accidentally “blinding” yourself to off-flavors. (Certain aromas will overwhelm scent receptors, making the smeller effectively “blind” to those aromas for several minutes.)
Next, swirl the glass to see if any attributes you picked up during the short sniffs increase. Then, cover the glass with your hand, swirl it for three to five seconds, align your nose with the edge of the glass, remove your hand, and take several short sniffs. Reflect on what you sense: Is there anything new? Did your perception of any specific odors intensify? Finally, take a long sniff, for three or more seconds.
3. Take Notes and Move On
Quickly taking note of what you smelled gives the brain a chance to synthesize the sensory experience. The taster can go back to confirm the string of words with a few short sniffs of the glass. With practice, the words you use to describe aromas will fall roughly into separate categories: malt (bread crust, dark chocolate), hops (grapefruit oil, pine bark), yeast (white pepper, red apple candy), additives (hibiscus petal, sour cherry), or other (rotten vegetables, skunk spray).
Then, it’s time to move on. If you’re evaluating multiple samples, such as in a competition, there are two different approaches. One is to smell the other samples and take notes on those before coming back to taste; this provides a second chance to confirm or add to original aroma notes. The second is to taste the sample you just studied, and repeat with each sample one by one.
Since off-flavors like hydrogen sulfide (rotten egg) are very volatile, meaning they can dissipate quickly, most beer judges will smell the whole flight first to make sure they don’t miss an off-flavor before it disappears.
4. Taste With Your Nose
There are odor receptors in the throat, roof of the mouth, and back of the nasal cavity that are not activated by taking typical sniffs and require the volatile odor compounds to be introduced through the mouth. This is called retronasal olfaction, meaning behind-the-nose smell. Start by firmly pinching the nostrils shut with your fingers. Take a breath with your mouth, take a sip of the beer, swish it slowly around your mouth to hit receptors on the tongue and the roof of the mouth, then swallow. Simultaneously release and exhale from the nose, keeping lips tightly shut.
Do not underestimate this step! Certain flavors with strong retronasal perception will create the sensation of your mouth filling with flavor — German Weissbier creating a strong banana flavor is a good example.
5. Take a Sip
Next, take a sip — you’re finally evaluating for flavor! Hold it in your mouth for a second or so, making sure to consider mouthfeel (carbonation, alcohol warming, viscosity, and astringency) before swallowing. Then, take a “normal” sip. Once again, go to your categories: malt, hops, yeast, additives, or other. Note flavor attributes the beer has in each category. It’s especially useful to contemplate if the flavors align with the aromas noted earlier. Does the aroma profile match the way the beer tastes? This little exercise forces you to get specific about what you are sensing. In order to decree that the flavor and aroma do, in fact, match, you have to have a very particular profile of each in your mind (or on your notepad).
Bonus: Compare and Contrast
An excellent exercise for brewers looking to improve is to compare their beer to exemplary commercial examples of that style. For example, a brewer looking to improve a German Weissbier recipe might taste their beer next to Weihenstephaner Hefeweissbier and Schneider Weisse Original to assess how their tasting descriptors differ in each category. Is there a malt flavor the homebrew is missing? Or an extra flavor coming from the Weihenstephaner yeast profile? The BJCP guidelines feature commercial examples for each style, so every beer is a candidate for this exercise. An even better way to conduct this exercise is to have another person give the samples to you, in numbered cups, so your bias doesn’t impact your perception.
A Final Note: Use Your Tasting Powers for Good
Practiced tasters make better brewers. For those studying to be a beer judge, filling out specific score sheets will require taking your notes and turning them into meaningful feedback. Knowledge of flavor development and the brewing process combined with thorough tasting descriptions make judges’ comments more useful for brewers.
Note that our guidelines never suggest making a judgement call on whether a beer is “good” or “bad.” Whether on a panel or at happy hour, a trained taster can ruin a pint for everyone by commenting negatively. (“Who else gets that nasty musty flavor?”)
Don’t be that taster, nor that judge. Use your powers for good, and help the beer world be a welcoming, delicious place.
The article The 5-Step Guide to Tasting Homebrew Like a Pro appeared first on VinePair.
source https://vinepair.com/articles/homebrew-tasting-guide/
0 notes
Text
The 5-Step Guide to Tasting Homebrew Like a Pro
Drinking and tasting are different. Sure, they can happen simultaneously, but critical tasting is a routine designed to produce results, rather than entertainment or enjoyment. Of course, a taster can enjoy the process — but it’s not the objective.
The purpose of critically tasting beer is to evaluate and improve it. Whether your goal is to improve your beer, or to create a high-scoring style in a homebrew competition, how you approach tasting can have a direct impact on your results.
Whatever the goal, all homebrewers should have a standard tasting method. Follow the five-step guidelines below and you’ll be tasting like a pro in no time.
1. Establish a Routine
As athletes repeat rituals before competing — Micheal Phelps does those arm swings before each swimming race, and Serena Williams reportedly listens to the theme from “Flashdance” before each match — learned triggers can enhance our ability to perform. They instantly switch the brain into “game time” mode.
In beer tasting, triggers can be a little less conspicuous — something that would be comfortable and non-disruptive at a judges table or in a quiet test room. One example, from personal experience, is holding the cup in your right hand if you’re left handed, or vice versa — this sends a message to the brain that what you’re holding isn’t just any cup of beer.
Other examples of physical triggers are swirling the beer counterclockwise instead of clockwise, using a special grip (say, three fingers instead of four), or sniffing your forearm or shoulder before you begin. It may sound silly, but it works. The more practiced the trigger, the more it becomes second nature and gets you ready to taste and evaluate.
2. Sniff Strategically
Instead of just smelling a beer in front of you, you can employ several types of sniffs to ensure you’re sensing the full range of aromas.
First, sniff from far away, while the glass is about six inches away from your face. No need to be dramatic about it — just be sure to register what is there as you’re bringing the glass toward you, because some aromas are more apparent at a distance. Once the glass is close to your nose, take a few short sniffs. (I do three every single time — routine!)
Keeping sniffs to less than a second long does a few things: It gives your senses several chances to register different smells; keeps your nasal passages from drying out, which can affect their sensitivity; and avoids accidentally “blinding” yourself to off-flavors. (Certain aromas will overwhelm scent receptors, making the smeller effectively “blind” to those aromas for several minutes.)
Next, swirl the glass to see if any attributes you picked up during the short sniffs increase. Then, cover the glass with your hand, swirl it for three to five seconds, align your nose with the edge of the glass, remove your hand, and take several short sniffs. Reflect on what you sense: Is there anything new? Did your perception of any specific odors intensify? Finally, take a long sniff, for three or more seconds.
3. Take Notes and Move On
Quickly taking note of what you smelled gives the brain a chance to synthesize the sensory experience. The taster can go back to confirm the string of words with a few short sniffs of the glass. With practice, the words you use to describe aromas will fall roughly into separate categories: malt (bread crust, dark chocolate), hops (grapefruit oil, pine bark), yeast (white pepper, red apple candy), additives (hibiscus petal, sour cherry), or other (rotten vegetables, skunk spray).
Then, it’s time to move on. If you’re evaluating multiple samples, such as in a competition, there are two different approaches. One is to smell the other samples and take notes on those before coming back to taste; this provides a second chance to confirm or add to original aroma notes. The second is to taste the sample you just studied, and repeat with each sample one by one.
Since off-flavors like hydrogen sulfide (rotten egg) are very volatile, meaning they can dissipate quickly, most beer judges will smell the whole flight first to make sure they don’t miss an off-flavor before it disappears.
4. Taste With Your Nose
There are odor receptors in the throat, roof of the mouth, and back of the nasal cavity that are not activated by taking typical sniffs and require the volatile odor compounds to be introduced through the mouth. This is called retronasal olfaction, meaning behind-the-nose smell. Start by firmly pinching the nostrils shut with your fingers. Take a breath with your mouth, take a sip of the beer, swish it slowly around your mouth to hit receptors on the tongue and the roof of the mouth, then swallow. Simultaneously release and exhale from the nose, keeping lips tightly shut.
Do not underestimate this step! Certain flavors with strong retronasal perception will create the sensation of your mouth filling with flavor — German Weissbier creating a strong banana flavor is a good example.
5. Take a Sip
Next, take a sip — you’re finally evaluating for flavor! Hold it in your mouth for a second or so, making sure to consider mouthfeel (carbonation, alcohol warming, viscosity, and astringency) before swallowing. Then, take a “normal” sip. Once again, go to your categories: malt, hops, yeast, additives, or other. Note flavor attributes the beer has in each category. It’s especially useful to contemplate if the flavors align with the aromas noted earlier. Does the aroma profile match the way the beer tastes? This little exercise forces you to get specific about what you are sensing. In order to decree that the flavor and aroma do, in fact, match, you have to have a very particular profile of each in your mind (or on your notepad).
Bonus: Compare and Contrast
An excellent exercise for brewers looking to improve is to compare their beer to exemplary commercial examples of that style. For example, a brewer looking to improve a German Weissbier recipe might taste their beer next to Weihenstephaner Hefeweissbier and Schneider Weisse Original to assess how their tasting descriptors differ in each category. Is there a malt flavor the homebrew is missing? Or an extra flavor coming from the Weihenstephaner yeast profile? The BJCP guidelines feature commercial examples for each style, so every beer is a candidate for this exercise. An even better way to conduct this exercise is to have another person give the samples to you, in numbered cups, so your bias doesn’t impact your perception.
A Final Note: Use Your Tasting Powers for Good
Practiced tasters make better brewers. For those studying to be a beer judge, filling out specific score sheets will require taking your notes and turning them into meaningful feedback. Knowledge of flavor development and the brewing process combined with thorough tasting descriptions make judges’ comments more useful for brewers.
Note that our guidelines never suggest making a judgement call on whether a beer is “good” or “bad.” Whether on a panel or at happy hour, a trained taster can ruin a pint for everyone by commenting negatively. (“Who else gets that nasty musty flavor?”)
Don’t be that taster, nor that judge. Use your powers for good, and help the beer world be a welcoming, delicious place.
The article The 5-Step Guide to Tasting Homebrew Like a Pro appeared first on VinePair.
Via https://vinepair.com/articles/homebrew-tasting-guide/
source https://vinology1.weebly.com/blog/the-5-step-guide-to-tasting-homebrew-like-a-pro
0 notes
Text
The Complete Guide to Egg Replacers in Paleo Baking
Avoiding recipes containing eggs in Paleo-world may seem next to impossible, but there are plenty of healthy, clean, and easy alternatives that fit the Paleo bill! If you are allergic to eggs or following the AIP, you have options and can still enjoy delicious baked goods. So hang tight: there is hope for you and your delicious Paleo baked goods, and your savory favorites, too!
Eggs Replacers in Baking
Eggs provide the classic and often expected mouthfeel and texture to recipes that include them. When you use egg replacers, there might be a slightly different result in density and/or texture to the finished product. You will most likely notice that your baked goods may be a touch sweeter and perhaps not as fluffy as a classical muffin that uses whole eggs.
For batters like pancake batter, without the binding capabilities of an egg, your egg-free version may need a touch of TLC during the flipping process while cooking.
Understanding that foods may act differently when experimenting with these egg replacers is a great way to learn and substitute other favorite recipes on your own.
Without the magical properties of an egg in your recipes—their viscosity, emulsifying, leavening, and binding abilities—you will more likely have a looser batter, a denser muffin, a more fragile dough, or a dish that may just need a little more attention and patience. But once you are accustomed to the differences in preparation methods when using these egg swaps, the payoff is delicious. Pancakes are always worth the effort in my book!
Basic Egg Replacing Rules
Swapping eggs in many recipes only works for dishes that have up to no more than four eggs. It is a far-fetched idea, for example, to think that you might be able to pull off a quiche with egg replacers! Once you get into recipes that typically call for mostly eggs or ask for more than four eggs, replacing them gets a little hairy and unmanageable. Stick to 2-4 egg recipes with these substitutions.
You can sometimes mix a few different egg-replacers together at a time for a single recipe. For example, chia seed and applesauce to replace the two eggs in a muffin recipe not only adds two different ways of binding your batter, but they both offer the pleasant additions of more moisture, sweetness, and texture!
Collagen egg
Just as collagens in the human body are strong and flexible, using animal-based collagen as an ‘egg’ is not a farfetched idea!
All gelatin is not created equal. Be sure to use a reputable company and not factory-farmed gelatin sources. Gelatin will inhibit some recipes from rising, which is typical of those that use leavener, yeast, and egg, but gelatin eggs will get the job done and create a great texture and is a very strong 1:1 replacement for swapping up to four eggs for baking recipes.
How to make a collagen egg:
1 T gelatin to 3 -4 T water
In a saucepan stovetop, without turning on heat, sprinkle gelatin into water a pinch at a time to let the gelatin absorb the water. Whisk a bit to avoid clumping.
Let stand for 2 minutes or so to gel up slightly.
Turn on stovetop to medium heat and whisk until all gelatin is melted, turn off heat, and whisk vigorously until frothy. Use immediately in recipe.
Try in these recipes: Paleo Irish Scones, Chocolate Coconut Banana Muffins
Flax egg
Flaxseeds have been popularized as a superfood for their omega-3 fatty acid content, and are most likely on the shelf at your local grocery store. For the flax egg to become gelatinous enough to suffice as a binder, you must first grind up the seed until it becomes a meal or powder. You can use a high-powered blender or a coffee grinder works great, too.
Flax has a strong and nutty flavor so this is best reserved for savory and hearty goods. Flax also contains a lot of oil, which will go rancid if left out. For best results, store whole flaxseeds in the refrigerator and grind seeds as needed.
How to make a flax egg:
1 T ground flax meal to 1 T water
Stir one T flax into water, let sit for 10 minutes to thicken.
Use the flax egg in a 1:1 ratio. For best results, substitute in recipes that only use up to two eggs.
Try in these recipes: Garden Fresh Zucchini Bread, Bacon Pancakes with Coconut Flour
Chia seed egg
Chia seeds are great in many recipes because they do not impart a strong flavor. They do however, offer quite a bit of texture, which tends to be favorable in many recipes, not unlike the pleasant little crunch of a poppy seed in lemon-poppy muffins!
Chia seeds have a viscous character when soaked, and you will often see them added to fresh juices and teas to make a ‘bubble tea’ effect on a beverage. Chia seeds can also be found at your local grocer, and are known for many health benefits like fiber, as well as omega-3 fatty acids.
How to make a chia seed egg:
1 T chia seeds to 2 T water
Mix chia seed with water, let sit for 10 minutes to become gelatinous.
Use chia seeds in a 1:1 ratio and replace in recipes that use up to two or three eggs.
Try in these recipes: Bananalicious Nut-Free Banana Bread, Chocolate Avocado Blueberry Muffins
Banana
Banana is a great way to replace egg in your baking and add a little sweetness and moisture. Due to unmistakable banana flavor, this way of replacing your eggs will lend itself best to sweets. The natural sugar content of bananas will create yummy caramelization to pancakes and muffins during the cooking process as well.
How to make a banana egg replacer:
½ mashed or blended banana per each egg replaced
You can replace up to four eggs with banana comfortably in most baked goods like muffins, breads, and cookies, as well as crepes and pancakes.
Try in these recipes: Pumpkin Bread, Paleo Cassava Flour Pancakes
Applesauce
Applesauce is similar to banana in that it will add sweetness as well as moisture when swapping for eggs in recipes. Also like banana, apples have a natural sweetness that lends itself very well to baked goods and sweet items. There are some savory recipes that may also benefit from having the sweetness of apples, too, like root vegetable patties, meatballs, and meatloaf.
How to use applesauce to replace eggs:
¼ cup applesauce replaces 1 egg
You can replace eggs fairly comfortably for recipes that have 2-3 eggs included.
Try in these recipes: Banana Bread Donuts, Morning Glory Muffins
Pureed Fruit
Peaches, pears, and avocados all work great as egg substitutes. Depending on the flavor profiles of your recipe, you have options as far as which egg replacer will work best. Peaches are sweet and have natural sugars that will caramelize nicely when cooked. Pears will have a similar texture to that of applesauce and a more floral note that would be delicious with warming spices like cinnamon and clove in your baked goods. Avocado surprisingly lends itself to recipes that use cacao and chocolate!
How to make a pureed fruit egg replacer:
¼ cup pureed fruit replaces 1 egg
Try in these recipes: Sweet Potato Turmeric Muffins, Coconut Lime Muffins
Pureed Vegetables
Pureed vegetables like sweet potatoes, squash, pumpkin, and beets work well for savory, and sometimes very colorful, egg swaps.
How to make a pureed vegetable egg replacer:
¼ cup steamed and pureed vegetables replaces 1 egg
Try in these recipes: Zucchini Fritters, Apple Cinnamon Bread
SaveSaveSaveSaveSaveSaveSaveSaveSaveSaveSaveSave
The post The Complete Guide to Egg Replacers in Paleo Baking appeared first on Paleo Plan.
Source: http://ift.tt/10qRbxJ
3 notes
·
View notes
Text
The 5-Step Guide to Tasting Homebrew Like a Pro

Drinking and tasting are different. Sure, they can happen simultaneously, but critical tasting is a routine designed to produce results, rather than entertainment or enjoyment. Of course, a taster can enjoy the process — but it’s not the objective.
The purpose of critically tasting beer is to evaluate and improve it. Whether your goal is to improve your beer, or to create a high-scoring style in a homebrew competition, how you approach tasting can have a direct impact on your results.
Whatever the goal, all homebrewers should have a standard tasting method. Follow the five-step guidelines below and you’ll be tasting like a pro in no time.
1. Establish a Routine
As athletes repeat rituals before competing — Micheal Phelps does those arm swings before each swimming race, and Serena Williams reportedly listens to the theme from “Flashdance” before each match — learned triggers can enhance our ability to perform. They instantly switch the brain into “game time” mode.
In beer tasting, triggers can be a little less conspicuous — something that would be comfortable and non-disruptive at a judges table or in a quiet test room. One example, from personal experience, is holding the cup in your right hand if you’re left handed, or vice versa — this sends a message to the brain that what you’re holding isn’t just any cup of beer.
Other examples of physical triggers are swirling the beer counterclockwise instead of clockwise, using a special grip (say, three fingers instead of four), or sniffing your forearm or shoulder before you begin. It may sound silly, but it works. The more practiced the trigger, the more it becomes second nature and gets you ready to taste and evaluate.
2. Sniff Strategically
Instead of just smelling a beer in front of you, you can employ several types of sniffs to ensure you’re sensing the full range of aromas.
First, sniff from far away, while the glass is about six inches away from your face. No need to be dramatic about it — just be sure to register what is there as you’re bringing the glass toward you, because some aromas are more apparent at a distance. Once the glass is close to your nose, take a few short sniffs. (I do three every single time — routine!)
Keeping sniffs to less than a second long does a few things: It gives your senses several chances to register different smells; keeps your nasal passages from drying out, which can affect their sensitivity; and avoids accidentally “blinding” yourself to off-flavors. (Certain aromas will overwhelm scent receptors, making the smeller effectively “blind” to those aromas for several minutes.)
Next, swirl the glass to see if any attributes you picked up during the short sniffs increase. Then, cover the glass with your hand, swirl it for three to five seconds, align your nose with the edge of the glass, remove your hand, and take several short sniffs. Reflect on what you sense: Is there anything new? Did your perception of any specific odors intensify? Finally, take a long sniff, for three or more seconds.
3. Take Notes and Move On
Quickly taking note of what you smelled gives the brain a chance to synthesize the sensory experience. The taster can go back to confirm the string of words with a few short sniffs of the glass. With practice, the words you use to describe aromas will fall roughly into separate categories: malt (bread crust, dark chocolate), hops (grapefruit oil, pine bark), yeast (white pepper, red apple candy), additives (hibiscus petal, sour cherry), or other (rotten vegetables, skunk spray).
Then, it’s time to move on. If you’re evaluating multiple samples, such as in a competition, there are two different approaches. One is to smell the other samples and take notes on those before coming back to taste; this provides a second chance to confirm or add to original aroma notes. The second is to taste the sample you just studied, and repeat with each sample one by one.
Since off-flavors like hydrogen sulfide (rotten egg) are very volatile, meaning they can dissipate quickly, most beer judges will smell the whole flight first to make sure they don’t miss an off-flavor before it disappears.
4. Taste With Your Nose
There are odor receptors in the throat, roof of the mouth, and back of the nasal cavity that are not activated by taking typical sniffs and require the volatile odor compounds to be introduced through the mouth. This is called retronasal olfaction, meaning behind-the-nose smell. Start by firmly pinching the nostrils shut with your fingers. Take a breath with your mouth, take a sip of the beer, swish it slowly around your mouth to hit receptors on the tongue and the roof of the mouth, then swallow. Simultaneously release and exhale from the nose, keeping lips tightly shut.
Do not underestimate this step! Certain flavors with strong retronasal perception will create the sensation of your mouth filling with flavor — German Weissbier creating a strong banana flavor is a good example.
5. Take a Sip
Next, take a sip — you’re finally evaluating for flavor! Hold it in your mouth for a second or so, making sure to consider mouthfeel (carbonation, alcohol warming, viscosity, and astringency) before swallowing. Then, take a “normal” sip. Once again, go to your categories: malt, hops, yeast, additives, or other. Note flavor attributes the beer has in each category. It’s especially useful to contemplate if the flavors align with the aromas noted earlier. Does the aroma profile match the way the beer tastes? This little exercise forces you to get specific about what you are sensing. In order to decree that the flavor and aroma do, in fact, match, you have to have a very particular profile of each in your mind (or on your notepad).
Bonus: Compare and Contrast
An excellent exercise for brewers looking to improve is to compare their beer to exemplary commercial examples of that style. For example, a brewer looking to improve a German Weissbier recipe might taste their beer next to Weihenstephaner Hefeweissbier and Schneider Weisse Original to assess how their tasting descriptors differ in each category. Is there a malt flavor the homebrew is missing? Or an extra flavor coming from the Weihenstephaner yeast profile? The BJCP guidelines feature commercial examples for each style, so every beer is a candidate for this exercise. An even better way to conduct this exercise is to have another person give the samples to you, in numbered cups, so your bias doesn’t impact your perception.
A Final Note: Use Your Tasting Powers for Good
Practiced tasters make better brewers. For those studying to be a beer judge, filling out specific score sheets will require taking your notes and turning them into meaningful feedback. Knowledge of flavor development and the brewing process combined with thorough tasting descriptions make judges’ comments more useful for brewers.
Note that our guidelines never suggest making a judgement call on whether a beer is “good” or “bad.” Whether on a panel or at happy hour, a trained taster can ruin a pint for everyone by commenting negatively. (“Who else gets that nasty musty flavor?”)
Don’t be that taster, nor that judge. Use your powers for good, and help the beer world be a welcoming, delicious place.
The article The 5-Step Guide to Tasting Homebrew Like a Pro appeared first on VinePair.
source https://vinepair.com/articles/homebrew-tasting-guide/
source https://vinology1.tumblr.com/post/189190788239
0 notes
Last Seen Blogs

mostlybrunettes
Mostly Brunettes

mostly-funnytwittertweets
previously funnytwittertweets

philipperegnoux
Sans titre

dardyrental-blog
Sewa Mobil, Harga Merakyat

mevldebrn-blog
mevlüde instagram@ilmitaleb