#mkv file compression
Note
top five file formats :3
5. .tar – I've come to appreciate it more after all these years on linux. I like how it preserves file system parameters.
4. .obj – Among 3D geometry formats, is straight up just a text file. I admire the panache of that. Great for when you want to generate objects dynamically in a pinch, quite reliable for what it does.
3. .mkv – Versatile, easy to use. What else is there to say? Soft-subbed anime package my beloved.
2. .png – It's lossless, it's transparent, It compresses quite well for some large uniform images.
1. .gif – The moving image, to which I owe everything. Dang thing is almost 40 years old, still nobody quite does it like her. Has limitations, sure, but that only serves to better foster creativity in the user, to engender an appreciation for each and every color in the palette. Also, did you know that GIFs can be much lighter than even PNGs, for very small icons and images?
97 notes
·
View notes
Text
@vmprsm replied to your post “Raw MKV rip of Mission Impossible: Fallout:...”:
Theoretically, if one wanted their own copies of the MI movies safely on a hard drive....where would one go?
I mean, there is a site where you can acquire a lot of movies via torrent. I tend to use (rot13) 1337k.gb and I got a heavily discounted Windscribe VPN subscription that I use on almost all of my devices.
But my thing is that... I want commentary reels and special features, and sometimes you'll download a movie but the fucking subtitles are either bad or they become desynced over time and I haaaaate it.
So I've been gathering bits and pieces over the past year to get a Plex system going in my house and it works like a fucking DREAM. But it requires some investment. If you just want to have a few local copies of your favorite movies, this is way overkill. But me, I am canceling all of my family's streaming services and pivoting to our Plex.
So what I have for actually getting the files:
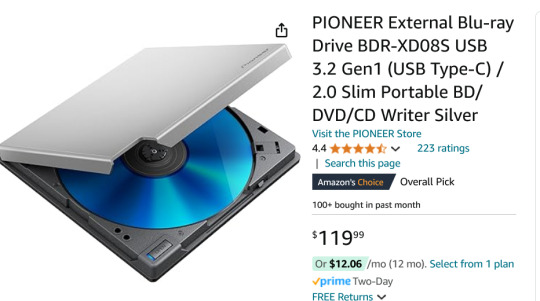
I don't have this model but it's similar to this, a Pioneer External Blu-ray Reader. It sits on a little shelf and is connected to my PC by a USB cable. (I think I got mine for around 68 bucks so you can wait for a sale.)
I use MakeMKV which will rip the big honking raw files from a Blu-ray and leave them as matroshka (.mkv) files.
Because these raw files are ENORMOUS, I compress them in Handbrake. Handbrake is wildly powerful, can convert file formats and make them super small. I have my Handbrake set up special to dump all the non-English language subtitles and audio tracks to save space.
(SUPER BONUS TIP FOR HANDBRAKE: If you have a dedicated GPU, you can give Handbrake permission to use it, and it'll compress shit literally 10x faster, love it.)
At the moment, I am using a Western Digital portable 5TB external harddrive because it was one sale and I couldn't beat the price. Eventually, I want to upgrade to two 10TB HDDs so I can keep a full backup of everything I'm ripping. Because this is a bit of a time and energy commitment and I don't wanna lose all my progress here!
At first I was running Plex off my desktop PC and that worked totally fine, but my family hates having to touch my desktop to wake it up every time, so I very recently grabbed one of these guys:
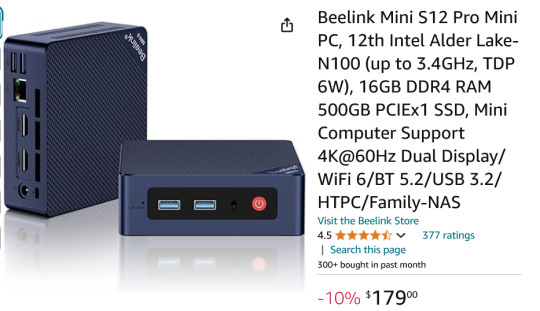
This is a Beelink Mini PC S12 Pro. It is small enough to fit in my hand but it is a speedy little demon that runs Windows 11. (And eventually I am gonna use it to firewall out ads from our entire home network, I'm pumped for that project but ANYWAY.)
The upside of these mini boys is that instead of being a hefty workhorse like my main computer, this is small and has a low-power draw.
So I moved my Plex Media Server to the mini PC, plugged in my 5TB drive of movies, and now everyone in the house can easily stream anything I have added to the library.

This is what it looks like, if you're curious. Any device in the house that runs Plex and is signed in can select any movie or TV show I have and just watch it like it was Netflix or something.
A month ago, I has like.... 65 movies? Now I'm ripping a few and we're gonna break 100 soon.
"But Arc, where do you get so many blurays!"
My local library.
When I lived in Broward County, FL, I had an extravagantly wonderful library system. Tax dollars at fucking WORK, y'all. Now I live in Georgia and the library system is not nearly as good, but I have still gotten my hands on a frankly ridiculous amount of blurays. Every week I'm picking up 3 to 10 movies or shows, taking them home, making good copies, and returning them.
All of this is an investment and it is work. But as someone who built my computer, built my keyboard, cracked my 3DS and PS Vita-- this is fun to me! This is what I love to do. And through doing it, I've seen more movies in the past year than the last ten years put together.
So yeah, I can't recommend this to everyone, but if you wanna get out of your subscriptions and to just have high quality shit on demand, this is what I'm doing.
Cannot stress this enough tho, if this seems interesting to you: wait for sales. All the components here go on steep sale if you wait patiently. Take your time assembling the parts and keep in mind that shit is modular, you can upgrade parts later.
72 notes
·
View notes
Text
Idk who needs to hear this, but you can download every single broadcast from Boomstream purchased from these theatres:
Vita (Leithian)
Skazki (Leithian, PI)
Musicals by Olga Vayner (Orpheus, Hermes)
The download button can be found at the very end of the Boomstream video once the live broadcast is over. Where YouTube shows a replay button, Boomstream shows a replay button and a download button on all desktop browsers. The downloaded file usually is .flv or .mkv and rather big. VLC can easily play those files, but if you'd like to convert and/or compress them, I recommend using Any Video Converter.
You are allowed to use Boomstream's download button, that's what it's there for. Please use it to make sure you retain access to the recording you have purchased.
#musicals#you do not have to screenrecord them#you are MEANT to download them#there are ways to prevent downloading. they are explicitly telling you to download their things#sometimes the download will struggle a bit but thats normal for huge files
21 notes
·
View notes
Note
Regarding your Plex server, do you have any tips for compressing media to save space?
Right now, almost all 1080p content is encoded in the H.264 codec. So my biggest tip would be to convert all of your H.264 content to a newer codec called H.265 10-bit.
First, you'll want to make sure that all of the devices you play media on can handle the H.265 10-bit codec. Pretty much any device that says it can do 4K HDR will suffice. It's okay if you have a device that can't do this, as Plex can transcode your media as you watch it, but you are going to use up a lot of computer resources and it can also be slow and buggy.
So to get the best experience, I would definitely recommend upgrading anything that cannot do H.265 10-bit. Thankfully, even the cheapest $30 4K Fire TV Stick is capable.
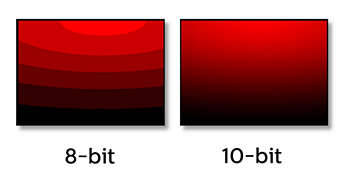
H.265 allows you to heavily compress your media and maintain quality. The 10-bit color, even if the original file was 8-bit, can reduce color banding in gradients which can often be a consequence of compressing video.
The rule of thumb is you can reduce the file size by 50% of H.264 and not take a hit on image quality. But you can actually go beyond that and still get acceptable quality.
Yes, H.264 will play on pretty much any device these days, but eventually that will be true of H.265. So if saving space is more important than dealing with a few compatibility issues that may crop up (and are usually solvable), then you can definitely shrink the size of your media library while maintaining image quality.
The bad news is that converting your media, depending on how much you have, could take a while. Even with a super beefy computer, compressing in H.265 is a slow process. And you can't use hardware encoding because that is meant more for streaming than media preservation.
Also, I do not recommend compressing 4K content at this time. Only 1080p. Re-encoding and compressing a 4K file takes more time than it is worth. A 4K movie could take 12 to 24 hours even on a very fast computer. Though if you have a 4K file and you don't care if it is 1080p, that might be worth it.
Handbrake is pretty much the only game in town as far as re-encoding your media. It can have a learning curve if you want to use it to its full potential, but there are a ton of decent presets you can use if you don't have the time to learn the fine details of what everything does.
I can give you some recommendations for a few important settings.
In the video tab...
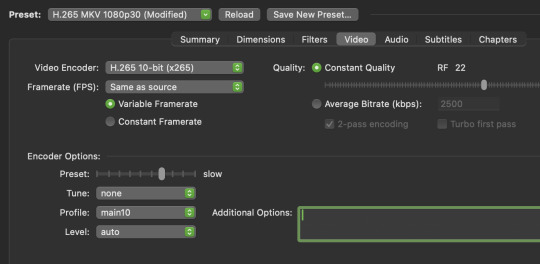
I'd start by finding a preset that is close to your end goal. In this case I chose the H.265 MKV 1080p30 preset in the "Matroska" presets that I will slightly tweak.
I usually want to make MKV files because they can hold subtitles in the file container without a separate subtitle file. I want H.265 10-bit. Most of my content is 1080p. And most of it is 24fps, so I'll just ignore the 30 frames the preset uses and change it later.
So once you select the preset, change framerate to "same as source" to just carry over whatever it was originally. You do not want to monkey with the framerate unless you have a really good reason.
You'll want "constant quality" selected. And then the RF or "rate factor" is basically how much compression you want to use. A lower number is less compression and a higher number is more compression. Once you have experience using Handbrake you'll be able to make a pretty good guess at what RF you should use, depending on the content. But I can give you some basic guidelines for you to test out.
When picking an RF, a higher number will give you a smaller file and a lower number will reduce the chances of creating unwanted compression artifacts. Since you are doing 10-bit, that will help a lot with color banding, but if you overcompress you may get unsightly blocks, especially in dark and fast moving scenes. If you watch dark content on YouTube, you probably know what I mean.
So before I compress media, I ask myself a few questions...
How important is this content to me?
Is good image quality what makes this content special?
Does this content have a lot of dark or fast moving scenes?
If this is my favorite show or movie, then I am going to want to preserve it at the highest possible quality. Or if the content is a visual spectacle, like Avatar, then I am going to want to make sure I preserve visual fidelity. And if this content is prone to compression artifacts due to dark and/or fast moving scenes, like a horror movie or an action movie, I am going to want to use less compression to avoid distracting artifacts.
However, if it is just a game show I like to put on in the background, I might not care if I compress it more. As long as it is watchable, I am not going to be precious about the compression quality.
Typically I choose an RF between 17 and 24.
17 will give bigger file sizes but will almost never create compression artifacts that were not already in the original content to begin with. This is for the stuff you really care about. Your absolute favs.
And if it is the game show I play in the background, I will probably choose 24.
But all of that space in between 17 and 24 is where you have to figure out what you can tolerate for different media. It may take some trial and error and test encodes to figure out what you prefer.
Like, when I compressed Law & Order for my mom, I knew that wasn't a huge visual spectacle. So I did 22. But for an action movie for my dad, I'd probably do 20 because of all of the fast moving scenes. And for my precious Batman TAS cartoons, I went with 17 because I wanted those files to be as close to perfect as possible.
The final slider I will talk about is the encoding speed. In the image above the preset is set to "slow." This ranges from "very slow" to "ultra fast." (Don't use placebo.) This setting basically allows Handbrake to either take its time and figure out the absolute best and most efficient compression... or to hurry up and just get the job done.
Think of this as the efficiency slider. If you give your computer more time to think, your compression will be more efficient. It will be the best compression possible for the quality RF you chose.
If you set it to a slower speed you will be able to get smaller file sizes with fewer compression artifacts, even if your chose a higher RF. But it could take one file many hours to encode.
At faster speeds your filesizes will get a little bigger and there is a chance some compression artifacts may sneak into your video, even if you chose a lower RF.
It's a little confusing, because the RF is supposed to be the only factor in image quality. But the encoding speed does factor in a little bit too. Especially in difficult to compress dark or fast scenes.
I was pretty happy with the "medium" setting. I have a fast computer with a lot of CPU cores and a lot of free time. So I didn't mind how long it took. But I actually think the "fast" and "faster" setting still gave great results while still shrinking file sizes.
Again, if it is super important to you, maybe do medium or slow for those files. Otherwise the fast setting is probably acceptable for most other things.
And finally the audio tab...

You are not going to get much benefit from compressing the audio. You might save a few megabytes. So I highly recommend just preserving whatever the original audio was. And you do this by selecting a "Passthru" codec. Handbrake will not touch the audio data and just copy it exactly to the new file.
However... if there is an audio codec that you know does not play nice with one of your devices, then you might want to convert it to something that works better. Though if you are using Plex, it can usually transcode audio without using significant CPU resources.
When I finished converting my media collection, I think I calculated that I saved myself about 20 TB of hard drive space when all was said and done. I think I have around 250 shows and 2000 movies. This left me a lot more room to keep more 4K content that is not worth compressing.
I definitely recommend watching some Handbrake tutorials and learning about some of the other functions. I also recommend learning how to do "batch encoding" so you can set up a bunch of files and just let your computer compress while you aren't using it.
But I covered the most important settings to get your started. Definitely do some tests and familiarize yourself with the process before you start converting your entire media collection.
I hope that was helpful. I promise explaining it is a lot harder than picking a few settings and hitting "start."
29 notes
·
View notes
Text
Y'all I love free software so much y'all don't even know. Have a list of my favorite free programs I have used lately when creative juices are flowing:
Gifs:
Giphy Capture: Very very easy to use (you will figure it out in no time). You can't recolor anything here, but I've found the compression options allow me to retain enough quality that I am not repulsed by the idea of posting gifsets made with this tool. They will never be as pretty as recolored gifs made in photoshop, but if you just want to make a scene and it not look horrid, this shit will get it done with a learning curve that's as flat as they come (Mac only tho sadly).
ezgif.com: Swiss army knife of gif making in your browser. You can crop, add effects, adjust brightness, saturation, hue, etc., trim, cut frames, and optimize file size. You can upload a set of images to turn into a gif, upload a gif you've already captured to edit it, or upload and video clip and render and edit into gifs all in your browser.
Davinci Resolve (18.5 Beta) - I am very excited about this one. Davinci Resolve is a professional-quality video editing software available for free for personal uses. It is stuffed full of video recoloring options, and they recently added gif rendering. This means you can recolor a whole scene all at once, split it into clips representing each gif in your set, then batch export a whole scene of short clips as gifs at the same time after adding text, cropping, cutting frames, and recoloring them as desired. Compression options on export are minimal right now, but I'm hoping as this new tool develops and moves out of beta... *rubs hands together evilly*.
Video:
Davinci Resolve - As above—professional-quality video editor available for free for personal use. Tbh the video editor pre-shipped with your OS will get you real far, but this one has a plethora of options you won't find in there, and typically will not ever find for free at all.
Ffmpeg - Need to batch convert .mkv files to .mp4 because your various softwares or maybe your PLEX server isn't playing nice??? ffmpeg has your back! If a command line is too intimidating though you can always go with Handbrake (if you can stumble your way through a command line though—ffmpeg will convert a whole season of TV to .mp4 before handbrake finishes a single episode).
Art:
Autodesk Sketchbook - I have had this puppy for a very very long time—I had it when it was actually a one-time purchase desktop app back in the day and I paid $50 and it was worth it. HOWEVER, Autodesk Sketchbook is now completely free! You can use everything I paid $50 for when I was like 16 years old for free! It runs on phones and tablets too! There are a lot of awesome free digital art tools (i.e., ye olde classic GIMP) or ones you can get for very cheap one time purchase, but this is just a free one I am fond of.
49 notes
·
View notes
Note
Hello! I hope you’re having a good day!
I saw your piracy for beginners post, and it was incredibly helpful. I was wondering if you perhaps had suggestions for finding torrents with subtitles? I have auditory processing issues and most things are nearly impossible for me to watch without them. If not, no worries! Thank you very much!
Hello, thank you for asking!! <3 I feel this question in my soul. English isn't my first language, and when I started pirating I was younger, and didn't understand a lick of what was being said in English media without subs. Finding subs was the hardest part of my pirating experience back then, so I'm very happy to teach you the way of the subs!
Tutorial for how to get subtitles under the cut! :D
First, some basic vocaboulary. Weaboos will know this already - there's hard subs and soft subs. Hard subs are encoded directly into the video, they're part of the frames. You can't turn them off and are considered kinda bad quality. They're harder to find nowadays.
Soft subs are your best friends! They're captions that you can turn on and off. For them, you need a media player software that support subs (like VLC).
They can be inside the video (usually when the videos is in .mkv format) or outside the video, as files of their own, in .srt format mostly. To get VLC to play an external subtitle file automatically, you need to rename it with the same name as your video file (ex: snails.mp4 + snails.srt), and they need to be in the same folder.
The easiest way to get subs is to just look for a video that includes subtitles from the get-go. I'm gonna walk you through the steps in 1337x, but this will work in other torrent sites as well!
Usually, searching for "movie name sub" will get you few or no results - most times, it's movies with multiple dubs (for example, multiple spoken languages you can choose from) that have subs for each language.
However: internal subtitles are often a sign of quality, and many good/quality releases will include them!
So. Let's say you want to watch the Fellowship of the Ring:
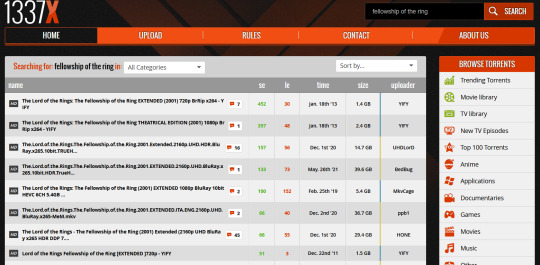
It's a popular movie, and there's a lot to choose from. No mention of subs, but...
The first two super popular ones - they're so popular because they're from YIFY. Their releases are TINY compressed, and you will lose some quality, but get tiny files that are easy to store and process!
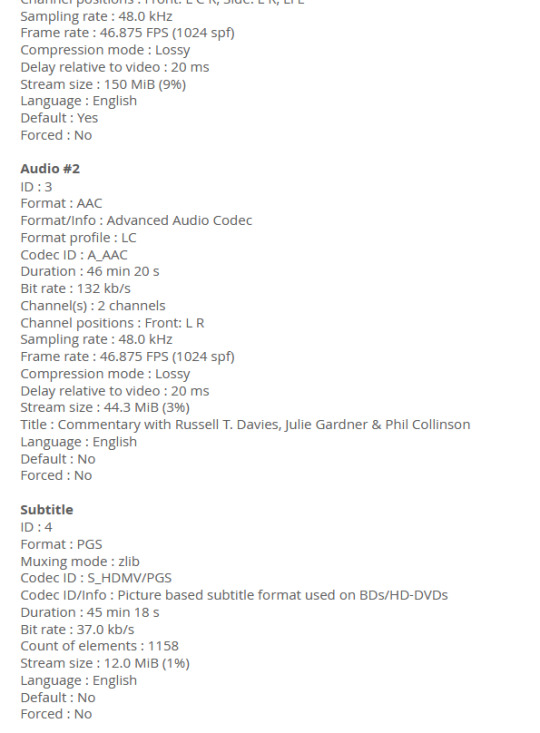
In my experience, it's a dice roll whether they'll have subs, but since they're so popular, you can usually download external matching subs from yts-subs.com. Let's open the first one up. You want to look for info about the "video", "audio", and next possibly "text", "subs", or "subtitles" tracks, and... bingo!

There's English subtitles in this one! What about the third one, that's 14.7 GBs?
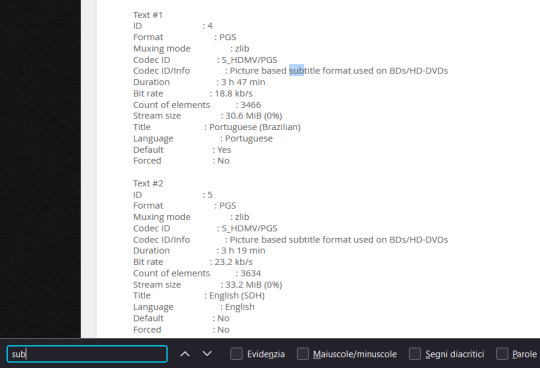
I had to press ctrl+f on my browser to search for keywords, since it was a lot of text... but see how it says "Text#1", "Text#2", etc? They're describing in detail the quality of the subtitles!
LOTR is a very popular saga, so releases tend to be very good for the average user.
Same method can be applied for tv series. Usually, the best the rip quality, the higher the chances they'll have subs.
Same season of doctor who - first one is half the size as the second one (lower quality), but no subs to be found on the first one.
What if you don't find a torrent that includes subtitles? Or if you don't have the storage space to download the fancy ones?
There's websites where you can look for your video file, and see if someone has uploaded subtitles for it.
I already mentioned the YIFY subtitles site, for subs for YIFY releases, yts-subs,
opensubtitles is a bit clunky in UI, but very good for movies,
addic7ed is the best for tv shows,
I've also heard good things of subscene.
It's best to look for subtitles that match your release/filename perfectly, as they will be synced better. But if you have subs that are out of sync, you can usually adjust them in VLC directly (usually just pressing g or h until they look good is enough). This easy technique saved my ass a lot.
Lastly: even though I don't use them myself, there are media players (and possibly VLC plugins?) that retrieve subtitles directly from online sites so you don't have to go hunting for them. I just gave BSPlayer a shot rn - it's super pushy in wanting you to get the paid option, and I don't like the UI, but it doesn't bundle adware or anything like that, and does it's job! Once you open a video file, you go in "menu>subtitles>check for subtitles online" and you can try them on, see which one works the best.
I hope you have a good time pirating!! Remember to stay safe and bind your client to the VPN.
If you need any extra help I'll be very very glad to assist! <3 And as always, if anyone seeing this has extra resources to share, please do!
53 notes
·
View notes
Note
did you convert your eras movie from mkv into an mp4 or did you just leave it like that?
I left it like that because mkv is a video file type that is compressed dynamically so the file size ends up smaller than the size of the converted mp4 file
6 notes
·
View notes
Note
Hi! Your gifs are so generous!. Can I ask what programs you use to make them, and also what type of file you think is better to make gifs?
Have a lovely day!
hi! i use kmplayer for screencapping and photoshop for making the gifs. i always use either 1080p or 4k footage, but i honestly usually prefer 1080p because 4k can be annoying to color. regarding file formats, i'd recommend using .mkv or .mov which are less compressed than .mp4 -> better quality (but file size is what matters the most of course) :)
i hope you're having a great day too!
3 notes
·
View notes
Note
Okay we are now converting (from mkv to mp4 incase someone can't convert it themselves) and then it's time to upload and you get the link!
I feel like I'm in 2005 again with how long it took me to download 6gb
The mkv file format compresses big files, so if anyone wants to download, the mp4 is gonna be a bigger file
You are truly a saint, really. No rush I think I speak for everyone who would like access that we can be patient!
5 notes
·
View notes
Text
Demystifying Digital Images and Video: Formats, Tools, Copyright, and More.
Introduction
In today's digital age, images and videos have become an integral part of our daily lives. From personal photographs shared on social media to professional content uploaded on platforms like YouTube and Twitch, understanding the intricacies of image and video file formats, codecs, and manipulation tools is essential. This blog post aims to provide a comprehensive overview of these digital elements, focusing on the definitions of common file types, export settings for popular broadcasting platforms, image manipulation tools, and the critical aspects of image copyright.
Definitions of Commonly Used Image and Web Video Formats, Wrappers, and Codecs
Image Formats:
JPEG (Joint Photographic Experts Group): JPEG is the most widely used image format for photographs and digital images. It uses lossy compression, which reduces file size while maintaining reasonable image quality.
PNG (Portable Network Graphics): PNG is preferred for images with transparent backgrounds or crisp, high-quality graphics. Unlike JPEG, it uses lossless compression.
GIF (Graphics Interchange Format): GIFs are a popular choice for short, looping animations and simple graphics. They use lossless compression and support transparency.
TIFF (Tagged Image File Format): TIFF is a versatile format commonly used in professional photography and graphic design. It supports lossless compression and maintains high image quality.
BMP (Bitmap): BMP is a Windows-native format known for its lack of compression. It results in large file sizes but retains image quality.
Video Formats and Codecs:
MP4 (MPEG-4): MP4 is a widely supported video format that uses the H.264 codec. It offers a balance between quality and file size, making it ideal for streaming and sharing on the web.
AVI (Audio Video Interleave): AVI is an older format that supports various codecs. It is not as efficient as MP4 in terms of compression and is used less frequently nowadays.
MOV (QuickTime Movie): MOV is a format developed by Apple and is popular among Mac users. It can use various codecs, such as H.264 and ProRes, for high-quality video.
MKV (Matroska): MKV is an open-source container format that can contain videos with a variety of codecs, making it highly customizable.
Export Settings for Popular Broadcast Platforms
When it comes to sharing images and videos on popular broadcasting platforms like YouTube, Twitch, and Facebook, selecting the right export settings is crucial for optimal quality and compatibility.
YouTube: For video content on YouTube, the recommended format is MP4 with H.264 video codec and AAC audio codec. The ideal resolution is 1080p (1920x1080) or 4K (3840x2160) for higher quality. These settings balance quality and compatibility across devices.
Twitch: Twitch also prefers the MP4 format with H.264 video and AAC audio codecs. A resolution of 720p (1280x720) or 1080p is recommended, depending on the viewer's internet speed and quality preferences.
Facebook: Facebook accepts a wide range of video formats, including MP4 and MOV. However, MP4 with H.264 video and AAC audio codecs is a reliable choice. The resolution should be adapted to the target audience and device capabilities.
Commonly Used Image Manipulation Tools and Techniques
Image manipulation tools are essential for enhancing and editing images. Here are some commonly used tools and techniques, along with their purposes:
Adobe Photoshop: Photoshop is a versatile image editing software that can be used for tasks like retouching, color correction, and compositing.
Adobe Lightroom: Lightroom is perfect for photo organization and enhancement, with features like exposure adjustment, color grading, and batch processing.
GIMP (GNU Image Manipulation Program): GIMP is a free alternative to Photoshop, offering similar features for image editing and manipulation.
Canva: Canva is a user-friendly online tool for creating graphics and social media content. It simplifies design tasks for non-designers.
Cropping and Resizing: These techniques are fundamental for adjusting image dimensions and removing unwanted parts of an image.
Image Copyright Essentials
Artists and content creators must be aware of copyright laws to protect their intellectual property. Key copyright essentials include:
Ownership: Creators automatically own the copyright to their work upon creation, but registration provides additional legal protection.
Fair Use: Fair use allows limited use of copyrighted material without permission for purposes like criticism, commentary, news reporting, and education.
Licensing: Creators can license their work under specific terms, such as Creative Commons licenses, allowing others to use their work while respecting their rights.
Public Domain: Works in the public domain are not protected by copyright and can be used freely.
DMCA Takedowns: The Digital Millennium Copyright Act (DMCA) enables copyright owners to request the removal of infringing content from online platforms.
Attribution: When using copyrighted material, proper attribution is often required to credit the creator.
Conclusion
Understanding digital image and video formats, codecs, export settings, image manipulation tools, and copyright essentials is essential for content creators, whether amateur or professional. By adhering to best practices and legal guidelines, creators can ensure their work is of high quality, reaches the right audience, and is protected from unauthorized use. Whether you're a budding photographer, a vlogger, or a graphic designer, the knowledge presented in this blog post can serve as a valuable resource to navigate the digital content landscape successfully.
References
Reference list
Arts Law Centre of Australia 2010, Copyright - Arts Law Centre of Australia, Arts Law Centre of Australia.
Attorney-General's Department 2022, Copyright basics, Attorney-General’s Department.
Image Manipulation: The What, How, and Why 2021, Clipping Path Campus.
Image Processing: Techniques, Types, & Applications [2022] n.d., www.v7labs.com.
Video File Formats, Codecs, and Containers Explained | TechSmith 2018, Welcome to the TechSmith Blog.
By: Juan Gutierrez.
4 notes
·
View notes
Text
Literally so weary
I spent so many hours today downloading premiere pro, making room on my computer, downloading hours of video, converting that video to a different file type (.mkv to .MP4) just so it will load in premiere pro
Only to find that it still won't load because it premiere pro doesn't like it's compression format which is .hev1, whatever that means,,, this is too much
It's Christmas why can't it just work 😩
10 notes
·
View notes
Note
you do edits and gifs right? i am trying to find a good screen recorder (preferably free and without a watermark. kind of a tall order. i know)
i just wondered if maybe you knew of one? also curious what programs/process you use to create your gifs and edits if you don't mind sharing
ty
Hey! I've been making gifs for the last ten years and I got some tricks up my sleeve. It's going to be such a long post (as I'll discuss my process in detail and depth, explaining all the little things), so if anyone is interested, just read under the cut! (❁´◡`❁)
Step one: finding the video
To make an HQ gif, your video has to be HQ. The best choice is to go on YouTube and download the highest-quality video:
Example -> if there is as quality option 4K, download the video in 4K.
Remember that .mp4 videos have a lower quality, because it's a compressed file.
A better extension is .mkv, which I find preserves the quality better.
If you can't get the video from YouTube, you may still want to have a good quality video -> you can still record your screen and I suggest this open source program: OBS Studio (Win, Mac and Linux!)
Here you can play with the settings -> on the output menu, remember to select the .mkv output! (NOTE: you need to play around with the settings because depending on how powerful your PC is, some will be better than others!)
Now all you have to do is press start recording and once you recorded your video, press stop recording (it's pretty intuitive!!)
Step two: screencapping
It's the slowest way to make gifs, but it helps preserving the quality.
Once you have your video, you need to make the screencaps!
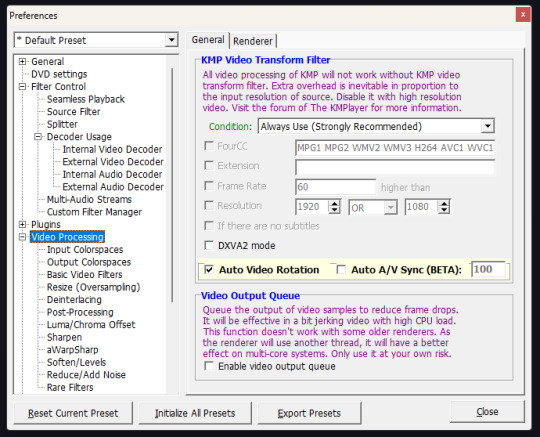
Download KMPlayer
Right click on the middle of the screen > options > preferences

These are my settings:

Open your file (you screen recorded in OBS studio) and put the cursor to the point the scene you want your gif starts
Then right click (on the screen) and select this
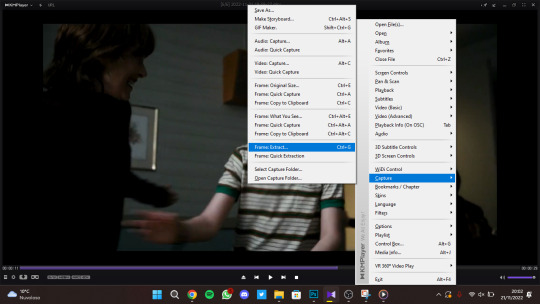
Make sure these are your options:
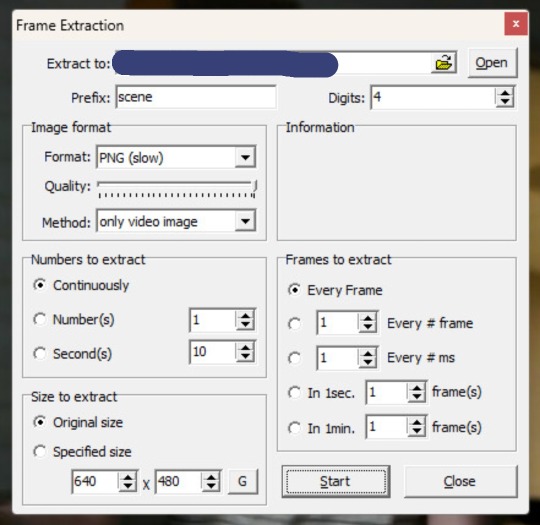
Press start and press play on the player -> now let it play until you finish your scene -> then press stop.
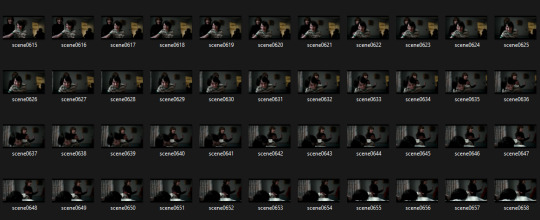
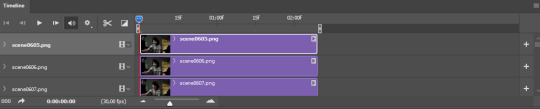
On the folder you chose as destination of the extraction, you should have something like this.
Step three: making the gif
Open Photoshop (I have Photoshop CC - 2018).
Go on File > Scripts > Load files into stack

Click on browse -> select all the screencaps you previously made -> once they're loaded, press on OK
Now, lean back, relax, grab some coffee because it's gonna take a while!
Turn on your timeline (Window > Timeline)

And press on Create frame Animation, there in the middle
Then press on the little burger menu on top right of the timeline and click on Make frames from layers
Click again on that menu and select Reverse frames
Now, select all the frames (the ones you see on the timeline) and right click where you see "0 sec" and choose Other ...

Put 0.04 as delay!
Step four: cropping and sharpening
Select the Crop Tool (shortcut: C) and you should have something like this

Move the handlers like this (don't reduce the image size!)
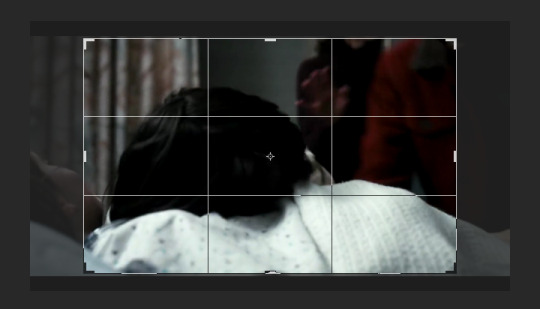
I just eliminated the black stripes on top and bottom and resized the width
Then confirm
Go to Image > Image Size and these are my settings:
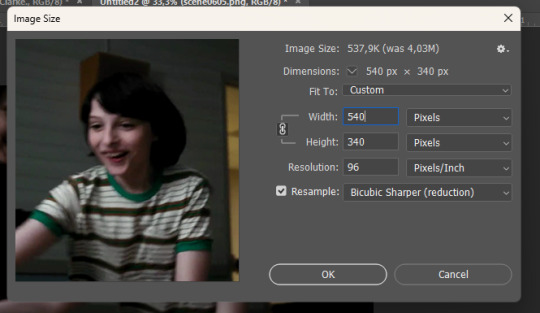
If you want to make a ONE COLUMN gifset -> width has to be 540 px
If you want to make a TWO COLUMN gifset -> width has to be 268 px
Height doesn't matter! Press OK.
Now, back to your Timeline, press that little icon on the bottom left

Now, this is what should happen:
On the layers panel, select all the layers and right click -> Convert to Smart Object

Now, you can use whatever sharpening option you want -> go on Filter > Sharpen > Smart Sharpen.
I usually do that twice:
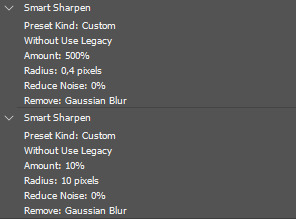
OPTIONAL -> duplicate the layer and set the opacity to 30% -> add Gaussian Blur (radius 1.5)
Step five: coloring
Now this is the fun part, and it's always different! So, just play around with the adjustments and find what suits the scene the best!
Step six: saving
File > Export > Save for Web

NOTE: .gif files must be under 10MB to be uploaded on Tumblr
REMEMBER TO SET LOOPING TO FOREVER!!!
And that is it!? If you have any questions please DM me, or send in another ask + there is a quicker way to do this, let me know if you are interested in that.

#ask#elz:explains#OMG I WAITED TEN YEARS TO RECEIVE THIS ASK!!!!#😭#sorry for typos#english is not my main language#gif tutorial#*resources
5 notes
·
View notes
Text

Comprehensive Guide to Video Encoding and Content Delivery
In today's digital age, video content has become an integral part of our daily lives, from streaming movies and TV shows to video conferencing and online tutorials. Behind the seamless delivery of these videos lies the complex world of video encoding. This comprehensive guide aims to demystify video encoding, covering fundamental concepts, adaptive bitrate streaming (ABS), content-aware encoding (CAE), and the role of XML-based Electronic Program Guides (EPGs) in the television industry.
1. Introduction to Video Encoding
Fundamental Concepts
Video encoding involves the conversion of raw video data into a digital format that can be efficiently transmitted, stored, and played back. Key concepts include:
Codecs: These are algorithms used to compress and decompress video data. Popular codecs include H.264, H.265 (HEVC), and VP9.
Bitrates: Bitrates refer to the amount of data processed per unit of time and are crucial for determining video quality and file size.
Container Formats: These formats encapsulate video, audio, and metadata into a single file, with examples including MP4, AVI, and MKV.
Importance of Video Encoding
Video encoding plays a vital role in content delivery and distribution, impacting factors such as streaming quality, bandwidth consumption, and storage requirements. Efficient video encoding ensures optimal viewing experiences across various devices and network conditions.
2. Adaptive Bitrate Streaming (ABS)
Principles of ABS
Adaptive Bitrate Streaming (ABS) dynamically adjusts video quality based on the viewer's network conditions, ensuring smooth playback and minimizing buffering. It achieves this by delivering video in multiple bitrates and resolutions, allowing seamless transitions between them.
Benefits of ABS
ABS offers several benefits, including improved user experience, reduced buffering, and efficient bandwidth utilization. Popular ABS technologies such as HTTP Live Streaming (HLS) and Dynamic Adaptive Streaming over HTTP (DASH) are widely used for online video streaming and live broadcasts.
3. Content-Aware Encoding (CAE)
Concept of CAE
Content-Aware Encoding (CAE) optimizes video encoding based on the characteristics of the content itself. This approach focuses on maximizing visual quality while minimizing file sizes, leading to better quality-to-bitrate ratios and improved streaming efficiency.
Advantages of CAE
CAE techniques, such as scene-aware encoding and object-based encoding, offer advantages such as reduced file sizes, improved visual quality, and enhanced streaming performance. Content providers can leverage CAE to deliver high-quality videos while conserving bandwidth.
4. XML EPG for TV
Role of XML EPGs
XML-based Electronic Program Guides (EPGs) serve as comprehensive databases of TV programming information, including channel listings, show descriptions, and scheduling details. They enable viewers to access detailed program information and make informed viewing choices.
Benefits of XML EPGs
XML EPGs benefit both content providers and viewers by enhancing content discovery, supporting personalized recommendations, and enabling interactive TV experiences. They play a crucial role in modern television services, enriching the viewer's entertainment experience.
Video encoding and content delivery technologies continues to rise, shaping the way we consume and interact with video content.
Understanding the principles of video encoding, adaptive bitrate streaming, content-aware encoding, and xmltv schedule epg guide is essential for content creators, broadcasters, and streaming platforms.
By harnessing these technologies, the industry can deliver immersive, high-quality video experiences while adapting to diverse viewer preferences and network conditions.
Whether you're a video enthusiast, content creator, or industry professional, embracing these concepts can elevate the quality and accessibility of video content in today's digital landscape.
Stay tuned for more insights into the ever-improving world of video technology and content delivery. Get the needed info, to discover where to find the best xmltv schedule epg, and never miss a TV show again! Access reliable sources for up-to-date TV listings and enhance your viewing experience today.
youtube
1 note
·
View note
Text
So, I stole some of my old gaming videos from myself off of my art channel to throw up on my gaming channel 'cause there was no way to just move them across accounts and they came from YouTube super compressed as MKVs and I can't find, for the life of me, anything that will compress them to that degree now for future videos or allows me to export AS MKV anymore these days. Uploading the H.264 mpeg formats that Premiere has set for the YouTube 1080p standard export takes like 2 hours! And premiere doesn't support MKV compression anymore so it doesn't open MKV files or let you export as. Opening them again after stealing them isn't a problem though just pop them in Media Encoder and re export them as mpeg and that's fine. The MKVs YouTube converts them to took like 20 minutes to reupload the video at the same length with no real huge or noticeable difference in quality though. I'd much rather upload a video in 20 minutes than wait fucking 2 hours having to keep the browser up! I wish premiere supported MKV export still. This shit is such a time sink and I can't really use my comp for much of anything when I'm uploading. T_T Why did you discontinue support for MKV Adobe?!
0 notes
Text
imPDF Free Online File Converter is Your Ultimate Solution for File Format Conversion
imPDF Free Online File Converter is Your Ultimate Solution for File Format Conversion.
In today's digital world, managing and converting files into different formats is essential. Whether you're handling documents, media files, or archives, having a reliable and versatile file converter at your disposal can make all the difference. That's where the imPDF Free Online File Converter comes in. Offering a comprehensive suite of conversion options, imPDF ensures that you can easily transform files across a wide range of formats without any hassle.

✅ Why Choose imPDF Free Online File Converter?
imPDF Free Online File Converter is designed to cater to a multitude of file conversion needs. It supports over 1200 different conversions, covering everything from video and audio to documents, images, and archives. This extensive range ensures that you can convert virtually any file type into the format you need, simplifying your workflow and enhancing productivity.
✅ imPDF Free Online File Converter Key Features
• Broad Format Support: imPDF supports a vast array of file formats, including but not limited to:
• Documents: DOC, DOCX, PDF, RTF, TXT, ODT, WIKI, PPT, PPTX, and more.
• Images: JPG, PNG, BMP, GIF, TIFF, ICO, and others.
• Audio: MP3, FLAC, WAV, M4A, AAC, and more.
• Video: MP4, AVI, MKV, FLV, MOV, and others.
• eBooks: EPUB, MOBI, AZW, FB2, and more.
• Archives: ZIP, RAR, 7Z, TAR, and others.
• Popular Conversions: imPDF makes common file conversions effortless. Some of the popular conversions include:
• PDF to Word and PDF to Excel
• FLAC to MP3 and WAV to MP3
• DOC to PDF and DOCX to PDF
• MP4 to AVI and MKV to MP4
• JPG to PNG and TIFF to PDF
• MOV to AVI and AVI to MP4
• Versatility Across File Types: The converter supports a wide range of conversion types, including:
• Video Converter: MP4 Converter, AVI Converter, MKV Converter
• Audio Converter: MP3 Converter, FLAC Converter, WAV Converter
• Document Converter: DOCX Converter, PDF Converter, DOC Converter
• Image Converter: JPG Converter, PNG Converter, TIFF Converter
• eBook Converter: EPUB Converter, MOBI Converter
• Archive Converter: ZIP Converter, RAR Converter, 7Z Converter
✅ How It Works?
Using the imPDF Free Online File Converter is simple and user-friendly:
Upload Your File: Select the file you want to convert from your device or cloud storage.
Choose the Output Format: Specify the format you want to convert your file to.
Start the Conversion: Click the convert button and wait for the process to complete.
Download Your File: Once the conversion is done, download the newly formatted file directly to your device.
✅ Continuous Improvement and User Feedback
At imPDF, we are committed to providing the best file conversion service. We are constantly adding new formats to our converter based on user feedback and evolving needs. If there's a specific format you require that we currently do not support, we encourage you to let us know. Your input helps us enhance our service and meet the diverse needs of our users.
✅ Why imPDF Stands Out
• Completely Free: Enjoy all these powerful conversion features without any cost.
• Easy to Use: No need for complex software—just a straightforward online tool.
• Regular Updates: We continuously improve our service to include new formats and features.
✅ Get Started Today
Don't let file format limitations hold you back. With imPDF Free Online File Converter, you can handle all your file conversion needs quickly and efficiently. Whether you’re converting documents, images, audio, video, or archives, our tool is designed to simplify the process.
Try imPDF Free Online File Converter now and experience the convenience of having over 1200 conversion options at your fingertips. For any questions or feedback, feel free to contact us—we’re here to help!
0 notes
Text
Unlock Superior Sound: Convert Videos to FLAC Online Instantly

In the digital age, sound quality has become an essential aspect of the multimedia experience. Whether you are a music enthusiast, a professional audio engineer, or simply someone who appreciates high-fidelity sound, the need for superior audio quality is undeniable. One of the best ways to achieve this is by converting videos to FLAC (Free Lossless Audio Codec) format. This blog will delve into the benefits of FLAC, the process of converting videos to FLAC online instantly, and why this method is a game-changer for audio aficionados.
Understanding FLAC: The Pinnacle of Audio Quality
FLAC stands for Free Lossless Audio Codec. Unlike MP3 or AAC, which compress audio files by removing some data (and thereby reducing audio quality), FLAC compresses audio files without any loss in quality. This means that the audio you get in a FLAC file is identical to the original recording. Here are some key benefits of FLAC:
Lossless Compression: FLAC files retain all the original audio data, providing superior sound quality.
Open Source: FLAC is a free and open-source format, ensuring wide compatibility and support.
High-Resolution Audio: Ideal for high-resolution audio files, FLAC supports sampling rates far beyond the standard CD quality.
Metadata Support: FLAC files can store rich metadata, including album art, track titles, and artist information.
To convert video to FLAC visit https://tuberipper.com/save/flac
Why Convert Videos to FLAC?
Videos often come with embedded audio tracks that vary in quality. Converting these audio tracks to FLAC can significantly enhance your listening experience. Here’s why you might want to convert videos to FLAC:
Preserve Original Quality: By converting to FLAC, you ensure that the audio quality remains unchanged from the source.
Compatibility with High-End Audio Equipment: Many high-end audio systems and devices support FLAC, allowing you to fully experience the superior sound quality.
Editing and Remixing: Audio professionals and enthusiasts often need high-quality audio for editing and remixing. FLAC provides the best source material for such tasks.
Archiving and Preservation: For those who want to archive audio for future use, FLAC provides a reliable format that won’t degrade over time.
The Online Conversion Process: Simple and Instant
Converting videos to FLAC online is a straightforward process that can be done in just a few steps. Here’s a step-by-step guide to help you through the process:
Step 1: Choose a Reliable Online Converter
Select a reputable online conversion tool that supports video to FLAC conversion. Ensure the tool you choose does not compromise on quality and maintains the integrity of the audio.
Step 2: Upload Your Video File
Upload the video file you wish to convert. Most online converters support a wide range of video formats, including MP4, AVI, MKV, and MOV.
Step 3: Select FLAC as the Output Format
Choose FLAC as your desired output format. Some converters might offer additional options to customize the audio settings, such as bitrate and sample rate.
Step 4: Convert and Download
Initiate the conversion process. Once the conversion is complete, download the FLAC file to your device. The process is usually quick, depending on the file size and your internet speed.
Step 5: Enjoy Superior Sound Quality
Transfer the FLAC file to your preferred audio player or device and enjoy the enhanced sound quality.
Benefits of Online Conversion
Opting for an online converter to transform your video files to FLAC comes with several advantages:
Convenience: Online converters are accessible from any device with internet access, making the process highly convenient.
No Software Installation: There’s no need to install any software, saving you time and storage space.
Instant Results: Most online tools offer fast conversion times, allowing you to get your FLAC files almost instantly.
User-Friendly: These tools are generally easy to use, even for those with minimal technical knowledge.
Tips for Optimal Conversion
To ensure you get the best possible audio quality from your FLAC conversions, consider the following tips:
High-Quality Source Files: Start with the highest quality video files available. The better the source, the better the output.
Stable Internet Connection: A stable and fast internet connection will speed up the upload and download processes.
Check Audio Settings: Some converters allow you to adjust audio settings. Experiment with these to get the best possible sound.
Metadata Editing: Use tools that support metadata editing to keep your audio files organized and properly tagged.
Applications of FLAC Audio
The superior sound quality of FLAC files makes them suitable for a variety of applications:
Personal Listening: Enhance your personal music library with high-fidelity audio files.
Professional Audio Work: Use FLAC files for professional editing, mixing, and mastering.
Streaming and Broadcasting: Ensure the best possible audio quality for streaming and broadcasting purposes.
Archiving: Preserve important audio recordings, such as interviews, speeches, and concerts, in a lossless format.
Conclusion: Embrace the Future of Audio Quality
Converting videos to FLAC online instantly unlocks a new level of audio quality that can transform your listening experience. Whether you’re looking to preserve the integrity of your favorite music tracks or need high-quality audio for professional purposes, FLAC offers an unmatched solution.
With the convenience and simplicity of online converters, anyone can easily take advantage of this superior audio format. So why settle for less when you can enjoy the full richness and depth of lossless audio? Start converting your video files to FLAC today and elevate your auditory experience to new heights.
0 notes
Last Seen Blogs


caesarsong
無標題

jfyfractal2
JFY Fractal - 2 -oC3

devaneii-os
Coração de cristal

plainandsimpleeee-blog-blog
We seal our fate with the choices we make