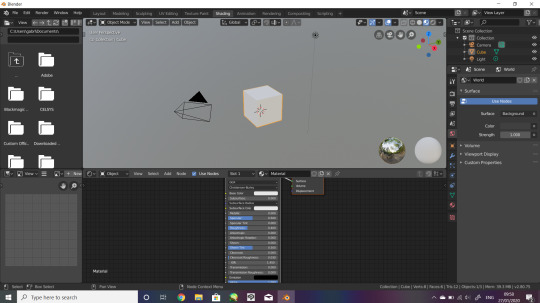
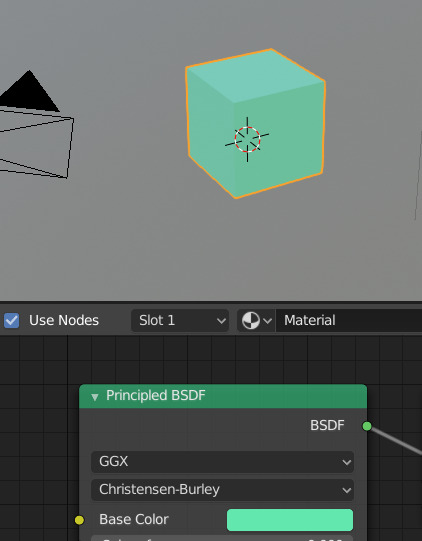
#modeled with eevee rendered with circles
Explore tagged Tumblr posts
Visit Tumblr Blog
Explore Tumblr blogs with no restrictions, modern design and the best experience.
Last Seen Tumblr Blogs


Fun Fact
US Tumblr user growth rate is estimated to slow down to 4.1%.
Text
IVE DONE IT
I TRIED TO MAKE A BLENDER MODEL
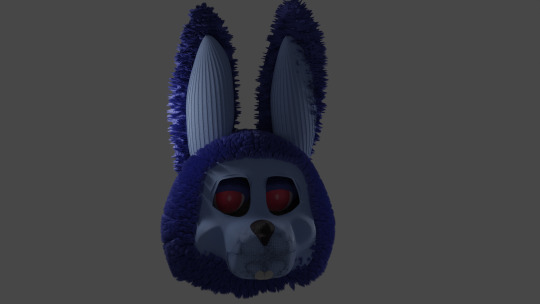
#literally first model I made besides a pizzeria map I’m working on#in which it looks like something out of Roblox or something lmao#but first actual model#he kinda looks like a fucked up sheep but whatever#His one ear looks a little weird but it might be the angle#my computer crashed like 3 times making this#yes it’s based on the vhs rubberface looking models/animatronics#yes it’s just a head so far#but I’m still proud#fnaf#modeled with eevee rendered with circles#blender#Bonnie
3 notes
·
View notes
Text
How to fix Transparency w/ Lashes and Alpha Hair in Blender! Cycles & Eevee!
(This tutorial also helps with adding transparency to Sims 4 Object cc. If needed, I can make a post on that as well.)
This is NOT a Tutorial on how to fix broken/ glitched lashes in the SIMS game!!!
It was brought to my attention that others do not know how to fix this issue in blender, so I've made this post to help out. This tutorial works for BOTH Eevee and Cycles! (This only matters at the end when in the materials tab.)
None of the CC is Mine! Ty to ALL creators!
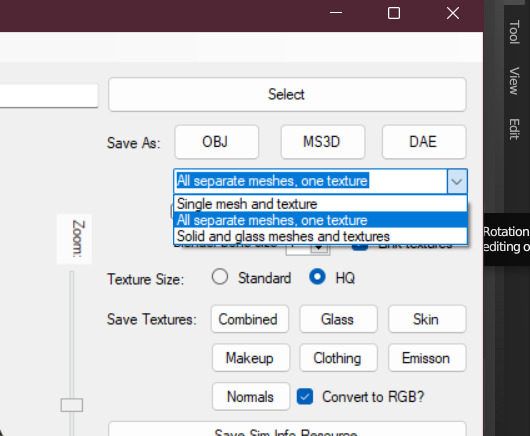
This is work for all methods of DAE exports.
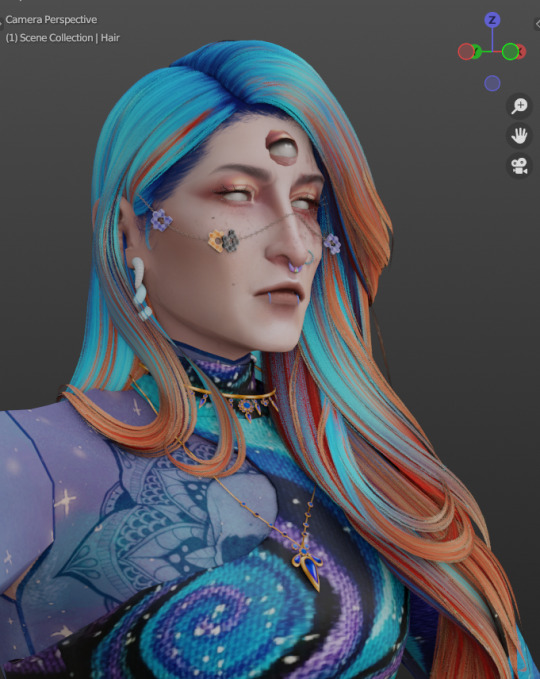
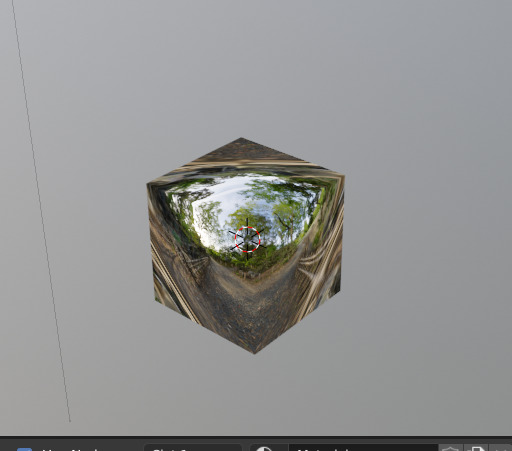
This is Erecen. They will be our tutorial model today.
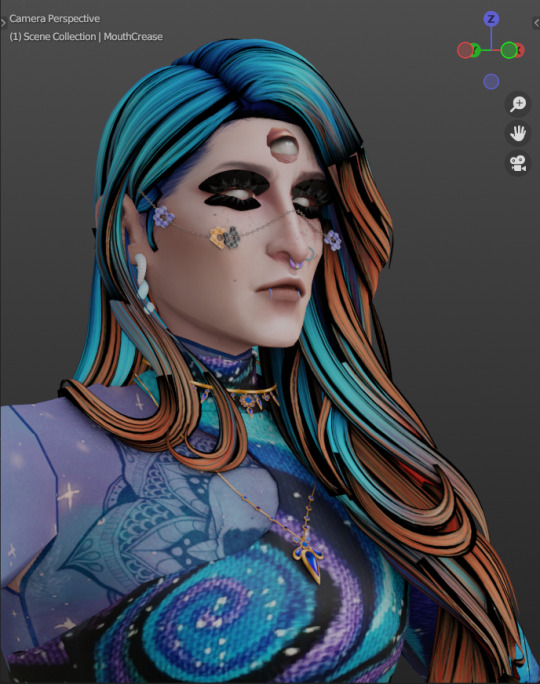
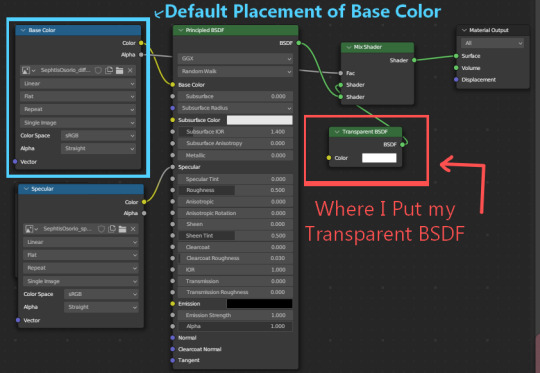
As you can see, the Alpha CC hair and lashes are not... working like how we saw them in game. So! We will need to fix this up within our Shading Node Wranglers to correct this.
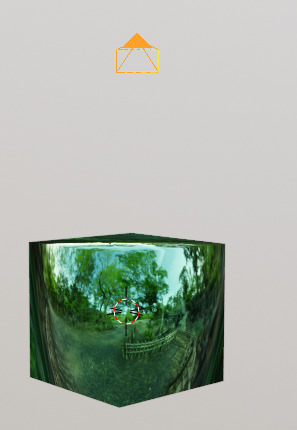
(If you use a GLASS mesh, make sure you are shade wrangling on the GLASS!)

(This picture is only showing which is the Glass mesh!) Plz ignore this if you are not using Glass mesh export on Ripper.
Lashes/Hair Transparency
First import your sim and wire the texture nodes how you normally would. Stay in Shade Editor/Shading tab.
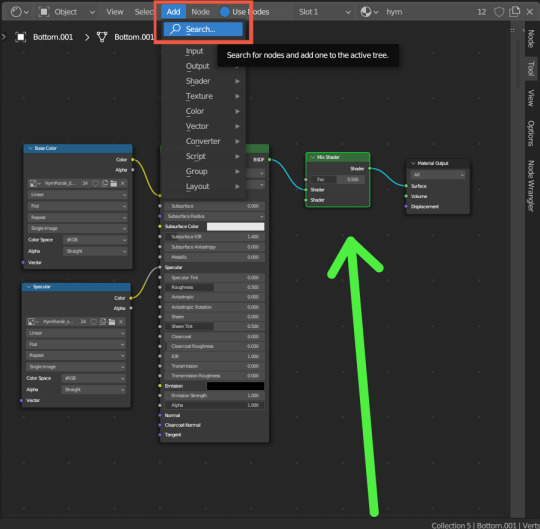
You will now want to Add a 'Mix Shader' node. Search for it by typing in "Mix Shader". Select and now drop it between your Principle BSDF node and Material Output node.
After this, you will want to Add a Transparent BSDF. I added mine the same way as the Mix Shader and have place it under my Mix Shader node.
With this Transparent BSDF node, you'll want to wire it to the TOP Green Circle of your Mix Shader node. (1 in pic below) This will disconnect your current wiring from Principle BSDF. This is fine since you now want to wire the Principle BSDF node to the BOTTOM Green Circle of your Mix Shader node. (2 in pic below)
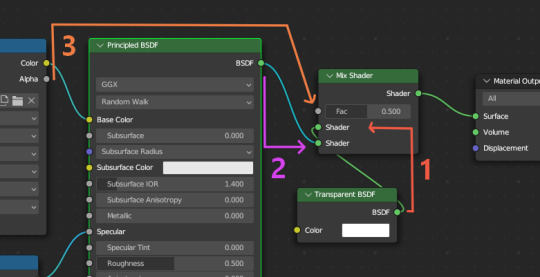
Afterwards, you will now need to go to your Base Color node; (Where your sims diffuse lies!) It should be the top left node, unless you have moved it. (3 in pic above) Now take the Alpha dot and drag it all the way to FAC on the same Mix Shader node. From here, we need to go to 'Editor Type'.
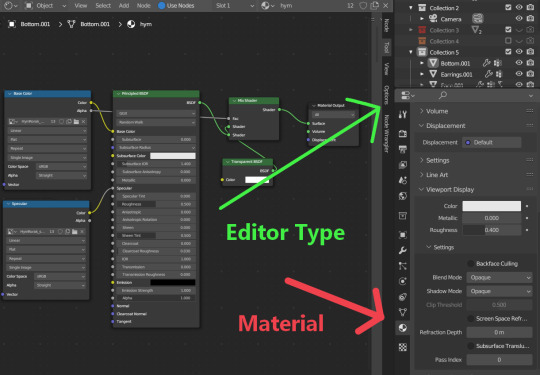
After locating Editor Type, you now want to locate the sphere listed as Material.
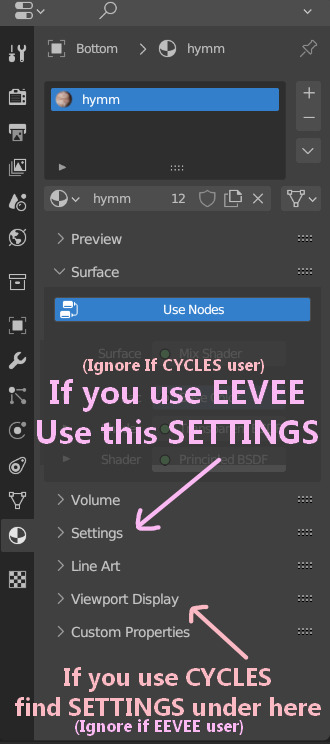
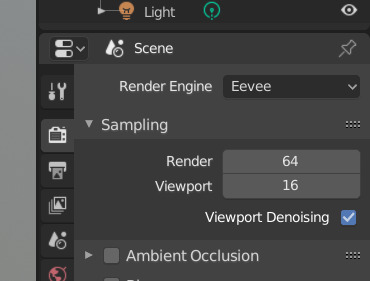
You now want to find the correct SETTINGS tab. Please note how you render your renderings. If you render in EEVEE, take note of the picture above. Same for CYCLES as taking note in the picture above. This is very important since the SETTINGS options switch between these two areas depending on the Engine.
In Eevee, this should be in the first SETTINGS tab in the materials properties tab.
In Cycles, the SETTINGS you will need is located under the tab listed as Viewport Display. From there, a new drop down will be available called Settings. (This is the correct SETTINGS you want)
Either engine will now have a few modes now visible.
For both Blend Mode and Shadow Mode, change them from Opaque to Alpha Hashed. (It is only required to change Blend Mode to Alpha Hashed for the transparent textures to work. Hashing shadows makes a nice balance of translucency and ambient occlusion.)
And that should be it! Your lashes/Alpha CC hair should be working correctly now!
I hope this helps! If not, please feel free to msg me of any other further know issues. Thank you to @spookyxdoom for bringing this topic up!
I even had my bf try it out without knowing a single thing about Blender and they figured it out just fine with this tutorial.
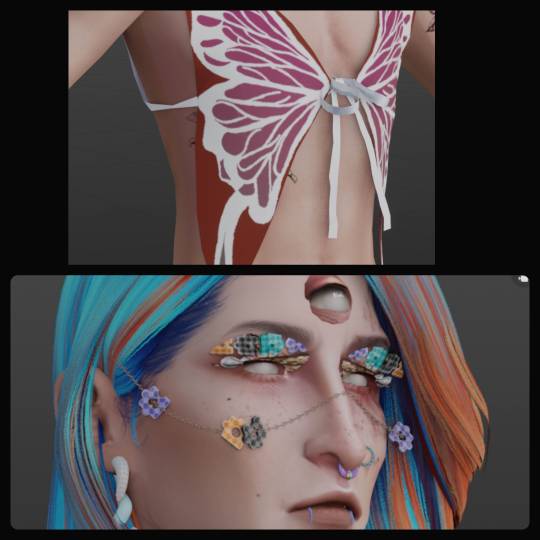
I already plan on doing other tutorials on how I fix overlapping textures as shown below.
35 notes
·
View notes
Text
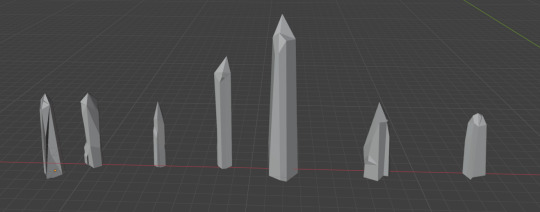
ENERGON CRYSTALS!!
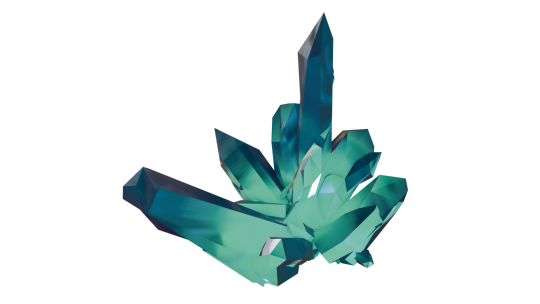
Modeled and rendered through Blender 4.3 Eevee
Instructions below of how you can make the same (beginner friendly):
First off, I watched this tutorial then made minor tweaks to the shader so it doesn't quite look like the tutorial.
My workflow:
First, make your crystals individually on SEPARATE layers. Do not join them (if accidentally joined, go into edit mode and press 'P' to separate.
I made 7 crystals. Preferably make them of different sizes and heights so your resulting crystal looks nice. I made five pentagon crystals and two hexagon crystals and put each under a collection named "crystals".
Here are my crystals:
Now you are ready to create a crystal generator which you can fiddle around with to make variations of crystal clusters.
Please follow the geometry node instructions to the T.
Create a mesh plane before doing geometry nodes:
Delete "group input" node, and start with making "mesh circle" node first
At the end, make a "group input" node and connect it to the sections that says "seed". There should be three different nodes with it.
REALLY IMPORTANT: do not use "align euler to vector" node because it is deprecated; use "align rotation to vector" node instead
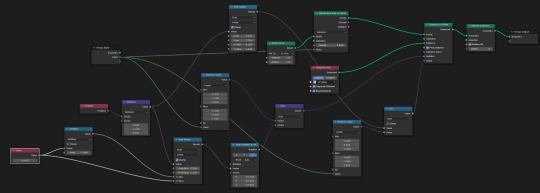
Voila! You've made a crystal generator.
Now, change around the "map range", "align rotation to vector", and "random value" nodes to create different crystals. You can also change around the seed number in your geometry node modifier.
When you get the cluster variation you want, you'll want to apply the modifier. Or, just right click on your crystal and click "convert to mesh". If you don't do this, your crystal will remain white (or have reflections of whatever HDRI you uploaded).
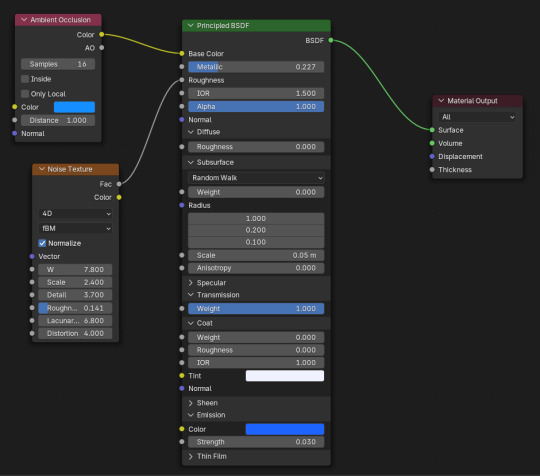
Create crystal shader:
Please check to make sure you are using Eevee render.
Change the colour of the "ambient occlusion" node to change the colour of your crystal.
Here's the changes I made
Didn't bother to make spotlight for crystal
Did not make the background black like he said.
Went into render mode or did something else so I couldn't see the HDRI environmental texture anymore
The four points above isn't really that important tbh.
Most important:
Did not bother creating the "wave texture" or "colour ramp" nodes. Therefore, no need for "mix shader" node. I couldn't get it to affect the crystal texture at the end so I just deleted all of it
I didn't use the "magic texture". This turns your crystal an iridescent colour regardless of what base colour you have selected on your "principle BSDF" node. I didn't like it, so I replaced it with an "ambient inclusion" node.
HOWEVER, you can still get an iridescent crystal through the "magic texture" node AND change the colour by adding a "hue/saturation/value" node in between. I did not do this as seen.
One last thing: I added a neon green light right underneath the centre of the crystal to make the bottom more green-blue tone. Otherwise, the crystal is just energon blue.
I think that's all the changes I made.
What's cool is that you can use the shader on the individual crystals themselves and make each one different colours so your cluster would turn out "multicoloured".
Last thing is to point your camera towards your crystal and click render then save as png, jpeg, whatever you want. Do save the blender file itself too.
I marked my crystal generator and crystal shader as an asset so I can use it on other blender files. I simply go to file on a new blender file and click "append" to whatever you named your crystal gen/shader file, and yeet them onto my new one.
#energon#maccadam#transformers#3d model#i started mere days ago#since using blender#blender#3d modeling software#blender eevee
6 notes
·
View notes
Text


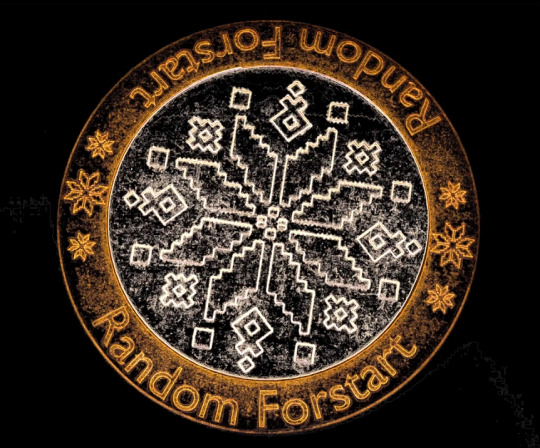
Hello! I’d like to share how a poorly defined task can end up taking six evenings.
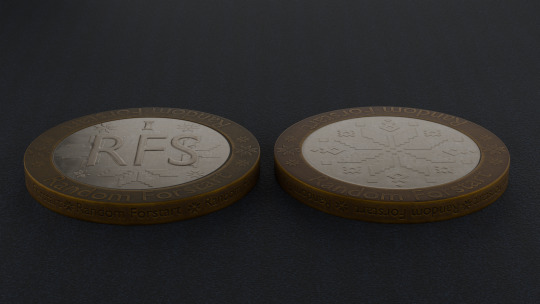
I decided that from time to time, I could post some videos on YouTube. And as a "true" YouTuber, I chose to start with creating a logo and a short video with it. I didn’t spend much time on the logo idea: since my nickname is "Random Forstart," the logo should reflect randomness and be quick to execute. And since I'm “incredibly creative,” the only thing that comes to mind with randomness is a flipping coin. So, I decided to make a coin with a Roman numeral "I" on the obverse, and on the reverse, I wanted to add a touch of Ukrainian style by placing an ornament in a Hutsul, Bukovinian, or Galician style around the edge, and adding the inscription "Random Forstart" along the edge and rim of the coin.
Decision made! Time to search for references, which, as it turned out, wasn't so quick. The coin in my mind had unusual edges, and such coins are rare—maybe because that edge shape complicates the production process.
Next, I started the blocking. Some elements didn’t look good with standard edges, so I applied subdivision. Then, I created the text: converted it to mesh, extruded it, applied remesh with the appropriate modifier, and added a subdivision surface to smooth things out. At this point, I realized there were too many polygons, and I’d likely need to bake everything onto a low-poly model. Otherwise, even Eevee would take forever to render it on my laptop.
Looking at the obverse, I realized that the Roman numeral "I" wasn’t the best choice, so I added some decor and replaced it with the abbreviation "RFS." It looked better, so I proceeded to combine everything using Boolean. My laptop took a long time merging high-poly elements, and even after that, the shading wasn’t impressive. I passed the mesh through remesh, and ended up with 65 million polygons. Plus, remesh had made the coin look more like a polygonal shape than a circle. I smoothed out some edges with sculpting, deciding to fix the rest on the normal map after baking.
I created a low-poly model with 4000 triangles. That's a lot, but since the model is for animation and not a game, I wanted it to be properly rounded.
During baking, I found that some surfaces were protruding too much, causing artifacts. I decided not to touch the high-poly but to adjust the normal map in GIMP. Overall, it turned out alright.
Then came texturing. At first, I thought I’d just apply textures in Blender, but I didn’t like the result, so I made the texture in Quixel Mixer. It looked great there, but once I imported it into Blender, it somehow changed. I had to adjust it several more times until it looked okay.
Once finished, I moved on to the animation. Initially, I tried using physics simulations and even spent a few hours on it, but it turned out that realistic wasn’t always what I wanted. In the end, I did the animation manually with keyframes. All that was left was to add sound and effects. I tried to do this in Blender, but I didn’t feel like figuring out Blender's video editor, so I did it all in Kdenlive.
#Digital 2D#Digital 3D#Animation#Props#Motion Graphics#Realism#NoAI#3d art#blender#cycler#animated#coin#logo concept#ethnic ornament#Ukrainian style#Hutsul ornament#Galician ornament#Bukovinian ornament#Texturing#Low poly
1 note
·
View note
Video
tumblr
Simple animation
#blender#blender eevee#blender community#blender art#digital art#art#3d#3drender#3d model#animation#vfx#vfx art#vfx artist#space#circle#render#rendering
2 notes
·
View notes
Photo


Burger On The Grill
Part 4: Building a Burger--Perfect Patty
After completing the donut tutorial by BlenderGuru, I was challenged to create something similar by myself, so I chose to make a burger. Last time, I formed some shapely buns. But what is a burger without meat?
Modeling
I meshed by first attempt at a burger patty by starting with a cylinder and following reference photos. I ended up with a shape I liked, but the topology was not distributed evenly enough for the Displace modifier I planned to use next.
My next step involved retopology. I started with a torus this time, chose just enough major segments to match my shape and limited the minor segments to 6. I deleted all vertices in the inner loop of the torus and used Grid Fill on the top and bottom to close the inner hole.
The proportional editing tool allowed me to deform the torus to roughly match my first shape. Then, I sized up the torus so that it just contained that first shape, subdivided the whole thing by two, and added a Shrink Wrap modifier to match the outline of the first shape perfectly.
Later, this Shrink Wrap modifier would causing my render to be completely black and empty. Applying the modifier before rendering corrected this issue.
Modeling the Patty by Sanctus – Blender Procedural
My next step involved making the patty lumpy. I subdivided the patty by two again, and then added a Displace modifier with a Cloud texture. Fiddling with the Size of the texture and the Strength of the modifier got me something I liked. Lowering the Midlevel eliminated the strange horizontal distortion around the perimeter of the patty.
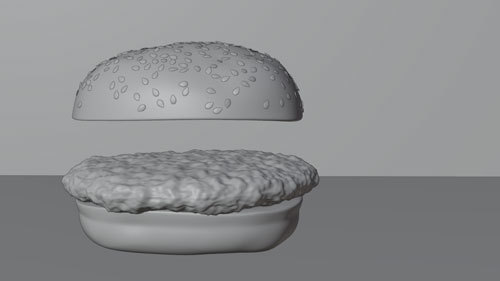
Yes, look at that yummy clay! It was really coming along nicely.
But what about texturing?
Texturing
My first attempt used an image texture for everything from diffuse color to bump, but since the image lacked the quality I wanted, I eventually turned to procedural methods.
Texturing the Patty by Sanctus – Blender Procedural
To get the oily effect on the surface of the meat, I played around with two methods. The first was to allow a noise texture to influence the roughness in the Principled shader as in the tutorial by Default Cube.
The second, which I preferred in the end, began by adding a Glossy shader. I set the noise texture to influence the bump of this Glossy shader. A Mix shader was used to combined the Glossy and Principled shaders, and a Layer Weight node plugged into the Fac of the Mix Shader allowed control over the gloss based on which normals were facing the camera.
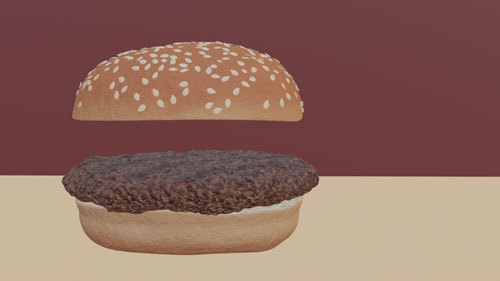
Here is a screenshot of the burger in Eevee. You can barely see it, but I went to the effort of adding grill lines to the patty.
Adding Grill Lines to the Texture by Default Cube
To sear in the grill lines, I added an Image Texture node, created a new image named "Grill Lines" and selected this node with Node Wrangler to see only its effect on the patty. I marked a seam on the underside of the patty in a circle and unwrapped the UVs. With Texture Paint, I used the Stroke with method Line and held down Alt as I clicked to drag a line across the top of the patty. After doing this to the top and bottom, 5 on each side, I saved the "Grill Lines" image.

A MixRGB node on Add combined the Grill Lines Image Texture with the Noise Texture before feeding the result into the Color Ramp.
See Meat Texture node layout at the top of post.
Follow me to keep watch for the next part!
Review the previous part.
See overview for links to all parts of this tutorial series!
See more of my work: Check out my archive.
Join me on my journey: Follow me on tumblr.
Support my creative profession: Buy me a coffee on KoFi.
#blender#tutorial#burger#patty#3d art#art process#blender guru#food art#meat#beef#grilled#texturing#materials#3d artist#art#digital art#3d render#blender3d#blendercommunity#blendertutorial
3 notes
·
View notes
Text
Blender 1 - Basics
youtube
For this project I wanted to use Blender to 3D model the base of the character’s mask.
I have used blender before but I wanted to learn the program in a greater depth.
Notes from the video:
MMB - Rotate around the screen
Scroll Wheel - Zooms in/out
Shift + MMB - Moves the camera
G - grab the object and move it - left click to finalise the movement and right click to undo it. G + X, Y or Z will only move the object in the direction of the specified axis.
R - rotate the object, same rules apply - easier to use the axis thing tho as you can choose which axis to rotate it along
S - scale - click on the scale icon on the menu to allow you to do this to expand the object along the chosen axis. To scale it up all at once, hold the big white circle below!

Shift + A - goes to the ‘add object’ menu.
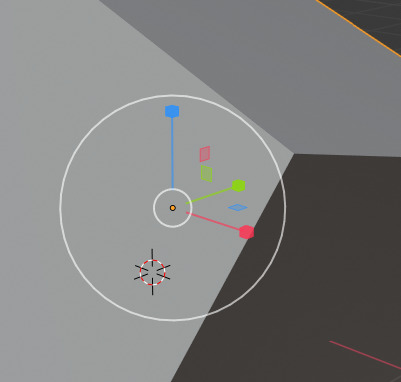
Shift + RMB - moves the 3D cursor (red and white dashed cursor above) to wherever you’d like it. The 3D cursor determines where things will appear when you add them into the space.
Shift + D - duplicates the object (in this case the light source)
The Shading Workspace -
accessed by clicking on ‘shading’ button on the menu at the top of the screen.
The green menu attached to the object is the principle shader, and the red box is the material output.

To change the colour of the selected object, you go to the ‘base colour’ part in the green box, and then choose any colour.

These are the render modes- the first one is wireframe, the second one is ‘solid mode’ which just shows the object in grey with some shading, the third is called ‘Look dev’ - which shows the colours of the object and some shading. The fourth is called ‘Rendered mode’ which shows the effect of the light source on the object.

The light source is visible to the right, and is having an effect on the lighting of the object.

The render engine ‘Eevee’ is real time and works pretty well, but for the best result you should use ‘cycles’ which takes a lot more time and processing power.
When using Eevee, you can enable screen space reflections and ambient occlusion so it looks more fancy.
Making an object Metallic:
Right click on the object and select ‘Shade Smooth’, then (while in the cycls render engine) go to the principle shader box and turn down the roughness, then enable ‘metallic’.

How to make an image:
The object visible above the cube is the camera. You can look through the camera by clicking the camera option in the right hand corner of the screen.

To lock the camera to your movement around the object, you press ‘n’ on the keyboard (while not looking through the camera) and a ‘transform’ menu will appear on the right. On the edge of the menu there is a ‘view’ option - which will display this:
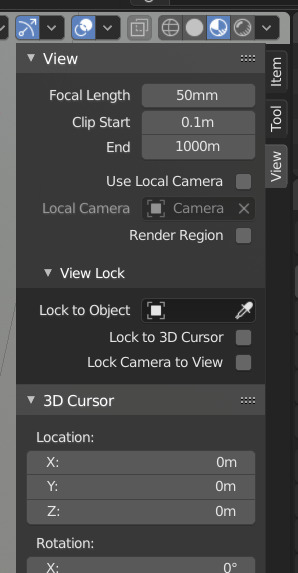
Once this is displayed, you can check ‘lock camera to view’ . Now you can move the camera to where you want it. When you have it in the right place, you select the render option on the main menu at the top of the screen, then choose ‘render image’! It will render in whatever engine you currently have set. To save the image, go to the top and click ‘image’ then ‘save’.
0 notes
Text
Blender 1 - Basics

youtube
For this project I wanted to improve my 3D modelling skills, so i’m going to try and learn how to use blender again to make a 3D sculpture of one of the characters in this game.
I have used blender before but I wanted to learn the program in a greater depth.
Notes from the video:
MMB - Rotate around the screen
Scroll Wheel - Zooms in/out
Shift + MMB - Moves the camera
G - grab the object and move it - left click to finalise the movement and right click to undo it. G + X, Y or Z will only move the object in the direction of the specified axis.
R - rotate the object, same rules apply - easier to use the axis thing tho as you can choose which axis to rotate it along
S - scale - click on the scale icon on the menu to allow you to do this to expand the object along the chosen axis. To scale it up all at once, hold the big white circle below!
Shift + A - goes to the ‘add object’ menu.
Shift + RMB - moves the 3D cursor (red and white dashed cursor above) to wherever you’d like it. The 3D cursor determines where things will appear when you add them into the space.
Shift + D - duplicates the object (in this case the light source)
The Shading Workspace -
accessed by clicking on ‘shading’ button on the menu at the top of the screen.

The green menu attached to the object is the principle shader, and the red box is the material output.

To change the colour of the selected object, you go to the ‘base colour’ part in the green box, and then choose any colour.
These are the render modes- the first one is wireframe, the second one is ‘solid mode’ which just shows the object in grey with some shading, the third is called ‘Look dev’ - which shows the colours of the object and some shading. The fourth is called ‘Rendered mode’ which shows the effect of the light source on the object.

The light source is visible to the right, and is having an effect on the lighting of the object.
The render engine ‘Eevee’ is real time and works pretty well, but for the best result you should use ‘cycles’ which takes a lot more time and processing power.

When using Eevee, you can enable screen space reflections and ambient occlusion so it looks more fancy.
Making an object Metallic:
Right click on the object and select ‘Shade Smooth’, then (while in the cycls render engine) go to the principle shader box and turn down the roughness, then enable ‘metallic’.
How to make an image:
The object visible above the cube is the camera. You can look through the camera by clicking the camera option in the right hand corner of the screen.
To lock the camera to your movement around the object, you press ‘n’ on the keyboard (while not looking through the camera) and a ‘transform’ menu will appear on the right. On the edge of the menu there is a ‘view’ option - which will display this:

Once this is displayed, you can check ‘lock camera to view’ . Now you can move the camera to where you want it. When you have it in the right place, you select the render option on the main menu at the top of the screen, then choose ‘render image’! It will render in whatever engine you currently have set. To save the image, go to the top and click ‘image’ then ‘save’.
0 notes
Text
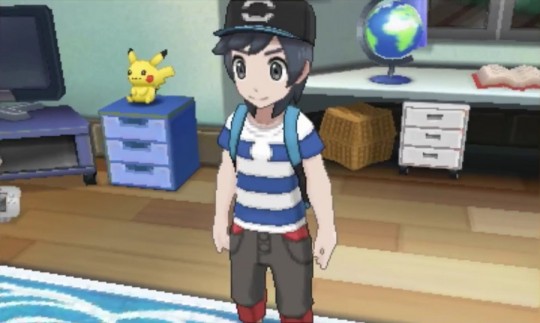
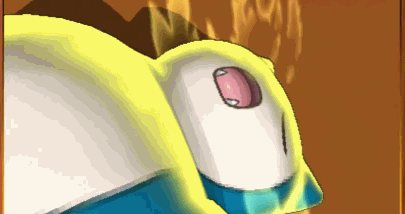
Pokemon Sun
It’s good. You should play it. It’s a Pokemon main series game and they’ve been pretty decent with each new addition since coming to the 3DS. The boost in power and interest makes them pretty accessible, fuller versions of Pokemon Colosseum the series has always wanted to be. 3D fights, enjoyable mechanics and enough here that mixes things up to make Sun/Moon worth picking up.
It’s accessible while still being a challenge. Wonderful! But how does it pull it off? Well...
The first thing that comes to mind is that Pokemon, as a series, seems to be desperately trying to grow a personality. In games gone by, things such as stories or characterisation or even dialogue was costly. If you put in a diatribe about man’s inhumanity to man and pokemon alike, you might have to cut out a boss encounter. Give villagers too much to say and you may have to replace an entire town with it as there wasn’t enough on the cartridge. Pokemon lasted as a pretty basic looking RPG for many a generation while stuff like Golden Sun or Megaman Battle Network looked gorgeous in comparison. That pokemon database takes up a lot of space! Modern flash cartridges seem to have an acre of room for all the 3D rendered models and the lush looking environments. It seems there’s room for storytime with Uncle Pokemon.
And you know he has an epic tale to tell! So grab an eevee and listen.
The story told is the one they’ve been telling for years now. Blah blah, you just arrived in town, blah blah, you’re a natural trainer, blah blah, go become a Pokemon Master. The difference is in the flavouring. Not-Hawaii location of the Alola Islands do offer a new lease on life for a tired plotline for your mute-ten year old to run through in the form of The Island Challenge. Instead of battles upon battles, sometimes you have to best a dungeon or photograph ghosts or find then defeat a powerful Totem pokemon. This is neat. While I don’t bemoan the older games too much for their reliance on the gym system, which made each a house where the boss lived while occasionally having a small fetch quest. Usually a fetch quest you need to do in order to face them at all! Here though, Challenge Captains and Kahunas interact with the world. They ingratiate themselves with the islands, which helps sell their supposed knowledge and skill naturally. Previously, Gym Leaders would have to have special quests and things to prove that they did more than just stand in a big house behind some elaborate set of traps.Challenge Captains and Kahunas are part of the community. They run shops or perform for tourists. They’re active in the world, meaning you’ll likely bump into them as you meander around. It works so much better to make them at least a little intimidating when you have to face them yourself.

Weirdly, not everyone gets rich off of unregulated betting on battles with random strangers. Which seems strange to think about but then again, it’s you, the rando wondering around aimlessly with money to burn, that they sell to.
The other thing about the story is that there’s more characters. Somewhat like Pokemon Black/White you begin the game meeting with your new friends. They’re what replaces the ‘Rival’ of older games as they’ll challenge you to battles regularly like a surprise pop quiz. Hau is the trainer that tries to stack himself against you and he’s not bad. He throws regular challenges at you while also being an all right character. I like him but I also feel like he floats around the story at large without any major impact. He’s appealing enough; a hopeful, enthusiastic son of a Kahuna that likes to stuff his face and battle. Fair enough. He doesn’t get in the way but also does make you want to punch him, unlike Blue or N. He, and almost all of the game, is overshadowed by the adventures of Lillie, however, Lillie is positioned as something of an anomaly within this world: someone that abstains from Pokemon Battles. I mean, you assume they’re out there somewhere but it does appear to bite her in the arse regularly. I get the motivation of not wanting to see Pokemon hurt but in a world where the wildlife can, and frequently does, attack at random, you’d think she’d figure out that battles likely arose out of a need to protect herself. She’s fine not to want to take part in battles but we’ve seen time and time again that people should have a pokemon for protection at all times! Oak wouldn’t stand for it, Burch presented a lovely example of why you’d need one and Lille of this game gets attacked by a Spearow flock that she is powerless to fight off or flee from.

Then take one of my pokemon and go get him then! I have running around in circles to do until my pokemon are all level 20! Vital, important work here!
In short, she’s kind of an idiot that can never go anywhere unaccompanied. On the plus side, I can report that she’s quite a sweet person. Her care for Pokemon and everyone around her is genuine, making her somewhat endearing. This marvel was created because Pokemon’s writing has improved considerably. For once, they’re attempting jokes and jabs at things. Hau is a doofus but it plays into his character. Lillie is selfless and that plays into her character too. Their defined, distinct and decently memorable. I wouldn’t call them stellar or fascinating but I didn’t mind meeting them.
This writing buff has permeated everything else, teamed with the 3D presentation to make a greater scope than I thought possible before. Pokemon Sun actually attempts to have ideas greater than ‘bad guys find sleeping monster and fail to control it’. I always found the attempted return of Team Rocket fascinating but Sun throws around the idea of Pokemon from other dimensions, Pokemon gangs, loyalty to family members and when you cross the line as a parent into being a child yourself.
I’m not joking.
While I will not say that this entirely works, I will say that it’s pretty out there for what I was expecting but I am so onboard for more. There’s elements that seem neutered or maybe didn’t connect as it should because it’s all still textboxes on a screen but there were clearly places where I was supposed to care but honestly didn’t.

The game is trying though. You can give it that much.
I can identity one major weakness with it’s story: it’s not mine, it’s Lillie’s. Lillie is the one that grows, goes through an arc and learns the magic of Pokemon Battles, if I might spoil that for just one moment. You are the silent protagonist that has a completely different story happening outside of the conflict between Lillie and the Ultra Beasts. Say what you like but older games placed you at the center of the story. You fought Team Rocket when you tangled with them and they declared you an enemy. You fought Team Aqua or Magma and put and end to their accidental damage to the weather they caused. You changed N’s mind and stopped Team Plasma.
But it’s Lillie that has the final say that puts the bad guys in their place after she sicks you on them. Sun has two stories that meet up then part ways at regular intervals. Do some island challenges, then go fight some story-related goons, then back to the thing you care about because it’s your story. Lillie’s little journey is fine but it feels like something I have little investment in because I don’t get the benefit of advancing there, Lillie does. My reward is being allowed to go back to doing what I want to do; catch pokemon and win challenges. The game will handhold and corral you into their straight path regularly just so that Lille gets her time in the spotlight.
If you could play as Lillie or fight your way through her story, then that would be something. But otherwise, I’m just her powerful trainer friend that she asks to solve her problems for her. And I ain’t that attached to her. A big problem when I’m a character that has no personality at all outside of my clothes.
That deep, unwavering stare forwards as if paralysed in the brain and only capable of that mild, cheery smile. Enjoy that for most of the game.
I love Team Skull though. The jokes and their personality was wonderful. Loved them! Keep them around.
Gameplay wise, it’s mostly the same. There’s a long list of tweaks and changes from previous titles that matter but ultimately don’t bother me so let’s focus on the major changes. The pokemon here are a good selection of old and new that draws on the Hawaiian tie to spirituality and it’s tropical climate. Ghost pokemon have a real spotlight in this place, making it likely they’ll appear in most teams this time around, even giving a welcome return to Phantump and Gastly, two pokemon I had to go find when I heard they were in the game. I like Toxepex, a poisonous anemone that can withstand a beating, and I like Sandigast, a possessed sandcastle that eats life energy. Yes, that’s a thing.
There are also regional versions of old pokemon, mostly in an attempt to make them a touch more appealing. Mostly, they’ve given dark typing to Raticate, Grimer and Meowth. Which is fine to me. I got a lot of use out of the new Grimer as it’s second typing allowed for more varied and interesting tactics. Dark works decently with Poison, I reckon. The other two are fine but are now fatter in design than before..
Pokemon seems to be trying to make it’s new additions stand out more though. And their method this time round is to make their lives a little more miserable. There’s pokemon that feast on others, there’s pokemon said to possess horrid powers but the breakout star for me is Mimikyu. Not only is this pokemon a wonderful Physical Sweeper, it’s appearance is a point of self-awareness. It’s lonely and jealous of Pikachu’s popularity. As such, it wants some of that attention so dresses as Pikachu to garner some love. Aww...Makes me want to hug it till the horrible phantom inside claws my soul.

Who’s my little hellspawn? You are! You are! Who sweeped half the opponent’s team?! You did! Good widdle snookums!
You see? Pokemon is trying to grow a personality. Some of it works.
Gameplay is also trying to aid in this: Pokemon may now call for help. At first, this sounds fine. More pokemon to fight means bigger payouts and you can always throw out a second pokemon to even things up, right? No! If a pokemon does this, you’re now outnumbered two to one. You cannot capture anything while the other pokemon is present. You also have a high chance that if you defeat one of the pokemon, the remaining one will attempt to call for further backup. Some pokemon have a high likelihood of receive help, giving the impression of fighting a pack that’s happy to wait in line for it’s turn. A good mechanic in theory but it drags out fights that you don’t want if it happens. It seems to have been implemented to allow for a new way of finding pokemon (Toxepex can only be found through coming to another pokemon’s aid) and to help make the relatively compact islands feel like their encounters have just as much impact as previous games as patches of long grass are often small with a clear path you can use instead. You have to want to go looking for pokemon to find them, usually, rather than having to wade through long grass that had overgrown paths you needed to cross to get somewhere.
If you can’t force more random encounters, then give them the chance to increase in magnitude instead. Doesn’t entirely work.
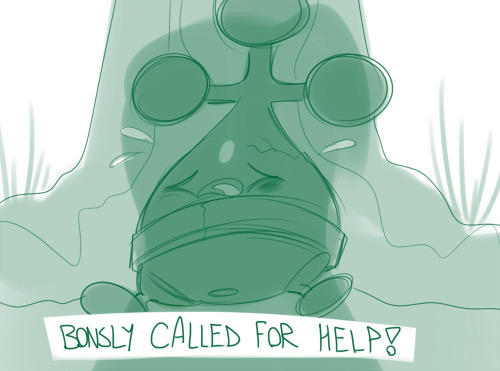
You must be the most popular Pokemon in the world if they’re still coming whenever you use ‘Call for Family’! Are you royalty or something?!
What I am in full favour for is Z-Moves. These are special moves that act as an alternative to a Mega Evolution. Personally, I think they’re superior. Yes, having a big, nasty pokemon that boosted it’s stats and became more powerful when you needed it is cathartic. However, it’s limited to select pokemon and does nothing but change the pokemon’s capabilities. Z-Moves can be applied to any pokemon and any ability. While some pokemon have unique Z-Moves, all pokemon are capable of using them. The reason this kicks so much arse is obvious: more powerful move that’s based on the type of z-crystal you give and which move you decide to turn into a decisive finisher. Where this gets interesting is that it can apply to status moves too. Performing Z-Status moves often grants additional effects to the move, such as some moves doubling the effect it has on a pokemon’s stats. Heck, a Z-Move Splash increases that pokemon’s attack by three stages. Not insignificant. So, your choice is now a powerful slam or a tactical edge but you can only choose one per battle. I think this is a lovely idea that means that any pokemon can become worth something, rather than hoping they’ll be given a Mega Evolution.
I like a game that can hand you a new tool to fiddle with and flip what you knew on it’s head.
It helps that they’re all kind of bonkers.
Oh! And there’s this thing where you can pet and feed your pokemon jellybeans. It is adorable. I’m not fully aware of how it benefits you but it’s cute to pet a Genga then feed him his favourite bean to make hearts appear. Bonus points from me.
So, yeah. Get this. It’s a little more self-aware and ambitious than usual. Either they had a change in design team or they wanted to make Sun stand above it’s competition, which appears to just be Yokai-Watch right now. If you enjoy pokemon or you enjoy a relaxing and simple RPG, this is worth picking up.
0 notes