#mq135
Explore tagged Tumblr posts
Visit Tumblr Blog
Explore Tumblr blogs with no restrictions, modern design and the best experience.
Last Seen Tumblr Blogs


Fun Fact
130K people were victims of a chain letter scam that affected Tumblr in May 2011.
Video
youtube
Air Pollution Monitoring using Arduino
#youtube#Air Pollution Monitoring using Arduino & ESP8266 | MQ135 | MQ2 | MQ4 | MQ7 | TCP Telnet Terminal APP | IoT Based Air Pollution/Quality Monit
0 notes
Text
Emerging Trends: How IoT is Transforming Drainage Systems in India
The Internet of Things (loT) has altered our way of life within the last ten years. It helped reduce the manual labor and the time of production in various sectors. Drainage systems are no exception and this technology has reached the depth of underground drains and piping systems. loT-based systems are g, flooding, and wastewater management. This blog aims to explore how loT is transforming drainage systems in India along with trends, benefits, and real-world applications.
The Need for Smart Drainage Systems in India
India, with perhaps the most diverse geographical location in the world, is frequently vulnerable to unexpected and rapid shifts in climate. Heavy monsoons and inadequate facilities cause frequent waterlogging and flooding, causing waterborne diseases across both rural and urban populations.
Traditional drainage systems rarely have real-time monitoring, and hence response to clogs and leaks is delayed. IoT-based drainage systems employ an active methodology, utilizing sensors, connectivity, and data analysis to enhance water flow, prevent flooding, and maintain environmental sustainability.
How IoT is Transforming Drainage Systems
IoT technology links physical devices like routers and sensors to the web, allowing for easy data collection and communication. In drainage networks, IoT devices track water levels, flow rates, and any blockages in real time. Here’s how IoT is driving transformation:
1. Real-Time Monitoring and Alerts
IoT sensors, like ultrasonic and water level sensors, provide real-time information on drainage conditions. For instance, the MQ135 sensor monitors sewage gas, while ultrasonic sensors estimate water levels and warn authorities about possible threats like a blockage or overflow . These real-time data allow communities to respond quickly, avoiding waterlogging and minimizing illnesses from stagnant water. In cities like Hyderabad, Mumbai, and Chennai, where flooding is a common occurrence, IoT systems might deliver immediate warnings via GSM or cloud-based platforms, allowing for quick actions.
2. Predictive Analytics for Proactive Maintenance
Predictive analytics, supported by IoT and AI, represents a vital change in drainage management. Through the examination of past and real-time information, IoT equipment may recognize issues with drainage before things go awry. Sensor information, for instance, may detect patterns indicating blockage or wear out in the infrastructure so predictive maintenance. This strategy decreases downtime and saves repair costs. A 2023 study discovered that IoT-based predictive maintenance could lower operating costs by up to 20% in urban infrastructure management.
3. Automation for Optimized Water Flow
IoT enables automation of drainage operations, optimizing water flow and reducing wastage. Smart drainage systems may adjust operations by leveraging real-time data, such as diverting water during heavy rainfall to prevent overflowing. In water treatment plants, IoT devices such as the AR7088H Industrial LTE Router provide remote control of processes like managing flow and sludge treatment, leading to improved performance. This automation is especially critical in India’s smart city vision, where IoT has a central role to play in sustainable urban planning.
4. Environmental Sustainability
IoT-based drainage systems foster environmental sustainability by lowering wastewater and pollution. Water quality is tracked by sensors in drainage systems, and contaminants like toxic waste and sewer gas are detected. This facilitates authorities to act on the source of pollution quickly, resulting in clean waters . Moreover, IoT systems enhance water usage in stormwater management, changing rainfall into a resource for independent communities. Most companies are using IoT to record rainfall, therefore supporting sustainable water management in India.
Emerging IoT Trends in Drainage Systems
Several IoT trends are shaping the future of drainage systems in India:
5G Integration: The rollout of 5G networks enhances IoT connectivity, enabling faster data transmission and real-time monitoring across large urban areas. By 2028, India’s 5G subscriptions are expected to reach 4.6 billion, expanding IoT usage in drainage management.
Edge computing: Edge computing processes data locally, resulting in decreased latency and bandwidth usage. This is important in time-sensitive tasks including flood prevention, where quick responses are needed.
AIoT (AI + IoT): Combining AI and IoT, or AIoT, optimizes data analytics for efficient decision-making. AI algorithms assess sensor data to maximize drainage operations and identify the possibility of floods, enabling systems to operate more independently.
Blockchain for Security: Given that IoT devices generate massive volumes of data, blockchain offers encrypted information exchange, protecting drainage systems from cyber assaults. This is critical for maintaining data integrity in smart city infrastructures.
Real-World Applications in India
IoT-based drainage systems have started making their presence felt in India. Intelligent drainage monitoring systems in Bangalore utilize IoT sensors to monitor obstacles in real-time, reducing flooding possibilities in low-lying areas. Similarly, CIMCON’s CIM360 IoT Edge Gateway upgrades old drainage networks by adopting existing infrastructure, real-time reporting of data, and improved security. In rural areas such as Gudipadu Cheruvu in Andhra Pradesh, IoT solutions are being tested to control the supply of water and avoid contamination and thus address the water supply problem.
Challenges and Future Prospects
Although promising, IoT implementation in drainage systems is hindered by high upfront fees, compatibility between devices, and cybersecurity risks. Over 100 million threats on IoT endpoints were detected in 2019, emphasizing the importance of adequate safety protocols. However, innovation in the blockchain system and the exercise of protocols are easing those barriers. With India’s IoT market expected to reach $629.5 billion by 2025, the future is auspicious for smart drainage systems.rapidly being used to analyze, detect, and automate a bunch of problems like waterloggin.
read more:https://leenusindia.com/

#surveyingtechniques#civilengineeringsurveys#piping network installation#industrial piping solutions#piping network services
0 notes
Text
DIY Air Quality Monitoring System
Introduction
In this DIY guide, we’ll walk you through building an Air Quality Monitoring System to keep tabs on the air quality in your home or surrounding environment. This project collects and tracks key air quality metrics — such as CO2 levels, PM2.5 particles, temperature, and humidity — and displays them in real time on a mobile app or web dashboard. Perfect for health-conscious individuals, this IoT project provides valuable insights into your environment and helps you make adjustments to improve indoor air quality.
Why Build an Air Quality Monitoring System?
The air we breathe has a direct impact on our health, yet indoor air quality often goes overlooked. By monitoring indoor CO2 and particulate matter levels, as well as temperature and humidity, you can create a healthier living space. This system helps you identify potential air quality issues, like high CO2 levels or excessive dust particles, that may require ventilation or filtration.
Benefits of Monitoring Air Quality:
Healthier Environment: Improve indoor air quality by tracking harmful pollutants.
Real-Time Alerts: Get notified when air quality drops below safe levels.
Data-Driven Decisions: Use data insights to decide when to ventilate or clean the air.
Long-Term Tracking: Log data over time to see how seasonal or activity changes impact air quality.
Key Components and Technologies
To build your Air Quality Monitoring System, you will need:
Microcontroller: Use a Raspberry Pi or ESP32 to serve as the main control unit. Both offer robust processing power and easy integration with sensors and cloud platforms.
Air Quality Sensors:
CO2 Sensor: The MQ135 sensor is an affordable option for measuring CO2 levels.
PM2.5 Sensor: The PMS5003 sensor detects fine particulate matter in the air, which can contribute to respiratory issues.
Temperature and Humidity Sensor: DHT11 or DHT22 sensors monitor environmental conditions that can affect indoor air quality.
Wi-Fi Module: ESP32 has built-in Wi-Fi, while Raspberry Pi can connect via a Wi-Fi dongle or built-in module, enabling remote data access.
Cloud Service for Data Storage and Visualization:
Use platforms like Cloudtopiaa, Blynk, or Thingspeak to store, visualize, and analyze your data. Cloudtopiaa provides reliable cloud services with secure data storage and custom visualization options.
Additional Components:
Jumper wires and breadboard
Power supply for the microcontroller
Basic tools like a soldering iron if needed
Step-by-Step Guide
Step 1: Set Up the Microcontroller
Choose and Prepare Your Microcontroller:
For this guide, we’ll use a Raspberry Pi. Set up the latest version of Raspbian OS on the Raspberry Pi.
Connect the Components:
Attach the MQ135 CO2 sensor to one of the GPIO pins.
Connect the PMS5003 PM2.5 sensor to another GPIO pin.
Connect the DHT11 or DHT22 sensor for temperature and humidity.
Step 2: Install Required Libraries
Open the terminal on your Raspberry Pi and install the libraries necessary for sensor data collection and Wi-Fi connectivity.sudo apt-get update sudo apt-get install python3-pip pip3 install adafruit-circuitpython-mq135 pip3 install adafruit-circuitpython-pm25 pip3 install Adafruit_DHT
Step 3: Program the Sensors
Write a Python script to read data from each sensor. Here’s a basic example for reading CO2, PM2.5, temperature, and humidity data.import time import Adafruit_DHT import board import adafruit_mq135 import adafruit_pm25
# Setup DHT_SENSOR = Adafruit_DHT.DHT22 DHT_PIN = 4 CO2_SENSOR = adafruit_mq135.MQ135(board.A0) PM25_SENSOR = adafruit_pm25.PM25_UART(board.UART1)
def read_sensors(): # Read temperature and humidity humidity, temperature = Adafruit_DHT.read_retry(DHT_SENSOR, DHT_PIN) # Read CO2 level co2_level = CO2_SENSOR.co2 # Read PM2.5 level pm25_data = PM25_SENSOR.read() pm25 = pm25_data['pm25'] if 'pm25' in pm25_data else None return temperature, humidity, co2_level, pm25
while True: temp, humidity, co2, pm25 = read_sensors() print(f"Temperature: {temp}°C, Humidity: {humidity}%, CO2 Level: {co2} ppm, PM2.5: {pm25} µg/m³") time.sleep(10)
Step 4: Cloud Integration with Cloudtopiaa
Set Up a Cloudtopiaa Account: Sign up for Cloudtopiaa to leverage their reliable data storage and visualization capabilities.
Create an IoT Project: Set up a new project and get an API key to send sensor data.
Connect Your Microcontroller: Update your script to send data to Cloudtopiaa.
import requests
CLOUDTOPIAA_API_KEY = "Your_Cloudtopiaa_API_Key"
def send_data_to_cloud(temp, humidity, co2, pm25): url = "https://api.cloudtopiaa.com/v1/data" # Example endpoint payload = { "temperature": temp, "humidity": humidity, "co2": co2, "pm25": pm25 } headers = { "Authorization": f"Bearer {CLOUDTOPIAA_API_KEY}" } requests.post(url, json=payload, headers=headers)
while True: temp, humidity, co2, pm25 = read_sensors() send_data_to_cloud(temp, humidity, co2, pm25) print(f"Sent data to Cloudtopiaa: Temperature: {temp}°C, Humidity: {humidity}%, CO2: {co2} ppm, PM2.5: {pm25} µg/m³") time.sleep(600) # Send data every 10 minutes
Step 5: Set Up Data Visualization
Log in to your Cloudtopiaa account to view your data in real-time. Use built-in visualization options to create charts and graphs that track air quality metrics over time.
Step 6: Build a Mobile App or Web Dashboard
Use a platform like Cloudtopiaa’s dashboard, Blynk, or a custom web interface to create a user-friendly dashboard that displays current air quality data and historical trends.
Conclusion
You’ve successfully built an Air Quality Monitoring System to help maintain a healthier environment in your home or workspace. With this system, you can track real-time air quality, make data-driven decisions about ventilation, and improve indoor air conditions for better health. Cloudtopiaa’s secure storage and powerful visualization tools make it easy to monitor your air quality from anywhere.
Additional Resources
Cloudtopiaa Documentation
Raspberry Pi Documentation
Blynk IoT Platform
This project demonstrates skills in IoT health applications, environmental monitoring, and data visualization — valuable tools for creating a smarter, safer living environment.
#DIYAirQualityMonitor #IndoorAirQuality #TechForHealth #Cloudtopiaa #tec4bizsolutions #RealTimeData #ESP32 #IoTProjects #CO2Sensor #PM25Detection
0 notes
Text
0 notes
Photo


MQ-135 Gas Sensor
The MQ-135 Gas sensors are used in air quality control equipments and are suitable for detecting or measuring of NH3, NOx, Alcohol, Benzene, Smoke and CO2.
38 notes
·
View notes
Photo

📸 Photo of the day: MQ135 gas sensor module for air quality detection. #Enewground #mq135 #gassensor #airquality #arduino #arduinouno #arduinomega #arduinonano #raspberrypi #raspberrypi4 #maker https://www.instagram.com/p/B0anxMmnm3o/?igshid=3csjfpldqwen
#enewground#mq135#gassensor#airquality#arduino#arduinouno#arduinomega#arduinonano#raspberrypi#raspberrypi4#maker
0 notes
Text
MQ135 Gas Sensor with ESP8266 and ST7789 SPI Display

MQ135 is a Gas sensor. It works on analogue and digital pins with Arduino boards. It gives analogue value in PPM of Air Quality. When we use a digital pin, it gives on signal at a particular value of analogue. This can be adjusted via potentiometer. So, you can also detect a particular gas without using any microcontroller. Just seeing a green LED, you can know it. Read the full article
0 notes
Text
in affitto laboratorio via Corsica, 133 mq135 affitto Euro500 -...
0 notes
Text
Luftqualitätsmesser Bausatz von Franzis

In diesem Beitrag möchte ich dir zeigen, wie du den Luftqualitätsmesser Bausatz der Firma Franzis zusammenbaust und die Werte am Arduino auslesen kannst.

Eine kleine Schaltung mit einem Luftqualitätsmesser habe ich dir bereits im Beitrag Arduino Lektion #113: Umweltsensor BME680 gezeigt. Jedoch wird für den dort gezeigten Baustein Programmierkenntnisse benötigt, für den Bausatz hier musst du lediglich mit einem Lötkolben umgehen können.


Bezug des Bausatzes - Luftqualitätsmesser von Franzis
Diesen Bausatz kannst du derzeit für knapp 20 € im Shop von Franzis zzgl. Versandkosten erwerben.
Lieferumfang des Bausatzes
Zum Lieferumfang gehört: - eine Platine, - drei 10 mm, LEDs, (rot, gelb, grün), - zwei 4,7 kOhm Widerstände, - ein 100nF Keramikkondensator, - eine PTC Sicherung - der MQ135 Sensor, - zwei Drehpotentiometer, - ein IC, sowie - ein USB-Kabel für die Stromversorgung

Nicht auf dem Bild ist die Anleitung sowie das Pappgehäuse für die fertige Schaltung.
Aufbau des Bausatzes
Der Bausatz ist für geübte am Lötkolben in wenigen Minuten geschehen. Leider habe ich in meinem Aufbau einen kleinen Fehler drin und die Komponenten außer MQ135 Sensor & die drei LEDs gehören auf die Vorderseite und alle anderen auf die Rückseite. Daher passt diese Platine nicht mehr in das dazu gehörige Pappgehäuse. https://youtu.be/9EV47pf9XpM Jedoch werde ich meinen 3D-Drucker anwerfen und die Schaltung in ein kleines Gehäuse packen. Der Vorteil an diesem vermeintlichen Fehler ist, dass man auch von vorne an die Drehpotentiometer kommt und somit einfacher nachjustieren kann.

fertig aufgebauter Luftqualitätsmesser von Franzis
Justieren des Sensors
Zum Justieren des Sensors sind zwei kleine Drehpotentiometer verbaut. Da sich der Sensor während dem Betrieb erwärmt, ändert sich der Messbereich etwas und daher muss nach ca. 6 Stunden erneut justiert. Das linke Drehpotentiometer dient dazu den Wert für die "gute Luft" einzustellen (grüne LED leuchtet), der rechte für den Schwellwert zum Wechsel von Gelb auf Rot (rot blinkend).
Anschluss an den Arduino UNO
Der Bausatz verfügt über einen Lötpunkt für den Anschluss an einen analogen Pin des Mikrocontrollers. Zusätzlich benötigt man noch die Masseleitung vom Bausatz.


Im Video zuvor habe ich an den Lötpunkt einen Stift gelötet sowie an die Masseleitung zusätzlich noch ein Breadboardkabel. https://youtu.be/OQjIDGzGXKw
Lesen von analogen Werten am Arduino
Zum lesen des analogen Wertes am Arduino benötigst du lediglich nachfolgendes kleines Programm (auch Sketch genannt). //Pin des Luftqualitätsmessers am analogen Pin A0 angeschlossen #define luftqualitaetsmesser A0 void setup() { //beginn der seriellen Kommunikation mit 9600 baud Serial.begin(9600); } void loop() { //lesen des analogen Wertes int value = analogRead(luftqualitaetsmesser); //Ausgeben des gelesenen Wertes auf der seriellen Schnittstelle Serial.print("Luftqualitätsmesser:"); Serial.println(value); //eine kleine Pause von 125ms. delay(125); } Read the full article
1 note
·
View note
Text
New MQ135 MQ-135 Air Quality Sensor Hazardous Gas Detection Module For Arduino M2 PromotionHot New Arrival
New MQ135 MQ-135 Air Quality Sensor Hazardous Gas Detection Module For Arduino M2 PromotionHot New Arrival

lastest_volume
0
Just For Today
Click Here To Visit The Shop
N€W New MQ135 MQ-135 Air Quality Sensor Hazardous Gas Detection Module For Arduino M2 PromotionHot New Arrival
0 notes
Video
youtube
An IoT Implemented Dynamic Air Pollution / Quality Device for Smart Pollution Monitoring | Arduino Based Air Quality Monitoring IOT Project | iot based air pollution monitoring system project report pdf | air pollution monitoring system using iot project report | air quality monitoring system using arduino pdf | air pollution monitoring system using arduino project report | air quality monitoring and alert system using arduino with mq135 | air quality monitoring system project using arduino | air pollution monitoring system using iot ppt | mq135 air quality sensor arduino.***********************************************************If You Want To Purchase the Full Working Project KITMail Us: [email protected] Name Along With You-Tube Video LinkWe are Located at Telangana, Hyderabad, Boduppal. Project Changes also Made according to Student Requirementshttp://svsembedded.com/ https://www.svskits.in/ http://svsembedded.in/ http://www.svskit.com/M1: 91 9491535690 M2: 91 7842358459 We Will Send Working Model Project KIT through DTDC / DHL / Blue Dart / First Flight Courier ServiceWe Will Provide Project Soft Data through Google Drive1. Project Abstract / Synopsis 2. Project Related Datasheets of Each Component3. Project Sample Report / Documentation4. Project Kit Circuit / Schematic Diagram 5. Project Kit Working Software Code6. Project Related Software Compilers7. Project Related Sample PPT’s8. Project Kit Photos9. Project Kit Working Video linksLatest Projects with Year Wise YouTube video Links157 Projects https://svsembedded.com/ieee_2022.php135 Projects https://svsembedded.com/ieee_2021.php 151 Projects https://svsembedded.com/ieee_2020.php103 Projects https://svsembedded.com/ieee_2019.php61 Projects https://svsembedded.com/ieee_2018.php171 Projects https://svsembedded.com/ieee_2017.php170 Projects https://svsembedded.com/ieee_2016.php67 Projects https://svsembedded.com/ieee_2015.php55 Projects https://svsembedded.com/ieee_2014.php43 Projects https://svsembedded.com/ieee_2013.php1100 Projects https://www.svskit.com/2022/02/900-pr...***********************************************************5. How to make IOT based Air Pollution Monitoring System using,6. Air Pollution Monitoring System,7. IOT Air
0 notes
Link
Features : – Sensitive material MQ135 gas sensor is used in clean air low conductivity tin oxide (SnO2). When the sensor is kept in their environment In the polluting gases , the ...
0 notes
Photo


IoT Based Air Pollution Monitoring using NodeMCU and MQ135 Sensor
There are different types of gas sensors to detect different gases. Here in this project we are going to use MQ135 gas sensor to sense the pollution content in the surrounding area and then to monitor these values over the Webpage. The circuit consists of a simple connection and takes fewer components to have your own IoT based air pollution monitoring system. In this project, at first, we will be knowing about the MQ135 sensor and its internal circuit. Later we will be building an air pollution monitoring system using nodeMCU and MQ 135 gas sensor and interface an LCD (16X2) display to nodeMCU, to show the pollution content value. Later on, we will connect the nodeMCU to our LAN, by providing the SSID and password credentials and then we will be generating a webpage where we send the sensor data. The page will be refreshed for every time interval to show the updated values.
COMPONENTS REQUIRED
MQ135 gas sensor
NodeMCU
LCD (16X2)
Breadboard
Connecting Wires
youtube
View the full tutorial
11 notes
·
View notes
Photo
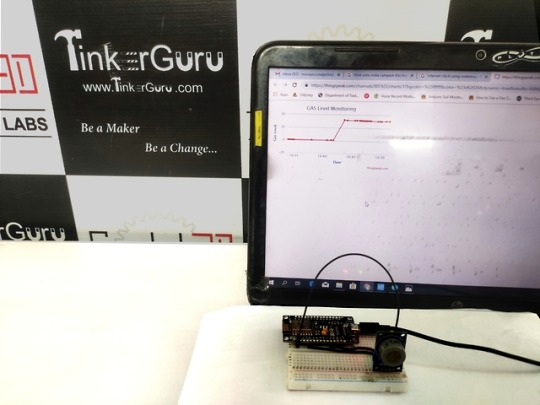
Gas Level Monitoring Over Internet Using ESP8266, Gas Sensor & thingspeak serverIn this project we will learn about Gas Level Monitoring Over Internet Using ESP8266 & Gas Sensor Module, i.e MQ7. We will measure the quantity of gas in percentage and send it over the internet using the thingspeak server. With this system, the data can be monitored remotely staying at any part of the world. We just need gas/smoke/LPG sensor like MQ2/MQ3/MQ5/MQ7/MQ135 that is directly connected to Nodemcu ESP8266-12E Module.ThingSpeak is an open source Internet of Things (IoT) application and API to store and retrieve data from things using the HTTP protocol over the Internet or via a Local Area Network.#AIMToInnovate/ #Tinkerguru/#atalinnovationmission/ #NITIAayog/ #StemChange/#RobotsMovie/ https://goo.gl/Z2h9Ro
0 notes
Text
in affitto laboratorio via Corsica, 133 mq135 affitto Euro500 -...
0 notes