#navigationcontroller
Explore tagged Tumblr posts
Visit Tumblr Blog
Explore Tumblr blogs with no restrictions, modern design and the best experience.
Last Seen Tumblr Blogs


Fun Fact
Celebrities use Tumblr as well.
Link
Get ready for a smoother and more streamlined video experience on Facebook mobile! The social media giant is rolling out a major update to its mobile video player, aiming to unify the way users watch Reels, longer videos, and live streams. This long-awaited change addresses a common pain point for many Facebook users – the inconsistency in viewing experiences depending on the type of video. Ushering in a Unified Fullscreen Era Previously, Facebook offered a hodgepodge of viewing experiences. Reels, the platform's short-form video counterpart to TikTok, played in a vertical fullscreen format. In contrast, longer videos defaulted to a half-screen view with comments displayed below. This inconsistency could be jarring for users, disrupting the overall viewing flow. Facebook Unveils Revamped Mobile Video Player Thankfully, Facebook is putting an end to this confusion. The revamped video player introduces a universal vertical fullscreen mode for all video content, from bite-sized Reels to in-depth live streams. This design choice aligns with user preferences for mobile video consumption, mirroring the success of vertical video formats on platforms like Instagram and TikTok. Streamlined Interface for Enhanced Engagement The new fullscreen experience goes beyond just a visual revamp. Facebook has incorporated a user-friendly interface that keeps essential controls within easy reach. Here's what you can expect: Core Actions: The now-familiar like, comment, share, and Messenger sharing buttons remain readily accessible, allowing viewers to seamlessly interact with the content. Content Recommendations: Facebook leverages its powerful recommendation engine to suggest relevant videos based on your interests. This could mean anything from quick makeup tutorials in Reels format to longer DIY home improvement guides for those tackling weekend projects. Refining Navigation and Playback Controls Beyond the unified fullscreen experience, Facebook is also introducing improved navigation features for a more intuitive viewing experience. Here are some key highlights: Precise Playback Controls: Users gain access to a pause button and the ability to skip forward or backward by ten seconds. Additionally, a bottom slider offers granular control over video playback, allowing viewers to jump to specific sections with ease. Landscape Mode for Non-Vertical Videos: Not all videos are created equal. For those precious horizontal videos you still cherish, a handy landscape mode toggle appears on fullscreen horizontal videos, allowing viewers to switch to a more traditional viewing format if desired. A More Personalized Video Journey with Smarter Recommendations The revamped video player isn't just about aesthetics and functionality. Facebook is also taking steps to personalize the video experience for each user. Here's what's on the horizon: Interest-Based Suggestions: Facebook's recommendation engine is getting smarter. The platform will analyze your viewing habits and interests to suggest content you're more likely to enjoy. This could be anything from the latest beauty hacks in Reels format to in-depth cooking tutorials for aspiring chefs. The Future of Facebook Video: A More Tailored Experience This update signifies Facebook's commitment to providing a more user-centric video experience. By offering a unified fullscreen mode, intuitive controls, and personalized recommendations, Facebook aims to keep users engaged and coming back for more. Frequently Asked Questions: Q: When will the new video player be available? A: The revamped video player is currently rolling out on iOS and Android platforms in the US and Canada, with a global rollout planned for the coming months. Q: Will this update affect how I watch live streams? A: Yes! Live streams will now also benefit from the unified fullscreen experience, providing a more immersive viewing experience for both viewers and broadcasters. Q: Can I still watch horizontal videos in landscape mode? A: Absolutely! A toggle button will appear on fullscreen horizontal videos, allowing you to switch to landscape mode for a more traditional viewing experience.
#Android#ContentDiscovery#Engagement#facebook#FacebookUnveilsRevampedMobileVideoPlayer#fullscreenmode#GlobalExpansion#interaction.#iOS#mobilevideo#navigationcontrols#personalized#recommendations#Reels#userexperience#videoplayer
1 note
·
View note
Photo
ios - Can't go back if QLPreviewController is pushed to NavigationController
0 notes
Text
…..So I decided to make a tutorial.
Yup, is on how to set up a wireless remote control for Photoshop.
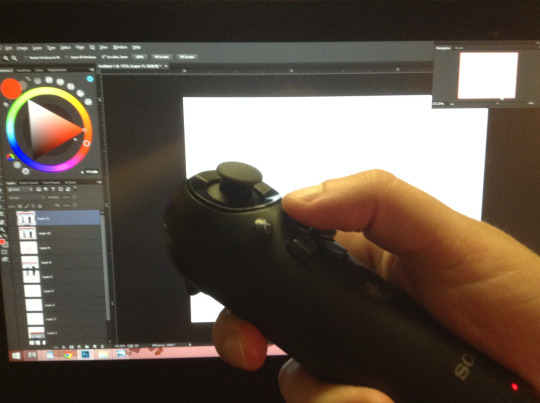
I suffer from constant back pain, and I spend many hours sitting down drawing, daily. So the idea came when searching for different alternatives other than just relying on a keyboard for all my shortcuts; smaller keyboards, a G13, etc.They did not work ´cause they are not comfortable enough to put anywhere. I also looked at the Cintiq control but is actually hella expensive and a bit limited for my taste. With this I can have my arm resting anywhere and I can position myself better, e.g., lying on a bed like a pig.
So like I said, this is a tutorial…of sorts…. for those wanting an alternative to using a keyboard for Photoshop shortcuts, also it works with any other art program or any type of software on Windows that uses a keyboard or a mouse.
It doesn’t necessarily has to be the PS3 navigation controller though, you can use any wired or wireless game-pad/joystick of any brand. But in all the research I did I found this is by far the best tool to use as a remote; is small, doesn’t weight much and you can get plenty of shortcuts out of it.
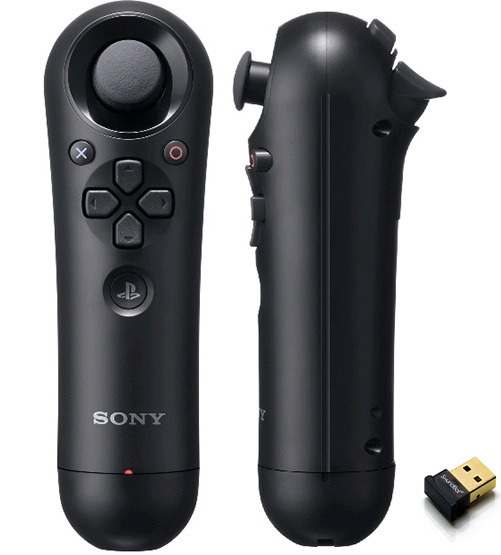
The Nav controller only has 10 buttons, which are plenty already. But thanks to a couple of awesome tools out there and some tweaking around you can set up about 80+ keyboard inputs……say wuuut!!! who the heck need so many shortcuts!!! (I´ll show you how to do it later, below)
First things first. Here is a list of all you need:
PS3 Navigation controller.
From 7 dollars used, up to 20 new on amazon……pretty sweet.
Bluetooth Dongle. (to use the controller wirelessly, so its optional)
From 2 bucks up to 15.
Mini-5 pin USB cable. (to charge the controller or to have it wired if you don’t have a Bluetooth dongle)
1,50 to 10 dollars. Everyone have one of these, EVERYONE!!!!
SCP DS3 driver and a software package. (needed to let windows recognize the PS3 nav controller. Links for them are on the step on how to configure the controller)
Free.
Xpadder. (needed to map the keyboard onto the controller)
10 Dollars. (their old 5.3 version is free, but I highly recommend buying the latest update)
That is it, for less than 30 bucks (if you buy an used controller and a cheap dongle+cable, like i did) you can have your own Photoshop controller extraordinaire.
Lets set up and configure this awesome bastard!
Just to note that If you are using a different controller that get recognized right away by windows, just skip this step.
To configure the controller and the Bluetooth dongle we need the SCP DS3 driver and software package mentioned above. This is needed because Sony never made Windows drivers for their controllers, and also the Bluetooth dongle driver needs to be re-written in order to be paired with the controller, this meaning that the dongle will only be usable with it. If you use different peripherals with a same dongle, you will need to buy one to dedicate only to the PS3 Nav controller.
To make things easier for me (and for you) and also because there are tons of tutorials out there about this step, I´m gonna link you to a YouTube video made by Wiltshire Tutorials. in his video he does a great job explaining (way better that I could ever do) how to do this part.
All the software you need for this part is in the description of that video.
Though I suggest going here first: http://forums.pcsx2.net/Thread-XInput-Wrapper-for-DS3-and-Play-com-USB-Dual-DS2-Controller and download the latest installer for the SCP Driver, also If you need extra information or if you wanna read more about this step that is the place to go. I suggest using the latest installer because that version lets you change the button layout of the controller. By default the PS home button gets configured in a way you can´t map in Xpadder, and with the the latest update I can have the PS home button set up to function as the R1 trigger, and Xpadder does let me re-map that button.
If you don’t care about being able to change that specific button just install the drivers provided in the video, they are totally fine.
Here is the video: https://youtu.be/TpSaOJJIun8
Its a pretty straight forward step, just follow everything he says. His video is for the PS3 controller, but it works the same for the Navigation controller, which is basically half of a PS3 controller. If you have any trouble, installing it or pairing it with the BT dongle, check his links in the description and see if that information helps (it did for me)
With that done, now we just need to install and setup Xpadder.
You don´t necessarily need to use Xpadder to re-map the buttons (there are a couple more programs that let you do the same, like joytokey) but I think this software is pretty complete, well thought and it offers a wide range of options to customize your controller or to map your shortcuts any way you like.
Kudos to the developer, he did a pretty fucking awesome job.
You can buy Xpadder here: http://www.xpadder.com/
Oh I said install, but actually you don´t need to install it, it runs directly from the .exe as a program.
Xpadder is really intuitive on how to set up the controller so I won´t go into any detail on how to do so, seriously, is ready to go from the start.
(you can use the image of the controller I put up there as your layout background if you wish)
The way Xpadder works is simple, you have 3 main features here:
1. The controller:
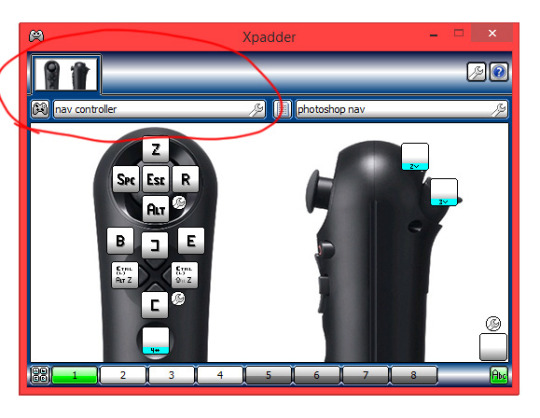
Which is the hardware you are using. In this case the Nav controller.
2. The Profiles:
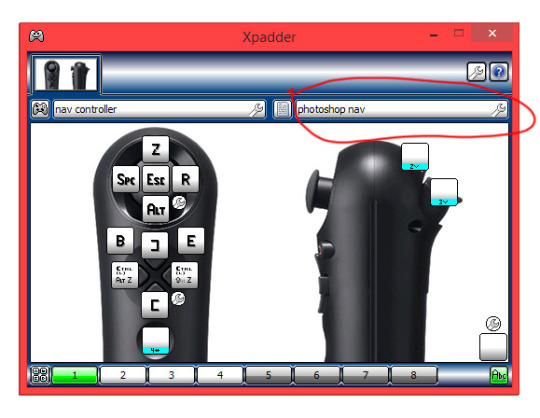
Which are the different mappings you configure for a said program. e.g. Photoshop, Painter, etc. Because each program uses different shortcuts is great that you can save different profiles. The cool thing about Xpadder is that you can set it up to automatically switch profiles according to the program you are using.
3. The Sets:
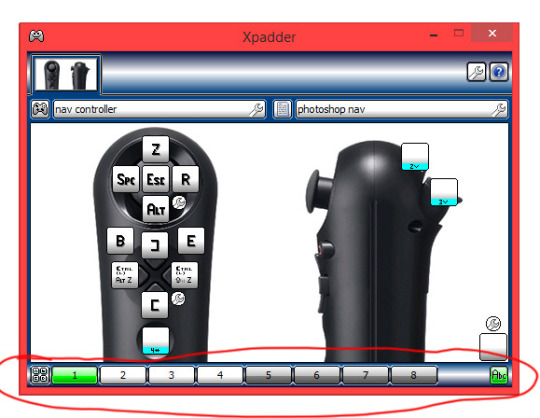
Which are the different mapping layouts within said profile. There up to 8 sets you can configure per profile. .
The Sets are actually the feature I love the most, because it lets you basically have 80+ shortcuts within one profile, and of course using just one little controller.
So here is what I do:
I don´t map the L1 trigger to any shortcut, but instead I make it temporarily (while you hold it) change to set 2, and the L2 trigger to the set 3. This allows me to have a new set of commands each time I hold any of the triggers. Kinda like a combo move. like this:
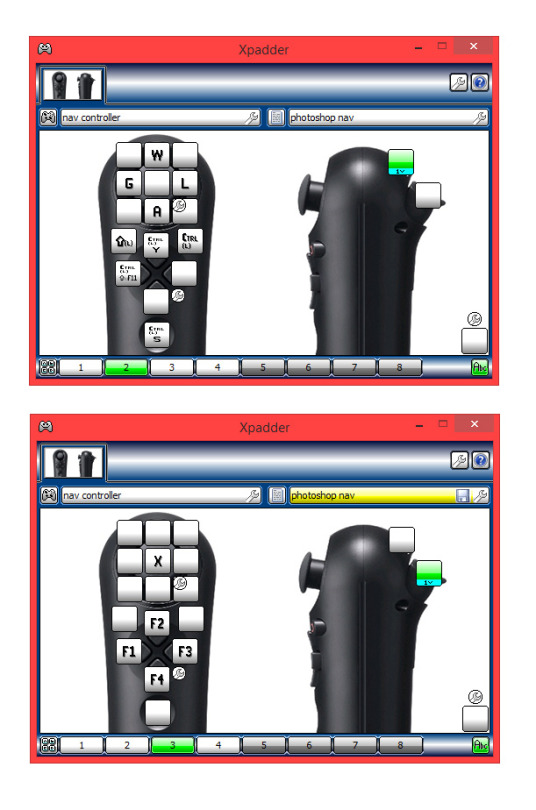
In each photo the green color above is the trigger I´m holding and the one below is the set that button brings up. You can see how it changes the mapping I have set.
And here is click by click how to set it up like that:
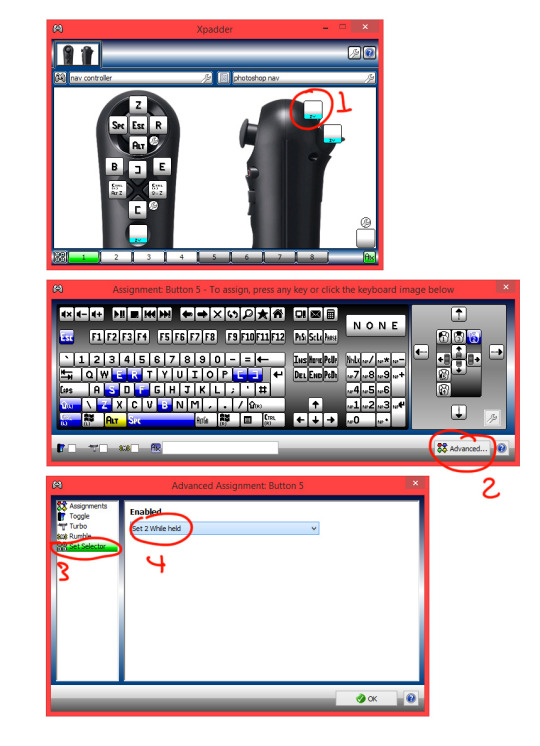
I also have the PS home button configured to change to set 4 (with the “two way” option in the advanced settings. Meaning: that one press of the button goes to set 4 and stays there, and if I press it again it returns to set 1) and there I map L1 to set 5 and L2 to set 6, which now gives me an insane amount of buttons to add shortcuts to. In addition, on the analog stick configuration settings (the little wrench icon on the lower right of the input mapping for that area) you can opt to have all directions as active, giving you 4 more buttons to map, that´s 9 buttons for just the stick.
So there you go.
This is something not many people know or think about doing…. I guess. So that is why I’m doing this “wannabe” tutorial for you all, is always cool to share shit like this, specially if its so simple but useful.
For all of those who suffer from back pain too, and all of you tired of your bulky-as-fuck keyboard, I hope this is of some use.
Now draw!
P.S.
Excuse me if I missed some stuff, or if you read it all and find it useless at the end, I ain’t too good explaining things.
But if you have any questions about any step or if you are stuck, feel free to message me.
Here is how to configure the PS button in case you wanna do that: https://buckteethsimulacra.tumblr.com/post/160422636892/here-is-how-to-properly-set-up-the-ps-home-button
I put it in a separate post ´cause this one is freaking long already.
#tutorial#scp#photoshop#ps3navcontroller#navcontroller#remote#remotecontrol#cintiq#remotecontroller#clipstudiopaint#tvpaint#controlremoto#ps3#controller#control#navigationcontroller#art#arttutorial#digitalart#scpdriver#wireless#wirelesscontrol#editing#xpadder#keyboard
0 notes
Text
HackingWithSwift Day 16/17/18
Project 1
class ViewController: UIViewController {
override func viewDidLoad() { super.viewDidLoad() // Do any additional setup after loading the view.
let fm = FileManager.default let path = Bundle.main.resourcePath! let items = try! fm.contentsOfDirectory(atPath: path)
for item in items { if item.hasPrefix("nssl") { // this is a picture to load! } } } }
Data type start with “UI” = from uikit
Can go to Preference -> Text Editing -> Show Line Number
============== Way to add auto layout > Go to the Editor menu and choose > Resolve Auto Layout Issues > Reset To Suggested Constraints. > Press Shift+Alt+Cmd+= to accomplish the same thing. > Manually
Large title “One of Apple’s design guidelines is the use of large titles – the text that appears in the gray bar at the top of apps. The default style is small text, which is what we’ve had so far, but with a couple of lines of code we can adopt the new design.” - by the author
navigationController?.navigationBar.prefersLargeTitles = true
0 notes
Text
Week 339.5: WWDC special
Happy Tuesday (at least in my timezone)! As promised, here’s the special WWDC20 edition of iOS Goodies! Same as last year, this won’t be following the usual pattern of the newsletter, but it will bring you up to date with the latest announcements from the first day of WWDC20. Here’s my summary of all the info I could process so far after the first day of WWDC20.
In iOS 14, we have a major home screen revamping, with App Library appearing after your last app page and organizing the apps by type, but also with the Widgets. Similar to the widgets from the Today View in purpose and appearance, they’re quite different under the hood. You can place them (almost) anywhere on your home screen, and you use WidgetKit to create them. There’s also a prebuilt widget gallery, the Smart Stack, which uses on-device machine learning to show the most relevant widget for that context. To create widgets, it seems you have to use SwiftUI.
App Clips were also announced, which, as far as I could figure out, are similar to the Android’s instant apps from some time ago: small parts of an app that can be used to perform a specific task (pay for parking, i.e.). They can be triggered by scanning specific QR codes, NFC tags or Safari App Banners. With both Widgets and App Clips, it’s probably more important than ever to make sure you use a modular architecture with reusable components.
Among the user-facing updates are a Messages redesign, a new Translate app which is integrated with Siri and works locally without the need of an internet connection, picture in picture, emoji search in the keyboard and customizable default apps for mail and web browser. Also, long pressing on the back button in a navigationController will now show all the screens in that navigation stack. It seems we’re also getting redesigned date and time pickers, as well as a color picker. And family subscriptions are now a thing: subscriptions can now be shared with the members of your Family Sharing group. StoreKit also got some updates, which should make working with in-app purchases easier. Here’s a list of all the updates coming to iOS 14. iOS 14 will be supported on iPhone 6S or newer.
iPadOS 14 is getting the same updates as iOS, even though it starts to look more and more like macOS, and it also gets Scribble, a feature that lets you input text by handwriting it with the Apple Pencil.
tvOS 14 wasn’t mentioned that much during the Keynote, and not at all (I think) during the Platforms State of the Union, but it also got a few updates: multiuser support for gaming, support for more controller, the possibility to connect two pairs of AirPods to the TV, HomeKit live camera feeds, and picture in picture.
In watchOS 7 we’re getting SwiftUI complications. Among the new user-facing features are handwashing detection, dance workouts and the much-expected sleep tracking. watchOS 7 is supported on Apple Watch Series 3 and newer.
The biggest focus during this first day was on the Mac and macOS, and that’s because Apple is moving away from Intel chips to their own Apple Silicon processors. But first, let’s talk a bit about macOS. The new update is macOS 11 Big Sur. Everything was redesigned, and it looks now a bit more like iPadOS. Besides the redesign, it also comes with faster Safari, updated Maps app (which seems to be Catalyst now), updated Messages app with threads and mentions in group conversations and widgets similar to the ones introduced on iOS. Also, the boot chime is back.
As for the Mac, it’s transitioning to Apple Silicon, Apple’s own processor line, it will come with Universal 2, a new universal binary file which contains the binaries for both architectures, it will use Rosetta 2 to allow existing apps to run on the new architecture and it will support iOS apps directly.
Some of the updates that impressed me the most were the privacy-related ones. When allowing an app to use your location, you can now only give it your broad location, instead of the precise one. And when an app asks for photo library access, you can only give it access to a few selected photos. Tracking is also affected by the new versions of Apple’s operating systems, as developers will now have to ask the user for permission before tracking them in the app, using the new AppTrackingTransparency framework. Soon you will need to provide details about your privacy practices in App Store Connect; the App Store will show what type of data an app can access. And last but not least, iOS will now show a visual indicator in the status bar when the camera or microphone are active, so the user will be aware of this.
SwiftUI also got some nice updates, and the best part is that they’re all additive changes: all the code written before will compile without the need of a migration. Paul Hudson already has an article out highlighting what’s new in SwiftUI for iOS 14.
But what about Xcode? Of course there’s new stuff in Xcode 12 too: bigger font in the navigation panel (and the possibility to customize it), there’s now a minimap in Interface Builder, it finally brings support for SVGs, better code completion and document tabs similar to VS Code.
Looking over the schedule of the videos for the rest of the week, there are some very interesting topics. Some that particularly stood out for me were the ones about collection views, especially about lists in collection views. Are we finally ready to deprecate UITableView?
Marius Constantinescu
0 notes
Text
Что такое трансфер и чем он отличается от такси?
New Post has been published on https://trskinfo.ru/2020/02/03/chto-takoe-transfer-i-chem-on-otlichaetsya-ot-taksi/
Что такое трансфер и чем он отличается от такси?

У многих путешественников, кто самостоятельно выбирает способ передвижения, возникает вопрос: в чем отличие такси от трансфера? Итак, для начала разберемся, что это за услуги.
Такси — это автомобиль для перевозки пассажиров, который оплачивается на основании показаний счетчика или установленной таксы.
Трансфер — это заранее забронированный автомобиль выбранного вами класса, с фиксированным тарифом и индивидуально подобранными удобствами. В трансфере согласованно с вами всё, вплоть до мелочей.
Преимущества трансфера
Трансфер подается заранее — Такси приезжает по мере того, как освободится ближайшая к вам машина, вне зависимости от того, делали ли вы заказ заранее или нет. Трансфер заказывается заранее, минимум за 24 часа, на сайте, где заполняется форма с подробным описанием того, что вы хотели бы получить. Менеджер транспортной компании уже знает номер рейса, которым вы прилетаете в аэропорт — такси уже ждет на стоянке, а водитель встречает вас так близко к зоне прилета, насколько позволяют правила. То же самое — для трансферов из отелей: встречающий будет ждать вас прямо на выходе из отеля — таково правило сервиса. Можно вызвать местное такси в аэропорт, но придется ждать машину, искать водителя, и у вас уйдет больше времени, как и в конце водитель может выставить неожиданный счет за уплату проезда.
Если нужно, в авто будет детское кресло — При заказе вам достаточно выбрать, сколько вам нужно детских кресел и для какого возраста. Водитель приедет на машине, укомплектованной для перевозки детей. Если на месте пытаться заказать такси в аэропорт и просить машину с одним-двумя детскими креслами, это не всегда будет возможным на Кипре.
Можно уехать с нестандартным багажом — Достаточно забронировать трансфер, указав в заявке, что у вас большое количество багажа или нестандартный багаж, например, оборудование. Заказ подтвердят только в том случае, если перевозчик найдет авто, в котором можно перевезти ваш багаж, иначе вы заранее будете знать, что в данном регионе мы не можем предоставить такой трансфер.
Машина того класса,который заказывали — Заказывая такси, вы не всегда можете быть спокойны насчет класса автомобиля, который приедет за вами. А вот с трансфером — 100% уверенность, что приедет именно тот автомобиль, который вы выбрали, чистый снаружи и внутри, без неприятных запахов. Вместительность известна заранее: сколько человек может уехать, для скольких сумок и чемоданов стандартных размеров есть место в багажнике.
Можно не разговаривать с водителем — Всё о поездке известно заранее, поэтому, если вы не знаете язык или просто не в настроении, можете не говорить почти ни слова. Встреча с табличкой, на которой написано имя пассажира, поможет найтись на месте, а остальное зафиксировано в ваучере. С обычным местным таксистом, возможно, придется спорить о том, сколько стоит такси из аэропорта — на незнакомом языке можно договориться и в два раза дороже.
Какой должен быть води��ель?
В первую очередь нужно отметить, что наша компания, оказывающая услуги трансфера, заботятся о безопасности пассажиров, поэтому у водителей чаще всего 8-часовой график работы. Соответственно, никакой усталости, вы можете быть спокойны, что водитель не уснет по дороге.
Во-вторых, это внешний вид. В компаниях есть обязательный дресс-код.
В-третьих, встретив вас с именной табличкой, водитель поможет донести багаж до автомобиля.
Правильное составление маршрута
В трансфере пункт назначения и все необходимые остановки в пути обговариваются заранее. Никаких «Ой, а можно тут остановить?» быть не может, если это не было согласовано с менеджером.
В отличие от такси, водитель трансфера действует исключительно по указаниям, полученным от менеджера. Кстати, какой бы путь ни выбрал водитель трансфера, на стоимости это никак не отразится.
С таксистом же, как повезет. Вполне может случиться и такое, что за задушевными беседами, которые чаще всего ведутся без ��ашего желания, вы можете и не заметить, что объехали чуть ли не весь город два раза, пока не наступит время «расплаты».
Такси в аэропорт по фиксированной цене
Цена трансфера обговаривается с менеджером компании и известна сразу. И, как уже говорилось, стоимость не поменяется, даже если водителю придется подождать вас в связи с задержкой рейса или выбрать более длинный путь в связи с пробкой, аварией и т.п.
Ну, а с таксистом не забалуешь: лишняя остановка, чуть длиннее путь, чуть дольше подождал — все эти непредвиденные обстоятельства скажутся на вашем кошельке.
Когда платить?
Трансфер можно оплатить заблаговременно, полностью или частично, чтобы не беспокоиться о наличных. Или самый удобный вариант для пассажиров, это оплата водителю после совершения услуги. При этом, как мы уже упоминали, сумму к оплате вы будете знать заранее, и она не поменяется. Наша компания принимает евро, доллар, фунт и турецкие лиры, а так же кредитные карты. Но об этом вам необходимо обозначить в резервации с вашим менеджером.
Таксисту же вы чаще всего платите по факту.
Оба способа хороши для того, чтобы быстро добраться до места. Разница лишь в вашем комфорте, надежности и уверенности, что всё пройдет, как запланировано.
Для бронирования комфортабельного трансфера по Кипру, вы можете заполнить форму онлайн или связаться с менеджером по телефону +90(533)889-9891 (Whatsapp, Viber, Telegram)
*Ваше имя фамилия
*Ваш e-mail
*Ваш телефон
Детали вашего трансфера
Номер рейса
Количество пассажиров
Дата и время трансфера
Откуда забираем?
Пожалуйста выберите местоположение на карте
(function($){ $(document).ready( function() var et_map = $( '#cf7-googlemap-pickuplocation' ), googleMap, googleMarker; var hasGeocode = 1; var hasPlaces = 1; var map_container = et_map.closest('.cf7-google-map-container'); var geocoder = null; if(hasGeocode) geocoder = new google.maps.Geocoder; var hasAddress = $('div.cf7-googlemap-address-fields', map_container).length>0, showAddress = false; var form = et_map.closest('form.wpcf7-form'); var address = $('input#address-pickuplocation', map_container ); var manual = $('input#manual-address-pickuplocation', map_container ); var autoLine =''; /*track automated values of line address*/ var $location_lat = $('#lat-pickuplocation', map_container); var $location_lng = $('#lng-pickuplocation', map_container); var $location_clat = $('#clat-pickuplocation', map_container); var $location_clng = $('#clng-pickuplocation', map_container); var $location_zoom = $('#zoom-pickuplocation', map_container); var $location = $('input#pickuplocation', map_container ); //address fields var countryField = $('input#country-pickuplocation', map_container ); var stateField = $('input#state-pickuplocation', map_container ); var cityField = $('input#city-pickuplocation', map_container ); var lineField = $('input#line-pickuplocation', map_container ); //var link = ' https://www.google.com/maps/search/?api=1&query='; function init() //scrollwheel: true, function fireMarkerUpdate(marker, e) $location_lat.val(marker.getPosition().lat()); $location_lng.val( marker.getPosition().lng()); $location.val( marker.getPosition().lat() + "," + marker.getPosition().lng() ); //console.log(marker); $location_zoom.val( marker.getMap().zoom); $location_clat.val( marker.getMap().getCenter().lat() ); $location_clng.val( marker.getMap().getCenter().lng() ); //reverse lookup the address if("true" == manual.val()) return; var latlng = lat: marker.getPosition().lat(), lng: marker.getPosition().lng(); if(hasGeocode) geocoder.geocode('location': latlng, function(results, status) if (status === 'OK') if (results[1]) //console.log(results); var geoAddress = results[1].formatted_address; address.val(geoAddress); if(showAddress) setAddressFields('', results[1].address_components); else address.val('Unknown location'); else window.alert('Google Geocoder failed due to: ' + status); ); var $map3 = et_map.gmap3( center : [$location_clat.val(), $location_clng.val()], zoom: parseInt($location_zoom.val()), mapTypeId: google.maps.MapTypeId.ROADMAP, mapTypeControl: true, navigationControl: true, streetViewControl: true ).marker( position : [$location_lat.val(), $location_lng.val()], icon : "https://trskinfo.ru/wp-content/plugins/cf7-google-map/assets/red-marker.png", draggable : true ).on('dragend', fireMarkerUpdate).then(function(result) googleMap = this.get(0); googleMarker = this.get(1); ); var markers = [googleMarker]; //locate the searched address var searchBox = null; if(hasPlaces) searchBox = new google.maps.places.SearchBox(address.get(0)); // Bias the SearchBox results towards current map's viewport. googleMap.addListener('bounds_changed', function() searchBox.setBounds(googleMap.getBounds()); ); // Listen for the event fired when the user selects a prediction and retrieve // more details for that place. searchBox.addListener('places_changed', function() var places = searchBox.getPlaces(); if (places.length == 0) return; // Clear out the old markers. markers.forEach(function(marker) marker.setMap(null); marker = null; ); markers = []; // For each place, get the icon, name and location. var bounds = new google.maps.LatLngBounds(); places.forEach(function(place) if (!place.geometry) console.log("Returned place contains no geometry"); return; var icon = url: 'https://trskinfo.ru/wp-content/plugins/cf7-google-map/assets/red-marker.png', ; // Create a marker for each place. var marker = $map3.marker( //new google.maps.Marker( draggable: true, icon: "https://trskinfo.ru/wp-content/plugins/cf7-google-map/assets/red-marker.png", title: place.name, position: place.geometry.location ).on('dragend', fireMarkerUpdate).then(function(result) markers.push(result); ); /** @since 1.3.2 fix search box results. */ $location.val(place.geometry.location.lat()+","+place.geometry.location.lng()); if(showAddress) setAddressFields('', place.address_components); //google.maps.event.addListener(marker, 'dragend', fireMarkerUpdate); //markers.push(marker); if (place.geometry.viewport) // Only geocodes have viewport. bounds.union(place.geometry.viewport); else bounds.extend(place.geometry.location); ); googleMap.fitBounds(bounds); ); //find the address from the marker position function setAddressFields(name, addressComponents) var idx, jdx, lineObj; var city, state, pin, country, line; var lineArr, cityArr, stateArr; lineArr = ['','','','']; cityArr = ['','','','','','']; stateArr = ['','','','','']; line=city=state=pin=country=''; if(''!= name) lineArr[0]=name; for(idx=0 ; idx<addressComponents.length ; idx++) lineObj = addressComponents[idx]; for(jdx=0; jdx<lineObj.types.length; jdx++) switch(lineObj.types[jdx]) case 'bus_station': case 'establishment': case 'point_of_interest': case 'transit_station': case 'premise': case 'subpremise': lineArr[0]= lineObj.long_name; break; case 'street_number': lineArr[1]= lineObj.long_name; break; case 'street_address': lineArr[2]= lineObj.long_name; break; case 'route': lineArr[3]= lineObj.long_name; break; case 'neighborhood': cityArr[0]= lineObj.long_name; break; case 'sublocality_level_5': cityArr[0]= lineObj.long_name; break; case 'sublocality_level_4': cityArr[1]= lineObj.long_name; break; case 'sublocality_level_3': cityArr[2]= lineObj.long_name; break; case 'sublocality_level_2': cityArr[3]= lineObj.long_name; break; case 'sublocality': if(jdx==lineObj.types.length) cityArr[4]= lineObj.long_name; break; case 'sublocality_level_1': cityArr[4]= lineObj.long_name; break; case 'locality': cityArr[5] = lineObj.long_name; break; case 'administrative_area_level_5': stateArr[0] = lineObj.long_name; break; case 'administrative_area_level_4': stateArr[1] = lineObj.long_name; break; case 'administrative_area_level_3': stateArr[2] = lineObj.long_name; break; case 'administrative_area_level_2': stateArr[3] = lineObj.long_name; break; case 'administrative_area_level_1': stateArr[4] = lineObj.long_name; break; case 'country': country = lineObj.long_name; case 'postal_code': pin = lineObj.long_name; //console.log("pin: "+pin); break; lineArr = $.unique(lineArr); cityArr = $.unique(cityArr); stateArr = $.unique(stateArr); for(idx=0; idx<lineArr.length;idx++) if(''!= lineArr[idx]) line += lineArr[idx]+", "; for(idx=0; idx<cityArr.length;idx++) if(''!= cityArr[idx]) city += cityArr[idx]+", "; for(idx=0; idx<stateArr.length;idx++) if(''!= stateArr[idx] && !~cityArr.indexOf(stateArr[idx])) state += stateArr[idx]+", "; /** @since 1.4.0 trigger address event */ var event = $.Event("update.cf7-google-map", 'address': 'line': line, 'city':city, 'state':state, 'pin':pin, 'country':country , bubbles: true, cancelable: true ); map_container.trigger(event); if(hasAddress) if(''!=pin) state = state + " " + pin; //set address fields autoLine = line; countryField.val(country); stateField.val(state); cityField.val(city); lineField.val(line); //if address line is manually changed, freeze the automated address lineField.on('change', function() if($(this).val() != autoLine) manual.val(true); ); //if the form contains jquery tabs, let's refresh the map form.on( "tabsactivate", function( event ) if( $.contains($(event.trigger),et_map) ) google.maps.event.trigger(et_map, 'resize'); ); //if the form contains jquery accordion, let's refresh the map form.on( "accordionactivate", function( event ) if( $.contains($(event.trigger),et_map) ) google.maps.event.trigger(et_map, 'resize'); ); if(et_map.is('.wpcf7-validates-as-required')) form.on('submit', function(event) if('' == $('input#lat-pickuplocation', form ).val() ) et_map.after('<span role="alert" class="wpcf7-not-valid-tip">The location is required.'); ); //set the width of the search field var map_width = et_map.css('width'); $('div.cf7-google-map-search', map_container).css('width','calc(' + map_width + ' - 10px)'); /*@since 1.2.0 init map once Post My CF7 Form has loaded.*/ var $cf7Form = et_map.closest('form.wpcf7-form'); if($cf7Form.is('.cf7_2_post form.wpcf7-form')) var id = $cf7Form.closest('.cf7_2_post').attr('id'); $cf7Form.on(id, function(event) init(); ); else init(); //on map resize et_map.resize(function() map_width = $(this).css('width'); $('div.cf7-google-map-search', map_container).css('width','calc(' + map_width + ' - 10px)'); google.maps.event.trigger(googleMap, 'resize'); ); //search button $('.cf7-google-map-search .dashicons-search', map_container).on('click', function() $(this).siblings('.cf7marker-address').show().val('').focus(); $(this).hide(); $(this).siblings('.dashicons-no-alt').show(); ); $('.cf7-google-map-search .dashicons-no-alt', map_container).on('click', function() $(this).closeCF7gmapSearchField(); ); ); $.fn.closeCF7gmapSearchField = function() $(this).siblings('.cf7marker-address').hide(); $(this).hide(); $(this).siblings('.dashicons-search').show(); )(jQuery)
Куда поедем?
Пожалуйста выберите местоположение на карте
(function($){ $(document).ready( function() var et_map = $( '#cf7-googlemap-pickupendlocation' ), googleMap, googleMarker; var hasGeocode = 1; var hasPlaces = 1; var map_container = et_map.closest('.cf7-google-map-container'); var geocoder = null; if(hasGeocode) geocoder = new google.maps.Geocoder; var hasAddress = $('div.cf7-googlemap-address-fields', map_container).length>0, showAddress = false; var form = et_map.closest('form.wpcf7-form'); var address = $('input#address-pickupendlocation', map_container ); var manual = $('input#manual-address-pickupendlocation', map_container ); var autoLine =''; /*track automated values of line address*/ var $location_lat = $('#lat-pickupendlocation', map_container); var $location_lng = $('#lng-pickupendlocation', map_container); var $location_clat = $('#clat-pickupendlocation', map_container); var $location_clng = $('#clng-pickupendlocation', map_container); var $location_zoom = $('#zoom-pickupendlocation', map_container); var $location = $('input#pickupendlocation', map_container ); //address fields var countryField = $('input#country-pickupendlocation', map_container ); var stateField = $('input#state-pickupendlocation', map_container ); var cityField = $('input#city-pickupendlocation', map_container ); var lineField = $('input#line-pickupendlocation', map_container ); //var link = ' https://www.google.com/maps/search/?api=1&query='; function init() //scrollwheel: true, function fireMarkerUpdate(marker, e) $location_lat.val(marker.getPosition().lat()); $location_lng.val( marker.getPosition().lng()); $location.val( marker.getPosition().lat() + "," + marker.getPosition().lng() ); //console.log(marker); $location_zoom.val( marker.getMap().zoom); $location_clat.val( marker.getMap().getCenter().lat() ); $location_clng.val( marker.getMap().getCenter().lng() ); //reverse lookup the address if("true" == manual.val()) return; var latlng = lat: marker.getPosition().lat(), lng: marker.getPosition().lng(); if(hasGeocode) geocoder.geocode('location': latlng, function(results, status) if (status === 'OK') if (results[1]) //console.log(results); var geoAddress = results[1].formatted_address; address.val(geoAddress); if(showAddress) setAddressFields('', results[1].address_components); else address.val('Unknown location'); else window.alert('Google Geocoder failed due to: ' + status); ); var $map3 = et_map.gmap3( center : [$location_clat.val(), $location_clng.val()], zoom: parseInt($location_zoom.val()), mapTypeId: google.maps.MapTypeId.ROADMAP, mapTypeControl: true, navigationControl: true, streetViewControl: true ).marker( position : [$location_lat.val(), $location_lng.val()], icon : "https://trskinfo.ru/wp-content/plugins/cf7-google-map/assets/red-marker.png", draggable : true ).on('dragend', fireMarkerUpdate).then(function(result) googleMap = this.get(0); googleMarker = this.get(1); ); var markers = [googleMarker]; //locate the searched address var searchBox = null; if(hasPlaces) searchBox = new google.maps.places.SearchBox(address.get(0)); // Bias the SearchBox results towards current map's viewport. googleMap.addListener('bounds_changed', function() searchBox.setBounds(googleMap.getBounds()); ); // Listen for the event fired when the user selects a prediction and retrieve // more details for that place. searchBox.addListener('places_changed', function() var places = searchBox.getPlaces(); if (places.length == 0) return; // Clear out the old markers. markers.forEach(function(marker) marker.setMap(null); marker = null; ); markers = []; // For each place, get the icon, name and location. var bounds = new google.maps.LatLngBounds(); places.forEach(function(place) if (!place.geometry) console.log("Returned place contains no geometry"); return; var icon = url: 'https://trskinfo.ru/wp-content/plugins/cf7-google-map/assets/red-marker.png', ; // Create a marker for each place. var marker = $map3.marker( //new google.maps.Marker( draggable: true, icon: "https://trskinfo.ru/wp-content/plugins/cf7-google-map/assets/red-marker.png", title: place.name, position: place.geometry.location ).on('dragend', fireMarkerUpdate).then(function(result) markers.push(result); ); /** @since 1.3.2 fix search box results. */ $location.val(place.geometry.location.lat()+","+place.geometry.location.lng()); if(showAddress) setAddressFields('', place.address_components); //google.maps.event.addListener(marker, 'dragend', fireMarkerUpdate); //markers.push(marker); if (place.geometry.viewport) // Only geocodes have viewport. bounds.union(place.geometry.viewport); else bounds.extend(place.geometry.location); ); googleMap.fitBounds(bounds); ); //find the address from the marker position function setAddressFields(name, addressComponents) var idx, jdx, lineObj; var city, state, pin, country, line; var lineArr, cityArr, stateArr; lineArr = ['','','','']; cityArr = ['','','','','','']; stateArr = ['','','','','']; line=city=state=pin=country=''; if(''!= name) lineArr[0]=name; for(idx=0 ; idx<addressComponents.length ; idx++) lineObj = addressComponents[idx]; for(jdx=0; jdx<lineObj.types.length; jdx++) switch(lineObj.types[jdx]) case 'bus_station': case 'establishment': case 'point_of_interest': case 'transit_station': case 'premise': case 'subpremise': lineArr[0]= lineObj.long_name; break; case 'street_number': lineArr[1]= lineObj.long_name; break; case 'street_address': lineArr[2]= lineObj.long_name; break; case 'route': lineArr[3]= lineObj.long_name; break; case 'neighborhood': cityArr[0]= lineObj.long_name; break; case 'sublocality_level_5': cityArr[0]= lineObj.long_name; break; case 'sublocality_level_4': cityArr[1]= lineObj.long_name; break; case 'sublocality_level_3': cityArr[2]= lineObj.long_name; break; case 'sublocality_level_2': cityArr[3]= lineObj.long_name; break; case 'sublocality': if(jdx==lineObj.types.length) cityArr[4]= lineObj.long_name; break; case 'sublocality_level_1': cityArr[4]= lineObj.long_name; break; case 'locality': cityArr[5] = lineObj.long_name; break; case 'administrative_area_level_5': stateArr[0] = lineObj.long_name; break; case 'administrative_area_level_4': stateArr[1] = lineObj.long_name; break; case 'administrative_area_level_3': stateArr[2] = lineObj.long_name; break; case 'administrative_area_level_2': stateArr[3] = lineObj.long_name; break; case 'administrative_area_level_1': stateArr[4] = lineObj.long_name; break; case 'country': country = lineObj.long_name; case 'postal_code': pin = lineObj.long_name; //console.log("pin: "+pin); break; lineArr = $.unique(lineArr); cityArr = $.unique(cityArr); stateArr = $.unique(stateArr); for(idx=0; idx<lineArr.length;idx++) if(''!= lineArr[idx]) line += lineArr[idx]+", "; for(idx=0; idx<cityArr.length;idx++) if(''!= cityArr[idx]) city += cityArr[idx]+", "; for(idx=0; idx<stateArr.length;idx++) if(''!= stateArr[idx] && !~cityArr.indexOf(stateArr[idx])) state += stateArr[idx]+", "; /** @since 1.4.0 trigger address event */ var event = $.Event("update.cf7-google-map", 'address': 'line': line, 'city':city, 'state':state, 'pin':pin, 'country':country , bubbles: true, cancelable: true ); map_container.trigger(event); if(hasAddress) if(''!=pin) state = state + " " + pin; //set address fields autoLine = line; countryField.val(country); stateField.val(state); cityField.val(city); lineField.val(line); //if address line is manually changed, freeze the automated address lineField.on('change', function() if($(this).val() != autoLine) manual.val(true); ); //if the form contains jquery tabs, let's refresh the map form.on( "tabsactivate", function( event ) if( $.contains($(event.trigger),et_map) ) google.maps.event.trigger(et_map, 'resize'); ); //if the form contains jquery accordion, let's refresh the map form.on( "accordionactivate", function( event ) if( $.contains($(event.trigger),et_map) ) google.maps.event.trigger(et_map, 'resize'); ); if(et_map.is('.wpcf7-validates-as-required')) form.on('submit', function(event) if('' == $('input#lat-pickupendlocation', form ).val() ) et_map.after('<span role="alert" class="wpcf7-not-valid-tip">The location is required.'); ); //set the width of the search field var map_width = et_map.css('width'); $('div.cf7-google-map-search', map_container).css('width','calc(' + map_width + ' - 10px)'); /*@since 1.2.0 init map once Post My CF7 Form has loaded.*/ var $cf7Form = et_map.closest('form.wpcf7-form'); if($cf7Form.is('.cf7_2_post form.wpcf7-form')) var id = $cf7Form.closest('.cf7_2_post').attr('id'); $cf7Form.on(id, function(event) init(); ); else init(); //on map resize et_map.resize(function() map_width = $(this).css('width'); $('div.cf7-google-map-search', map_container).css('width','calc(' + map_width + ' - 10px)'); google.maps.event.trigger(googleMap, 'resize'); ); //search button $('.cf7-google-map-search .dashicons-search', map_container).on('click', function() $(this).siblings('.cf7marker-address').show().val('').focus(); $(this).hide(); $(this).siblings('.dashicons-no-alt').show(); ); $('.cf7-google-map-search .dashicons-no-alt', map_container).on('click', function() $(this).closeCF7gmapSearchField(); ); ); $.fn.closeCF7gmapSearchField = function() $(this).siblings('.cf7marker-address').hide(); $(this).hide(); $(this).siblings('.dashicons-search').show(); )(jQuery)
Дополнительно
Путешествуют ли с вами маленькие дети? ДаНет
Если да, то укажите количество детей и их возраст
Предпочтение по оплате StgEuroDollarTLОплата картой
Другие предпочтения и пожелания
Дата резервации
#как заказать трансфер#кипр#ларнака#пафос#портал о северном кипре#Северный Кипр#такси#такси или трансфер#трансфер#трскинфо#эрджан
0 notes
Text
4 Day Camping Safari to Manyara and Ngorongoro

jQuery(document).ready( function() { jQuery("#map2").gmap3({ map: {options: {center: ,zoom: 12,mapTypeId: google.maps.MapTypeId.ROADMAP,mapTypeControl: true,navigationControl: true,scrollwheel: false,streetViewControl: true,draggable: true,}},marker:{values: }], options: {draggable: false }, }}); }); LAKE MANYARA, TARANGIRE AND NGORONGORO are one of the ultimate safari experiences in Africa, this is the mother of all parks. Safaris can range widely in cost – depending on how many days, how many people, the level of luxury you’re looking for and many other factors. Our safari vehicles with hatched roof for shade against sunny African wilderness; are extended body with roomy seats for comfortable sitting and stretching out legs. Every guest is accessible to window seat. Cars are also fitted with fridges, power charge sockets and VHF radio calls for easy and fast communication with base office. DAY 1: FULL DAY GAME DRIVE IN ARUSHA NATIONAL PARK. We depart from your hotel in Arusha. We go through Arusha National Park, where we view the herds of buffalo in the spectacular Ngurdoto Crater, the flamingos of the Momela Lakes, and the imposing peak of rugged Mount Meru. Arusha National park houses a variety of wildlife, including giraffe, zebra, colobus monkeys, leopards and hyenas, in the park’s small but bustling 53 square miles of natural habitats. Enjoy a picnic lunch while gazing at the rolling hills and wooded savannahs of this national treasure. At the end of the day, we return to your hotel in Arusha. Afternoon game drives through the park followed by dinner and overnight. Dinner and overnight at Mvuli hotel: Bed, Dinner and Breakfast. DAY 2: FULL DAY GAME DRIVE IN TARANGIRE NATIONAL PARK. Morning breakfast at Mvuli hotel, safari briefing and afterwards we depart for Tarangire National Park. Your first experience of safari will be the thrilling game drive through the vastness of Tarangire National Park, arrive in good time for lunch. Afternoon game drives through the park followed by dinner and overnight. Dinner and overnight at Fanaka lodge: Bed, Dinner, and Breakfast and Lunch. DAY 3: FULL DAY GAME DRIVE IN NGORONGORO CRATER. Today we visit the largest intact volcanic crater in the world, the magnificent Ngorongoro Crater. At more than 2,000 feet deep and 12 miles in diameter, the Ngorongoro Crater has one of the largest concentrations of wildlife in Africa. 30,000 animals make their home in this crater, making it an ideal place for sightings of the ‘big 5’ – lion, elephant, rhino, buffalo and leopard. We enjoy a picnic lunch in this truly world-class attraction, also known as the ‘8th Wonder of the World’. Our dinner and overnight stay is at the rustic Lake Manyara. Dinner and overnight at Fanaka lodge: Bed, Dinner, and Breakfast and Lunch. DAY 4: FULL DAY GAME DRIVE IN LAKE MANYARA NATIONAL PARK. We depart from your lodge proceed to Lake Manyara National Park. Although small in size, this park is one of the most diverse reserves in the country. Lake Manyara covers two thirds of the park. At the backdrop is the wall of the Great Rift Valley, before which lies the ground water forest, areas of open grassland near the lake foreshore, and the Soda Lake. We enjoy a picnic lunch in this area, which consists of open grassy areas, hot springs, dense woodlands and steep mountainsides. Lake Manyara National Park is a birding paradise that has more than 350 species of bird. The park is also famed for its unique and elusive tree- We will leave Lake Manyara National Park in Afternoon to Arusha, with prior arrangement to the Airport. SAFARI INCLUDES: Full board accommodation whilst on safari in the above mentioned en suite tented camps and lodges Private safari guide Private 4 x 4 safari jeep with pop up roof for game viewing Transfers in both directions between the International Airport Park fees Crater fees Airport Arrival/Departure Meet and Greets at the airport On safari – Vehicles equipped with ice chest with mineral water, wildlife guidebooks Government taxes, VAT and service charges relating to accommodation and included meals SAFARI EXCLUDES: Tanzania Visa: $50 per person on arrival, USA and CANADA passport holders USD.100 Personal Expenses (e.g. laundry, telephone, beverages, etc.) Meals not listed above Optional Tours (balloon rides USD. 500 per person etc) Tips and any items of personal nature. Read the full article
0 notes
Text
95% off #Full Swift 3 Course. From Dummy to Advance. Build 60+ Apps – $10
The Complete iOS Developer Course. Learn Full Swift Language from Scratch and become iOS Paid Professional from Beginner
Beginner Level, – 44.5 hours, 326 lectures
Average rating 4.4/5 (4.4 (78 ratings) Instead of using a simple lifetime average, Udemy calculates a course’s star rating by considering a number of different factors such as the number of ratings, the age of ratings, and the likelihood of fraudulent ratings.)
Course requirements:
You need only OS X (Mac) No pre knowledge required
Course description:
You’re here to learn every single point of iOS Development? You want to fill gaps in your knowledges? You want to learn Full Complete Swift 3 in one course? Maybe you already know something about Swift and iOS… but you want to write perfect, clear, smooth, BEST CODE.
YOU’RE IN THE RIGHT PLACE: If you start right now – you can create any app you have in your mind of any difficulty type in only 4 weeks.
WHY EXACTLY ME: My name’s Akhmed. I am the creator of most popular coding courses, like:
– Create Full Instagram Clone with Swift & Xcode
– Create Social App on Custom Backend with Swift, PHP, MySQL, HTML
I highly recommend this course. Ahmed Idigov does an absolutely fantastic job with this course. I have completed a few other related courses on Udemy that were good courses but Ahmed’s instruction really sets this course apart from others. In addition, this course is 100% up-to-date. Everything that Ahmed explained throughout the course worked just as he demonstrated. I especially appreciate this because I did not have to spend additional time on Google searching for answers. Great course! – J. Alvardo
Perfect course to get started with building a real apps. Ahmed explained all the features that every app needs. With Ahmed I start to earn money! I like his all courses! – M. Alrashidi
I PROMISE YOU:
I am working to enhance your knowledges and your experience of development. I promise, you will learn all coding aspects that never been shown in other courses or tutorials. I know what needs to be covered. If you don’t like it, I guarantee full money back!
Akhmed’s courses are very Good. It is better than all the other course I have tried! I like he is covering what others do not. Great Job! Thanks for your efforts! – M. Kayne
I though I knew enough about Swift. When I started to watch I realized that I did not know anything! Thank you very much for your great course! – J.J. Abrams!
I am fresh in development, but with Akhmed I already released my first app in App Store. Now it brings me good income! – D. Ather
Sign up today and you’ll get:
+45 hours content Full knowledges about iOS development Full Swift 3 Language Course Build +60 different apps Code and practice every element of iOS HD 1080p 7/24 hours live access to me Know all about development
If you’re ready to become an Advance in development, enroll right now and start to become a Real Professional of iOS Developer!
I was a courier, I did not have any programming knowledges. But now I became iOS Developer! Now I can realize any of my project alone. – P. Batista
I like how simply Akhmed is coding… without complication! I think even kid can understand him. Thanks for a great courses! – S. Spinoza
I suggest his courses to everyone who want learn everything about programming without wasting a time. – K. Sreedhar
From Dummy to Advance in 4 weeks
First Look at Swift Introduction to Xcode Hello World App Label Button TextField ImageView TextView Slider Switch Activity Indicator ProgressView Stepper DatePicker PickerView ScrollView All about Views AlertController ActionSheet All about Navigation ToolBar WebView Auto-Layout Pin Auto-Layout Align Alignment ViewController NavigationController TableViewController TableViewCell XIB & NIB Segues Customized TableView TableView Programmatically SearchBar CollectionViewController Customized CollectionView CollectionView Programmatically TabBar Segmented Control PageViewController PageControl ContainerView SplitViewController PickerController Tap Gesture Pinch Gesture Rotate Gesture Swipe Gesture Pan Gesture Edge Pan Gesture Long Press Gesture UserDefaults Global Variables and Constants Notifications JSON CoreData Working Files Custom Fonts All About Layers 3D Action Peak & Pop Controllers Media Player Maps Animation Custom Animated Segues and many many more
We start from basics to build up your confiden
Reviews:
“This course is a gem. The best iOS course for beginner in my opinion. It is even better than the highest rated iOS courses on udemy. I will surely have solid foundation to move on to the advance topics once i completed this course, definitely taking the other courses from Akhmed. Please add more content like working with camera, microphones, firebase etc.” (Harry Ng)
“pros: 1. very detail and go through almost all things cons: 1. accent is too heavy, sometimes i have to guess what he says 2. recording quality is poor, sometimes the noise make my ear hurt 3. dig deep is good, but some part i think it took too long and too much(like programmatically UI)” (Nplus chang)
“Talented and experienced teacher. Introducing a deeper look into each iOS Swift element, which is great if you want to become an advanced in iOS development.” (Alexey Gofman)
About Instructor:
Akhmed Idigov
Hello! My name is Akhmed! And I would love to teach you to programming. I have many years of development experience. I am watching a lot of tutorials everywhere, so I know what I should cover to bring you something new – more than just average knowledges. With me you will become professional developer. Get ready and go ahead together

Instructor Other Courses:
Create Social App on Custom Backend on Swift PHP MySQL HTML Akhmed Idigov, Head of Development (121) $10 $200 Create FULL INSTAGRAM Clone with Swift and Xcode. Be advance …………………………………………………………… Akhmed Idigov coupons Development course coupon Udemy Development course coupon Mobile Apps course coupon Udemy Mobile Apps course coupon Full Swift 3 Course. From Dummy to Advance. Build 60+ Apps Full Swift 3 Course. From Dummy to Advance. Build 60+ Apps course coupon Full Swift 3 Course. From Dummy to Advance. Build 60+ Apps coupon coupons
The post 95% off #Full Swift 3 Course. From Dummy to Advance. Build 60+ Apps – $10 appeared first on Udemy Cupón/ Udemy Coupon/.
from Udemy Cupón/ Udemy Coupon/ http://coursetag.com/udemy/coupon/95-off-full-swift-3-course-from-dummy-to-advance-build-60-apps-10/ from Course Tag https://coursetagcom.tumblr.com/post/156224673633
0 notes
Text
iOS App Grocery List (Swift 3.1, iOS10.3) from 0 to AppStore
iOS App Grocery List (Swift 3.1, iOS10.3) from 0 to AppStore
iOS, Swift, iOS App, Grocery, shopping What you’ll learn
How to build professional iOS App
We will build the app from 0 to Appstore!
Use of device camera
Save data to user defaults
Subclass UITableviewCell
TabBarController
NavigationController
UISearchBar
Auto layout
Object Oriented Programming
Save and retrieve data from database using JSON
Create custom classes
iOS Protocols
Debugging…
View On WordPress
0 notes
Text
Paytm Payment Integration in iOS using Swift Language
New Post has been published on http://blog.openwebsolutions.in/paytm-payment-integration-ios-swift-language/
Paytm Payment Integration in iOS using Swift Language
When you start working with PayTm Payment Integration, first of all, you have to know the basic idea of installing framework file manually. I recently worked on this process and faced some problem while installing the PodFile. That’s why I recommended you to install PaymentsSDK file from this link. Then follow these steps one by one.
Step 1: After successfully downloading, just drag and drop the .framework file into your swift project.
Step 2: After completing step 1, you need to add the framework into your target file that you can find here- YourProject(TARGET) >BuildPhrase >Link Binary With Libraries, after that check if it add into – YourProject(TARGET) >General >Linked Frameworks With Libraries, this directory or not. If not added then you can also do the same by clicking the “+” button. You can now use PaymentsSDK easily into your project’s each and every View Controller by using “import PaymentSDK” in header section in your swift file.
Step 3: If you find some error in step 2 then step 3 is for you otherwise you can proceed with the next step. When I have done this two-step, I found an error Like “PaymentSDK framework not found” after compiling. I suggest you simply two things to do to remove that error. First, enable your bit code by simply going to YourProject(TARGET) >Build Setting >Build Option >Enable Bitcode
and set it to Yes because here we are using that framework which is bitcode enabled. Forgot it if already set Yes and now add paymentSDK framework to the Other Linker Framework by going to YourProject(TARGET) >Build Setting >Linking >Other Liker Flags
add PaymentSDK framework file just like this,
now clean your project by simply using Cmd + Option + Shift + K and build it. I hope this gonna work perfectly.
Step 4: Now it’s time to dive into your code in your ViewController.swift file. Import PaymentSDK and create a delegate method of Payment “PGTransactionDelegate” because we are now using this delegate method to work with the payment procedure and in it two variable just like this,
var server = PGServerEnvironment()
var txnController = PGTransactionViewController()
After this, you need to write some code to navigate to transaction controller for payment procedure.
func beginPayment()
server = server.createProductionEnvironment()
let type :ServerType = .eServerTypeProduction
let order = PGOrder(orderID: “”, customerID: “”, amount: “”, eMail: “”, mobile: “”)
order.params = [“MID”: “rxazcv89315285244163”,
“ORDER_ID”: “order1”,
“CUST_ID”: “cust123”,
“MOBILE_NO”: “7777777777”,
“EMAIL”: “[email protected]”,
“CHANNEL_ID”: “WAP”,
“WEBSITE”: “WEBSTAGING”,
“TXN_AMOUNT”: “100.12”,
“INDUSTRY_TYPE_ID”: “Retail”,
“CHECKSUMHASH”: “oCDBVF+hvVb68JvzbKI40TOtcxlNjMdixi9FnRSh80Ub7XfjvgNr9NrfrOCPLmt65UhStCkrDnlYkclz1qE0uBMOrmuKLGlybuErulbLYSQ=”,
“CALLBACK_URL”: “https://securegw-stage.paytm.in/theia/paytmCallback?ORDER_ID=order1”]
self.txnController = self.txnController.initTransaction(for: order) as?PGTransactionViewController
self.txnController.title = “Paytm Payments”
self.txnController.setLoggingEnabled(true)
if(type != ServerType.eServerTypeNone)
self.txnController.serverType = type;
else
return
self.txnController.merchant = PGMerchantConfiguration.defaultConfiguration()
self.txnController.delegate = self
self.navigationController?.pushViewController(self.txnController, animated: true)
I assume that all merchant config and all params for this method are created from the backend side. The suggestion is to talk with your backend programmer and get understood that merchant configuration.
** Here you need to know something if you are working Stagging Environment then just change the
server = server.createStagingEnvironment()
** And if you do not use navigation controller don’t worry, you can present that payment page as a popup by creating an instance of navigationController, because Paytm not allow presenting that txnController. You need to modify that just like this :
let storyBoard: UIStoryboard = UIStoryboard(name: “Main”, bundle: nil)
let navigationController = storyBoard.instantiateViewController(withIdentifier: ReuseIdentifiers.identifierForNavigationVC) as! UINavigationController
navigationController.pushViewController(txnController, animated: true)
navigationController.modalTransitionStyle = .crossDissolve
txnController.delegate = self
self.present(navigationController, animated: true, completion: nil)
Step 5: After doing the previous step your last work remains to check whether the payment is successful or cancel or failed. If you want to check it then you need to perform some method from PGTransactionDelegate method those are :
//this function triggers when transaction gets finished
func didFinishedResponse(_ controller: PGTransactionViewController, response responseString: String)
let msg : String = responseString
var titlemsg : String = “”
if let data = responseString.data(using: String.Encoding.utf8)
do
if let jsonresponse = try JSONSerialization.jsonObject(with: data, options: .mutableContainers) as? [String:Any] , jsonresponse.count > 0
titlemsg = jsonresponse[“STATUS”] as? String ?? “”
catch
print(“Something went wrong”)
let actionSheetController: UIAlertController = UIAlertController(title: titlemsg , message: msg, preferredStyle: .alert)
let cancelAction : UIAlertAction = UIAlertAction(title: “OK”, style: .cancel)
action -> Void in
controller.navigationController?.popViewController(animated: true)
actionSheetController.addAction(cancelAction)
self.present(actionSheetController, animated: true, completion: nil)
//this function triggers when transaction gets cancelled
func didCancelTrasaction(_ controller : PGTransactionViewController)
controller.navigationController?.popViewController(animated: true)
//Called when a required parameter is missing.
func errorMisssingParameter(_ controller : PGTransactionViewController, error : NSError?)
controller.navigationController?.popViewController(animated: true)
Now you can do whatever you want into those function. I hope that this tutorial helps you a lot. Thanks for visiting our blog.
0 notes
Text
Web View iOS Tutorial
In this tutorial a web browser is created using the WKWebView object. A website will be loaded, where the title will be displayed and a refresh button will be added to the toolbar. This tutorial is made with Xcode 10 and built for iOS 12.
Open Xcode and create a new Single View App.
For product name, use IOSWebViewTutorial and then fill out the Organization Name and Organization Identifier with your customary values. Enter Swift as Language and choose Next.
Go to the Storyboard and select the View Controller. Go to the Editor menu and select Embed in -> Navigation Controller.
Go to the ViewController.swift file and import the WebKit module.
import WebKit
Add the webView property to the ViewController class
var webView: WKWebView!
Change the class declaration to implement the WKNavigationDelegate protocol.
class ViewController: UIViewController, WKNavigationDelegate {
Add the loadView method
override func loadView() { webView = WKWebView() webView.navigationDelegate = self view = webView }
The WKWebview is assigned to the root view and the view controller is a delegate of the WKNavigationDelegate protocol. Change the viewDidLoad method to
override func viewDidLoad() { super.viewDidLoad() // 1 let url = URL(string: "https://ioscreator.com")! webView.load(URLRequest(url: url)) // 2 let refresh = UIBarButtonItem(barButtonSystemItem: .refresh, target: webView, action: #selector(webView.reload)) toolbarItems = [refresh] navigationController?.isToolbarHidden = false }
The webView loads the url using an URLRequest object.
a refresh item is added to the toolbar which will refresh the current webpage.
Next, Implement the webView(_:didFinish:) delegate method
func webView(_ webView: WKWebView, didFinish navigation: WKNavigation!) { title = webView.title }
The title of the webpage will be displayed in the title bar when the website is loaded.
Build and Run the project.
You can download the source code of the IOSWebViewTutorial at the ioscreator repository on Github.
0 notes
Text
Office 365アイコン(imageMso)一覧(N)
[Office 365アイコン(imageMso)一覧(N)]
Office 365のデスクトップ版Officeアプリケーション(WordやExcelなど)のアイコン一覧を作成しました。
アルファベット別見出し NUM A B C D E F G H I J K L M N O P Q R S T U V W X Y Z N N NameCreateFromSelection NameDefine NameDefineMenu NamedMacroMenu NameIndent NameManager NamesOnly NamesUnderIcons NameUseInFormula NavBack NavDrillDown NavDrillUp NavForward NavigationBarInsert NavigationControl NavigationMenu Navigation…
View On WordPress
0 notes
Text
How To Make A UIViewController Transition Animation Like in the Ping App
Update note: This tutorial has been updated to Xcode 9/Swift 4 by Luke Parham. The original tutorial was written by Rounak Jain.
A while back, the makers of the anonymous social networking app Secret released an app called Ping, which allowed users to receive notifications about topics they were interested in.
One thing that stood out about Ping, aside from it’s unpredictable recommendations, was the circular transition between the main screen and the menu, as seen in the animation to the right.
Naturally, when you see something cool you want to see if you can figure out how they did it. Even if you’re some kind of nerd who doesn’t think that about every animation you see, you’ll get to learn a lot about view controller transition animations while exploring this animation.
In this tutorial, you’ll learn how to implement this cool animation in Swift using a UIViewController transition animation. In the process, you’ll learn about using shape layers, masking, the UIViewControllerAnimatedTransitioning protocol, the UIPercentDrivenInteractiveTransition class, and more.
Existing knowledge of view controller transition animations is useful, but not required for this tutorial. If you want an intro to the topic first, be sure to check out Custom UIViewController Transitions: Getting Started.
Strategizing
In Ping, the UIViewController transition animation happened when you went from one view controller to another.
In iOS, you can write custom transitions between view controllers by putting both view controllers inside a UINavigationController, and implementing iOS’s UIViewControllerAnimatedTransitioning protocol to animate the transition.
One thing to keep in mind before getting started is that you can implement these animations using any method you want, be it pop, UIView, UIKit Dynamics or the lower-level Core Animation APIs.
In this tutorial, you’ll be focusing on the standard UIView and Core Animation APIs.
Now that you know where the coding action happens, it’s time to think about how to actually implement the circle transition.
Just from looking, a good guess about the animation’s implementation goes something like:
There’s a circle that originates from the button on the top right; it acts as a viewport into the view that’s appearing.
The text of the view controller you’re leaving grows and animates offscreen to the left.
The text of the view controller you’re moving to grows and fades in from the right; within the visible space of the expanding circle.
Now that you know vaguely what you’re going for, it’s time to get started.
Getting Started
To begin, download the starter app. If you build and run you’ll see an app that’s been created to mirror the simple elegance of text on a colored background. Go ahead and do so and tap that circular button a few times.
As you can see, you’ve got a boring old default push and pop animation on your hands. My mom always told me I could do anything if I put my mind to it so now I’m telling you, you can make this transition better!
Navigation Controller Delegates
UINavigationController instances have a delegate property that can be any object that implements the UINavigationControllerDelegate protocol.
The other four methods in this protocol have to do with reacting to view controllers being shown and specifying which orientations are supported, but there are two methods that allow you to specify objects that are responsible for implementing custom transitions.
Before you get too carried away, you’ll want to make a new class that can take care of being this delegate for your app.
With the starter app open and the Pong group selected, press ⌘+N to start adding a new file. Choose Cocoa Touch Class from the options and click Next. Name the new class TransitionCoordinator and make sure it’s set to Subclass of: NSObject and Language: Swift. Hit Next and then Create.
This class needs to adhere to the UINavigationControllerDelegate protocol. Change the class definition line to:
class TransitionCoordinator: NSObject, UINavigationControllerDelegate {
So far so good, next you’ll implement the only delegate method you care about at the moment. Add the following method to TransitionCoordinator:
func navigationController(_ navigationController: UINavigationController, animationControllerFor operation: UINavigationControllerOperation, from fromVC: UIViewController, to toVC: UIViewController) -> UIViewControllerAnimatedTransitioning? { return nil }
All this method needs to do is look at which view controller it’s moving from, along with the one it’s moving to and return an appropriate animation object for the pair.
At the moment, you’re just returning nil which is what’s been happening all along by default. When a navigation controller asks for an animation controller for a certain transition and receives nil, it ends up using the default push and pop transitions you saw earlier.
You’ll come back to this class to return a proper animation controller object in a little bit.
In AppDelegate.swift add the following just below the window property declaration:
let transitionCoordinator = TransitionCoordinator()
This initializes a TransitionCoordinator and keeps a strong reference to it.
Now find the line where you’re hiding the navigation bar:
nav.isNavigationBarHidden = true
After this line, assign the TransitionCoordinator to be the navigation controller’s delegate with the following:
nav.delegate = transitionCoordinator
Build and run to confirm it runs. You won’t see anything new happening yet since the delegate is returning a nil animation.
Yeah, I know it’s boring, I told you!
The UIViewControllerAnimatedTransitioning Protocol
The “animation object” the TransitionCoordinator will return is just something that conforms to UIViewControllerAnimatedTransitioning.
Objects that conform to this protocol have a simple job. They only really need to implement two methods. The first is a method that returns how long the transition will take in seconds. The second is a method that takes in a context object with all the information it needs to actually perform the animation.
A really common pattern is to create the animation object and assign it the UINavigationControllerOperation argument if your transition looks different between pushing and popping.
In this case, you don’t actually need to do it; the transition is the same whether you’re pushing or popping so if you write it generically, it will just work regardless of the direction you’re going.
Now that you know what you need, it’s time to write a new class. Press ⌘+N again, make another Cocoa Touch Class and this time, name it CircularTransition.
The first thing you need to do with your new class is have it conform to the UIViewControllerAnimatedTransitioning protocol. To do so, just add it after the NSObject inheritance declaration like so:
class CircularTransition: NSObject, UIViewControllerAnimatedTransitioning {
Per usual, you’ll immediately be told that your class doesn’t conform to this protocol. Well you just tell Xcode to be cool, cause that’s exactly what you’re about to do!
First, add the method that specifies how long our animation is going to take.
func transitionDuration(using transitionContext: UIViewControllerContextTransitioning?) -> TimeInterval { return 0.5 }
This is the first method UIKit will call on your transition object after it’s been provided by the navigation controller delegate. Here you’re just saying that this transition should take around half a second to complete.
Next, add an empty definition of the actual animation method that you’ll come back to later.
func animateTransition(using transitionContext: UIViewControllerContextTransitioning) { //make some magic happen }
This is where you’ll receive a transition context object that will have all the information you’ll need to write your animation code.
Head back over to TransitionCoordinator.swift and replace the current nil return statement with something a little more useful:
return CircularTransition()
Here, you’re telling the navigation controller that you’re sick of that boring push and pop transition it keeps trying to use and you’ve got something better in mind. Internally, UIKit will take this UIViewControllerAnimatedTransitioning object and use it to drive the animations for all transitions that occur for this navigation controller from now on.
It is pretty awesome that this is open to you, but remember, with great power, comes a lot of work. So head back to CircularTransition.swift and brace yourself for the real work!
The CircleTransitionable Protocol
If you’ve ever tried writing one of these transitions, you’ve probably figured out that it’s really easy to write code that digs into internal view controller state and feels generally “smelly”. Instead, you’ll define exactly what the view controller needs to provide up front and let any view controller that wishes to animate this way provide access to these views.
Add the following protocol definition at the top of CircularTransition.swift, before the class definition:
protocol CircleTransitionable { var triggerButton: UIButton { get } var contentTextView: UITextView { get } var mainView: UIView { get } }
This protocol defines the information you’ll need from each view controller in order to successfully animate things.
The triggerButton will be the button the user tapped.
The contentTextView will be the text view to animate on or offscreen.
The mainView will be the main view to animate on or offscreen.
Next, go to ColoredViewController.swift and make it conform to your new protocol by replacing the definition with the following.
class ColoredViewController: UIViewController, CircleTransitionable {
Luckily, this view controller already defines both the triggerButton and contentTextView so it’s already close to ready. The last thing you’ll need to do is add a computed property for the mainView property. Add the following immediately after the definition of contentTextView:
var mainView: UIView { return view }
Here, all you had to do was return the default view property of the view controller.
The project contains a BlackViewController and WhiteViewController that display the two views in the app. Both are subclasses of ColoredViewController so you’ve officially set up both classes to be transitionable. Congrats!
Animating the Old Text Away
At long last, it’s time to do some actual animating!
Navigate back to CircularTransition.swift and add the following guard statement to animateTransition(transitionContext:).
guard let fromVC = transitionContext.viewController(forKey: .from) as? CircleTransitionable, let toVC = transitionContext.viewController(forKey: .to) as? CircleTransitionable, let snapshot = fromVC.mainView.snapshotView(afterScreenUpdates: false) else { transitionContext.completeTransition(false) return }
Here you’re making sure you have access to all the major pieces of the puzzle. The transitionContext allows you to grab references to the view controllers you’re transitioning between. You cast them to CircleTransitionable so you can later access their main views and text views.
snapshotView(afterScreenUpdates:) returns a snapshotted bitmap of fromVC.
Snapshot views are a really useful way to quickly grab a disposable copy of a view for animations. You can’t animate individual subviews around, but if you just need to animate an entire hierarchy without having to put things back when you’re done then a snapshot is an ideal solution.
In the else clause of your guard you’re calling completeTransition() on the transitionContext. You pass false to tell UIKit that you didn’t complete the transition and that it shouldn’t move to the next view controller.
After the guard, grab a reference to the container view the context provides.
let containerView = transitionContext.containerView
This view is like your scratchpad for adding and removing views on the way to your final destination.
When you’re done animating, you’ll have done the following in containerView:
Removed the fromVC‘s view from the container.
Added the toVC‘s view to the destination with subviews configured as they should be on appearance.
Add the following at the bottom of animateTransition(transitionContext:):
containerView.addSubview(snapshot)
To animate the old text offscreen without messing up the actual text view’s frame, you’ll animate a the snapshot.
Next, remove the actual view you’re coming from since you won’t be needing it anymore.
fromVC.mainView.removeFromSuperview()
Finally, add the following animation method below animateTransition(transitionContext:).
func animateOldTextOffscreen(fromView: UIView) { // 1 UIView.animate(withDuration: 0.25, delay: 0.0, options: [.curveEaseIn], animations: { // 2 fromView.center = CGPoint(x: fromView.center.x - 1300, y: fromView.center.y + 1500) // 3 fromView.transform = CGAffineTransform(scaleX: 5.0, y: 5.0) }, completion: nil) }
This method is pretty straightforward:
You define an animation that will take 0.25 seconds to complete and eases into its animation curve.
You animate the view’s center down and to the left offscreen.
The view is blown up by 5x so the text seems to grow along with the circle that you’ll animate later.
This causes the text to both grow and move offscreen at the same time. The magic numbers probably seem a bit arbitrary, but they came from playing around and seeing what felt best. Feel free to tweak them yourself and see if you can come up with something you like better.
Add the following to the bottom of animateTransition(transitionContext:):
animateOldTextOffscreen(fromView: snapshot)
You pass the snapshot to your new method to animate it offscreen.
Build and run to see your masterpiece so far.
OK, so it’s still not all that impressive, but this is how complex animations are done, one small building block at a time.
Note: There is still one warning in CircularTransition.swift. Don’t worry; you will fix it soon!
Fixing the Background
One annoying thing that’s immediately noticeable is that since the entire view is animating away, you’re seeing a black background behind it.
This black background is the containerView and what you really want is for it to look like just the text is animating away, not the entire background. To fix this, you’ll need to add a new background view that doesn’t get animated.
In CircularTransition.swift, go to animateTransition(using:). After you grab a reference to the containerView and before you add the snapshotView as a subview, add the following code:
let backgroundView = UIView() backgroundView.frame = toVC.mainView.frame backgroundView.backgroundColor = fromVC.mainView.backgroundColor
Here you’re creating the backgroundView, setting its frame to be full screen and its background color to match that of the backgroundView.
Then, add your new background as a subview of the containerView.
containerView.addSubview(backgroundView)
Build and run to see your improved animation.
Much better.
The Circular Mask Animation
Now that you’ve got the first chunk done, the next thing you need to do is the actual circular transition where the new view controller animates in from the button’s position.
Start by adding the following method to CircularTransition:
func animate(toView: UIView, fromTriggerButton triggerButton: UIButton) { }
This will complete the circular transition – you’ll implement it shortly!
In animateTransition(using:), add the following after animateOldTextOffscreen(fromView:snapshot):
containerView.addSubview(toVC.mainView) animate(toView: toVC.mainView, fromTriggerButton: fromVC.triggerButton)
This adds your final view to the containerView and will animate it – once you’ve implemented the animation!
Now you have the skeleton for the circular transition. However, the real keys to making this animation work are understanding the handy CAShapeLayer class along with the concept of layer masking.
CAShapeLayer
CAShapeLayers are a special class of CALayer that, instead of always rendering as a square, can have their shape defined by first defining a bezier path and then assigning that path to the layer’s path property.
In this case, you’ll define two bezier paths and animate between them.
Add the following logic to the method you added earlier, animate(toView:triggerButton:):
// 1 let rect = CGRect(x: triggerButton.frame.origin.x, y: triggerButton.frame.origin.y, width: triggerButton.frame.width, height: triggerButton.frame.width) // 2 let circleMaskPathInitial = UIBezierPath(ovalIn: rect)
This creates a bezier path that defines a small circular window into the content, starting at the location of the triggerButton.
You created a:
rect similar to the button’s frame, but with an equal width and height.
bezier path oval from the rect which results in a circle.
Next, create a circle representing the ending state of the animation. Since you’ll only be able to see content inside of the circle, you don’t want any edge of the circle to still be visible by the end of the animation. Add the following below the code you just added:
// 1 let fullHeight = toView.bounds.height let extremePoint = CGPoint(x: triggerButton.center.x, y: triggerButton.center.y - fullHeight) // 2 let radius = sqrt((extremePoint.x*extremePoint.x) + (extremePoint.y*extremePoint.y)) // 3 let circleMaskPathFinal = UIBezierPath(ovalIn: triggerButton.frame.insetBy(dx: -radius, dy: -radius))
Here’s what this does:
Defines a point that’s the full screen’s height above the top of the screen.
Calculates the radius of your new circle by using the Pythagorean Theorem: a² + b² = c².
Creates your new bezier path by taking the current frame of the circle and “insetting” it by a negative amount in both directions, thus pushing it out to go fully beyond the bounds of the screen in both directions.
Now that you’ve got your bezier paths set up, it’s time to actually put them to work. Still in animate(toView:triggerButton:), add:
let maskLayer = CAShapeLayer() maskLayer.path = circleMaskPathFinal.cgPath toView.layer.mask = maskLayer
This creates a CAShapeLayer layer and sets its path to the circular bezier path. maskLayer is then used as a mask for the destination view.
But wait a second, how exactly do masks work?
CALayer Masking
In general, a mask with an alpha value of 1 shows the layer content underneath, while an alpha value of 0 hides content beneath. Anything in-between partially reveals the layer’s content. Here’s a diagram to explain this:
Basically, you can think of whatever shape you can see as being the shape that’ll be cut out so you can see things underneath. Everything else will end up being hidden. With these bezier paths, the pixels inside the circle have an alpha of 1.0 while the parts outside the bounds of the circle are clear, and therefore make it so you can’t see the masked view at those points.
Now that you’ve got all this set up, the only thing left to do is actually animate between the two circular masks. The tricky thing is, so far you’ve only done UIView animations, but those don’t work for CALayers.
Animations with Core Animation
In this situation, you’ve hit a point where the UIView animation abstraction can no longer help you and you need to drop back down a level.
This was bound to happen sooner or later, but don’t worry, the API is super straightforward. It’s also good to understand since UIView animations are really just CATransactions under the hood anyway.
In contrast to the closure based API of UIView animations, Core Animation animations use an object based approach. This too is an abstraction that breaks down into a CATransaction under the hood, which is actually true for pretty much any view-related thing you do.
Still in animate(toView:triggerButton:), create a CABasicAnimation object that will perform the animation.
let maskLayerAnimation = CABasicAnimation(keyPath: "path")
Here, you create an animation object and tell it that the property that will be animated is the path property. This means you’ll animate the rendered shape.
Next, set the from and to-values for this animation.
maskLayerAnimation.fromValue = circleMaskPathInitial.cgPath maskLayerAnimation.toValue = circleMaskPathFinal.cgPath
Here, you’re using the two bezier paths you previously created to define the two states your layer should animate between.
The last thing you have to do to configure the animation is tell the object how long to run. Add the following line to do so:
maskLayerAnimation.duration = 0.15
In this case, the animation will run for 0.15 seconds.
Instead of using completion blocks like UIView animations, CAAnimations use a delegate with callbacks to signal completion. While you don’t technically require one for this animation, you’ll implement the delegate to better understand it.
Start by adding the following line:
maskLayerAnimation.delegate = self
This class is now the animation object’s delegate.
Go to the bottom of the file and add this class extension to conform to the CAAnimationDelegate protocol.
extension CircularTransition: CAAnimationDelegate { func animationDidStop(_ anim: CAAnimation, finished flag: Bool) { } }
When this animation is complete, you can officially call this whole animation a success. In this callback you want to call completeTransition() on the context object you received at the beginning of the animation.
Unfortunately, this highlights one annoying thing about having to use this delegate callback. To get access to the context object you’ll have to save off a reference to it at the beginning of the main animation method.
First, go to the top of CircularTransition and add:
weak var context: UIViewControllerContextTransitioning?
Then, go to the line after the guard statement in animateTransition(transitionContext:) and save the incoming context for later.
context = transitionContext
Now, go back to animationDidStop(anim:finished:) in the extension and add the following line:
context?.completeTransition(true)
You’re now notifying the system when the animation completes successfully.
Now that you’ve got your animation object all set up, just add it to the maskLayer. Add the following line at the end of animate(toView:triggerButton:).
maskLayer.add(maskLayerAnimation, forKey: "path")
Once again you need to specify that you intend to animate the path of the maskLayer. Once you’ve added an animation to a layer, it will automatically start.
Build and run to see your almost completely finished transition!
The Finishing Touches
For the sake of completeness, you’ll add one more small animation to the transition. Instead of the circle just growing to reveal the destination view controller, you’ll also have the destination view’s text fade-in from the right.
Compared to the last animation, this one’s a breeze. Go to the bottom of the CircularTransition class definition and add the following method:
func animateToTextView(toTextView: UIView, fromTriggerButton: UIButton) { }
Add the following lines to this new method:
let originalCenter = toTextView.center toTextView.alpha = 0.0 toTextView.center = fromTriggerButton.center toTextView.transform = CGAffineTransform(scaleX: 0.1, y: 0.1)
Here, you’re setting the starting state of toTextView. You set its alpha to 0, center it with the trigger button, and scale it to 1/10th its normal size.
Next, add the following UIView animation.
UIView.animate(withDuration: 0.25, delay: 0.1, options: [.curveEaseOut], animations: { toTextView.transform = CGAffineTransform(scaleX: 1.0, y: 1.0) toTextView.center = originalCenter toTextView.alpha = 1.0 }, completion: nil)
Here you’re just undoing everything you just did to animate your text view back to the center, to its full size with a quick fade in.
Finally, add the following call to the bottom of animateTransition(transitionContext:).
animateToTextView(toTextView: toVC.contentTextView, fromTriggerButton: fromVC.triggerButton)
You’re providing animateToTextView with the toVC text view and the fromVC button. Now, it’ll complete the text view animation alongside your other transition animations.
Build and run one final time to have a transition that closely mimics that of the original Ping app!
Where to Go From Here?
To download the completed Pong app, click here.
To see the official Apple documentation for UIViewController transition animation, check out Customizing the Transition Animations in the View Controller Programming Guide for iOS.
Hopefully you enjoyed this tutorial and feel a little more confident about trying to replicate other animations you’ve seen in the wild.
If you’re interested in learning more, feel free to check out our beginning and intermediate animation video courses as well as our full book, iOS Animations by Tutorials.
If you have questions, comments or would like to show off your own cool animations, please join the discussion below!
The post How To Make A UIViewController Transition Animation Like in the Ping App appeared first on Ray Wenderlich.
How To Make A UIViewController Transition Animation Like in the Ping App published first on http://ift.tt/2fA8nUr
0 notes
Text
Shoppy | iOS Universal eCommerce App Template (Swift) - Ecommerce Bests
Shoppy | iOS Universal eCommerce App Template (Swift) – Ecommerce Bests
[ad_1] Both iOS and Android version can share the same Parse database Jan 30th 2017 • Removed the 2 NavigationControllers that were causing a warning message in XCode • Added Facebook Login button in the Login controller in Storyboard, and its relative code in Login.swift, Info.plist and AppDelegate.swift • Updated the User Guide • Added the following .framework files: FBSDKCoreKit.framework…
View On WordPress
#app#Bests#buyer#ecommerce#Facebook#finder#fun#ios#shop#Shoppy#social#store#Swift#template#Twitter#Universal
0 notes
Text
4 DAY MOUNT MERU TREKKING

jQuery(document).ready( function() { jQuery("#map2").gmap3({ map: {options: {center: ,zoom: 12,mapTypeId: google.maps.MapTypeId.ROADMAP,mapTypeControl: true,navigationControl: true,scrollwheel: false,streetViewControl: true,draggable: true,}},marker:{values: }], options: {draggable: false }, }}); }); Mount Meru is the best for acclimatization prior to Kilimanjaro climb. The Mountain is the third highest peak in Africa and is the second highest mountain in Tanzania at 4,568m. The mountain is located within Arusha National Park, Tanzania’s gem. This prime location gives climbers the chance to spot some of wildlife.. The price per person is $1250, the price varies depending on group sizes. DAY 1: ARRIVE IN TANZANIA. Arrive anytime at Kilimanjaro International Airport (JRO). We will arrange a private transfer from Kilimanjaro International Airport (JRO) to Arusha Safari Lodge, where the rest of the day is at leisure. We stay at Arusha Safari Lodge, which is beautifully located on the slope of Mt. Meru and is a perfect place to prepare for your adventure. We will gather in the hotel for a pre-climb briefing and an equipment check. We will also confirm you have the appropriate mandatory medical coverage and travel insurance. Dinner and overnight at Arusha Safari Lodge: Bed, dinner and Breakfast-included. DAY 2: MERIAKAMBA HUT (FULL BOARD) We drive from Arusha to Momela Gate. After a short registration at the Gate our walk will begin with full armed ranger escorting us, simply we can see along the way the wild animals including elephants, zebras, and giraffe , monkeys, antelope, and often elephants along the route. Dinner and overnight night at Miriakamba Hut. Elevation (m): (1,387 m to (1,500 m) Elevation(ft): 4,921 ft) to 3,000 ft ) Distance: 10 km Hiking Time: 4-6 hours Habitat: Montane Forest. DAY 3: SADDLE HUT (FULL BOARD) The walk from Miriakamba Hut to the saddle below Little Meru is a short day but a steep climb. The walk will take us slowly along the ridge for a spectacular view of the Meru Crater and the impressive Ash Cone. After hot lunch at Saddle Hut we can make a short climb to the summit of Little Meru (3,820m) for superb views just before sunset. Dinner and overnight night at Saddle Hut Elevation(m): 2,514 m to 3,570 m Elevation(ft): 8,250 ft to 11,712 ft Distance: 8 km Hiking Time: 3-5 hours Habitat: Forest and Moorland. DAY 4: SUMMIT DAY (FULL BOARD) We start early at around 1:30 a.m. to climb steeply to Rhino Point (3,800 m.) and on to Cobra Point (4350m). We reach the summit (4,566 m) on time for sunrise there is a possibility to see Kilimanjaro Peak above the clouds. The final part of the climb is along a spectacular narrow ridge line between the sheer inner cliffs and the sloping outer wall of the crater. We take a short rest and brunch at Saddle Hut before continuing the descent to the Meriakamba Hut. Elevation (m): 3,570 m to 4,565m to 2,514m Elevation (ft): 14,977ft to 11,712 ft to 8,250ft Distance: 5 km up 13 km down Hiking Time: 10 – 12 hours Habitat: Alpine Desert Moorland and Montane forest. DAY 5: MERIAKAMBA HUT TO MOMELLA GATE TO ARUSHA (FULL BOARD) We take a short and fast descent way through open grassland and mixed forest, with possibility of seeing wildlife before reaching Momella Gate in the late morning. The returning transfer will be waiting at Momella gate to pickup you to Arusha at Safari Lodge. Elevation(m): 2,514 m to 1,500 m to 1,387 m Elevation(ft): 4,921 ft to 8,250 ft to 4,921ft Distance: 10 km Hiking time: 2-4 hours Habitat: Montane Forest Dinner and overnight at Arusha Safari Lodge: Bed, dinner and Breakfast-included. DAY 6: DEPART ARUSHA (NONE) Arusha to Kilimanjaro International Airport, private departure transfer is included. PRICE ABOVE INCLUDES: • 2 Nights accommodation in Arusha or Moshi and three meals a day while on the Mountain. • Private professional mountain guides • All Park fees • Rescue fees • All meals while on the Mountain • Arrival and Departure transfers • Guides, Porters, cook salaries and park fees • Pulse Oximeters • Walking Poles • First aid supplies • Flying Doctor Service NOT EXCLUDES: • Tanzania Visa: $50 per person on arrival • Personal Expenses (e.g. laundry, telephone, beverages, etc.) • Meals not listed above • Optional Tours (short safari after your climb etc) • Tips and any items of personal nature. Read the full article
0 notes
Link
0 notes