#navcontroller
Explore tagged Tumblr posts
Visit Tumblr Blog
Explore Tumblr blogs with no restrictions, modern design and the best experience.
Last Seen Tumblr Blogs


Fun Fact
Celebrities use Tumblr as well.
Text
Conducción Más Inteligente: Cómo NAVSAT Está Transformando La Gestión De Flotas en Costa Rica
Bienvenidos al episodio de hoy, donde exploramos el mundo de la gestión de flotas y la tecnología inteligente con una mirada más cercana a NAVSAT, un proveedor líder de soluciones GPS con sede en Costa Rica. Ya seas un gerente logístico, propietario de un negocio o simplemente alguien interesado en cómo la tecnología está transformando el transporte, este episodio es para ti. Obtenga más información: https://navsat.com/
#gestión de flotas#mapas gps garmin#flotas gps#navcontrol control de rutas y actividades#control de vehiculos por gps#administración de flotillas#aplicaciones para personal de campo#mapasgpsgarmin#rastreo gps#monitoreo del comportamiento de conducción
0 notes
Text
EDGE Awarded Contract to Deliver Counter-UAS Systems to UAE Ministry of Defence
EDGE Group, one of the world’s leading advanced technology and defence groups, has announced a contract to deliver several robust, multi-layered counter-unmanned aerial systems (C-UAS) to the UAE Ministry of Defence (MoD) in a significant move towards reinforcing the UAE’s national security. Announced at the Unmanned Systems Exhibition and Conference (UMEX) 2024, the contract includes the delivery of SIGN4L’s advanced SKYSHIELD C-UAS and NAVCONTROL-G systems. The state-of-the-art C-UAS provide a high degree of situational awareness and soft-kill capabilities against unmanned aerial threats, enabling the comprehensive protection of critical infrastructure and border integrity.
EDGE Group, one of the world’s leading advanced technology and defence groups, has announced a contract to deliver several robust, multi-layered counter-unmanned aerial systems (C-UAS) to the UAE Ministry of Defence (MoD) in a significant move towards reinforcing the UAE’s national security. Announced at the Unmanned Systems Exhibition and Conference (UMEX) 2024, the contract includes the…

View On WordPress
0 notes
Text
NavControl TFT Controller for AcquaLink® & OceanLink® - Black
Features:
Color: Black
NavControl TFT Controller
Specifically for AcquaLink® and OceanLink®
This product may not be returned to the original point of purchase. Please contact the manufacturer directly with any issues or concerns.
0 notes
Text
Here is how to properly set up the PS home button.
Note: For those who don´t know what this is all about; this is part II of a tutorial I did on how to set up a PS3 Nav controller on the PC in order to be used with Photoshop, Clipstudio Paint or whatever.
Here it is: https://buckteethsimulacra.tumblr.com/post/160422447952/so-i-decided-to-make-a-tutorial
Xppader does not recognize the PS button as an actual button ( ´cause windows detects the controller as it was the Xbox 360 one, and Xppader for some reason doesn´t detects that specific button, I think the issue is in the Xbox driver itself)
……but there is a way around. Basically what you do is map the PS button to a different one using the SCP profile manager that comes with the SCP latest driver.
Look in the ScpServer folder where the ScpDriver.exe is (the folder you used to install the driver) there should be a file called “ScpMonitor.exe” Open it. Assuming you have the latest Scp update, that application is used to check the status of the controller as well as the battery charge, it should open on the right side of your task bar.
So, right click on it -> profile manager. A menu will open with a picture of a PS4 controller
Now click on the + symbol. a box will open, now name your profile and then click on where it says DS3button (more precisely on the …. on the right)
Click add. On “name” select PS. And on “value” select R1. Click accept.
Then click save then activate (very important)……and that´s it, you can test it right there, whenever you press the PS button it will input R1
Now Xpadder should recognize the PS as R1 (you have to add the input in Xpadder first, just like you added all of the other buttons) and that´s it!
Here it is click by click:


Feel free to message me if you have any trouble.
#scpdriver#scp#xpadder#navcontroller#psnav#tutorial#photoshop#clipstudio#remotecontroller#remotecontrol#bluetooth#wireless#wirelesscontroller#remote#photoshopremote#shortcuts#keyboard
0 notes
Text
How can the navigation component benefit in enhancing the Android experience?
How can the navigation component benefit in enhancing the Android experience?
The popularity of the Android platform has made significant businesses adapt it for their mobile app development venture to reach a bigger user base. Diving deeper into the technical aspects of Android, it had been a tedious experience in the past to switch between fragments inside any activity. Coding for the fragment switching and controlling the back stack involves serious struggle from the development point of view. Implementing it in the wrong way could lead to critical issues like “Illegal State Exception”. For making the navigation aspects smoother, there has been the emergence of the Navigation Component from Google. It has not only eased the coding of fragment navigations but also managed aspects like back stack, exceptions, etc.
Navigation Component:
Navigation is the movement of users across several sections in the content piece of the app in successive steps. To ease the coding experience for developers, Android engineers introduced a new navigation aspect that aids in easing complex navigation interactions. This Navigation component provides a simple solution to developer issues related to the navigation activities in the android app development.
The Android Jetpack navigation component has several exciting aspects that aid the easy implementation of navigations. This could range from highly complex navigations like navigation drawers or simple patterns like buttons. The Navigation component not only consists of a complete set of libraries but also guides with a strong framework of in-app navigations. If the app developers are following these simple navigation principles, then they can successfully offer a consistent experience to the app users.
The Navigation component includes 3 important parts.
Read More Blogs:
How to Develop a Video Conferencing App like Zoom
Navigation graph:
It is the XML file that consists of all the key information related to the navigation aspect in one place. Being the latest resource type, it has all the precise content aspects in the app termed as a destination along with all the types of patterns that users can traverse via the app. All kinds of navigation paths are included in the Navigation graph with clear screen visualizations. These screens are the actual fragments and are termed as destinations. There are exclusive actions present between the destinations that describe the paths that users will employ for navigation.
NavHost:
NavHost is an empty container that shows the destinations via the navigation graph. The Navigation component has an integrated NavhostFragment that will showcase the possible fragment destinations.
NavController:
The Nav Controller is an object that controls the app navigation inside a Nav Host. It will write the exchange process of destination content inside the Nav host along with the user movement via the app.
Exclusive advantages of Navigation Component:
Managing transactions related to fragments.
Offering consistent resources for various transitions and animations.
Default corrections for managing up and back movements.
Deep linking implementation and managing.
Implementation of several complex navigation UI aspects with simple tasks.
Providing View Model Support via navigation graph for sharing UI-related data through Navgraph destinations.
Principles of Android Navigation:
Navigation has some standard principles with a motive to offer an intuitive and steady user experience for their creative Android app development project. The development of the Navigation component is done for implementing the in-built principles by default.
The important preliminary destination in any kind of app is the key aspect for users. This will be the starting screen and the last screen as the users will move from one screen to another inside the app employing the UP button.
Managing the back stack: As the user navigates from various fragments inside the app, there will be the maintenance of a back stack. This back stack aids in navigating the user to the right destination from the source as they move Up or Back. There are some crucial points to be noted in this regard as below:
The current destination will be existing at the highest position in the stack.
The start destination will exist at the lowest position in the stack.
Fresh destinations will be moved to the top of the stack.
The Current destination is eliminated from the stack while going back.
The aid of deep linking initializes manual navigation between the fragments. Regardless of employing manual navigation to a specific screen or deep linking, the back stack is settled inside those screens. Hence, if you have employed deep linking to navigate to a specific screen, as you go back, the identical back stack will be employed when you perform manual navigations to that screen.
The Back and Up buttons perform almost in the same manner with the only difference of the up button employed for only in-app navigations. Up button must not be displayed in the starting app screen since it will not allow out of the app navigation. The back button will allow this activity to the app screen that will exist lower in the navigation ladder.
Read More Blogs:
ludo game development cost in india
Wrapping up:
Navigation is an important aspect of the android app for both users and developers making it to be existing with swift and steady patterns. Reliable navigation will offer the user uninterrupted movements without any hiccups. The use of the Navigation component in the android app development venture will aid in easy navigations and data passing through the fragments. There will be automatic movement of a few important aspects which were tough to be managed with the traditional fragment management system. The Navgraph, Navhoist, and Navcontroller aid in handling several fragment transitions inside any kind of android app. It will eliminate the annoying element in managing a large number of custom programs for the app developers in all those activities when taking care of fragments. There will be a decreased burden in developing fragment transition handling to take minimal time in developing the app. If you want to effectively make use of the Navigation component to develop a user-friendly app, then associate with a leading mobile app development company in Bangalore like Brillmindz Technologies. The app developers are well versed with all the latest technological innovations in Android, and deliver user-friendly products that are profitable in the long run.
0 notes
Text
IDEX 2021: SIGN4L introduces new counter drone technology for fixed or mobile applications
IDEX 2021: SIGN4L introduces new counter drone technology for fixed or mobile applications
SIGN4L, a division of the Electronic Warfare & Intelligence cluster at EDGE, launched a radio frequency (RF) communication jamming system called V-Protect, and a specialised counter-drone device called NavControl-G, at the IDEX 2021 exhibition in Abu Dhabi this week. V-Protect is an advanced mobile active and reactive high-power jammer system aimed at helping block common terrestrial RF signal…

View On WordPress
#Airspace#Airspace management#C-UAS#Counter drone#Counter UAS#Counter UAS tender#Drone#Drone operator#Drone supplier#DroneNews#Drones#DronesToday#UAS#UAS news#UAS tender#UAS traffic management#UAV#unmanned#unmanned air systems#UTM#UTM news
0 notes
Text
What’s New in Navigation 2020
Posted by Jeremy Woods, Software Engineer, Android UI Toolkit
The latest versions of the Jetpack Navigation library (2.2.0 and 2.3.0) added a lot of requested features and functionality, including dynamic navigation, navigation back stack entries, a library for navigation testing, additional features for deep linking, and more. Let’s go over the most important changes, see what problems they solve, and learn how to use them!
Dynamic Navigation
We’ve updated Navigation to simplify adding dynamic feature modules for your application.
Previously, implementing navigation between destinations defined in dynamic feature modules required a lot of work. Before you could navigate to the first dynamic destination, you needed to add the Play Core library and the Split Install API to your app. You also needed to check for and download the dynamic module. Once downloaded, you could then finally navigate to the destination. On top of this, if you wanted to have an on-screen progress bar for the module being downloaded, you needed to implement a SplitInstallManager listener.
To address this complexity, we created the Dynamic Navigator library. This library extends the functionality of the Jetpack Navigation library to provide seamless installation of on-demand dynamic feature modules when navigating. The library handles all Play Store interaction for you, and it even includes a progress screen that provides the download status of your dynamic module.
The default UI for showing a progress bar when a user navigates to a dynamic feature for the first time. The app displays this screen as the corresponding module downloads
id=“imgCaption”>
To use dynamic navigation, all you need to do is:
Change instances of NavHostFragment to DynamicNavHostFragment
Add an app:moduleName attribute to the destinations associated with a DynamicNavHostFragment
For more information on dynamic navigation, see Navigate with dynamic feature modules and check out the samples.
NavBackStackEntry: Unlocked
When you navigate from one destination to the next, the previous destination and its latest state is placed on the Navigation back stack. If you return to the previous destination by using navController.popBackBack(), the top back stack entry is removed from the back stack with its state still intact and the NavDestination is restored. The Navigation back stack contains all of the previous destinations that were needed to arrive at the current NavDestination.
We manage the destinations on the Navigation back stack by encapsulating them into the NavBackStackEntry class. NavBackStackEntry is now public. This means that users can go a level deeper than just NavDestinations and gain access to navigation-specific ViewModels, Lifecycles, and SavedStateRegistries. You can now properly scope data sharing or ensure it is destroyed at the appropriate time.
See Navigation and the back stack for more information.
NavGraph ViewModels
Since a NavBackStackEntry is a ViewModelProvider, you can create a ViewModel to share data between destinations at the NavGraph level. Each parent navigation graph of all NavDestinations are on the back stack, so your view model can be scoped appropriately:
val viewModel: MyViewModel by navGraphViewModels(R.id.my_graph)
For more information on navGraph scoped view models, see Share UI-related data between destinations with ViewModel
Returning a Result from a destination
By combining ViewModel and Lifecycle, you can share data between two specific destinations. To do this, NavBackStackEntry provides a SavedStateHandle, a key-value map that can be used to store and retrieve data, even across configuration changes. By using the given SavedStateHandle, you can access and pass data between destinations. For example to pass data from destination A to destination B:
In destination A:
override fun onViewCreated(view: View, savedInstanceState: Bundle?) { val navController = findNavController(); // We use a String here, but any type that can be put in a Bundle is supported navController.currentBackStackEntry?.savedStateHandle?.getLiveData<String>("key")?.observe( viewLifecycleOwner) { result -> // Do something with the result. } }
And in destination B:
navController.previousBackStackEntry?.savedStateHandle?.set("key", result)
See Returning a result to the previous Destination for more details.
Testing your Navigation Flow
Previously, the recommended testing solution for Navigation was Mockito. You would create a mock NavController and verify that navigate() was called at the appropriate time with the correct parameters. Unfortunately, this solution was not enough to test certain areas of Navigation flow, such as ViewModel interaction or the Navigation back stack. The Navigation Library now offers a well-integrated solution for these areas with the Navigation Testing library.
The Navigation Testing library adds TestNavHostController, which gives access to the Navigation back stack in a test environment. This means that you can now verify the state of the entire back stack. When using the TestNavHostController, you can set your own LifecycleOwner, ViewModelStoreOwner, and OnBackPressDispatcher by using the APIs given by NavHostController. By setting these components, you can test them in the context of navigation.
For example, here’s how to test a destination that uses a nav graph-scoped ViewModel:
val navController = TestNavHostController(ApplicationProvider.getApplicationContext()) // This allows fragments to use by navGraphViewModels() navController.setViewModelStore(ViewModelStore()) navController.setGraph(R.navigation.main_nav)
The TestNavHostController also lets you set the current destination. You can move the test directly to the use case being tested without the need to set it up using navigate() calls. This is extremely convenient for writing tests for different navigation scenarios.
When setting the current destination, you might do something like the following:
val navController = TestNavHostController(ApplicationProvider.getApplicationContext()) navController.setGraph(R.navigation.main_nav) navController.setCurrentDestination(R.id.destination_1)
Remember that when setting the current destination, that destination must be part of your nav graph.
For more information about TestNavHostController, see the Test Navigation docs.
Nav Deep Linking
Deep linking allows you to navigate directly to any destination no matter where you currently are in the NavGraph. This can be very useful for launching your app to a specific destination or jumping between destinations that would otherwise be inaccessible to one another.
When navigating using a deep link, you can now provide deep link query parameters in any order and even leave them out altogether if they have been given a default value or have been made nullable. This means that if you have provided default values for all of the query parameters on a deep link, the deep link can match a URL pattern without including any query parameters.
For example, www.example.com?arg1={arg1}&arg2={arg2} will now match with www.example.com as long as arg1 and arg2 have default values and/or are nullable.
Deep links can also be matched using intent actions and MIME types. Instead of requiring destinations to match by URI, you can provide the deep link with an action or MIME type and match with that instead. You can specify multiple match types for a single deep link, but note that URI argument matching is prioritized first, followed by action, and then mimeType.
You create a deep link by adding it to a destination in XML, using the Kotlin DSL, or by using the Navigation Editor in Android Studio.
Here’s how to add a deep link to a destination using XML:
<fragment android:id="@+id/a" android:name="com.example.myapplication.FragmentA" tools:layout="@layout/a"> <deeplink app:url="www.example.com" app:action="android.intent.action.MY_ACTION" app:mimeType="type/subtype"/> </fragment>
Here’s how to add the same deep link using the Kotlin DSL:
val baseUri = "http://www.example.com/" fragment<MyFragment>(nav_graph.dest.a) { deepLink(navDeepLink { uriPattern = "${baseUri}" action = "android.intent.action.MY_ACTION" mimeType = "type/subtype" }) }
You can also add the same deep link using the Navigation Editor in Android Studio versions 4.1 and higher. Note that you must also be using the Navigation 2.3.0-alpha06 dependency or later.
Adding a deep link to a destination in the Navigation Editor
id=“imgCaption”>
To navigate to a destination using a deep link, you must first build a NavDeepLinkRequest and then pass that deep link request into the Navigation controller’s call to navigate():
val deepLinkRequest = NavDeepLinkRequest.Builder .fromUri(Uri.parse("http://www.example.com")) .setAction("android.intent.action.MY_ACTION") .setMimeType("type/subtype") .build() navController.navigate(deeplinkRequest)
For more information on deep links, visit Create a deep link for a destination, as well as the deep linking sections in Navigate to a destination and Kotlin DSL.
Navigation Editor
Android Studio 4.0 includes new features for the Navigation Editor. You can now edit your destinations using a split pane view. This means you can edit the XML or design and see the changes in real time.
Viewing a navigation.xml file in split view mode
id=“imgCaption”>
In Android Studio 4.1, the Navigation Editor introduced the component tree. This allows you to traverse the entire nav graph, freely going in and out of nested graphs.
Navigating through a graph in the Navigation Editor
id=“imgCaption”>
Additional Changes
NavigationUI can now use any layout that uses the Openable interface. This means that it is no longer limited to DrawerLayout and allows for customization of the AppBarConfiguration. You can provide your Openable and use it as the layout instead.
Navigation also provides support for Kotlin DSL. Kotlin DSL can be used to create different destinations, actions, or deep links. For more information see the documentation for Kotlin DSL.
Wrap up
Navigation added lots of useful features over the past year. You can simplify your dynamic feature modules by taking advantage of the Dynamic Navigator library, use a NavBackStackEntry to help correctly scope your data, easily test your navigation flow using the TestNavHostController, or even match your deep link using intent actions and/or MIME types.
For more information about the Jetpack Navigation library, check out the documentation at https://developer.android.com/guide/navigation
Please provide feedback (or file bugs) using the Navigation issuetracker component.
What’s New in Navigation 2020 published first on https://phonetracking.tumblr.com/ What’s New in Navigation 2020 published first on https://leolarsonblog.tumblr.com/
0 notes
Text
What’s New in Navigation 2020
Posted by Jeremy Woods, Software Engineer, Android UI Toolkit
The latest versions of the Jetpack Navigation library (2.2.0 and 2.3.0) added a lot of requested features and functionality, including dynamic navigation, navigation back stack entries, a library for navigation testing, additional features for deep linking, and more. Let’s go over the most important changes, see what problems they solve, and learn how to use them!
Dynamic Navigation
We’ve updated Navigation to simplify adding dynamic feature modules for your application.
Previously, implementing navigation between destinations defined in dynamic feature modules required a lot of work. Before you could navigate to the first dynamic destination, you needed to add the Play Core library and the Split Install API to your app. You also needed to check for and download the dynamic module. Once downloaded, you could then finally navigate to the destination. On top of this, if you wanted to have an on-screen progress bar for the module being downloaded, you needed to implement a SplitInstallManager listener.
To address this complexity, we created the Dynamic Navigator library. This library extends the functionality of the Jetpack Navigation library to provide seamless installation of on-demand dynamic feature modules when navigating. The library handles all Play Store interaction for you, and it even includes a progress screen that provides the download status of your dynamic module.
The default UI for showing a progress bar when a user navigates to a dynamic feature for the first time. The app displays this screen as the corresponding module downloads
To use dynamic navigation, all you need to do is:
Change instances of NavHostFragment to DynamicNavHostFragment
Add an app:moduleName attribute to the destinations associated with a DynamicNavHostFragment
For more information on dynamic navigation, see Navigate with dynamic feature modules and check out the samples.
NavBackStackEntry: Unlocked
When you navigate from one destination to the next, the previous destination and its latest state is placed on the Navigation back stack. If you return to the previous destination by using navController.popBackBack(), the top back stack entry is removed from the back stack with its state still intact and the NavDestination is restored. The Navigation back stack contains all of the previous destinations that were needed to arrive at the current NavDestination.
We manage the destinations on the Navigation back stack by encapsulating them into the NavBackStackEntry class. NavBackStackEntry is now public. This means that users can go a level deeper than just NavDestinations and gain access to navigation-specific ViewModels, Lifecycles, and SavedStateRegistries. You can now properly scope data sharing or ensure it is destroyed at the appropriate time.
See Navigation and the back stack for more information.
NavGraph ViewModels
Since a NavBackStackEntry is a ViewModelProvider, you can create a ViewModel to share data between destinations at the NavGraph level. Each parent navigation graph of all NavDestinations are on the back stack, so your view model can be scoped appropriately:
val viewModel: MyViewModel by navGraphViewModels(R.id.my_graph)
For more information on navGraph scoped view models, see Share UI-related data between destinations with ViewModel
Returning a Result from a destination
By combining ViewModel and Lifecycle, you can share data between two specific destinations. To do this, NavBackStackEntry provides a SavedStateHandle, a key-value map that can be used to store and retrieve data, even across configuration changes. By using the given SavedStateHandle, you can access and pass data between destinations. For example to pass data from destination A to destination B:
In destination A:
override fun onViewCreated(view: View, savedInstanceState: Bundle?) { val navController = findNavController(); // We use a String here, but any type that can be put in a Bundle is supported navController.currentBackStackEntry?.savedStateHandle?.getLiveData<String>("key")?.observe( viewLifecycleOwner) { result -> // Do something with the result. } }
And in destination B:
navController.previousBackStackEntry?.savedStateHandle?.set("key", result)
See Returning a result to the previous Destination for more details.
Testing your Navigation Flow
Previously, the recommended testing solution for Navigation was Mockito. You would create a mock NavController and verify that navigate() was called at the appropriate time with the correct parameters. Unfortunately, this solution was not enough to test certain areas of Navigation flow, such as ViewModel interaction or the Navigation back stack. The Navigation Library now offers a well-integrated solution for these areas with the Navigation Testing library.
The Navigation Testing library adds TestNavHostController, which gives access to the Navigation back stack in a test environment. This means that you can now verify the state of the entire back stack. When using the TestNavHostController, you can set your own LifecycleOwner, ViewModelStoreOwner, and OnBackPressDispatcher by using the APIs given by NavHostController. By setting these components, you can test them in the context of navigation.
For example, here's how to test a destination that uses a nav graph-scoped ViewModel:
val navController = TestNavHostController(ApplicationProvider.getApplicationContext()) // This allows fragments to use by navGraphViewModels() navController.setViewModelStore(ViewModelStore()) navController.setGraph(R.navigation.main_nav)
The TestNavHostController also lets you set the current destination. You can move the test directly to the use case being tested without the need to set it up using navigate() calls. This is extremely convenient for writing tests for different navigation scenarios.
When setting the current destination, you might do something like the following:
val navController = TestNavHostController(ApplicationProvider.getApplicationContext()) navController.setGraph(R.navigation.main_nav) navController.setCurrentDestination(R.id.destination_1)
Remember that when setting the current destination, that destination must be part of your nav graph.
For more information about TestNavHostController, see the Test Navigation docs.
Nav Deep Linking
Deep linking allows you to navigate directly to any destination no matter where you currently are in the NavGraph. This can be very useful for launching your app to a specific destination or jumping between destinations that would otherwise be inaccessible to one another.
When navigating using a deep link, you can now provide deep link query parameters in any order and even leave them out altogether if they have been given a default value or have been made nullable. This means that if you have provided default values for all of the query parameters on a deep link, the deep link can match a URL pattern without including any query parameters.
For example, www.example.com?arg1={arg1}&arg2={arg2} will now match with www.example.com as long as arg1 and arg2 have default values and/or are nullable.
Deep links can also be matched using intent actions and MIME types. Instead of requiring destinations to match by URI, you can provide the deep link with an action or MIME type and match with that instead. You can specify multiple match types for a single deep link, but note that URI argument matching is prioritized first, followed by action, and then mimeType.
You create a deep link by adding it to a destination in XML, using the Kotlin DSL, or by using the Navigation Editor in Android Studio.
Here's how to add a deep link to a destination using XML:
<fragment android:id="@+id/a" android:name="com.example.myapplication.FragmentA" tools:layout="@layout/a"> <deeplink app:url="www.example.com" app:action="android.intent.action.MY_ACTION" app:mimeType="type/subtype"/> </fragment>
Here's how to add the same deep link using the Kotlin DSL:
val baseUri = "http://www.example.com/" fragment<MyFragment>(nav_graph.dest.a) { deepLink(navDeepLink { uriPattern = "${baseUri}" action = "android.intent.action.MY_ACTION" mimeType = "type/subtype" }) }
You can also add the same deep link using the Navigation Editor in Android Studio versions 4.1 and higher. Note that you must also be using the Navigation 2.3.0-alpha06 dependency or later.
Adding a deep link to a destination in the Navigation Editor
To navigate to a destination using a deep link, you must first build a NavDeepLinkRequest and then pass that deep link request into the Navigation controller's call to navigate():
val deepLinkRequest = NavDeepLinkRequest.Builder .fromUri(Uri.parse("http://www.example.com")) .setAction("android.intent.action.MY_ACTION") .setMimeType("type/subtype") .build() navController.navigate(deeplinkRequest)
For more information on deep links, visit Create a deep link for a destination, as well as the deep linking sections in Navigate to a destination and Kotlin DSL.
Navigation Editor
Android Studio 4.0 includes new features for the Navigation Editor. You can now edit your destinations using a split pane view. This means you can edit the XML or design and see the changes in real time.
Viewing a navigation.xml file in split view mode
In Android Studio 4.1, the Navigation Editor introduced the component tree. This allows you to traverse the entire nav graph, freely going in and out of nested graphs.
Navigating through a graph in the Navigation Editor
Additional Changes
NavigationUI can now use any layout that uses the Openable interface. This means that it is no longer limited to DrawerLayout and allows for customization of the AppBarConfiguration. You can provide your Openable and use it as the layout instead.
Navigation also provides support for Kotlin DSL. Kotlin DSL can be used to create different destinations, actions, or deep links. For more information see the documentation for Kotlin DSL.
Wrap up
Navigation added lots of useful features over the past year. You can simplify your dynamic feature modules by taking advantage of the Dynamic Navigator library, use a NavBackStackEntry to help correctly scope your data, easily test your navigation flow using the TestNavHostController, or even match your deep link using intent actions and/or MIME types.
For more information about the Jetpack Navigation library, check out the documentation at https://developer.android.com/guide/navigation
Please provide feedback (or file bugs) using the Navigation issuetracker component.
What’s New in Navigation 2020 published first on https://phonetracking.tumblr.com/
0 notes
Text
Por Qué Toda Empresa de Entregas Necesita una Solución GPS con Conciencia Climática
En el competitivo mundo de la logística y los servicios de entrega, cada minuto cuenta. Las expectativas de los clientes respecto a entregas puntuales y precisas nunca han sido tan altas, y cualquier retraso—por mínimo que sea—puede afectar la satisfacción, la reputación y los ingresos. Aunque muchas empresas ya han adoptado el rastreo por GPS para optimizar sus operaciones, existe una necesidad creciente de sistemas más inteligentes que consideren una variable crítica: el clima.
Rutas de entrega que parecen óptimas sobre el papel pueden volverse ineficientes o incluso peligrosas cuando se presentan condiciones climáticas adversas. La lluvia, la niebla, las tormentas y el calor o frío extremos pueden retrasar a los conductores, dañar mercancías e incrementar el consumo de combustible. Aquí es donde entra en juego la tecnología GPS con conciencia climática.
La Influencia del Clima en la Logística de Entregas
El clima adverso afecta directamente los tiempos de entrega y la seguridad del conductor. Cierres de carreteras por inundaciones, visibilidad reducida durante neblina intensa y caminos resbaladizos por lluvia o hielo pueden ralentizar u obstaculizar completamente las operaciones. Un sistema GPS convencional puede seguir sugiriendo la ruta más corta a través de una zona afectada por una tormenta, sin considerar los riesgos y demoras asociadas.
Los sistemas GPS con conciencia climática toman en cuenta datos meteorológicos en tiempo real, ayudando a las empresas a evitar problemas antes de que ocurran. Estos sistemas analizan pronósticos y condiciones actuales, ajustando proactivamente las rutas para evitar zonas potencialmente peligrosas o congestionadas. Esto no solo asegura entregas puntuales, sino que también reduce los riesgos de accidentes y el estrés de los conductores.
Rutas Proactivas Basadas en Datos Meteorológicos en Vivo
La integración de datos climáticos en vivo en los sistemas GPS representa un avance significativo para las empresas de entrega. Al planificar una ruta, el sistema revisa los patrones climáticos esperados y las condiciones de las carreteras. Si se está formando una tormenta en el trayecto, el sistema puede recomendar una ruta alternativa, aunque sea ligeramente más larga, para mantener la confiabilidad de la entrega.
Este enfoque proactivo reemplaza la logística reactiva, en la cual los retrasos se abordan después de que ocurren. Con la tecnología adecuada, los gerentes logísticos ahora pueden prevenir demoras ajustando los horarios de entrega o redirigiendo vehículos con anticipación.
Reducción de Combustible y Costos Mediante una Navegación Más Inteligente
Operar durante condiciones climáticas adversas no solo afecta el tiempo: también impacta la eficiencia del combustible. Los vehículos consumen más combustible en tráfico lento, frenando con frecuencia o al estar detenidos en filas debido a bloqueos por el clima. Al evitar rutas afectadas, los vehículos mantienen velocidades constantes y enfrentan menos paradas, lo que reduce el consumo de combustible y el desgaste mecánico.
Además, menos retrasos significan menos horas en carretera, lo que se traduce en costos operativos más bajos en general. Para flotas grandes, incluso pequeñas mejoras en eficiencia pueden generar ahorros significativos a largo plazo.
Mejorando la Confianza del Cliente con Tiempos de Entrega Más Precisos
Una de las mayores ventajas del GPS con conciencia climática es su aporte a estimaciones más precisas del tiempo de llegada (ETA). Los clientes hoy en día esperan visibilidad sobre sus entregas y notificaciones rápidas si ocurre algún retraso. Cuando el clima se toma en cuenta en tiempo real, las empresas pueden proporcionar ventanas de entrega más confiables, mejorando la confianza y satisfacción del cliente.
Las plataformas GPS modernas también envían alertas a los despachadores y clientes si el clima afecta los tiempos de entrega, permitiendo que las empresas mantengan la transparencia y la capacidad de respuesta. Este nivel de comunicación ya no es un lujo—es una necesidad competitiva.
Apoyo a la Seguridad del Conductor y la Continuidad Operativa
La seguridad del conductor es fundamental en cualquier operación logística. Enviar un vehículo de entrega a través de zonas con tormentas, carreteras heladas o áreas con baja visibilidad puede poner en peligro no solo al conductor, sino también a la carga y a otros usuarios de la vía. El GPS con conciencia climática ayuda a los gerentes de entrega a tomar decisiones que prioricen tanto la eficiencia como la seguridad.
Al monitorear continuamente las condiciones viales, el sistema puede redirigir a los conductores lejos de tramos peligrosos y guiarlos por rutas más seguras. Esto protege no solo al personal, sino también la integridad de la mercancía, reduciendo pérdidas o reclamaciones por incidentes relacionados con el clima.
Reflexión Final
Una solución GPS con conciencia climática ya no es una mejora opcional—es una herramienta vital para cualquier empresa de entregas que busque operar eficientemente, reducir riesgos y mantener la satisfacción del cliente. Combina los fundamentos de la planificación de rutas con una consciencia ambiental dinámica, dando a las empresas la agilidad para anticiparse a condiciones impredecibles.
Navsat Costa Rica ofrece tecnologías GPS avanzadas adaptadas a los desafíos logísticos modernos. Con inteligencia climática integrada, optimización de rutas en tiempo real y un enfoque en la seguridad y el rendimiento, Navsat Costa Rica ayuda a las empresas a transformar la forma en que gestionan sus entregas. Invertir en una solución GPS con conciencia climática no se trata solo de evitar retrasos: se trata de escalar operaciones con confianza, sin importar el pronóstico.
#gestión de flotas#mapas gps garmin#flotas gps#navcontrol control de rutas y actividades#control de vehiculos por gps#administración de flotillas#aplicaciones para personal de campo#monitoreo del comportamiento de conducción#mapasgpsgarmin#rastreo gps
0 notes
Text
Top Android Application Development Trends In 2020
Are you a business owner seeking to construct a cell program this season? You then need all of the tips you're able to get about the important trends in mobile program development. We have previously covered the very crucial iOS tendencies for 2020, and also best mobile program design trends which will rule in 2020. Now it is time to have a peek at Android mobile program development tendencies for 2020.
If you are intending to make an electronic product for your Android platform, then we have you covered. Keep reading to find the ten most important tendencies in Android growth which will explode this season.
Jump to a section: IoT MotionLayout
This strategy is useful for programs which use unstructured information (like text and images ) or resolve issues which have a high number of parameters. By way of instance, programs that forecast what consumers would love to view or purchase next. Fortunately, Android supports a vast selection of ML applications and techniques, therefore implementing this kind of cutting-edge performance is simpler than you can anticipate.
When creating an ML program for Android, the development team should look for a product, execute inference algorithms, and deploy the present ML versions, retrain themor construct new ones. Google ready two guides to help companies succeed in construction AI-powered programs: the Folks + AI Guidebook and The Material Design for Machine Learning spec, including design instructions and designs for ML-powered attributes like object discovery or detection scanning.
Android programmers can discover pre-trained versions in ML Kit and Google Cloud, or construct a fresh version using TensorFlow. A significant choice here is dividing if inferencing on your solution operates on the apparatus or utilizes a distant cloud support.
Navigation refers to each the interactions which enable moving around different segments and parts of content in your program. Android Jetpack includes a useful Navigation component which aids programmers to execute navigation, while it is an easy button or a more intricate pattern such as a navigation drawer. Another benefit of the Navigation part is the fact that it also guarantees a constant and predictable user experience because programmers who employ it'll follow based navigation fundamentals.
The Navigation part includes 3 components:
Navigation chart -- an XML resource which comprises each the navigation-related info in one place (like person content areas known as destinations and potential paths users can shoot via the program ).
NavHost -- an empty container which reveals all of the destinations on your navigation chart.
NavController -- a thing that manages the program navigation inside a NavHost.
The Navigation part also enables programmers to take care of fragment trades, handle the Back and Up actions properly by default, and execute deep linking. In addition, it offers standardized resources for alterations and animations, in addition to navigation UI patterns.
In 2020, more company owners are going to be considering integrating the services and content of the programs with the Google Assistant. The key benefit of buying this kind of integration is that you're able to provide quicker ways for consumers to get your program straight in the Assistant.
By employing Program Tasks, you can deep-link to certain activities inside your cellular program from the Google Assistant. Another attribute, Android Slices, enables developers to exhibit the most crucial content from the program to the users into the Assistant. With the quantities of Google Assistant users around the upswing, integrating mobile programs with this popular digital assistant will develop into an integral target among several development teams.
Read also about 7 tips for developing your business using Google Assistant. Kotlin currently offers programmers a brand new exciting feature: multiplatform jobs (that may function as a substitute for Flutter). It is still an experimental feature accessible Kotlin 1.2 and 1.3, but we all think that it's going to become very large in 2020. Development teams can quickly discuss their code between those programs. This way, it hastens the growth process and saves a lot of time that the staff can dedicate to harder tasks. They're also able to get into the stage APIs anytime.
By way of instance, by utilizing this attribute, you can create a mobile program with elements of this code (such as business logic or connectivity) shared between Android and iOS. You might even share code between the server and client that is useful when building apps using APIs. That is why we're going to see an increasing number of teams using Kotlin for mobile program development.
IoT
Implementations of this Web of Things (IoT) in Android program development is another important trend.
From the Android globe, this tendency translates into Android Items, which permits programmers to construct apparatus in addition to popular hardware platforms such as Raspberry Pi.
Programmers do not require any understanding of embedded system layout to start. The frame allows simple native access to hardware, like cameras and screens. You could even join your program to Google providers and incorporate extra peripherals together with the Peripheral I/O APIs. The Android Matters Console additionally helps teams to drive new attributes and safety upgrades over-the-air.
When your program is prepared, you can begin publishing your code to apparatus with the assistance of the Android Items Console. It gives tools for installing and upgrading the system image on hardware devices that are supported.
MotionLayout
MotionLayout is a sort of design that programmers can utilize to handle widget and motion cartoon in their programs. The application is part of this
ConstraintLayout library and can be backward-compatible using Android 4.0. Together with the library, the staff can quickly fill the difference between design transitions and intricate movement managing as the instrument provides a rich choice of features. MotionLayout not only clarifies transitions between designs but additionally allows animating any design properties. In addition, it supports seekable transitions, allowing developers to immediately demonstrate any stage inside the transition on the grounds of a state such as a touch input.
Notice that MotionLayout will just work with its lead children and will not support nested layout hierarchies or action transitions.
In 2020, programmers will be utilizing MotionLayout to make ports which use animation to assist users understand what's occuring in the program and have a much better experience.
In 2020, we are going to see the growth of Android Instant Apps. What are instantaneous programs? Immediate apps are programs which don't require setup to be employed by program users. Google Play Instant enables native programs and games to start on apparatus without being set up (they will need to operate on Android 5.0 or newer).
Programmers can build instant apps and instant games utilizing Android Studio. By supplying an instantaneous experience to program users, you can enhance your program or game's detection, raise the amount of installments, and get more active customers.
Right now, Google Play Instant provides two degrees of immediate experiences: basic and enhanced. The fundamental immediate encounter lets users tap a Try Now button or site banner to access an instantaneous experience. The improved immediate experience permits users to start an instantaneous experience from any surface capable to establish a URL.
Digital transformation is a vital trend for businesses in 2020. This Google-led initiative intends to allow employees to utilize Android devices and programs at work.
The most Frequent enterprise deployment situations for Android apparatus are: Employee-owned apparatus (BYOD),
Company-owned apparatus for information workers,
And company-owned apparatus for dedicated use (both worker and customer-facing( like hospital check-in channels or stock management apparatus ). They present distinct challenges to development groups, but we are going to see these become more prominent from the Android development area.
This package of tools and libraries helps Android programmers to compose high-quality code quicker, follow best practices, and simplify complicated jobs. In 2020, Android Jetpack is becoming much more applicable to cellular development projects since it is always expanded with new tools.
Among those tools which will become large in 2020 will be Jetpack Compose, Android's toolkit for constructing native UI. The alternative accelerates the procedure for constructing user interfaces on Android. Programmers can make their program without a code by preventing whole classes of bugs. That simplifies the code also makes it effortless to keep.
All you want to do is clarify the UI and Write will look after everything. After the program state varies, the UI is going to be upgraded automatically. Write works with all your current code, so it is possible to embrace it readily.
The development of immediate programs has altered the mobile landscape, and the tendency is very likely to last in 2020. But, web pages shown on mobile devices are becoming more intuitive and enjoyable than ever.
What's AMP? It is a brand new technology that supplies a wise way of publishers to boost their visibility in search. Accelerated Mobile Pages improve search engine optimization (search engine optimization ) and help businesses to be discoverable by consumers. Google's search algorithms are continuously evolving, and also to meet the shifting requirements it is ideal to follow Google's personal recommendations.
At this time, Google is all on cellular. Did you realize that more individuals run searches on mobile devices than desktop apparatus? Speed and performance are two important elements which affect a site's ranking. And they are exactly what Google is reassuring with Accelerated Mobile Pages. Based on Google, AMP websites load 4x quicker than ordinary non-AMP websites. Users get to get their content in only 1 minute.
The cell scene is extremely competitive, and organizations are doing what they can to obtain visibility. Google will give more visibility to AMP in search engine results pages, forcing a great deal of traffic to your website.
That is all when it comes to Android advancement 2020 tendencies, read also about common mistakes which could mess up your mobile application development.
Conclusion
These ten tech trends are only the tip of the iceberg in the continuously evolving cellular landscape. We hope that this Report helps you to create the best technology options to your mobile growth Author Bio:
Salman Ahmed is a Business Manager at Magneto IT Solutions – an IT company in Bahrain offers quality Iphone Application Development, Magento development,android app development, magento migration, mobile app development services. The company has experienced vue js developers for hire at very affordable price. He is a firm believer in teamwork; for him, it is not just an idea, but also the team’s buy-in into the idea, that makes a campaign successful! He’s enthusiastic about all things marketing.
0 notes
Text
Building a Notepad Application from Scratch with Ionic
A difficult part of the beginner’s journey to learning Ionic is the step between understanding some of the basics and actually building a fully working application for the first time. Concepts explained in isolation can make sense, but it may be difficult to understand when to use them in the context of building an application. Even after spending some time learning about Ionic, you might find yourself starting a new project with no idea where to begin.
The aim of this tutorial is to provide a complete walkthrough of building a simple (but not too simple) Ionic application from start to finish. I have attempted to strike a balance between optimised/best-practice code, and something that is just straight-forward and easy enough for beginners to understand. Sometimes the “best” way to do things can look a lot more complex and intimidating, and doesn’t serve much of a purpose for beginners. You can always introduce more advanced concepts to your code as you continue to learn.
I will be making it a point to take longer to explain smaller concepts in this tutorial, more so than others, since it is targeted at people right at the beginning of their Ionic journey. However, I will not be able to cover everything in the level of depth required. I will mostly be including just enough to introduce you to the concept in this tutorial, and I will link out to further resources to explain those concepts in more depth.
What will we be building?
The example we will be building needs to be simple enough such that it won’t take too much effort to build, but it also needs to be complex enough to be a realistic representation of a real application.
I decided on building a notepad application for this example, as it will allow us to cover many of the core concepts such as:
Navigation/Routing
Templates
Two-way data binding
Interpolations
Event binding
Types and Interfaces
Services
Data Input
Data Storage
Styling
As well as covering important concepts, it is also a reasonably simple and fun application to build. In the end, we will have something that looks like this:
We will have an application that allows us to:
Create, delete, and edit notes
Save and load those notes from storage
View a list of notes
View note details
Before We Get Started
Last updated for Ionic 4, beta.7
This tutorial will assume that you have read at least some introductory content about Ionic, have a general understanding of what it is, and that you have Ionic set up on your machine. You will also need to have a basic understanding of HTML, CSS, and JavaScript.
If you do not already have Ionic set up on your machine, or you don’t have a basic understanding of the structure of an Ionic project, take a look at the additional resource below for a video walkthrough.
Additional resources:
Installing Ionic and Basic Project Structure
1. Generate a New Ionic Project
Time to get started! To begin, we will need to generate a new Ionic 4 application. We can do that with the following command:
ionic start ionic-notepad blank --type=angular
We are naming our application ionic-notepad and we are using the blank template from Ionic (which will just give us a bare-bones starter template). By supplying the --type flag we are indicating we want to create an Ionic/Angular project (which will generate an Ionic 4 application for us).
You will be prompted to set up Cordova or Ionic Pro during the creation process, you can just say no to these. Once the application has finished generating, make it your working directory by running:
cd ionic-notepad
2. Create the Required Pages/Services
This application will have two pages:
Home (a list of all notes)
Detail (the details of a particular note)
and we will also be making use of a service/provider:
NotesService
which is going to be responsible for handling most of the logic around creating, updating, and deleting notes. We are going to create these now by using Ionic’s generate command.
Run the following commands to generate the pages:
ionic g page Home
ionic g page Detail
Run the following commands to generate the service:
ionic g service services/Notes
The reason we use services/Notes instead of just Notes is that we want all of our services to be within a services folder (by default, they will just be created in the project root directory).
3. Setting up Navigation/Routing
Now we move on to our first real bit of work – setting up the routes for the application. Most of this is handled automatically for us when we generate the pages, but we are going to make a couple of changes.
Modify src/app/app-routing.module.ts to reflect the following:
import { NgModule } from '@angular/core'; import { Routes, RouterModule } from '@angular/router'; const routes: Routes = [ { path: '', redirectTo: 'notes', pathMatch: 'full' }, { path: 'notes', loadChildren: './home/home.module#HomePageModule' }, { path: 'notes/:id', loadChildren: './detail/detail.module#DetailPageModule' }, ]; @NgModule({ imports: [RouterModule.forRoot(routes)], exports: [RouterModule] }) export class AppRoutingModule { }
We’ve renamed out home path to notes just because I think it makes more sense for the URL to say notes – this is purely a cosmetic change. We have also changed the path for our Detail page to:
notes/:id
This is not just a cosmetic change. By adding :id to the path, which is prefixed by a colon : we are creating a route that will accept parameters which we will be able to grab later. That means that if a user goes to the following URL:
http://localhost:8100/notes
They will be taken to the Home page. However, if they go to:
http://localhost:8100/notes/12
They will be taken to the Detail page, and from that page, we will be able to grab the :id value of 12. We will make use of that id to display the appropriate note to the user later.
Additional resources:
Angular Routing in Ionic
4. Starting the Notes/Home Page
The Home page, which will display a list of all of the notes the user has added, will be the default screen that user sees. We are going to start implementing the template for this page now. We don’t have everything in place that we need to complete it, so we will just be focusing on getting the basic template set up.
Modify src/app/home/home.page.html to reflect the following:
<ion-header> <ion-toolbar color="primary"> <ion-title> Notes </ion-title> <ion-buttons slot="end"> <ion-button> <ion-icon slot="icon-only" name="clipboard"></ion-icon> </ion-button> </ion-buttons> </ion-toolbar> </ion-header> <ion-content> <ion-list> <ion-item button detail> <ion-label>Title goes here</ion-label> </ion-item> </ion-list> </ion-content>
This template is entirely made up of Ionic’s web components. We have the <ion-header> which contains the title for our page, and we have <ion-buttons> set up inside of the <ion-toolbar> which will allow us to place a set of buttons either to the left or the right of the toolbar. In this case, we just have a single button in the end slot which we are using as the button to trigger adding a new note. By giving our icon a slot of icon-only it will style the icon so that it is larger (since it doesn’t have text accompanying it).
Then we have our <ion-content> section which provides the main scrolling content section of the page. This contains an <ion-list> with a single <ion-item>. Later, we will modify this list to create multiple items – one for each of the notes that are currently stored in the application.
There will be more information available about all of this, including “slots”, in the additional resources at the end of this section.
Although we will not be making any major changes to the class for our Home page just yet, let’s change a few minor things and talk through the code that is there already.
Modify src/app/home/home.page.ts to reflect the following:
import { Component, OnInit } from '@angular/core'; import { AlertController, NavController } from '@ionic/angular'; @Component({ selector: 'app-home', templateUrl: 'home.page.html', styleUrls: ['home.page.scss'], }) export class HomePage implements OnInit { constructor(private alertCtrl: AlertController, private navCtrl: NavController){ } ngOnInit(){ } }
At the top, we have our imports – these are the dependencies that we will need to make use of in this page. We import Component and OnInit from the @angular/core library, and we import AlertController and NavController from the @ionic/angular library.
Component allows us to create a component using the @Component decorator and specifies the metadata for the page including the URL of its template and .scss file (required for all components/pages)
OnInit allows us to implement the ngOnInit method which will be triggered as soon as the page is initialised
AlertController will allow us to create alert prompts
NavController will allow us to control navigation using Ionic’s navigation methods
It isn’t enough to just import some of these dependencies, we also may need to set them up in our class using dependency injection. We need to “inject” these dependencies through the constructor in the class. Take a look at the following code:
constructor(private alertCtrl: AlertController, private navCtrl: NavController){ }
What this is doing is setting up class members, which will be references to the injected dependency, that will be accessible through the class. In the case of the AlertController we are basically saying:
“Create a class member variable called alertCtrl which will be an instance of the AlertController service”
By prefixing this with private we are saying that we want this variable to be accessible anywhere inside of this class (but not outside of the class). We could also use public which would make the variable accessible anywhere inside or outside of the class.
This means that anywhere in this class we will be able to reference this.alertCtrl or this.navCtrl to access the methods that they each provide.
It’s going to be hard for us to go much further than this without starting to work on our Notes service, as this is what is going to allow us to add, update, and delete notes. Without it, we don’t have anything to display!
Additional resources:
Understanding Slots
An Introduction to ES6 Modules for Ionic Developers
Angular Concepts & Syntax
5. Creating an Interface
Before we implement our Notes service, we are going to define exactly “what” a note is by creating our own custom type with an interface.
Angular uses TypeScript, which is basically JavaScript with “types”. A type gives us a way to enforce that data is what we expect it to be, and you will often see variables, methods, and parameters followed by a colon : and then a type. For example:
let myName: string = "Josh"
Since we have added : string after the variable we defined, it will enforce that myName can only be a string. If we tried to assign a number to myName it wouldn’t allow us to do it. I don’t want to dive too deep into types and interfaces here, so I will link to another tutorial in the additional resources section.
Create a folder and file at src/app/interfaces/note.ts and add the following:
export interface Note { id: string, title: string, content: string }
This will allow us to import a Note type elsewhere in our application, which will allow us to force our notes to follow the format defined above. Each note must have an id that is a string, a title that is a string, and content that is a string.
Additional resources:
Creating Custom Interfaces
6. Implement the Notices Service
The pages in our application are responsible for displaying views/templates on the screen to the user. Although they are able to implement logic of their own in their associates *.page.ts files, the majority of the complex logic performed in our applications should be done in services.
A service does not display anything to the user, it is just a “helper” that is used by components/pages in our application to perform logic/data operations. Our pages can then call the methods of this service to do work for it. This way, we can keep the code for our pages light, and we can also share the data and methods available through services with multiple pages in our application (whereas, if we define methods in our pages they are only accessible to that one page). Services are the primary way that we are able to share data between different pages.
Our Notes service will implement various methods which will allow it to:
Create a note and add it to an array in the data service
Delete notes from that array
Find and return a specific note by its id
Save the array of notes to storage
Load the array of notes from storage
Let’s implement the code, and then talk through it. I’ve added comments to various parts of the code itself, but we will also talk through it below.
import { Injectable } from '@angular/core'; import { Storage } from '@ionic/storage'; import { Note } from '../interfaces/note'; @Injectable({ providedIn: 'root' }) export class NotesService { public notes: Note[] = []; public loaded: boolean = false; constructor(private storage: Storage) { } load(): Promise<boolean> { // Return a promise so that we know when this operation has completed return new Promise((resolve) => { // Get the notes that were saved into storage this.storage.get('notes').then((notes) => { // Only set this.notes to the returned value if there were values stored if(notes != null){ this.notes = notes; } // This allows us to check if the data has been loaded in or not this.loaded = true; resolve(true); }); }); } save(): void { // Save the current array of notes to storage this.storage.set('notes', this.notes); } getNote(id): Note { // Return the note that has an id matching the id passed in return this.notes.find(note => note.id === id); } createNote(title): void { // Create a unique id that is one larger than the current largest id let id = Math.max(...this.notes.map(note => parseInt(note.id)), 0) + 1; this.notes.push({ id: id.toString(), title: title, content: '' }); this.save(); } deleteNote(note): void { // Get the index in the array of the note that was passed in let index = this.notes.indexOf(note); // Delete that element of the array and resave the data if(index > -1){ this.notes.splice(index, 1); this.save(); } } }
Once again, we have our imports at the top of the file. Rather than Component we use Injectable this time, which provides the @Injectable decorator we use with all of our services/providers. This allows us to define where the service is providedIn which in this case (and in most cases) is root, meaning that a single instance of this service will be available for use throughout our entire application.
We also import Storage which we inject through the constructor as we will be making use of it to save and load data throughout the service, and we also import our Note interface that we just created.
We set up two class members above our constructor:
notes which will be an array of notes (the Note[] type means it will be an array of our Note type we created)
loaded which is a boolean (true or false) which will indicate whether or not the data has been loaded in from storage
Like the dependencies we inject through the constructor, variables declared above the constructor will be accessible throughout the entire class using this.notes or this.loaded.
IMPORTANT: We will be making use of this.storage throughout this class, but it won’t work until we complete the next step. There are additional dependencies that need to be installed for storage.
Our load function is responsible for loading data in from storage (if it exists) and then setting it up on the this.notes array. We surround this entire method with a Promise that resolves when the operation is complete, as we will need a way to detect when the operation has finished later. This is asynchronous behaviour, and it is critically important to understand the difference between asynchronous and synchronous code – I’ve linked to further information on this in the additional resources at the end of this section.
The way in which we are loading data in this application I would describe as a “beginner friendly” approach. There are “better” ways to do this using observables, but this is a perfectly acceptable approach.
The save function simply sets our notes array on the notes key in storage so that it can be retrieved later – we will call this whenever there is a change in data.
The getNote function will accept an id, it will then search through the notes array and return the note that matches the id passed in. We will make use of this in our detail page later.
The createNote function handles creating a new note and pushing it into the notes array. We do have an odd bit of code here:
let id = Math.max(...this.notes.map(note => parseInt(note.id)), 0) + 1;
We need each of our notes to have a unique id so that we can grab them appropriately through the URL. To keep things simple, we are using a simple numeric id (an id could be anything, as long as it is unique). To ensure that we always get a unique id, we use this code to find the note with the largest id that is currently in the array, and then we just add 1 to that.
Finally, the deleteNote method simply takes in a note and then removes that note from the array.
Additional resources:
Asynchronous vs Synchronous: Understanding the Difference
Navigation Basics & Passing Data Between Pages in Ionic & Angular
When & How to Use Services/Providers in Ionic
7. Setting up Data Storage
Ionic provides a useful Storage API that will automatically handle storing data using the best mechanism available. However, it is not installed by default. To set up Ionic Storage, you will first need to install the following package:
npm install @ionic/storage --save
You will also need to make a change to your root module file.
Modify src/app/app.module.ts to reflect the following:
import { NgModule } from '@angular/core'; import { BrowserModule } from '@angular/platform-browser'; import { RouterModule, RouteReuseStrategy, Routes } from '@angular/router'; import { IonicStorageModule } from '@ionic/storage'; import { IonicModule, IonicRouteStrategy } from '@ionic/angular'; import { SplashScreen } from '@ionic-native/splash-screen/ngx'; import { StatusBar } from '@ionic-native/status-bar/ngx'; import { AppComponent } from './app.component'; import { AppRoutingModule } from './app-routing.module'; @NgModule({ declarations: [AppComponent], entryComponents: [], imports: [BrowserModule, IonicModule.forRoot(), AppRoutingModule, IonicStorageModule.forRoot()], providers: [ StatusBar, SplashScreen, { provide: RouteReuseStrategy, useClass: IonicRouteStrategy } ], bootstrap: [AppComponent] }) export class AppModule {}
Notice that we have imported IonicStorageModule from @ionic/storage and we have added IonicStorageModule.forRoot() to the imports for the module.
Additional resources:
Ionic Storage API
An Introduction to NgModule for Ionic
8. Finishing the Notes Page
With our notes service in place, we can now finish off our Home page. We will need to make some modifications to both the class and the template.
Modify src/app/home/home.page.ts to reflect the following:
import { Component, OnInit } from '@angular/core'; import { AlertController, NavController } from '@ionic/angular'; import { NotesService } from '../services/notes.service'; @Component({ selector: 'app-home', templateUrl: 'home.page.html', styleUrls: ['home.page.scss'], }) export class HomePage implements OnInit { constructor(private notesService: NotesService, private alertCtrl: AlertController, private navCtrl: NavController){ } ngOnInit(){ this.notesService.load(); } addNote(){ this.alertCtrl.create({ header: 'New Note', message: 'What should the title of this note be?', inputs: [ { type: 'text', name: 'title' } ], buttons: [ { text: 'Cancel' }, { text: 'Save', handler: (data) => { this.notesService.createNote(data.title); } } ] }).then((alert) => { alert.present(); }); } }
We have added one additional import which is the NotesService. Just like the services we import from the Ionic library, we also need to inject our own service through the constructor to make it available to use throughout this component.
We have added a call to the load method of the Notes service, which will handle loading in the data from storage as soon as the application is started.
We have also added an addNote() method which will allow the user to add a new note. We will create an event binding in the template later to tie a button click to this method, which will launch an Alert on screen. This prompt will allow the user to enter a title for their new note, and when they click Save the new note will be added.
Now we just need to finish off the template.
Modify src/app/home/home.page.html to reflect the following:
<ion-header> <ion-toolbar color="primary"> <ion-title> Notes </ion-title> <ion-buttons slot="end"> <ion-button (click)="addNote()"> <ion-icon slot="icon-only" name="clipboard"></ion-icon> </ion-button> </ion-buttons> </ion-toolbar> </ion-header> <ion-content> <ion-list> <ion-item button detail *ngFor="let note of notesService.notes" [href]="'/notes/' + note.id" routerDirection="forward"> <ion-label></ion-label> </ion-item> </ion-list> </ion-content>
We have modified our button in the header section to include a click event binding that is linked to the addNote() method. This will trigger the addNote() method we just created whenever the user clicks on the button.
We have also modified our notes list:
<ion-list> <ion-item button detail *ngFor="let note of notesService.notes" [href]="'/notes/' + note.id" routerDirection="forward"> <ion-label></ion-label> </ion-item> </ion-list>
Rather than just having a single item, we are now using *ngFor which will loop over each note in our notes array in the notes service (which is why we reference notesService.notes).
Take notice of the * syntax used here for the *ngFor in the list, this is shorthand for creating an embedded template. Rather than literally rendering out:
<ion-item button detail *ngFor="let note of notesService.notes">
to the DOM (Document Object Model), an embedded template will be created for each items specific data. So, if our notes array had 4 notes in it, then the via joshmorony - Learn Ionic & Build Mobile Apps with Web Tech https://ift.tt/2y5WScQ
0 notes
Text
…..So I decided to make a tutorial.
Yup, is on how to set up a wireless remote control for Photoshop.
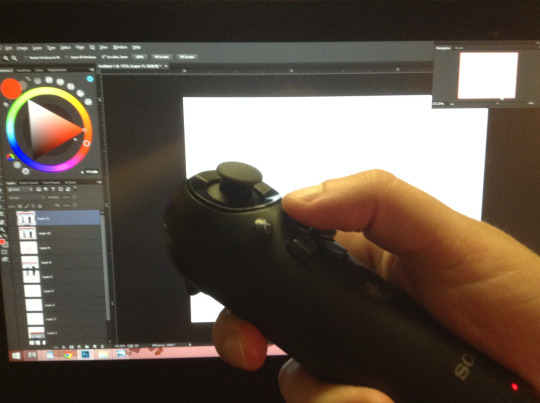

I suffer from constant back pain, and I spend many hours sitting down drawing, daily. So the idea came when searching for different alternatives other than just relying on a keyboard for all my shortcuts; smaller keyboards, a G13, etc.They did not work ´cause they are not comfortable enough to put anywhere. I also looked at the Cintiq control but is actually hella expensive and a bit limited for my taste. With this I can have my arm resting anywhere and I can position myself better, e.g., lying on a bed like a pig.
So like I said, this is a tutorial…of sorts…. for those wanting an alternative to using a keyboard for Photoshop shortcuts, also it works with any other art program or any type of software on Windows that uses a keyboard or a mouse.
It doesn’t necessarily has to be the PS3 navigation controller though, you can use any wired or wireless game-pad/joystick of any brand. But in all the research I did I found this is by far the best tool to use as a remote; is small, doesn’t weight much and you can get plenty of shortcuts out of it.
The Nav controller only has 10 buttons, which are plenty already. But thanks to a couple of awesome tools out there and some tweaking around you can set up about 80+ keyboard inputs……say wuuut!!! who the heck need so many shortcuts!!! (I´ll show you how to do it later, below)
First things first. Here is a list of all you need:
PS3 Navigation controller.
From 7 dollars used, up to 20 new on amazon……pretty sweet.
Bluetooth Dongle. (to use the controller wirelessly, so its optional)
From 2 bucks up to 15.
Mini-5 pin USB cable. (to charge the controller or to have it wired if you don’t have a Bluetooth dongle)
1,50 to 10 dollars. Everyone have one of these, EVERYONE!!!!
SCP DS3 driver and a software package. (needed to let windows recognize the PS3 nav controller. Links for them are on the step on how to configure the controller)
Free.
Xpadder. (needed to map the keyboard onto the controller)
10 Dollars. (their old 5.3 version is free, but I highly recommend buying the latest update)
That is it, for less than 30 bucks (if you buy an used controller and a cheap dongle+cable, like i did) you can have your own Photoshop controller extraordinaire.
Lets set up and configure this awesome bastard!
Just to note that If you are using a different controller that get recognized right away by windows, just skip this step.
To configure the controller and the Bluetooth dongle we need the SCP DS3 driver and software package mentioned above. This is needed because Sony never made Windows drivers for their controllers, and also the Bluetooth dongle driver needs to be re-written in order to be paired with the controller, this meaning that the dongle will only be usable with it. If you use different peripherals with a same dongle, you will need to buy one to dedicate only to the PS3 Nav controller.
To make things easier for me (and for you) and also because there are tons of tutorials out there about this step, I´m gonna link you to a YouTube video made by Wiltshire Tutorials. in his video he does a great job explaining (way better that I could ever do) how to do this part.
All the software you need for this part is in the description of that video.
Though I suggest going here first: http://forums.pcsx2.net/Thread-XInput-Wrapper-for-DS3-and-Play-com-USB-Dual-DS2-Controller and download the latest installer for the SCP Driver, also If you need extra information or if you wanna read more about this step that is the place to go. I suggest using the latest installer because that version lets you change the button layout of the controller. By default the PS home button gets configured in a way you can´t map in Xpadder, and with the the latest update I can have the PS home button set up to function as the R1 trigger, and Xpadder does let me re-map that button.
If you don’t care about being able to change that specific button just install the drivers provided in the video, they are totally fine.
Here is the video: https://youtu.be/TpSaOJJIun8
Its a pretty straight forward step, just follow everything he says. His video is for the PS3 controller, but it works the same for the Navigation controller, which is basically half of a PS3 controller. If you have any trouble, installing it or pairing it with the BT dongle, check his links in the description and see if that information helps (it did for me)
With that done, now we just need to install and setup Xpadder.
You don´t necessarily need to use Xpadder to re-map the buttons (there are a couple more programs that let you do the same, like joytokey) but I think this software is pretty complete, well thought and it offers a wide range of options to customize your controller or to map your shortcuts any way you like.
Kudos to the developer, he did a pretty fucking awesome job.
You can buy Xpadder here: http://www.xpadder.com/
Oh I said install, but actually you don´t need to install it, it runs directly from the .exe as a program.
Xpadder is really intuitive on how to set up the controller so I won´t go into any detail on how to do so, seriously, is ready to go from the start.
(you can use the image of the controller I put up there as your layout background if you wish)
The way Xpadder works is simple, you have 3 main features here:
1. The controller:
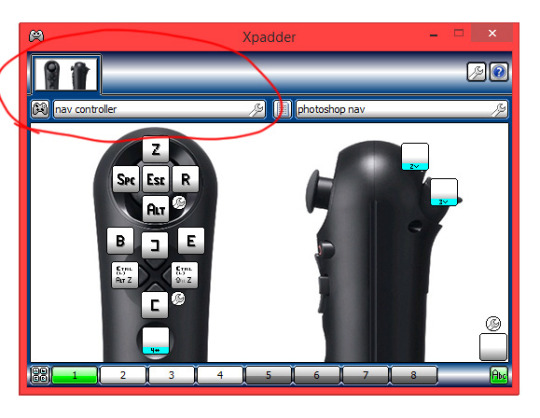
Which is the hardware you are using. In this case the Nav controller.
2. The Profiles:
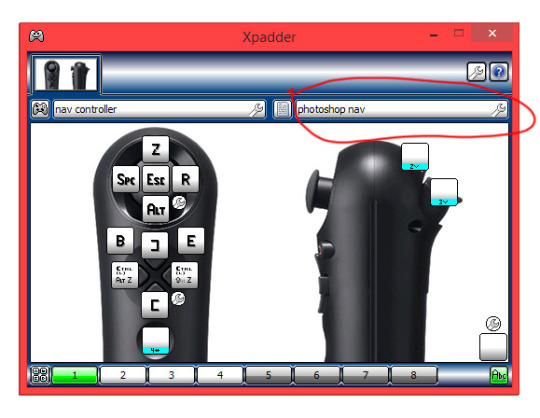
Which are the different mappings you configure for a said program. e.g. Photoshop, Painter, etc. Because each program uses different shortcuts is great that you can save different profiles. The cool thing about Xpadder is that you can set it up to automatically switch profiles according to the program you are using.
3. The Sets:
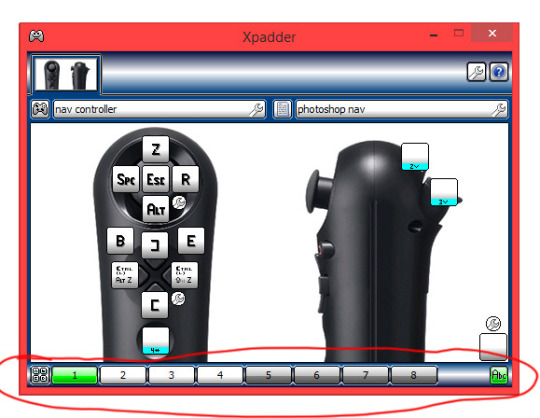
Which are the different mapping layouts within said profile. There up to 8 sets you can configure per profile. .
The Sets are actually the feature I love the most, because it lets you basically have 80+ shortcuts within one profile, and of course using just one little controller.
So here is what I do:
I don´t map the L1 trigger to any shortcut, but instead I make it temporarily (while you hold it) change to set 2, and the L2 trigger to the set 3. This allows me to have a new set of commands each time I hold any of the triggers. Kinda like a combo move. like this:
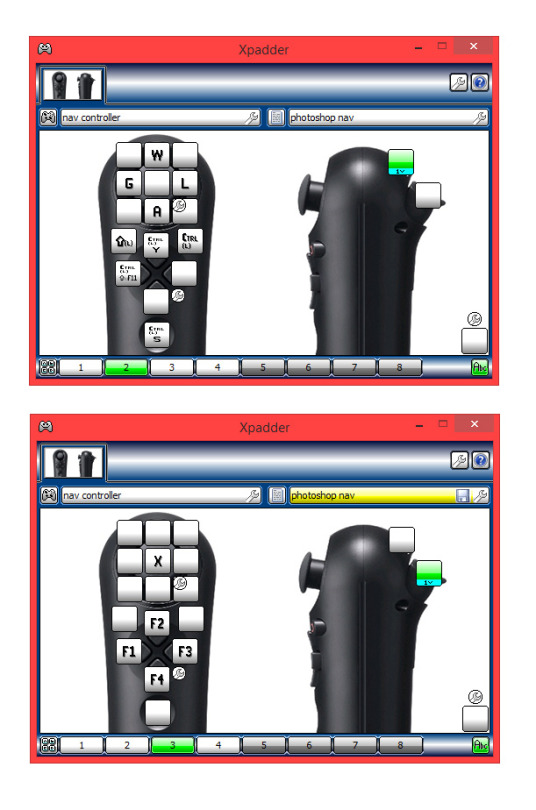
In each photo the green color above is the trigger I´m holding and the one below is the set that button brings up. You can see how it changes the mapping I have set.
And here is click by click how to set it up like that:
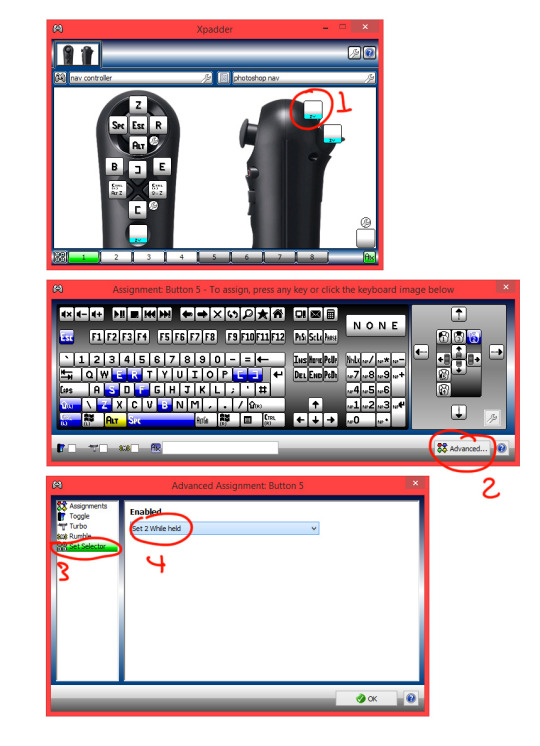
I also have the PS home button configured to change to set 4 (with the “two way” option in the advanced settings. Meaning: that one press of the button goes to set 4 and stays there, and if I press it again it returns to set 1) and there I map L1 to set 5 and L2 to set 6, which now gives me an insane amount of buttons to add shortcuts to. In addition, on the analog stick configuration settings (the little wrench icon on the lower right of the input mapping for that area) you can opt to have all directions as active, giving you 4 more buttons to map, that´s 9 buttons for just the stick.
So there you go.
This is something not many people know or think about doing…. I guess. So that is why I’m doing this “wannabe” tutorial for you all, is always cool to share shit like this, specially if its so simple but useful.
For all of those who suffer from back pain too, and all of you tired of your bulky-as-fuck keyboard, I hope this is of some use.
Now draw!
P.S.
Excuse me if I missed some stuff, or if you read it all and find it useless at the end, I ain’t too good explaining things.
But if you have any questions about any step or if you are stuck, feel free to message me.
Here is how to configure the PS button in case you wanna do that: https://buckteethsimulacra.tumblr.com/post/160422636892/here-is-how-to-properly-set-up-the-ps-home-button
I put it in a separate post ´cause this one is freaking long already.
#tutorial#scp#photoshop#ps3navcontroller#navcontroller#remote#remotecontrol#cintiq#remotecontroller#clipstudiopaint#tvpaint#controlremoto#ps3#controller#control#navigationcontroller#art#arttutorial#digitalart#scpdriver#wireless#wirelesscontrol#editing#xpadder#keyboard
0 notes
Link
Envato Tuts+ Code http://j.mp/2C2f74L
In this post we'll take a look at Ionic pages. I'll show you how to edit content inside your app as well as how to create additional app pages and set up navigation.
Editing Page Content
In Getting Started With Ionic, we learned how to create our very first Ionic project. Carrying on from there, in this tutorial, we are going to edit one of the pages we created for our app.
In order to edit our page, we need to open up our project using a text editor tool. In my case, I'll be using Visual Studio Code, but please feel free to use your own preferred text editor. Once you have your project opened, it should look similar to the image below (note we open the entire project folder and not just a specific page):
Ionic uses page files that contain all the necessary files you will need to make changes to any given page in your application. These pages can be found in a folder under the src folder in your Ionic project.
We are going to be making a simple change in our Ionic app, by editing the home page. In order to do so, navigate to the home.html file in src/pages/home and make the following changes to the file:
<ion-header> <ion-navbar> <ion-title>My Home</ion-title> </ion-navbar> </ion-header> <ion-content padding> <h2>Welcome to My Ionic App!</h2> <p> This is super awesome. </p> <p> This is my 1st Ionic app ever. </p> </ion-content>
With that done, navigate to the home.scss file, also in src/pages/home, and make the following changes:
page-home { ion-content { background: black !important; } h2 { color: white; } p { color: white; } }
Here, we changed the background color of the home page from white to black by targeting ion-content. This is where our page content exists. In addition, we also targeted the h2 header element as well as the p (paragraph) elements and changed the color of the text for both to white.
With your changes complete (don't forget to save), run either ionic serve or ionic lab from the command line. These Ionic CLI tools will compile your app and make it available for testing. I'll be using ionic lab in this example.
Once you've successfully run either of these commands, your local development server should spin up your application, and it should look something like this:
Ionic Page Structures
So, we've edited the home page by changing the text as well as the background color of the page. How did we go about doing this? Our home page folder consists of three files: home.html, home.scss, and home.ts.
The home.ts file is a TypeScript file that consists of an Angular component with the following component decorator:
@Component({ selector: 'page-home', templateUrl: 'home.html' })
The home.html file acts as the component's template, which we can use to make changes to our home page content. It is specified with the templateUrl parameter to the component decorator.
To change the style of the home page, we can use CSS or SCSS in the home.scss file.
Creating Additional Pages
Next, we are going to be creating an additional page in our application called info. In order to create this new page, we need to run the following command in our project: ionic generate page info. In Visual Studio Code, we can do so by opening up the integrated terminal from View > Integrated Terminal. Simply type the command there and press Enter.
This will generate a new page in your project, with the files info.html, info.ts, and info.scss.
After the page is successfully generated, you should be able to see it under the pages folder in your project files. In order for us to be able to use this newly created page within our application, we will need to first register it in our app.module.ts file. You can find this in the src/app folder.
First, add an import statement for your info page's component file near the top of app.module.ts.
import { InfoPage } from '../pages/info/info';
You can add this in below the import statements for the other pages.
Then, add InfoPage to the declarations and entryComponents arrays of your app module. Your @NgModule declaration should now look like the following:
@NgModule({ declarations: [ MyApp, AboutPage, ContactPage, HomePage, TabsPage, InfoPage ], //... entryComponents: [ MyApp, AboutPage, ContactPage, HomePage, TabsPage, InfoPage ], //...
Navigation in Ionic
In its simplest form, Ionic pushes and pops pages as its navigation concept. The idea is that we are stacking pages on top of one another—when we open a new page, we push it onto the stack, and when we go back to the previous page, we pop the current page off.
So when you are viewing a page in an Ionic application, you are always viewing the topmost page on the stack, and if you click to view a different page, you will be pushing this page on top of the navigation stack covering the previous page in the view.
If you were to go back to the previous page, you will then be popping the current page off the stack and viewing the page below it. Think of it as a deck of cards, where you are adding and removing cards from the deck.
Add a Navigation Button
Carrying on with our example, with our page successfully created and registered within our application, let's set up navigation to our newly created page from the home page.
Using the home page we edited earlier, let's further customize it by adding a button that will allow us to navigate to our info page. Add the following code to home.html, inside ion-content and below the paragraph text:
<button ion-button>Navigate to Info</button>
The code above specifies an Ionic component, namely an ion-button. Later we'll add a click handler so when this button is pressed, we will navigate to the info page.
Your home page should look similar to this now:
However, if we were to click on our newly created button now, it wouldn't take us anywhere as we haven't programmed it yet with any functionality. In order to do so, we'll need to add a click listener event followed by a function onto our button as follows:
<button ion-button (click)="navigateToInfo()">Navigate to Info</button>
Next, let's go ahead and declare the function we wrote above, navigateToInfo(), in our home.ts file. First, import the NavController helper from the ionic-angular core library. NavController allows us to manage navigation in our Ionic application, and we'll use it to push the info page on top of the home page when the button is clicked.
We'll also need to import the InfoPage component. Put these lines at the top of your home.ts file.
import { NavController } from 'ionic-angular'; import { InfoPage } from '../info/info';
Next, we'll modify the home page component to receive an instance of NavController via dependency injection. Change the home page constructor to the following:
constructor(public navCtrl: NavController) { }
Finally, we can declare the navigateToInfo function inside of our HomePage component.
navigateToInfo() { this.navCtrl.push(InfoPage) }
All we do is push a reference to the info page component to the NavController.
Update the Info Page
With the above complete, navigate to the info.html page, and add a new header to ion-content. Perhaps something like <h2>This is awesome...</h2>.
Now, if you run your application and click the Navigate to Info button on the home page, you will see your newly created info page. Also note the back button, which is automatically created for you by Ionic.
Congratulations! You have successfully created and navigated to a new page. Feel free to repeat this process and create other pages within this demo project.
Conclusion
So far in this series, we've managed to create a new Ionic project, create new pages, edit the contents of our pages, and set up navigation. We've now covered a few of the core concepts that will aid us further as we continue on our journey of developing Ionic applications.
While you're here, check out some of our other posts about Ionic app development!
http://j.mp/2C2f8Wn via Envato Tuts+ Code URL : http://j.mp/2etecmc
0 notes
Video
youtube
Part 20 consuming rest api in ionic
in this video, I will show you that how you can consume the rest API.
in the previous video we have implemented the asp.net web API project so here we will retrieve that data.
1. Create the New Ionic 3 App
As usual, we are creating new Ionic 3 app from scratch. Open the terminal or Node command line then type this command
ionic start ionic3Example blank
now navigate to our project
cd ionic3Example
2. Install and Configure the New Angular 4.3 HttpClient
By default in the last version of Ionic 3 (when this tutorial created) it still using old Angular HTTP module. For this, we have to install a different module for the new Angular 4.3 HTTPClient. Angular use different module name for HTTP, so the developer can migrate to the new Angular 4.3 HTTPClient slowly because old HTTP module still can be used. For safe use with Ionic 3, update all '@angular' dependencies with the latest version.
npm install @angular/common@latest --save npm install @angular/compiler@latest --save npm install @angular/compiler-cli@latest --save npm install @angular/core@latest --save npm install @angular/forms@latest --save npm install @angular/http@latest --save npm install @angular/platform-browser@latest --save npm install @angular/platform-browser-dynamic@latest --save
Next, open and edit 'src/app/app.module.ts' then add this import.
import { HttpClientModule } from '@angular/common/http';
Then register it to '@NgModule' imports after 'BrowserModule', so it will look like this.
imports: [ BrowserModule, HttpClientModule, IonicModule.forRoot(MyApp) ],
3. Create Ionic 3 Service or Provider
This time we will implement the new Angular 4.3 HTTPClient on the Ionic 3 service or provider. Create the service or provider file by type this command.
ionic g provider Rest
It will create 'rest.ts' file and 'rest' folder inside 'providers' folder and also register it on 'app.module.ts'. Now, open and edit 'providers/rest/rest.ts' then replace 'http' import by new Angular 4.3 HTTPClient.
import { HttpClient } from '@angular/common/http';
Also, replace 'Http' injection in the constructor.
constructor(public http: HttpClient) { console.log('Hello RestServiceProvider Provider'); }
Next, we will create all REST API call inside 'rest.ts' file. Add this line before the constructor.
apiUrl = 'your url here';
Add this functions after constructors.
getStudents() { return new Promise(resolve => { this.http.get(this.apiUrl+'/students').subscribe(data => { resolve(data); }, err => { console.log(err); }); }); }
4. Display Data in View
To displaying data in the view, open and edit `src/pages/home/home.ts` then add this import
import { RestProvider } from '../../providers/rest/rest';
Inject the `RestProvider` to the constructor.
constructor(public navCtrl: NavController, public restProvider: RestProvider) {}
Add variable for holds users data before the constructor. students : any;
Create a function below the constructor for calling the users from the provider then fill users variable.
getStudents() { this.restProvider.getStudents() .then(data => { this.students = data; console.log(this.students); }); }
Now, call that function inside the constructor.
constructor(public navCtrl: NavController, public restProvider: RestProvider) { this.getStudents(); } Then, open and edit 'src/pages/home/home.html' then replace '<ion-content>' and it's content using this.
<ion-list inset> <ion-item *ngFor="let student of students"> <h1> {{student.id}}</h1> <h2>{{student.name}}</h2> <p>{{student.dept}}</p> <p>{{student.gender}} </p> </ion-item> </ion-list>
Run the Application . ==================================================== to download full source code and presentation visit our wesite and Blog website : - http://dotnetlab.in/ source code : - https://github.com/rahuljograna facebook page :- https://www.facebook.com/DotnetLab-1896440207343189/ visit my blog : - http://aspnetinhindi.blogspot.in follow me on twitter : https://twitter.com/THEJOGRANA
0 notes
Quote
NavOptions
NavController - Ionic API Documentation - Ionic Framework
0 notes