#ps3navcontroller
Explore tagged Tumblr posts
Visit Tumblr Blog
Explore Tumblr blogs with no restrictions, modern design and the best experience.
Last Seen Tumblr Blogs


Fun Fact
Tumblr Inc. is funded by 13 investors.
Text
…..So I decided to make a tutorial.
Yup, is on how to set up a wireless remote control for Photoshop.
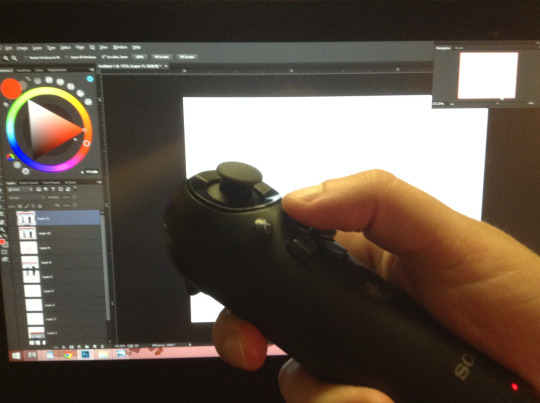
I suffer from constant back pain, and I spend many hours sitting down drawing, daily. So the idea came when searching for different alternatives other than just relying on a keyboard for all my shortcuts; smaller keyboards, a G13, etc.They did not work ´cause they are not comfortable enough to put anywhere. I also looked at the Cintiq control but is actually hella expensive and a bit limited for my taste. With this I can have my arm resting anywhere and I can position myself better, e.g., lying on a bed like a pig.
So like I said, this is a tutorial…of sorts…. for those wanting an alternative to using a keyboard for Photoshop shortcuts, also it works with any other art program or any type of software on Windows that uses a keyboard or a mouse.
It doesn’t necessarily has to be the PS3 navigation controller though, you can use any wired or wireless game-pad/joystick of any brand. But in all the research I did I found this is by far the best tool to use as a remote; is small, doesn’t weight much and you can get plenty of shortcuts out of it.
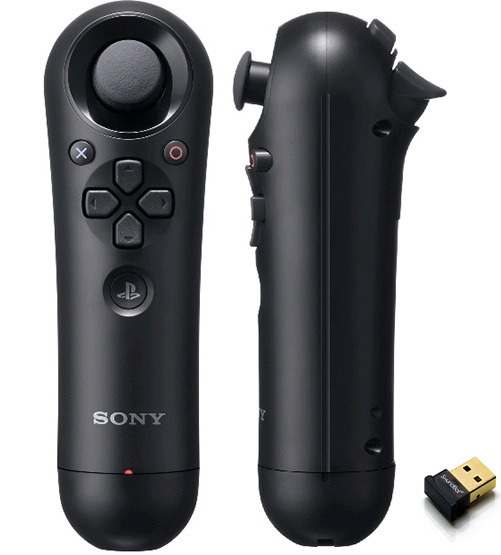
The Nav controller only has 10 buttons, which are plenty already. But thanks to a couple of awesome tools out there and some tweaking around you can set up about 80+ keyboard inputs……say wuuut!!! who the heck need so many shortcuts!!! (I´ll show you how to do it later, below)
First things first. Here is a list of all you need:
PS3 Navigation controller.
From 7 dollars used, up to 20 new on amazon……pretty sweet.
Bluetooth Dongle. (to use the controller wirelessly, so its optional)
From 2 bucks up to 15.
Mini-5 pin USB cable. (to charge the controller or to have it wired if you don’t have a Bluetooth dongle)
1,50 to 10 dollars. Everyone have one of these, EVERYONE!!!!
SCP DS3 driver and a software package. (needed to let windows recognize the PS3 nav controller. Links for them are on the step on how to configure the controller)
Free.
Xpadder. (needed to map the keyboard onto the controller)
10 Dollars. (their old 5.3 version is free, but I highly recommend buying the latest update)
That is it, for less than 30 bucks (if you buy an used controller and a cheap dongle+cable, like i did) you can have your own Photoshop controller extraordinaire.
Lets set up and configure this awesome bastard!
Just to note that If you are using a different controller that get recognized right away by windows, just skip this step.
To configure the controller and the Bluetooth dongle we need the SCP DS3 driver and software package mentioned above. This is needed because Sony never made Windows drivers for their controllers, and also the Bluetooth dongle driver needs to be re-written in order to be paired with the controller, this meaning that the dongle will only be usable with it. If you use different peripherals with a same dongle, you will need to buy one to dedicate only to the PS3 Nav controller.
To make things easier for me (and for you) and also because there are tons of tutorials out there about this step, I´m gonna link you to a YouTube video made by Wiltshire Tutorials. in his video he does a great job explaining (way better that I could ever do) how to do this part.
All the software you need for this part is in the description of that video.
Though I suggest going here first: http://forums.pcsx2.net/Thread-XInput-Wrapper-for-DS3-and-Play-com-USB-Dual-DS2-Controller and download the latest installer for the SCP Driver, also If you need extra information or if you wanna read more about this step that is the place to go. I suggest using the latest installer because that version lets you change the button layout of the controller. By default the PS home button gets configured in a way you can´t map in Xpadder, and with the the latest update I can have the PS home button set up to function as the R1 trigger, and Xpadder does let me re-map that button.
If you don’t care about being able to change that specific button just install the drivers provided in the video, they are totally fine.
Here is the video: https://youtu.be/TpSaOJJIun8
Its a pretty straight forward step, just follow everything he says. His video is for the PS3 controller, but it works the same for the Navigation controller, which is basically half of a PS3 controller. If you have any trouble, installing it or pairing it with the BT dongle, check his links in the description and see if that information helps (it did for me)
With that done, now we just need to install and setup Xpadder.
You don´t necessarily need to use Xpadder to re-map the buttons (there are a couple more programs that let you do the same, like joytokey) but I think this software is pretty complete, well thought and it offers a wide range of options to customize your controller or to map your shortcuts any way you like.
Kudos to the developer, he did a pretty fucking awesome job.
You can buy Xpadder here: http://www.xpadder.com/
Oh I said install, but actually you don´t need to install it, it runs directly from the .exe as a program.
Xpadder is really intuitive on how to set up the controller so I won´t go into any detail on how to do so, seriously, is ready to go from the start.
(you can use the image of the controller I put up there as your layout background if you wish)
The way Xpadder works is simple, you have 3 main features here:
1. The controller:
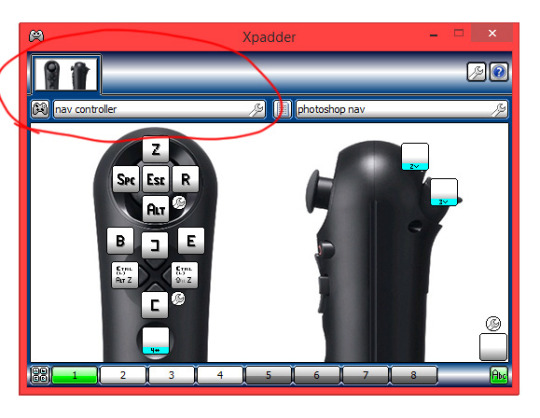
Which is the hardware you are using. In this case the Nav controller.
2. The Profiles:
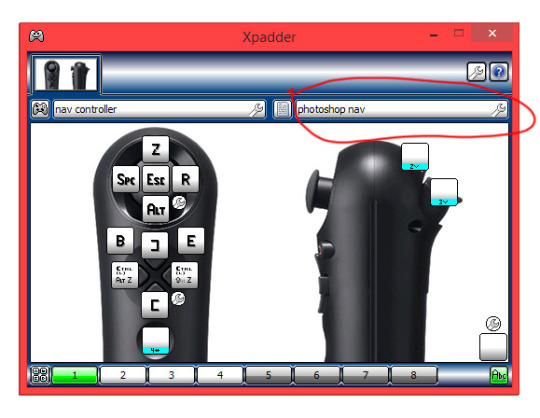
Which are the different mappings you configure for a said program. e.g. Photoshop, Painter, etc. Because each program uses different shortcuts is great that you can save different profiles. The cool thing about Xpadder is that you can set it up to automatically switch profiles according to the program you are using.
3. The Sets:
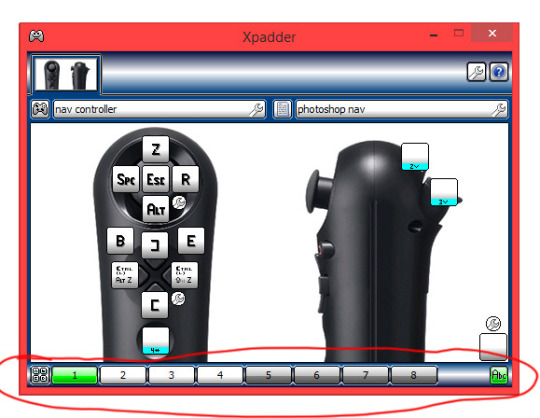
Which are the different mapping layouts within said profile. There up to 8 sets you can configure per profile. .
The Sets are actually the feature I love the most, because it lets you basically have 80+ shortcuts within one profile, and of course using just one little controller.
So here is what I do:
I don´t map the L1 trigger to any shortcut, but instead I make it temporarily (while you hold it) change to set 2, and the L2 trigger to the set 3. This allows me to have a new set of commands each time I hold any of the triggers. Kinda like a combo move. like this:
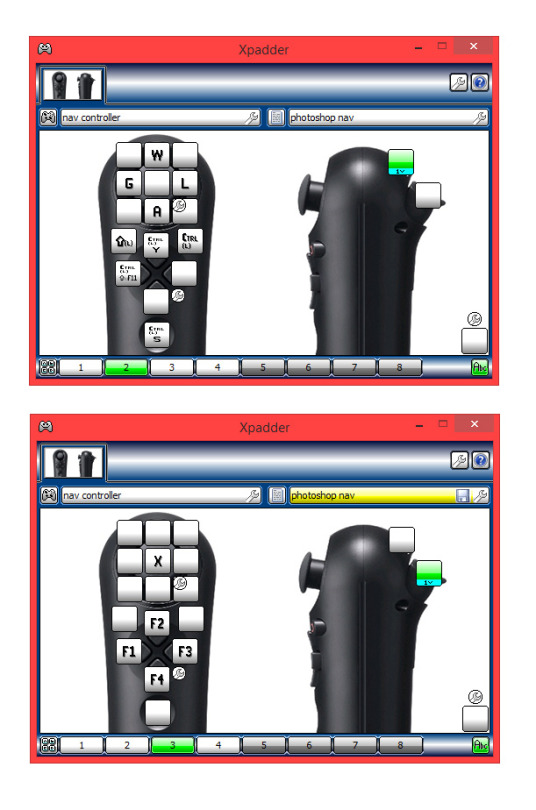
In each photo the green color above is the trigger I´m holding and the one below is the set that button brings up. You can see how it changes the mapping I have set.
And here is click by click how to set it up like that:
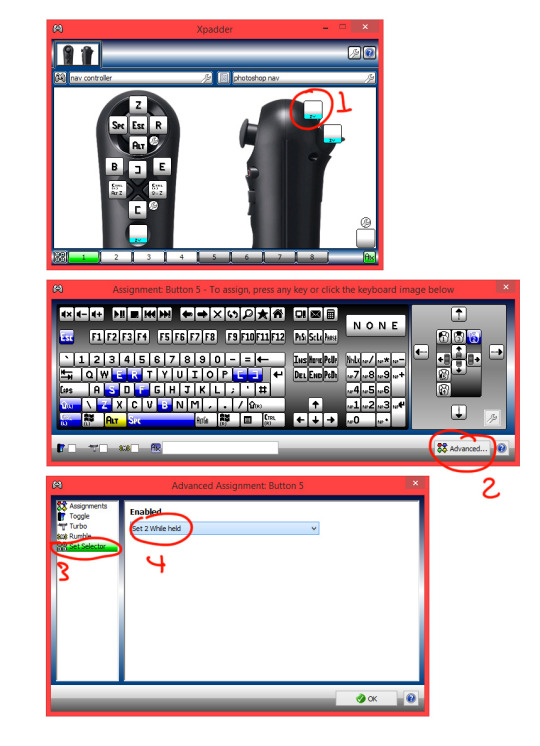
I also have the PS home button configured to change to set 4 (with the “two way” option in the advanced settings. Meaning: that one press of the button goes to set 4 and stays there, and if I press it again it returns to set 1) and there I map L1 to set 5 and L2 to set 6, which now gives me an insane amount of buttons to add shortcuts to. In addition, on the analog stick configuration settings (the little wrench icon on the lower right of the input mapping for that area) you can opt to have all directions as active, giving you 4 more buttons to map, that´s 9 buttons for just the stick.
So there you go.
This is something not many people know or think about doing…. I guess. So that is why I’m doing this “wannabe” tutorial for you all, is always cool to share shit like this, specially if its so simple but useful.
For all of those who suffer from back pain too, and all of you tired of your bulky-as-fuck keyboard, I hope this is of some use.
Now draw!
P.S.
Excuse me if I missed some stuff, or if you read it all and find it useless at the end, I ain’t too good explaining things.
But if you have any questions about any step or if you are stuck, feel free to message me.
Here is how to configure the PS button in case you wanna do that: https://buckteethsimulacra.tumblr.com/post/160422636892/here-is-how-to-properly-set-up-the-ps-home-button
I put it in a separate post ´cause this one is freaking long already.
#tutorial#scp#photoshop#ps3navcontroller#navcontroller#remote#remotecontrol#cintiq#remotecontroller#clipstudiopaint#tvpaint#controlremoto#ps3#controller#control#navigationcontroller#art#arttutorial#digitalart#scpdriver#wireless#wirelesscontrol#editing#xpadder#keyboard
0 notes