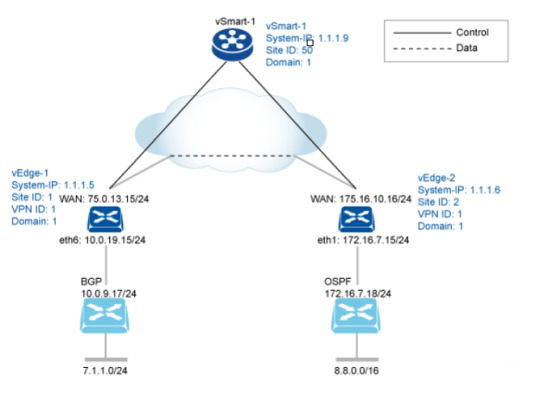
#networksetup
Text
Unlock the potential of your Small Office/Home Office with "SOHO Networks." This essential guide offers expert advice on setting up, configuring, and maintaining a robust network for your business or home office. Perfect for professionals and tech enthusiasts looking to enhance their connectivity and productivity.
0 notes
Text

Explore practical routing configuration examples for optimized data flow management and seamless network operation. Master the art of routing in complex environments. https://www.dclessons.com/routing-configuration-example
#RoutingConfiguration#NetworkingTutorial#CiscoConfig#NetworkEngineering#RoutingExample#NetworkSetup#CiscoNetworking#ITLearning#NetworkConfig#TechTutorials#DClessons
0 notes
Text
IP tĩnh là gì? Hướng dẫn cách cài đặt IP tĩnh mới nhất 2024
IP tĩnh giúp đảm bảo rằng một thiết bị luôn có cùng một địa chỉ IP, giúp bạn dễ dàng quản lý và tiếp cận nó. Điều này đặc biệt hữu ích khi bạn cần thiết lập các kết nối mạng đáng tin cậy.
Chúng ta sẽ khám phá định nghĩa và cách cài đặt IP tĩnh mới nhất 2024 trong bài viết dưới đây.
0 notes
Photo

The Best Dual-Band Routers of 2019
Take your internet connection to the next level with the unmatched performance and reliability of the best dual-band routers in 2019. Stay connected, stay efficient.
0 notes
Photo

The Best Dual-Band Routers of 2019
Say goodbye to buffering and hello to seamless streaming with these top-rated dual-band routers of 2019.
0 notes
Link
Having network issues? Trying to figure out Minecraft server port forwarding? No matter why you're here, you came to the right place!
#wifi#PortForwardingMadeEasy#techguide#networkingtips#techtutorials#internethelp#networksetup#onlinegaming#techsolutions#internettroubleshooting#networksecurity
0 notes
Text

Are you spending too much time sending a file to multiple devices? No more worries!
iTech Xpress is efficient in establishing and developing high-rated network services so that you can access files from any device.
We also provide top-branded networking products like LAN, WAN, and other wireless devices with one-time set-up and monthly maintenance service.
Call us for a secure network installation now!
Visit Our Website:- https://itechxpressinc.com/
0 notes
Video
youtube
Step-by-Step Guide:Samba Server Setup and Configuration for Linux and Wi...
0 notes
Text
Kuinka ottaa HP:n tulostinverkkopalvelut käyttöön?
Riippumatta siitä, kuka olet tai mitä teet, tiedät todennäköisesti jo, mitä tulostimet ovat ja kuinka niistä voi olla sinulle hyötyä. Nämä ovat laitteita, joiden avulla voit helposti luoda tulostettuja asiakirjoja ilman vaikeuksia.
Koska jokainen yksityishenkilö käyttää nykyään tiedostojen lähettämiseen teknologian ja verkon apua, HP:n luomat tulostimet ovat hyödyllisiä laajalla marginaalilla. Tästä syystä sinun tulee muistaa saada lisätietoja sen toiminnasta HP:n tukitiimin avulla mahdollisimman pian.
Kun olet selvittänyt kuinka navigoida HP-tulostimen tarjoamissa ominaisuuksissa, voit helpottaa ongelmiasi ja parantaa käyttömukavuuttasi huomattavasti. Se on yksi tärkeimmistä syistä, miksi niin monilla ihmisillä on nykyään tulostuslaitteet valmiina kotonaan tai toimistossaan. Kaikki nämä elementit auttavat sinua saavuttamaan tärkeimmät tulokset ja vähentämään riskien mahdollisuutta niin paljon kuin mahdollista.
Onko tämä ensimmäisiä kertoja, kun olet yrittänyt ostaa ja asentaa Hewlett-Packardin luoman painokoneen? Jos vastauksesi on kyllä, et ehkä ole varma mitä tehdä tai mistä aloittaa.
Mutta tarkoittaako se, että sinun pitäisi luopua vaatimuksistasi? Ei. Tämä johtuu siitä, että HP:n tekninen tukitiimi on käytettävissä koko päivän auttamaan kaikissa tilanteissa. Voit soittaa, lähettää tekstiviestin, lähettää sähköpostia tai keskustella live-chatissa heidän kanssaan aina kun sinulla on aikaa.
Sen lisäksi voit noudattaa muutamia vaiheita, jos haluat ottaa verkkopalvelut käyttöön tulostimessasi. Tarkastellaanpa niitä nyt yksityiskohtaisesti:
1. Ensimmäinen asia, joka sinun on tehtävä, on avata HP-tulostin kytkemällä se pistorasiaan
2. Kun ohjauspaneeli tulee eteen, napauta HP ePrint -kuvaketta
3. Napauta NetworkSetup-välilehteä, jonka kohtaat uudella sivulla
4. Valitse Web Services Setup -ruutu, joka löytyy seuraavalta avautuvalta sivulta
5. Ota ominaisuus käyttöön mieltymystesi ja tarpeidesi mukaan
Soita HP Tuki Suomi, jos haluat tietää lisää yllä olevista vaiheista.
0 notes
Text
PukiWikiサーバー構築(Mac mini[M1])
作業内容
PukiWikiのネットワーク接続をローカルホストから内部ネットワーク(有線)に変更する
PukiWikiサーバー起動の手段を手動のみに変更する
サーバーメンテナンスのWebコンソール(Cockpit)経由リモート接続をSSHリモートログインに変更する
前回作業の続き
手順1:事前確認
内部ネットワーク(有線)の確認
ターミナルから下記のコマンド操作を行う
taiyo@Mac-mini ~ % networksetup -getinfo Ethernet Manual Configuration IP address: 192.168.20.60 Subnet mask: 255.255.255.0 Router: (null) IPv6: Automatic IPv6 IP address: none IPv6 Router: none Ethernet Address:
PukiWikiサーバー確認
ターミナルから下記のコマンド操作を行う
taiyo@Mac-mini ~ % ps -A | grep 000_rh8-pukiwiki 144 ?? 34:30.30 /opt/homebrew/bin/qemu-system-aarch64 -name 000_rh8-pukiwiki -display none -machine virt,highmem=off -cpu cortex-a72 -smp 1 -m 768M -k ja -device intel-hda -device hda-output -device virtio-gpu-pci -device qemu-xhci -device usb-tablet -device usb-kbd -monitor telnet::46000,server,nowait -net nic,model=virtio -net user,hostfwd=tcp:127.0.0.1:46100-:9090, guestfwd=tcp:10.0.2.15:9090-cmd:/usr/bin/nc 127.0.0.1 46100,hostfwd=tcp:127.0.0.1:46200-:80, guestfwd=tcp:10.0.2.15:80-cmd:/usr/bin/nc 127.0.0.1 46200 -drive if=pflash,format=raw,file=/Users/taiyo/qemu-images/000/edk2-aarch64-code.fd,readonly=on -drive if=pflash,format=raw,file=/Users/taiyo/qemu-images/000/ovmf_vars.fd -drive if=virtio,format=raw,file=/Users/taiyo/qemu-images/000/qemu-000.img -boot order=d 13601 ttys000 0:00.00 grep 000_rh8-pukiwiki
PukiWikiサーバー停止
ターミナルから下記のコマンド操作を行う
taiyo@Mac-mini ~ % sh ~/qemu-images/qemu-000-stop.sh ????????QEMU 7.1.0 monitor - type 'help' for more information (qemu) system_powerdown (qemu) % taiyo@Mac-mini ~ % ps -A | grep 000_rh8-pukiwiki 13736 ttys000 0:00.00 grep 000_rh8-pukiwiki
手順2:QEMU関連の設定変更
自動起動設定を解除
ターミナルから下記のコマンド操作を行う
taiyo@Mac-mini ~ % sudo launchctl unload /Library/LaunchDaemons/local.qemu-guest-000.start.plist Password: taiyo@Mac-mini ~ % sudo rm /Library/LaunchDaemons/local.qemu-guest-000.start.plist
手動起動スクリプトを更新
ターミナルから下記のコマンド操作を行う
taiyo@Mac-mini ~ % vim qemu-images/qemu-000-start.sh taiyo@Mac-mini ~ % cat ~/qemu-images/qemu-000-start.sh #!/bin/bash GUEST_NAME="000_rh8-pukiwiki" MONITOR_PORT=46000 SSH_PORT=46100 HTTP_PORT=46200 num=$(ps -A | grep -e ${GUEST_NAME} | grep -v "grep" | wc -c) if [ $num -gt 0 ]; then echo "Skip: ${GUEST_NAME} process is alrady exist." else nohup /opt/homebrew/bin/qemu-system-aarch64 -name ${GUEST_NAME} -display none \ -machine virt,highmem=off -cpu cortex-a72 -smp 1 -m 768M -k ja \ -device intel-hda -device hda-output \ -device virtio-gpu-pci -device qemu-xhci \ -device usb-tablet -device usb-kbd \ -monitor telnet::${MONITOR_PORT},server,nowait \ -net nic,model=virtio \ -net user,hostfwd=tcp:192.168.20.60:${SSH_PORT}-:22,hostfwd=tcp:192.168.20.60:${HTTP_PORT}-:80,'guestfwd=tcp:10.0.2.15:80-cmd:/usr/bin/nc 192.168.20.60 '${HTTP_PORT} \ -drive if=pflash,format=raw,file=/Users/taiyo/qemu-images/000/edk2-aarch64-code.fd,readonly=on \ -drive if=pflash,format=raw,file=/Users/taiyo/qemu-images/000/ovmf_vars.fd \ -drive if=virtio,format=raw,file=/Users/taiyo/qemu-images/000/qemu-000.img \ -boot order=d > /tmp/${GUEST_NAME}.log & fi
仮想サーバー起動
ターミナルから下記のコマンド操作を行う
taiyo@Mac-mini ~ % sh ~/qemu-images/qemu-000-start.sh taiyo@Mac-mini ~ % ps -A | grep 000_rh8-pukiwiki 4513 ttys000 0:14.92 /opt/homebrew/bin/qemu-system-aarch64 -name 000_rh8-pukiwiki -display none -machine virt,highmem=off -cpu cortex-a72 -smp 1 -m 768M -k ja -device intel-hda -device hda-output -device virtio-gpu-pci -device qemu-xhci -device usb-tablet -device usb-kbd -monitor telnet::46000,server,nowait -net nic,model=virtio -net user,hostfwd=tcp:192.168.20.60:46100-:22,hostfwd=tcp:192.168.20.60:46200-:80, guestfwd=tcp:10.0.2.15:80-cmd:/usr/bin/nc 192.168.20.60 46200 -drive if=pflash,format=raw,file=/Users/taiyo/qemu-images/000/edk2-aarch64-code.fd,readonly=on -drive if=pflash,format=raw,file=/Users/taiyo/qemu-images/000/ovmf_vars.fd -drive if=virtio,format=raw,file=/Users/taiyo/qemu-images/000/qemu-000.img -boot order=d 4520 ttys000 0:00.00 grep 000_rh8-pukiwiki
手順3:Cockpitサービスを解除
PukiWikiサーバーにログイン
ターミナルから下記のコマンド操作を行う
taiyo@Mac-mini ~ % ssh -p 46100 [email protected] [email protected]'s password: Web console: https://virt000:9090/ or https://10.0.2.15:9090/ Last login: Mon Oct 3 11:26:55 2022 from ::ffff:10.0.2.2
Cockpitサービスを停止する
ターミナルから下記のコマンド操作を行う
[taiyo@virt000 ~]$ sudo systemctl stop cockpit.socket [sudo] taiyo のパスワード:
Cockpitサービスの自動起動を解除する
ターミナルから下記のコマンド操作を行う
[taiyo@virt000 ~]$ sudo systemctl disable cockpit.socket Removed /etc/systemd/system/sockets.target.wants/cockpit.socket.
Cockpit関連パッケージをアンインストールする
ターミナルから下記のコマンド操作を行う
[taiyo@virt000 ~]$ sudo dnf list --installed | grep cockpit cockpit.aarch64 264.1-1.el8 @rhel-8-for-aarch64-baseos-rpms cockpit-bridge.aarch64 264.1-1.el8 @rhel-8-for-aarch64-baseos-rpms cockpit-packagekit.noarch 264.1-1.el8 @rhel-8-for-aarch64-appstream-rpms cockpit-podman.noarch 49.1-1.module+el8.6.0+15917+093ca6f8 @rhel-8-for-aarch64-appstream-rpms cockpit-storaged.noarch 264.1-1.el8 @rhel-8-for-aarch64-appstream-rpms cockpit-system.noarch 264.1-1.el8 @rhel-8-for-aarch64-baseos-rpms cockpit-ws.aarch64 264.1-1.el8 @rhel-8-for-aarch64-baseos-rpms subscription-manager-cockpit.noarch 1.28.29-3.el8 @rhel-8-for-aarch64-baseos-rpms [taiyo@virt000 ~]$ sudo dnf remove cockpit cockpit-bridge cockpit-packagekit cockpit-podman cockpit-storaged cockpit-system cockpit-ws サブスクリプション管理リポジトリーを更新しています。 依存関係が解決しました。 ======================================================================================================================================== パッケージ Arch バージョン リポジトリー サイズ ======================================================================================================================================== 削除中: cockpit aarch64 264.1-1.el8 @rhel-8-for-aarch64-baseos-rpms 57 k cockpit-bridge aarch64 264.1-1.el8 @rhel-8-for-aarch64-baseos-rpms 1.0 M cockpit-packagekit noarch 264.1-1.el8 @rhel-8-for-aarch64-appstream-rpms 568 k cockpit-podman noarch 49.1-1.module+el8.6.0+15917+093ca6f8 @rhel-8-for-aarch64-appstream-rpms 526 k cockpit-storaged noarch 264.1-1.el8 @rhel-8-for-aarch64-appstream-rpms 574 k cockpit-system noarch 264.1-1.el8 @rhel-8-for-aarch64-baseos-rpms 3.3 M cockpit-ws aarch64 264.1-1.el8 @rhel-8-for-aarch64-baseos-rpms 2.4 M 依存関係パッケージの削除: subscription-manager-cockpit noarch 1.28.29-3.el8 @rhel-8-for-aarch64-baseos-rpms 3.7 M 未使用の依存関係の削除: cairo aarch64 1.15.12-6.el8 @rhel-8-for-aarch64-appstream-rpms 1.7 M cairo-gobject aarch64 1.15.12-6.el8 @rhel-8-for-aarch64-appstream-rpms 68 k clevis aarch64 15-8.el8 @rhel-8-for-aarch64-appstream-rpms 206 k clevis-luks aarch64 15-8.el8 @rhel-8-for-aarch64-appstream-rpms 72 k device-mapper-multipath aarch64 0.8.4-22.el8_6.1 @rhel-8-for-aarch64-baseos-rpms 371 k device-mapper-multipath-libs aarch64 0.8.4-22.el8_6.1 @rhel-8-for-aarch64-baseos-rpms 2.0 M fontconfig aarch64 2.13.1-4.el8 @rhel-8-for-aarch64-baseos-rpms 1.2 M iscsi-initiator-utils aarch64 6.2.1.4-4.git095f59c.el8 @rhel-8-for-aarch64-baseos-rpms 1.8 M iscsi-initiator-utils-iscsiuio aarch64 6.2.1.4-4.git095f59c.el8 @rhel-8-for-aarch64-baseos-rpms 201 k isns-utils-libs aarch64 0.99-1.el8 @rhel-8-for-aarch64-baseos-rpms 542 k jose aarch64 10-2.el8 @rhel-8-for-aarch64-appstream-rpms 158 k jq aarch64 1.6-3.el8 @rhel-8-for-aarch64-appstream-rpms 507 k libX11 aarch64 1.6.8-5.el8 @rhel-8-for-aarch64-appstream-rpms 1.3 M libX11-common noarch 1.6.8-5.el8 @rhel-8-for-aarch64-appstream-rpms 1.3 M libXau aarch64 1.0.9-3.el8 @rhel-8-for-aarch64-appstream-rpms 112 k libXext aarch64 1.3.4-1.el8 @rhel-8-for-aarch64-appstream-rpms 145 k libXrender aarch64 0.9.10-7.el8 @rhel-8-for-aarch64-appstream-rpms 74 k libblockdev-lvm aarch64 2.24-8.el8 @rhel-8-for-aarch64-appstream-rpms 70 k libjose aarch64 10-2.el8 @rhel-8-for-aarch64-appstream-rpms 162 k libluksmeta aarch64 9-4.el8 @rhel-8-for-aarch64-appstream-rpms 94 k libxcb aarch64 1.13.1-1.el8 @rhel-8-for-aarch64-appstream-rpms 2.0 M libxslt aarch64 1.1.32-6.el8 @rhel-8-for-aarch64-baseos-rpms 814 k luksmeta aarch64 9-4.el8 @rhel-8-for-aarch64-appstream-rpms 72 k oniguruma aarch64 6.8.2-2.el8 @rhel-8-for-aarch64-appstream-rpms 688 k pixman aarch64 0.38.4-2.el8 @rhel-8-for-aarch64-appstream-rpms 396 k python3-cairo aarch64 1.16.3-6.el8 @rhel-8-for-aarch64-appstream-rpms 333 k python3-gobject aarch64 3.28.3-2.el8 @rhel-8-for-aarch64-appstream-rpms 68 k python3-html5lib noarch 1:0.999999999-6.el8 @rhel-8-for-aarch64-appstream-rpms 1.1 M python3-lxml aarch64 4.2.3-4.el8 @rhel-8-for-aarch64-appstream-rpms 4.9 M python3-psutil aarch64 5.4.3-11.el8 @rhel-8-for-aarch64-appstream-rpms 2.0 M python3-pydbus noarch 0.6.0-5.el8 @rhel-8-for-aarch64-appstream-rpms 122 k python3-setuptools noarch 39.2.0-6.el8 @rhel-8-for-aarch64-baseos-rpms 450 k python3-systemd aarch64 234-8.el8 @rhel-8-for-aarch64-appstream-rpms 489 k python3-tracer noarch 0.7.5-2.el8 @rhel-8-for-aarch64-appstream-rpms 299 k python3-webencodings noarch 0.5.1-6.el8 @rhel-8-for-aarch64-appstream-rpms 72 k redhat-logos aarch64 84.5-1.el8 @rhel-8-for-aarch64-baseos-rpms 381 k rhsm-icons noarch 1.28.29-3.el8 @rhel-8-for-aarch64-baseos-rpms 6.3 k setroubleshoot-plugins noarch 3.3.14-1.el8 @rhel-8-for-aarch64-appstream-rpms 2.6 M setroubleshoot-server aarch64 3.3.26-3.el8 @rhel-8-for-aarch64-appstream-rpms 1.3 M tpm2-tools aarch64 4.1.1-5.el8 @rhel-8-for-aarch64-baseos-rpms 6.4 M tracer-common noarch 0.7.5-2.el8 @rhel-8-for-aarch64-appstream-rpms 33 k udisks2-iscsi aarch64 2.9.0-9.el8 @rhel-8-for-aarch64-appstream-rpms 72 k udisks2-lvm2 aarch64 2.9.0-9.el8 @rhel-8-for-aarch64-appstream-rpms 137 k userspace-rcu aarch64 0.10.1-4.el8 @rhel-8-for-aarch64-baseos-rpms 572 k トランザクションの概要 ======================================================================================================================================== 削除 52 パッケージ 解放された容量: 49 M これでよろしいですか? [y/N]: y [以下略]
手順4:動作確認
PukiWiki表示確認
Webブラウザから下記URLを開いて、PukiWikiの内容が表示されることを確認する
参照先:http://192.168.20.60:46200/WkWiki/
PukiWiki更新確認
PukiWikiの記事を編集して、内容が更新されることを確認する
0 notes
Text

Ready to dive deep into routing configurations? DC Lessons brings you a comprehensive course that's perfect for IT professionals, network engineers, and anyone eager to master the art of routing configuration. https://www.dclessons.com/routing-configuration-example
#RoutingConfiguration#Networking#Cisco#NetworkingTutorial#DCLEssons#ITTraining#RoutingExample#NetworkSetup#ITSkills#NetworkingGuide#RoutingProtocols#TechTutorials#RoutingAndSwitching#NetworkConfiguration#InternetRouting#ITEducation#RoutingBasics
0 notes
Text
snapchat information
Snapchat is an American multimedia instant messaging programme and service established by Snap Inc., originally Snapchat Inc.
aka.ms/networksetup
Snapchat's pictures and messages are only viewable for a limited time before they disappear forever.
The app has progressed from its early concentration on photo sharing between individuals to its current emphasis on users' "Stories" comprising 24 hours of chronological content and "Discover," which allows advertisers to offer ad-supported short-form content.
It also allows users to retain images in the "my eyes only" which lets them keep their photos in a password-protected region.
According to reports, it has also implemented some form of end-to-end encryption, with future ambitions to expand its use.
Evan Spiegel, Bobby Murphy, and Reggie Brown[7] all attended Stanford before they went on to develop Snapchat.
It has become noted for reflecting a new, mobile-first orientation for social networking, and places substantial emphasis on users interacting with virtual stickers and augmented reality objects.
As of July 2021, Snapchat had 293 million daily active users, a 23% rise over a year.
[8]
There are about 4 billion Snaps sent every day.
[9]
Parents often worry about their children's privacy when they use Snapchat, especially if they are under 16.
1 note
·
View note
Text
シェルスクリプトを使って macOS 上で有効になっている物理ネットワークデバイス名を取得する
はじめに
非常に限定されたシチュエーションに関する内容です。
macOS プラットフォームに限定ですが、現在接続中の無線/有線ネットワークデバイスを抽出したいという相談がありました。
「なるほどそういう要件もあるのだな」と思うと同時に興味深かったため、対応方法を考えてみました。
検証環境
$ uname -v
Darwin Kernel Version 21.6.0: Sat Jun 18 17:07:22 PDT 2022; root:xnu-8020.140.41~1/RELEASE_ARM64_T6000
$ bash -version | head -n 1
GNU bash, バージョン 5.1.16(1)-release (aarch64-apple-darwin21.1.0)
networksetup コマンドを利用する
macOS…

View On WordPress
0 notes
Text
Pulsate Business Information Service, LLC: The Trusted Digital Marketing and IT Agency in Cleveland
Gone are the days when businesses advertised their products and services through newspapers and other such mediums. Nowadays, business owners prefer digital marketing. It is the new buzzword in the marketing world. In simple terms, digital marketing refers to advertising delivered through digital channels such as websites, search engines, social media, email, and mobile apps.
Set up in 2004, Pulsate Business Information Service, LLC is a trusted Digital Marketing and IT agency in Cleveland. It believes that creativity can reap great results and this approach and powerful force allows them to deliver imaginative top-down digital strategies that engage, convert and, most importantly, perform. This Ohio-based company provides a plethora of services that includes but is not limited to Network Designing, Install & Setup Services, POS Systems, Funding & Financing, Web Development, Web Designing and Hosting, installation and maintenance of CCTV Surveillance, and data recovery and network setup in Lake County. With many years of experience in the digital marketing industry, Pulsate Business Information Service, LLC offers a variety of marketing strategies, making it the first choice of many businesses in and around Cleveland.

The company uses the best tools & software for digital marketers, web designers, developers, and digital agencies. Its diligent team comprises digital marketing experts who have won the hearts of its clients by offering best-in-class social media marketing, content marketing, content strategy, brand awareness, and media strategy.
Whether you are a sole trader or have an internal team of marketers, Pulsate Business Information Service, LLC has the complete solution to support you.
#datarecovery#networksetup#cleveland#lakecounty#digitalmarketing#itagency#best digital marketing solutions#best data recovery software
0 notes
Photo
And now HELP I T SOLUTION pvt has started the maintenance of computer/laptops and networking also. If you need AMC so pleas whatsap me on +917000853373 #amc #service #networking #rent #rentallaptop #networksetup #computeramc #jabalpuriya #computermaintenance #maintence #cisco #switch #modem #rj45 #computerlab #laptop #computer #speed #hits_india #rinkuspeed #jabalpur_city (at Jabalpur, Madhya Pradesh) https://www.instagram.com/p/CFn7Nx1HkwP/?igshid=1r3hr9o0wnvfx
#amc#service#networking#rent#rentallaptop#networksetup#computeramc#jabalpuriya#computermaintenance#maintence#cisco#switch#modem#rj45#computerlab#laptop#computer#speed#hits_india#rinkuspeed#jabalpur_city
0 notes
Text
Commands For Terminal On Mac Os

The Terminal app allows you to control your Mac using a command prompt. Why would you want to do that? Well, perhaps because you’re used to working on a command line in a Unix-based system and prefer to work that way. Terminal is a Mac command line interface. There are several advantages to using Terminal to accomplish some tasks — it’s usually quicker, for example. In order to use it, however, you’ll need to get to grips with its basic commands and functions. Once you’ve done that, you can dig deeper and learn more commands and use your Mac’s command prompt for more complex, as well as some fun, tasks.
Mac Terminal Commands Pdf
Just open the Terminal and type in the following command: say 'Hello, from MacLife' This will cause the default selected voice in OS X to spring to life and say the words that are wrapped in quotes. You can view a full list of potential Mac terminal network commands using the networksetup tool by typing networksetup -help at the terminal. This will display the help list, with various examples on how to use the tool to view and change different network settings. Terminal (officially called Terminal.app) is, strictly speaking, an emulator and works off most typical UNIX commands (OS X is a UNIX-based system, as opposed to Windows, which is NT-based). Unlike OS X, which has a graphical user interface (shortened to GUI), Terminal works off a text-based interface and all commands have to be typed in - this.
Curated Mac apps that keep your Mac’s performance under control. Avoid Terminal commands, avoid trouble.
Download Free
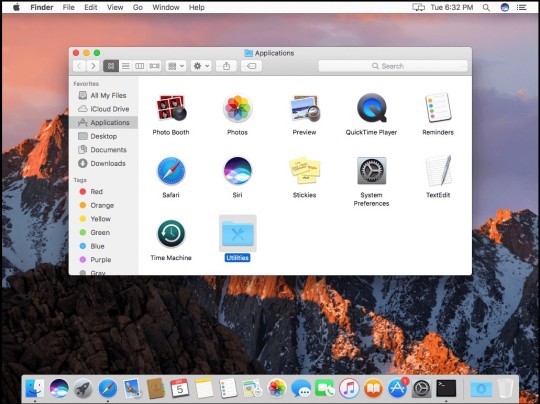
How to open Terminal on Mac
The Terminal app is in the Utilities folder in Applications. To open it, either open your Applications folder, then open Utilities and double-click on Terminal, or press Command - spacebar to launch Spotlight and type 'Terminal,' then double-click the search result.
You’ll see a small window with a white background open on your desktop. In the title bar are your username, the word 'bash' and the dimensions of the window in pixels. Bash stands for 'Bourne again shell'. There are a number of different shells that can run Unix commands, and on the Mac Bash is the one used by Terminal.
If you want to make the window bigger, click on the bottom right corner and drag it outwards. If you don’t like the black text on a white background, go to the Shell menu, choose New Window and select from the options in the list.
If Terminal feels complicated or you have issues with the set-up, let us tell you right away that there are alternatives. MacPilot allows to get access to over 1,200 macOS features without memorizing any commands. Basically, a third-party Terminal for Mac that acts like Finder.
For Mac monitoring features, try iStat Menus. The app collects data like CPU load, disk activity, network usage, and more — all of which accessible from your menu bar.
Basic Mac commands in Terminal
The quickest way to get to know Terminal and understand how it works is to start using it. But before we do that, it’s worth spending a little time getting to know how commands work. To run a command, you just type it at the cursor and hit Return to execute.
Every command is made up of three elements: the command itself, an argument which tells the command what resource it should operate on, and an option that modifies the output. So, for example, to move a file from one folder to another on your Mac, you’d use the move command 'mv' and then type the location of the file you want to move, including the file name and the location where you want to move it to.
Let’s try it.
Type cd ~/Documentsthen and press Return to navigate to your Home folder.
Type lsthen Return (you type Return after every command).
You should now see a list of all the files in your Documents folder — ls is the command for listing files.
To see a list of all the commands available in Terminal, hold down the Escape key and then press y when you see a question asking if you want to see all the possibilities. To see more commands, press Return.
Unix has its own built-in manual. So, to learn more about a command type man (name of command), where 'command' is the name of the command you want find out more about.
Terminal rules
There are a few things you need to bear in mind when you’re typing commands in Terminal, or any other command-line tool. Firstly, every character matters, including spaces. So when you’re copying a command you see here, make sure you include the spaces and that characters are in the correct case.
You can’t use a mouse or trackpad in Terminal, but you can navigate using the arrow keys. If you want to re-run a command, tap the up arrow key until you reach it, then press Return. To interrupt a command that’s already running, type Control-C.
Commands are always executed in the current location. So, if you don’t specify a location in the command, it will run wherever you last moved to or where the last command was run. Use the cdcommand, followed by a directory path, like in Step 1 above, to specify the folder where you want a command to run.
There is another way to specify a location: go to the Finder, navigate to the file or folder you want and drag it onto the Terminal window, with the cursor at the point where you would have typed the path.
Here’s another example. This time, we’ll create a new folder inside your Documents directory and call it 'TerminalTest.'
Open a Finder window and navigate to your Documents folder.
Type cd and drag the Documents folder onto the Terminal window.
Now, type mkdir 'TerminalTest'
Go back to the Finder, open Text Edit and create a new file called 'TerminalTestFile.rtf'. Now save it to the TerminalTest folder in your Documents folder.
In the Terminal window, type cd ~/Documents/TerminalTest then Return. Now type lsand you should see 'TerminalTestFile' listed.
To change the name of the file, type this, pressing Return after every step:
cd~/Documents/Terminal Test
mv TerminalTestFile TerminalTestFile2.rtf
That will change the name of the file to 'TerminalTestFile2'. You can, of course, use any name you like. The mv command means 'move' and you can also use it to move files from one directory to another. In that case, you’d keep the file names the same, but specify another directory before typing the the second instance of the name, like this:
mv ~/Documents/TerminalTest TerminalTestFile.rtf ~/Documents/TerminalTest2 TerminalTestFile.rtf
More advanced Terminal commands
Terminal can be used for all sorts of different tasks. Some of them can be performed in the Finder, but are quicker in Terminal. Others access deep-rooted parts of macOS that aren’t accessible from the Finder without specialist applications. Here are a few examples.
Copy files from one folder to another
In a Terminal window, type ditto (folder 1) (folder 1) where 'folder 1' is the folder that hosts the files and 'folder 2' is the folder you want to move them to.
To see the files being copied in the Terminal window, type -v after the command.
Download files from the internet
You’ll need the URL of the file you want to download in order to use Terminal for this.
cd ~/Downloads/
curl -O (URL of file you want to download)
If you want to download the file to a directory other than your Downloads folder, replace ~/Downloads/ with the path to that folder, or drag it onto the Terminal window after you type the cd command.
Change the default location for screenshots
If you don’t want macOS to save screenshots to your Desktop when you press Command-Shift-3, you can change the default location in Terminal
defaults write com.apple.screencapture location (path to folder where you want screenshots to be saved)
Hit Return
killall SystemUIServer
Hit Return
Change the default file type for screenshots
By default, macOS saves screenshots as .png files. To change that to .jpg, do this:
defaults write com.apple.screencapture type JPG
Press Return
killall SystemUIServer
Press Return
Delete all files in a folder
The command used to delete, or remove, files in Terminal is rm. So, for example, if you wanted to remove a file in your Documents folder named 'oldfile.rtf' you’d use cd ~/Documents to go to your Documents folder then to delete the file. As it stands, that will delete the file without further intervention from you. If you want to confirm the file to be deleted, use -i as in rm -i oldfile.rtf
To delete all the files and sub-folders in a directory named 'oldfolder', the command is rm -R oldfolder and to confirm each file should be deleted, rm -iR oldfolder
Just because you can use Terminal to delete files on your Mac, doesn’t mean you should. It’s a relatively blunt instrument, deleting only those files and folders you specify.
Another way to free up space
If your goal in removing files or folders is to free up space on your Mac, or to remove junk files that are causing your Mac to run slowly, it’s far better to use an app designed for the purpose. CleanMyMac X is one such app.
It will scan your Mac for files and recommend which ones you can delete safely, as well as telling you how much space you’ll save. And once you’ve decided which files to delete, you can get rid of them in a click. You can download CleanMyMac here.
As you can see, while Terminal may look scary and seem like it’s difficult to use, it really isn’t. The key is learning a few commands, such as those we’ve outlined above, and getting to know the syntax for those commands.
However, you should be careful when using Terminal, it’s a powerful tool that has deep access to your Mac’s system files. Check commands by googling them if you’re not sure what they do. And if you need to delete files to save space, use an app like CleanMyMac X to do it. It’s much safer!
Mac Terminal Commands Pdf
These might also interest you:
1 note
·
View note
Last Seen Blogs

jellyfishteatea
jellyfish

ifyouwerethewinteridbethesnow
Padraic, my prince

ourpetco
Ourpet.co

xiaophilia
Inactive and dying

alturdbeast
AlturdBeast