#node js express application
Explore tagged Tumblr posts
Visit Tumblr Blog
Explore Tumblr blogs with no restrictions, modern design and the best experience.
Last Seen Tumblr Blogs


Fun Fact
Women make up for the other 50% of Tumblr’s audience.
Text
Helpful Insight is one of the best Node.js Application Development Companies in India. We are developing various Node.js applications with an experienced team of Node.js developers. Our developers are pros at working with real-time, scalable, and multilayered applications based on node.js.
Our team at Helpful Insight includes Node JS developers who develop rapid and scalable network web applications in Bharat. NodeJS is an excellent platform for developing high-performance and reliable network applications, by using JavaScript. Our NodeJS developers know how to deliver tailor-made web applications, designed for rapid scaling, to fit your specific business needs.
Web applications requiring low latency, high throughput, and high scalability are ideally developed using node js development services. Our NodeJS developers have extensive experience in developing applications that solve real business problems while offering easy maintenance. We understand that you require an application capable of processing big data sets and handling high-traffic volumes. Hire Node JS Developers for your business will meet all requirements and give you the best experience possible.
We ensure to deliver a dependable, secure, and scalable web application to you. Rest assured, our developers will do a tremendous job providing you with a web application and backend development that surpasses all of your wishes and hopes. Let us help you design that web application you have always desired, contact us today.
#best node js backend framework#express js#node js applications examples#best node.js ide#node-js application example github#node js application example code#node js framework list
0 notes
Text
youtube
#youtube#video#codeonedigest#microservices#microservice#nodejs tutorial#nodejs express#node js development company#node js#nodejs#node#node js training#node js express#node js development services#node js application#redis cache#redis#docker image#dockerhub#docker container#docker tutorial#docker course
0 notes
Text
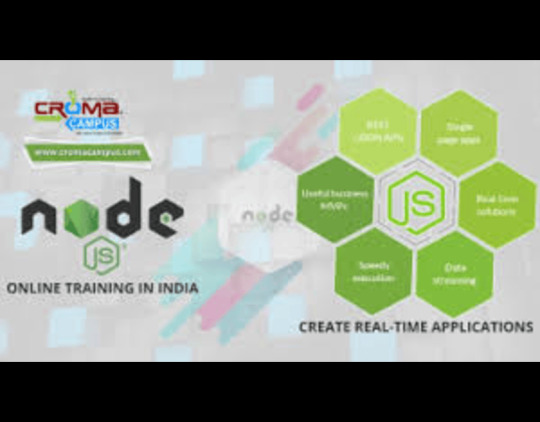
Node js Full Stack
Node js Full Stack course at Croma Campus offers hands-on training in front-end and back-end development. Learn HTML, CSS, JavaScript, Node.js, Express, MongoDB, and more. This course prepares you for real-world projects and job-ready skills. Ideal for aspiring full-stack developers looking to build dynamic web applications.
0 notes
Text
Socket.IO setup

Building Real-Time Applications with Socket.IO setup: Step-by-Step Tutorial
Socket.IO setup. In today's interconnected world, real-time applications are becoming increasingly essential. Whether it's for live chat applications, collaborative tools, or gaming, real-time communication enhances user engagement and makes interactions more dynamic. One powerful tool for building real-time applications is Socket.IO. In this tutorial, we will guide you through the process of building a real-time application using Socket.IO, focusing on key concepts and practical implementation. What is Socket.IO? Socket.IO is a JavaScript library that enables real-time, bidirectional communication between web clients (like browsers) and servers. Unlike traditional HTTP requests, which follow a request-response model, Socket.IO provides a persistent connection, enabling instant data exchange between the client and server. Socket.IO works on top of WebSockets, but it provides fallback mechanisms for environments where WebSockets may not be available. This ensures that real-time communication is possible in a wide range of conditions, making it a versatile choice for building interactive web applications. Prerequisites Before we dive into the tutorial, make sure you have the following: Basic knowledge of JavaScript and Node.js Node.js installed on your machine. You can download it from nodejs.org. A code editor (like Visual Studio Code or Sublime Text). Step 1: Setting Up the Project Start by setting up a basic Node.js project. Create a new directory for your project: bash mkdir real-time-app cd real-time-app Initialize a new Node.js project: bash npm init -y Install Express and Socket.IO: bash npm install express socket.io Express is a lightweight web framework for Node.js that simplifies the creation of web servers. Socket.IO will handle real-time communication between the server and the client. Step 2: Create the Server Now that we've set up the dependencies, let's create a simple server. Create a file called server.js in the project root: js const express = require('express'); const http = require('http'); const socketIo = require('socket.io');// Create an instance of Express app const app = express();// Create an HTTP server const server = http.createServer(app); // Initialize Socket.IO with the HTTP server const io = socketIo(server); // Serve static files (like HTML, CSS, JS) app.use(express.static('public')); // Handle socket connection io.on('connection', (socket) => { console.log('a user connected'); // Handle message from client socket.on('chat message', (msg) => { io.emit('chat message', msg); // Emit the message to all clients }); // Handle disconnect socket.on('disconnect', () => { console.log('user disconnected'); }); }); // Start the server server.listen(3000, () => { console.log('Server is running on http://localhost:3000'); }); Step 3: Create the Client-Side Next, we need to create the client-side code that will connect to the server and send/receive messages in real time. Create a public folder inside the project directory. In the public folder, create an index.html file: html Real-Time Chat Real-Time Chat Application Send const socket = io(); // Connect to the server// Listen for messages from the server socket.on('chat message', function(msg){ const li = document.createElement('li'); li.textContent = msg; document.getElementById('messages').appendChild(li); }); // Handle form submission const form = document.getElementById('form'); form.addEventListener('submit', function(event){ event.preventDefault(); const input = document.getElementById('input'); socket.emit('chat message', input.value); // Send the message to the server input.value = ''; // Clear the input field }); Step 4: Run the Application With the server and client code in place, it’s time to run the application! In your terminal, run the following command: bash node server.js Open your browser and go to http://localhost:3000. You should see the chat interface. Open multiple browser windows or tabs to simulate multiple users. Type a message in the input field and click "Send." You should see the message appear in real-time in all open windows/tabs. Step 5: Enhancements and Improvements Congratulations! You've built a basic real-time chat application using Socket.IO. To enhance the application, consider adding the following features: User authentication: Allow users to log in before they can send messages. Private messaging: Enable users to send messages to specific individuals. Message persistence: Use a database (e.g., MongoDB) to store chat history. Typing indicators: Show when a user is typing a message in real time. Emoji support: Allow users to send emojis and other media. Conclusion Socket.IO setup. In this tutorial, we covered the basics of building a real-time application using Socket.IO. We walked through setting up a Node.js server with Express, integrating Socket.IO for real-time communication, and creating a simple chat interface on the client side. Socket.IO makes it easy to add real-time features to your web applications, enabling more dynamic and interactive experiences for users. With this foundation, you can now start exploring more advanced real-time features and take your applications to the next level! Read the full article
#communication#CreatetheClient-Side#CreatetheServer#Enhancements#function#History#Improvements#RuntheApplication#Setting
0 notes
Text
Best MERN Stack Web Development Course in Rawalpindi

Are you looking about starting a career in Full stack web development? The MERN Stack course at FIT Computer Institute in Rawalpindi is the perfect place to begin your journey. We provide hands-on training and real time projects using today’s most in-demand technologies which including React JS, Node JS, MongoDB, and Express.
In our React JS course in Rawalpindi, you’ll learn to create fast, interactive front-end applications. The Node JS course in rawalpindi will teach you how to build powerful server-side logic, while MongoDB and Express round out your skills for managing databases and back-end development.
We also offer freelancing traing to help you start earning independently. how to set up your profiles, find real clients, and get paid on platforms like Upwork, Fiverr, and even direct client hunting techniques.
Ready to take the first step? Join FIT Computer Institute today!
Address:
2nd Floor, FIT Computer institute, Al-Mustafa Plaza, near Chandni Chowk, C Block Block C Satellite Town, Rawalpindi, Punjab 46000, Pakistan
Phone: +92 344 5701828
Website: www.futureittechnology.com
#MERNStackRawalpindi #WebDevelopmentCourse #ReactNodeMongoExpress #LearnToCode #FITComputerInstitute
0 notes
Text
Future-Proof Your Career: Enroll in Kochi’s Premier MERN Stack Training at Techmindz
The tech world is evolving fast, and companies are on the hunt for developers who can build robust, scalable, and interactive web applications from scratch. The MERN stack—comprising MongoDB, Express.js, React.js, and Node.js—has emerged as one of the most powerful combinations for full-stack development. If you're looking to master these skills, Techmindz offers the most advanced and job-ready MERN stack training in Kochi.
Whether you're an aspiring web developer or a working professional looking to upskill, Techmindz’s MERN stack course equips you with everything you need to become a proficient full-stack developer.
💼 Why MERN Stack?
MERN stack is the go-to technology for building dynamic, single-page applications and RESTful APIs. It’s:
JavaScript-based (you only need one language across the stack)
In high demand among startups and tech giants alike
Perfect for developing responsive, real-time apps
Great for career versatility—from frontend to backend roles
By learning MERN, you position yourself for high-growth job opportunities in web development, both in India and globally.
🚀 Why Choose Techmindz for MERN Stack Training in Kochi?
Techmindz is not just another training center. It's a corporate-backed IT finishing school, located in Kochi’s Infopark, designed to transform learners into industry-ready professionals.
✅ 1. Comprehensive, Structured Curriculum
Our MERN stack program is built to cover all key components:
MongoDB – Learn document-based database design and querying
Express.js – Build efficient and secure server-side logic
React.js – Master building dynamic, user-friendly interfaces
Node.js – Handle server-side development and APIs
Deployment – Host applications on cloud platforms like Heroku or AWS
✅ 2. Hands-On Projects
Theory is good—but application is everything. With Techmindz, you’ll build real-world projects including e-commerce platforms, admin dashboards, and dynamic web apps that showcase your skills to future employers.
✅ 3. Expert Trainers from the Industry
You’ll learn from developers actively working in the field, ensuring the course stays current with industry standards and trends.
✅ 4. Career and Placement Support
Techmindz provides 100% placement assistance, including resume workshops, portfolio reviews, and interview prep. Our strong industry network gives you access to jobs in startups, MNCs, and product-based companies.
👩💻 Who Can Join?
Final-year students and recent graduates in CS/IT
Frontend developers looking to learn backend technologies
Professionals switching to full-stack development
Entrepreneurs building their own web apps
No prior backend experience? No worries. The course starts from the basics and progressively builds to advanced full-stack concepts.
📍 Why Techmindz is Kochi’s Top Choice
Located in Kerala’s tech hub, Infopark, Kochi, Techmindz stands out for its:
Corporate training environment
Flexible batches (weekday/weekend/online)
Interactive classroom sessions
Affordable pricing with EMI options
Live project experience
Final Thoughts
The future belongs to developers who can do it all—from managing databases to building beautiful UIs. With the MERN stack training at Techmindz in Kochi, you get the skills, the support, and the confidence to step into the industry as a capable full-stack developer.
🎯 Invest in your future. Enroll at Techmindz—Kochi’s trusted destination for MERN stack excellence.
0 notes
Text
Top 5 Popular Node.js Frameworks to Boost Your Development Efficiency

Have you ever felt stuck while building a website? Maybe you spent hours trying to solve a simple problem, or your code got so messy that you couldn't find where the bugs were hiding. If this sounds familiar, you're not alone! Many developers face these challenges, especially when working with Node.js. That's where a good Node.js framework comes to the rescue.
A Node.js framework is like a helpful friend who organizes your toolbox and shows you the best way to use each tool. It saves you time, reduces mistakes, and makes your work much easier. Today, we'll look at the top 5 Node.js frameworks that can make your development journey smoother and more enjoyable.
Why Do You Need a Node.js Framework?
Before we dive into our list, let's talk about why you might want to use a Node.js framework in the first place. When you build a website from scratch, you need to handle many things: setting up a server, managing routes, connecting to databases, handling errors, and much more. A Node.js framework takes care of these common tasks so you can focus on what makes your website special.
Think of it like cooking dinner. You could grow your own vegetables, make your own cheese, and bake your own bread. Or you could buy these ingredients ready-made and focus on creating a delicious recipe. A Node.js framework gives you the ingredients so you can create something amazing without starting from zero.
Now, let's explore the top 5 Node.js frameworks that developers love in 2025.
Top 5 Node.js frameworks that developers love in 2025
1. Express.js - Simple and Flexible
Express.js is the most popular Node.js framework out there. It's like the trusty bicycle of frameworks - not too fancy, but reliable and gets the job done well.
What makes Express special?
Express is lightweight and doesn't force you to follow strict rules. You can build your application your way, which makes it perfect for beginners and experienced developers alike. It's great for creating APIs, web applications, and mobile app backends.
Here's what you can do with Express:
Create web servers with just a few lines of code
Handle different URL routes easily
Process data from forms
Connect to databases
Serve static files like images and CSS
Many companies offering Web Development Services choose Express because it's easy to learn and has plenty of tutorials and examples online. Whether you're building a small project or a large application, Express can handle it without getting in your way.
2. NestJS - Organized and Structured
If Express is a bicycle, NestJS is more like a car with GPS. It gives you more structure and tells you where everything should go in your node js web development project.
NestJS is inspired by Angular, which is a popular framework for building front-end applications. It uses TypeScript, which helps catch errors before your code runs.
Why choose NestJS?
NestJS shines when you're working on big projects, especially with a team. It keeps everything organized in modules, making it easier to maintain and grow your application over time.
It also comes with built-in support for testing, which helps you make sure your application works correctly. Professional Web Development Services often recommend NestJS for large business applications where code quality is a top priority.
3. Fastify - Speed Champion
As its name suggests, Fastify is all about speed. If you want your website to load quickly, even when many people use it at once, this Node.js framework deserves your attention.
How fast is Fastify?
Fastify can handle up to twice as many requests per second compared to Express. This makes it perfect for applications that need to deal with heavy traffic or process large amounts of data quickly.
Despite focusing on speed, Fastify is still friendly to work with. It has a plugin system that makes it easy to add new features to your application without writing everything from scratch.
Many modern Web Development Services are switching to Fastify when building high-performance APIs and microservices. It also validates data very quickly, which helps keep your application secure and reliable.
4. Koa.js - The Modern Choice
Created by the same team behind Express, Koa.js represents the next step in the evolution of Node.js frameworks. It's smaller, more expressive, and handles modern JavaScript features better.
What makes Koa different?
Koa uses modern JavaScript features like async/await, which makes handling asynchronous operations (like fetching data from a database) much cleaner and easier to understand.
Koa's middleware system gives you more control over how your application handles requests and responses. It also makes error handling simpler, which means fewer headaches when something goes wrong.
For node js web development projects that involve complex data operations, Koa can significantly improve your productivity. Companies providing Web Development Services often choose Koa for projects that need to handle many tasks happening at different times.
5. Adonis.js - The Complete Package
Sometimes you want a framework that handles everything out of the box. That's where Adonis.js comes in. It's a full-featured Node.js framework that provides all the tools you need in one place.
Why Adonis stands out:
Adonis comes with everything needed to build a complete web application:
Tools for database operations
User login and registration systems
Form validation
Template engine for creating HTML pages
File uploading
And much more
If you've used Laravel (a popular PHP framework), you'll feel right at home with Adonis.js. It follows similar patterns and principles.
For businesses looking for comprehensive Web Development Services, Adonis provides a complete solution that can significantly reduce development time. It's particularly good for traditional websites with pages that are created on the server.
How to Choose the Right Framework for Your Project
With so many great options, how do you pick the right Node.js framework for your needs? Here are some simple guidelines:
For beginners or simple projects: Express.js
For large, team-based applications: NestJS
For websites that need to be super fast: Fastify
For modern, clean code: Koa.js
For full-featured websites: Adonis.js
Also think about what you or your team already know. If everyone is familiar with Express, switching to a completely different framework might slow you down at first.
Conclusion
The right Node.js framework can make a huge difference in how quickly and easily you can build web applications. Whether you choose the simplicity of Express, the structure of NestJS, the speed of Fastify, the modern approach of Koa, or the completeness of Adonis, you're setting yourself up for success in your node js web development journey.
Remember that the best framework is the one that fits your specific needs and helps you create high-quality websites efficiently. Many professional Web Development Services use different frameworks for different projects, depending on what each client needs.
Have you tried any of these frameworks? Which one worked best for you? Share your experiences and let's learn from each other!
0 notes
Text
Express.js vs. Node.js: Which One Should You Use?
Not sure whether to use Express.js or Node.js for your next project? This guide explains their differences, advantages, and best use cases to help you make the right choice. Whether it's a web app, API, or real-time application, find out which framework suits your needs best! ⚡ 👉 Read more: https://www.infowindtech.com/express-js-vs-node-js-pros-cons-key-differences/
0 notes
Text
Web applications have become essential for businesses to maintain a competitive edge in the rapidly evolving digital landscape. Express. js Development Companies Node. js development companies are experts in creating high-performing and scalable web applications with the use of Node. js.
1 note
·
View note
Text
youtube
#youtube#video#codeonedigest#microservices#microservice#docker#nodejs module#nodejs express#node js#nodejs#node js training#node js express#node js development company#node js development services#node js developers#node js application#postgres database#postgres tutorial#postgresql#postgres#docker image#docker container#docker tutorial#dockerfile#docker course
0 notes
Text

Node js Full Stack
Learn Node js Full Stack with Croma Campus and become a proficient developer. This course covers frontend and backend technologies including HTML, CSS, JavaScript, Node.js, Express, and MongoDB. Gain hands-on experience through real-time projects and expert guidance to build dynamic web applications and secure top placements in the industry.
0 notes
Text
Which are the latest technologies in IT?

For frontend development— HTML, CSS, JavaScript, Bootstrap, Jquery, and Angular JS are used to develop dynamic website interfaces. If you’re already a computer engineering /application student, you might have to just brush up on HTML, CSS, and Jquery, since these are part of the course curriculum. However, you would need to work hard to learn Angular JS .
For backend development— Here you have options like PHP, Django, Node JS, etc. I would recommend you to learn frameworks like Node JS, Express JS, Mongo DB. There are two advantages to this—
First, these frameworks use your knowledge of JavaScript ( which you need to learn for Angular JS). So you wouldn’t not be required to learn a new programming language.
Second, these frameworks are now being adopted by companies like Paypal and others because the development time is comparatively less and offers extensive scalability to products (websites). In short, there’s large number of jobs and in the near future there’s going to be more.
If you are interested in learning both frontend and backend technologies, TCCI is always there to help you. So I would recommend you that once you learn these technologies, continue to learn other technologies like Django, Redis etc. This will help you to become a good developer and open up more opportunities in web development.
You can visit TCCI in Bopal and Iscon-Ambli Road in Ahmedabad.
Call us@ +91 9825618292.
Visit us@ tccicomputercoaching.com
#Best python computer class in Bopal-Ahmedabad#Best computer institute near me#Best Java computer class near iscon cross road ahmedabad#Best coding course in Bopal-Ahmedabad#TCCI Computer coaching
0 notes
Text
Node JS and Databases
Steps to Build a Blog Application
1. Project Setup
First, you create a new Node.js project on your computer.
You also install necessary tools like Express (for creating a web server) and Mongoose or MySQL (for interacting with the database).
Nodemon can be used during development to restart the server automatically when code changes.
2. Folder Structure
Organize your project files so that everything is easy to manage.
Models: This folder will store database schemas (like the blog post structure).
Routes: These handle requests to different parts of your blog (e.g., showing all posts or creating new ones).
Views: These are the templates used to render your pages (like home, post details).
Public: A place for static files (CSS stylesheets, images).
3. Setting Up the Database
You can use either MongoDB (a NoSQL database) or MySQL (a relational database) to store your blog posts.
MongoDB is easier for beginners because you don't need to define strict tables.
You create a "Blog" model, which defines the structure of each blog post (e.g., it should have a title, content, and a timestamp).
The database connection is established at the beginning so the app can interact with it throughout.
4. Handling HTTP Requests with Express
The Express framework helps manage the flow of the app:
When a user visits the home page, the server sends a list of all blog posts.
When they click on a specific post, it shows the details of that post.
There is also a form where users can create new posts by submitting titles and content.
You create routes to manage these requests. Each route corresponds to a specific URL (e.g., / for the home page, /post/:id to view a post).
5. Creating Views (Templates)
To make your pages dynamic, you use EJS (or another templating engine like Handlebars). Templates allow you to display different content based on the data from the database.
For example:
The home page lists all available blog posts with links to view them individually.
The post page shows the title, content, and date of a single post.
There can also be a form on the home page that lets users submit new posts.
6. Routing and User Interaction
When users visit the homepage, the server pulls data from the database and shows a list of posts.
Clicking on a post’s link takes them to a detailed view of that post.
Users can also add a new post by submitting a form. When they do, the app saves the new post in the database and refreshes the list.
7. Starting the App
You need to make sure both the database server and Node.js app are running.
MongoDB needs to be started separately (if using it).
The Node.js server listens for requests and responds based on the routes you’ve created.
The server is accessible via http://localhost:3000. You can open this in a browser to test the blog app.
8. Testing the Blog API (Optional)
To make sure everything works correctly, you can use tools like Postman to test your routes:
Test retrieving all posts by making a GET request.
Test creating a new post by sending a POST request with sample data.
You can also build error handling to manage invalid inputs.
9. Future Improvements
After setting up the basic blog, you can add advanced features:
User Authentication: Allow users to log in and manage their own posts.
Comments: Add a comment section for each post.
Pagination: Break long lists of posts into pages for better readability.
CSS Styling: Make the blog look more attractive with a custom stylesheet.
Summary
This blog app involves setting up a Node.js server, connecting it to a database to store posts, and using templates to render pages. When users visit the blog, they can view, create, or manage posts, all of which are stored in the database. Express routes manage the requests, and the views ensure everything is displayed neatly.
This project gives you hands-on experience with backend development using Node.js, along with frontend templates, and a solid understanding of working with databases.
Fullstack Seekho is launching a new full stack training in Pune 100% job Guarantee Course. Below are the list of Full Stack Developer Course in Pune:
1. Full Stack Web Development Course in Pune and MERN Stack Course in Pune
2. Full Stack Python Developer Course in Pune
3. full stack Java course in Pune And Java full stack developer course with placement
4. Full Stack Developer Course with Placement Guarantee
Visit the website and fill the form and our counsellors will connect you!
0 notes
Text
Best IT Courses in Nagpur at Eliora Techno Unlock Your Career Potential
In today’s digital age, a strong foundation in IT (Information Technology) is crucial for career growth. Whether you're a beginner looking to dive into the IT world or a professional aiming to upgrade your skills, finding the right course can be overwhelming. Fortunately, Eliora Techno in Nagpur offers some of the best IT courses, tailored to meet industry standards and equip you with skills that are in demand.

Why Choose Eliora Techno in Nagpur?
Located in the heart of Nagpur, Eliora Techno has built a reputation for offering top-tier IT training programs that cater to beginners, intermediates, and professionals. The institute focuses on practical, hands-on learning, ensuring that students not only understand the theory behind various technologies but also know how to implement them in real-world situations. With experienced trainers, a student-centric approach, and a state-of-the-art infrastructure, Eliora Techno is a top choice for aspiring IT professionals.
Let’s dive into the top IT courses offered at Eliora Techno in Nagpur:
1. Full Stack Development (MERN Stack)
For those looking to become versatile developers, Full Stack Development is the perfect course. At Eliora Techno, you can learn both MERN (MongoDB, Express, React, Node.js) and MEAN (MongoDB, Express, Angular, Node.js) stacks, which are popular in building robust web applications.
- Key Highlights:
- Learn both front-end and back-end technologies.
- Work on real-time projects.
- Gain expertise in databases like MongoDB.
- Master JavaScript frameworks such as React and Angular.
Full Stack Development is in high demand across the globe, and mastering it can open doors to various opportunities in top IT firms.
2. Java Development
Java remains one of the most popular programming languages globally. Eliora Techno offers a comprehensive Java Developer course that covers everything from the basics to advanced Java concepts.
- Key Highlights:
- Object-oriented programming (OOP) with Java.
- Hands-on training in frameworks like Spring and Hibernate.
- Real-time projects that simulate professional environments.
Whether you're looking to build Android apps, web applications, or software solutions, Java is an essential skill in the developer toolkit.
3. Digital Marketing
The IT industry isn’t just about coding. Digital marketing has become an indispensable skill for anyone looking to grow in the online space. Eliora Techno offers an all-encompassing Digital Marketing course that covers SEO, SEM, SMM, content marketing, email marketing, and more.
- Key Highlights:
- Understand the nuances of SEO to boost organic traffic.
- Learn how to run paid campaigns on Google Ads and social media.
- Master the art of content creation and optimization.
- Work with real businesses to develop marketing strategies.
For anyone who wants to specialize in online marketing, this course is an ideal way to enter the fast-paced world of digital marketing.
4. PHP Full Stack Developer
PHP continues to be one of the leading programming languages in web development. Eliora Techno’s PHP Full Stack Developer course is tailored for those who want to build dynamic websites and web applications.
- Key Highlights:
- Comprehensive coverage of front-end technologies like HTML, CSS, and JavaScript.
- Learn back-end development using PHP and MySQL.
- Develop and deploy live projects.
This course is perfect for aspiring web developers looking to specialize in open-source technologies.
5. React JS and Node JS
React JS and Node JS are two of the most popular JavaScript frameworks, particularly for building fast, scalable applications. Eliora Techno offers in-depth courses on both technologies, teaching students how to create high-performance applications.
- Key Highlights:
- Build dynamic user interfaces with React JS.
- Learn how to handle back-end operations using Node JS.
- Understand how to work with APIs and databases.
With the growing demand for React and Node developers, this course is highly recommended for those who want to specialize in modern web development.
6. Graphic Designing
Graphic design is another field within the IT industry that’s growing rapidly. Eliora Techno offers a comprehensive Graphic Design course that teaches students how to create visually stunning graphics using tools like Adobe Photoshop, Illustrator, and InDesign.
- Key Highlights:
- Learn the basics of design principles.
- Master tools like Photoshop and Illustrator.
- Work on real-world projects such as logos, brochures, and websites.
This course is perfect for creative minds looking to enter the world of digital art and design.
Why Eliora Techno Stands Out
Eliora Techno doesn’t just offer IT courses, it provides a holistic learning environment. Students are mentored by industry experts, work on live projects, and receive 100% placement assistance upon course completion. The institute's focus on practical knowledge, real-world experience, and job-readiness ensures that its students are industry-ready.
Moreover, Eliora Techno’s partnership with top IT companies in Nagpur and across India means that students have excellent job prospects upon course completion.
Conclusion
Whether you want to become a full-stack developer, digital marketer, graphic designer, or specialize in any IT field, Eliora Techno offers the best IT courses in Nagpur to kickstart or advance your career. With its practical, hands-on approach and expert faculty, Eliora Techno is the perfect place to acquire industry-relevant skills and achieve your career goals. Don’t wait—start your journey to a brighter future with Eliora Techno today!
#onlinelearningeducation#educationonlinelearning#distanceeducationonlinelearning#onlineclassesmachinelearningcourse#onlinelearningplatforms#onlineeducation#coursesonline#besthronlineclassesinnagpur#tophrclasses
0 notes
Text
MERN Stack Training in Kochi: Master Full-Stack Development with Techmindz
The demand for full-stack developers is on the rise, and the MERN Stack—comprising MongoDB, Express.js, React.js, and Node.js—is one of the most powerful and widely adopted technology stacks for building modern web applications. If you're looking for the best MERN Stack Training in Kochi, Techmindz offers a practical, industry-relevant course designed to equip you with end-to-end development skills.
Why Choose Techmindz for MERN Stack Training in Kochi?
Techmindz has established itself as a leading IT training institute in Kerala by offering job-oriented courses taught by industry experts. Here's why Techmindz is the preferred destination for aspiring full-stack developers:
1. Comprehensive MERN Stack Curriculum
Our training program is designed to help you master:
MongoDB: NoSQL database for high-performance, scalable applications
Express.js: Web application framework for Node.js
React.js: Front-end JavaScript library for building dynamic user interfaces
Node.js: Server-side JavaScript runtime environment
You’ll also learn essential tools and practices like Git, RESTful APIs, JWT authentication, deployment using cloud platforms, and more.
2. Hands-On Project-Based Learning
At Techmindz, learning goes beyond theory. You’ll build real-world full-stack applications from scratch, including:
User authentication systems
E-commerce platforms
Blog and content management systems
RESTful APIs and microservices
Each student completes a capstone project that showcases their full-stack development capabilities.
3. Expert Mentorship
Our trainers are experienced full-stack developers who provide valuable insights, industry tips, and personalized guidance throughout the course. You'll learn not just how to code, but how to solve real-world problems efficiently.
4. Career Support and Placement Assistance
Techmindz doesn’t just train you—we help launch your career. We offer:
Interview preparation and mock interviews
Portfolio and resume building workshops
Placement support with top tech companies in Kochi and beyond
Our strong industry connections ensure that Techmindz students are always a step ahead in the job market.
5. Flexible Learning Modes
Whether you prefer in-person classes at our Kochi campus or online sessions from the comfort of your home, Techmindz offers flexible training options to fit your schedule.
Who Should Enroll in the MERN Stack Course?
Our MERN Stack Training in Kochi is perfect for:
College students and graduates seeking a job in web development
Front-end developers looking to expand into back-end technologies
Freelancers and entrepreneurs wanting to build dynamic web apps
IT professionals aiming to switch to full-stack roles
Start Your Full-Stack Journey with Techmindz
If you want to become a proficient full-stack developer, Techmindz’s MERN Stack Training in Kochi is your launchpad. With a focus on hands-on learning, real-world projects, and career readiness, we ensure that you’re job-ready from day one.
Don’t wait—join Techmindz today and begin your journey into full-stack development with confidence!
0 notes
Text
#1 Digital Marketing Company | Dcrayons Consultancy Private Limited
Do you know about how to create a shopify partner account?
Ready to elevate your business? When you join the Shopify Partner Account , you unlock revenue possibilities and tap into a thriving network of Shopify merchants. This straightforward guide will help you kickstart your journey and maximize your Shopify Partner Account.
Joining the shopify partner account – for a successful business
Developing an application for Shopify is enjoyable and easy because Shopify provides numerous applications and resources that users can easily utilize. This guide will cover all of the steps from development environment installation to your app distribution. It has a guide for making an Instagram feed app, with step-by-step instructions. This helps understand the steps discussed.
What is the process of shopify partner account?
Here we are describing some steps of a shopify partner account. some steps of shopify partner accounts.
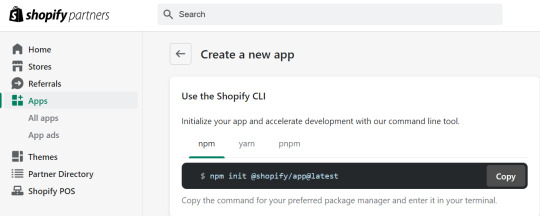
Step-1: Setting Up Your Shopify Partner Account
The newly launched consultation journey starts from creating a Shopify Partner account. Thus, if you did not have an account, you would have to get one before proceeding with the next steps. Here’s how to do it. Let us discuss some steps.
To open a Shopify account, start by signing up or logging in. Then, visit the official Shopify Partner Program page. If you don’t have an account yet, create one. If you already have an account, just log in.
Navigate to Apps: After logging in to the portal go to the ‘Apps’ tab.
Create a New App: Go to ‘Create App’ and enter app name and URL for the app. This process will create important credentials, such as the API key and secret key-API, that are necessary for your application.
Step 2: Initializing Your Shopify App
Congratulations! You have successfully opened your Shopify Partner Account. Now, it’s time to start your Shopify application. Open your terminal and run the following command:
npm init @shopify/app@latest
This command pulls up your app and creates a shopify.app.toml file. This config file contains details like client id, the name of your application, URL of your application and the scopes needed for the application. Furthermore, you will have to prepare a . file named env and then specify SHOPIFY_API_KEY.
Step 3: Installing Dependencies
To ensure your app has all the necessary dependencies to function correctly, run the following command in your terminal
npm install
This command installs all the packages needed in your application .In this case is React.js for the frontend and Node.js for the backend.
Step 4: Running Your Application
Once all dependencies are installed, you can start your development server by running
npm run dev
Step 5: Building the Frontend and Backend
Again, for our instance, we will be developing the frontend of the app using the help of the React library of JavaScript and the backend with Node. Here’s a brief overview of how to set up both. let describe some steps.
Frontend with React.js
Create React Components: Create React components to be used within your application for headers, footers and other sections of your application.
Navigation Links: As to create different pages, the labels and destinations have to be included in the navigation Link component in App.jsx. That way, you are able to surf from one area of your application to the other.
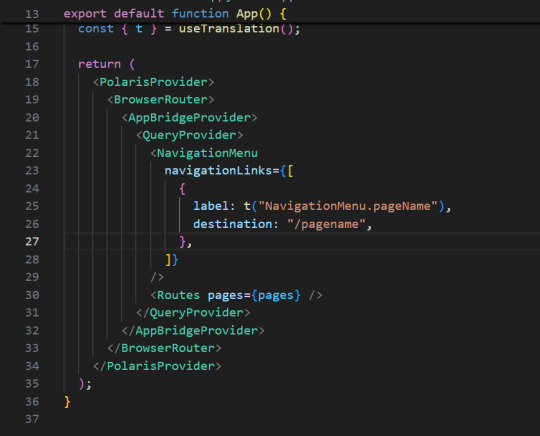
Backend with Node.js
Set Up Express Server: Please use express Js to set up your server and control the backend procedures.
API Routes: Define API routes which will handle the request and response between the front end and the back end.
Practical Example: Instagram Feed App…
Let’s apply the above steps to create a practical example: an application that is used in feeding the user’s Instagram account. This application will let the users login through the Instagram account, pull the media, and then the media can be showcased in a grid or slider view.
Main Functionality
The landing page of the app features a button which says “Connect to Instagram.” When the users tap on this button, they are transferred to the Instagram login page. If the login is complete, the app will retrieve pictures and videos from their Instagram profile and provide it in slider or grid view.
Authentication and Authorization
We use an authentication URL containing the following parameters: In this method, the parameters included are client Id, redirect Uri, scope, response Type, and auth Url. This URL corresponds to the redirection to Instagram’s login page. Once a user logs in, Instagram gives an authorization ID and using this ID, an access token is given by our back end..
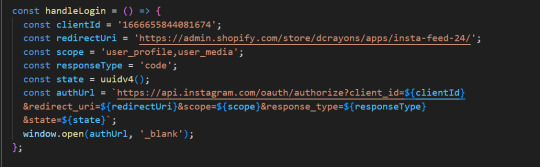
Here is how the process works in detail.
Auth URL: Create an auth URL with the necessary parameters.
Redirect and authorization: Redirect users to Instagram’s login page. Once successfully logged in, get a license ID.
Access token request: To request an access token from the backend, use an authorization ID with client id, client secret, grant type, and redirect uri.
Introducing news reports and displaying content
Once we have the access token, we can then retrieve all the media id from the user’s Instagram profile. We use these media id to retrieve the URLs of the images and videos. These media items are then displayed in our app, which has various styling options.
Here is a detailed analysis of this phenomenon.
Retrieve Media IDs : Use an access token to retrieve media IDs from the Instagram API.
Accept media URLs : Assign a corresponding media URL (image or video) for each media ID.
Display Media: Use React components to display media objects in a grid or slider format.
Optimizing the Instagram feed
One of the main features of our app is that we can customize the Instagram feed. Here are some options to change.
Width: Adjusts the spacing between images.
Rounded corners: Apply rounded corners to images.
Viewable posts: Check how many posts can be viewed at one time.
These CSS and React state settings can be used to update the layout dynamically based on the user’s preferences.
Deploying Your Shopify App
Once your app is fully developed and tested, you can deploy it to any store created in Shopify. Here’s a brief overview of the deployment process:
Build Your App: Run the build command to prepare your app for production.
Upload to Shopify: Use the Shopify CLI or Partner Dashboard to upload your app to the Shopify store.
Submit for Review: If you intend to publish your app on the Shopify App Store, submit it for review to ensure it meets Shopify’s standards and guidelines.
How to Maximize Your Shopify Partner account?
Promote your services: Use the Shopify Partner Dashboard to promote your design services, apps or themes. Emphasize what makes your offers unique and how they benefit Shopify merchants.
Use Shopify’s resources: Take advantage of the training materials and support provided. These resources will help you stay up to date with Shopify’s latest features and best practices.
Connect with the community: Join the Shopify forums and partner communities to connect with other professionals. Sharing knowledge and learning from others can help you improve your services and grow your business.
Track Your Performance: Monitor your earning potential and performance with the Affiliate Dashboard. This will help you understand what is working and where you can make improvements..
Conclusion
Creating a Shopify app involves several key steps, from setting up your development environment to deploying your app. By following this comprehensive guide, you can create a functional and customizable app to meet various needs. Our example of an Instagram feed app demonstrates how you can integrate third-party services and enhance your app’s functionality, offering users a dynamic and engaging experience. Whether you’re a seasoned developer or just starting, Shopify provides the tools and resources to help you succeed
0 notes