#node2
Explore tagged Tumblr posts
Visit Tumblr Blog
Explore Tumblr blogs with no restrictions, modern design and the best experience.
Last Seen Tumblr Blogs


Fun Fact
If you dial 1-866-584-6757, you can leave an audio post for your followers.
Text
auh im dying scoob but i have some stuff for the wuwa oc
who now has a name lmao
grips ocs
i love making characters
Name: Valerian ; latin, to be strong
Attribute: Spectro
Weapon: Pistols (design is TBA)
Skills currently:
An Aura of Flame — Normal Attack Basic Attack
Valerian fires up to 5 consecutive shots, dealing Spectro DMG.
Heavy Attack
Valerian enters the aiming state for a more powerful shot. The aimed shot fired after charging finishes deals Spectro DMG.
Mid-Air Attack
Valerian consumes STA to perform consecutive shots at the target in mid-air, dealing Spectro DMG.
Dodge Counter
Use Basic Attack after a successful Dodge to attack the target, dealing Spectro DMG.
An Aura of Flame — Normal Attack (node2)
Healing bonus 1.80%
An Aura of Flame — Normal Attack (node3)
Healing bonus 4.20%
Aqua Aura — Resonance Skill (node1)
Attack the enemy and deal Spectro DMG, triggers Metal Bond to all characters on team.
Metal Bond
All characters on team receive a shield of 200% of Valerian's HP and will heal all characters on nearby teams.
Aqua Aura — Resonance Skill (node2)
DEF bonus 1.80%
Aqua Aura — Resonance Skill (node3)
DEF bonus 4.20%
that's about it for the time being, it still has more to go, and things to be named, but by golly i'll be doing this.
6 notes
·
View notes
Text
I realise I could have had a double date party with Phantylia in Node2, but honestly Ratio there felt bad so I just didn't want to try again 😂
#d plays hsr#by which i mean#ratiorine + mozeqiu#maybe I'll try it#but i feel weird without a buffer
2 notes
·
View notes
Text
Mastering Data Structures Using Python: A Complete Guide
When learning programming, mastering Data Structures Using Python is one of the most critical milestones. Python, known for its simplicity and versatility, is a perfect language to delve into data structures, which form the backbone of efficient algorithms. In this blog, we’ll explore the essential data structures in Python, how to use them, and why they’re so vital in programming.
Why Learn Data Structures Using Python?
1. Simplifies Complex Operations
Python's built-in libraries and clean syntax make implementing data structures intuitive. Whether you’re manipulating arrays or designing trees, Python minimizes complexity.
2. High Demand for Python Programmers
The demand for professionals with expertise in Python for data structures is skyrocketing, especially in fields like data science, artificial intelligence, and software engineering.
3. A Foundation for Problem-Solving
Understanding data structures like lists, stacks, queues, and trees equips you to solve complex computational problems efficiently.
What Are Data Structures?
At their core, data structures are ways of organizing and storing data to perform operations like retrieval, insertion, and deletion efficiently. There are two main types:
Linear Data Structures: Data is stored sequentially (e.g., arrays, linked lists).
Non-Linear Data Structures: Data is stored hierarchically (e.g., trees, graphs).
Python, with its versatile libraries, offers tools to implement both types seamlessly.
Essential Data Structures in Python
1. Lists
One of Python's most versatile data structures, lists are dynamic arrays that can store heterogeneous data types.
Example:
python
Copy code
# Creating a list
fruits = ["apple", "banana", "cherry"]
print(fruits[1]) # Output: banana
Features of Lists:
Mutable (elements can be changed).
Supports slicing and iteration.
Used extensively in Python programming for simple data organization.
2. Tuples
Tuples are immutable sequences, often used for fixed collections of items.
Example:
python
Copy code
# Creating a tuple
coordinates = (10, 20)
print(coordinates[0]) # Output: 10
Key Benefits:
Faster than lists due to immutability.
Commonly used in scenarios where data integrity is crucial.
3. Dictionaries
Dictionaries in Python implement hash maps and are perfect for key-value storage.
Example:
python
Copy code
# Creating a dictionary
student = {"name": "John", "age": 22}
print(student["name"]) # Output: John
Why Use Dictionaries?
Quick lookups.
Ideal for scenarios like counting occurrences, storing configurations, etc.
4. Sets
Sets are unordered collections of unique elements, useful for removing duplicates or performing mathematical set operations.
Example:
python
Copy code
# Using sets
numbers = {1, 2, 3, 4, 4}
print(numbers) # Output: {1, 2, 3, 4}
Applications:
Used in tasks requiring unique data points, such as intersection or union operations.
Advanced Data Structures in Python
1. Stacks
Stacks are linear data structures following the LIFO (Last In, First Out) principle.
Implementation:
python
Copy code
stack = []
stack.append(10)
stack.append(20)
print(stack.pop()) # Output: 20
Use Cases:
Undo operations in text editors.
Browser backtracking functionality.
2. Queues
Queues follow the FIFO (First In, First Out) principle and are used for tasks requiring sequential processing.
Implementation:
python
Copy code
from collections import deque
queue = deque()
queue.append(1)
queue.append(2)
print(queue.popleft()) # Output: 1
Applications:
Customer service simulations.
Process scheduling in operating systems.
3. Linked Lists
Unlike arrays, linked lists store data in nodes connected via pointers.
Types:
Singly Linked Lists
Doubly Linked Lists
Example:
python
Copy code
class Node:
def __init__(self, data):
self.data = data
self.next = None
# Creating nodes
node1 = Node(10)
node2 = Node(20)
node1.next = node2
Benefits:
Efficient insertion and deletion.
Commonly used in dynamic memory allocation.
4. Trees
Trees are hierarchical structures used to represent relationships.
Types:
Binary Trees
Binary Search Trees
Heaps
Example:
python
Copy code
class TreeNode:
def __init__(self, data):
self.data = data
self.left = None
self.right = None
Applications:
Databases.
Routing algorithms.
5. Graphs
Graphs consist of nodes (vertices) connected by edges.
Representation:
Adjacency List
Adjacency Matrix
Example:
python
Copy code
graph = {
"A": ["B", "C"],
"B": ["A", "D"],
"C": ["A", "D"],
"D": ["B", "C"]
}
Applications:
Social networks.
Navigation systems.
Why Python Stands Out for Data Structures
1. Built-In Libraries
Python simplifies data structure implementation with libraries like collections and heapq.
2. Readable Syntax
Beginners and experts alike find Python's syntax intuitive, making learning data structures using Python easier.
3. Versatility
From simple algorithms to complex applications, Python adapts to all.
Common Challenges and How to Overcome Them
1. Understanding Concepts
Some learners struggle with abstract concepts like recursion or tree traversal. Watching tutorial videos or practicing coding challenges can help.
2. Memory Management
Efficient use of memory is critical, especially for large-scale data. Python's garbage collection minimizes these issues.
3. Debugging
Using tools like Python’s pdb debugger helps troubleshoot problems effectively.
0 notes
Text
Homework 3 EE232E - Graphs and Network Flows solved
In this assignment, we will study a real network. The data is available on this Dropbox Link 1 . We are going to study the properties of this real network. The data is given as a directed edge list format, where each line has three items: node1, node2 and the weight of the edge from node1 to node2. 1. Is this network connected? If not, find out the giant connected component. And in the following,…
0 notes
Photo

Bowers and Bowie is a combo I can get behind! Pic and setup by @amskau1 #soundup #bowie #music #musiclove ・・・ David Bowie on the turntable. #surround #stereo #hifi #stereofil #highend #audio #audiophile #audiophiles #bowersandwilkins #bowerswilkins #bw803d3 #800series #primaresound #primare #node #node2 #projectaudiosystems #turntable #platespiller #tidal #avforum #hifiklubben #hifisentralen #instahifi #lydogbilde #clicfurniture @hifiklubbennorge @instahifi @clicfurniture @soundgarden.as @project_audio @bowerswilkins https://www.instagram.com/p/B-5pD1fJlyD/?igshid=1pguv998y87ke
#soundup#bowie#music#musiclove#surround#stereo#hifi#stereofil#highend#audio#audiophile#audiophiles#bowersandwilkins#bowerswilkins#bw803d3#800series#primaresound#primare#node#node2#projectaudiosystems#turntable#platespiller#tidal#avforum#hifiklubben#hifisentralen#instahifi#lydogbilde#clicfurniture
0 notes
Text

Source: Johnny Mnemonic
91 notes
·
View notes
Photo


My Tumblr Crushes:
o-blivia
fvtvre-p0rn
drkftr
graylok
omgbulrefol
data-node2
rhubarbes
dustrial-inc
xbejonson
28 notes
·
View notes
Text
Theia
I have waited for vscode team to make the outline window detachable, but it seems that it's rather challenging than I expected. Then I found Theia.
It have almost same look with vscode but outline window is on the right side.
below is my test setting(package.json)
{ "private": true, "dependencies": { "@theia/callhierarchy": "next", "@theia/file-search": "next", "@theia/git": "next", "@theia/json": "next", "@theia/markers": "next", "@theia/messages": "next", "@theia/mini-browser": "next", "@theia/navigator": "next", "@theia/outline-view": "next", "@theia/plugin-ext-vscode": "next", "@theia/preferences": "next", "@theia/preview": "next", "@theia/search-in-workspace": "next", "@theia/terminal": "next", "@theia/debug": "next" }, "devDependencies": { "@theia/cli": "next" }, "scripts": { "prepare": "yarn run clean && yarn build && yarn run download:plugins", "clean": "theia clean", "build": "theia build --mode development", "start": "theia start --plugins=local-dir:plugins", "download:plugins": "theia download:plugins" }, "theiaPluginsDir": "plugins", "theiaPlugins": { "vscode-builtin-node-debug2": "http://open-vsx.org/api/ms-vscode/node-debug2/1.33.0/file/ms-vscode.node-debug2-1.33.0.vsix", "vscode-builtin-python": "https://github.com/theia-ide/vscode-builtin-extensions/releases/download/v1.39.1-prel/python-1.39.1-prel.vsix", "vscode-builtin-java": "https://github.com/theia-ide/vscode-builtin-extensions/releases/download/v1.39.1-prel/java-1.39.1-prel.vsix", "vscode-builtin-sql": "https://github.com/theia-ide/vscode-builtin-extensions/releases/download/v1.39.1-prel/sql-1.39.1-prel.vsix", "vscode-builtin-bat": "https://github.com/theia-ide/vscode-builtin-extensions/releases/download/v1.39.1-prel/bat-1.39.1-prel.vsix", "vscode-builtin-cpp": "https://github.com/theia-ide/vscode-builtin-extensions/releases/download/v1.39.1-prel/cpp-1.39.1-prel.vsix", "vscode-builtin-css": "https://github.com/theia-ide/vscode-builtin-extensions/releases/download/v1.39.1-prel/css-1.39.1-prel.vsix", "vscode-builtin-html": "https://github.com/theia-ide/vscode-builtin-extensions/releases/download/v1.39.1-prel/html-1.39.1-prel.vsix", "vscode-builtin-javascript": "https://github.com/theia-ide/vscode-builtin-extensions/releases/download/v1.39.1-prel/javascript-1.39.1-prel.vsix", "vscode-builtin-json": "https://github.com/theia-ide/vscode-builtin-extensions/releases/download/v1.39.1-prel/json-1.39.1-prel.vsix", "vscode-builtin-markdown": "https://github.com/theia-ide/vscode-builtin-extensions/releases/download/v1.39.1-prel/markdown-1.39.1-prel.vsix", "vscode-builtin-npm": "https://github.com/theia-ide/vscode-builtin-extensions/releases/download/v1.39.1-prel/npm-1.39.1-prel.vsix", "vscode-builtin-scss": "https://github.com/theia-ide/vscode-builtin-extensions/releases/download/v1.39.1-prel/scss-1.39.1-prel.vsix", "vscode-builtin-typescript": "https://github.com/theia-ide/vscode-builtin-extensions/releases/download/v1.39.1-prel/typescript-1.39.1-prel.vsix", "vscode-builtin-typescript-language-features": "https://github.com/theia-ide/vscode-builtin-extensions/releases/download/v1.39.1-prel/typescript-language-features-1.39.1-prel.vsix" } }
and launch.json sample to debug node.js code.
{ // Use IntelliSense to learn about possible attributes. // Hover to view descriptions of existing attributes. "version": "0.2.0", "configurations": [ { "type": "node2", "request": "attach", "name": "Attach by Process ID", "processId": "${command:PickProcess}", "skipFiles": [ "/**" ] }, { "type": "node2", "request": "launch", "name": "Launch Program", "skipFiles": [ "/**" ], "program": "${workspaceFolder}\\test1\\test.js" } ] }
if you want to attch debugger to running process, run the code from theia terminal with --inspect option.
4 notes
·
View notes
Text
Yarn.py (Yarn for PyGame)
I really wanted to make a game for this year’s A Game By Its Cover jam, but in the end I couldn’t get the game mechanics I wanted to make to work with the Famicase cartridge artwork and the spy story I had written. Oh well. Fortunately, I got sidetracked and ported my old Yarn runtime from Haxe to Python and PyGame, to write the dialogue for my AGBIC game, and that will be useful for other dialogue-heavy PyGame-based games in the future.
I put the source code for yarn.py up on GitHub here: https://github.com/robertpfeiffer/yarn-pygame
For those of you who don’t know what Yarn is, it’s a twine-inspired system for authoring dialogue, with an editor based on node-webkit (https://github.com/robertpfeiffer/yarn-pygame) and a feature-rich loader for Unity3D (https://github.com/thesecretlab/YarnSpinner).
Authoring
Because the official editor ran kind of slow in my old laptop and I wanted to use GNU Emacs instead of an html5-based text widget, I wrote a small PyGame-based editor for yarn dialogue that displays the interlinked dialogue nodes with PyGame, but talks to an Emacs server via emacsclient to actually edit the text content of the nodes - no reason to reinvent the wheel and code our own text editor here.
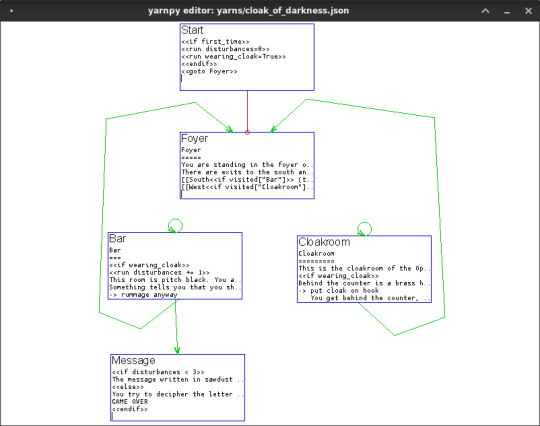
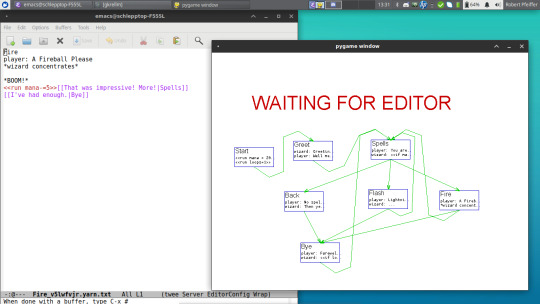
That covers the editing/authoring side.
Runtime
For the game engine/loading/dialogue state/UI side, I wrote an interpreter for Yarn that is compatible with the original Yarn editor, but not with YarnSpinner for Unity, because it uses regular Python syntax for scripting instead of a custom DSL.
I implemented different PyGame based frontends around the core YarnController. If you want to use yarn.py with your own Python-based game engine, or if you want to write your own UI frontend, you can use the YarnController directly. Otherwise there are two PyGame-based frontends to choose from: One in the style of Night In The Woods with speech bubbles, and one in the style of JRPG games.

This is in cartoon style.

This is the same dialogue rendered in JRPG style, complete with character portraits.
Right now, you have to explicitly call a draw() function on an instance of the dialogue frontend to draw it, but maybe in the future other frontends will be drawn as part of sprite groups.
If you look into the source code at https://github.com/robertpfeiffer/yarn-pygame, you can see the code that produced the .gifs above in the “examples/“ directory.
You can easily expose python objects and modules to your Yarn Controller, like this:
controller.locals["pygame"]=pygame
and then refernce it in your dialogue like this:
This is running on pygame <<print pygame.version.ver>> [[Next Node|Node2]]
If you know a bit of twine and a bit of PyGame, you should feel right at home with Yarn.py.
17 notes
·
View notes
Text
rules: answer 20 questions, then tag 20 bloggers you want to get to know better
i was tagged by @tessaigavirtual
name: fawn
nickname(s): fern, phaubio, fff, fern the taco, motherfawn, fawnthemom, baby deer
zodiac sign: libra
height: 5′8″
languages: english, lil bit of french & little bit of sign language
nationality: american
fav season: fall
fav song: too many to name but right now but alrighty aphrodite- peach pit, lover chanting- little dragon, diamonds- mat kerekes
fav scent: weed, rain, fresh grass, fresh bread
fav colour: red
fav animal: kiwi
fav fictional character: kahlan amnell
coffee, tea, or hot chocolate: coffee
average sleep hours: 5-9
dog or cat person: cat
number of blankets you sleep with: one
dream trip: japan
blog established: 2012
following/followers: idr off the top of my head
random fact: I have a stripper pole in my bedroom
I tag
@exoneon @bluue-hydrangea @data-node2 @mirayama @love-personal @yesterdaysprint @hallucination @elliipses @vhspositive @queerxoh
1 note
·
View note
Text
Kubernetes, abbreviated as K8s is an open-source tool used to orchestrate containerized workloads to run on a cluster of hosts. It is used to automate system deployments, scale, and manage containerized applications. Normally, Kubernetes distributes workloads across the cluster and automates the container networking needs. It also allocates storage and persistent volumes and works continuously to maintain the desired state of container applications. There are several tools one can use to set up a Kubernetes cluster. These tools include Minikube, Kubeadm, Kubernetes on AWS (Kube-AWS), Amazon EKS e.t.c. In this guide, we will walk through how to deploy HA Kubernetes Cluster on Rocky Linux 8 using RKE2. What is RKE2? RKE stands for Rancher Kubernetes Engine. RKE2 also known as the (RKE Government) is a combination of RKE1 and K3s. It inherits usability, ease-of-operations, and deployment model from K3s and close alignment with upstream Kubernetes from RKE1. Normally, RKE2 doesn’t rely on docker, it launches the control plane components as static pods that are managed by the kubelet. The diagram below will help you understand the RKE2 cluster topology. RKE2 ships a number of open-source components that include: K3s Helm Controller K8s API Server Controller Manager Kubelet SchedulerSet up Linux Nodes Proxy etcd containerd/cri runc Helm Metrics Server NGINX Ingress Controller CoreDNS CNI: Canal (Calico & Flannel), Cilium or Calico System Requirements Use a system that meets the below requirements: RAM: 4GB Minimum (we recommend at least 8GB) CPU: 2 Minimum (we recommend at least 4CPU) 3 Rocky Linux 8 Nodes Zero or more agent nodes that are designated to run your apps and services A load balancer to direct front-end traffic to the three nodes. A DNS record to map a URL to the load balancer Step 1 – Set up Rocky Linux 8 Nodes For this guide, we will use 3 Rocky Linux nodes, a load balancer, and RKE2 agents(1 or more). TASK HOSTNAME IP ADDRESS Server Node 1 server1.computingpost.com 192.168.205.2 Server Node 2 server2.computingpost.com 192.168.205.3 Server Node 3 server3.computingpost.com 192.168.205.33 Load Balancer rke.computingpost.com 192.168.205.9 Agent Node1 agent1.computingpost.com 192.168.205.43 Agent Node2 agent2.computingpost.com 192.168.205.44 Set the hostnames as shown: ##On Node1 sudo hostnamectl set-hostname server1.computingpost.com ##On Node2 sudo hostnamectl set-hostname server2.computingpost.com ##On Node3 sudo hostnamectl set-hostname server3.computingpost.com ##On Loadbalancer(Node4) sudo hostnamectl set-hostname rke.computingpost.com ##On Node5 sudo hostnamectl set-hostname agent1.computingpost.com ##On Node6 sudo hostnamectl set-hostname agent2.computingpost.com Add the hostnames to /etc/hosts on each node $ sudo vim /etc/hosts 192.168.205.2 server1.computingpost.com 192.168.205.3 server2.computingpost.com 192.168.205.33 server3.computingpost.com 192.168.205.43 agent1.computingpost.com 192.168.205.44 agent2.computingpost.com 192.168.205.9 rke.computingpost.com Configure the firewall on all the nodes as shown: sudo systemctl stop firewalld sudo systemctl disable firewalld sudo systemctl start nftables sudo systemctl enable nftables Step 2 – Configure the Fixed Registration Address To achieve high availability, you are required to set up an odd number of server plane nodes(runs etcd, the Kubernetes API, and other control plane services). The other server nodes and agent nodes need a URL they can use to register against. This is either an IP or domain name of any of the control nodes. This is mainly done to maintain quorum so that the cluster can afford to lose connection with one of the nodes without impacting the functionality cluster. This can be achieved using the following: A layer 4 (TCP) load balancer
Round-robin DNS Virtual or elastic IP addresses In this guide, we will configure NGINX as a layer 4 (TCP) load balancer to forward the connection to one of the RKE nodes. Install and configure Nginx on Node4 sudo yum install nginx Create a config file: sudo mv /etc/nginx/nginx.conf /etc/nginx/nginx.conf.bak sudo vim /etc/nginx/nginx.conf Create a new Nginx file with the below lines replacing where required: user nginx; worker_processes 4; worker_rlimit_nofile 40000; error_log /var/log/nginx/error.log; pid /run/nginx.pid; # Load dynamic modules. See /usr/share/doc/nginx/README.dynamic. include /usr/share/nginx/modules/*.conf; events worker_connections 8192; stream upstream backend least_conn; server :9345 max_fails=3 fail_timeout=5s; server :9345 max_fails=3 fail_timeout=5s; server :9345 max_fails=3 fail_timeout=5s; # This server accepts all traffic to port 9345 and passes it to the upstream. # Notice that the upstream name and the proxy_pass need to match. server listen 9345; proxy_pass backend; upstream rancher_api least_conn; server :6443 max_fails=3 fail_timeout=5s; server :6443 max_fails=3 fail_timeout=5s; server :6443 max_fails=3 fail_timeout=5s; server listen 6443; proxy_pass rancher_api; upstream rancher_http least_conn; server 192.168.205.2:80 max_fails=3 fail_timeout=5s; server 192.168.205.3:80 max_fails=3 fail_timeout=5s; server 192.168.205.33:80 max_fails=3 fail_timeout=5s; server listen 80; proxy_pass rancher_http; upstream rancher_https least_conn; server 192.168.205.2:443 max_fails=3 fail_timeout=5s; server 192.168.205.3:443 max_fails=3 fail_timeout=5s; server 192.168.205.33:443 max_fails=3 fail_timeout=5s; server listen 443; proxy_pass rancher_https; Save the file, disable SELinux and restart Nginx: sudo setenforce 0 sudo systemctl restart nginx Step 3 – Download installer script on Rocky Linux 8 Nodes All the Rocky Linux 8 nodes intended for this use need to be configured with the RKE2 repositories that provide the required packages. Instal curl tool on your system: sudo yum -y install curl vim wget With curl download the script used to install RKE2 server on your Rocky Linux 8 servers. curl -sfL https://get.rke2.io --output install.sh Make the script executable: chmod +x install.sh To see script usage options run: less ./install.sh Once added, you can install and configure both the RKE2 server and agent on the desired nodes. Step 4 – Set up the First Server Node (Master Node) Install RKE2 server: sudo INSTALL_RKE2_TYPE=server ./install.sh Expected output: [INFO] finding release for channel stable [INFO] using 1.23 series from channel stable Rocky Linux 8 - AppStream 19 kB/s | 4.8 kB 00:00 Rocky Linux 8 - AppStream 11 MB/s | 9.6 MB 00:00 Rocky Linux 8 - BaseOS 18 kB/s | 4.3 kB 00:00 Rocky Linux 8 - BaseOS 11 MB/s | 6.7 MB 00:00 Rocky Linux 8 - Extras 13 kB/s | 3.5 kB 00:00
Rocky Linux 8 - Extras 41 kB/s | 11 kB 00:00 Rancher RKE2 Common (stable) 1.7 kB/s | 1.7 kB 00:00 Rancher RKE2 1.23 (stable) 4.8 kB/s | 4.6 kB 00:00 Dependencies resolved. ====================================================================================================================================================================================================== ....... Transaction Summary ====================================================================================================================================================================================================== Install 5 Packages Total download size: 34 M Installed size: 166 M Downloading Packages: ..... Once installed, you need to create a config file manually. The config file contains the tls-sanparameter which avoids certificate errors with the fixed registration address. The config file can be created with the command: sudo vim /etc/rancher/rke2/config.yaml Add the below lines to the file replacing where required. write-kubeconfig-mode: "0644" tls-san: - rke.computingpost.com - 192.168.205.9 Replace rke.computingpost.com with your fixed registration address and 192.168.205.9 with its IP address. Save the file and start the service; sudo systemctl start rke2-server sudo systemctl enable rke2-server Confirm status of the service after starting it: $ systemctl status rke2-server ● rke2-server.service - Rancher Kubernetes Engine v2 (server) Loaded: loaded (/usr/lib/systemd/system/rke2-server.service; disabled; vendor preset: disabled) Active: active (running) since Sat 2022-08-27 10:17:17 UTC; 1min 32s ago Docs: https://github.com/rancher/rke2#readme Process: 3582 ExecStartPre=/sbin/modprobe overlay (code=exited, status=0/SUCCESS) Process: 3576 ExecStartPre=/sbin/modprobe br_netfilter (code=exited, status=0/SUCCESS) Process: 3573 ExecStartPre=/bin/sh -xc ! /usr/bin/systemctl is-enabled --quiet nm-cloud-setup.service (code=exited, status=0/SUCCESS) Main PID: 3587 (rke2) Tasks: 163 Memory: 1.8G CGroup: /system.slice/rke2-server.service ├─3587 /usr/bin/rke2 server .... Install kubectl curl -LO "https://storage.googleapis.com/kubernetes-release/release/$(curl -s https://storage.googleapis.com/kubernetes-release/release/stable.txt)/bin/linux/amd64/kubectl" chmod +x kubectl sudo mv kubectl /usr/local/bin Export the config: $ vim ~/.bashrc #Add line below export PATH=$PATH:/var/lib/rancher/rke2/bin export KUBECONFIG=/etc/rancher/rke2/rke2.yaml #Source bashrc file $ source ~/.bashrc After some time, check if the node and pods are up: kubectl get nodes kubectl get pods -A Sample Output: Obtain the token: $ sudo cat /var/lib/rancher/rke2/server/node-token K1079187d01ac73b1a17261a475cb1b8486144543fc59a189e0c4533ef252a26450::server:33f5c1a2b7721992be25e340ded19cac Accessing the Cluster from Outside with kubectl Copy /etc/rancher/rke2/rke2.yaml on your machine located outside the cluster as ~/.kube/config. Then replace 127.0.0.1 with the IP or hostname of your RKE2 server. kubectl can now manage your RKE2 cluster. scp /etc/rancher/rke2/rke2.yaml user@ipaddress:~/.kube/config Step 5 – Set up additional Server Nodes (Master Nodes) Now install RKE2 on the other two server nodes; curl -sfL https://get.rke2.io --output install.sh chmod +x install.sh sudo INSTALL_RKE2_TYPE=server ./install.sh Once installed, create the config file: sudo vim /etc/rancher/rke2/config.yaml Add the below lines to the file server: https://rke.computingpost.com:9345
token: [token from /var/lib/rancher/rke2/server/node-token on server node 1] write-kubeconfig-mode: "0644" tls-san: - rke.computingpost.com If you don’t have DNS server map A record for Load Balancer in /etc/hosts file: $ sudo vi /etc/hosts 192.168.205.9 rke.computingpost.com Save the file and restart the rke2-server each at a time sudo systemctl start rke2-server sudo systemctl enable rke2-server After some time, check the status of the nodes We have 3 master nodes configured. Step 6 – Set up Agent Nodes (Worker Nodes) To set up an agent node, install the RKE2 agent package using the commands below: curl -sfL https://get.rke2.io --output install.sh chmod +x install.sh sudo INSTALL_RKE2_TYPE=agent ./install.sh If you don’t have DNS server map A record for Load Balancer in /etc/hosts file: $ sudo vi /etc/hosts 192.168.205.9 rke.computingpost.com Create and modify configuration file to suit your use. $ sudo vim /etc/rancher/rke2/config.yaml server: https://rke.computingpost.com:9345 token: [token from /var/lib/rancher/rke2/server/node-token on server node 1] Start and enable the service: sudo systemctl start rke2-agent sudo systemctl enable rke2-agent Check the nodes: From the output, we have one agent node added to the cluster. Check pods. This output shows all the pods available, we have pods for the rke2 ingress and metrics deployed by default in the kube-system namespace. Step 7 – Deploy an Application. Once the above configurations have been made, deploy and application on your cluster. For this guide, we will deploy a demo Nginx application. kubectl apply -f -
0 notes
Text
herz jesu artikel
https://www.mariawalder-messbuch.de/as62/pfingstkreis/herzjs/node2.html
http://www.kathpedia.com/index.php/Miserentissimus_redemptor_(Wortlaut)
https://www.lateinische-messe.tirol/herz-jesu/geschichtlicher-rueckblick
https://www.herz-jesu-apostolat.org/gebete/s%C3%BChnegebet/
0 notes
Photo

2022/05/13 (Fri.) 22:30-04:30 Be Shocked Club ~Bonite 2 Bass~ @ Womb Lounge (Shibuya, Tokyo) Entrance: 2000 JPY GUEST: TAKAMI (REBOOT/BUZZ×3) B2B hidemi (UP BEAT SOUNDWORKS) Lineup: Addiy Akito (KRASH) Break (AS ONE) Chad, fai (KICK ASS!) MaMe (node2) Onnoji (Electro Swing PartyJapan) zensen 宗教戦争 VJ: Dash (ASOBI) Light.a.k.a (hoshizora) RESIDENT: RefuCafe SPYKEY TKRN https://ra.co/events/1527972 弊社より、TAKAMIが出演いたします。
0 notes
Text

Source: edward delandre Xenomorph.
93 notes
·
View notes
Text
How to configure a hyperledger fabric node for development purposes
Hyperledger Fabric is a blockchain platform for creating and deploying business applications. In this article, we will show you how to configure a hyperledger fabric node for development purposes. First, download and install the hyperledger fabric software. Then, create a new directory called dev and extract the hyperledger fabric SDK into it.
Building a blockchain application can be resource intensive and time consuming. To make the process easier, some developers prefer to use development nodes on Hyperledger Fabric. In this article, we will show you how to configure a Hyperledger Fabric node for development purposes. We will also provide an example of how to create a basic blockchain application using the Node.js client library for Hyperledger Fabric.
Hyperledger Fabric is a blockchain platform that enables distributed applications (DApps) to be developed and deployed. This platform is composed of a series of modular nodes that can be configured for development purposes. In this article, we will show you how to configure a hyperledger fabric node for development purposes. After reading this article, you will know how to set up the required environment and tools necessary for Hyperledger Fabric development.
Hyperledger Fabric node deployment is a blockchain platform that enables companies to create and manage transactions across a distributed ledger. In this article, we will show you how to configure a Hyperledger Fabric node for development purposes.
Hyperledger Fabric is a software platform for developing and deploying blockchain applications. It is one of several projects being developed by the Hyperledger consortium, which includes major companies such as IBM, Intel, and Airbus. Fabric is designed for use in business networks and can handle a high volume of transactions. The software is open source and can be installed on a variety of platforms.
Hyperledger Fabric is a distributed ledger technology that allows for the creation of robust, modular applications. In order to facilitate development and testing of these applications, it is necessary to configure a Hyperledger Fabric node for use. This article provides instructions on how to do this.
In this article, we will be discussing how to configure a hyperledger fabric node for development purposes. We will be using the following nodes:
- Fabric1: This is our primary node and it will be used for all of our testing.
- Node1: This is our development node and it will be used for all of our coding.
- Node2: This is a spare node that we can use if anything goes wrong with
Fabric1.
- Go Environment: We will be using go to compile and run our code. If you are new to Hyperledger Fabric, or if you want to develop applications on top of it, then you will need to configure a machine for development. This document will show you how to do this.
This article will show you how to configure a hyperledger fabric node for development purposes. We will cover setting up the node, installing the required dependencies, and then launching the node in development mode. Finally, we'll show you how to develop a simple application on top of the hyperledger fabric platform.
1 note
·
View note
Text
Decision Trees
Decision tree: a mechanism for making decisions based on a series of "if" factors
Root node – the decision that matters the most, ergo the decision that precedes all others
Leaf node – the last outcome of a decision tree branch
format: if (node1) and (node2) and (node3)...and (node n), then (leaf node: final decision)
determining the root node: intuitive in a simple human context BUT with data, one must use an algorithm
utilize mechanisms from previous studies (i.e., data visualization with histograms, regression) to find one that gives the most classifying information
each node is "greedily constructed," i.e., the model extracts as much information as it can for an individual node without thinking about info that could be derived from future nodes
so the decision tree algorithm is run recursively, again and again, until the data is sifted perfectly into individual categories
you can use the same features over and over again (recursive!!) to separate out stat at different levels of "purity"
each time there is new data, you can run them through the tree and observe where they end up!
growing a tree
split the parent node and pick the feature that results in the largest "goodness of fit"
repeat until the child nodes are pure, i.e., until the "goodness of fit" measure <= 0
preventing tree overfitting
overfitting: too pure, too in-depth tree, too many nodes that are specifically fitted to the given dataset rather than the real-world function
set a depth cut-off (max tree depth)
set a min. number of data points in each node
stop growing tree if further splits are not statistically significant
and cost-complexity pruning: utilizing some alpha regularization threshold to prevent overfit
cost-complexity pruning
regularizing the decision tree via alpha at the cost of tree purity
so as alpha increases, impurity also increases. number of nodes and depth of tree decrease
real-world accuracy increases to a certain point before decreasing – as prevention of overfitting with regularization becomes underfitting
1 note
·
View note