#nodejs mongoose
Explore tagged Tumblr posts
Visit Tumblr Blog
Explore Tumblr blogs with no restrictions, modern design and the best experience.
Last Seen Tumblr Blogs


Fun Fact
The Tumblr app for Google Glass was released on May 16, 2013.
Text
The MERN stack (MongoDB, Express.js, React.js, Node.js) is a powerful combination of technologies for building modern, full-stack web applications using JavaScript. A CRUD (Create, Read, Update, Delete) app is a basic yet essential application structure for handling data in web development. In this guide, we will walk through the process of building a simple CRUD app using the MERN stack, where users can create, read, update, and delete records in a database.
By the end of this tutorial, you'll understand how to set up the backend and frontend of a MERN stack application, create API endpoints, connect the app to a MongoDB database, and build an interactive user interface with React
#MERNStack#MongoDB#ExpressJS#React#NodeJS#FullStack#FullStackDevelopment#CRUDApp#WebDevelopment#AppDevelopment#FrontendDevelopment#ReactJS#JavaScript#JSX#ReactHooks#ReactRouter#BackendDevelopment#API#RESTAPI#ServerSide#NoSQL#Database#Mongoose#JWT#Authentication#Authorization#OAuth#PassportJS#Git#GitHub
0 notes
Text

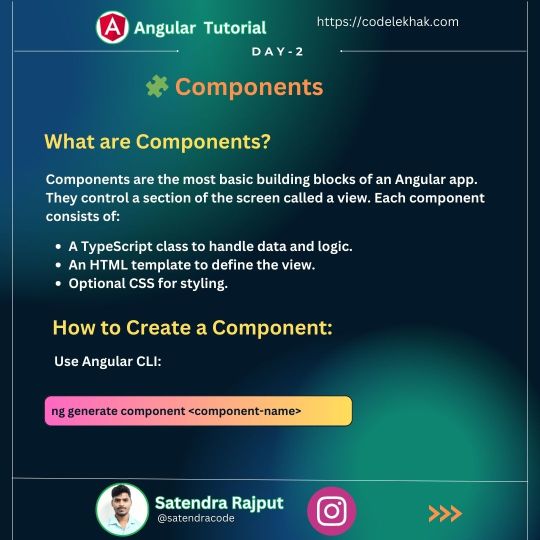
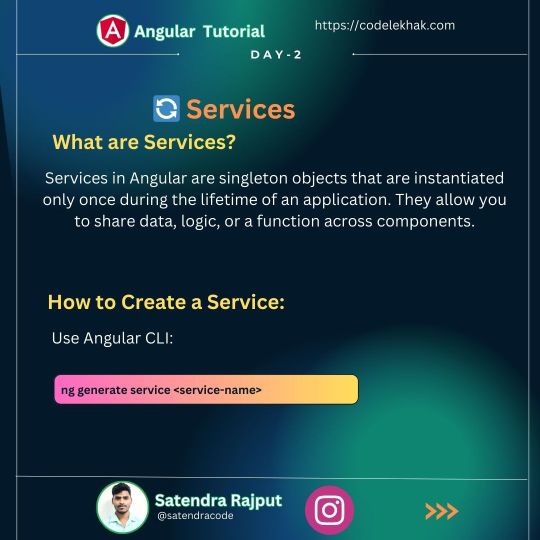
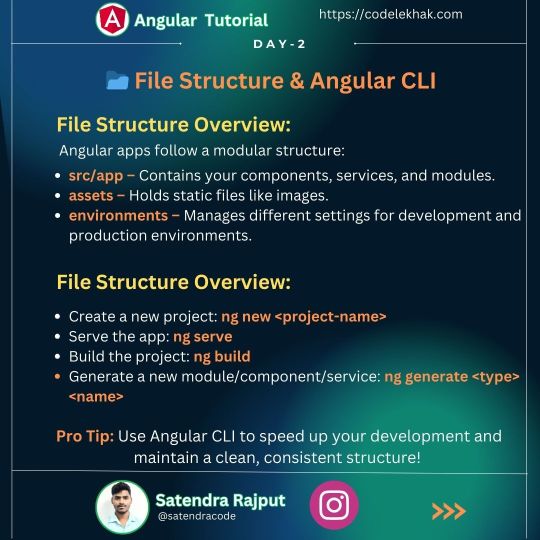

🚀 Day 2: Understanding Angular Architecture 🛠️
Today, we're diving into the core of Angular: Modules, Components, and Services. Understanding these building blocks is crucial for mastering Angular development.
#mongo#mongoose#node.js#express#node#nodejs#angular#css animation examples#cs submission#css3#mean stack#mean stack development company#html5 css3#html5#html5 game#javascript#html css#htmlcoding#html#coding#programming
0 notes
Text
Prisma Vs Mongoose
When working with MongoDB in Node.js applications, developers often choose between Prisma and Mongoose. Both are powerful tools, but they cater to different needs and offer unique features…
#prisma#mongoose#reactjs#react#mern#mernstack#mongodb#nosql#javascript#js#nodejs#npm#prismaorm#orm#database#databaseconnectivity#developers#developer#software#softwaredeveloper#programming#programminglanguage#javascriptprogramming#advancedjavascript
1 note
·
View note
Text
youtube
#youtube#video#codeonedigest#microservices#docker#microservice#nodejs module#nodejs express#node js#nodejs#nodejs projects#nodejs tutorial#node js development company#node js express#node js training#mongo database#mongo db#mongoose#mongodb#docker image#docker container#docker tutorial#docker course#dockerfile#dockerhub
0 notes
Video
youtube
Flutter Chat App Nodejs App Tutorial + Mongodb + Socket | devhubspot
#youtube#fluttershy#flutter app development#flutter#chat#chat app#messager#nodejs#mongodb#mongoose#socket#socket.io#devhubspot
0 notes
Video
youtube
Flutter Chat App Nodejs App Tutorial + Mongodb + Socket | devhubspot
#youtube#chat#chatter#chat app#devhubspot#flutter#fluttershy#flutter app development#nodejs#node#mongodb#mongoose#soket#socket#socket.io
0 notes
Text
Mongoose npm for nodejs 2023
Mongoose is a widely-used Node.js library that provides a straightforward and elegant way to interact with MongoDB, a popular open-source NoSQL database. Developed to simplify database management and streamline interactions between applications and MongoDB, Mongoose offers an object modeling system that enables developers to define schemas, validate data, and perform CRUD (Create, Read, Update, Delete) operations with ease. Read More..
1 note
·
View note
Text
Certainly! Let’s explore how to build a full-stack application using Node.js. In this comprehensive guide, we’ll cover the essential components and steps involved in creating a full-stack web application.
Building a Full-Stack Application with Node.js, Express, and MongoDB
1. Node.js: The Backbone of Our Application
Node.js is a runtime environment that allows us to run JavaScript on the server-side.
It’s built on Chrome’s V8 JavaScript engine and uses an event-driven, non-blocking I/O model, making it lightweight and efficient.
Node.js serves as the backbone of our application, providing the environment in which our server-side code will run.
2. Express.js: Simplifying Server-Side Development
Express.js is a minimal and flexible Node.js web application framework.
It provides a robust set of features for building web and mobile applications.
With Express.js, we can:
Set up middlewares to respond to HTTP requests.
Define routing rules.
Add additional features like template engines.
3. MongoDB: Storing Our Data
MongoDB is a document-oriented database program.
It uses JSON-like documents with optional schemas and is known for its flexibility and scalability.
We’ll use MongoDB to store our application’s data in an accessible and writable format.
Building Our Full-Stack Application: A Step-by-Step Guide
Setting Up the Environment:
Install Node.js:sudo apt install nodejs
Initialize a new Node.js project:mkdir myapp && cd myapp npm init -y
Install Express.js:npm install express
Creating the Server:
Create a basic Express server:const express = require('express'); const app = express(); const port = 3000; app.get('/', (req, res) => { res.send('Hello World!'); }); app.listen(port, () => { console.log(`Server running at http://localhost:${port}`); });
Defining Routes:
Define routes for different parts of our application:app.get('/user', (req, res) => { res.send('User Page'); });
Connecting to MongoDB:
Use Mongoose (a MongoDB object modeling tool) to connect to MongoDB and handle data storage.
Remember, this is just the beginning! Full-stack development involves frontend (client-side) work as well. You can use React, Angular, or other frontend libraries to build the user interface and connect it to your backend (Node.js and Express).
Feel free to explore more about each component and dive deeper into building your full-stack application! 😊 12
2 notes
·
View notes
Text
You can learn NodeJS easily, Here's all you need:
1.Introduction to Node.js
• JavaScript Runtime for Server-Side Development
• Non-Blocking I/0
2.Setting Up Node.js
• Installing Node.js and NPM
• Package.json Configuration
• Node Version Manager (NVM)
3.Node.js Modules
• CommonJS Modules (require, module.exports)
• ES6 Modules (import, export)
• Built-in Modules (e.g., fs, http, events)
4.Core Concepts
• Event Loop
• Callbacks and Asynchronous Programming
• Streams and Buffers
5.Core Modules
• fs (File Svstem)
• http and https (HTTP Modules)
• events (Event Emitter)
• util (Utilities)
• os (Operating System)
• path (Path Module)
6.NPM (Node Package Manager)
• Installing Packages
• Creating and Managing package.json
• Semantic Versioning
• NPM Scripts
7.Asynchronous Programming in Node.js
• Callbacks
• Promises
• Async/Await
• Error-First Callbacks
8.Express.js Framework
• Routing
• Middleware
• Templating Engines (Pug, EJS)
• RESTful APIs
• Error Handling Middleware
9.Working with Databases
• Connecting to Databases (MongoDB, MySQL)
• Mongoose (for MongoDB)
• Sequelize (for MySQL)
• Database Migrations and Seeders
10.Authentication and Authorization
• JSON Web Tokens (JWT)
• Passport.js Middleware
• OAuth and OAuth2
11.Security
• Helmet.js (Security Middleware)
• Input Validation and Sanitization
• Secure Headers
• Cross-Origin Resource Sharing (CORS)
12.Testing and Debugging
• Unit Testing (Mocha, Chai)
• Debugging Tools (Node Inspector)
• Load Testing (Artillery, Apache Bench)
13.API Documentation
• Swagger
• API Blueprint
• Postman Documentation
14.Real-Time Applications
• WebSockets (Socket.io)
• Server-Sent Events (SSE)
• WebRTC for Video Calls
15.Performance Optimization
• Caching Strategies (in-memory, Redis)
• Load Balancing (Nginx, HAProxy)
• Profiling and Optimization Tools (Node Clinic, New Relic)
16.Deployment and Hosting
• Deploying Node.js Apps (PM2, Forever)
• Hosting Platforms (AWS, Heroku, DigitalOcean)
• Continuous Integration and Deployment-(Jenkins, Travis CI)
17.RESTful API Design
• Best Practices
• API Versioning
• HATEOAS (Hypermedia as the Engine-of Application State)
18.Middleware and Custom Modules
• Creating Custom Middleware
• Organizing Code into Modules
• Publish and Use Private NPM Packages
19.Logging
• Winston Logger
• Morgan Middleware
• Log Rotation Strategies
20.Streaming and Buffers
• Readable and Writable Streams
• Buffers
• Transform Streams
21.Error Handling and Monitoring
• Sentry and Error Tracking
• Health Checks and Monitoring Endpoints
22.Microservices Architecture
• Principles of Microservices
• Communication Patterns (REST, gRPC)
• Service Discovery and Load Balancing in Microservices
1 note
·
View note
Text
Unit testing for NodeJS using Mocha and Chai

Unit testing is important because it checks small parts of code to make sure they work right and finds bugs early. It's important to do these tests before releasing an app. This guide will cover unit testing with Mocha and Chai.
Why Mocha and Chai?
Mocha is a feature-rich JavaScript test framework that runs on Node.js, making asynchronous testing simple and enjoyable. It provides functions that execute in a specific order, collecting test results and offering accurate reporting.
Chai is a BDD/TDD assertion library that can be used with any JavaScript testing framework. It offers several interfaces, allowing developers to choose the assertion style they find most comfortable.
Benefits of using Mocha and Chai
Readable and expressive assertions Chai provides different assertion styles and syntax options that work well with Mocha, allowing you to choose the style that suits your needs for clarity and readability.
Support for asynchronous testing Mocha handles asynchronous testing easily, letting you test asynchronous code in Node.js applications without needing extra libraries or complex setups.
Setting Up the Testing Environment
Installing dependencies
First, let's set up a new Node.js project and install the necessary dependencies:mkdir auth-api-testing cd auth-api-testing npm init -y # Install production dependencies npm install express jsonwebtoken mongoose bcryptjs dotenv # Install development dependencies npm install --save-dev mocha chai chai-http supertest nyc
Setup testing scripts
Add the following scripts to your package.json:{ "scripts": { "test": "NODE_ENV=test mocha --timeout 10000 --exit", "test:coverage": "nyc npm test" } }
Project Overview
Before diving into testing, let's understand the application we'll be testing. We're building a simple but secure authentication API with the following features.
Application Structure
src/ ├── models/ │ └── user.model.js # User schema and model ├── routes/ │ ├── auth.routes.js # Authentication routes │ └── user.routes.js # User management routes ├── middleware/ │ ├── auth.middleware.js # JWT verification middleware │ └── validate.js # Request validation middleware ├── controllers/ │ ├── auth.controller.js # Authentication logic │ └── user.controller.js # User management logic └── app.js # Express application setup
API Endpoints
Authentication Endpoints:
POST /api/auth/register - Registers new user - Accepts: { email, password, name } - Returns: { token, user } POST /api/auth/login - Authenticates existing user - Accepts: { email, password } - Returns: { token, user }
User Endpoints:
GET /api/users/profile - Gets current user profile - Requires: JWT Authentication - Returns: User object PUT /api/users/profile - Updates user profile - Requires: JWT Authentication - Accepts: { name, email } - Returns: Updated user object
Environment setup for testing
Create a .env.test file for test-specific configuration:PORT=3001 MONGODB_URI=mongodb://localhost:27017/auth-api-test JWT_SECRET=your-test-secret-key
Understanding Test Structure
Let's create our first test file test/auth.test.jsconst chai = require('chai'); const chaiHttp = require('chai-http'); const app = require('../src/app'); const User = require('../src/models/user.model'); chai.use(chaiHttp); const expect = chai.expect; describe('Auth API Tests', () => { // Runs before all tests before(async () => { await User.deleteMany({}); }); // Runs after each test afterEach(async () => { await User.deleteMany({}); }); // Test suites will go here });
Test Lifecycle Hooks
Mocha provides several hooks for test setup and cleanup:
before(): Runs once before all tests
after(): Runs once after all tests
beforeEach(): Runs before each test
afterEach(): Runs after each test
Mocha's describe() and it() Blocks
Tests are organized using describe() blocks for grouping related tests and it() blocks for individual test cases:describe('Auth API Tests', () => { describe('POST /api/auth/register', () => { it('should register a new user successfully', async () => { // Test implementation }); it('should return error when email already exists', async () => { // Test implementation }); }); });
Writing our first test suite
Testing Registration and Login
describe('POST /api/auth/register', () => { it('should register a new user successfully', async () => { const res = await chai .request(app) .post('/api/auth/register') .send({ email: '[email protected]', password: 'Password123!', name: 'Test User' }); expect(res).to.have.status(201); expect(res.body).to.have.property('token'); expect(res.body).to.have.property('user'); expect(res.body.user).to.have.property('email', '[email protected]'); }); it('should return 400 when email already exists', async () => { // First create a user await chai .request(app) .post('/api/auth/register') .send({ email: '[email protected]', password: 'Password123!', name: 'Test User' }); // Try to create another user with same email const res = await chai .request(app) .post('/api/auth/register') .send({ email: '[email protected]', password: 'Password123!', name: 'Test User 2' }); expect(res).to.have.status(400); expect(res.body).to.have.property('error'); }); });
Testing Authentication
describe('Protected Routes', () => { let token; let userId; beforeEach(async () => { // Create a test user and get token const res = await chai .request(app) .post('/api/auth/register') .send({ email: '[email protected]', password: 'Password123!', name: 'Test User' }); token = res.body.token; userId = res.body.user._id; }); it('should get user profile with valid token', async () => { const res = await chai .request(app) .get('/api/users/profile') .set('Authorization', `Bearer ${token}`); expect(res).to.have.status(200); expect(res.body).to.have.property('email', '[email protected]'); }); it('should return 401 with invalid token', async () => { const res = await chai .request(app) .get('/api/users/profile') .set('Authorization', 'Bearer invalid-token'); expect(res).to.have.status(401); }); });
Database Testing
Setting Up Test Database
const mongoose = require('mongoose'); before(async () => { await mongoose.connect(process.env.MONGODB_URI_TEST); }); after(async () => { await mongoose.connection.dropDatabase(); await mongoose.connection.close(); });
Testing CRUD Operations
describe('User CRUD Operations', () => { it('should update user profile', async () => { const res = await chai .request(app) .put(`/api/users/${userId}`) .set('Authorization', `Bearer ${token}`) .send({ name: 'Updated Name' }); expect(res).to.have.status(200); expect(res.body).to.have.property('name', 'Updated Name'); }); it('should delete user account', async () => { const res = await chai .request(app) .delete(`/api/users/${userId}`) .set('Authorization', `Bearer ${token}`); expect(res).to.have.status(200); // Verify user is deleted const user = await User.findById(userId); expect(user).to.be.null; }); });
Best Practices
Keep Test Atomic
Each test should stand alone and not depend on other tests
Tests should be able to run in any sequence
Use the before, after, beforeEach, and afterEach hooks for proper setup and cleanupdescribe('User API', () => { beforeEach(async () => { // Reset database state await User.deleteMany({}); // Create fresh test data await User.create(testData); }); it('should create a user', async () => { // This test has a clean state }); });Follow the AAA Pattern
Arrange: Set up test data and conditions
Act: Execute the code being tested
Assert: Verify the results
it('should update user profile', async () => { // Arrange const user = await createTestUser(); const updateData = { name: 'New Name' }; // Act const response = await chai .request(app) .put(`/api/users/${user._id}`) .send(updateData); // Assert expect(response).to.have.status(200); expect(response.body.name).to.equal(updateData.name); });Test Edge CasesTest boundary conditions, error scenarios, invalid inputs, and empty or null values.describe('User Registration', () => { it('should handle empty email', async () => { const response = await chai .request(app) .post('/api/auth/register') .send({ email: '', password: 'valid123' }); expect(response).to.have.status(400); expect(response.body.error).to.include('email'); }); it('should handle invalid email format', async () => { const response = await chai .request(app) .post('/api/auth/register') .send({ email: 'notanemail', password: 'valid123' }); expect(response).to.have.status(400); expect(response.body.error).to.include('valid email'); }); });Use Descriptive Test NamesTest names should clearly describe the scenario being tested, follow a consistent naming convention, and include the expected behavior.// Good examples it('should return 404 when user does not exist', async () => {}); it('should handle special characters in username', async () => {}); it('should maintain password hash after update', async () => {}); // Bad examples it('test user creation', async () => {}); it('error case', async () => {});Mock External Dependencies
Use stubs and mocks for external services
Isolate the code being tested
Control test environment
const sinon = require('sinon'); describe('Email Service', () => { let emailStub; beforeEach(() => { emailStub = sinon.stub(emailService, 'send'); }); afterEach(() => { emailStub.restore(); }); it('should send welcome email after registration', async () => { await userController.register(testUser); expect(emailStub.calledOnce).to.be.true; expect(emailStub.firstCall.args[0]).to.equal(testUser.email); }); });Handle Promises Properly
Always return promises or use async/await
Use proper error handling
Test both success and failure cases
// Good - using async/await it('should handle async operations', async () => { try { const result = await someAsyncOperation(); expect(result).to.exist; } catch (error) { expect(error).to.exist; } }); // Good - using promises it('should handle promises', () => { return somePromiseOperation() .then(result => { expect(result).to.exist; }) .catch(error => { expect(error).to.exist; }); });Set Appropriate Timeouts
Set realistic timeouts for async operations
Configure global timeouts in mocha config
Override timeouts for specific tests when needed
// Set timeout for specific test it('should handle long running operations', async function() { this.timeout(5000); // 5 seconds const result = await longRunningOperation(); expect(result).to.exist; });
Introducing Keploy Unit Test Generator
Writing manual test cases for mocha with chai, though effective, often has several challenges:
Time-consuming: Making detailed test suites by hand can take a lot of time, especially for large codebases.
Difficult to maintain: As your application changes, updating and maintaining manual tests becomes more complex and prone to errors.
Inconsistent coverage: Developers might focus on the main paths, missing edge cases or error scenarios that could cause bugs in production.
Skill-dependent: The quality and effectiveness of manual tests depend heavily on the developer's testing skills and familiarity with the codebase.
Repetitive and tedious: Writing similar test structures for multiple components or functions can be boring, possibly leading to less attention to detail.
Delayed feedback: The time needed to write manual tests can slow down development, delaying important feedback on code quality and functionality.
To tackle these issues, Keploy has introduced a ut-gen that uses AI to automate and improve the testing process, which is the first implementation of the Meta LLM research paper that understands code semantics and creates meaningful unit tests.
It aims to automate unit test generation (UTG) by quickly producing thorough unit tests. This reduces the need for repetitive manual work, improves edge cases by expanding the tests to cover more complex scenarios often missed manually, and increases test coverage to ensure complete coverage as the codebase grows.https://marketplace.visualstudio.com/items?itemName=Keploy.keployio
Key Features
Automate unit test generation (UTG): Quickly generate comprehensive unit tests and reduce redundant manual effort.
Improve edge cases: Extend and improve the scope of tests to cover more complex scenarios that are often missed manually.
Boost test coverage: As the codebase grows, ensuring exhaustive coverage becomes feasible.
Conclusion
In conclusion, mastering Node.js backend testing with Mocha and Chai is important for developers who want their applications to be reliable and strong. By using Mocha's testing framework and Chai's clear assertion library, developers can create detailed test suites that cover many parts of their code, from simple unit tests to complex async operations. Following best practices like keeping tests focused, using clear names, and handling promises correctly can greatly improve your testing process. By using these tools and techniques in your development workflow, you can find bugs early, improve code quality, and deliver more secure and efficient applications.
FAQ’s
What's the difference between Mocha and Chai, and do I need both?
While both are testing tools, they serve different purposes. Mocha is a testing framework that provides the structure for organizing and running tests (using describe() and it() blocks). Chai is an assertion library that provides functions for verifying results (like expect(), should, and assert). While you can use Mocha without Chai, using them together gives you a more complete and expressive testing solution.
How do I set up and clean up test data between tests?
Mocha provides several lifecycle hooks for managing test data:
before(): Run once before all tests
beforeEach(): Run before each test
afterEach(): Run after each test
after(): Run once after all tests
Example:javascriptCopybeforeEach(async () => { // Reset database state await User.deleteMany({}); // Create fresh test data await User.create(testData); }); afterEach(async () => { // Clean up after each test await User.deleteMany({}); });
How should I structure my tests for better organization and maintenance?
Group related tests using describe() blocks
Use descriptive test names that clearly state the expected behavior
Follow the AAA (Arrange-Act-Assert) pattern in each test
Keep tests atomic and independent
Organize test files to mirror your source code structure
Example:describe('User Authentication', () => { describe('Registration', () => { it('should successfully register with valid credentials', async () => { // Arrange const userData = { email: '[email protected]', password: 'valid123' }; // Act const response = await registerUser(userData); // Assert expect(response).to.have.status(201); }); }); });
What's the difference between before, beforeEach, after, and afterEach?
'before' runs once before all tests, 'beforeEach' runs before each individual test, 'afterEach' runs after each individual test, and 'after' runs once after all tests are complete. These are useful for setting up and cleaning up test data.
How do I test async code?
You can use async/await or return promises in your tests. Just add 'async' before your test function and use 'await' when calling async operations. Make sure to set appropriate timeouts for longer operations.
0 notes
Text
The Ultimate Guide to Node.js for Web Development

Node.js, a JavaScript runtime environment, has gained immense popularity in recent years for building scalable and efficient web applications. Its event-driven, non-blocking architecture and rich ecosystem of modules make it a powerful tool for developers. This comprehensive guide will delve into the key concepts, best practices, and real-world applications of Node.js for web development.
Understanding Node.js
Node.js is built on the V8 JavaScript engine, the same engine used by Google Chrome. It allows you to execute JavaScript code outside of a web browser, making it ideal for server-side development. Node.js is single-threaded but can handle multiple concurrent requests efficiently using its event-driven, non-blocking I/O model.
Key Features of Node.js
Asynchronous Programming: Node.js is asynchronous, meaning it can handle multiple tasks concurrently without blocking the main thread. This makes it well-suited for building real-time applications and handling a large number of concurrent connections.
Event-Driven Architecture: Node.js uses an event-driven architecture, where callbacks are executed when events occur. This allows for efficient resource utilization and high performance.
Rich Ecosystem: Node.js has a vast ecosystem of modules available through the npm (Node Package Manager) repository. These modules can be easily installed and used to extend the functionality of your applications.
Cross-Platform Compatibility: Node.js can run on Windows, macOS, and Linux, making it a versatile choice for development.
Setting Up Your Node.js Environment
Download and Install Node.js: Download the latest version of Node.js from the official website and follow the installation instructions for your operating system.
Verify Installation: Open a terminal or command prompt and run node -v to check the installed version of Node.js.
Create a New Project: Create a new directory for your project and initialize a package.json file using npm init.
Building Your First Node.js Application
Create a Server: Create a JavaScript file (e.g., index.js) and use the HTTP module to create a basic HTTP server.
Handle Requests: Define routes and handlers to handle different HTTP requests (GET, POST, PUT, DELETE).
Respond to Clients: Send appropriate responses to the client, such as HTML, JSON, or plain text.
Read Also:-https://www.quickwayinfosystems.com/blog/javascript-revolution-nodejs-backend-development/
Essential Node.js Modules
Express.js: A popular web framework for building RESTful APIs and web applications.
Mongoose: A MongoDB object modeling tool for interacting with MongoDB databases.
Socket.io: A real-time communication library for building web applications with bi-directional communication.
Passport: A flexible authentication middleware for Node.js.
Sequelize: An ORM for Node.js that supports multiple databases, including MySQL, PostgreSQL, and SQLite.
Best Practices for Node.js Development
Modularize Your Code: Break down your application into smaller, reusable modules to improve maintainability and organization.
Use Asynchronous Operations: Leverage Node.js's asynchronous programming model to avoid blocking the main thread.
Handle Errors Gracefully: Implement proper error handling mechanisms to prevent unexpected crashes.
Optimize Performance: Use techniques like caching, code minification, and compression to improve performance.
Security: Prioritize security by following best practices for input validation, authentication, and authorization.
Real-World Applications of Node.js
Node.js is widely used for building a variety of web applications, including:
Real-time chat applications: Node.js's event-driven architecture and non-blocking I/O make it well-suited for building real-time communication features.
APIs and microservices: Node.js can be used to build RESTful APIs and microservices for modern web applications.
Single-page applications (SPAs): Node.js can serve as the backend for SPAs, providing dynamic content and data.
IoT applications: Node.js can be used to build IoT applications that interact with devices and sensors.
The Future of Node.js
Node.js continues to evolve and gain popularity in the web development community. With its focus on performance, scalability, and a vast ecosystem of modules, Node.js is well-positioned to node js software development company remain a dominant force in backend development for years to come.
#node js software development agency#node js development company in india#node js development services in india#node js development india#nodejs development services in india#node js development services india#custom nodejs development company in india
0 notes
Text
How to Learn NodeJS as a Django Developer?
If you're a Django developer looking to expand your skill set and delve into the world of Node.js, you're in for an exciting journey. Node.js is a powerful runtime environment that allows you to build scalable, high-performance applications using JavaScript on both the client and server sides. Learning Node.js alongside your Django expertise can open up a wide range of possibilities and career opportunities. Here's how you can get started:

1. Understand the Basics of JavaScript: Since both Node.js and client-side JavaScript use the same language, start by mastering JavaScript fundamentals. Get comfortable with variables, data types, loops, and functions. This strong foundation will make transitioning to Node.js smoother.
2. Explore Node.js Fundamentals: Familiarize yourself with Node.js core modules, its event-driven architecture, and the npm (Node Package Manager). Learn how to create a simple server, handle HTTP requests, and work with asynchronous operations, which are essential in Node.js development.
3. Build RESTful APIs: Django developers often work with RESTful APIs. Node.js excels in creating APIs as well. Learn how to create APIs using frameworks like Express.js, which simplifies the process of building robust and scalable APIs.
4. Database Integration: Just like Django's ORM, Node.js has libraries and frameworks (such as Mongoose for MongoDB) for working with databases. Learn how to connect, query, and manage databases in Node.js.
5. Authentication and Authorization: Study authentication and authorization techniques in Node.js. This knowledge will be valuable when building secure applications.
6. Real-time Applications: Node.js is renowned for its real-time capabilities. Explore technologies like WebSockets and Socket.io to build real-time features in your applications.
7. Testing and Debugging: Node.js has a robust ecosystem for testing and debugging. Learn how to write unit tests, perform integration testing, and debug effectively.
8. Scalability and Deployment: Node.js is well-suited for building scalable applications. Understand concepts like clustering and load balancing. Learn how to deploy Node.js applications to platforms like Heroku or AWS.
9. Explore Frameworks: Just as Django is built on Python, Node.js has various frameworks. Consider diving into frameworks like Express.js, Nest.js, or Meteor.js to streamline your development process.
10. Projects and Practice: The best way to learn Node.js is through hands-on projects. Start with small projects and gradually work your way up to more complex applications. Building a portfolio of Node.js projects will demonstrate your skills to potential employers or clients.
By combining your Django expertise with Node.js, you'll become a versatile full-stack developer, capable of creating a wide range of web applications and services. Embrace the learning process, stay curious, and enjoy the journey of mastering Node.js as a Django developer.
0 notes
Text
1 note
·
View note
Text
0 notes
Video
youtube
Nestjs Mongo Database Microservice Project Tutorial for Beginners Full Video Link - https://youtu.be/lmo8n9WujdQ Check out this new video about Nestjs mongo db microservice project on the CodeOneDigest YouTube channel! Learn nestjs project setup with dependencies and mongo database. Create microservices in nestjs framework with mongoose orm #mongodb #nestjs #mongoose #microservice #api #nodejs #javascript #codeonedigest@YouTube @codeonedigest @nestframework @MongoDB @typescript @JavaScript @java @awscloud @nodejs
#youtube#nestjs#nestjs microservices#nestjs mongodb#mongo database#nestjs mongo db#nestjs mongo database#nestjs microservices mongodb
0 notes
Text
Simplifying Database management in NodeJS using ORM
What is ORM in Node.js?
ORM (Object Relational Models) is a way of mapping of relational database systems to objects. Various database systems access data in various ways, and ORM makes it simpler for us to maintain objects even when the sources and apps they access change over time.

By using ORM, data migration between databases can be streamlined and seamless. ORM maintains objects despite changes in the apps and sources of database access, since different database systems access data in different ways.
What are the benefits of using an ORM?
Simplified Database Interaction: One of the primary advantages of Node.js ORM is the abstraction it provides over raw SQL queries. Developers can work with a higher-level, object-oriented syntax that closely resembles the application’s programming language, making it easier to read, write, and maintain database-related code.
Cross-Database Compatibility: Node.js ORM frameworks often support multiple database systems, such as MySQL, PostgreSQL, SQLite, and more. This cross-database compatibility allows developers to switch between databases or even migrate their applications to a different database system without significant changes to the codebase.
Model-Driven Development: ORM frameworks promote the use of data models to represent database tables and their relationships. By defining these models, developers can work with entities in the application code that closely mirror the database structure.
Data Validation and Transformation: ORM frameworks often include built-in validation and transformation mechanisms. Developers can define rules and constraints on data fields, ensuring that only valid and consistent data is stored in the database.
Database Migration Management: ORM frameworks usually provide tools for managing database schema changes and migrations. This is especially beneficial when the application evolves and requires modifications to the database structure.
Optimized Query Generation: ORM generate efficient SQL queries tailored to the specific database system, optimizing performance and minimizing the risk of common performance pitfalls.
Code Reusability: With ORM frameworks, developers can encapsulate database-related logic within reusable functions or methods. This leads to cleaner and more modular code, allowing developers to easily share and reuse database interaction components across different parts of the application.
Testing and Mocking: ORM frameworks facilitate unit testing by providing mockable interfaces for database interactions. Developers can write tests without needing to connect to a live database, making the testing process faster, more predictable, and less dependent on external resources.
What are the steps to integrate an ORM in NodeJS?
Initialize Your Node.js Project (if not done already):
If you haven’t already set up a Node.js project, navigate to your project’s root directory using your terminal and run the following command to initialize a new Node.js project:
npm init
Follow the prompts to configure your project settings and create a package.json file.
Choose an ORM:
Decide which ORM you want to use for your project. Some popular ORM frameworks for Node.js include Sequelize, Mongoose, TypeORM, and Bookshelf. Research each ORM to determine which one best fits your project’s requirements.
Install the Chosen ORM Package:
Once you’ve selected an ORM, you can install the corresponding npm package. Use the following command to install the package globally (recommended for global CLI tools) or locally (recommended for most projects):
# To install globally
npm I -g orm-package-name
# To install locally
npm i orm-package-name
Configure the ORM:
ORM frameworks usually require some configuration to connect to your database. Create a configuration file (e.g., config.js or database.js) in your project and specify the database connection details such as host, port, username, password, and database name. In Sequelize it is done like this-
const Sequelize = require(“sequelize”);
const sequelize = new Sequelize(
‘hello_world_db’,
‘DATABASE_USERNAME’,
‘DATABASE_PASSWORD’,
{
host: ‘DATABASE_HOST’,
dialect: ‘mysql’
}
);
Import and Initialize the ORM:
In your Node.js application code, import the installed ORM package and initialize it using the configuration you’ve set up. This step may involve creating an instance of the ORM’s main class and passing the configuration as parameters. For example to import Sequelize ORM we use the following command :-
sequelize.authenticate().then(() => {
console.log(‘Connection has been established successfully.’);
}).catch((error) => {
console.error(‘Unable to connect to the database: ‘, error);
});
Define Models:
Define your data models using the ORM’s syntax. Models represent database tables and their relationships. This step involves creating classes or objects that map to database tables, specifying fields, data types, and relationships between tables. In Sequelize we define models as given in code below:-
const Book = sequelize.define(“books”, {
title: {
type: DataTypes.STRING,
allowNull: false
},
author: {
type: DataTypes.STRING,
allowNull: false
},
release_date: {
type: DataTypes.DATEONLY,
},
subject: {
type: DataTypes.INTEGER,
}
});
Interact with the Database:
With your models and database connection set up, you can now start interacting with the database using the ORM’s methods. This might include querying, inserting, updating, and deleting records using the model objects you’ve defined.
sequelize.sync().then(() => {
console.log(‘Book table created successfully!’);
Book.create({
title: “Clean Code”,
author: “Robert Cecil Martin”,
release_date: “2021-12-14”,
subject: 3
}).then(res => {
console.log(res)
}).catch((error) => {
console.error(‘Failed to create a new record : ‘, error);
});
}).catch((error) => {
console.error(‘Unable to create table : ‘, error);
});
Handle Errors and Monitor Performance:
As you work with the ORM, make sure to handle errors gracefully and optimize your queries for performance. The ORM’s documentation should provide guidance on error handling and query optimization.
Test and Refine:
Test your application thoroughly to ensure that the ORM integration is working as expected. Use testing frameworks and tools to write unit and integration tests for your database interactions. Refine your code based on testing results and feedback.
Conclusion
An ORM is ideal and suitable for beginner web developers or small-scale projects. Since there is no ORM that solves all your problems, the best ORM is the ORM that is most suitable for your application need.
In summary, use ORM to achieve code standardization, security, maintainability, language abstraction, DRY, etc.
#Offshore Outsourced Software Product Development#digital engineering services#services data engineering#services digital engineering#services digital operations in California#New York#Detroit in US#North Rhine-Westphalia#Germany
0 notes