#npm imports
Explore tagged Tumblr posts
Visit Tumblr Blog
Explore Tumblr blogs with no restrictions, modern design and the best experience.
Last Seen Tumblr Blogs


Fun Fact
Post activity is at the highest at 4:00 pm EDT; notes peak at 10:00 pm EDT.
Text
LOTG REGION MAP
This is a map for all the regions (and some subregions) for LOTG, at least the ones that are important. The other areas are just even more cities and factories, with a lot of empty space in between.

REGION DESCS BELOW (its long)
Refinery [HF] Heavy Factory
A foul stench covers the facility. Monstrous factories filled with dangerous organisms filter through the earth for precious minerals. Even after their departure, their machines continued on, their crunching echoing through the walls.
Derelict Sprawls [DU] Derelict Urban
The one of the oldest remaining cities on the surface, many refused to abandon it to live atop the iterators, and simply fortified further. Though it seems to have not worked out for them.
Sub-region: Cathedral
A place of prayer and worship, those who came to the cathedrals sought some form of guidance. When Sixteenth Boundary Collapse was constructed, the cathedrals had been integrated into them.
Abandoned Rail [AR]
A rail station connecting Refinery and Sprawls, proving obsolete after the Lineside was constructed. Most of the station has sunk deep into the earth or been washed away by the rains.
Quiet Bay [QB]
The rain shadow caused by SBC’s can has left the skies of the bay rather calm. Some cycles are clear enough to see the neighboring iterator group on the horizon. Small temples dot the shores.
Arboreal Lineside [AL]
A commercial rail line, linking together the iterators separated by the mountains. Most of the rail remains above the clouds, undamaged by rain. Vultures and other aerial life have claimed it as their nesting grounds.
Tundra [CF] Cold Farms
A quiet, vast snowy plain. Early civilizations settled here long ago due to the dense rains and nearby lake. Though these early settlements were built over in favor of agricultural land, not all of it was completely destroyed. Grass eats away at the bricks, unveiling the past.
Evergreen Backlet [EB]
Across the temperate forests of plants is an urban sprawl blanketed in snow. Each building and complex towering and spreading like an invasive species, the greenery below struggling. Yet the further traveled from Thirteen Catastrophes, the steeper the climb becomes, and the more the rainfall begins to freeze to snow. Yet the suburbs still feel endless.
Swamped Peaks [SP]
Once a beautiful mountain range, now treated like a septic tank. The rainfall from the local iterator has turned the once untouched snow into a disgusting slurry. Mounds of strange biomass fill the caves, alongside terrible predators, conditioned by the cold.
Sub-region: Observatory
At the highest point lies the unfortunate remains of an astronomical research laboratory, far from the reaches of the iterator rains. However, it’s condition has since deteriorated, housed now by scavengers and whatever escaped the sewers.
The Sewers [BD] Biomass Dump
A labyrinth of musky tunnels and sumps spreads like roots through the range. A dangerous place, filled with discarded biomass, sticking to the walls in a thick film. One wrong step could lead you to being devoured by the writhing masses, or right into the rushing currents of what may not even be water anymore.
Glacier [SG] Superstructure Glacier
Living blocks stacked into towers higher than previously imagined, the alleys below uncomfortably squeezed together. Bridges between buildings, creating a canopy of sorts. Though, rather than the city being reclaimed by nature, it appears the iterator itself is reclaiming it.
Sub-region: House of Bows
Architecturally unimpressive compared to the Temple of Nexus or Council of Droplets, yet a wonder in its own way. Swarmers fill the vacant rooms, iterator biomass crammed in the corners, weaving between wall to wall. It’s difficult to tell where building ends, and creature begins.
Eroded Basin [NB] NPM Basin
Nine Purple Mountains was constructed within the basin in order to contain the water vapor and protect the Steppe and Scablands. The rainfall only further widened the basin, causing structural damage to the buildings and facilities above. Scrap, garbage, and rubble fills the basin below them now.
Dry Canyon [CA] Canyon Alley
The skeleton of a river, dried up from iterator activity. Many attempts at constructing railways and other settlements lie dead and abandoned. Though it remains one of the only safe routes from OOQT to NPM.
Scablands [WD] Wild Desert
The ground fractals and forms into scars in the earth, rocks scabbing the surface. Vibrant wildlife flourishing in little patches. Temples and sanctuaries scattered throughout, serving and taking care of those lost within the beautifully cruel desert. They had tried their best to protect these lands from iterator rains.
Sub-region: Oasis
Go east, past the crumbling temples, and deep into the wild as you can go, you will find it. A lake so deep it’s thought to lead to the void sea. Many have drowned trying to find the bottom themselves. Perhaps there’s another path down?
Untouched Steppe [US]
Untouched by rains, that is. Rolling plains of shrubs and grasses, with skies so clear you can see the stars from the surface. Cities built around religious sites spread wide, seemingly making do with what little water there is. Though it may seem rather lifeless, droves of wild creatures appear from their burrows and dens during the cool nights.
Mausoleum [DC] Desert Crypts
Just below the mountains is a large graveyard of sorts. The memories of those who have moved on and left this material world lined in rows, stacked like blocks, sand and dust slowly enveloping them. Fierce organisms guard these crypts, guarding what is already largely forgotten.
River Reservoir [RR]
The wetlands that surrounded the river were built atop of and excavated in favor of creating water pumps and tanks for the iterators. As a result, the water levels began to fluctuate rapidly in response to the rains. Though the architecture is designed around this, a creature in the wrong spot may end up swallowed by the river.
Archipelago [AP]
What was once a large plain has been drowned and eroded by a single, rather large iterator. What remains now are a few islands and external facilities and factories peeking out over the dirty waters.
29 notes
·
View notes
Text
Mini React.js Tips #3 | Resources ✨

Continuing the #mini react tips series, its components making time~!
In React, a component is like a Lego brick for building websites or apps. It's a small, independent part of the user interface (UI) that you can reuse whenever you need it. These components can be combined to create bigger and more complex applications. Examples are the header, footer, cards, asides, etc!
What you'll need:
know how to create a React project >> click
know the default React project's file structure >> click
know basic HTML
know basic JavaScript
basic knowledge of using the Terminal

What We Are Creating:
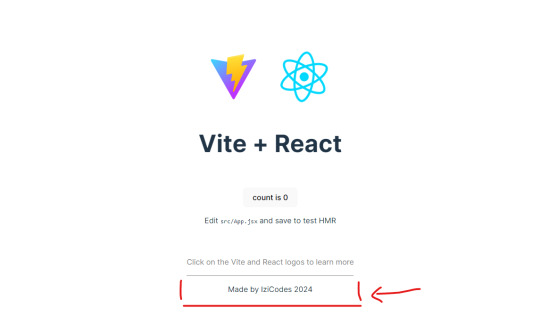
The footer at the bottom!
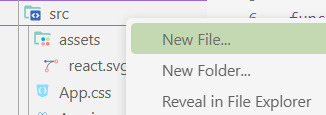
[ 1 ] Navigate to the 'src' Folder: Open your project in Visual Studio Code, locate the 'src' folder, and right-click on it.
[ 2 ] Create a New File: Click 'New File' to create the file within the 'src' folder. This file will house the code for your React component.
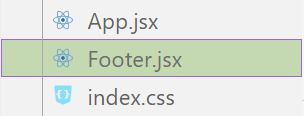
[ 3 ] Naming Conventions: Give your component a name, according to the convention of starting with a capital letter. This naming convention is essential for React to recognize your component~!!
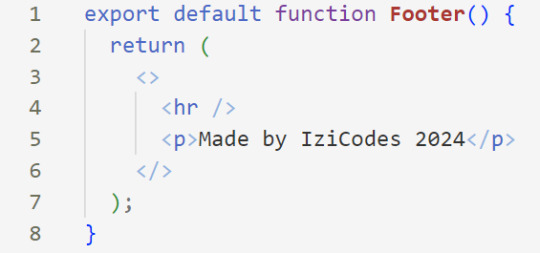
[ 4 ] Create The Initial Function: Open the file and type:
export default function [name of component]() {}

[ 5 ] Insert The return() Statement: The statement is used within a component to specify what content should be rendered when the component is invoked or used. Type:
return()

*the error is there because we haven't added anything inside yet, don't worry!
[ 6 ] Insert The Empty Tags: Inside of the return(), add empty tags (tags that don't have a specified element inside of them).

[ 7 ] Time For Some HTML: Inside the empty tags, enter the normal HTML elements that you want~!
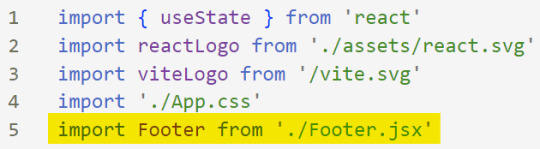
[ 8 ] Integration with App.jsx: Navigate to the 'App.jsx' file in the project, which is typically the entry point of your React application. At the top, import your newly created component. Type:
import [name of component] from './[location of the component]'
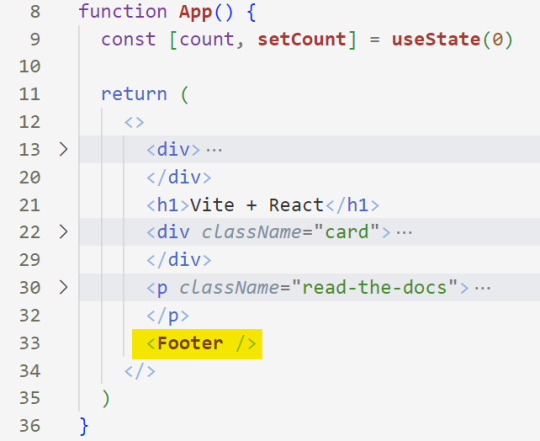
[ 9 ] Use Your Component: Inside the return() statement of the 'App()' function, include your component using the following syntax:
<[name of your component] />
[ 10 ] Run the Development Server: Start your development server with the command (the 'Local' link):
npm run dev
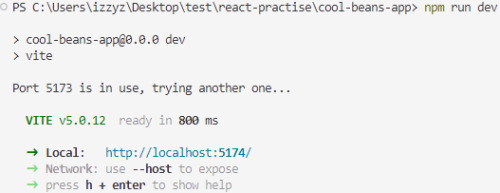
[ 11 ] Preview Your Project: Open the link provided in your terminal in your web browser. Witness your component in action!
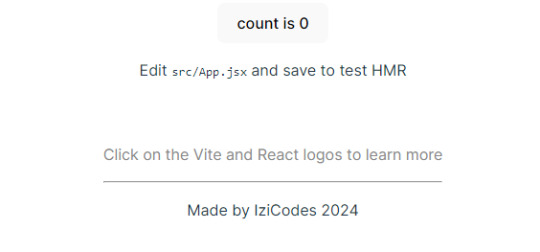
Congratulations! You made your first component! Try and create some new ones and place them around in the App()~!
BroCode’s 'React Full Course for Free’ 2024 >> click
React Official Website >> click
W3School's React Components >> click
Importing and Exporting Components >> click
🐬Previous Tip: Tip #2 The anatomy of the default React project >> click
Stay tuned for the other posts I will make on this series #mini react tips~!
#mini react tips#my resources#resources#codeblr#coding#progblr#programming#studyblr#studying#javascript#react.js#reactjs#coding tips#coding resources
33 notes
·
View notes
Text
Education_Developer Project Lifecycle
I see a lot of people here on codeblr want to start some project but, not really know the best way to get started. To rectify this, hear is my very in depth guide on how to get started. Read this entire post (some of these are started early but its milestone is later).
Note, I highly suggest the use of Github and will be referencing some things that are specific to it (like Wikipedia pages). If you prefer some other method that's fine just be aware you may be making your life harder than it needs to be.
Milestone 1: Form Teams
Find your people, exchange contact information and determine a time to meet up, consistently. If you are working solo, ignore some of the instructions for this section. That is not to say ignore the parts about consistency and time management. In fact, because you are working solo that should be even more important.
At the first meeting establish chat service (teams, slack, google chat, discord). Establish the frequency of the meetings and how often everyone should check their messages (ex: every 24 hours). Discuss the options about the project.
Platform: Android, django, iOS, react native, etc.
IDE: Xcode, WebStorm, VSCode, etc. Note that modern IDEs now have built-in methods for sharing your editor view with teammates: code together, code with me, etc.
Backend: firebase, postgresql, not needed, etc.
Libraries
APIs you will access
Package manager: npm, yarn, gradle, etc.
Finally, discuss the roles you all want on the team, what should one person focus on, who is the manager, editor, client rep, tester, researcher, repo master, master of specific tech, analyst etc.
Deliverables:
Add a wiki page (or more) to your repo titled "Team Organization" and list there the decisions you made from above, along with any pother pertinent information for the team.
Add a page to your wiki titled "Project Description" which should be kept updated as you make decisions about your project. It should contain these sections:
Description: a short description of your project,
Technologies: a list of the technologies you plan to use: frameworks, libraries, hosting services, etc.
Client: your client's name and contact info, if you have one, otherwise just say "Startup."
Milestone 2: Personas and User Stories
If you have a client who wants you to build the app, or you have identified a group of users for your app, then try to meet with them. Ask them what they do? (that is relevant to why they will use the app), why they want the app? how do they currently do the things they want the app to do? etc. If this is a startup answer those questions and more.
The point of this section is to better understand the users of this website. You need to make personas and user stories and record them so that you can reference them as you complete this project. It is very easy to loose sight of who will be using your product and assume they know more than they actually do.
Deliverables:
Add at least three personas to your wiki. These should cover 3 distinct user-types for your app. Each Persona must have a name, photo, and personal history.
Add a "User Stories" wiki page with at least 9 user stories covering the most common use cases for your app. They should all be of the form: As <the name of one of your personas> I want a <feature> so that I can <satisfy a need>.
Milestone 3: Design
For those that are more artsy than everyone else, now is your time to shine. Use a tool like Pencil, figma, justinmind, balsamiq, mockflow.com to design your product.
Your design should include:
An image for each of the major screens and dialogs of your app. Show all the widgets in their proper placement. Name each screen and write some text to explain how actions in one screen will lead to other screens.
In the case of a widget-free apps, you should include diagrams for all the major 'areas', animation stills that detail the most common animations and game mechanics (for example, Super Mario would have a set of drawings showing Mario jumping, punching up, and landing on a Goomba's head), as well as story boards if they are more relevant to your game.
A goal of the design is for you to think about the usability of your app. Try to 'use' the app in your mind: simulate how a user might use the app. Printing the screens into sheets of paper of the correct size and shuffling them as you pretend to use the app is a very common way to test the usability.
Another goal is to save you time. Remember that making a change now, like adding or deleting a screen, is a thousand times easier than if you wait until after you have written the code.
Deliverable: Add one page to your wiki called "Design" and add the images of your design here, along with some textual description of each screen and what it is used for.
Milestone 4: Requirements
This will be the main requirements document for your project. If you were charging a client for your work, this document would form part of that contract, specifying exactly what features your software will implement. The other part of the contract would be the payment details.
The document includes the design you made before (so, embed or add links to those images) but extends on that with detailed descriptions of all the desired features.
You will also mark each feature with one of:
Required: Core functionality of the app. Must have these for it to even start working.
Desired: Added functionality, usability, features, cosmetic features.
Aspirational: Other cool stuff you would like to add
Remember: all good programmers should understate what can be done and then over deliver. If you think something is going to take you 4 weeks, tell the client it will take 8. Then, when it inevitably takes you 6 weeks, you will seem ahead of schedule. On a similar note, if the client is asking for a lot of shit, say no. Now is not the time to be a people pleaser. If you want to please them, do it as a surprise addition, after basic functionality has been achieved.
Roughly the required features are those that need to get done first before anything else can even get started: things like logins, navigation menu, connection to backend, etc. They lay the foundation for building the app. An app that only implements the required features will at most get a passing grade in the class: 70.
The desired features are what make your app worth using. They make the app functional, attractive, and easy to use. Roughly, an app that implements all the desired features gets a 90 in the class.
The aspirational features make your app a professional-quality app. Implementing some of these moves it towards 100.
Deliverables:
Make a Requirements wiki page and list your requirements there.
Each item should succinctly explain a feature.
Each one will have a number. You can add sub-numbering, 1.1, 1.2, 1.2.1, etc. if you want.
Each one will be marked as either: Required, Desired, or Aspirational.
Add all the Proof of Concept Issues to your GitHub Issues with label:enhancement, milestone:Proof Of Concept. These are what you will implement first.
Milestone 5: Research
As a developer, you need to be intimately familiar with the technologies you are or could be using. You need to understand the pros, cons, and requirements of each library and platform that is relevant to your project. Thus, you need to be up to date on technology and, since technology seems to be always changing, this will be something you need to do throughout your career.
Specifically, you need to
Know about the various platforms available to you: their options and limitations.
Know about the various libraries that you can use to make your work easier.
Download, install, and build sample 'Hello world' apps using the most promising technologies. It is not enough to just read about it, you have to do it in order to learn.
Learn how to use the specific framework+libraries you choose to use for the project by building little apps with them.
Learn to use your package manager.
All of the above needs to be done before you start coding together with your team. Do not assume your teammates will teach you. You are responsible for learning.
This milestone will take a lot of time and work, which is why you should start working on this milestone as soon as that first meeting occurs where you discussion options.
Deliverable: Create a separate repo (I suggest naming it research-<projectname>) where you will place your sample project built using your team's chosen framework. The project will be more than just "hello world", or cut-n-paste from a tutorial. Start with tutorial code but, add you own code to their code. The app should have some minimal interactivity: user enters some data, program does something with it and shows the user.
Milestone 6: Architecture
Now that you are comfortable working with your chosen framework, you will write a document that roughly describes the big parts of your code. The structure will depend a lot on your chosen framework.
If you are building a webapp then you will probably list the set of database tables (models, for example: rails:ActiveRecords, meteor:Collections, etc), the set Views, and the set of Controllers. For webapps you should also list the of your URLs app, and what lives at each one.
If you are building an Android app then you will list your Activities or Fragments, along with their corresponding Views, as well as your model Java classes. You will also list your database tables (firebase, sqlite, localStorage, etc) if you need persistence, which almost everyone does.
Think deeply about your design. Go over the most common use-cases and check how those will be accomplished in code: which methods will be invoked? do the methods have references to all the objects they need in order to perform their job? Remember that your main goal is *de-coupling** the various classes: the fewer references (method arguments, global variables) they need, the easier your life will be.
Deliverable: Add architecture document to the wiki containing:
List all the languages/frameworks/libraries/services/APIs you plan to use. Explain how they will tie together. For example: This will be a native Android app written in Kotlin, using the android.graphics library, using firebase real-time database for cloud data, and firebase authentication for user accounts.
What package/build manager will you use? npm, gradle, yarn, flutter, pipenv, etc.
List what each person will work on. Everyone must make significant code contributions, or they will fail the class, see Syllabus.
Make sure all the images (if any) are embedded in the wiki page and hosted at GitHub.
Make sure the wiki page is easy to read.
If you are building a webapp:
Deployment How will you deploy? Which hosting provider(s)? Automation? Scripts? Explain.
Are you using Virtual Machines (vmware, vbox, etc) or Containers (docker) for development or deployment? Explain.
Is it a SPA or traditional? or mix? Explain. (My web application development lectures explain the difference.)
List of URLs you will implement. Explain any search arguments in English. Link (actual hyperlink) each URL to the page it shows in your Detailed Design milestone.
If implementing a REST API, document it. List all methods, parameters, and give English description of what they do.
The Views of your app. Embed the images from your Design Milestone. Typically, a webpage includes multiple views. For example, this webpage has a Header, Menu, and Content views (at least).
The Database schema: set of tables/documents with list of attributes and their types. Describe each table and attribute in English.
List of common queries you expect will be needed. Do any of then need to join tables?
If you are building a mobile or desktop app:
Release: How will you create and deliver a binary to testers? Explain. Note that the testers include us (the teachers of this class, when we grade your app). You must deliver a simple to install app: double-click to install.
Are you using Virtual Machines (vmware, vbox, etc) or Containers (docker) for development? If so, explain.
The Models for your app. These could be UML class diagrams, or just models with attributes (with type) and descriptions (in English).
How will your app maintain state? in memory? or database? or both? Note this in your Model Classes.
If you are using a db-backend (say firebase) then include the Database schema: set of tables/documents with list of attributes and their types.
List of common queries you expect will be needed. Do any of then need to join tables?
The Views of your app: name, describe. Embed the images from your Design Milestone. Typically, one page in the app is composed of multiple View elements.
Below will be complete as I do for my Capstone project.
Source Control
Ethical, Legal, and Security Considerations
Proof of Concept (PoC)
PoC Demo
Testing
Beta Release
RC1 Release
Quality Assurance
Website
1.0 Release
Final Demo Video
#erozcodes#studyblr#codeblr#education#self study#production cycle#scrum#devlifecycle#this shit can be so painful and I hope this can help
3 notes
·
View notes
Text
Transform Strings to JavaScript Identifiers - to-valid-identifier
The to-valid-identifier JavaScript library takes a string and converts it into a valid JavaScript identifier. This can be helpful if you need to dynamically generate variable names or work with data that might not be formatted correctly. How to use it: 1. Install the to-valid-identifier package with NPM and import it into your project. npm install to-valid-identifier import toValidIdentifier from…

View On WordPress
6 notes
·
View notes
Text
i want to keep tumblr because i like aesthetics
aesthetic aggregation is important because it allows for intimate relationships to develop outside of life-long domesticated-servile contracts
you transfer
love energy,
actually, when you share your aesthetic, and merge, like that
however
i don't think its possible to make organic relationships the same way it was a decade ago, no, entirely too sanitized
i highly doubt, since the algorithm that i'll ever oganically run into; actually its absurd to even finish that sentence
luckily, i became a sysadmin / programmer, in the interem period, and can actually build the tools this time around
i have an idea for an aesthetic aggregator portal place that combines dump.fm & tumblr with cellular automata, like a living pool you gaze into and everything's a ripple on a wave, man, that's like connected, woah
and i'm schemeing on it, i love lisp, when i go looking everything i want to do is available to me like channeling a spell... somebody already wrote scheme to wasm, that really shouldn't be too hard... still looking for alternate ways to chat :D hmu on xmpp it's exactly like AIM
i've tried node/npm, python, package managers... the best most satisfying one if you're going to go and install a big library, blob thing like that, is probably some flavor of emacs... for me, this is a personal preference, the fact that you 'can' do anything that rust/python/go/js can do in LISP... is enough for me, because, it is elegant, it is more pleasant to look at and easier to read, idk. loving my time with it recently and have been knocking it out of the park most days recently... the past 7 years i've been working on a top secret project, which will have a working alpha demo of the basic features by the end of next week :D
the best os rn is a freeBSD jail with guixSD GNU/linux-libre there's also hyperbola/BSD in the works you want to try to phase out the linux kernel because of all the google/microsoft shenanigans creeping in, you don't need unix/linux any more you can do all your daily driver stuff on an embedded, low power risc soc that costs under a hundo you need less overhead for embedded systems, there's microkernels like genome, and platforms like zephyr, its ok to move away idk one thing i learned its good to take a step back and look at the scope of what you're trying to achieve, try to strip away all the unneccessary parts... a mhz is 1,000,000 calculations a microsecond or whatever, when you sit down and write a piece of code how many calculations exactly do you need to do to do your business, honestly.
^these are the 3 am ramblings of a minimalist
i'm trying to find peers here on my site that's connected to the internet that's why i'm sending messages to it about my interests, pardon me, sir please send $1 to this address
3 notes
·
View notes
Text
React JS
Component-Based Architecture:
React applications are built using components, which are reusable, self-contained pieces of the UI. Components can be nested, managed, and handled independently, leading to better maintainability and scalability.
JSX (JavaScript XML):
React uses JSX, a syntax extension that allows HTML to be written within JavaScript. This makes the code more readable and easier to write.
Virtual DOM:
React maintains a virtual DOM, an in-memory representation of the actual DOM. When the state of an object changes, React updates the virtual DOM and efficiently determines the minimal set of changes needed to update the real DOM, leading to performance improvements.
One-Way Data Binding:
Data flows in one direction, from parent to child components, which makes the data flow and logic easier to understand and debug.
State Management:
React components can maintain internal state, making it easy to build dynamic and interactive UIs. For more complex state management, libraries like Redux or Context API can be used.
Advantages of Using React
Performance:
Due to the virtual DOM, React minimizes direct manipulation of the DOM, resulting in better performance for dynamic applications.
Reusable Components:
Components can be reused across different parts of an application, reducing the amount of code and enhancing consistency.
Strong Community and Ecosystem:
A large community and a rich ecosystem of tools and libraries support React, making it easier to find solutions, get support, and integrate with other technologies.
SEO Friendly:
React can be rendered on the server using Node.js, making web pages more SEO-friendly compared to traditional client-side rendering.
Getting Started with React
To start building applications with React, you need to have Node.js and npm (Node Package Manager) installed. Here’s a basic setup to create a new React application:
Install Node.js and npm:
Download and install from Node.js website.
Create a New React Application:
You can use Create React App, an officially supported way to create single-page React applications with no configuration required:
npx create-react-app my-app cd my-app npm start
import React from 'react';
function Welcome(props) { return
Hello, {props.name}
; }
export default Welcome;
#React JS#Front end Developer#Advanced JavaScript#coding#html css#htmlcoding#html#css#php#website#html5 css3#software#React Training
5 notes
·
View notes
Text
Backend update
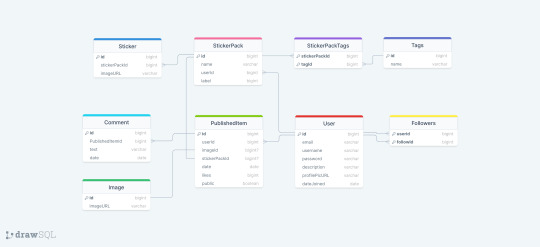
Had the most horrible time working with Sequelize today! As I usually do whenever I work with Sequelize! Sequelize is an SQL ORM - instead of writing raw SQL, ORM gives you an option to code it in a way that looks much more like an OOP, which is arguably simpler if you are used to programming that way. So to explain my project a little bit, it's a full stack web app - an online photo editor for dragging and dropping stickers onto canvas/picture. Here is the diagram.
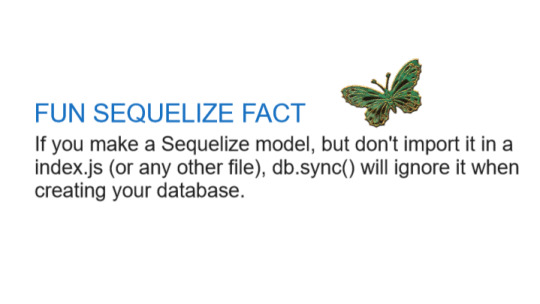
I'm doing it with Next which I've never used before, I only did vanilla js, React and a lil bit of Angular before. The architecture of a next project immediately messed me up so much, it's way different from the ones I've used before and I often got lost in the folders and where to put stuff properly (this is a huge thing to me because I always want it to be organized by the industry standard and I had no reference Next projects from any previous jobs/college so it got really overwhelming really soon :/) . The next problem was setting up my MySQL database with Sequelize because I know from my past experience that Sequelize is very sensitive to where you position certain files/functions and in which order are they. I made all the models (Sequelize equivalent of tables) and when it was time to sync, it would sync only two models out of nine. I figured it was because the other ones weren't called anywhere. Btw a fun fact
So I imported them to my index.js file I made in my database folder. It was reporting an db.define() is not a function error now. That was weird because it didn't report that for the first two tables that went through. To make a really long story short - because I was used to an server/client architecture, I didn't properly run the index.js file, but just did an "npm run dev" and was counting on all of the files to run in an order I am used to, that was not the case tho. After about an hour, I figured I just needed to run index.js solo first. The only reasons those first two tables went through in the beginning is because of the test api calls I made to them in a separate file :I I cannot wait to finish this project, it is for my bachelors thesis or whatever it's called...wish me luck to finish this by 1.9. XD
Also if you have any questions about any of the technologies I used here, feel free to message me c: <3 Bye!
#codeblr#code#programming#webdevelopment#mysql#nextjs#sequelize#full stack web development#fullstackdeveloper#student#computer science#women in stem#backend#studyblr
15 notes
·
View notes
Text
importとrequireの対比表がわかりやすくて良いです。
2 notes
·
View notes
Text
Importance of MERN Stack
What is MERN Stack?
Four essential technologies make up the full-stack JavaScript framework MERN Stack:
MongoDB: A NoSQL database system known for its flexibility and scalability, MongoDB stores data in a JSON-like format, making it ideal for handling large volumes of data.
Express.js: A minimalist web application framework for Node.js, Express.js simplifies the process of building robust and scalable web applications by providing a set of features for web and mobile applications.
React.js: Developed by Facebook, React.js is a powerful JavaScript library for building interactive user interfaces. Its component-based architecture allows developers to create reusable UI components, resulting in a more modular and maintainable codebase.
Node.js: A server-side JavaScript runtime environment, Node.js enables developers to build fast and scalable network applications. With its event-driven, non-blocking I/O model, Node.js is well-suited for building real-time web applications.
Why Choose MERN Stack?
Streamlined Development: With MERN Stack, developers can leverage the power of JavaScript across the entire development stack, from frontend to backend. This unified approach reduces development time and eliminates the need to switch between different programming languages and frameworks.
SEO-Friendly Architecture: MERN Stack's server-side rendering capabilities, coupled with its support for modern JavaScript frameworks like React.js, make it highly SEO-friendly. This ensures that web applications built with MERN Stack are easily discoverable by search engines, leading to improved search engine rankings and increased organic traffic.
Optimized Performance: MERN Stack's asynchronous, non-blocking architecture allows for seamless communication between frontend, backend, and database components, resulting in faster response times and improved performance. This translates to a smoother user experience and higher customer satisfaction.
Improved Security: In today's digital environment, security is of the highest priority. MERN Stack provides built-in security features, such as authentication and authorization mechanisms, as well as support for encryption and data validation, to ensure that web applications are protected against common security threats.
Scalability and Flexibility: Whether you're building a small-scale application or a large-scale enterprise solution, MERN Stack offers the scalability and flexibility you need to grow and adapt to changing business requirements. With its modular architecture and support for microservices, MERN Stack allows for easy scaling and maintenance of complex applications.
Getting Started with MERN Stack
Are you prepared to explore the MERN Stack world? Here is a detailed how-to for getting started:
Install Node.js: Begin by installing Node.js, which includes npm (Node Package Manager), on your local machine. Node.js will serve as the runtime environment for your server-side code.
Set Up MongoDB: Install MongoDB, a NoSQL database system, and set up a local or remote MongoDB instance to store your application data.
Create an Express.js Server: Use Express.js to create a server-side application that will handle HTTP requests and serve as the backend for your web application.
Build Your React.js Frontend: Use React.js to create a client-side application that will handle user interface interactions and communicate with the backend server.
Integrate MongoDB with Express.js: Connect your Express.js server to your MongoDB database using Mongoose, a MongoDB object modeling tool for Node.js.
Deploy Your Application: Once your application is complete, deploy it to a hosting provider of your choice to make it accessible to users worldwide.
Conclusion
MERN Stack offers a powerful and versatile framework for building modern web applications that are fast, scalable, and secure. Whether you're a seasoned developer or just getting started, MERN Stack provides the tools and resources you need to bring your ideas to life. So why wait? Start exploring the endless possibilities of MERN Stack today and unlock the potential of your web development projects with Meander Training, Meander training is a platform where you can start your web development journey, it provides industrial training with certification.
1 note
·
View note
Text
You can learn NodeJS easily, Here's all you need:
1.Introduction to Node.js
• JavaScript Runtime for Server-Side Development
• Non-Blocking I/0
2.Setting Up Node.js
• Installing Node.js and NPM
• Package.json Configuration
• Node Version Manager (NVM)
3.Node.js Modules
• CommonJS Modules (require, module.exports)
• ES6 Modules (import, export)
• Built-in Modules (e.g., fs, http, events)
4.Core Concepts
• Event Loop
• Callbacks and Asynchronous Programming
• Streams and Buffers
5.Core Modules
• fs (File Svstem)
• http and https (HTTP Modules)
• events (Event Emitter)
• util (Utilities)
• os (Operating System)
• path (Path Module)
6.NPM (Node Package Manager)
• Installing Packages
• Creating and Managing package.json
• Semantic Versioning
• NPM Scripts
7.Asynchronous Programming in Node.js
• Callbacks
• Promises
• Async/Await
• Error-First Callbacks
8.Express.js Framework
• Routing
• Middleware
• Templating Engines (Pug, EJS)
• RESTful APIs
• Error Handling Middleware
9.Working with Databases
• Connecting to Databases (MongoDB, MySQL)
• Mongoose (for MongoDB)
• Sequelize (for MySQL)
• Database Migrations and Seeders
10.Authentication and Authorization
• JSON Web Tokens (JWT)
• Passport.js Middleware
• OAuth and OAuth2
11.Security
• Helmet.js (Security Middleware)
• Input Validation and Sanitization
• Secure Headers
• Cross-Origin Resource Sharing (CORS)
12.Testing and Debugging
• Unit Testing (Mocha, Chai)
• Debugging Tools (Node Inspector)
• Load Testing (Artillery, Apache Bench)
13.API Documentation
• Swagger
• API Blueprint
• Postman Documentation
14.Real-Time Applications
• WebSockets (Socket.io)
• Server-Sent Events (SSE)
• WebRTC for Video Calls
15.Performance Optimization
• Caching Strategies (in-memory, Redis)
• Load Balancing (Nginx, HAProxy)
• Profiling and Optimization Tools (Node Clinic, New Relic)
16.Deployment and Hosting
• Deploying Node.js Apps (PM2, Forever)
• Hosting Platforms (AWS, Heroku, DigitalOcean)
• Continuous Integration and Deployment-(Jenkins, Travis CI)
17.RESTful API Design
• Best Practices
• API Versioning
• HATEOAS (Hypermedia as the Engine-of Application State)
18.Middleware and Custom Modules
• Creating Custom Middleware
• Organizing Code into Modules
• Publish and Use Private NPM Packages
19.Logging
• Winston Logger
• Morgan Middleware
• Log Rotation Strategies
20.Streaming and Buffers
• Readable and Writable Streams
• Buffers
• Transform Streams
21.Error Handling and Monitoring
• Sentry and Error Tracking
• Health Checks and Monitoring Endpoints
22.Microservices Architecture
• Principles of Microservices
• Communication Patterns (REST, gRPC)
• Service Discovery and Load Balancing in Microservices
1 note
·
View note
Text
Exploring the Top Tools for Cloud Based Network Monitoring in 2025
With businesses increasingly implementing cloud-first programming, there has been no time when network visibility is more required. Conventional monitoring tools are no longer sufficient to monitor the performance, latency and security of the modern and distributed infrastructures.
And that is where cloud based network monitoring enters. It allows IT teams that have hybrid and cloud environments to have real-time views, remotely access them, and also have improved scalability.
Some of those tools are remarkable in terms of their features, user-friendliness, and in-depth analytics, in 2025. This is the list totaling the best alternatives that are assisting companies keep in front of the network problems prior to them affecting operations.

1. Datadog
DevOps and IT teams are fond of using Datadog due to its cloud-native architecture and extensive availability. It also provides visibility of full-stack, metrics, traces as well as logs, all on a single dashboard.
Its Network Performance Monitoring (NPM) allows identifying bottlenecks, tracing traffic and tracking cloud services such as AWS, Azure and Google cloud. It provides teams with the ability to move quickly with real-time alerts and customizable dashboards with the insights.
2. SolarWinds Hybrid Cloud Observability
SolarWinds is traditionally associated with on-prem monitoring solutions, whereas, with shifts toward hybrid cloud observability, it will find itself extremely pertinent in 2025. The platform has evolved and is able to combine conventional network monitoring with cloud insights.
It provides anomaly detection, visual mapping, deep packet inspection using AI. This aids IT teams to troubleshoot through complex environments without switching between tools.
3. ThousandEyes by Cisco
ThousandEyes specializes in digital experience monitoring, and it is especially applicable to large, distributed networks. It also delivers end to end visibility at user to application level across third party infrastructure.
Its cloud agents and the internet outage tracking ensure that businesses can find out in a short time whether a performance problem is either internal or external. The strong support of Cisco gives the accuracy and the access of its network data.
4. LogicMonitor
LogicMonitor is a simple to deploy and scale agentless platform. It is awesome when an organization needs automation and little configuration.
The tool measures bandwidth, uptime, latency and cloud performance among various providers. Its predictive analytics not only identify trends, but they also notify teams before minor problems become major ones.
5. ManageEngine OpManager Plus
OpManager Plus is a powerful tool to be used by those who require an infrastructure support combination of the traditional and cloud-based monitoring. It is compatible with hybrid networks that provide stats such as device health, traffic and application performance.
It is distinguished by the UI, which is clean, self-explanatory, and can be customized. It especially is suitable in the middle-sized IT departments who require an unobstructed glance of both physical and virtual systems.
6. PRTG Network Monitor (Cloud Hosted)
The hosted version of PRTG has the same functions as its widely used desktop version, and its availability is on cloud levels. It carries sensors to keep track of server availability to network capacity and usage as well as cloud services.
It is perfect when companies require such a convenient approach as a license and payment as you go prices. Even the simpler option of the tool can be a good option to apply to the project where IT team size is smaller or you are at the beginning of the cloud migration.
What to Look for in a Monitoring Tool
When choosing a cloud network monitoring solution, it's important to focus on a few key aspects:
Ease of deployment and scalability
Multi-cloud and hybrid support
Custom alerting and reporting
Integration with your existing stack
User-friendly dashboards and automation
Each business is unique in its requirements and there is no such thing like the best tool, only the tool that suits your infrastructure, the size of your team and your response requirements.
Conclusion
With evolving infrastructure it is important to have the correct tools implemented to observe performance and availability. In 2025, the cloud based network monitoring tools will be more competitive, intelligent and responsive than ever.
Be it a Hollywood-sized company or a small IT start-up, by investing in any of these best platforms, you have the sight of keeping secure, flexible and consistent in a cloud driven planet.
0 notes
Text
Mini React.js Tips #4 | Resources ✨

Continuing the #mini react tips series, one of the important things I wanted to learn QUICK was how to add new CSS files to my project correctly. I am an SCSS > CSS person, but the guide will focus on CSS for now! Next, I will make a guide for SCSS/SASS files~!
What you'll need:
know how to create a React project >> click
know the default React project's file structure >> click
know how to create a component >> click
know basic CSS
basic knowledge of using the Terminal

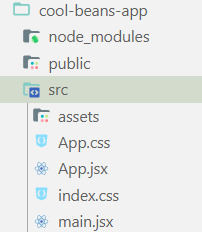
[ 1 ] Navigate to the src folder: The src folder is where you will find the 'assets' folder, .jsx files, and .css files.
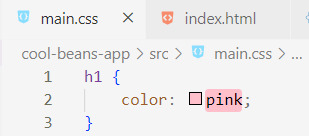
[ 2 ] Create your .css file: In the src folder, create the .css file. You can create a subfolder to place the new .css or just leave it in the src folder. Example 'main.css'
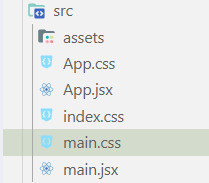
[ 3 ] Add the styling: In the new file, add the styling code inside for elements in your React app. Here we are going to target the h1 tag in the Header component.
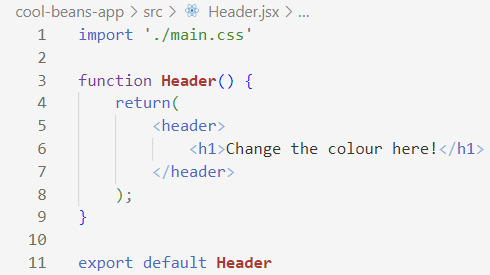
[ 4 ] Import the CSS file to the component file: Personally, if it's not a global CSS styling but specifically for a component, I will import the CSS straight into the component's .jsx file. If it's global, I would add it in the App.jsx file instead. At the top of the file, add:
import './[location of the CSS file]'
[ 5 ] Run the Development Server: Start your development server with the command in the Terminal (the 'Local' link) + make sure your component is in the App() in App.jsx:
npm run dev
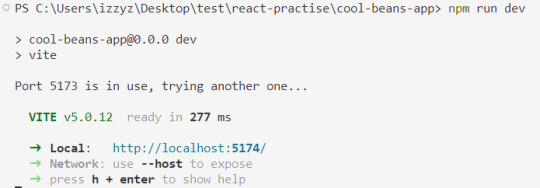
[ 6 ] View the changes: See if you can view your styling!

Congratulations! You've successfully added CSS files to your React project! Try adding more styling to the same component or globally across all your other components!
If you run into errors, do make sure your referencing to the CSS file's location is correct. Adding './' in front is important before adding the location of the CSS file. I ran into a lot of errors because of this for some reason?? :
'./styles.css' = correct
'styles.css' = incorrect
Resources:
BroCode's 'React Full Course for Free' 2024 >> click
Different Ways to Write CSS in React >> click
W3School's Styling React Using CSS >> click
React Official Website >> click
🐬Previous Tip: Tip #3 Creating A Component >> click
Stay tuned for the other posts I will make on this series #mini react tips~!
#mini react tips#my resources#resources#codeblr#coding#progblr#programming#studyblr#studying#javascript#react.js#reactjs#coding tips#coding resources
17 notes
·
View notes
Text
Best React Developer in Chennai
In today's digital-first world, building fast, interactive, and scalable web applications is essential for business growth. React.js, the popular front-end JavaScript library developed by Meta, has become the top choice for developers building modern web applications. However, finding the right React developer—especially in a competitive market like Chennai—can make all the difference in the success of your project.
Adhiran Infotech, a Chennai-based IT services firm, shares expert insights on how to identify and hire the right React developer for your business or startup needs.
1. Define Your Project Goals Clearly
Before beginning the hiring process, businesses must have a clear understanding of:
The scope of the application
The desired features and functionality
Integration needs (APIs, databases, cloud platforms)
Timeline and budget
A well-defined project roadmap helps in identifying developers with the relevant skill set and experience.
2. Look for Technical Proficiency
An ideal React developer should be proficient in:
JavaScript (ES6+), React.js, and JSX
State management tools like Redux, MobX, or Context API
React Hooks, lifecycle methods, and component-based architecture
RESTful APIs and backend integration (Node.js knowledge is a plus)
Version control tools like Git
Familiarity with tools like Webpack, Babel, and npm
Adhiran Infotech recommends conducting a technical assessment or reviewing sample projects to evaluate real-world coding ability.
3. Consider Industry Experience
While React is a universal framework, hiring developers who understand your industry domain—whether it's e-commerce, fintech, logistics, or healthcare—can significantly reduce development time and miscommunication. Familiarity with the business context results in better UX decisions and product alignment.
4. Evaluate Communication and Collaboration Skills
React development is often part of a larger product team, requiring close coordination with designers, backend developers, testers, and project managers. Look for developers who:
Can communicate ideas clearly
Are proactive in problem-solving
Adapt well to feedback
Understand Agile or Scrum workflows
Adhiran Infotech emphasizes that soft skills are just as important as technical knowledge in ensuring smooth collaboration and on-time delivery.
5. Choose the Right Hiring Model
Depending on the size and scope of your project, you can choose from:
Freelance React Developers – cost-effective for short-term or MVP projects
Dedicated In-House Developers – best for long-term products and startups
React Development Agencies – provide complete teams with project management, design, and QA support
As a full-service IT firm, Adhiran Infotech offers scalable engagement models to suit startups, SMEs, and enterprise clients.
6. Explore Chennai's Developer Ecosystem
Chennai boasts a thriving tech talent pool, thanks to its engineering colleges, IT hubs, and startups. Top sourcing platforms include:
LinkedIn and GitHub
AngelList and Upwork
Local tech meetups and coding boot camps
Referrals from reputed IT firms like Adhiran Infotech
Hiring locally gives you better collaboration, fewer communication gaps, and faster iterations.
Conclusion
Finding the right React developer in Chennai doesn't have to be overwhelming. With a structured hiring approach focused on skills, experience, and collaboration, businesses can identify talent that truly fits their technical and strategic goals. Whether building a single-page application, a full-scale SaaS platform, or revamping a legacy system, Adhiran Infotech helps clients connect with Chennai's top React developers to turn ideas into reality—efficiently, affordably, and at scale.
0 notes
Text
Customizable Toast Notification Manager For Bootstrap 5 - use-bootstrap-toaster
use-bootstrap-toaster is a lightweight and simple JavaScript library to easily create and customize toast notifications in your Bootstrap 5 project. You can display custom HTML content, control the placement and stacking of your toasts, and even add animations and delays. How to use it: 1. Install and import the library into your Bootstrap project using NPM: npm install…
View On WordPress
3 notes
·
View notes
Text
Start Coding Today: Learn React JS for Beginners

Start Coding Today: Learn React JS for Beginners”—will give you a solid foundation and guide you step by step toward becoming a confident React developer.
React JS, developed by Facebook, is an open-source JavaScript library used to build user interfaces, especially for single-page applications (SPAs). Unlike traditional JavaScript or jQuery, React follows a component-based architecture, making the code easier to manage, scale, and debug. With React, you can break complex UIs into small, reusable pieces called components.
Why Learn React JS?
Before diving into the how-to, let’s understand why learning React JS is a smart choice for beginners:
High Demand: React developers are in high demand in tech companies worldwide.
Easy to Learn: If you know basic HTML, CSS, and JavaScript, you can quickly get started with React.
Reusable Components: Build and reuse UI blocks easily across your project.
Strong Community Support: Tons of tutorials, open-source tools, and documentation are available.
Backed by Facebook: React is regularly updated and widely used in real-world applications (Facebook, Instagram, Netflix, Airbnb).
Prerequisites Before You Start
React is based on JavaScript, so a beginner should have:
Basic knowledge of HTML and CSS
Familiarity with JavaScript fundamentals such as variables, functions, arrays, and objects
Understanding of ES6+ features like let, const, arrow functions, destructuring, and modules
Don’t worry if you’re not perfect at JavaScript yet. You can still start learning React and improve your skills as you go.
Setting Up the React Development Environment
There are a few ways to set up your React project, but the easiest way for beginners is using Create React App, a boilerplate provided by the React team.
Step 1: Install Node.js and npm
Download and install Node.js from https://nodejs.org. npm (Node Package Manager) comes bundled with it.
Step 2: Install Create React App
Open your terminal or command prompt and run:
create-react-app my-first-react-app
This command creates a new folder with all the necessary files and dependencies.
Step 3: Start the Development Server
Navigate to your app folder:
my-first-react-app
Then start the app:
Your first React application will launch in your browser at http://localhost:3000.
Understanding the Basics of React
Now that you have your environment set up, let’s understand key React concepts:
1. Components
React apps are made up of components. Each component is a JavaScript function or class that returns HTML (JSX).
function Welcome() { return <h1>Hello, React Beginner!</h1>; }
2. JSX (JavaScript XML)
JSX lets you write HTML inside JavaScript. It’s not mandatory, but it makes code easier to write and understand.
const element = <h1>Hello, World!</h1>;
3. Props
Props (short for properties) allow you to pass data from one component to another.
function Welcome(props) { return <h1>Hello, {props.name}</h1>; }
4. State
State lets you track and manage data within a component.
import React, { useState } from 'react'; function Counter() { const [count, setCount] = useState(0); return ( <div> <p>You clicked {count} times.</p> <button onClick={() => setCount(count + 1)}>Click me</button> </div> ); }
Building Your First React App
Let’s create a simple React app — a counter.
Open the App.js file.
Replace the existing code with the following:
import React, { useState } from 'react'; function App() { const [count, setCount] = useState(0); return ( <div style={{ textAlign: 'center', marginTop: '50px' }}> <h1>Simple Counter App</h1> <p>You clicked {count} times</p> <button onClick={() => setCount(count + 1)}>Click Me</button> </div> ); } export default App;
Save the file, and see your app live on the browser.
Congratulations—you’ve just built your first interactive React app!
Where to Go Next?
After mastering the basics, explore the following:
React Router: For navigation between pages
useEffect Hook: For side effects like API calls
Forms and Input Handling
API Integration using fetch or axios
Styling (CSS Modules, Styled Components, Tailwind CSS)
Context API or Redux for state management
Deploying your app on platforms like Netlify or Vercel
Practice Projects for Beginners
Here are some simple projects to strengthen your skills:
Todo App
Weather App using an API
Digital Clock
Calculator
Random Quote Generator
These will help you apply the concepts you've learned and build your portfolio.
Final Thoughts
This “Start Coding Today: Learn React JS for Beginners” guide is your entry point into the world of modern web development. React is beginner-friendly yet powerful enough to build complex applications. With practice, patience, and curiosity, you'll move from writing your first “Hello, World!” to deploying full-featured web apps.
Remember, the best way to learn is by doing. Start small, build projects, read documentation, and keep experimenting. The world of React is vast and exciting—start coding today, and you’ll be amazed by what you can create!
0 notes
Text
PROJETO
Passo a Passo da Implementação da NeoSphere
1. Configuração do Ambiente de Desenvolvimento
Ferramentas Necessárias:
Python 3.10+ para backend Web2 (FastAPI, Redis).
Node.js 18+ para serviços Web3 e frontend.
Solidity para smart contracts.
Docker para conteinerização de serviços (Redis, MongoDB, RabbitMQ).
Truffle/Hardhat para desenvolvimento de smart contracts.
# Instalação de dependências básicas (Linux/Ubuntu) sudo apt-get update sudo apt-get install -y python3.10 nodejs npm docker.io
2. Implementação da API Web2 com FastAPI
Estrutura do Projeto:
/neosphere-api ├── app/ │ ├── __init__.py │ ├── main.py # Ponto de entrada da API │ ├── models.py # Modelos Pydantic │ └── database.py # Conexão com MongoDB └── requirements.txt
Código Expandido (app/main.py):
from fastapi import FastAPI, Depends, HTTPException from pymongo import MongoClient from pymongo.errors import DuplicateKeyError from app.models import PostCreate, PostResponse from app.database import get_db import uuid import datetime app = FastAPI(title="NeoSphere API", version="0.2.0") @app.post("/posts/", response_model=PostResponse, status_code=201) async def create_post(post: PostCreate, db=Depends(get_db)): post_id = str(uuid.uuid4()) post_data = { "post_id": post_id, "user_id": post.user_id, "content": post.content, "media_urls": post.media_urls or [], "related_nft_id": post.related_nft_id, "created_at": datetime.datetime.utcnow(), "likes": 0, "comments_count": 0 } try: db.posts.insert_one(post_data) except DuplicateKeyError: raise HTTPException(status_code=400, detail="Post ID já existe") return post_data @app.get("/posts/{post_id}", response_model=PostResponse) async def get_post(post_id: str, db=Depends(get_db)): post = db.posts.find_one({"post_id": post_id}) if not post: raise HTTPException(status_code=404, detail="Post não encontrado") return post
3. Sistema de Cache com Redis para NFTs
Implementação Avançada (services/nft_cache.py):
import redis from tenacity import retry, stop_after_attempt, wait_fixed from config import settings class NFTCache: def __init__(self): self.client = redis.Redis( host=settings.REDIS_HOST, port=settings.REDIS_PORT, decode_responses=True ) @retry(stop=stop_after_attempt(3), wait=wait_fixed(0.5)) async def get_metadata(self, contract_address: str, token_id: str) -> dict: cache_key = f"nft:{contract_address}:{token_id}" cached_data = self.client.get(cache_key) if cached_data: return json.loads(cached_data) # Lógica de busca na blockchain metadata = await BlockchainService.fetch_metadata(contract_address, token_id) if metadata: self.client.setex( cache_key, settings.NFT_CACHE_TTL, json.dumps(metadata) ) return metadata def invalidate_cache(self, contract_address: str, token_id: str): self.client.delete(f"nft:{contract_address}:{token_id}")
4. Smart Contract para NFTs com Royalties (Arquivo Completo)
Contrato Completo (contracts/NeoSphereNFT.sol):
// SPDX-License-Identifier: MIT pragma solidity ^0.8.20; import "@openzeppelin/contracts/token/ERC721/ERC721.sol"; import "@openzeppelin/contracts/access/Ownable.sol"; import "@openzeppelin/contracts/interfaces/IERC2981.sol"; contract NeoSphereNFT is ERC721, Ownable, IERC2981 { using Counters for Counters.Counter; Counters.Counter private _tokenIdCounter; struct RoyaltyInfo { address recipient; uint96 percentage; } mapping(uint256 => RoyaltyInfo) private _royalties; mapping(uint256 => string) private _tokenURIs; event NFTMinted( uint256 indexed tokenId, address indexed owner, string tokenURI, address creator ); constructor() ERC721("NeoSphereNFT", "NSPH") Ownable(msg.sender) {} function mint( address to, string memory uri, address royaltyRecipient, uint96 royaltyPercentage ) external onlyOwner returns (uint256) { require(royaltyPercentage <= 10000, "Royalties max 100%"); uint256 tokenId = _tokenIdCounter.current(); _tokenIdCounter.increment(); _safeMint(to, tokenId); _setTokenURI(tokenId, uri); _setRoyaltyInfo(tokenId, royaltyRecipient, royaltyPercentage); emit NFTMinted(tokenId, to, uri, msg.sender); return tokenId; } function royaltyInfo( uint256 tokenId, uint256 salePrice ) external view override returns (address, uint256) { RoyaltyInfo memory info = _royalties[tokenId]; return ( info.recipient, (salePrice * info.percentage) / 10000 ); } function _setTokenURI(uint256 tokenId, string memory uri) internal { _tokenURIs[tokenId] = uri; } function _setRoyaltyInfo( uint256 tokenId, address recipient, uint96 percentage ) internal { _royalties[tokenId] = RoyaltyInfo(recipient, percentage); } }
5. Sistema de Pagamentos com Gateway Unificado
Implementação Completa (payment/gateway.py):
from abc import ABC, abstractmethod from typing import Dict, Optional from pydantic import BaseModel class PaymentRequest(BaseModel): amount: float currency: str method: str user_metadata: Dict payment_metadata: Dict class PaymentProvider(ABC): @abstractmethod def process_payment(self, request: PaymentRequest) -> Dict: pass class StripeACHProvider(PaymentProvider): def process_payment(self, request: PaymentRequest) -> Dict: # Implementação real usando a SDK do Stripe return { "status": "success", "transaction_id": "stripe_tx_123", "fee": request.amount * 0.02 } class NeoPaymentGateway: def __init__(self): self.providers = { "ach": StripeACHProvider(), # Adicionar outros provedores } def process_payment(self, request: PaymentRequest) -> Dict: provider = self.providers.get(request.method.lower()) if not provider: raise ValueError("Método de pagamento não suportado") # Validação adicional if request.currency not in ["USD", "BRL"]: raise ValueError("Moeda não suportada") return provider.process_payment(request) # Exemplo de uso: # gateway = NeoPaymentGateway() # resultado = gateway.process_payment(PaymentRequest( # amount=100.00, # currency="USD", # method="ACH", # user_metadata={"country": "US"}, # payment_metadata={"account_number": "..."} # ))
6. Autenticação Web3 com SIWE
Implementação no Frontend (React):
import { useSigner } from 'wagmi' import { SiweMessage } from 'siwe' const AuthButton = () => { const { data: signer } = useSigner() const handleLogin = async () => { const message = new SiweMessage({ domain: window.location.host, address: await signer.getAddress(), statement: 'Bem-vindo à NeoSphere!', uri: window.location.origin, version: '1', chainId: 137 // Polygon Mainnet }) const signature = await signer.signMessage(message.prepareMessage()) // Verificação no backend const response = await fetch('/api/auth/login', { method: 'POST', headers: { 'Content-Type': 'application/json' }, body: JSON.stringify({ message, signature }) }) if (response.ok) { console.log('Autenticado com sucesso!') } } return ( <button onClick={handleLogin}> Conectar Wallet </button> ) }
7. Estratégia de Implantação
Infraestrutura com Terraform:
# infra/main.tf provider "aws" { region = "us-east-1" } module "neosphere_cluster" { source = "terraform-aws-modules/ecs/aws" cluster_name = "neosphere-prod" fargate_capacity_providers = ["FARGATE"] services = { api = { cpu = 512 memory = 1024 port = 8000 } payment = { cpu = 256 memory = 512 port = 3000 } } } resource "aws_elasticache_cluster" "redis" { cluster_id = "neosphere-redis" engine = "redis" node_type = "cache.t3.micro" num_cache_nodes = 1 parameter_group_name = "default.redis6.x" }
Considerações Finais
Testes Automatizados:
Implementar testes end-to-end com Cypress para fluxos de usuário
Testes de carga com k6 para validar escalabilidade
Testes de segurança com OWASP ZAP
Monitoramento:
Configurar Prometheus + Grafana para métricas em tempo real
Integrar Sentry para captura de erros no frontend
CI/CD:
Pipeline com GitHub Actions para deploy automático
Verificação de smart contracts com Slither
Documentação:
Swagger para API REST
Storybook para componentes UI
Archimate para documentação de arquitetura
Este esqueleto técnico fornece a base para uma implementação robusta da NeoSphere, combinando as melhores práticas de desenvolvimento Web2 com as inovações da Web3.
0 notes