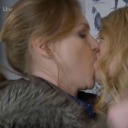
#one of the earlier concepts/sketches from way back in may when i started jotting this idea down
Explore tagged Tumblr posts
Visit Tumblr Blog
Explore Tumblr blogs with no restrictions, modern design and the best experience.
Last Seen Tumblr Blogs


Fun Fact
Tumblr Inc. is funded by 13 investors.
Text
falling - pettiot - Peaky Blinders (TV) [Archive of Our Own]
PART ONE - DAY ONE
Ch 1 | Ch 2 | Ch 3 | Ch 4 | Ch 5 | Ch 6 | Ch 7 | Ch 8 | Ch 9
PART TWO - MONTH ONE (Or Maybe Month Two, Or Three)
Ch 10 | Ch 11 | Ch 12 | Ch 13 | Ch 14 | Ch 15 | Ch 16 | Ch 17 | Ch 18
PART THREE - YEAR ONE (Or So)
Ch 19 | Ch 20 | Ch 21 | Ch 22 | Ch 23 | Ch 24 | Ch 25 | Ch 26 | Ch 27
CODA - ENDLESS
Ch 28 | Ch 29 | Ch 30 | Ch 31 | 32 | 33 | 34 | 35 | 36 |
A Modern AU take on Tommy's immediate return from military service, and the period between his demobilisation and the start of S1.
(Tags shall be progressively updated)
.
Tommy Shelby/Lizzie Stark, Tommy Shelby/Freddie Thorne, Arthur Shelby, Polly Grey, Ada Shelby, John Shelby, Johnny Dogs, Various Lees, John Shelby's Children, Mr Zhang, Mai Zhang (S1E1 Red Dust Girl), Sergeant Moss, Esme Lee, Jeremiah Jesus, Danny Whizz-Bang Owen, Vicente Changretta, Matteo (S4 Mafia Lieutenant), Zilpha Lee, Alfie Solomons, Mrs Shelby, Darby Sabini, Charles Strong, Curly, Finn Shelby | Alternative Universe, Modern AU (ish), more tags at the link
#my writing#peaky blinders#peaky blinders fanfic#tommy shelby#charles strong#finn shelby#i have a terrible yearning love for this chapter#one of the earlier concepts/sketches from way back in may when i started jotting this idea down#the homecoming that's not home; the stripping of some self-delusions in order to more firmly preserve others#what is self but a moment in time hinged on a decision#everything outside the moment is subjective
8 notes
·
View notes
Text
FMP Evaluation
INTRO
We were asked to produce an independent final piece. I began by producing brainstorms to jot down my ideas. Initial research included music videos, game concepts or character design. My proposal was for a short film about sentient cookies: I talked about my idea, mediums I was going to use, presentation and how I want the short film to look. I produced schedules to help organise my action plan.
RESEARCH
I conducted primary (online surveys) and secondary research (web pages, books, videos and directors). The survey was helpful, influenced what kind of genre I wanted my short film to fit into as well as what age range I need to appeal to.
What else was helpful was research into an old YouTube video called Marshmallow Murder. This helped me figure out how to go about executing the themes, as well as how to handle any voices I edit in.
What wasn’t helpful was knowing the gender my target audience were, or the secondary research into David Dominguez didn’t influence me too much as his discography was centred towards rock and metal.
My research helped me appeal to a specific demographic and psychographic target audience for people who like comedy sketches & that which can be seen as cute and yet creepy.
AUDIENCE
My demographic target audience is anybody aged between 16-20+. My psychographic target audience is people who enjoy watching comedy sketches online, or people who enjoy watching weird content online. I wanted to make something surreal and bizarre as an avenue to express my creative aptitude.
I found this out by analysing the results from my online survey to discern how specific my target audience may be and how to cater to them. My project appeals to them because it starts with an innocent theme and transitions into something horrible and creepy and then begins to carry that surreal, bizarre vibe.
PRODUCTION
I used Adobe Premiere 2018 CC, Adobe Audition 2018 CC, colour correction, Reverb, pitch control and delay. Made use of the source monitors, audio transitions, video transitions.
1) I recorded my footage using a Panasonic HDC SD900
2) I made my skeleton edit on Adobe Premiere 2018 CC
3) I imported royalty free music into Adobe Premiere 2018 CC and arranged the footage and music on the timeline
4) I recorded voice samples with a Zoom portable voice recorder
5) I edited the voice samples using reverb, delay and pitch correction on Adobe Audition 2018 CC
6) I imported the edited sound files onto Adobe Premiere 2018 CC to be used as non-diegetic sound.
7) Experimented with colour correction to make the footage look brighter on the source monitors.
8) Experimented with video transitions and audio transitions.
9) Arranged the non-diegetic sound on the timeline
10) Added the title and rolling end credits.
For pre-production, I did location recces, prop and actor sourcing, filled in health and safety assessments, created storyboards, wrote up proposals and wrote up a treatment.
I experimented with Adobe After Effects 2018 CC to create a title as well as add animated faces to my props. I experimented with different backing music and combinations of non-diegetic screams. It helped me decide how to edit and produce it. It impacted my work by helping me add atmosphere and bring the characters to life without non-diegetic voices, helping to bring my idea to life and give it its own personality.
I used the razor tool to cut the footage to add transitions to help the story flow, pitch correctors, reverb and delay in Adobe Audition 2018 CC to edit the voice samples, & audio transitions to fade out music. I used video transitions to help change perspective and make the footage flow, colour correction to make the footage pop out more. The work pushed me to improve further because I wanted to discover new ways to help bring ideas to life and think of more details to add in to help improve my editing and production skills further.
REFLECTION
I think the project was a good opportunity for me to prove my creative worth, giving me the freedom to produce my own work style. It hinged heavily on my own creative aptitude, resourcefulness and organisational skills to show I can create something unique. Everything went fine, besides the filming being delayed due to bad weather. I overcame this by planning the shoot around the weather forecasts, finding my best day.
What I would do differently is learn how to animate faces using After Effects to help show the cookies are sentient and aware of what is happening, as well as expand the story to work in a backstory so the short film makes sense.
Working independently felt liberating. I worked better by myself since the plan was guaranteed to be followed and I had the chance to display my own storytelling techniques. It really gave me the chance to shine and gave me the opportunity to create something I was hoping to bring to life for a while.
I followed my schedule and proposal accurately. My planning was followed to the letter and as a result, the final piece was well edited and recorded. The only minor difference that happened was that the cookies gained sentience a little earlier than the storyboard described but it wasn’t too major of a change to warrant problems. I think it helped the overall story flow better.
I feel I have used my time well when it came to planning my schedule. One area I could improve on is getting my research done much sooner. The research was really important and I should have dedicated more time to it. I could have moved on to the planning, giving myself more time instead of trying to balance, spending more time on the location recces and finding more potential locations. But overall, my time was well spent.
I feel accomplished with my final piece. It is almost exactly as I envisioned. Some areas could be improved upon like the sound arrangement. I feel it is filmed and edited well for a first year student but it shows a lot of potential for me to improve in the future.
FEEDBACK
After receiving peer feedback, people really enjoyed my short film and felt like it was funny. They liked the range of shots I used and the way the story was conveyed. Some people feel the sounds could be worked on more to balance the volume and the camera work could be less shaky, but feedback was constructive and informative of what could be improved and worked on.
0 notes
Text
P9: Final Project
Process Date: February 28, 2017 – March 15, 2017
Assignment Scenario and Overview
*The following is what was assigned in class*
“The final project is intended to let you expand on a prototyping technique or techniques that you learned previously in the course, but with fewer constraints on the application domain or design. You may further refine and develop an earlier assignment, start something entirely new, take the opportunity to experiment with something that might be useful in your capstone, or just explore a fun or creative idea you have. In addition, we would like your project to utilize at least two of the prototyping techniques we have explored in the course (A1 - A8).”
Concept
To summarize the idea of the prototype, it is a tool for prospective college students (E.g. high school and middle school students) to utilize in order to find a college that is the right “one” for them, hence the name. My plan was to create a product that is essentially quick and convenient for the students, allowing them to quickly read a list of colleges suggested to them based on their input, filter them out to their interest, and/or view all the necessary information of the college under one finger. Being introduced to various schools will enable them to not be limited to just the colleges they are familiar with, while also being able to explore schools under, dedicating just a short period of their time.
Goals
I was inspired to come up with this concept, as I noticed both myself and my peers back when we were in high school, as well as current prospective college students struggling to find the college that best fit them. Main college information sites, such as College Board, require students to dedicate time to go through multiple clicks and pages to find the wanted information, and sometimes they will not provide specific information, so students will need to web search or read pages of forums. Even current web and mobile applications that serve the same purpose lack making it personable for its users. With these in mind, my goal was to solve the problems and focus heavily of the overall concept to ideate and create implementations for the prototype.
Implementation
The functions are similar to that of Glassdoor, a job-finding and exploring application, except it is for searching colleges. The first step would consist ask students to fill out their GPA, standardized test scores, an area of study, or anything else they are interested in. They will then be given a list of colleges that fit their criteria. With that list, users can also sort and filter down their scope, such as the school’s population size, rank, sports team, etc. Users can learn more about each college, such as its reviews from previous and currents students and list of primary resources to utilize. Colleges that grasp the users’ interest can be favorited and be referred back to later.
Process
1. Brainstorming: Before recruiting participants on their experience with college finding, jotted down ideas I had based on my personal experiences with college finding, to get an overall sense of the direction I wanted to go with my product.
2. Interview Analysis: I recruited a few of my younger sister’s friends who all recently went through college application process and asked them qualitative questions. I then used their responses to make adjustments from my initial brainstorming.
3. Sketching: My sketching was rather quick and more of a brain dump. During this stage of the process, I tried very hard to implement most of the information architecture into the design of the application.

Images 1 & 2. Initial brainstorming, interview notes, and user flow sketches (steps 1-3).
4. Wireframes: I created static wireframes to create a very basic layout of each screens, putting my sketches into a visual perspective.

Images 3-7. Screens of static wireframes to see the overall picture during this step of the overall process.
5. Interactive Prototype: There weren’t too many changes transitioning from the wireframe to high fidelity phase of the product, but some important implementations included added necessary interactions. Due to time constraint, I designed static screens and used inVision to make it interactive, such as hot spots on buttons and input sections, as well as adding transitional animations.

Images 8-10. Main (high-fidelity) screens of the prototype. Input, suggestion list, and specific college information.
TRY OUT THE HIGH FIDELITY PROTOTYPE HERE
Video Demo
Click Here to watch the short 60-second video demo for the prototype! **
**Note: the screens on the video demo may not match the final prototype, as some changes were made after the evaluation period of the prototyping process.
Evaluation

I had two opportunities to evaluate the effectiveness of my product.
1. UX Prototyping Open House: Because the final implementations were not until the week after, I took the open house as an opportunity for me to ask my classmates, instructor team, and HCDE faculty who attended the event to give me their input on the prototype. Their comments and suggestions were insightful as they were from people with prior class and/or professional experience with interface and product design.
2. Target Users (AKA high school students): I had the ability to recruit a few high school students to participate in testing the product and provide feedback on its functionality and how they felt about it. I considered their opinions to be more practical, as they fit into the stakeholder category.
Analysis
As mentioned in the evaluation section, I asked two different groups of participants to critique my prototype: people from the open house and my main target users. I specifically asked the open house attendees questions about the design and layout aspects of the application, while asking the high schoolers questions about the concept of the product. The following is a list of things that worked well about the prototype as well as things that needed improvement with the prototype.
What about the prototype worked well?
My target users, the high schoolers, thought the concept was helpful and can see themselves using it as an actual product. I found this to be a success in itself, as there are not as many versions of the concept.
Many of the users from the evaluation liked the color concept of the application (for the most part). They said the pink scheme fit with the playful name of the mobile application, which seems like a dating application. However, a some suggested to change from a monochromatic to complementary or split complementary, by using different colors to that fit with the pink.
What about the prototype needed improvement?
Some said there should be a way to make typing in the information to be interactive, such as adding in a keyboard and showing the fields be typed in through the keyboard.
During the first evaluation, I realized that I forgot to add an “back” button when users testing didn’t know how to go back, from the specific college page to the list of suggestions page while using my prototype.
Ironically, I wanted to enable users to add their favorite colleges from the list of suggested colleges they received from the application, but I completely forgot to add icons by each listed college to show users they can add it (although I left space to add the icons).
Some classmates suggested adding a menu page on the very bottom of the screen to enable users to navigate through different pages.
In the “review” tab when viewing the specific colleges, a few participants from the first evaluation pointed out that using smiley-face icons to measure the satisfaction rate seemed confusing. For example, people whose satisfaction rate would be a 1 out of 5 would still have one smiley-face highlighted.
To fix this, I plan on changing the shapes from a smiley-faces to solid circles. It is both simple and also lowers the risk of confusion between positive and negative reviews.
Conclusion
Overall, the evaluations I received during my user testing met my design goal, which was to create a platform that allowed prospective college students to find colleges that best fit their resume and characteristic. However, there were some details that needed to be fixed, such as adding back buttons and a menu page, in order to complement the experience of using the product as a whole.
Although I loved the fact that the final project was open-ended, enabling me to expand my creativity, trying to go through all the main steps of the UCD process within a 1.5 week timeline was difficult. There were many times during the process when I wanted to skip to the final, high-fidelity step but each time I was reminded back to the previous assignments we did in class and how crucial they were in the final steps. It was also a great opportunity for me to experience rapid prototyping and quickly running my brain to see how the prototype can be iterated and implemented continually.
0 notes