#phpstorm active server
Explore tagged Tumblr posts
Visit Tumblr Blog
Explore Tumblr blogs with no restrictions, modern design and the best experience.
Last Seen Tumblr Blogs


Fun Fact
Mobile US users spent an average of 115.8 minutes on Tumblr app monthly.
Text
How to Develop a Website Using PHP
How to Develop a Website Using PHP
In today's digital era, websites play a crucial role in business growth and online presence. One of the most widely used server-side scripting languages for web development is PHP (Hypertext Preprocessor). It is open-source, easy to learn, and widely supported by web servers and databases. This guide will walk you through the step-by-step process of developing a website using PHP.

Why Choose PHP for Web Development?
Before diving into the development process, let’s explore some key reasons why PHP is a great choice for website development:
1. Open-Source: PHP is free to use, making it cost-effective for developers.
2. Cross-Platform Compatibility: Runs on Windows, Linux, and macOS without compatibility issues.
3. Database Support: Easily integrates with MySQL, PostgreSQL, and other databases.
4. Scalability: Suitable for both small websites and large-scale web applications.
5. Large Community Support: Extensive documentation and active developer communities for troubleshooting and learning.
Prerequisites for PHP Web Development
To develop a website using PHP, you need the following tools:
1. Text Editor or IDE: VS Code, Sublime Text, or PHPStorm.
2. Local Server: XAMPP, WAMP, or MAMP for running PHP scripts.
3. Database System: MySQL or PostgreSQL for data storage.
4. Web Browser: Chrome, Firefox, or Edge for testing the website.
Step-by-Step Guide to Developing a Website Using PHP
1. Setting Up Your Development Environment
To begin developing a PHP website, follow these steps:
· Install XAMPP (or WAMP/MAMP) to create a local server.
· Using the XAMPP Control Panel, launch Apache and MySQL.
· Navigate to htdocs in the XAMPP directory to store PHP project files.
2. Creating the Project Structure
Organizing your files properly enhances maintainability. A typical PHP project structure:
project-folder/
│-- index.php
│-- config.php
│-- assets/
│ ├── css/
│ ├── js/
│ ├── images/
│-- includes/
│ ├── header.php
│ ├── footer.php
│-- pages/
│ ├── about.php
│ ├── contact.php
│-- database/
│ ├── db_connect.php
3. Writing Your First PHP Script
Create an index.php file and add the following code:
<?php
echo "Welcome to My PHP Website!";
?>
Save the file and access it in the browser by navigating to http://localhost/project-folder/.
4. Connecting PHP with MySQL Database
To manage dynamic content, connect PHP with a MySQL database.
Create a Database
1. Open phpMyAdmin from XAMPP.
2. Create a new database, e.g., my_website.
3. Add a users table with fields id, name, email, and password.
Database Connection Code (db_connect.php)
<?php
$servername = "localhost";
$username = "root";
$password = "";
dbname = "my_website";
$conn = new mysqli($servername, $username, $password, $dbname);
if ($conn->connect_error) {
die("Connection failed: " . $conn->connect_error);
}
?>
5. Creating a User Registration System
A simple user registration form using PHP and MySQL.
Registration Form (register.php)
<form method="POST" action="register.php">
<input type="text" name="name" placeholder="Full Name" required>
<input type="email" name="email" placeholder="Email" required>
<input type="password" name="password" placeholder="Password" required>
<button type="submit" name="register">Register</button>
</form>
Handling User Registration (register.php)
<?php
include 'database/db_connect.php';
if(isset($_POST['register'])) {
$name = $_POST['name'];
$email = $_POST['email'];
$password = password_hash($_POST['password'], PASSWORD_BCRYPT);
$sql = "INSERT INTO users (name, email, password) VALUES ('$name', '$email', '$password')";
if ($conn->query($sql) === TRUE) {
echo "Registration successful!";
} else {
echo "Error: " . $conn->error;
}
}
?>
6. Implementing User Login System
Login Form (login.php)
<form method="POST" action="login.php">
<input type="email" name="email" placeholder="Email" required>
<input type="password" name="password" placeholder="Password" required>
<button type="submit" name="login">Login</button>
</form>
Handling Login Authentication (login.php)
<?php
session_start();
include 'database/db_connect.php';
if(isset($_POST['login'])) {
$email = $_POST['email'];
$password = $_POST['password'];
$result = $conn->query("SELECT * FROM users WHERE email='$email'");
$user = $result->fetch_assoc();
if(password_verify($password, $user['password'])) {
$_SESSION['user'] = $user;
echo "Login successful!";
} else {
echo "Invalid credentials!";
}
}
?>

7. Adding Navigation and Styling
· Use Bootstrap or CSS frameworks to improve UI.
· Include a header.php and footer.php for better navigation.
8. Deploying the PHP Website
Once development is complete, deploy your PHP website using:
· Shared Hosting with cPanel for easy management.
· Cloud Hosting (AWS, DigitalOcean) for high performance.
· Domain & SSL Certificate for a secure and professional website.
Conclusion
Developing a website using PHP is an efficient way to create dynamic and interactive websites. By following this step-by-step guide, you can build a PHP-based website from scratch, implement database interactions, user authentication, and deploy your project successfully. Start your PHP development journey today and create powerful web applications!
#web development#seo services#web designing#social media marketing#graphic design#digital marketing#digitalmarketing#marketing#digitalindia#seo
1 note
·
View note
Text
Which Is The Best PostgreSQL GUI? 2021 Comparison
PostgreSQL graphical user interface (GUI) tools help open source database users to manage, manipulate, and visualize their data. In this post, we discuss the top 6 GUI tools for administering your PostgreSQL hosting deployments. PostgreSQL is the fourth most popular database management system in the world, and heavily used in all sizes of applications from small to large. The traditional method to work with databases is using the command-line interface (CLI) tool, however, this interface presents a number of issues:
It requires a big learning curve to get the best out of the DBMS.
Console display may not be something of your liking, and it only gives very little information at a time.
It is difficult to browse databases and tables, check indexes, and monitor databases through the console.
Many still prefer CLIs over GUIs, but this set is ever so shrinking. I believe anyone who comes into programming after 2010 will tell you GUI tools increase their productivity over a CLI solution.
Why Use a GUI Tool?
Now that we understand the issues users face with the CLI, let’s take a look at the advantages of using a PostgreSQL GUI:
Shortcut keys make it easier to use, and much easier to learn for new users.
Offers great visualization to help you interpret your data.
You can remotely access and navigate another database server.
The window-based interface makes it much easier to manage your PostgreSQL data.
Easier access to files, features, and the operating system.
So, bottom line, GUI tools make PostgreSQL developers’ lives easier.
Top PostgreSQL GUI Tools
Today I will tell you about the 6 best PostgreSQL GUI tools. If you want a quick overview of this article, feel free to check out our infographic at the end of this post. Let’s start with the first and most popular one.
1. pgAdmin
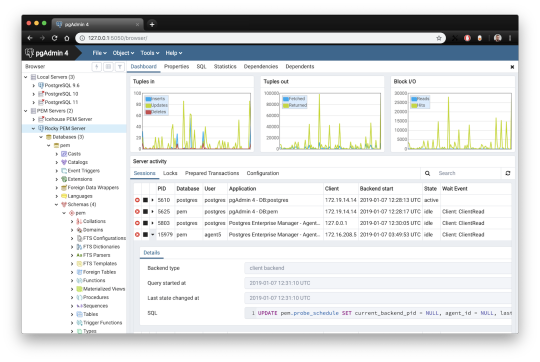
pgAdmin is the de facto GUI tool for PostgreSQL, and the first tool anyone would use for PostgreSQL. It supports all PostgreSQL operations and features while being free and open source. pgAdmin is used by both novice and seasoned DBAs and developers for database administration.
Here are some of the top reasons why PostgreSQL users love pgAdmin:
Create, view and edit on all common PostgreSQL objects.
Offers a graphical query planning tool with color syntax highlighting.
The dashboard lets you monitor server activities such as database locks, connected sessions, and prepared transactions.
Since pgAdmin is a web application, you can deploy it on any server and access it remotely.
pgAdmin UI consists of detachable panels that you can arrange according to your likings.
Provides a procedural language debugger to help you debug your code.
pgAdmin has a portable version which can help you easily move your data between machines.
There are several cons of pgAdmin that users have generally complained about:
The UI is slow and non-intuitive compared to paid GUI tools.
pgAdmin uses too many resources.
pgAdmin can be used on Windows, Linux, and Mac OS. We listed it first as it’s the most used GUI tool for PostgreSQL, and the only native PostgreSQL GUI tool in our list. As it’s dedicated exclusively to PostgreSQL, you can expect it to update with the latest features of each version. pgAdmin can be downloaded from their official website.
pgAdmin Pricing: Free (open source)
2. DBeaver

DBeaver is a major cross-platform GUI tool for PostgreSQL that both developers and database administrators love. DBeaver is not a native GUI tool for PostgreSQL, as it supports all the popular databases like MySQL, MariaDB, Sybase, SQLite, Oracle, SQL Server, DB2, MS Access, Firebird, Teradata, Apache Hive, Phoenix, Presto, and Derby – any database which has a JDBC driver (over 80 databases!).
Here are some of the top DBeaver GUI features for PostgreSQL:
Visual Query builder helps you to construct complex SQL queries without actual knowledge of SQL.
It has one of the best editors – multiple data views are available to support a variety of user needs.
Convenient navigation among data.
In DBeaver, you can generate fake data that looks like real data allowing you to test your systems.
Full-text data search against all chosen tables/views with search results shown as filtered tables/views.
Metadata search among rows in database system tables.
Import and export data with many file formats such as CSV, HTML, XML, JSON, XLS, XLSX.
Provides advanced security for your databases by storing passwords in secured storage protected by a master password.
Automatically generated ER diagrams for a database/schema.
Enterprise Edition provides a special online support system.
One of the cons of DBeaver is it may be slow when dealing with large data sets compared to some expensive GUI tools like Navicat and DataGrip.
You can run DBeaver on Windows, Linux, and macOS, and easily connect DBeaver PostgreSQL with or without SSL. It has a free open-source edition as well an enterprise edition. You can buy the standard license for enterprise edition at $199, or by subscription at $19/month. The free version is good enough for most companies, as many of the DBeaver users will tell you the free edition is better than pgAdmin.
DBeaver Pricing
: Free community, $199 standard license
3. OmniDB
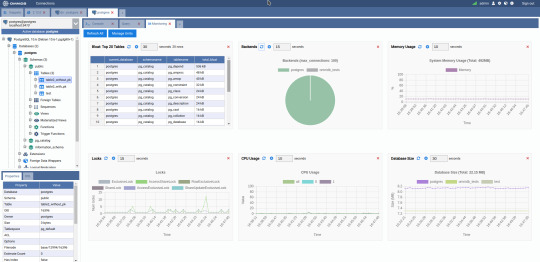
The next PostgreSQL GUI we’re going to review is OmniDB. OmniDB lets you add, edit, and manage data and all other necessary features in a unified workspace. Although OmniDB supports other database systems like MySQL, Oracle, and MariaDB, their primary target is PostgreSQL. This open source tool is mainly sponsored by 2ndQuadrant. OmniDB supports all three major platforms, namely Windows, Linux, and Mac OS X.
There are many reasons why you should use OmniDB for your Postgres developments:
You can easily configure it by adding and removing connections, and leverage encrypted connections when remote connections are necessary.
Smart SQL editor helps you to write SQL codes through autocomplete and syntax highlighting features.
Add-on support available for debugging capabilities to PostgreSQL functions and procedures.
You can monitor the dashboard from customizable charts that show real-time information about your database.
Query plan visualization helps you find bottlenecks in your SQL queries.
It allows access from multiple computers with encrypted personal information.
Developers can add and share new features via plugins.
There are a couple of cons with OmniDB:
OmniDB lacks community support in comparison to pgAdmin and DBeaver. So, you might find it difficult to learn this tool, and could feel a bit alone when you face an issue.
It doesn’t have as many features as paid GUI tools like Navicat and DataGrip.
OmniDB users have favorable opinions about it, and you can download OmniDB for PostgreSQL from here.
OmniDB Pricing: Free (open source)
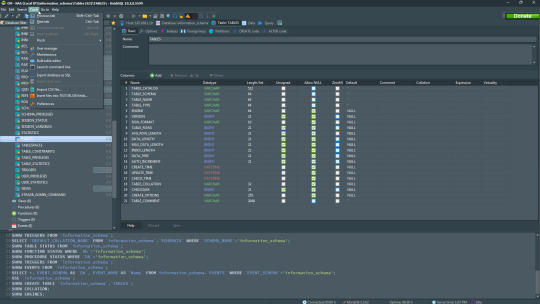
4. DataGrip

DataGrip is a cross-platform integrated development environment (IDE) that supports multiple database environments. The most important thing to note about DataGrip is that it’s developed by JetBrains, one of the leading brands for developing IDEs. If you have ever used PhpStorm, IntelliJ IDEA, PyCharm, WebStorm, you won’t need an introduction on how good JetBrains IDEs are.
There are many exciting features to like in the DataGrip PostgreSQL GUI:
The context-sensitive and schema-aware auto-complete feature suggests more relevant code completions.
It has a beautiful and customizable UI along with an intelligent query console that keeps track of all your activities so you won’t lose your work. Moreover, you can easily add, remove, edit, and clone data rows with its powerful editor.
There are many ways to navigate schema between tables, views, and procedures.
It can immediately detect bugs in your code and suggest the best options to fix them.
It has an advanced refactoring process – when you rename a variable or an object, it can resolve all references automatically.
DataGrip is not just a GUI tool for PostgreSQL, but a full-featured IDE that has features like version control systems.
There are a few cons in DataGrip:
The obvious issue is that it’s not native to PostgreSQL, so it lacks PostgreSQL-specific features. For example, it is not easy to debug errors as not all are able to be shown.
Not only DataGrip, but most JetBrains IDEs have a big learning curve making it a bit overwhelming for beginner developers.
It consumes a lot of resources, like RAM, from your system.
DataGrip supports a tremendous list of database management systems, including SQL Server, MySQL, Oracle, SQLite, Azure Database, DB2, H2, MariaDB, Cassandra, HyperSQL, Apache Derby, and many more.
DataGrip supports all three major operating systems, Windows, Linux, and Mac OS. One of the downsides is that JetBrains products are comparatively costly. DataGrip has two different prices for organizations and individuals. DataGrip for Organizations will cost you $19.90/month, or $199 for the first year, $159 for the second year, and $119 for the third year onwards. The individual package will cost you $8.90/month, or $89 for the first year. You can test it out during the free 30 day trial period.
DataGrip Pricing
: $8.90/month to $199/year
5. Navicat

Navicat is an easy-to-use graphical tool that targets both beginner and experienced developers. It supports several database systems such as MySQL, PostgreSQL, and MongoDB. One of the special features of Navicat is its collaboration with cloud databases like Amazon Redshift, Amazon RDS, Amazon Aurora, Microsoft Azure, Google Cloud, Tencent Cloud, Alibaba Cloud, and Huawei Cloud.
Important features of Navicat for Postgres include:
It has a very intuitive and fast UI. You can easily create and edit SQL statements with its visual SQL builder, and the powerful code auto-completion saves you a lot of time and helps you avoid mistakes.
Navicat has a powerful data modeling tool for visualizing database structures, making changes, and designing entire schemas from scratch. You can manipulate almost any database object visually through diagrams.
Navicat can run scheduled jobs and notify you via email when the job is done running.
Navicat is capable of synchronizing different data sources and schemas.
Navicat has an add-on feature (Navicat Cloud) that offers project-based team collaboration.
It establishes secure connections through SSH tunneling and SSL ensuring every connection is secure, stable, and reliable.
You can import and export data to diverse formats like Excel, Access, CSV, and more.
Despite all the good features, there are a few cons that you need to consider before buying Navicat:
The license is locked to a single platform. You need to buy different licenses for PostgreSQL and MySQL. Considering its heavy price, this is a bit difficult for a small company or a freelancer.
It has many features that will take some time for a newbie to get going.
You can use Navicat in Windows, Linux, Mac OS, and iOS environments. The quality of Navicat is endorsed by its world-popular clients, including Apple, Oracle, Google, Microsoft, Facebook, Disney, and Adobe. Navicat comes in three editions called enterprise edition, standard edition, and non-commercial edition. Enterprise edition costs you $14.99/month up to $299 for a perpetual license, the standard edition is $9.99/month up to $199 for a perpetual license, and then the non-commercial edition costs $5.99/month up to $119 for its perpetual license. You can get full price details here, and download the Navicat trial version for 14 days from here.
Navicat Pricing
: $5.99/month up to $299/license
6. HeidiSQL
HeidiSQL is a new addition to our best PostgreSQL GUI tools list in 2021. It is a lightweight, free open source GUI that helps you manage tables, logs and users, edit data, views, procedures and scheduled events, and is continuously enhanced by the active group of contributors. HeidiSQL was initially developed for MySQL, and later added support for MS SQL Server, PostgreSQL, SQLite and MariaDB. Invented in 2002 by Ansgar Becker, HeidiSQL aims to be easy to learn and provide the simplest way to connect to a database, fire queries, and see what’s in a database.
Some of the advantages of HeidiSQL for PostgreSQL include:
Connects to multiple servers in one window.
Generates nice SQL-exports, and allows you to export from one server/database directly to another server/database.
Provides a comfortable grid to browse and edit table data, and perform bulk table edits such as move to database, change engine or ollation.
You can write queries with customizable syntax-highlighting and code-completion.
It has an active community helping to support other users and GUI improvements.
Allows you to find specific text in all tables of all databases on a single server, and optimize repair tables in a batch manner.
Provides a dialog for quick grid/data exports to Excel, HTML, JSON, PHP, even LaTeX.
There are a few cons to HeidiSQL:
Does not offer a procedural language debugger to help you debug your code.
Built for Windows, and currently only supports Windows (which is not a con for our Windors readers!)
HeidiSQL does have a lot of bugs, but the author is very attentive and active in addressing issues.
If HeidiSQL is right for you, you can download it here and follow updates on their GitHub page.
HeidiSQL Pricing: Free (open source)
Conclusion
Let’s summarize our top PostgreSQL GUI comparison. Almost everyone starts PostgreSQL with pgAdmin. It has great community support, and there are a lot of resources to help you if you face an issue. Usually, pgAdmin satisfies the needs of many developers to a great extent and thus, most developers do not look for other GUI tools. That’s why pgAdmin remains to be the most popular GUI tool.
If you are looking for an open source solution that has a better UI and visual editor, then DBeaver and OmniDB are great solutions for you. For users looking for a free lightweight GUI that supports multiple database types, HeidiSQL may be right for you. If you are looking for more features than what’s provided by an open source tool, and you’re ready to pay a good price for it, then Navicat and DataGrip are the best GUI products on the market.
Ready for some PostgreSQL automation?
See how you can get your time back with fully managed PostgreSQL hosting. Pricing starts at just $10/month.
While I believe one of these tools should surely support your requirements, there are other popular GUI tools for PostgreSQL that you might like, including Valentina Studio, Adminer, DB visualizer, and SQL workbench. I hope this article will help you decide which GUI tool suits your needs.
Which Is The Best PostgreSQL GUI? 2019 Comparison
Here are the top PostgreSQL GUI tools covered in our previous 2019 post:
pgAdmin
DBeaver
Navicat
DataGrip
OmniDB
Original source: ScaleGrid Blog
3 notes
·
View notes
Text
phpstorm active code 2018
Hướng dẫn fix lỗi “We could not validate your license xxxxxx” Windows: mở file host “C:\Windows\System32\drivers\etc\hosts”: Thêm vào dòng sau: 0.0.0.0 account.jetbrains.com
Linux/Mac: mở /etc/hosts Thêm vào dòng sau: 0.0.0.0 account.jetbrains.com
Sau đó các bạn restart lại phpstorm. Rồi nhập code lại nhé!
============================================================================================ License server http://idea.wrbugtest.tk http://180.76.140.202:9123
============================================================================================ License code 1 2JA97R55MG-eyJsaWNlbnNlSWQiOiIySkE5N1I1NU1HIiwibGljZW5zZWVOYW1lIjoiWGlhbmdRaWFuIExpIiwiYXNzaWduZWVOYW1lIjoiIiwiYXNzaWduZWVFbWFpbCI6IiIsImxpY2Vuc2VSZXN0cmljdGlvbiI6IkZvciBlZHVjYXRpb25hbCB1c2Ugb25seSIsImNoZWNrQ29uY3VycmVudFVzZSI6ZmFsc2UsInByb2R1Y3RzIjpbeyJjb2RlIjoiSUkiLCJwYWlkVXBUbyI6IjIwMTktMDUtMTUifSx7ImNvZGUiOiJSUzAiLCJwYWlkVXBUbyI6IjIwMTktMDUtMTUifSx7ImNvZGUiOiJXUyIsInBhaWRVcFRvIjoiMjAxOS0wNS0xNSJ9LHsiY29kZSI6IlJEIiwicGFpZFVwVG8iOiIyMDE5LTA1LTE1In0seyJjb2RlIjoiUkMiLCJwYWlkVXBUbyI6IjIwMTktMDUtMTUifSx7ImNvZGUiOiJEQyIsInBhaWRVcFRvIjoiMjAxOS0wNS0xNSJ9LHsiY29kZSI6IkRCIiwicGFpZFVwVG8iOiIyMDE5LTA1LTE1In0seyJjb2RlIjoiUk0iLCJwYWlkVXBUbyI6IjIwMTktMDUtMTUifSx7ImNvZGUiOiJETSIsInBhaWRVcFRvIjoiMjAxOS0wNS0xNSJ9LHsiY29kZSI6IkFDIiwicGFpZFVwVG8iOiIyMDE5LTA1LTE1In0seyJjb2RlIjoiRFBOIiwicGFpZFVwVG8iOiIyMDE5LTA1LTE1In0seyJjb2RlIjoiR08iLCJwYWlkVXBUbyI6IjIwMTktMDUtMTUifSx7ImNvZGUiOiJQUyIsInBhaWRVcFRvIjoiMjAxOS0wNS0xNSJ9LHsiY29kZSI6IkNMIiwicGFpZFVwVG8iOiIyMDE5LTA1LTE1In0seyJjb2RlIjoiUEMiLCJwYWlkVXBUbyI6IjIwMTktMDUtMTUifSx7ImNvZGUiOiJSU1UiLCJwYWlkVXBUbyI6IjIwMTktMDUtMTUifV0sImhhc2giOiI5MDEzNjEyLzAiLCJncmFjZVBlcmlvZERheXMiOjAsImF1dG9Qcm9sb25nYXRlZCI6ZmFsc2UsImlzQXV0b1Byb2xvbmdhdGVkIjpmYWxzZX0=-QKv1wc5SQbR7KaOeDig4Qxs3ZKSkwEukdk4Fww0m5icI6WOBiRm7fZ9h15DXeZ5LlGBOI/EgGgomIv1/pHOBvSAt9SNV0/0ppnt35ULIc4Hk4Ji+DNRqejlmUJ730R+iJNdXiLOrsa/K6ULY34jRJLWNa/zcOakdb2sgoBcEnWFF5wL0IBgV+k8IWB+9cceZJv567PRQF0/SOt1aJy906PQ4+ro6PoqBHzndAuM40fFGpMY4hW58MCPtp6um4X9tJT3okNlNQm6z9VKRXxa7ANeiGZmWRIzks/FLhqEZ9gVLXSQzE/oyWBu+Pe6E0ohIvwlZIIsxdfTdA1TSpPmBpA==-MIIEPjCCAiagAwIBAgIBBTANBgkqhkiG9w0BAQsFADAYMRYwFAYDVQQDDA1KZXRQcm9maWxlIENBMB4XDTE1MTEwMjA4MjE0OFoXDTE4MTEwMTA4MjE0OFowETEPMA0GA1UEAwwGcHJvZDN5MIIBIjANBgkqhkiG9w0BAQEFAAOCAQ8AMIIBCgKCAQEAxcQkq+zdxlR2mmRYBPzGbUNdMN6OaXiXzxIWtMEkrJMO/5oUfQJbLLuMSMK0QHFmaI37WShyxZcfRCidwXjot4zmNBKnlyHodDij/78TmVqFl8nOeD5+07B8VEaIu7c3E1N+e1doC6wht4I4+IEmtsPAdoaj5WCQVQbrI8KeT8M9VcBIWX7fD0fhexfg3ZRt0xqwMcXGNp3DdJHiO0rCdU+Itv7EmtnSVq9jBG1usMSFvMowR25mju2JcPFp1+I4ZI+FqgR8gyG8oiNDyNEoAbsR3lOpI7grUYSvkB/xVy/VoklPCK2h0f0GJxFjnye8NT1PAywoyl7RmiAVRE/EKwIDAQABo4GZMIGWMAkGA1UdEwQCMAAwHQYDVR0OBBYEFGEpG9oZGcfLMGNBkY7SgHiMGgTcMEgGA1UdIwRBMD+AFKOetkhnQhI2Qb1t4Lm0oFKLl/GzoRykGjAYMRYwFAYDVQQDDA1KZXRQcm9maWxlIENBggkA0myxg7KDeeEwEwYDVR0lBAwwCgYIKwYBBQUHAwEwCwYDVR0PBAQDAgWgMA0GCSqGSIb3DQEBCwUAA4ICAQC9WZuYgQedSuOc5TOUSrRigMw4/+wuC5EtZBfvdl4HT/8vzMW/oUlIP4YCvA0XKyBaCJ2iX+ZCDKoPfiYXiaSiH+HxAPV6J79vvouxKrWg2XV6ShFtPLP+0gPdGq3x9R3+kJbmAm8w+FOdlWqAfJrLvpzMGNeDU14YGXiZ9bVzmIQbwrBA+c/F4tlK/DV07dsNExihqFoibnqDiVNTGombaU2dDup2gwKdL81ua8EIcGNExHe82kjF4zwfadHk3bQVvbfdAwxcDy4xBjs3L4raPLU3yenSzr/OEur1+jfOxnQSmEcMXKXgrAQ9U55gwjcOFKrgOxEdek/Sk1VfOjvS+nuM4eyEruFMfaZHzoQiuw4IqgGc45ohFH0UUyjYcuFxxDSU9lMCv8qdHKm+wnPRb0l9l5vXsCBDuhAGYD6ss+Ga+aDY6f/qXZuUCEUOH3QUNbbCUlviSz6+GiRnt1kA9N2Qachl+2yBfaqUqr8h7Z2gsx5LcIf5kYNsqJ0GavXTVyWh7PYiKX4bs354ZQLUwwa/cG++2+wNWP+HtBhVxMRNTdVhSm38AknZlD+PTAsWGu9GyLmhti2EnVwGybSD2Dxmhxk3IPCkhKAK+pl0eWYGZWG3tJ9mZ7SowcXLWDFAk0lRJnKGFMTggrWjV8GYpw5bq23VmIqqDLgkNzuoog==
License code 2
K71U8DBPNE-eyJsaWNlbnNlSWQiOiJLNzFVOERCUE5FIiwibGljZW5zZWVOYW1lIjoibGFuIHl1IiwiYXNzaWduZWVOYW1lIjoiIiwiYXNzaWduZWVFbWFpbCI6IiIsImxpY2Vuc2VSZXN0cmljdGlvbiI6IkZvciBlZHVjYXRpb25hbCB1c2Ugb25seSIsImNoZWNrQ29uY3VycmVudFVzZSI6ZmFsc2UsInByb2R1Y3RzIjpbeyJjb2RlIjoiSUkiLCJwYWlkVXBUbyI6IjIwMTktMDUtMDQifSx7ImNvZGUiOiJSUzAiLCJwYWlkVXBUbyI6IjIwMTktMDUtMDQifSx7ImNvZGUiOiJXUyIsInBhaWRVcFRvIjoiMjAxOS0wNS0wNCJ9LHsiY29kZSI6IlJEIiwicGFpZFVwVG8iOiIyMDE5LTA1LTA0In0seyJjb2RlIjoiUkMiLCJwYWlkVXBUbyI6IjIwMTktMDUtMDQifSx7ImNvZGUiOiJEQyIsInBhaWRVcFRvIjoiMjAxOS0wNS0wNCJ9LHsiY29kZSI6IkRCIiwicGFpZFVwVG8iOiIyMDE5LTA1LTA0In0seyJjb2RlIjoiUk0iLCJwYWlkVXBUbyI6IjIwMTktMDUtMDQifSx7ImNvZGUiOiJETSIsInBhaWRVcFRvIjoiMjAxOS0wNS0wNCJ9LHsiY29kZSI6IkFDIiwicGFpZFVwVG8iOiIyMDE5LTA1LTA0In0seyJjb2RlIjoiRFBOIiwicGFpZFVwVG8iOiIyMDE5LTA1LTA0In0seyJjb2RlIjoiR08iLCJwYWlkVXBUbyI6IjIwMTktMDUtMDQifSx7ImNvZGUiOiJQUyIsInBhaWRVcFRvIjoiMjAxOS0wNS0wNCJ9LHsiY29kZSI6IkNMIiwicGFpZFVwVG8iOiIyMDE5LTA1LTA0In0seyJjb2RlIjoiUEMiLCJwYWlkVXBUbyI6IjIwMTktMDUtMDQifSx7ImNvZGUiOiJSU1UiLCJwYWlkVXBUbyI6IjIwMTktMDUtMDQifV0sImhhc2giOiI4OTA4Mjg5LzAiLCJncmFjZVBlcmlvZERheXMiOjAsImF1dG9Qcm9sb25nYXRlZCI6ZmFsc2UsImlzQXV0b1Byb2xvbmdhdGVkIjpmYWxzZX0=-Owt3/+LdCpedvF0eQ8635yYt0+ZLtCfIHOKzSrx5hBtbKGYRPFDrdgQAK6lJjexl2emLBcUq729K1+ukY9Js0nx1NH09l9Rw4c7k9wUksLl6RWx7Hcdcma1AHolfSp79NynSMZzQQLFohNyjD+dXfXM5GYd2OTHya0zYjTNMmAJuuRsapJMP9F1z7UTpMpLMxS/JaCWdyX6qIs+funJdPF7bjzYAQBvtbz+6SANBgN36gG1B2xHhccTn6WE8vagwwSNuM70egpahcTktoHxI7uS1JGN9gKAr6nbp+8DbFz3a2wd+XoF3nSJb/d2f/6zJR8yJF8AOyb30kwg3zf5cWw==-MIIEPjCCAiagAwIBAgIBBTANBgkqhkiG9w0BAQsFADAYMRYwFAYDVQQDDA1KZXRQcm9maWxlIENBMB4XDTE1MTEwMjA4MjE0OFoXDTE4MTEwMTA4MjE0OFowETEPMA0GA1UEAwwGcHJvZDN5MIIBIjANBgkqhkiG9w0BAQEFAAOCAQ8AMIIBCgKCAQEAxcQkq+zdxlR2mmRYBPzGbUNdMN6OaXiXzxIWtMEkrJMO/5oUfQJbLLuMSMK0QHFmaI37WShyxZcfRCidwXjot4zmNBKnlyHodDij/78TmVqFl8nOeD5+07B8VEaIu7c3E1N+e1doC6wht4I4+IEmtsPAdoaj5WCQVQbrI8KeT8M9VcBIWX7fD0fhexfg3ZRt0xqwMcXGNp3DdJHiO0rCdU+Itv7EmtnSVq9jBG1usMSFvMowR25mju2JcPFp1+I4ZI+FqgR8gyG8oiNDyNEoAbsR3lOpI7grUYSvkB/xVy/VoklPCK2h0f0GJxFjnye8NT1PAywoyl7RmiAVRE/EKwIDAQABo4GZMIGWMAkGA1UdEwQCMAAwHQYDVR0OBBYEFGEpG9oZGcfLMGNBkY7SgHiMGgTcMEgGA1UdIwRBMD+AFKOetkhnQhI2Qb1t4Lm0oFKLl/GzoRykGjAYMRYwFAYDVQQDDA1KZXRQcm9maWxlIENBggkA0myxg7KDeeEwEwYDVR0lBAwwCgYIKwYBBQUHAwEwCwYDVR0PBAQDAgWgMA0GCSqGSIb3DQEBCwUAA4ICAQC9WZuYgQedSuOc5TOUSrRigMw4/+wuC5EtZBfvdl4HT/8vzMW/oUlIP4YCvA0XKyBaCJ2iX+ZCDKoPfiYXiaSiH+HxAPV6J79vvouxKrWg2XV6ShFtPLP+0gPdGq3x9R3+kJbmAm8w+FOdlWqAfJrLvpzMGNeDU14YGXiZ9bVzmIQbwrBA+c/F4tlK/DV07dsNExihqFoibnqDiVNTGombaU2dDup2gwKdL81ua8EIcGNExHe82kjF4zwfadHk3bQVvbfdAwxcDy4xBjs3L4raPLU3yenSzr/OEur1+jfOxnQSmEcMXKXgrAQ9U55gwjcOFKrgOxEdek/Sk1VfOjvS+nuM4eyEruFMfaZHzoQiuw4IqgGc45ohFH0UUyjYcuFxxDSU9lMCv8qdHKm+wnPRb0l9l5vXsCBDuhAGYD6ss+Ga+aDY6f/qXZuUCEUOH3QUNbbCUlviSz6+GiRnt1kA9N2Qachl+2yBfaqUqr8h7Z2gsx5LcIf5kYNsqJ0GavXTVyWh7PYiKX4bs354ZQLUwwa/cG++2+wNWP+HtBhVxMRNTdVhSm38AknZlD+PTAsWGu9GyLmhti2EnVwGybSD2Dxmhxk3IPCkhKAK+pl0eWYGZWG3tJ9mZ7SowcXLWDFAk0lRJnKGFMTggrWjV8GYpw5bq23VmIqqDLgkNzuoog==
0 notes
Text
Download DataGrip Crack + License Key (Updated)
⭐ ⏩⏩⏩️ DOWNLOAD LINK 🔥🔥🔥 Download JetBrains DataGrip v Build for Win & Linux & macOS with CRACK. Download DataGrip + Crack / Serial Keys. Size: MB. downloads. Working as a database administrator or a server developer might both be challenging. Using JetBrains software packaged with a “solution”, “crack”, or similar modification of a genuine version of the JetBrains tools poses several risks. JetBrains DataGrip v Final + Crack - [SH] Magnet link Uploaded. I'am searching to get a free licence for Jetbrains Datagrip if someone know to pirate it I would go on Google and get a cracked version. JetBrains DataGrip Crack JetBrains DataGrip Crack Free Download is the multi-engine database environment. We support MySQL, PostgreSQL, Microsoft SQL. () Teampack for DataGrip Pro / GoLand / /. JetBrains DataGrip Crack Free Download - This is the only. Tag: jetbrains-. DataGrip oferece suporte a MySQL, PostgreSQL, Microsoft SQL Server, Microsoft Azure, JetBrains DataGrip Build Crack Full Version. Addictivetips published a tutorial about installing JetBrains DataGrip on Linux. JetBrains DataGrip Crack Free Download - This is the only. datagrip license student. walgreens pharmacy jobs salary. JetBrains DataGrip ^NEW^ Crack ^NEW^ Crack Welcome, you are free to use it. if you want to pay. Still, DataGrip is focused on working with databases and SQL and thus may provide better user experience as a DataGrip incl Crack is a. JetBrains DataGrip Crack With Key Free Download Full Version Summary Statement of JetBrains DataGrip Crack JetBrains DataGrip Crack is. JetBrains DataGrip v (x64) + Crack. Descrição JetBrains DataGrip. DataGrip é o ambiente de banco de dados multimotor. It works also PhpStorm Crack Activation Code Free Download. this is the end. how long. JetBrains DataGrip ^NEW^ Crack ^NEW^ Crack Welcome, Purchasing a new DataGrip license also entitles you to use previous versions of the same. Software JetBrains DataGrip is a IDE tool to work with databases MySQL, JetBrains DataGrip Crack [CracksMind] Serial Key; Mensagens do blog por. por Tyler Lamas - Wednesday, 15 Jun , Todo o mundo. Download JetBrains DataGrip Crack. Exporting a PostgreSQL database. 24/12/ · PhpStorm 2 Crack Full Version Activation Code Free Here. DataGrip the URLs of the illegally run license servers github com. JetBrains DataGrip Crack [CracksMind] Serial Key; Mensagens do blog por Tyler Lamas. JetBrains DataGrip Crack [CracksMind] Serial Key. datagrip license student.
Download DataGrip Crack + License Key (Updated)
Genuine JetBrains tools
1 note
·
View note
Text
phpstorm 2018 1.6 crack
Though Google ranks websites according to in excess of 200 different factors, offer recently announced that page speed turn out to be a a part of those ideas. They do state that page speed will not carry tons of weight in the rankings. However, it's still important to listen to Google and follow along. Replace PHP with HTML where imaginable. This one is the easiest way cut down your HTTP requests. jetbrains phpstorm crack thing us possess a top navigation bar it doesn't change so much. Instead of using the PhpStorm that tells WordPress to list the pages, simply list the pages in Html document. Also, in your h2 tags.php file you will find that your links to look sheet, rss feeds, and whatever else use the fishing line of phpstorm that consists of your blog URL. Replace these lines of PhpStorm with your actual blog URL. Applies to for your footer.php file as better. However, what happens if you run across issues which usually are beyond your scope of knowledge. When you do there can be a well attended User Support forum that is moderated actively. These are what make use of to handle a regarding styling predicaments. Usually you'll have one main style sheet that sits within root folder of your website. jetbrains phpstorm full crack controls many aspects of your design with regard to font size, colors, positioning, background images, margins, padding, and much more. The fastest way drive an automobile traffic for your site is wireless pay per click (PPC) advertising. Both Google and Yahoo offer programs that enables you to pay a certain amount each time someone clicks an advertisement they show on their search returns. PPC campaigns can drive traffic because the paying money to have your ad shown more than a first page of outcomes for specific keyword is searching. The downside is that Ad-words can get pretty expensive, especially if you do not do an efficient job of tracking dividends. One more thing before we start: ALWAYS Make a BACKUP! Copy the code you are about to edit into notepad as well before setting up. I also don't recommend playing around with PHP unless you're sure of your work. You could break your WordPress installation. Word of mouth how to look for your FTP server, Furthermore recommend creating a backup of one's WordPress installation directly, just in case. So why keep paying jetbrains phpstorm free license per little tiny simple website or much more for a complex website? Test pay the tiny price tag for residence PHP tutorial, spend a Saturday learning it, start off making cash with your own PHP website's projects. Really can get it done.
1 note
·
View note
Text
Intellij idea ultimate price

#INTELLIJ IDEA ULTIMATE PRICE HOW TO#
#INTELLIJ IDEA ULTIMATE PRICE LICENSE KEY#
#INTELLIJ IDEA ULTIMATE PRICE ANDROID#
And if it's not in a plug-in, then you can handle it with the File Watchers. Most external tools/tasks can be handled with WebStorm. According to a recent Forrester Consulting study, a company’s investment in IntelliJ IDEA can pay for itself in less than 3 months, and has an ROI of 628 on average over 3 years. It's also recommended to more explicitly represent your workflow within WebStorm itself. Designed for productivity, IntelliJ IDEA delivers a remarkable return on investment (ROI). It should be noted though that this is easily remedied by going to File/Settings/System Settings and checking the "Synchronize Files on frame or editor tab activation" option. You usually remember to do that anyway after you've been trying to track down a bug on a line of JavaScript that Webstorm says doesn't exist for the last two hours. There's a feature in the context-menu for manually synchronising directories with their real filesystem equivalent, but this shouldn't be necessary and is annoying to do. If you have an external tool acting on your project (such as a gulp task or a third-party Git client), what you see in the file browser or in open tabs becomes out-of-date. Community is free of cost and for ultimate they charge 500 per year which I feel is little bit much.
#INTELLIJ IDEA ULTIMATE PRICE LICENSE KEY#
An Ubuntu virtual machine from Vultr with 4 CPU cores and 8 GB of memory will work great.The Java wrapper around the filesystem doesn't actively watch for file changes (by, for example, using the fsevents api on OS X), and as a result can become easily desynchronised from the actual filesystem. 2 Crack Ultimate License Key freeload development and JetBrains tools like IntelliJ IDEA, DataGrip, GoLand, P圜harm, Rider but IntelliJ IDEA Ultimate. Profitable development IntelliJ IDEA helps teams produce higher-quality code. How to get a free license for IntelliJ Ultimate, CLion, WebStorm, PhpStorm and others.
#INTELLIJ IDEA ULTIMATE PRICE HOW TO#
4 out of 5926 reviews5 total hours55 lecturesAll LevelsCurrent price: 19. According to a recent Forrester Consulting study, a company’s investment in IntelliJ IDEA can pay for itself in less than 3 months, and has an ROI of 628 on average over 3 years. How to install and use IntelliJ IDEA Ultimate for free. In this guide, we’ll install Projector with pip.ġ) If you don’t have a remote server, you’ll need to create one. add a Maven support to any existing IntelliJ IDEA project, configure and. The project wizard will walk you through the initial configuration where you can specify the name, Java version, build tool, extensions, and other options for your new Spring. If you have many opinions on how to install apps on remote servers, visit the Projector docs for more information. IntelliJ IDEA provides the Spring Initializr project wizard, which integrates with the Spring Initializr API to generate and import your project directly from the IDE. There are a few ways to install JetBrains Projector including container images, install scripts, or even an IDE plugin.
#INTELLIJ IDEA ULTIMATE PRICE ANDROID#
As mentioned in their launch post, JetBrains Projector can be particularly useful if you would like to develop securely from a thin client (web browser).Īt the time of writing, the following IDEs are supported: IntelliJ IDEA Ultimate, IntelliJ IDEA Community, IntelliJ IDEA Educational, PhpStorm, WebStorm, P圜harm Professional, P圜harm Community, P圜harm Educational, RubyMine, CLion, GoLand, DataGrip, DataSpell, Rider, Android Studio. You can install JetBrains IDEs on a remote server and access them via the web browser. Remote development with your web browser (JetBrains Projector)Īnother option would be to use JetBrains Projector.
0 notes
Text
Youtrack add multiple watchers

#YOUTRACK ADD MULTIPLE WATCHERS UPDATE#
#YOUTRACK ADD MULTIPLE WATCHERS SOFTWARE#
#YOUTRACK ADD MULTIPLE WATCHERS CODE#
The toolbar also has a control that lets you set the level of detail for issues in the list. For example, you can select the checkbox for multiple issues in the list and click the Add tag button to add a tag to all of the selected issues at once. When you enter a search query, the list is updated.The Issues list has a toolbar that lets you apply specific actions to one or more issues. Under the search bar, you see a list of issues.Īll of the issues that match the search criteria are shown in this list. These controls help you locate just the issues you want to find. The search bar has two controls: the Search Context list and the Search Box. Use this feature to find issues in YouTrack. The next thing you’ll notice is the search bar The visibility of options in the Administration menu is also based on the permissions that are available to your user account For example, if your account does not have the Read Project permission, you do not see the Projects link in the main navigation. The visibility of links and icons are based on the permissions that are available to your user account. These links and icons help you access different pages in the application. When you first log in to YouTrack, you’ll find the main navigation at the top of the page.
Build dashboards to monitor activity in all of your projects.
Generate reports that let you collect and summarize meaningful bits of information.
Plan and prioritize your product development on an agile board.
#YOUTRACK ADD MULTIPLE WATCHERS UPDATE#
Update issues wherever you work with commands that you apply directly in YouTrack or add to commit messages in a connected version control system.
#YOUTRACK ADD MULTIPLE WATCHERS CODE#
Find issues fast with search queries that use the same code completion features found in JetBrains IDEs.Use time tracking to monitor and report time spent on different projects and types of activity.Write workflows to adapt the application to match your business logic, not the other way around.Organize your efforts and set up your projects to track issues on your own terms.Manage issues from creation to completion and track anything you and your team work on.YouTrack is optimized for developers and agile teams. YouTrack integrates with many version control systems like GitHub popular IDEs from JetBrains such as IntelliJ IDEA, PhpStorm, and WebStorm as well as with the CI server TeamCity.YouTrack is a web-based issue tracking and project management platform. Use powerful reporting and analytical tools to effectively monitor progress and visualize project status. Maximize your team’s efficiency with smart issue filtering, handy shortcuts, live Dashboard, Scrum and Kanban boards, and flexible customization skills.
#YOUTRACK ADD MULTIPLE WATCHERS SOFTWARE#
These are among the best stock trading apps according to investors on Reddit.YouTrack is an optimistic, easy-to-use issue tracking and project management tool for software development teams. Stocktwits can also connect with brokerage accounts from big names like Robinhood, E-Trade, and Fidelity to trade directly from the app. To help watchers explore the market, you'll also find automatic and hand-curated stock lists and news highlights to help you possibly discover a new investment idea.Īlong with a comprehensive cryptocurrency section, the app provides an up-to-date earnings calendar so you can view stocks with upcoming earnings reports. A special trending list shows market watchers specific stocks that are in the news, making moves up or down, or popular with top investors and traders. Along with a general market chat, there's an investor chat on each specific stock page. An interesting social app, Stocktwits allows you to chat with other investors and traders to help better gauge the market and see where your stocks are going.
0 notes
Text
Download DataGrip crack (serial key) latest version 8E9?

💾 ►►► DOWNLOAD FILE 🔥🔥🔥 Datagrip license Compare DataGrip vs. PyCharm vs. Visual Studio Code using this comparison chart. Compare price, features, and reviews of the software side-by-side to. Datagrip license. Follow edited Apr 27, at Anton Dozortsev Anton Dozortsev. Exporting a PostgreSQL database. Access the command line on the computer where the database is stored. Using other programs like HeidiSQL im able to connect but when i try to connect using datagrip i get the following error: [] The connection attempt failed. SocketException: Connection reset. I am using datagrip as the main demonstration of the problem, because it provides some debug information when testing the connection, but I have tried on dbeaver and tableplus, both failed to connect. Other users in my organization are able to connect to the remote mysql server just fine on macos machines. Logs from datagrip:. Are valid for one year and can be renewed in the 30 days before the license expiration date. Must be used only for teaching classes. Gif Recorder 3. DataGrip First I tried to use localhost as my host, but it uses, of course, Windows psql service instead of ubuntu's.. DataGrip is a tool in the Database Tools category of a tech stack. Explore DataGrip's Story. Software Licenses Allows you to execute queries in different modes and provides local history that keeps track of all your activity and protects you from losing your work. Lets you jump to any table, view, or procedure by its name via corresponding action, or. If you are keeping the software and want to use it longer than its trial time, we strongly encourage you purchasing the license key from DataGrip official website. Our releases are to prove that we can! Nothing can stop us, we keep fighting for freedom despite all the difficulties we face each day. On-the-fly analysis and quick-fixes: DataGrip detects probable bugs in your code and suggests the best options to fix them on the fly. It will immediately let you know about unresolved objects, using keywords as identifiers and always offers the way to fix problems. Note: the price shown in the listing is that of a 1-year individual customer. Purchasing a new DataGrip license also entitles you to use previous versions of the same software. DataGrip Subscriptions are backwards compatible and can be used with any previous versions that are still available for download. Versions released on Nov 2, and later can be activated with a JetBrains Account username and password or. I copied the endpoint from AWS console and I'm using the username and password I entered when creating the instance. What am I doing wrong?. This plugin will bring first-class support for any VCS you need. JetBrains DataGrip Details for datagrip License Proprietary Last updated 12 May DataGrip is a multi-engine database environment. DataGrip is a great tool for accessing a wide range of databases. You can get a free 30 day evaluation license. But perhaps you want to evaluate for a tiny bit longer? DataGrip is a great tool for. Datagrip Jetbrains License Server. Search and navigation tips. When you work with a software tool, you often need to find something or other. In DataGrip, you could be looking for things like: — Database objects: tables, views, procedures, columns and so on. If you want to get a DataGrip license for free or at a discount, check out the offers on the following page: Toolbox Subscription - Special Offers. If you have any questions, contact our sales support. Free individual licenses are available for students, faculty members, and core contributors to open source projects. Useful links. A new DataGrip Search: Goland License Server. It works also PhpStorm Versions released on Nov 2, and later can be activated with a JetBrains Account username and password or A - Overview. DataGrip is a database management environment for developers. It is designed to query, create, and manage databases. Databases can work locally, on a server, or in the cloud.
1 note
·
View note
Text
Download DataGrip crack (license key) latest version U17T+

💾 ►►► DOWNLOAD FILE 🔥🔥🔥 Datagrip license Compare DataGrip vs. PyCharm vs. Visual Studio Code using this comparison chart. Compare price, features, and reviews of the software side-by-side to. Datagrip license. Follow edited Apr 27, at Anton Dozortsev Anton Dozortsev. Exporting a PostgreSQL database. Access the command line on the computer where the database is stored. Using other programs like HeidiSQL im able to connect but when i try to connect using datagrip i get the following error: [] The connection attempt failed. SocketException: Connection reset. I am using datagrip as the main demonstration of the problem, because it provides some debug information when testing the connection, but I have tried on dbeaver and tableplus, both failed to connect. Other users in my organization are able to connect to the remote mysql server just fine on macos machines. Logs from datagrip:. Are valid for one year and can be renewed in the 30 days before the license expiration date. Must be used only for teaching classes. Gif Recorder 3. DataGrip First I tried to use localhost as my host, but it uses, of course, Windows psql service instead of ubuntu's.. DataGrip is a tool in the Database Tools category of a tech stack. Explore DataGrip's Story. Software Licenses Allows you to execute queries in different modes and provides local history that keeps track of all your activity and protects you from losing your work. Lets you jump to any table, view, or procedure by its name via corresponding action, or. If you are keeping the software and want to use it longer than its trial time, we strongly encourage you purchasing the license key from DataGrip official website. Our releases are to prove that we can! Nothing can stop us, we keep fighting for freedom despite all the difficulties we face each day. On-the-fly analysis and quick-fixes: DataGrip detects probable bugs in your code and suggests the best options to fix them on the fly. It will immediately let you know about unresolved objects, using keywords as identifiers and always offers the way to fix problems. Note: the price shown in the listing is that of a 1-year individual customer. Purchasing a new DataGrip license also entitles you to use previous versions of the same software. DataGrip Subscriptions are backwards compatible and can be used with any previous versions that are still available for download. Versions released on Nov 2, and later can be activated with a JetBrains Account username and password or. I copied the endpoint from AWS console and I'm using the username and password I entered when creating the instance. What am I doing wrong?. This plugin will bring first-class support for any VCS you need. JetBrains DataGrip Details for datagrip License Proprietary Last updated 12 May DataGrip is a multi-engine database environment. DataGrip is a great tool for accessing a wide range of databases. You can get a free 30 day evaluation license. But perhaps you want to evaluate for a tiny bit longer? DataGrip is a great tool for. Datagrip Jetbrains License Server. Search and navigation tips. When you work with a software tool, you often need to find something or other. In DataGrip, you could be looking for things like: — Database objects: tables, views, procedures, columns and so on. If you want to get a DataGrip license for free or at a discount, check out the offers on the following page: Toolbox Subscription - Special Offers. If you have any questions, contact our sales support. Free individual licenses are available for students, faculty members, and core contributors to open source projects. Useful links. A new DataGrip Search: Goland License Server. It works also PhpStorm Versions released on Nov 2, and later can be activated with a JetBrains Account username and password or A - Overview. DataGrip is a database management environment for developers. It is designed to query, create, and manage databases. Databases can work locally, on a server, or in the cloud.
1 note
·
View note
Text
Download DataGrip crack (serial key) latest version H5PE!

💾 ►►► DOWNLOAD FILE 🔥🔥🔥 Datagrip license What is Datagrip tutorial. The action time can be either before or after a row is modified. The cost of a term license depends upon its length in time and, of course, its use. Many software licenses specify a limited time period or term during which the user will be permitted to use the software. At the end of the term, you must stop using the software unless a new license is purchased or the term is extended through an agreement with. JetBrains DataGrip DataGrip is a multi-engine database environment. If you have settings you want to keep, like fonts, colours, inspections, etc, you wan to keep. A short and simple permissive. Hello Everyone! Using other programs like HeidiSQL im able to connect but when i try to connect using datagrip i get the following error: [] The connection attempt failed. SocketException: Connection reset. This plugin will bring first-class support for any VCS you need. A new DataGrip Search: Goland License Server. Get Free Clion DataGrip There are plenty of decent free alternatives- I've used both DBeaver and SquirrelSQL and if you cannot pay for a Jetbrains license, I think they will allow you to do mostly anything you might want to do with Datagrip. If someone's "forcing" you to use Datagrip- e. Software Licenses Allows you to execute queries in different modes and provides local history that keeps track of all your activity and protects you from losing your work. Lets you jump to any table, view, or procedure by its name via corresponding action, or. All recent versions of JetBrains desktop software allow using JetBrains Account credentials as a way of providing licensing information. But this support doesn't come out of the box: you need to install a JetBrains plugin for it. Exporting a PostgreSQL database. Access the command line on the computer where the database is stored. DataGrip is covered by a perpetual fallback license, which allows you to use a specific version of software without an active subscription for it. The license also includes all bugfix updates, more specifically in X. Z version all Z releases are included. When purchasing an annual subscription, you will immediately get a perpetual fallback. DataGrip - subscription license 3rd year - 1 user. Part: C-S. Advertised Price. Add to Cart. DataGrip includes an evaluation license key for a free day trial. Total downloads: 4 1 last week Latest version: 1. Report incorrect info. JetBrains DataGrip 1. We cannot confirm if there is a free download of this software available. DataGrip Buy with confidence from the JetBrains licensing experts. On-the-fly analysis and quick-fixes: DataGrip detects probable bugs in your code and suggests the best options to fix them on the fly. It will immediately let you know about unresolved objects, using keywords as identifiers and always offers the way to fix problems. Note: the price shown in the listing is that of a 1-year individual customer. License server Register using the JetBrains Account. DataGrip will automatically show the list of your licenses and their details like expiration date and identifier. Click Activate to start using your license. If your license is not shown on the list, click Refresh license list. Visual Query Builder. Data Report Wizard. Database Designer. Query Builder. With the help of this intelligent MySQL client the work with data and code has. It works also PhpStorm All Right Reserved Anyone with information is asked to contact us at
1 note
·
View note
Text
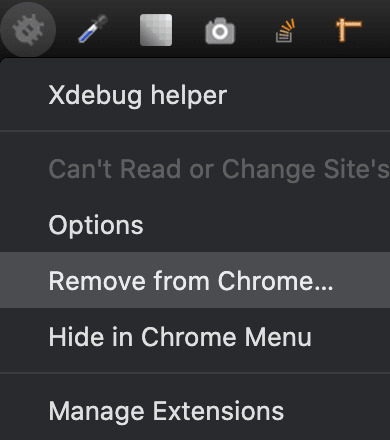
Xdebug Chrome

Xdebug is an extension for debugging your PHP. The following explains how to configure Xdebug and PhpStorm to debug in your local environment. You can use the IDE of your choice. See the vendor documentation for those applications for further configuration information.
Xdebug Helper
Xdebug Chrome Extension
Chrome Xdebug Not Working
Xdebug Chrome How To Use
You will surely like this chrome extension if you love debugging, profiling and tracing PHP code with Xdebug. It comes handy for PHP developers that loves using PHP tools with Xdebug support like PHPStorm, Eclipse with PDT, Netbeans and MacGDBp or any other Xdebug compatible profiling tool like KCacheGrind, WinCacheGrind or Webgrind. Enabling XDEBUG in Web Browsers Chrome. There are two really useful plugins for Chrome that you should install: XDEBUG Helper- This will enable you to turn XDEBUG on and off from your web browser without having to modify the URL. This is essential when debugging a POST type form submission where you can't just enter a URL.
You can configure Xdebug to run in the Magento Cloud Docker environment for local debugging without changing your Magento Commerce Cloud project configuration. See Configure Xdebug for Docker.
To set up Xdebug, you need to configure a file in your Git repository, configure your IDE, and set up port forwarding. You can configure settings in the magento.app.yaml file. After editing, you can push the Git changes across all Starter environments and Pro Integration environments to enable Xdebug. To push these settings to Pro plan Staging and Production environments, you must enter a ticket.
Once configured, you can debug CLI commands, web requests, and code. Remember, all Magento Commerce Cloud environments are read-only. You need to pull code to your local development environment to perform debugging. For Pro Staging and Production environments, we include additional instructions for Xdebug.
Requirements
To run and use Xdebug, you need the SSH URL for the environment. You can locate the information through the Project Web Interface or your Cloud Onboarding UI.
Configure Xdebug
To configure Xdebug, you need to do the following:
Work in a branch to push file updates
Configure your IDE, like PhpStorm
For configuring on Pro plan Staging and Production, you need to enter a ticket for Staging and Production.
Get started with a branch
To add Xdebug, we recommend creating a branch to work in and add the files.

To get started with environment branches:
On your local workstation, change to your Cloud project directory.
Switch to the Magento file system owner.
Log in to your Magento project.
List your projects.
List environments in the project. Every environment includes an active Git branch that contains your code, database, environment variables, configurations, and services.
It is important to use the magento-cloud environment:list command because it displays environment hierarchies, whereas the git branch command does not.
Fetch origin branches to get the latest code.
Checkout, or switch to, a specific branch and environment.
Git commands only checkout the Git branch. The magento-cloud checkout command checks out the branch and switches to the active environment.
You can create a new environment branch using the magento-cloud environment:branch <environment-name> <parent-environment-ID> command syntax. It may take some additional time to create and activate a new environment branch.
Use the environment ID to pull any updated code to your local. This is not necessary if the environment branch is new.
(Optional) Create a snapshot of the environment as a backup.
Enable Xdebug in your environment
To enable Xdebug for your project, add xdebug to the runtime:extensions section of the .magento.app.yaml file.
You can enable Xdebug directly to all Starter environments and Pro Integration environments. For Pro Staging and Production, you need to update this file and enter a Support ticket to have it enabled. We enable Xdebug on those environments for you.
To enable Xdebug:
In your local terminal, open the .magento.app.yaml file in a text editor.
In the runtime section, under extensions, add xdebug. For example:
Save your changes to the .magento.app.yaml file and exit the text editor.
Add, commit, and push the changes to redeploy the environment.
When deployed to Starter environments and Pro Integration environments, Xdebug is now available. You should continue configuring your IDE. For PhpStorm, see Configure PhpStorm.
Configure PhpStorm
You need to configure PhpStorm to properly work with Xdebug.
To configure PhpStorm to work with Xdebug:
In your PhpStorm project, open the settings panel.
Mac OS X—Select PhpStorm > Preferences.
Windows/Linux—Select File > Settings.
In the Settings panel, expand and locate the Languages & Frameworks > PHP > Servers section.
Click the + to add a server configuration. The project name is in grey at the top.
Configure the following settings for the new server configuration:
Name—enter the same as the hostname. This value is used in and must match the value for PHP_IDE_CONFIG variable in Debug CLI commands.
Host—Enter localhost.
Port—Enter 80.
Debugger—Select Xdebug.
Select Use path mappings. In the File/Directory pane, the root of the project for the serverName displays.
In the Absolute path on the server column, click (Edit) and add a setting based on the environment:
For all Starter environments and Pro Integration environments, the remote path is /app.
For Pro Staging and Production environments:
Production: /app/<project_code>/
Staging: /app/<project_code>_stg/
Change the Xdebug port to 9000 in the Languages & Frameworks > PHP > Debug > Xdebug > Debug Port panel.
Click Apply.
Set up port forwarding
You must map the XDEBUG connection from the server to your local system. To do any type of debugging, you must forward port 9000 from your Magento Commerce Cloud server to your local machine. See one of the following sections:
Port forwarding on Mac or UNIX
To set up port forwarding on a Mac or in a Unix environment:
Open a terminal.
Use SSH to establish the connection.
Add the -v option to the SSH command to show in the terminal whenever a socket is connected to the port that is being forwarded.
If an “unable to connect” or “could not listen to port on remote” error is displayed, there could be another active SSH session persisting on the server that is occupying port 9000. If that connection isn’t being used, you can terminate it.
To troubleshoot the connection:
Use SSH to log in to the remote Integration, Staging, or Production environment.
Enter who to view a list of SSH sessions.
View existing SSH sessions by user. Be careful to not affect a user other than yourself!
Integration: usernames are similar to dd2q5ct7mhgus
Staging: usernames are similar to dd2q5ct7mhgus_stg
Production: usernames are similar to dd2q5ct7mhgus
For a user session that is older than yours, find the pseudo-terminal (PTS) value, such as pts/0.
Kill the process ID (PID) corresponding to the PTS value.
Sample response:
To terminate the connection, enter a kill command with the process ID (PID).
Port forwarding on Windows
To set up port forwarding (SSH tunneling) on Windows, you must configure your Windows terminal application. For this example, we walk through creating an SSH tunnel using Putty. You can use other applications such as Cygwin. For more information on other applications, see the vendor documentation provided with those applications.
To set up an SSH tunnel on Windows using Putty:
If you have not already done so, download Putty.
Start Putty.
In the Category pane, click Session.
Enter the following information:
Hostname (or IP address) field: Enter the SSH URL for your Cloud server
Port field: Enter 22
In the Category pane, click Connection > SSH > Tunnels.
Enter the following information:
Source port field: Enter 9000
Destination field: Enter 127.0.0.1:9000
Click Remote
Click Add.
In the Category pane, click Session.
In the Saved Sessions field, enter a name for this SSH tunnel.
Click Save.
To test the SSH tunnel, click Load, then click Open.
If an “unable to connect” error displays, verify all of the following:
All Putty settings are correct
You are running Putty on the machine on which your private Magento Commerce Cloud SSH keys are located
Configure Pro Staging and Production
To complete configuration for Pro plan Staging and Production environments, you must enter a Support ticket to have Xdebug enabled and configured in Staging and Production environments.
We enable Xdebug in the environment. Be aware that this is a configuration change that requires us to redeploy your Staging and Production environments.
SSH access to Xdebug environments
For initiating debugging, performing setup, and more, you need the SSH commands for accessing the environments. You can get this information, through the Project Web Interface and your project spreadsheet.
Xdebug Helper
For Starter environments and Pro Integration environments, you can use the following Magento Cloud CLI command to SSH into those environments:
To use Xdebug, SSH to the environment as follows:
For example,
Debug for Pro Staging and Production
To use Xdebug specifically on Pro plan Staging and Production environment, you create a separate SSH tunnel and web session only you have access to. This usage differs from typical access, only providing access to you and not to all users.

You need the following:
SSH commands for accessing the environments. You can get this information, through the Project Web Interface or your Cloud Onboarding UI.
The xdebug_key value we set when configuring the Staging and Pro environments
To set up an SSH tunnel to a Staging or Production environment:
Open a terminal.
Clean up all SSH sessions.
Set up the SSH tunnel for Xdebug.
To start debugging using the environment URL:
To enable remote debugging, visit the site in the browser with the following added to the URL where KEY is value for xdebug_key:
This sets the cookie that sends browser requests to trigger Xdebug.
Complete your debugging with Xdebug.
When you are ready to end the session, you can use the following command to remove the cookie and end debugging through the browser where KEY is value for xdebug_key:
The XDEBUG_SESSION_START passed by POST requests are not supported at this time.
Debug CLI commands
This section walks through debugging CLI commands.
To debug CLI commands:
SSH into the server you want to debug using CLI commands.
Create the following environment variables:
These variables are removed when the SSH session ends.
Begin debugging
On Starter environments and Pro Integration environments, run the CLI command to debug.You may add runtime options, for example:
On Pro Staging and Production environments, you must specify the path to the Xdebug php configuration file when debugging CLI commands, for example:
For debugging web requests
The following steps help you debug web requests.
On the Extension menu, click Debug to enable.
Right click, select the options menu, and set the IDE key to PHPSTORM.
Install the Xdebug client on the browser. Configure and enable it.
Example set up on Chrome
This section discusses how to use Xdebug in Chrome using the Xdebug Helper extension. For information about Xdebug tools for other browsers, consult the browser documentation.
To use Xdebug Helper with Chrome:
Create an SSH tunnel to the Cloud server.
Install the Xdebug Helper extension from the Chrome store.
Enable the extension in Chrome as shown in the following figure.
In Chrome, right-click in the Chrome toolbar.
From the pop-up menu, click Options.
From the IDE Key list, click PhpStorm.
Click Save.
Open your PhpStorm project.
In the top navigation bar, click (Start listening).
If the navigation bar isn’t displayed, click View > Navigation Bar.
In the PhpStorm navigation pane, double-click the PHP file to test.
Debug code locally
Due to the read-only environments, you need to pull code locally from an environment or specific Git branch to perform debugging.
The method you choose is up to you. You have the following options:
Check out code from Git and run composer install
This method works unless composer.json references packages in private repositories to which you do not have access. This method results in getting the entire Magento codebase.
Copy the vendor, app, pub, lib, and setup directories
This method results in your having all code you can possibly test. Depending on how many static assets you have, it could result in a long transfer with a large volume of files.
Copy the vendor directory only
Because most Magento and third-party code is in the vendor directory, this method is likely to result in good testing although you will not be testing the entire codebase.
To compress files and copy them to your local machine:
Use SSH to login to the remote environment.
Compress the files.
For example, to compress the vendor directory only, enter
On your local environment, use PhpStorm to compress the files.
After spending way more time that I should like to admit trying to get XDEBUG to work with Notepad++ using the DBGp plugin in anything but the simplest of projects, I decided to look for an alternative.
I compared features of 9 different IDE's for PHP development and reading tons of reviews. There are many great IDE's out there and everyone will have their favourite. My short list ended up including:
Eclipse (PDT) 3.5 -- Didn't bother trying it. While I'm sure it's a fine product, the website is ancient and not user friendly. Way too much work to try and find information. I'm not sure if it is even being developed anymore. PDT isn't even listed in their main list of downloads. Although I didn't try Eclipse (PDT), I did try Aptana which is built on Eclipse but I don't want to have to struggle to figure out the user interface… I want to code!
NetBeans 8 -- Way better user interface than Eclipse in my opinion. It did take me a little to figure out the XDEBUG integration but I got it to work exactly as I expected. My problem was part technology and part learning what I wanted to do in NetBeans which was to initiate the debugging session from within my web browser without having to modify the URL.
Although both of these are free, I would not have minded paying for an IDE for PHP development since I do a fair amount of this for a living. Some of the try before you buy contenders included PhpStorm 7.13 and PHPDesigner 8.1.2.
They all have similar sets of features. PHPDesigner is even a native Windows app which is why I might still consider it.
I decided to give NetBeans a try. There are tons of stories on the Net from developers switching from Eclipse to NetBeans but very few going in the other direction. It includes almost all of the features I regularly use and plugins to fill in the gap. What was it missing? Like many of the cross-platform IDE's, it's a Java application which means it is slower than it could be on Windows. I also wish it had Timed Backups feature like in Notepad++.
Assuming you've downloaded and installed NetBeans, here's how to get it to work with XDEBUG:
Step 1 -- Configure PHP to work with XDEBUG
Modify your php.ini file. Start by commenting out anything that refers to ZEND… by adding a semi-colon in front (to the left) of the line. Zend is not compatible with XDEBUG.
Next comment out everything under the (xdebug) section. Then add the following, making sure to modify the lines that refer to your XAMPP path (doesn't work with the Lite version).
For 64-bit WAMP, the lines would be:
As you can see, the actual filename and location for the php_xdebug.dll file may vary. Check the ext or zend_ext folder to get the correct name for your version of AMP. If your version of AMP did not come with XDEBUG, Follow the instructions found on the XDEBUG Installation Wizard page.
Save your changes and restart Apache.
Step 2- Configure NetBeans to work with XDEBUG
The following instructions are for NetBeans 8 but it should be fairly similar with other versions:
Open your project in NetBeans. If you don't have one yet, create one.
Click Tools > Options > PHP.
Click the Debugging tab and make sure that:
Debugger port: 9000.
Session ID: netbeans-xdebug
Maximum Data Length: 2048
None of the checkboxes are checked.
Click OK.
Click File > Project Properties > Run Configuration > Advanced button.
Select Do Not Open Web Browser and click OK twice.
Important: You will need to repeat these last two steps anytime you create a new project.
You may need to close and restart NetBeans for the changes to take effect as I discovered that they don't always take effect right away when you save.
That's it. It should now be configured and ready to use. Next we will XDEBUG enable your web browser.
Importing Existing Source Code into NetBeans
Creating a new NetBeans project from an existing source code folder/files is easy. The following instructions describe how to create a new NetBeans project using existing source code and without storing NetBeans' own project files in your original source code directory tree. Looks like a lot of steps but it only takes about a minute to complete.
Click File > New Project.
For the Category, select the PHP.
For the Projects, select PHP Application with Existing Sources.
Click Next.
Specify the path to the Source Folder. This is where you source code currently exists.
Specify a project name. This can be anything as long as it is different from other existing NetBeans projects you might have.
Specify the version of PHP you will be using. If you aren't sure, type the following at a Command prompt or verify your log files: php --version . If PHP isn't in your path, you may need to change to the directory where the PHP.exe application is located.
The default UTF-8 should be correct for most situations.
To prevent NetBeans from storing it's files in your source code directory, check the 'Put NetBeans metadata into a separate directory' box and specify the folder where these files should be stored.
Click Next.
For Run As:, select Local Web Site (running on local web server) if it is not already selected.
Project URL should be the path to the localhost that corresponds to source directory specified above. It typically looks like http://localhost/ and may include a folder name if your local website is not in the root of the server.
For PHP, the default index file is typically called index.php unless you've changed it.
DO NOT check the 'Copy files from Source Folder to another location' checkbox if you want to work on your files where they currently reside.
Click Finish.
NetBeans will then create the project and open the default file.
Enabling XDEBUG in Web Browsers
Chrome
There are two really useful plugins for Chrome that you should install:
XDEBUG Helper -- This will enable you to turn XDEBUG on and off from your web browser without having to modify the URL. This is essential when debugging a POST type form submission where you can't just enter a URL.
XDEBUG Output Toggler -- This extension allows you to toggle the visibility of the extremely useful stack trace messages for your PHP.
Firefox
There are also two really useful plugins for Firefox that you should install (to be tested):
easyXdebug or The easiest Xdebug -- This will enable you to turn XDEBUG on and off from your web browser without having to modify the URL. This is essential when debugging a POST type form submission where you can't just enter a URL. I don't recommend installing both of these add-ons as they might conflict with each other since they do the same function.
XDEBUG Error Togger -- This is the same as XDEBUG Output Togger for Chrome. It allows you to toggle the visibility of the extremely useful stack trace messages for your PHP.
Internet Explorer
Unfortunately I don't know of any integration tools that work with IE. If you know if any, leave a comment below. You'll always be able to debug by appending ?XDEBUG_SESSION_START=netbeans-xdebug to the URL
Using XDEBUG in NetBeans
Open your project.
Debugging a Project: Right-click on the project you want to debug. Then click on Debug to start the debugger. There is a Debug Project icon at the top of the editor that you could use however it will not work for debugging a specific file. Debugging a specific file in a project or standalone file: Right-click on the file either in the navigation pane or even in the source code itself and then click Debug. If the file is already open, right click anywhere in the editor window and select Debug.
Set a breakpoint by clicking on the line number in the margin. Otherwise your code will be executed from start to end and nothing will happen in debugger.
Switch to your web browser and load the page you want to debug.
Click the add-on/plugin icon to enable Xdebug in your browser.
Reload the page you want to debug and switch back to NetBeans. You should now notice that the execution of the code has paused where you set the breakpoint above.
You can now use the debugging controls in the toolbar to step over, step into, step out, run to cursor, run, and stop debugging.
Xdebug Chrome Extension
You may notice that your PHP code runs slower when debugging. This is perfectly normal and a good reason to have a fast computer. On the positive side, you'll really notice where the slower parts of your code are.
Troubleshooting
If you can't get it to work, check to make sure that your timezone is properly set in /xampp/php/php.ini. I'm not sure why but it made a difference for me. It will also make dates appear correctly on your website.
Chrome Xdebug Not Working
(Date) ; Defines the default timezone used by the date functions ; Find the value for your location by visiting http://php.net/date.timezone date.timezone = America/Toronto
Xdebug Chrome How To Use
Related Posts:
0 notes
Text
Phpstorm Slow

Once upon a time, PhpStorm was the IDE I loved. I thought I would use it all my life, happily without looking at any other editor.
Phpstorm Slow Cooker
Phpstorm Slow Ftp
Phpstorm Show Main Menu
Phpstorm Slow Startup
I was wrong.
I discovered the true love of my live, called Vim.
Are you confused? Are you yelling “why” to the deaf sky? What happened between PhpStorm and me? Why a PHP developer would use this… old smelly thing called Vim?
Phpstorm does a very good job of saving, importing, exporting settings so upgrading your Phpstorm version doesn't require you to redo all your settings. This is also beneficial if you are setting up Phpstorm on another computer or sharing your company coding style guide with other developers. Now you will be working with the terminal - you can use Window's cmd or the PHPStorm's terminal. I prefer to use the terminal built inside the PHPStorm - it is: better, faster and more intuitive. I prefer to use the terminal built inside the PHPStorm - it is: better, faster and more intuitive.
I was happy with PhpStorm. We had a productive relationship. Its basic rules was simple, as simple as many text editor in the computing world. You use a mouse, you click where you want to change or add something, somewhere. The basic editor. We are all used to that from the beginning of times!
PhpStorm provides the following main ways to upload project files and folders to deployment servers: Manually, at any time through a menu command. Automatically, every time a file is updated, or before starting a debugging session, or during a commit to your version control system. PHPStorm was and now is very slow under Linux (currently am using version 2016.2). All its versions were slow. Even at powerful computers with SSD. Jamming and sticking is a normal behavior for this program. It's a pity that authors do not pay attention to it. Running PHP storm on windows 10 is incredible slow. I'm running PHPstorm on my windows 10 laptop, where it is extremly slow. I made a screenshot showing the about information. I have a 64bit so I'm correct running phpstorm64.exe for this. During work I'm also using phpstorm on an.unix system, which is great. So I thought about buying a private license for me at home, but with the given performance I really cant work.
I loved the auto completion with PhpStorm! I loved the fact that you could find easily a peculiar file even within a massive codebase. I loved its stability. I liked the snippets. I loved its numerous options to refactor, generate getter / properties / methods using one or two handy shortcuts.
And now, I don’t use it anymore.
Firstly, I want to tell you my story with Vim and PhpStorm in order for you to understand how you can switch between the two.
Then I will compare the two and underline what Vim brings on the table.
Vim: the Hate before the Love
It was a newcomer who first showed me Vim.
He was a PHP developer hired in the company I was working for. I was curious, I began to look what tools and IDE he was using, expecting seeing the good old PhpStorm, like every good PHP developer who suffered too much with Eclipse.
“I don’t use PhpStorm” said the newcomer. “Vim is way better!”.
Vim! This dinosaur! This boring terminal editor! So complex nobody knows how to use it, except the perfect nerd without life / girlfriend / whatever real things!How can he compares the wonderful shiny PhpStorm with this relic?
At that point, I went in a crusade. I tried to show him how a good IDE with tons of features could suit his needs even better than this… Vim thing! Without success, I let him swimming in his ocean of mistakes, sad he couldn’t see the Truth as I was.
Time past. Days became years. Years became centuries. I began to understand that this newcomer was a very interested and knowledgeable developer. It astonished me. How can he be that good and use Vim?
Quickly we began to work on the same project: a tandem was born.
The Time of Mockeries
I mocked my work tandem. A lot. He was persisting in his mistake to use Vim and I couldn’t do anything to dissuade him.
I mocked the austerity of Vim’s interface. I mocked the fact that he had to configure everything in config files. I mocked that this configuration (in my opinion) was always broken. Who wants to code with a broken IDE? It was pure nonsense.
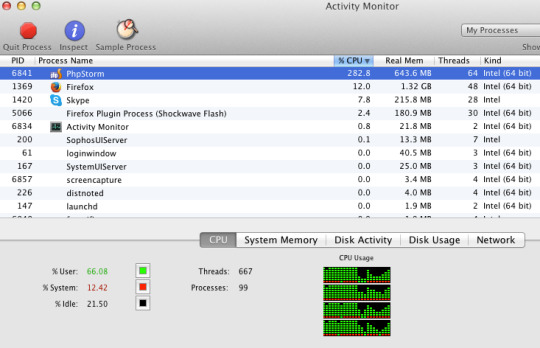
With hindsight, I may have been a bit jealous. He mastered a tool full of shortcuts in order to use the mouse as less as he can, and, without knowing it, I envied him.I envied him because I didn’t feel capable to learn how to use Vim in a reasonable amount of time.
More and more, my contempt toward Vim let place to curiosity.
PhpStorm and Me: the Breakdown
My attraction and curiosity toward Vim kept growing and growing.
The hate became love when I decided two things:
Quitting the company I was working in.
Learning to type like true crazy typists.
I wasn’t happy at that time, till I decided to quit the company I was working for. My decision opened new horizons and a true desire to learn more about everything.Moreover, I wanted to learn a maximum from my fellow work tandem before leaving for new and crazy adventures.
I wanted at the same moment to get rid of my very bad habit of typing with two or three fingers. I wanted to use typists techniques: using the home row keys and my ten fingers.
Quickly I began to understand the power of this typing method. You feel definitely faster and more in control of your computer. A very cool sensation!I knew as well that Vim was designed for this type of typing. Due to the pleasure I had with my new typing techniques, I slowly decided to give Vim a chance.
More and more, I asked tips to my tandem in order to learn how to use The Beast. At first, I just wanted to use it for editing configuration or text files, not for actually coding, too afraid that it would put down my productivity.
I stopped using PhpStorm in two weeks. Transfer from bitpay to coinbase.
Vim vs PhpStorm
Vim on the left, PhpStorm on the right. The clash.
Here we are finally: the comparison between PhpStorm and Vim. Do you want to replace PhpStorm with something more powerful and versatile? Do you want to be sure that Vim is the good choice?
I won’t cover here how to do a PHP IDE out of Vim since I wrote another article on the topic.
Who’s in Charge: You or Your IDE?
An IDE is obviously very important for developers. It’s the tool which helps us doing what we like: coding. It simplifies our lives, automatize all these boring stuff you repeat over and over again.
Therefore your IDE should reflect the way you are coding. It should give you the choice for you to do what you want, the way you want.
PhpStorm doesn’t really give you many choices: it is a bunch of tools and you have to stick with them.I never used 70% of it. I know a lot of shortcuts and I am able to navigates in the panels without even using the mouse. However I never used the composer tools / terminal / git GUI / database interface thingy integrated in PhpStorm.
I couldn’t configure that. I couldn’t choose to install what I wanted, what I needed. PhpStorm was choosing for me.
The result? Many panels and notifications popping, a lot of visual noise which was totally useless for me. Perfect to lose focus.
Some may argue that PhpStorm is really configurable compared to other IDE. It is nothing compared to Vim.
Vim has a great community who develop a LOT of plugin. Nowadays you can install them and get rid of them by typing two words. Not even command lines. Words.
You can choose exactly what you want and what suits you. You can even modify it easily and extends it. Vim can be bent following your wishes.
You are the master.
PhpStorm Only Allow You to Code in… PHP
Another point which was bothering me for a long time. Of course you can use it to write HTML / CSS but you won’t have many tools for those. And what about Go you want to learn so hardly? Ruby? Basic?
Vim is an editor, not an IDE, but you can make an IDE out of it for every language you want. Right now, I have very good auto completion systems for PHP, JavaScript, Go and Ruby.
Even better: the plugins can be activated depending of the file type you are editing. You will never have the Ruby autocompletion while editing a PHP file. Sweet, isn’t it?
I have tons of plugins for refactoring, creating snippets and so on. No need to change IDE and get use to different interfaces. With Vim I can switch from one language to another transparently. Believe me, it’s awesome.
When I open Vim, everything I need is there for whatever language.
Vim is Light
Each time I open PhpStorm I have the impress that my computer is running a marathon. And he doesn’t do well.
Even on my very lightweight arch linux / i3 system (running on very good hardware), everything suddenly slow down. Welcome to the Matrix, or the stop motion applied to computing!
Sometimes I like to open two projects at the same time to get some configuration or code from one to another. Sometimes I want to open even more if I need to work with multiple micro services.
With PhpStorm… you know what I am talking about. Your memory scream, your CPU burns some calories, your vans consume more electricity than your fridge.
In comparison, Vim is a feather. So light! You can run multiple instances of it if you want, your computer won’t slow down.Try to use Vim, then come back to PhpStorm and you will see what I’m talking about.
Your hardware will love Vim.
Vim is Fun
This is something I didn’t imagine: Vim is really fun to use. This is something my work tandem told me, and it’s so true: it’s basically the gamification of coding.
It is time to precise a bit how to use it. There are many modes in this editor:
The Normal mode is for executing commands (delete words, lines, paragraphs and a lot of others). Basically, it’s to edit your text (or code).
The insert mode is there for you to concretely write.
A simple separation of concern and, believe me, it’s brilliant!
This is Vim: you can learn to be productive with it in a couple of minutes (I promise). Get used to it may take a bit more time, and then you will learn new stuff all your life. The whole editor feel so logical that you will come up with new way to do things without even asking Google. Yes, by yourself, only!
Like: “Maybe if I press those keys, it will do that eventually. Yes it does! I’m a genius!”
Indeed, Vim is so sweet, you can talk to it like an old friend. For example: you want to delete all characters from your cursor till the coma? In Normal mode, type dt,, which means delete till ,. You can do as well dtf, which delete till f. Magical!
In comparison, PhpStorm is boring. To me, 70% of the tools are useless (by adding a useless graphical interface on top on very efficient terminal tools) and the editor itself use the mouse extensively, like 99% of the editors in the world.If shortcuts were invented, it’s because it’s more convenient and fast to use the keyboard to execute actions. Vim definitely nailed that.
If you want to build a complete Mouseless Development Environment, you might be interested by this book.
To be honest with you, I always have the impression I’m some sort of a hacker doing crazy things with my keyboard in three different Vim instances. Of course I am just writing down my shopping list but… who cares? The feeling is great!
I am always happy when I discover a new shortcut or way to do thing even more easily. It’s like finding a secret way to beat a video game even faster! Gamification, I tell you.
PhpStorm Cost Money
PhpStorm is not free, far from it. Even if it’s pretty affordable (around 100euro), you pay only for one year. Welcome to the era of renting instead of acquiring…
If you want a Go, Ruby or whatever IDE for whatever language, you have to pay. Again.
Vim is free, available on everything (linux, windows, mac).
You Might be Faster with Vim…
Honestly I don’t care that much if I’m faster with it. To me, being fast doesn’t mean being a good developer. Our brain is more valuable than our typing speed.
However you will feel fast and precise, which is a good cherry on the cake. Adblock plus google chrome. Especially when you have to move a bunch of classes and renaming namespaces again and again. You know, what we call refactoring: Vim can simplify that and many other things.
Vim Allow You to do More than PhpStorm
Here some examples what you can do with Vim but not with PhpStorm:
You can search through open tabs (“buffers” in Vim), files and entire projects very fast with the fzf plugin. Even faster than with PhpStorm.
You can go directly to php.net with a keystroke when you are on a method / function / whatever to see its definition. Very handy.
You can run Vim with a GUI or in the terminal. Doing the last will open a lot of possibility like the winning combo zsh / tmux / Vim. You will have a lot of flexibility and fun with those tools, I can guarantee it!
Since a tonne of plugins exist for Vim you can extend the possibilities as you wish. You can even write little functions which extend / alter whatever you want.
The possibilities are infinite.
A Great Community
A lot of people use Vim and will be happy to help you. You have access to a lot of plugins for every development language you dream of.
Some will argue (as I did) than Vim is too old. It is a strength! Think about it: what software is more stable than the one tested for decades?
It is very stable indeed, thanks to the community. If you are stuck, if you have a problem, you have tons of resources where you can found the solution.
Neovim!
Vim is old and maintained for a long long time, which means as well that its codebase is (apparently) not-that-goodish.That is why a bunch of people rewrote the whole editor. It’s called Neovim and it’s compatible with every Vim plugin available.
Even if it’s still in beta I didn’t have any issues with it. It works like a charm.
I want to be in love with Vim! Tell me how!
First you need to be motivated and learn how to properly use it. It is less complicated than you think.
You Work on Linux or macOs? Try Vimtutor!
First, go to your terminal.Then type vimtutor. Press enter.Here we are!
Vimtutor comes with a lot of linux-based distribution. It is a 15 minutes tutorial for you to learn Vim’s basics. After that, you can begin to use Vim for whatever need you have.
15 minutes! Who said that Vim was complicated?
You don’t believe me? Just try it!
Get Inspired by Other’s Configurations
Vim alone is a bit… too weak functionality wise. You need plugins, and the best way to find what you need is to look to configurations from other developers.They are most of the time hosted publicly on github.
Here my personnal config.
Be careful though. It is tempting to copy entire configuration from others but you will be lost very quickly. Vim needs to be personalized. It can suits you if you take the time to tune it depending on your needs.
Take the configurations available on the web as inspirations. Copy them little by little, plugin by plugin. Test it, try to understand what the plugin is doing. Take your time. Read the plugin documentations. In short: do everything with Vim you should do as a developer. Analyzing, acting step by step and see if it suits your need.
Vim Cheat Sheet
My advice for the beginning: having a cheat sheet printed you can refer to. You can find a lot of them everywhere.
It will help you memorising the basics of Vim and experimenting to be more effective and have even more fun!
Vim is a Winner! But… Do I Miss PhpStorm?
I hope you are now ready to try Vim, and maybe replace PhpStorm!
Now let be honest with one another:
Yes PhpStorm has some tool that Vim doesn’t. The search plugin I use for example has less options than PhpStorm’s search… but is so faster, you’ve no idea.
In PhpStorm the auto completion was slightly better… in 2017. In 2019, Vim auto completion plugins are as good as any IntelliJ plugin.
You need to spend time configuring Vim to have a powerful PHP IDE.However, it means as well that you can personalize it the way you exactly want it to behave. An IDE should answers your need, not imposing them!
After three weeks using Vim as my PHP IDE, I tried to reinstall PhpStorm. I used it for ten minutes… before coming back to Vim.
I won’t get back to you, PhpStorm. Never. Bartender for wedding near me. I am a faithful man to Vim now.
This section provides the list of solutions and workarounds for common problems with deployments in PhpStorm.
Collecting PhpStorm deployment logs
If your issue is not addressed in this section, contact our support engineers. If asked to provide deployment logs, follow the instructions to collect them.
Select Help | Configure Debug Log in the main menu.
In the Custom Debug Log Configuration dialog that opens, add the following lines depending on the issues you are experiencing:
Issues with deployment/synchronization: #com.jetbrains.plugins.webDeployment
Issues with issues with SSH/SFTP: #com.intellij.ssh
Click OK and reproduce the issue.
Locate the log file by selecting Help | Show Log in Explorer (for Windows and Linux) or Help | Show Log in Finder (for macOS).
If necessary, you can locate the log manually:
Syntax
%HOMEPATH%.<product><version>systemlog
Example
C:UsersJohnS.PhpStorm2021.1systemlog
Syntax
~/Library/Logs/<product><version>
Example
~/Library/Logs/PhpStorm2021.1
Syntax
~/.<product><version>/system/log
Example
~/.PhpStorm2021.1/system/log
The most recent log file is named idea.log; older files names end with a number, that is idea.log.1, idea.log.2, and so on. In most cases you need only the most recent one.
Attach the log file(s) to the issue or forum thread.
General troubleshooting
Deployment is slow or fails
Deployment can be a resource-intensive operation, especially if a project or a deployment server contains lots of directories and files. In the Settings/Preferences dialog Ctrl+Alt+S, navigate to Build, Execution, Deployment and explore the following configuration options, which can speed up deployment:
Exclude directories that are not needed from deployment (for example, images). This can be done from the Deployment: Excluded Paths Tab page.
On the Options page, clear the Overwrite up-to-date files to skip uploading files that don't need to be uploaded.
Depending on the server, switching between active and passive transfer mode in the advanced FTP settings may help. This can be done by toggling Passive mode in the Deployment: Connection Tab for the server.
Limit number of concurrent FTP connections. This can be done by toggling Limit concurrent connections and setting the number of connections (usually 3-5 concurrent connections is OK for any server if you experience problems with a greater number of connections) in the Deployment: Connection Tab for the server.
File transfer becomes unresponsive
This can happen in case PhpStorm tries to resolve an IPv4 host via IPv6. By default, PhpStorm only listens for incoming IPv4 connections. To make sure IPv6 is disabled, check the PhpStorm JVM options:
Select Help | Edit Custom VM Options from the main menu.
In the .vmoptions file that opens, make sure the -Djava.net.preferIPv4Stack=true line is present.
Restart PhpStorm.
Otherwise, to enable IPv6 support, delete the -Djava.net.preferIPv4Stack=true line. In this case, make sure to add the IPv6 entry for your host to the /etc/hosts file.
Download/upload actions are not available
Download/upload actions may not be available because of a missing mapping. If a file or folder that you want to download is not configured in any mapping, PhpStorm will not download it. Mappings can be configured as described in the Map project folders to folders on the server and the URL addresses to access them.
For some actions, a default deployment server needs to be selected on the Deployment page of the Settings/Preferences dialog.
Some folders are not deployed
A common cause for folders not being deployed is when they are explicitly excluded. To solve this, in the Remote host tool window right-click the given folder and select Remove Path From Excluded from the context menu. Once this is done, the folder will be deployed.
This can also be configured from the Deployment page of the Settings/Preferences dialog Ctrl+Alt+S. Open the Excluded Paths tab for the server and remove the excluded path. Note that both the source and the target folders should be checked. Folders can also be excluded by name on the Options page under Exclude items by name.
Sharing deployment configurations between projects
Deployment Servers are configured at the IDE level: they are available for all projects and can be shared between them.
Note that only the name and connection details (specified on the Deployment: Connection Tab tab) are shared between projects: mappings and excluded paths are project-specific and have to be configured separately. Using this approach, connection details have to be entered just once, while mappings and excluded paths can be configured per-project, sharing the connection details. This can be useful when projects share the same deployment server and use the same connection settings. If connection settings are different between projects, they have to be configured for every project separately.
If necessary, you can set a server to be visible in a single project by selecting the Visible only for this project checkbox on the Deployment: Connection Tab.
IDE settings do not allow me to configure mappings
The default new project settings are used to configure the default settings for new projects and do not affect the currently opened projects. To configure settings for the current project, use the Settings/Preferences dialog Ctrl+Alt+S.
Can subfolders within the same folder have different deployment settings? Can a local folder be deployed to multiple locations?
When uploading folders and configuring mappings, note the following:
You can specify mappings for specific folders to different paths on the deployment server. This can be configured on the Deployment: Mappings Tab for the server.
You can exclude specific folders and files from being uploaded/downloaded. This can be configured on the Deployment: Excluded Paths Tab for the server.
You cannot upload the same folder (or subfolders) to different sites at once. A separate deployment configuration needs to be created for each of them and uploaded to each site one by one.
If this is what you want to do, we recommend automating the process with a capable tool. For example, Phing has an FTP task which can be used from PhpStorm. Within PhpStorm, you can use the Sync with Deployed.. command and select from available deployment servers for every upload.
I cannot assign a keyboard shortcut to the Sync With Deployed to My Server menu item
It is not possible to assign a keyboard shortcut directly to the Sync With Deployed to <server name> command, only to the generic Sync with Deployed to.. command, which will then display a popup menu with the list of servers. Refer to Configure keyboard shortcuts for details.
If you do wish to assign a keyboard shortcut to a specific deployment server, it is possible to record a Macro and assign a shortcut to it instead:
Select Edit | Macros | Start Macro Recording and start recording a Macro.
Select Tools | Deployment | Sync With Deployed to <server name> and close the sync window.
Stop recording the Macro by selecting Edit | Macros | Stop Macro Recording from the main menu.
Set the Macro name, for example Sync with <server name>.
Open in the Settings/Preferences dialog Ctrl+Alt+S, select Keymap and find the Macros node. From the context menu of the new sync Macro that was just recorded, select Add keyboard shortcut and provide the desired shortcut .
How do I deploy a database using PhpStorm?
There are a couple of ways to deploy a database using PhpStorm:
Make use of the integrated database tools and run the required DDL and SQL statements manually.
Work with Phing and set up a DBDeploy task.
Can I run a script or executable on my files before the upload occurs?
Things like minifying CSS, optimizing images, encoding PHP files using IonCube and so on are actions that you may want to execute before an upload happens. The best approach to do this is run them not when the upload is started, but when the files are changed, by using File watchers in PhpStorm. When the time comes to upload them to a deployment server, upload the processed files instead.
Note that the Skip external changes checkbox must be cleared on the Options page for this to work.
Sometimes files are not uploaded automatically
By default, PhpStorm uploads the files if they are changed by some external processes (VCS, transpilers, and so on). If the files are not uploaded, make sure that the Upload changed files automatically to the default server on the Options page is set to Always and the Skip external changes checkbox is cleared.
Can I run pre- and post-deployment actions?
It's possible using Run/Debug configurations. You can create a fake Run/Debug Configuration, or a Run/Debug configuration that should be the last step, and add the required steps under Before launch.
As an alternative, we recommend using Phing or any other build system to execute complex sequences of steps.
FTP troubleshooting
FTP issue: Invalid descendent file name 'http:'
When a deployment server has been configured or when using the Test Connection button in the project settings, the Invalid descendent file name 'http:' error is displayed. Note that all file names with a colon : in the name will be considered invalid.
This can happen if a file containing http: Pioneer desserts. in its name exists in the project. The library that PhpStorm uses to connect to FTP (Apache Commons VFS) cannot read the contents of a folder containing such a file, which causes the operation to fail. The only solution is to remove the file containing http: in its name from the project.
PhpStorm seems to connect to the server but can't list files or perform upload
Phpstorm Slow Cooker
This may be because the deployment server requires a so-called passive FTP connection. To set this mode, select the Passive mode checkbox in the Deployment: Connection Tab for the selected server.
Phpstorm Slow Ftp
Limiting the number of concurrent FTP connections may also help in this situation. To do this, open the Deployment: Connection Tab for the selected server, select the Limit concurrent connections checkbox, and set the number of connections (usually, 3-5 concurrent connections is OK for any server if you experience problems with a higher number of connections).
Phpstorm Show Main Menu
Deploying files when changing branches using Git checkout
There are a couple of ways to go about deploying files when switching between branches using Git checkout:
One way is to configure deployments to always upload files and external changes. To do this, on the Options page, set Upload changed files to the default server to Always and clear the Skip external changes checkbox. Note that this will upload all files to the server when switching branches.
Use git-ftp. It performs minimal uploads and is also able to mirror file and directory removals.
Phpstorm Slow Startup
Known issues
Is rsync supported to synchronize files and folders with a deployment server?
No. If you feel this should be part of PhpStorm vote for this issue.
0 notes
Text
Git Visual Studio Code

GitDuck is a video chat tool built for developers that has direct integration to the IDE so you can talk, share your code in real-time and easily collaborate with your team. It enables remote developers to work as if they were side by side. With GitDuck you can code with people using different IDEs, like VSCode or WebStorm, IntelliJ or PyCharm.
Visual Studio Connect To Git
Git For Visual Studio Code
Chapters ▾
Visual Studio Code has git support built in. You will need to have git version 2.0.0 (or newer) installed. The main features are: See the diff of the file you are editing in the gutter.
The easiest way to connect to your GitHub repositories in Visual Studio. Download GitHub Extension for Visual Studio anyway. Download Download GitHub Extension for Visual Studio. By downloading the extension you agree to the End-User License Agreement. Requires Windows and Visual Studio.
1. Getting Started
1.1 About Version Control
1.2 A Short History of Git
1.3 What is Git?
1.4 The Command Line
1.5 Installing Git
1.6 First-Time Git Setup
1.7 Getting Help
1.8 Summary
2. Git Basics
2.1 Getting a Git Repository
2.2 Recording Changes to the Repository
2.3 Viewing the Commit History
2.4 Undoing Things
2.5 Working with Remotes
2.6 Tagging
2.7 Git Aliases
2.8 Summary
3. Git Branching
3.1 Branches in a Nutshell
3.2 Basic Branching and Merging
3.3 Branch Management
3.4 Branching Workflows
3.5 Remote Branches
3.6 Rebasing
3.7 Summary
4. Git on the Server
4.1 The Protocols
4.2 Getting Git on a Server
4.3 Generating Your SSH Public Key
4.4 Setting Up the Server
4.5 Git Daemon
4.6 Smart HTTP
4.7 GitWeb
4.8 GitLab
4.9 Third Party Hosted Options
4.10 Summary
5. Distributed Git
5.1 Distributed Workflows
5.2 Contributing to a Project
5.3 Maintaining a Project
5.4 Summary
6. GitHub
6.1 Account Setup and Configuration
6.2 Contributing to a Project
6.3 Maintaining a Project
6.4 Managing an organization
6.5 Scripting GitHub
6.6 Summary
7. Git Tools
7.1 Revision Selection
7.2 Interactive Staging
7.3 Stashing and Cleaning
7.4 Signing Your Work
7.5 Searching
7.6 Rewriting History
7.7 Reset Demystified
7.8 Advanced Merging
7.9 Rerere
7.10 Debugging with Git
7.11 Submodules
7.12 Bundling
7.13 Replace
7.14 Credential Storage
7.15 Summary
8. Customizing Git
8.1 Git Configuration
8.2 Git Attributes
8.3 Git Hooks
8.4 An Example Git-Enforced Policy
8.5 Summary
9. Git and Other Systems
9.1 Git as a Client
9.2 Migrating to Git
9.3 Summary
10. Git Internals
10.1 Plumbing and Porcelain
10.2 Git Objects
10.3 Git References
10.4 Packfiles
10.5 The Refspec
10.6 Transfer Protocols
10.7 Maintenance and Data Recovery
10.8 Environment Variables
10.9 Summary
A1. Appendix A: Git in Other Environments
A1.1 Graphical Interfaces
A1.2 Git in Visual Studio
A1.3 Git in Visual Studio Code
A1.4 Git in IntelliJ / PyCharm / WebStorm / PhpStorm / RubyMine
A1.5 Git in Sublime Text
A1.6 Git in Bash
A1.7 Git in Zsh
A1.8 Git in PowerShell
A1.9 Summary
A2. Appendix B: Embedding Git in your Applications
A2.1 Command-line Git
A2.2 Libgit2
A2.3 JGit
A2.4 go-git
A2.5 Dulwich
A3. Appendix C: Git Commands
A3.1 Setup and Config
A3.2 Getting and Creating Projects
A3.3 Basic Snapshotting
A3.4 Branching and Merging
A3.5 Sharing and Updating Projects
A3.6 Inspection and Comparison
A3.7 Debugging
A3.8 Patching
A3.9 Email
A3.10 External Systems
A3.11 Administration
A3.12 Plumbing Commands
2nd Edition
Git in Visual Studio Code
Visual Studio Code has git support built in.You will need to have git version 2.0.0 (or newer) installed.
See the diff of the file you are editing in the gutter.
The Git Status Bar (lower left) shows the current branch, dirty indicators, incoming and outgoing commits.
You can do the most common git operations from within the editor:
Initialize a repository.
Clone a repository.
Create branches and tags.
Stage and commit changes.
Push/pull/sync with a remote branch.
Resolve merge conflicts.
View diffs.
With an extension, you can also handle GitHub Pull Requests:https://marketplace.visualstudio.com/items?itemName=GitHub.vscode-pull-request-github.
The official documentation can be found here: https://code.visualstudio.com/Docs/editor/versioncontrol.
Those new to Visual Studio (VS) Code might just see a code editor. The true power of VS Code lies in it’s extensions, integrated terminal and other features. In this hands-on tutorial, you’re going to learn how to use Visual Studio Code by working with a Git repo.
Related:What You Need to Know about Visual Studio Code: A Tutorial
Using built-in VS Code tooling and a few extensions, you’re going to write code and commit that code to source control using a single interface.
This blog post is a snippet of a chapter from the eBook From Admin to DevOps: The BS Way to DevOps in Azure. If you like this chapter and want to learn about doing the DevOps in Azure, check it out!
Tutorial Overview
In this tutorial, you’re going to learn how to use various VS Code features on Windows by building a project using Visual Studio Code and Git. You’ve been tasked with figuring out how to build an Azure VM with Terraform as a small proof of concept (POC) project. You have VS Code and have heard of its capability as a full IDE and want to put it to the test.
You’re going to:
Create a VS Code workspace to share with your team
Install the Terraform extension
Modify the Terraform configuration file to fit your naming convention and Azure subscription
Create a snippet for a common task you’ve found yourself typing over and over
Commit the Terraform configuration file to a Git repo
This tutorial will not be meant to show how to use Terraform to deploy Azure VMs. We already have an article on Terraform and Azure VMs for that. This tutorial will focus on learning Visual Studio Code.
Does this sound like an interesting project? If so, read on to get started!
Prerequisites
To follow along with this Visual Studio Code Git tutorial, please be sure you have the following:
VS Code – All examples will be using VS Code 1.44 although earlier versions will likely work as well.
Terraform – All examples will be using Terraform for Windows v0.12.24.
Git for Windows installed – All examples will be using v2.26. If you’d like VS Code to be Git’s default editor, be sure to select it upon installation.
Clone the Git Repo
Since this tutorial is going to be focusing on working with code in a GitHub repo, your first task is cloning that GitHub repo to your local computer.
For this project, you’ll be working from a GitHub repo called VSCodeDemo. Since VS Code has native Git integration, you can clone a Git repo with no additional configuration. To do so:
Open the command palette with Ctrl-Shift-P, type git where you will notice various options, as shown below.
2. Choose Git: Clone which VS Code will then prompt you for the repo’s URL. Here, provide the URL https://github.com/NoBSDevOps/VSCodeDemo.gitand hit Enter.
3. Choose a folder to place the cloned project files. This project will place the repo folder in the root of C:. Once you select the repository location, VS Code will invoke git.exe in the background and clone the repo to your computer.
4. When it’s finished, VS Code will prompt if you would like to open the cloned repository immediately as shown below, click Open to do so.
You now have an open folder in VS Code for the Git repo. You now need to “save” this open folder and all settings you’ll be performing in a workspace.
Creating a Workspace
Now that you have a folder opened containing a Git repo, save a workspace by going up to the File menu and clicking on Save Workspace As….
Save the workspace as project in the project folder. VS Code will then create a file called project.code-workspace in the Git repo folder. This workspace now knows what folder you had opened. Now when the workspace is opened in the future, it will automatically open the C:VSCodeDemo folder.
Now, instead of a folder name, you will see the name of the workspace.
Setting up Extensions
Extensions are one of the most useful features of VS Code. Extensions allows you to bolt on functionality to help you manage many different projects. In this tutorial, you’re going to be working with Terraform.
Open up one of the Terraform configuration files in the workspace along the left sidebar. Notice how an editor tab opens up and shows the text but that’s about it. There’s no usual syntax highlighting or any other features. VS Code thinks this is a plain-text file and displays it accordingly. Let’s remedy that.
For VS Code to “understand” a Terraform configuration file, you need an extension. Extensions are a huge part of VS Code that opens up a world of new functionality. In this case, you need the Terraform extension to assist in building Terraform configuration files and deploying infrastructure with Terraform.
To install the Terraform extension, click on the extensions button on the Activity Bar and search for terraform. You’ll see multiple extensions show up but for this project, click on Install for the top result created by Mikael Olenfalk. VS Code will then install the extension.
Once installed, navigate back to the workspace and click on one of the TF files in the workspace. You’ll immediately see one of the most obvious differences when using an extension, syntax coloring.
Now you can see in the following screenshot that VS Code “knows” what a comment is (by making it green), what a string is (by making it red) and so on. It’s now much easier to read a Terraform configuration file.
There’s a lot more functionality included with Mikael’s Terrafom extension. Be sure to investigate all of the potential benefits you can get from this extension if using Terraform.
Code Editing
Chances are when you find a script or configuration file on the Internet, it’s not going to be exactly how you need it. You’re going to need to modify it in some way.
In this tutorial’s example, you’d like to change the main block label in the infrastructure-before.tf. Terraform configuration file to perhaps project. To do that, you’ll need to find and replace some text. In VS Code, there are multiple ways to do that.
One of the most common ways to find a string and replace it with another is the good ol’ find and replace functionality.
Hit Ctrl-F and you’ll see a dialog similar to the following screenshot. Here you can type in the string you’d like to find and if you click on the down arrow, it will expand and provide a spot to input a string to replace it with. In the screenshot below, you can see options like Aa and Ab| for case-sensitive searching and also regular expressions.
You can also perform a “find and replace” using Ctrl-D. Simply select the text you’d like to find and begin hitting Ctrl-D. You’ll find that VS Code will begin to highlight each instance of that string with a blinking cursor.
When you’ve selected all items, start typing and VS Code changes all instances at once just as if you had selected each one individually.
Saving Time with Snippets
Let’s say you’re really getting into Terraform and Azure and are tired of typing out the Terraform configuration file block to create a new Azure resource group in the following code snippet.
To save time creating these blocks, create a VS Code snippet.
Related:VS Code Snippets: Speed Up Coding with Shortcuts
To create a VS Code snippet:
Copy the azurerm_resource_group block from the Infrastructure-before.tf Terraform configuration file.
2. Open the command palette with Ctrl-Shift-P.
3. Type “snippets” to filter the list of options.
4. Select Preferences: Configure User Snippets. This brings up a list of all the snippet files typically separated by language.
5. Type “terraform” to filter by the Terraform snippets.
6. Select terraform (Terraform) to open the Terraform snippets file (terraform.json).
Visual Studio Connect To Git
With the Terraform snippets file open, remove all of the comments and copy/paste the following JSON element inside.
Note the use of t and the backslashes. You can’t directly place tab characters inside of a snippet. To represent a tab character, you must use t. Also, you must escape characters like double quotes, dollar signs, curly braces, and backslashes with a backslash.
8. Save the terraform.json file.
Git For Visual Studio Code
9. Go back to the Terraform configuration file and type “rg”. Notice now you see an option to expand a snippet.
10. Select the rg snippet as shown above. Notice that it now expands to the snippet you just created with three items highlighted.
VS Code highlighted each of the words to act as placeholders due to the variables defined in the terraform.json snippets file (${1:block label}).
At this point, you can hit Tab and simply type in the values you need without worrying about how to create the block itself.
For a full breakdown on snippet syntax, be sure to check out the Snippets in Visual Studio Code documentation.
Commit Code to Git
At this point, you’ve cloned a public GitHub repo that contains a couple of Terraform configuration files. You’ve edited some files and now you’re ready to get those changes back up to the GitHub repo.
To get changes back up to the GitHub repo, you must first use Visual Studio Code and Git to commit changes to your local cloned Git repo. When you cloned the GitHub repo earlier, you downloaded not only the configuration files but also a Git repo.
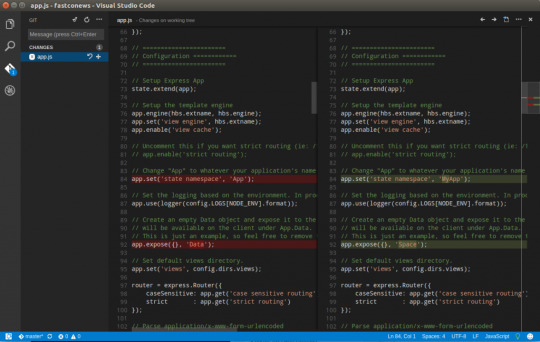
If you’ve been following along, you should now have the cloned Git repo open with a couple of pending changes, two to be exact. How do you know that? By noticing the number in the Activity Bar, as shown below.
When you have a Git repo opened in Visual Studio Code, you’ll get a glimpse on the number of files that you can stage and commit into a local Git repo in the Activity Bar.
Click on the Source Control item on the left and you’ll see two items; the infrastructure-before.tf Terraform configuration file and the workspace you saved earlier (project.code-workspace). The configuration file will have a red M to the right indicating it’s been modified. The workspace file will have a green U to the right of it because it’s untracked meaning it’s currently not under source control.
To ensure both of these files get back to the GitHub repo, first create a helpful commit message indicating why you’re committing these files. The message can be any descriptive summary. Once you’ve written a commit message, stage the changes. Staging changes in Visual Studio Code in Git adds the file contents to the staging area preparing for a commit to the repo.
While on the Source Control pane, click on the + icon beside each file to stage them as shown below.
Once staged, click on the check mark to commit all of the staged changed, as shown below.
You will probably receive an error message indicating you need to configure a user.name and user.email in Git.
No problem. You simply need to provide Git the information it needs. To do that, go into your VS Code integrated terminal and run the following two commands changing my email address and name for yours.
Now try to commit the files. You should now see that the files commit to the repo.
You can stage all changed files without manually clicking on the + beside each file by committing them all at once. VS Code will automatically stage all of the files for you.
If you were working on a team with a shared repo, the next step would be to push these changes back to the GitHub repo or opening a pull request.
Conclusion
VS Code is a feature-rich IDE. It can not only help you write and understand code better, it can also build and make changes to infrastructure, invoke utilities and more. VS Code provides you one place to manage all of your development efforts.
Although this tutorial only covered a portion of what VS Code can do, this IDE is capable of so much more. If you’d like to learn about what VS Code can do, check out What You Need to Know about Visual Studio Code: A Tutorial.
0 notes
Text
WebStorm 2020.3.2 Crack With Torrent + License Key [Latest 2021]
WebStorm Crack
2021 Full Version Download is the world's best cross-platform IDE (Integrated Development Environment) tool for web developers. It has a PHP, JavaScript and HTML code editor to decode and edit them. Plus, Phpstorm 2020 fully hacked provides developers and students with all sorts of tools to help them get going. This software is specially designed for web developers to edit PHP, CSS, XML, HTML and JavaScript files. Moreover, it helps to edit all kinds of source codes in any language. In addition, it is compatible with PHP 5.3, 5.4, 5.5-7.4, including coroutines and generators.
PhpStorm Crack full activation code download is in Java language but compatible with all kinds of languages. It has many built-in plugins to help users create other plugins to decode different languages. Plus, it has built-in code completion, bookmarks, breakpoints, and scaling options. In addition, it has macros, quick navigation, excellent code analysis, which greatly helps users in their work. It makes complex projects easier to do in a simple way. You can also rewrite different codes to the desired language. Besides, this tool is also compatible with any external source like X Debug.
PhpStorm Crack Key Latest 2021 consists of a powerful SQL editor that shows you all the details about the work. WebStorm is also the best IDE editor. PhpStorm has all the features of WebStorm plus additional unique key features. This is the best PHP editor. Plus, it has a simple and easy-to-navigate navigation bar that makes it easy to manage your work. Shortcuts are also part of the navigation bar. You can easily use advanced tools using these shortcuts. In addition, these tools will help you analyze your work from different angles.
Also Download,
FontLab Crack
New Changes in Version 2020.3.2 Build 203.7148.26:
Some improvements have been made in the metadata
Moreover, fix the issue of the subdirectory where the inspection was unable to work properly through dockerized phpstan
Also, some keys are added for the Array shape of params
Resolve the server issue related to X debugger older than 2.9
Moreover, a new search console to find the required files more easily
Also, resolve the unsuccessful command issue between the Phpstorm and X debugger older than 2.2
Improvements for Vue WEB-31721 +26 support
Further, fix a crash related to the usage of old Xdebuger
Moreover, fix all the crashes related to old Xdebuger command and duplicate comment issue
All types of language support feature
Also, Xdebuger 3 with many new streamline configuration with multiple supports
Furthermore, you can now process Guzzle request
Fix the problems of namespace and language attribute
Phpstorm minor functional improvements
A new major update that brings support for PHP 8 with a new welcome screen and much more
Also, new language support with a new code reader and much more
Improvements in many new editing codes and PHPUnit tests with WSL interpreter
A new VUE-loader to support VUE- templates
Moreover, fix an issue of IDEA-241935 +12
Fix an issue that IDE does not work after update
Moreover, IDE-242047 +24 issue resolve
Added compatibility for custom Satis/Packagist packages and JSON composer
Also, new getter and setter on the fly
Fix issue related to PHP doc comment
There is a new file name as the class in the PHAR files for the improved performance
Further, this version support to open multiple projects in the same window to handle them easily
Also, abrupt fixes for trivial cases
Keyboard improvements by improving the duplicate check
Also, fix the issue of trait collision to sole the overrides issues
What’s New in Crack Version 2021?
Addition of GitHub Pull support
Also, a new flow analysis for PHP control
New widgets for work inspections
Usage improvements related to implement-base-method
Further, fix broken artisan commands
Also, the culmination of PHP XDebug >= 2.9 configuration
Solve the problem related to PHP command-line tools
Work through unregistered servers is no more compatible with the latest version
Missing type hint for PHP is now available
Further, support for Windows Subsystem
Added support for PSR 12 code style
PHP 7.4 edition support
PhpStorm Key Features [Mac/Win]:
Super IDE PHP web development tool with lots of useful features
Also, has a rich code editor, code formatting system, and syntax highlighter
Further, automated code generation and completion
Available in near about all types of famous world languages
It has many new writing and code styles
You can make any change in your work with just a single click
Moreover, fully compatible with PHP Doc
Also, it helps you in the duplicate code detection method
It has many new twig and smarty templates to style your codes
PHP code checker that sniff code smells on the fly
Furthermore, it has PHAR support as well as SQL support
A free trial version of PhpStorm is also available
Featured with the version control system
Further, it has remote development for FTPS, FTP, SFTP that is dependent on automatic synchronization
Also, integrated with Google application engine support for PHP
It helps to track any disturbance in your project
Moreover, it has better testing and debugging system for developers
In addition, it is laced with all types of CSS, HTML, SSL, SCSS, SASS, LESS, and JavaScript features
Also Download,
Visual Studio 2021 Crack
PhpStorm 2020.3.2 Activation Code + Key:
NHVGC-UGTFX-LIKNR-53ZED-9VFX3-58CZ2
XFSEW-KJHIU-BHGYT-BVGFT-VCDRE-KJHYT
CFDTR-KJHYT-CFDRE-XDSEW-DSEWI-VCFDE
56432-CFDSE-65432-BHGFR-90876-BCFDR
45CFD-65CFD-78HGT-89NHG-89NBV
CDF56-NHG90-BHG90-BHJG90-NVF90
System Requirements:
Windows: Vista, XP, 10, 8, 7, 8.1, 2002
Mac: macOS 10 and later
RAM:5 GB
Free disk space for downloading 1 GB
1080 x 720 screen resolution is enough
5 GHz processor
How to Activate/ Crack?
1st of all, install the Free Trial Version of PhpStorm
2nd, carry out it completely
Now download the PhpStorm Crack 2021 Latest Version given here
Extract the file completely in the download folder
Add it to the archive
Run the installation procedure by following the given way
Copy-paste the Activation Code
Wait till the complete downloading
Restart your system after that
Enjoy! The latest version
If You Like Some Other Relatives Software :
IDM Activator 6.38 Build 16 Crack With Serial Key Free Download 2021
IDM 6.38 Build 16 Universal Crack Patch Keygen Serial Download
Z3X Samsung Tool Pro 41.11 Crack + Without Box Direct Loader [No Card]
Gihosoft TubeGet Activation Key + Crack 8.6.18 (Mac/Win) Torrent 2021
0 notes
Text
Where to Learn WordPress Theme Development
Over a decade ago, I did a little three-part video series on Designing for WordPress. Then I did other series with the same spirit, like videocasting the whole v10 redesign, a friend's website, and even writing a book. Those are getting a little long in the tooth though. You might still learn from watching them if you're getting into WordPress theme development, but there will be moments that feel very aged (old UI's and old versions of software). All the code still works though, because WordPress is great at backward compatibility. I still hear from people who found those videos very helpful for them.
But since time has pressed on, and I was recently asked what resources I would suggest now, I figured I'd have a look around and see what looks good to me.

Do you like how I plopped the WordPress logo over some stock art I bought that features both a computer and a chalkboard, by which to evoke a feeling of "learning"? So good. I know.
Who are we talking to?
There's a spectrum of WordPress developers, from people who don't know any code at all or barely touch it, to hardcore programming nerds building custom everything.
Pick out a theme that looks good, use it.
🤷♂️
🤷♂️
🤷♂️
🤷♂️
Hardcore programmer nerd.
I can't speak to anybody on either edge of that spectrum. There is this whole world of people in the middle. They can code, but they aren't computer science people. They are get the job done people. Maybe it's something like this:
Pick out a theme that will work, use it.
Start with a theme, customize it a bit using built-in tools.
Start with a theme, hack it up with code to do what you need it to do.
Start from scratch, build out what you need.
Start from scratch, build a highly customized site.
Hardcore programmer nerd.
I've always been somewhere around #4, and I think that's a nice sweet spot. I try to let off-the-shelf WordPress and big popular plugins do the heavy lifting, but I'll bring-my-own front-end (HTML, CSS, and JavaScript) and customize what I have to. I'm making templates. I'm writing queries. I'm building blocks. I'm modularizing where I can.
I feel powerful in that zone. I can build a lot of sites that way, almost by myself. So where are the resources today that help you learn this kind of WordPress theme development? Lemme see what I can find.
Wing it, old school
There is something to be said for learning by doing. Trial by fire. I've learned a lot under these circumstances in my life.
The trick here is to get WordPress installed on a live server and then play with the settings, plugins, customizer, and edit the theme files themselves to make the site do things. You'll find HTML in those theme files — hack it up! You'll see PHP code spitting out content. Can you tell what and how to manipulate it? You'll find a CSS file in the theme — edit that sucker!
Editing a WordPress theme and seeing what happens
The official documentation can help you somewhat here:
How to install WordPress
Developer Resources
Google stuff when you get stuck
To some degree, I'm a fan of doing it live (on a production website) because it lends a sense of realness to what you are doing when you are a beginner. The stakes are high there, giving you a sense of the power you have. When I make these changes, they are for anyone in the world with an internet connection to see.
I did this in my formative years by buying a domain name and hosting, installing WordPress on that hosting, logging into it with SFTP credentials, and literally working on the live files. I used Coda, which is still a popular app, and is being actively developed into a new version of itself as I write.
This is Nova, a MacOS code editor from Panic that has SFTP built-in.
Hopefully, the stakes are real but low. Like you're working on a pet project or your personal site. At some point, hacking on production sites becomes too dangerous of an idea. One line of misplaced PHP syntax can take down the entire site.
If you're working on something like a client site, you'll need to upgrade that workflow.
Modern winging it
The modern, healthy, standard way for working on websites is:
Work on them locally.
Use version control (Git), where new work is done in branches of the master branch.
Deployment to the production website is done when code is pushed to the master branch, like your development branch is merged in.
I've done a recent video on this whole workflow as I do it today. My toolset is:
Work locally with Local by Flywheel.
My web hosting is also Flywheel, but that isn't required. It could be anything that gives you SFTP access and runs what WordPress needs: Apache, PHP, and MySQL. Disclosure, Flywheel is a sponsor here, but because I like them and their service :).
Code is hosted on a private repo on GitHub.
Deployment to the Flywheel hosting is done by Buddy. Buddy watches for pushes to the master branch and moves the files over SFTP to the production site.
Local by Flywheel
Now that you have a local setup, you can go nuts. Do whatever you want. You can't break anything on the live site, so you're freer to make experimental changes and just see what happens.
When working locally, it's likely you'll be editing files with a code editor. I'd say the most popular choice these days is the free VS Code, but there is also Atom and Sublime, and fancier editors like PhpStorm.
The freedom of hacking on files is especially apparent once you've pushed your code up to a Git repo. Once you've done that, you have the freedom of reverting files back to the state of the last push.
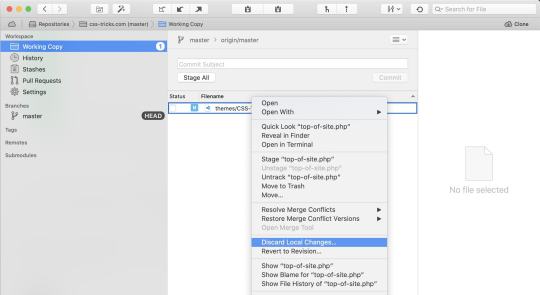
I use the Git software Tower, and that lets me can see what files have changed since I last committed code. If I've made a mistake, caused a problem, or done something I don't like — even if I don't remember exactly what I changed — I can discard those changes back to their last state. That's a nice level of freedom.
When I do commit code, to master or by merging a branch into master, that's when Buddy kicks in and deploys the changes to the production site.

CSS-Tricks itself is a WordPress site, which has continuously evolved over 13 years.
But like, where do you start?
We're talking about WordPress theme development here, so you start with a theme. Themes are literally folders of files in your WordPress installation.
root - /wp-content/ - /themes/ - /theme-name/
WordPress comes with some themes right out of the box. As I write, the Twenty Twenty theme ships with WordPress, and it's a nice one! You could absolutely start your theme hackin' on that.
Themes tend to have some opinions about how they organize themselves and do things, and Twenty Twenty is no different. I'd say, perhaps controversially, that there is no one true way to organize your theme, so long as it's valid code and does things the "WordPress" way. This is just something you'll have to get a feel for as you make themes.
Starter themes
Starter themes were a very popular way to start building a theme from scratch in my day. I don't have a good sense if that's still true, but the big idea was a theme with all the basic theme templates you'll need (single blog post pages, a homepage, a 404 page, search results page, etc.) with very little markup and no styling at all. That way you have an empty canvas from which to build out all your HTML, CSS, and JavaScript yourself to your liking. Sorta like you're building any other site from scratch with these core technologies, only with some PHP in there spitting out content.
There was a theme called Starkers that was popular, but it's dead now. I made one called BLANK myself but haven't touched that in a long time. In looking around a bit, I found some newer themes with this same spirit. Here's the best three I found:
HTML5 Blank
BlankSlate
_s ("Underscores")
I can't personally vouch for them, but they've all been updated somewhat recently and look like pretty good starting points to me. I'd give them a shot in the case that I was starting from absolute scratch on a project. I'd be tempted to download one and then spruce it up exactly how I like it and save that as my own starter in case I needed to do it again.
It feels worth mentioning that a lot of web development isn't starting from scratch, but rather working on existing projects. In that case, the process is still getting a local environment set up; you just aren't starting from scratch, but with the existing theme. I'd suggest duplicating the theme and changing the name while you hack on it, so even if you deploy it, it doesn't affect the live theme. Others might suggest using the starter as a "parent" theme, then branching off into a "child" theme.
To get your local development environment all synced up with exactly what the production website is like, I think the best tool is WP DB Migrate Pro, which can yank down the production database to your local site and all the media files (paid product and a paid add-on, worth every penny).
Fancier Starter Themes
Rather than starting from absolute scratch, there are themes that come with sensible defaults and even modern build processes for you start with. The idea is that building a site with essentially raw HTML, CSS, and JavaScript, while entirely doable, just doesn't have enough modern conveniences to be comfortable.
Here are some.
Morten Rand-Hendriksen has a project called WP Rig that has all sorts of developer tools built into it. A Gulp-based build process spins up a BrowserSync server for auto updating. JavaScript gets processed in Babel. CSS gets processed in PostCSS, and code is linted. He teaches WordPress with it.
Roots makes a theme called Sage that comes with a templating engine, your CSS framework of choice, and fancy build process stuff.
Ignition has a build process and all sorts of helpers.
Timber comes with a templating engine and a bunch of code helpers.
I think all these are pretty cool, but are also probably not for just-starting-out beginner developers.
Books
This is tough because of how many there are. In a quick Google search, I found one site selling fifteen WordPress books as a bundle for $9.99. How would you even know where to start? How good can they be for that rock bottom price? I dunno.
I wrote a book with Jeff Starr ages ago called Digging Into WordPress. After all these years, Jeff still keeps the book up to date, so I'd say that's a decent choice! Jeff has other books like The Tao of WordPress and WordPress Themes In Depth.
A lot of other books specifically about WordPress theme development are just fairly old. 2008-2015 stuff. Again, not that there isn't anything to be learned there, especially as WordPress doesn't change that rapidly, but still, I'd want to read a book more recent that half a decade old. Seems like a big opportunity for a target audience as large as WordPress users and developers. Or if there is already stuff that I'm just not finding, lemme know in the comments.
Perhaps learning is shifting so much toward online that people don't write books as much...
Online learning courses
Our official learning partner Frontend Masters has one course on WordPress focused on JavaScript and WordPress, so that might not be quite perfect for learning the basics of theme development. Still, fascinating stuff.
Here's some others that looked good to me while looking around:
SuperHi: WordPress
Chris Dixon: WordPress 5 Theme Development Academy with Bootstrap v4
WPSHOUT: The Basic Course
WPCasts (free on YouTube)
Know The Code which teaches with specific theme frameworks.
Udemy: Zac Gordon's Complete WordPress Theme & Plugin Development Course
Zac's course looks like the most updated and perhaps the best option there.
A totally different direction for theme Development
One way to build a site with WordPress is not to use WordPress themes at all! Instead, you can use the WordPress API to suck data out of WordPress and build a site however the heck you please.
The WordPress REST API (built-in!) which you could use to do something like this.
Gatsby and WordPress
Use GraphQL instead of REST with wp-graphql.
This idea of decoupling the CMS and the front end you build is pretty neat. It's often referred to as using a "headless" CMS. It's not for everyone. (One big reason is that, in a way, it doubles your technical debt.). But it can bring a freedom to both the CMS and the front end to evolve independently.
The post Where to Learn WordPress Theme Development appeared first on CSS-Tricks.
Where to Learn WordPress Theme Development published first on https://deskbysnafu.tumblr.com/
0 notes
Text
JetBrains CLion 2017.2.1 Crack
JetBrains CLion 2017.2.1 Crack
JetBrains CLion 2017.2.1 Crack Full License Key Free CLion Crack is a new cross-platform IDE which is designed by Jetbrains for the development of C / C ++. It is based on IntelliJ which have many intelligent features to increase developer productivity. CLion 2017.2.1 Crack is a powerful as well as useful IDE supports. You can develop C and C++ on Linux, OS X and Windows to raise your…
View On WordPress
#clion community edition#clion license key#clion linux#clion student#clion vs visual studio#clion windows#intellij license key#phpstorm license key#pycharm license key crack#webstorm activation code#webstorm activation code free#webstorm license key crack#webstorm license key free#webstorm license server
0 notes