#phpstorm vs webstorm
Explore tagged Tumblr posts
Visit Tumblr Blog
Explore Tumblr blogs with no restrictions, modern design and the best experience.
Last Seen Tumblr Blogs


Fun Fact
Tumblr is available in 18 languages.
Text
Programming stats for 2023

Always interesting to see what are the tops for 2023 in terms of programming~! 🥰🙌🏾 So, I got this email this morning from WakaTime (which is an extension on most IDEs and coding editors that tracks your coding process) and they gathered some information for 2023!
Remember these stats are according to WakaTime's data from more than 500k developers who spent a combined 51 million hours programming using their extension/plugin! > link to the website <

Top Languages
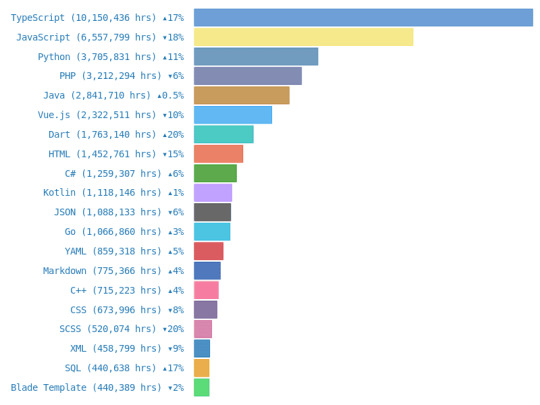
TypeScript
JavaScript
Python
PHP
Java
Vue.js
Dart
HTML
C#
Kotlin
Top Editors
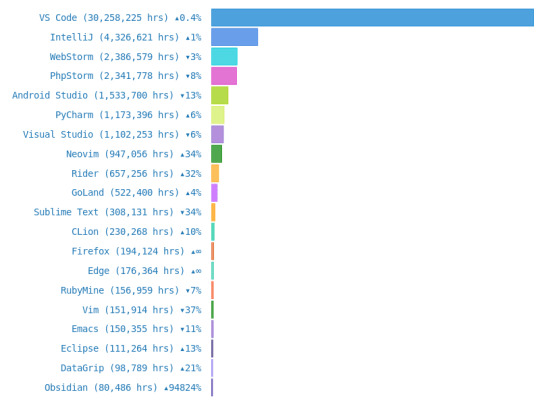
VS Code
IntelliJ
WebStorm
PhpStorm
Android Studio
PyCharm
Visual Studio
Neovim
Rider
GoLand
Top Operating System Used

Windows
Mac
Linux
WSL
Unix
Android
#codeblr#coding#progblr#programming#studyblr#studying#computer science#tech#statistics#coding advice#coding tips
25 notes
·
View notes
Text
PHP Programming
Introduction
PHP runs on numerous , varying platforms , including Windows , Linux , Mac OS X and so on .
PHP is a compatible with almost any modern server , such as Apache , IIS and more .
PHP support a wide range of database .PHP is free..
PHP stands for "Hypertext Pre-processor." (It is a recursive acronym, if you can understand what that means.)
PHP is an HTML-embedded Web scripting language. This means PHP code can be inserted into the HTML of a Web page.
PHP is a server side scripting language. that is used to develop static websites or dynamic websites or web Application .PHP is earlier stood for Personal Home Pages .PHP scripts can only be interpreted on a server that has PHP installed .
POPULARITY
It’s the most popular server side language . It’s the most popular Choice for beginners in back-end development because of it's ease of us and availability of tutorials
PHP is not hard then other Programming languages if you have learned any other language like HTML , JAVASCRIPT , SQL cases before PHP so you can easily learn it . It is a server side scripting language which offers the create a static and dynamic websites PHP is a simple server side scripting language .
FEATURES :
PHP is a server side scripting language , mainly used for web development but also used as general- purpose programming language . OBJECT ORIENTED programming ( oops ), is a type of programming language principle added to php5 , that helps in building complex , reusable web applications.
although there is a lot of discussion about the future of PHP , it is clear that PHP does have a future . It is by the most used programming language for websites . There are plenty of jobs involving PHP skills and this will stay the same in the near future .
CAREER :
Talking about PHP , This is open-source programming language provided a cost effective way of building dynamic websites . There is a good demand for PHP developers across the globe today . Hence you can definitely choose for a career in PHP in order to build a good future in software development .
ADVANTAGES :
This scripting language offers a lot of resources , such as command , function and codes , which can easily be rewritten and used without incurring any cost . The ease of use ,easy integration , Cost efficiency and easy access makes PHP One of the Most popular server-side programming language .
COMPARE WITH JAVA :
However , Many Programmers that use both languages will tell you PHP is the better choice. The main Reason programmers choose PHP over JAVA is the speed .It's Much faster to develop and PHP tends to have fewer issues when using shared hosting . When using java , It's best to have a dedicated server for your hosting .
LOT OF COMPANIES STILL USING PHP :
Facebook
Wikipedia
Yahoo
Mailchimp
Tubmlr(php7)
Slack (using in back end )
Dailymotion
Etsy
etc.,
#followforfollowback frasitumblr vsco followme tumblraesthetic style quotes zler meme likeforfollow beautiful fotografia tiktok edit model ch#php#php web development company india#php scripts#phpstorm vs webstorm#php training in noida#tumblr like aesthetic love tumblrgirl follow instagram photography instagood likeforlikes s tumblrboy likes cute art girl a sad o l frases g
1 note
·
View note
Text
Webstorm vs pycharm

#Webstorm vs pycharm how to#
To apply the formatting to other file types, or to limit formatting to files located only in specific directories, you can customize the default configuration by using glob patterns.įor more information, see WebStorm online help. tsx files that you’ve edited in your project. allows IntelliJ IDEA, P圜harm, WebStorm, or JetBrains Rider to launch as many instances of the configuration to run in parallel as needed The two. For this, open Preferences / Settings | Languages & Frameworks | JavaScript | Prettier and tick the corresponding checkbox: On save and/or On ‘Reformat Code’ action.īy default, WebStorm will apply formatting to all. You can also configure WebStorm to run Prettier on save ( Cmd+S/Ctrl+S) or use it as the default formatter ( Opt+Cmd+L/Ctrl+Alt+L). You can use the Reformat with Prettier action ( Opt+Shift+Cmd+P on macOS or Alt+Shift+Ctrl+P on Windows and Linux) to format the selected code, a file, or a whole directory. Once it’s done, you can do a few things in your IDE.
#Webstorm vs pycharm how to#
You can find instructions on how to do it here. But you must remember that you can run only that files/tests/scripts. If you’re using other JetBrains IDE like IntelliJ IDEA, PhpStorm, or P圜harm, make sure you have this plugin installed and enabled in Preferences / Settings | Plugins.įirst, you need to install and configure Prettier. Or maybe you have a test you want to run, you can do that without opening your tests file. WebStorm comes with built-in support for Prettier. JetBrains IDEs (WebStorm, IntelliJ IDEA, P圜harm, etc.)
1 note
·
View note
Text
Git Visual Studio Code

GitDuck is a video chat tool built for developers that has direct integration to the IDE so you can talk, share your code in real-time and easily collaborate with your team. It enables remote developers to work as if they were side by side. With GitDuck you can code with people using different IDEs, like VSCode or WebStorm, IntelliJ or PyCharm.
Visual Studio Connect To Git
Git For Visual Studio Code
Chapters ▾
Visual Studio Code has git support built in. You will need to have git version 2.0.0 (or newer) installed. The main features are: See the diff of the file you are editing in the gutter.
The easiest way to connect to your GitHub repositories in Visual Studio. Download GitHub Extension for Visual Studio anyway. Download Download GitHub Extension for Visual Studio. By downloading the extension you agree to the End-User License Agreement. Requires Windows and Visual Studio.
1. Getting Started
1.1 About Version Control
1.2 A Short History of Git
1.3 What is Git?
1.4 The Command Line
1.5 Installing Git
1.6 First-Time Git Setup
1.7 Getting Help
1.8 Summary
2. Git Basics
2.1 Getting a Git Repository
2.2 Recording Changes to the Repository
2.3 Viewing the Commit History
2.4 Undoing Things
2.5 Working with Remotes
2.6 Tagging
2.7 Git Aliases
2.8 Summary
3. Git Branching
3.1 Branches in a Nutshell
3.2 Basic Branching and Merging
3.3 Branch Management
3.4 Branching Workflows
3.5 Remote Branches
3.6 Rebasing
3.7 Summary
4. Git on the Server
4.1 The Protocols
4.2 Getting Git on a Server
4.3 Generating Your SSH Public Key
4.4 Setting Up the Server
4.5 Git Daemon
4.6 Smart HTTP
4.7 GitWeb
4.8 GitLab
4.9 Third Party Hosted Options
4.10 Summary
5. Distributed Git
5.1 Distributed Workflows
5.2 Contributing to a Project
5.3 Maintaining a Project
5.4 Summary
6. GitHub
6.1 Account Setup and Configuration
6.2 Contributing to a Project
6.3 Maintaining a Project
6.4 Managing an organization
6.5 Scripting GitHub
6.6 Summary
7. Git Tools
7.1 Revision Selection
7.2 Interactive Staging
7.3 Stashing and Cleaning
7.4 Signing Your Work
7.5 Searching
7.6 Rewriting History
7.7 Reset Demystified
7.8 Advanced Merging
7.9 Rerere
7.10 Debugging with Git
7.11 Submodules
7.12 Bundling
7.13 Replace
7.14 Credential Storage
7.15 Summary
8. Customizing Git
8.1 Git Configuration
8.2 Git Attributes
8.3 Git Hooks
8.4 An Example Git-Enforced Policy
8.5 Summary
9. Git and Other Systems
9.1 Git as a Client
9.2 Migrating to Git
9.3 Summary
10. Git Internals
10.1 Plumbing and Porcelain
10.2 Git Objects
10.3 Git References
10.4 Packfiles
10.5 The Refspec
10.6 Transfer Protocols
10.7 Maintenance and Data Recovery
10.8 Environment Variables
10.9 Summary
A1. Appendix A: Git in Other Environments
A1.1 Graphical Interfaces
A1.2 Git in Visual Studio
A1.3 Git in Visual Studio Code
A1.4 Git in IntelliJ / PyCharm / WebStorm / PhpStorm / RubyMine
A1.5 Git in Sublime Text
A1.6 Git in Bash
A1.7 Git in Zsh
A1.8 Git in PowerShell
A1.9 Summary
A2. Appendix B: Embedding Git in your Applications
A2.1 Command-line Git
A2.2 Libgit2
A2.3 JGit
A2.4 go-git
A2.5 Dulwich
A3. Appendix C: Git Commands
A3.1 Setup and Config
A3.2 Getting and Creating Projects
A3.3 Basic Snapshotting
A3.4 Branching and Merging
A3.5 Sharing and Updating Projects
A3.6 Inspection and Comparison
A3.7 Debugging
A3.8 Patching
A3.9 Email
A3.10 External Systems
A3.11 Administration
A3.12 Plumbing Commands
2nd Edition
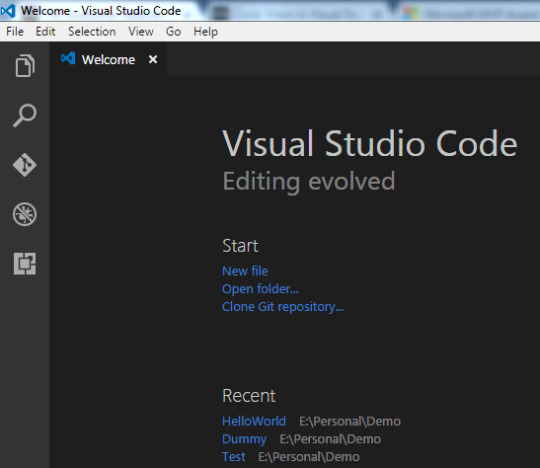
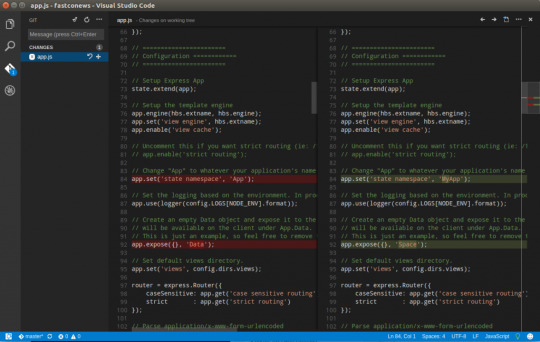
Git in Visual Studio Code
Visual Studio Code has git support built in.You will need to have git version 2.0.0 (or newer) installed.
See the diff of the file you are editing in the gutter.
The Git Status Bar (lower left) shows the current branch, dirty indicators, incoming and outgoing commits.
You can do the most common git operations from within the editor:
Initialize a repository.
Clone a repository.
Create branches and tags.
Stage and commit changes.
Push/pull/sync with a remote branch.
Resolve merge conflicts.
View diffs.
With an extension, you can also handle GitHub Pull Requests:https://marketplace.visualstudio.com/items?itemName=GitHub.vscode-pull-request-github.
The official documentation can be found here: https://code.visualstudio.com/Docs/editor/versioncontrol.
Those new to Visual Studio (VS) Code might just see a code editor. The true power of VS Code lies in it’s extensions, integrated terminal and other features. In this hands-on tutorial, you’re going to learn how to use Visual Studio Code by working with a Git repo.
Related:What You Need to Know about Visual Studio Code: A Tutorial
Using built-in VS Code tooling and a few extensions, you’re going to write code and commit that code to source control using a single interface.
This blog post is a snippet of a chapter from the eBook From Admin to DevOps: The BS Way to DevOps in Azure. If you like this chapter and want to learn about doing the DevOps in Azure, check it out!
Tutorial Overview
In this tutorial, you’re going to learn how to use various VS Code features on Windows by building a project using Visual Studio Code and Git. You’ve been tasked with figuring out how to build an Azure VM with Terraform as a small proof of concept (POC) project. You have VS Code and have heard of its capability as a full IDE and want to put it to the test.
You’re going to:
Create a VS Code workspace to share with your team
Install the Terraform extension
Modify the Terraform configuration file to fit your naming convention and Azure subscription
Create a snippet for a common task you’ve found yourself typing over and over
Commit the Terraform configuration file to a Git repo
This tutorial will not be meant to show how to use Terraform to deploy Azure VMs. We already have an article on Terraform and Azure VMs for that. This tutorial will focus on learning Visual Studio Code.
Does this sound like an interesting project? If so, read on to get started!
Prerequisites
To follow along with this Visual Studio Code Git tutorial, please be sure you have the following:
VS Code – All examples will be using VS Code 1.44 although earlier versions will likely work as well.
Terraform – All examples will be using Terraform for Windows v0.12.24.
Git for Windows installed – All examples will be using v2.26. If you’d like VS Code to be Git’s default editor, be sure to select it upon installation.
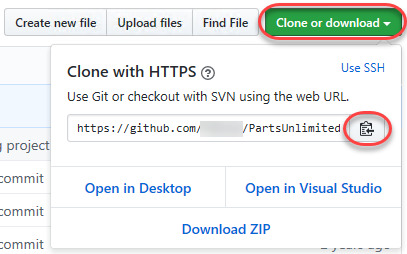
Clone the Git Repo
Since this tutorial is going to be focusing on working with code in a GitHub repo, your first task is cloning that GitHub repo to your local computer.
For this project, you’ll be working from a GitHub repo called VSCodeDemo. Since VS Code has native Git integration, you can clone a Git repo with no additional configuration. To do so:
Open the command palette with Ctrl-Shift-P, type git where you will notice various options, as shown below.
2. Choose Git: Clone which VS Code will then prompt you for the repo’s URL. Here, provide the URL https://github.com/NoBSDevOps/VSCodeDemo.gitand hit Enter.
3. Choose a folder to place the cloned project files. This project will place the repo folder in the root of C:. Once you select the repository location, VS Code will invoke git.exe in the background and clone the repo to your computer.
4. When it’s finished, VS Code will prompt if you would like to open the cloned repository immediately as shown below, click Open to do so.
You now have an open folder in VS Code for the Git repo. You now need to “save” this open folder and all settings you’ll be performing in a workspace.
Creating a Workspace
Now that you have a folder opened containing a Git repo, save a workspace by going up to the File menu and clicking on Save Workspace As….
Save the workspace as project in the project folder. VS Code will then create a file called project.code-workspace in the Git repo folder. This workspace now knows what folder you had opened. Now when the workspace is opened in the future, it will automatically open the C:VSCodeDemo folder.
Now, instead of a folder name, you will see the name of the workspace.
Setting up Extensions
Extensions are one of the most useful features of VS Code. Extensions allows you to bolt on functionality to help you manage many different projects. In this tutorial, you’re going to be working with Terraform.
Open up one of the Terraform configuration files in the workspace along the left sidebar. Notice how an editor tab opens up and shows the text but that’s about it. There’s no usual syntax highlighting or any other features. VS Code thinks this is a plain-text file and displays it accordingly. Let’s remedy that.
For VS Code to “understand” a Terraform configuration file, you need an extension. Extensions are a huge part of VS Code that opens up a world of new functionality. In this case, you need the Terraform extension to assist in building Terraform configuration files and deploying infrastructure with Terraform.
To install the Terraform extension, click on the extensions button on the Activity Bar and search for terraform. You’ll see multiple extensions show up but for this project, click on Install for the top result created by Mikael Olenfalk. VS Code will then install the extension.
Once installed, navigate back to the workspace and click on one of the TF files in the workspace. You’ll immediately see one of the most obvious differences when using an extension, syntax coloring.
Now you can see in the following screenshot that VS Code “knows” what a comment is (by making it green), what a string is (by making it red) and so on. It’s now much easier to read a Terraform configuration file.
There’s a lot more functionality included with Mikael’s Terrafom extension. Be sure to investigate all of the potential benefits you can get from this extension if using Terraform.
Code Editing
Chances are when you find a script or configuration file on the Internet, it’s not going to be exactly how you need it. You’re going to need to modify it in some way.
In this tutorial’s example, you’d like to change the main block label in the infrastructure-before.tf. Terraform configuration file to perhaps project. To do that, you’ll need to find and replace some text. In VS Code, there are multiple ways to do that.
One of the most common ways to find a string and replace it with another is the good ol’ find and replace functionality.
Hit Ctrl-F and you’ll see a dialog similar to the following screenshot. Here you can type in the string you’d like to find and if you click on the down arrow, it will expand and provide a spot to input a string to replace it with. In the screenshot below, you can see options like Aa and Ab| for case-sensitive searching and also regular expressions.
You can also perform a “find and replace” using Ctrl-D. Simply select the text you’d like to find and begin hitting Ctrl-D. You’ll find that VS Code will begin to highlight each instance of that string with a blinking cursor.
When you’ve selected all items, start typing and VS Code changes all instances at once just as if you had selected each one individually.
Saving Time with Snippets
Let’s say you’re really getting into Terraform and Azure and are tired of typing out the Terraform configuration file block to create a new Azure resource group in the following code snippet.
To save time creating these blocks, create a VS Code snippet.
Related:VS Code Snippets: Speed Up Coding with Shortcuts
To create a VS Code snippet:
Copy the azurerm_resource_group block from the Infrastructure-before.tf Terraform configuration file.
2. Open the command palette with Ctrl-Shift-P.
3. Type “snippets” to filter the list of options.
4. Select Preferences: Configure User Snippets. This brings up a list of all the snippet files typically separated by language.
5. Type “terraform” to filter by the Terraform snippets.
6. Select terraform (Terraform) to open the Terraform snippets file (terraform.json).
Visual Studio Connect To Git
With the Terraform snippets file open, remove all of the comments and copy/paste the following JSON element inside.
Note the use of t and the backslashes. You can’t directly place tab characters inside of a snippet. To represent a tab character, you must use t. Also, you must escape characters like double quotes, dollar signs, curly braces, and backslashes with a backslash.
8. Save the terraform.json file.
Git For Visual Studio Code
9. Go back to the Terraform configuration file and type “rg”. Notice now you see an option to expand a snippet.
10. Select the rg snippet as shown above. Notice that it now expands to the snippet you just created with three items highlighted.
VS Code highlighted each of the words to act as placeholders due to the variables defined in the terraform.json snippets file (${1:block label}).
At this point, you can hit Tab and simply type in the values you need without worrying about how to create the block itself.
For a full breakdown on snippet syntax, be sure to check out the Snippets in Visual Studio Code documentation.
Commit Code to Git
At this point, you’ve cloned a public GitHub repo that contains a couple of Terraform configuration files. You’ve edited some files and now you’re ready to get those changes back up to the GitHub repo.
To get changes back up to the GitHub repo, you must first use Visual Studio Code and Git to commit changes to your local cloned Git repo. When you cloned the GitHub repo earlier, you downloaded not only the configuration files but also a Git repo.
If you’ve been following along, you should now have the cloned Git repo open with a couple of pending changes, two to be exact. How do you know that? By noticing the number in the Activity Bar, as shown below.
When you have a Git repo opened in Visual Studio Code, you’ll get a glimpse on the number of files that you can stage and commit into a local Git repo in the Activity Bar.
Click on the Source Control item on the left and you’ll see two items; the infrastructure-before.tf Terraform configuration file and the workspace you saved earlier (project.code-workspace). The configuration file will have a red M to the right indicating it’s been modified. The workspace file will have a green U to the right of it because it’s untracked meaning it’s currently not under source control.
To ensure both of these files get back to the GitHub repo, first create a helpful commit message indicating why you’re committing these files. The message can be any descriptive summary. Once you’ve written a commit message, stage the changes. Staging changes in Visual Studio Code in Git adds the file contents to the staging area preparing for a commit to the repo.
While on the Source Control pane, click on the + icon beside each file to stage them as shown below.
Once staged, click on the check mark to commit all of the staged changed, as shown below.
You will probably receive an error message indicating you need to configure a user.name and user.email in Git.
No problem. You simply need to provide Git the information it needs. To do that, go into your VS Code integrated terminal and run the following two commands changing my email address and name for yours.
Now try to commit the files. You should now see that the files commit to the repo.
You can stage all changed files without manually clicking on the + beside each file by committing them all at once. VS Code will automatically stage all of the files for you.
If you were working on a team with a shared repo, the next step would be to push these changes back to the GitHub repo or opening a pull request.
Conclusion
VS Code is a feature-rich IDE. It can not only help you write and understand code better, it can also build and make changes to infrastructure, invoke utilities and more. VS Code provides you one place to manage all of your development efforts.
Although this tutorial only covered a portion of what VS Code can do, this IDE is capable of so much more. If you’d like to learn about what VS Code can do, check out What You Need to Know about Visual Studio Code: A Tutorial.
0 notes
Text
JetBrains CLion 2017.2.1 Crack
JetBrains CLion 2017.2.1 Crack
JetBrains CLion 2017.2.1 Crack Full License Key Free CLion Crack is a new cross-platform IDE which is designed by Jetbrains for the development of C / C ++. It is based on IntelliJ which have many intelligent features to increase developer productivity. CLion 2017.2.1 Crack is a powerful as well as useful IDE supports. You can develop C and C++ on Linux, OS X and Windows to raise your…
View On WordPress
#clion community edition#clion license key#clion linux#clion student#clion vs visual studio#clion windows#intellij license key#phpstorm license key#pycharm license key crack#webstorm activation code#webstorm activation code free#webstorm license key crack#webstorm license key free#webstorm license server
0 notes
Photo

JetBrains製品にPower Mode IIを入れてブチアゲていくスタイル https://ift.tt/2OXPZkN
あついよね。仕事したくないです。 でも仕事しないといけない風潮があるので、気分を無理やりブチアゲて楽しく仕事をしましょう。
私はWebStormやらPyCharmやらPhpStormやら、JetBrainsのAll-Products-Packを購入しているので、今回はJetBrains製品が対象です。 VS Coderな方はこちらの記事を参照ください。
Power Mode II
今回紹介するプラグインはこちら!Power Mode IIです! https://plugins.jetbrains.com/plugin/8251-power-mode-ii
早速インストールしていきましょう。
インストール
Cmd + , で環境設定を開く
Pluginsを選択し、 power mode で検索
No plugins found. Search in repositoriesが出る
Search in repositories をクリック
無事でてくるので、選択して右Paneの install をクリック
IDEの再起動を促されるのでそのまま再起動
こんな感じ

BAM!!
選択して削除や、貼付けをすると BAM! とワードアートみたいなのが出てきてアガっちゃいます。

設定項目をいじってみる
SHAKEをオフに
アゲアゲージ(サイズ)を最大に

他にもこんな設定いるのかってくらいたくさん設定項目があるのでお��に入りの設定を探してみてください! ちなみに僕はインストールしてキャプチャとった時点でアンインストールしました。
Happy Coding!!
元記事はこちら
「JetBrains製品にPower Mode IIを入れてブチアゲていくスタイル」
August 22, 2018 at 04:00PM
0 notes
Photo

(via Using VS Code for WordPress Development | IBUGU LLC)
VS Code is a free, open source code editor that is lightweight like Sublime Text, but offers many of the same features as bigger IDEs like PhpStorm or WebStorm.
#word press#wordpress#plugins#wordpress plugins#wordpressplugins#wordpress security#wordpresssecurity
0 notes
Text
Using VS Code for WordPress Development
If you keep up with the many different text editors and developer tools available, you may have heard of a newer IDE called Visual Studio Code. VS Code is a free, open source code editor that is lightweight like Sublime Text, but offers many of the same features as bigger IDEs like PhpStorm or WebStorm. In this article I’ll review some features and extensions of VS Code that I really appreciate, and show you how to make the most out of it for WordPress and general web development. WordPress Integration Out-of-the-box, VS Code doesn’t support WordPress and PHP in general as well as some other development environments like PhpStorm. Luckily, that’s easy to change by installing some extensions. I recommend installing the PHP Intelephense extension, which adds PHP auto-completions, symbol navigation support, and a much better way to find references in your workspace. While that will add autocompletions for PHP core functions and any functions that you have defined in your project, it won’t pick up on any WordPress core functions. For that I recommend installing the WordPress Snippet extension, which adds helpful autocompletions for most WordPress core functions, Source: https://managewp.org/articles/16705/using-vs-code-for-wordpress-development
from Willie Chiu's Blog https://williechiu40.wordpress.com/2017/11/27/using-vs-code-for-wordpress-development/
0 notes
Text
Using VS Code for WordPress Development
If you keep up with the many different text editors and developer tools available, you may have heard of a newer IDE called Visual Studio Code. VS Code is a free, open source code editor that is lightweight like Sublime Text, but offers many of the same features as bigger IDEs like PhpStorm or WebStorm. In this article I’ll review some features and extensions of VS Code that I really appreciate, and show you how to make the most out of it for WordPress and general web development. WordPress Integration Out-of-the-box, VS Code doesn’t support WordPress and PHP in general as well as some other development environments like PhpStorm. Luckily, that’s easy to change by installing some extensions. I recommend installing the PHP Intelephense extension, which adds PHP auto-completions, symbol navigation support, and a much better way to find references in your workspace. While that will add autocompletions for PHP core functions and any functions that you have defined in your project, it won’t pick up on any WordPress core functions. For that I recommend installing the WordPress Snippet extension, which adds helpful autocompletions for most WordPress core functions, from ManageWP.org https://managewp.org/articles/16705/using-vs-code-for-wordpress-development
0 notes