#postgres connection command line
Explore tagged Tumblr posts
Visit Tumblr Blog
Explore Tumblr blogs with no restrictions, modern design and the best experience.
Last Seen Tumblr Blogs


Fun Fact
Mobile US users spent an average of 115.8 minutes on Tumblr app monthly.
Text
Unlocking PostgreSQL Power: Tips, Tricks, and Hands-On Tutorial

Welcome to our PostgreSQL Tutorial! PostgreSQL, often called "Postgres," is a powerful, open-source database system used by developers and businesses worldwide. Whether you’re building a small application or managing large datasets, PostgreSQL is versatile and reliable.
What is PostgreSQL?
PostgreSQL is a relational database management system (RDBMS). This means it organizes data into tables that can be linked by relationships. It supports SQL (Structured Query Language), the standard language for interacting with databases.
Why Choose PostgreSQL?
Open Source: PostgreSQL is free to use and has a strong community support.
Extensibility: It allows you to create custom functions and data types.
Performance: PostgreSQL handles large volumes of data efficiently.
ACID Compliance: Ensures data integrity with reliable transactions.
Getting Started
Installation: Download and install PostgreSQL from the official website. It supports Windows, macOS, and Linux.
Connecting to PostgreSQL: Use the psql command-line tool or GUI tools like pgAdmin to connect and manage your database.
Creating a Database: Use the command CREATE DATABASE followed by your desired database name.
Basic Operations
Inserting Data: Add records using the INSERT INTO command.
Querying Data: Retrieve data with the SELECT statement.
Updating Data: Modify existing records using UPDATE.
Deleting Data: Remove unwanted records with DELETE.
Explore More
To dive deeper into PostgreSQL and explore advanced features, check out this PostgreSQL Tutorial. Happy learning!
By following this PostgreSQL Tutorial, you'll quickly become comfortable managing and querying your databases with ease.
0 notes
Text
Which Is The Best PostgreSQL GUI? 2021 Comparison
PostgreSQL graphical user interface (GUI) tools help open source database users to manage, manipulate, and visualize their data. In this post, we discuss the top 6 GUI tools for administering your PostgreSQL hosting deployments. PostgreSQL is the fourth most popular database management system in the world, and heavily used in all sizes of applications from small to large. The traditional method to work with databases is using the command-line interface (CLI) tool, however, this interface presents a number of issues:
It requires a big learning curve to get the best out of the DBMS.
Console display may not be something of your liking, and it only gives very little information at a time.
It is difficult to browse databases and tables, check indexes, and monitor databases through the console.
Many still prefer CLIs over GUIs, but this set is ever so shrinking. I believe anyone who comes into programming after 2010 will tell you GUI tools increase their productivity over a CLI solution.
Why Use a GUI Tool?
Now that we understand the issues users face with the CLI, let’s take a look at the advantages of using a PostgreSQL GUI:
Shortcut keys make it easier to use, and much easier to learn for new users.
Offers great visualization to help you interpret your data.
You can remotely access and navigate another database server.
The window-based interface makes it much easier to manage your PostgreSQL data.
Easier access to files, features, and the operating system.
So, bottom line, GUI tools make PostgreSQL developers’ lives easier.
Top PostgreSQL GUI Tools
Today I will tell you about the 6 best PostgreSQL GUI tools. If you want a quick overview of this article, feel free to check out our infographic at the end of this post. Let’s start with the first and most popular one.
1. pgAdmin
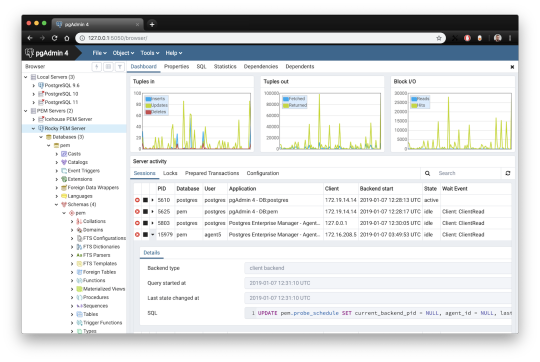
pgAdmin is the de facto GUI tool for PostgreSQL, and the first tool anyone would use for PostgreSQL. It supports all PostgreSQL operations and features while being free and open source. pgAdmin is used by both novice and seasoned DBAs and developers for database administration.
Here are some of the top reasons why PostgreSQL users love pgAdmin:
Create, view and edit on all common PostgreSQL objects.
Offers a graphical query planning tool with color syntax highlighting.
The dashboard lets you monitor server activities such as database locks, connected sessions, and prepared transactions.
Since pgAdmin is a web application, you can deploy it on any server and access it remotely.
pgAdmin UI consists of detachable panels that you can arrange according to your likings.
Provides a procedural language debugger to help you debug your code.
pgAdmin has a portable version which can help you easily move your data between machines.
There are several cons of pgAdmin that users have generally complained about:
The UI is slow and non-intuitive compared to paid GUI tools.
pgAdmin uses too many resources.
pgAdmin can be used on Windows, Linux, and Mac OS. We listed it first as it’s the most used GUI tool for PostgreSQL, and the only native PostgreSQL GUI tool in our list. As it’s dedicated exclusively to PostgreSQL, you can expect it to update with the latest features of each version. pgAdmin can be downloaded from their official website.
pgAdmin Pricing: Free (open source)
2. DBeaver

DBeaver is a major cross-platform GUI tool for PostgreSQL that both developers and database administrators love. DBeaver is not a native GUI tool for PostgreSQL, as it supports all the popular databases like MySQL, MariaDB, Sybase, SQLite, Oracle, SQL Server, DB2, MS Access, Firebird, Teradata, Apache Hive, Phoenix, Presto, and Derby – any database which has a JDBC driver (over 80 databases!).
Here are some of the top DBeaver GUI features for PostgreSQL:
Visual Query builder helps you to construct complex SQL queries without actual knowledge of SQL.
It has one of the best editors – multiple data views are available to support a variety of user needs.
Convenient navigation among data.
In DBeaver, you can generate fake data that looks like real data allowing you to test your systems.
Full-text data search against all chosen tables/views with search results shown as filtered tables/views.
Metadata search among rows in database system tables.
Import and export data with many file formats such as CSV, HTML, XML, JSON, XLS, XLSX.
Provides advanced security for your databases by storing passwords in secured storage protected by a master password.
Automatically generated ER diagrams for a database/schema.
Enterprise Edition provides a special online support system.
One of the cons of DBeaver is it may be slow when dealing with large data sets compared to some expensive GUI tools like Navicat and DataGrip.
You can run DBeaver on Windows, Linux, and macOS, and easily connect DBeaver PostgreSQL with or without SSL. It has a free open-source edition as well an enterprise edition. You can buy the standard license for enterprise edition at $199, or by subscription at $19/month. The free version is good enough for most companies, as many of the DBeaver users will tell you the free edition is better than pgAdmin.
DBeaver Pricing
: Free community, $199 standard license
3. OmniDB
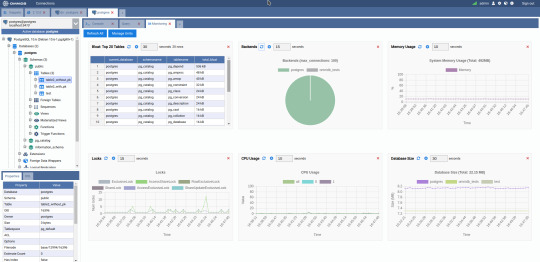
The next PostgreSQL GUI we’re going to review is OmniDB. OmniDB lets you add, edit, and manage data and all other necessary features in a unified workspace. Although OmniDB supports other database systems like MySQL, Oracle, and MariaDB, their primary target is PostgreSQL. This open source tool is mainly sponsored by 2ndQuadrant. OmniDB supports all three major platforms, namely Windows, Linux, and Mac OS X.
There are many reasons why you should use OmniDB for your Postgres developments:
You can easily configure it by adding and removing connections, and leverage encrypted connections when remote connections are necessary.
Smart SQL editor helps you to write SQL codes through autocomplete and syntax highlighting features.
Add-on support available for debugging capabilities to PostgreSQL functions and procedures.
You can monitor the dashboard from customizable charts that show real-time information about your database.
Query plan visualization helps you find bottlenecks in your SQL queries.
It allows access from multiple computers with encrypted personal information.
Developers can add and share new features via plugins.
There are a couple of cons with OmniDB:
OmniDB lacks community support in comparison to pgAdmin and DBeaver. So, you might find it difficult to learn this tool, and could feel a bit alone when you face an issue.
It doesn’t have as many features as paid GUI tools like Navicat and DataGrip.
OmniDB users have favorable opinions about it, and you can download OmniDB for PostgreSQL from here.
OmniDB Pricing: Free (open source)
4. DataGrip

DataGrip is a cross-platform integrated development environment (IDE) that supports multiple database environments. The most important thing to note about DataGrip is that it’s developed by JetBrains, one of the leading brands for developing IDEs. If you have ever used PhpStorm, IntelliJ IDEA, PyCharm, WebStorm, you won’t need an introduction on how good JetBrains IDEs are.
There are many exciting features to like in the DataGrip PostgreSQL GUI:
The context-sensitive and schema-aware auto-complete feature suggests more relevant code completions.
It has a beautiful and customizable UI along with an intelligent query console that keeps track of all your activities so you won’t lose your work. Moreover, you can easily add, remove, edit, and clone data rows with its powerful editor.
There are many ways to navigate schema between tables, views, and procedures.
It can immediately detect bugs in your code and suggest the best options to fix them.
It has an advanced refactoring process – when you rename a variable or an object, it can resolve all references automatically.
DataGrip is not just a GUI tool for PostgreSQL, but a full-featured IDE that has features like version control systems.
There are a few cons in DataGrip:
The obvious issue is that it’s not native to PostgreSQL, so it lacks PostgreSQL-specific features. For example, it is not easy to debug errors as not all are able to be shown.
Not only DataGrip, but most JetBrains IDEs have a big learning curve making it a bit overwhelming for beginner developers.
It consumes a lot of resources, like RAM, from your system.
DataGrip supports a tremendous list of database management systems, including SQL Server, MySQL, Oracle, SQLite, Azure Database, DB2, H2, MariaDB, Cassandra, HyperSQL, Apache Derby, and many more.
DataGrip supports all three major operating systems, Windows, Linux, and Mac OS. One of the downsides is that JetBrains products are comparatively costly. DataGrip has two different prices for organizations and individuals. DataGrip for Organizations will cost you $19.90/month, or $199 for the first year, $159 for the second year, and $119 for the third year onwards. The individual package will cost you $8.90/month, or $89 for the first year. You can test it out during the free 30 day trial period.
DataGrip Pricing
: $8.90/month to $199/year
5. Navicat

Navicat is an easy-to-use graphical tool that targets both beginner and experienced developers. It supports several database systems such as MySQL, PostgreSQL, and MongoDB. One of the special features of Navicat is its collaboration with cloud databases like Amazon Redshift, Amazon RDS, Amazon Aurora, Microsoft Azure, Google Cloud, Tencent Cloud, Alibaba Cloud, and Huawei Cloud.
Important features of Navicat for Postgres include:
It has a very intuitive and fast UI. You can easily create and edit SQL statements with its visual SQL builder, and the powerful code auto-completion saves you a lot of time and helps you avoid mistakes.
Navicat has a powerful data modeling tool for visualizing database structures, making changes, and designing entire schemas from scratch. You can manipulate almost any database object visually through diagrams.
Navicat can run scheduled jobs and notify you via email when the job is done running.
Navicat is capable of synchronizing different data sources and schemas.
Navicat has an add-on feature (Navicat Cloud) that offers project-based team collaboration.
It establishes secure connections through SSH tunneling and SSL ensuring every connection is secure, stable, and reliable.
You can import and export data to diverse formats like Excel, Access, CSV, and more.
Despite all the good features, there are a few cons that you need to consider before buying Navicat:
The license is locked to a single platform. You need to buy different licenses for PostgreSQL and MySQL. Considering its heavy price, this is a bit difficult for a small company or a freelancer.
It has many features that will take some time for a newbie to get going.
You can use Navicat in Windows, Linux, Mac OS, and iOS environments. The quality of Navicat is endorsed by its world-popular clients, including Apple, Oracle, Google, Microsoft, Facebook, Disney, and Adobe. Navicat comes in three editions called enterprise edition, standard edition, and non-commercial edition. Enterprise edition costs you $14.99/month up to $299 for a perpetual license, the standard edition is $9.99/month up to $199 for a perpetual license, and then the non-commercial edition costs $5.99/month up to $119 for its perpetual license. You can get full price details here, and download the Navicat trial version for 14 days from here.
Navicat Pricing
: $5.99/month up to $299/license
6. HeidiSQL
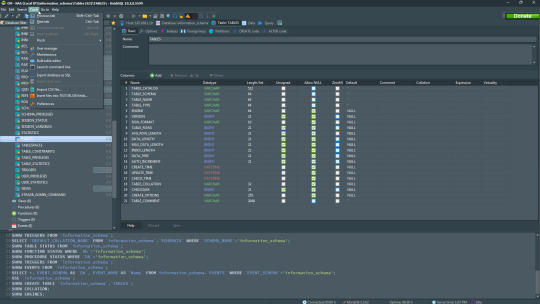
HeidiSQL is a new addition to our best PostgreSQL GUI tools list in 2021. It is a lightweight, free open source GUI that helps you manage tables, logs and users, edit data, views, procedures and scheduled events, and is continuously enhanced by the active group of contributors. HeidiSQL was initially developed for MySQL, and later added support for MS SQL Server, PostgreSQL, SQLite and MariaDB. Invented in 2002 by Ansgar Becker, HeidiSQL aims to be easy to learn and provide the simplest way to connect to a database, fire queries, and see what’s in a database.
Some of the advantages of HeidiSQL for PostgreSQL include:
Connects to multiple servers in one window.
Generates nice SQL-exports, and allows you to export from one server/database directly to another server/database.
Provides a comfortable grid to browse and edit table data, and perform bulk table edits such as move to database, change engine or ollation.
You can write queries with customizable syntax-highlighting and code-completion.
It has an active community helping to support other users and GUI improvements.
Allows you to find specific text in all tables of all databases on a single server, and optimize repair tables in a batch manner.
Provides a dialog for quick grid/data exports to Excel, HTML, JSON, PHP, even LaTeX.
There are a few cons to HeidiSQL:
Does not offer a procedural language debugger to help you debug your code.
Built for Windows, and currently only supports Windows (which is not a con for our Windors readers!)
HeidiSQL does have a lot of bugs, but the author is very attentive and active in addressing issues.
If HeidiSQL is right for you, you can download it here and follow updates on their GitHub page.
HeidiSQL Pricing: Free (open source)
Conclusion
Let’s summarize our top PostgreSQL GUI comparison. Almost everyone starts PostgreSQL with pgAdmin. It has great community support, and there are a lot of resources to help you if you face an issue. Usually, pgAdmin satisfies the needs of many developers to a great extent and thus, most developers do not look for other GUI tools. That’s why pgAdmin remains to be the most popular GUI tool.
If you are looking for an open source solution that has a better UI and visual editor, then DBeaver and OmniDB are great solutions for you. For users looking for a free lightweight GUI that supports multiple database types, HeidiSQL may be right for you. If you are looking for more features than what’s provided by an open source tool, and you’re ready to pay a good price for it, then Navicat and DataGrip are the best GUI products on the market.
Ready for some PostgreSQL automation?
See how you can get your time back with fully managed PostgreSQL hosting. Pricing starts at just $10/month.
While I believe one of these tools should surely support your requirements, there are other popular GUI tools for PostgreSQL that you might like, including Valentina Studio, Adminer, DB visualizer, and SQL workbench. I hope this article will help you decide which GUI tool suits your needs.
Which Is The Best PostgreSQL GUI? 2019 Comparison
Here are the top PostgreSQL GUI tools covered in our previous 2019 post:
pgAdmin
DBeaver
Navicat
DataGrip
OmniDB
Original source: ScaleGrid Blog
3 notes
·
View notes
Text
Ichiran@home 2021: the ultimate guide
Recently I’ve been contacted by several people who wanted to use my Japanese text segmenter Ichiran in their own projects. This is not surprising since it’s vastly superior to Mecab and similar software, and is occassionally updated with new vocabulary unlike many other segmenters. Ichiran powers ichi.moe which is a very cool webapp that helped literally dozens of people learn Japanese.
A big obstacle towards the adoption of Ichiran is the fact that it’s written in Common Lisp and people who want to use it are often unfamiliar with this language. To fix this issue, I’m now providing a way to build Ichiran as a command line utility, which could then be called as a subprocess by scripts in other languages.
This is a master post how to get Ichiran installed and how to use it for people who don’t know any Common Lisp at all. I’m providing instructions for Linux (Ubuntu) and Windows, I haven’t tested whether it works on other operating systems but it probably should.
PostgreSQL
Ichiran uses a PostgreSQL database as a source for its vocabulary and other things. On Linux install postgresql using your preferred package manager. On Windows use the official installer. You should remember the password for the postgres user, or create a new user if you know how to do it.
Download the latest release of Ichiran database. On the release page there are commands needed to restore the dump. On Windows they don't really work, instead try to create database and restore the dump using pgAdmin (which is usually installed together with Postgres). Right-click on PostgreSQL/Databases/postgres and select "Query tool...". Paste the following into Query editor and hit the Execute button.
CREATE DATABASE [database_name] WITH TEMPLATE = template0 OWNER = postgres ENCODING = 'UTF8' LC_COLLATE = 'Japanese_Japan.932' LC_CTYPE = 'Japanese_Japan.932' TABLESPACE = pg_default CONNECTION LIMIT = -1;
Then refresh the Databases folder and you should see your new database. Right-click on it then select "Restore", then choose the file that you downloaded (it wants ".backup" extension by default so choose "Format: All files" if you can't find the file).
You might get a bunch of errors when restoring the dump saying that "user ichiran doesn't exist". Just ignore them.
SBCL
Ichiran uses SBCL to run its Common Lisp code. You can download Windows binaries for SBCL 2.0.0 from the official site, and on Linux you can use the package manager, or also use binaries from the official site although they might be incompatible with your operating system.
However you really want the latest version 2.1.0, especially on Windows for uh... reasons. There's a workaround for Windows 10 though, so if you don't mind turning on that option, you can stick with SBCL 2.0.0 really.
After installing some version of SBCL (SBCL requires SBCL to compile itself), download the source code of the latest version and let's get to business.
On Linux it should be easy, just run
sh make.sh --fancy sudo sh install.sh
in the source directory.
On Windows it's somewhat harder. Install MSYS2, then run "MSYS2 MinGW 64-bit".
pacman -S mingw-w64-x86_64-toolchain make # for paths in MSYS2 replace drive prefix C:/ by /c/ and so on cd [path_to_sbcl_source] export PATH="$PATH:[directory_where_sbcl.exe_is_currently]" # check that you can run sbcl from command line now # type (sb-ext:quit) to quit sbcl sh make.sh --fancy unset SBCL_HOME INSTALL_ROOT=/c/sbcl sh install.sh
Then edit Windows environment variables so that PATH contains c:\sbcl\bin and SBCL_HOME is c:\sbcl\lib\sbcl (replace c:\sbcl here and in INSTALL_ROOT with another directory if applicable). Check that you can run a normal Windows shell (cmd) and run sbcl from it.
Quicklisp
Quicklisp is a library manager for Common Lisp. You'll need it to install the dependencies of Ichiran. Download quicklisp.lisp from the official site and run the following command:
sbcl --load /path/to/quicklisp.lisp
In SBCL shell execute the following commands:
(quicklisp-quickstart:install) (ql:add-to-init-file) (sb-ext:quit)
This will ensure quicklisp is loaded every time SBCL starts.
Ichiran
Find the directory ~/quicklisp/local-projects (%USERPROFILE%\quicklisp\local-projects on Windows) and git clone Ichiran source code into it. It is possible to place it into an arbitrary directory, but that requires configuring ASDF, while ~/quicklisp/local-projects/ should work out of the box, as should ~/common-lisp/ but I'm not sure about Windows equivalent for this one.
Ichiran wouldn't load without settings.lisp file which you might notice is absent from the repository. Instead, there's a settings.lisp.template file. Copy settings.lisp.template to settings.lisp and edit the following values in settings.lisp:
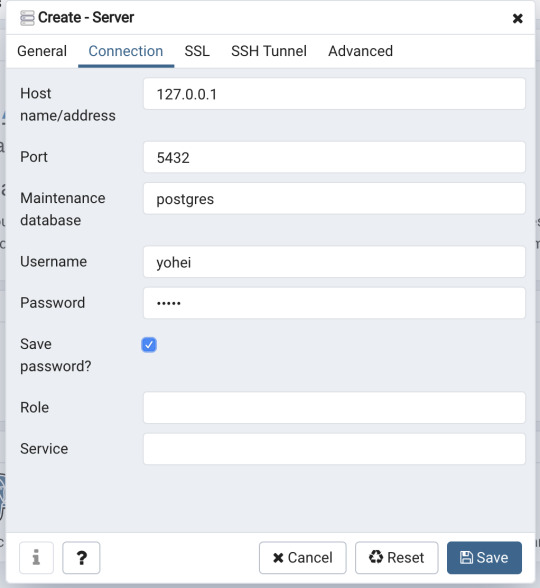
*connection* this is the main database connection. It is a list of at least 4 elements: database name, database user (usually "postgres"), database password and database host ("localhost"). It can be followed by options like :port 5434 if the database is running on a non-standard port.
*connections* is an optional parameter, if you want to switch between several databases. You can probably ignore it.
*jmdict-data* this should be a path to these files from JMdict project. They contain descriptions of parts of speech etc.
ignore all the other parameters, they're only needed for creating the database from scratch
Run sbcl. You should now be able to load Ichiran with
(ql:quickload :ichiran)
On the first run, run the following command. It should also be run after downloading a new database dump and updating Ichiran code, as it fixes various issues with the original JMdict data.
(ichiran/mnt:add-errata)
Run the test suite with
(ichiran/test:run-all-tests)
If not all tests pass, you did something wrong! If none of the tests pass, check that you configured the database connection correctly. If all tests pass, you have a working installation of Ichiran. Congratulations!
Some commands that can be used in Ichiran:
(ichiran:romanize "一覧は最高だぞ" :with-info t) this is basically a text-only equivalent of ichi.moe, everyone's favorite webapp based on Ichiran.
(ichiran/dict:simple-segment "一覧は最高だぞ") returns a list of WORD-INFO objects which contain a lot of interesting data which is available through "accessor functions". For example (mapcar 'ichiran/dict:word-info-text (ichiran/dict:simple-segment "一覧は最高だぞ") will return a list of separate words in a sentence.
(ichiran/dict:dict-segment "一覧は最高だぞ" :limit 5) like simple-segment but returns top 5 segmentations.
(ichiran/dict:word-info-from-text "一覧") gets a WORD-INFO object for a specific word.
ichiran/dict:word-info-str converts a WORD-INFO object to a human-readable string.
ichiran/dict:word-info-gloss-json converts a WORD-INFO object into a "json" "object" containing dictionary information about a word, which is not really JSON but an equivalent Lisp representation of it. But, it can be converted into a real JSON string with jsown:to-json function. Putting it all together, the following code will convert the word 一覧 into a JSON string:
(jsown:to-json (ichiran/dict:word-info-json (ichiran/dict:word-info-from-text "一覧")))
Now, if you're not familiar with Common Lisp all this stuff might seem confusing. Which is where ichiran-cli comes in, a brand new Command Line Interface to Ichiran.
ichiran-cli
ichiran-cli is just a simple command-line application that can be called by scripts just like mecab and its ilk. The main difference is that it must be built by the user, who has already did the previous steps of the Ichiran installation process. It needs to access the postgres database and the connection settings from settings.lisp are currently "baked in" during the build. It also contains a cache of some database references, so modifying the database (i.e. updating to a newer database dump) without also rebuilding ichiran-cli is highly inadvisable.
The build process is very easy. Just run sbcl and execute the following commands:
(ql:quickload :ichiran/cli) (ichiran/cli:build)
sbcl should exit at this point, and you'll have a new ichiran-cli (ichiran-cli.exe on Windows) executable in ichiran source directory. If sbcl didn't exit, try deleting the old ichiran-cli and do it again, it seems that on Linux sbcl sometimes can't overwrite this file for some reason.
Use -h option to show how to use this tool. There will be more options in the future but at the time of this post, it prints out the following:
>ichiran-cli -h Command line interface for Ichiran Usage: ichiran-cli [-h|--help] [-e|--eval] [-i|--with-info] [-f|--full] [input] Available options: -h, --help print this help text -e, --eval evaluate arbitrary expression and print the result -i, --with-info print dictionary info -f, --full full split info (as JSON) By default calls ichiran:romanize, other options change this behavior
Here's the example usage of these switches
ichiran-cli "一覧は最高だぞ" just prints out the romanization
ichiran-cli -i "一覧は最高だぞ" - equivalent of ichiran:romanize :with-info t above
ichiran-cli -f "一覧は最高だぞ" - outputs the full result of segmentation as JSON. This is the one you'll probably want to use in scripts etc.
ichiran-cli -e "(+ 1 2 3)" - execute arbitrary Common Lisp code... yup that's right. Since this is a new feature, I don't know yet which commands people really want, so this option can be used to execute any command such as those listed in the previous section.
By the way, as I mentioned before, on Windows SBCL prior to 2.1.0 doesn't parse non-ascii command line arguments correctly. Which is why I had to include a section about building a newer version of SBCL. However if you use Windows 10, there's a workaround that avoids having to build SBCL 2.1.0. Open "Language Settings", find a link to "Administrative language settings", click on "Change system locale...", and turn on "Beta: Use Unicode UTF-8 for worldwide language support". Then reboot your computer. Voila, everything will work now. At least in regards to SBCL. I can't guarantee that other command line apps which use locales will work after that.
That's it for now, hope you enjoy playing around with Ichiran in this new year. よろしくおねがいします!
6 notes
·
View notes
Text
A Small Guide to Choose the Right NodeJs Framework for Web Development
Either you are at developer end or at client-end, you need to be well-aware of the various frameworks that nodejs development services offer to make the right choice for web development. Although choosing the right framework can be tricky, we would like to list these frameworks for your better understanding.
1. AdonisJs
Apps built with NodeJS & Adonis perform faster across various platforms and operating systems. Its stable eco-system helps developers to choose a business-friendly package and write a server-side web application. Adonis creates efficient SQL-queries as they are easy to learn and implement.
2. Express.js
For fast, minimalist, and non-opinionated framework Express.js can help servers and routes to be easily managed. It offers the ability to develop lightweight apps to carry out multitasks seamlessly. Express.js acts as a bridge between front-end & database, for users to send and receive a request to configure routes. The best thing is that developers with basic knowledge would find it easy to learn and it also offers customizable solutions. Express.js is a very useful framework under any nodejs development services.
3. Meteor.js
Its a full-stack JS platform for developers to build cutting-edge applications for web and mobile with the ability to add real-time updates. What sets this framework apart from others is that the development and real-time updates can run simultaneously. It offers a simple process by providing an entire tier of the application written in the single JavaScript language.
4. Nest.js
To make server-side web applications more efficient, scalable, and fast, NestJS is the right option to work with NodeJS. It combines elements like OOP, FP, FRP to provide an amazing architecture. It has an array of features, enabled through Nest CLI.
5. Sails.js
Build high-speed and scalable applications with Sails.js as it uses a data-driven API that offers plenty of service-oriented architecture. Its equipped with ORM to make itself compatible with all databases. It supports many adapters like MYSQL, MongoDB, PostgreSQL, etc. It also includes automated generators, it can work easily with other languages like React, Angular, Backbone, iOS/Objective C, etc.
6. Koa.js
Koa.js is the next-gen framework as unlike others it uses ECMAScript (ES6) methodologies. Developers can find the error faster and resolve them efficiently. Koa.js offers futuristic options, it has component-based building blocks, and very modular.
7. LoopBack.js
Build dynamic applications with the help of CLI & API explorer using the LoopBack.js framework. It can conveniently be used with REST and other databases like Postgres, MYSQL, MongoDB, Oracle, etc. You can also build a dynamic application using schema, developers can connect devices and browsers to data and services. It runs on both on-premises and cloud servers. This is also one of the favorable frameworks when it comes to the Node.js application development service.
8. Hapi.js
Hapi.js helps the server data to be implemented by bridging the gap between server-side and client-side. It can create a server on a specific IP which is possible through the onPreHandler feature. Hapi.js has good command over request handling, it has rich functions to build web servers, other features are also included like cashing, authentication, and input validation. It offers API references with a detailed view.
9. Derby.js
This framework allows developers to add customized codes to deliver fully scalable web applications. Derby.js uses native DOM methodologies to render templates on the server. The framework is used by a major nodejs development company.
10. Total.js
Total.js is used to build fast and customized web apps and eCommerce apps, REST service apps, IoT apps, etc. It offers faster developments with a low maintenance cost that is both advantageous to clients and developers. Web Application Development Company has been using Total.js for long to deliver scalable apps.
11. Socket.io
Socket.io in Node.js framework enables real-time, bidirectional, and event-based communication. It runs on cross-platforms like iOS, Mac, Windows devices, and browsers. You can create a chat app in just a few lines of code, provides real-time analytics, binary streaming, document collaboration, etc.
We hope this will help you a little to understand the difference between these Node.JS frameworks. If you would like to seek further information regarding nodejs development services, you can get in touch with W3villa technologies, for consulting services and custom web application development services.
#web#web application development#web development#nodejs#nodejsdevelopment#nodejsdeveloper#web developer
1 note
·
View note
Text
Psequel alternative

#Psequel alternative how to#
#Psequel alternative update#
#Psequel alternative pro#
Easier access to files, features, and the operating system.The window-based interface makes it much easier to manage your PostgreSQL data.You can remotely access and navigate another database server.Offers great visualization to help you interpret your data.Shortcut keys make it easier to use, and much easier to learn for new users.Now that we understand the issues users face with the CLI, let’s take a look at the advantages of using a PostgreSQL GUI: I believe anyone who comes into programming after 2010 will tell you GUI tools increase their productivity over a CLI solution. Many still prefer CLIs over GUIs, but this set is ever so shrinking. It is difficult to browse databases and tables, check indexes, and monitor databases through the console.Console display may not be something of your liking, and it only gives very little information at a time.It requires a big learning curve to get the best out of the DBMS.The traditional method to work with databases is using the command-line interface (CLI) tool, however, this interface presents a number of issues: PostgreSQL is the fourth most popular database management system in the world, and heavily used in all sizes of applications from small to large. In this post, we discuss the top 6 GUI tools for administering your PostgreSQL deployments.
#Psequel alternative update#
We listen to all of our users’ feedback, put it into consideration and finally deliver a new update every week.PostgreSQL graphical user interface (GUI) tools help open source database users to manage, manipulate, and visualize their data. We response almost instantly to the bug reports, feature requests. Perhaps the best thing about being a user of TablePlus is having access to a really quick support. It has everything you need for a PostgreSQL GUI Tool. TablePlus is a modern, native tool with an elegant UI that allows you to simultaneously manage multiple databases such as MySQL, PostgreSQL, SQLite, Microsoft SQL Server and more. Then TablePlus is the app that you’re looking for.
#Psequel alternative how to#
You don’t need to be a tool expert to figure out how to use it. Has a well-thought design which works as you expected.You can be able to connect, create, update, delete, import, export… your database and its data in a very fast and secure way. An app that can be able to get up and run in less than half a second or deal with heavy operations with a couple of million rows without freezing. Was built native to deliver the highest performance.You will probably need a PostgreSQL client that: It’s time to try something new and keep up with the latest changes. Moving on with an alternative GUI tool for PostgreSQL For most people, Psequel is no longer an available GUI for PostgreSQL. In this fast-changing world where everything can be outdated easily, An app without speedy development and a frequent update schedule will never be able to deliver the best experience. It’s also closed source and the developer had stated there were no plans to open source it before disappearing. Īlthough no official statement has been issued, the development of PSequel had stopped and its issue tracker has been filled with tons of unanswered questions, bug reports, and feature requests. The latest version of PSequel which is V1.5.3 was released on. It gets SSH tunneling right while most of the others failed to do so. You can be able to do anything with your PostgreSQL database, creating, connecting, updating, deleting…, you name it. The UI is simple and elegant, just somewhat similar to Sequel Pro. It was written from scratch in Swift 2 thus it’s really neat and clean.
#Psequel alternative pro#
The main goal was just to bring the same experience of working with Sequel Pro from MySQL to PostgreSQL when Sequel Pro’s support for PostgreSQL never seems to happen.Īnd PSequel did a great job being a GUI client for Postgres. Got inspired by the simplicity and elegance of Sequel Pro, the developer behind PSequel wanted to build a PostgreSQL equivalent of it. Psequel was a great PostgreSQL GUI client.
0 notes
Text
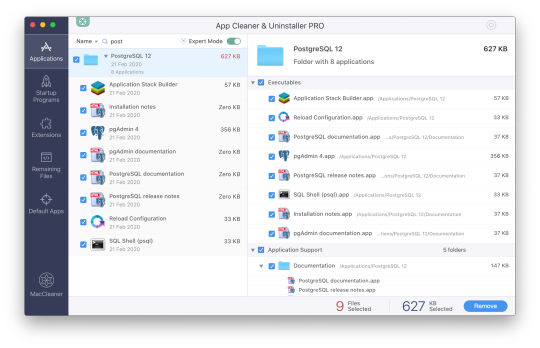
Installing postgres app

#Installing postgres app how to#
#Installing postgres app install#
#Installing postgres app download#
#Installing postgres app mac#
#Installing postgres app how to#
See Removing Existing PostgreSQL Installations on the Postgres.app website for instructions on how to do this. It’s recommended that you remove any pre-existing PostgreSQL installations before installing Postgres.app. If you do, you’ll run into problems, if both versions are trying to use the same port (5432 is the default port). The above instructions assume you don’t already have PostgreSQL running on your Mac. sudo mkdir -p /etc/paths.d &Įcho /Applications/Postgres.app/Contents/Versions/latest/bin | sudo tee /etc/paths.d/postgresapp Remove Existing Installations You can also configure your $PATH to use the included command line tools. This will connect to your default database.Īnother alternative is to use a GUI application, such as pgAdmin, DBeaver, Postico, Azure Data Studio, etc. This will connect to that database using the psql command line interface.Īlternatively, you can launch psql in a separate terminal window and type psql. To connect to a database, double click one of the database icons shown in the above screen. You can start and stop PostgreSQL using the relevant buttons on this panel.
#Installing postgres app install#
When you install Postgres.app, several databases are created by default, including one using your system username. Once you’ve done that, you should see a screen similar to the following:
Double-click the Postgres.app icon (in your Applications folder).
Drag the Postgres.app icon to your Applications folder.ĭone.
#Installing postgres app download#
Download the latest version of Postgres.app from the Postgres.app website.
Here are step-by-step instructions for installing PostgreSQL.app on your Mac. You simply download it and drag it to your Applications folder, just like with any other application.
#Installing postgres app mac#
Postgres.app is a full-featured PostgreSQL installation packaged as a standard Mac application. While you can configure PATH for this to work, there is easier solution.The easiest way to install PostgreSQL on a Mac is by installing Postgres.app. Because this package for the setup expects to find standard Postgres installation on your machine. However this won't work on your local machine. If you already deployed your app on the server with Postgres, you probably installed the psycopg2 package to talk to the database. Click the "Start" button and your server is ready to go. Now all that is left to do is to run the app. Download it, open and move the Postgres.app to Applications folder on your Mac. The most up to date version is "Postgres.app with PostgreSQL 13" as of writing this post in December 2020. You can get the dmg file from the official site. This also assumes you don't have other versions of Postgres installed. There are more than one ways how to install this database on your machine, however downloading Postgres.app is the easiest. We will start with the Postgres part that is not Django specific. So developing this feature without Postgres database would be kind of crazy.Īnyway, let's see how to setup Postgres locally. Add -set flags to the command to connect the installation to the PVC you created and enable volume permissions: helm install release-name repo-name -set persistence.existingClaim pvc-name -set volumePermissions.enabledtrue. Postgres offers powerful full-text search you can use from Django. Install the helm chart with the helm install command. In my case, what kind of forced me to have local PostgreSQL for one of my projects, was search. For example SQLite does not care about length of the text in columns. You can get yourself into a situation where your app works locally but does not start on the server, because there is a small difference in how these two databases work. While this setup is pretty easy (you get configuration for SQLite out of the box) it has some issues. With Django I would say it is pretty common to have SQLite as a developer database and then on the server have Postgres as "the real" production database.
0 notes
Text
Kitematic remote host

docker run -rm -link brewformulas_postgres_1:postgres -i postgres is create a new container of the postgres docker image, linking the running postgres empty database (Here it’s important to not have the -t flag in order to avoid the error cannot enable tty mode on non tty input).ssh -C connects to the remote machine and send the data.| ssh -C will push the dumped data through SSH using compression.pg_dump -host=$POSTGRES_PORT_5432_TCP_ADDR -dbname=brewformulas_org_prod -username=postgres will dump the brewformulas_org_prod database content to the stdout.sh -c is used in order to execute the line within the container (otherwise the environment variable POSTGRES_PORT_5432_TCP_ADDR is not yet accessible).docker run -rm -link brewformulasdb:postgres -it postgres will create a new container, linked to the container where the database, to be dumped, is running.(In this case, the first server is an Ubuntu server, so I had to use sudo while on the second server I’m running Debian as root). Sudo docker run -rm -link brewformulasdb:postgres -it postgres sh -c 'pg_dump -host=$POSTGRES_PORT_5432_TCP_ADDR -dbname=brewformulas_org_prod -username=postgres' | ssh -C "docker run -rm -link brewformulas_postgres_1:postgres -i postgres sh -c 'psql -host=172.17.0.31 -dbname=brewformulas_org_prod -username=postgres'"īasically, this command is using the pg_dump command in a container linked to the running database to be dumped, SSH the second server and send the dump data (We’re using the -C flag from SSH for the data compression) and then use the psql command on the remote server in a container in order to populate the database with the dumped data.
0 notes
Text
This guide will walk you through the steps required to Install PostgreSQL 11 on Debian 11 / Debian 10. PostgreSQL is a powerful, highly-extensible database server written in C. It is the World’s most advanced relational database system with over 30 years of active development that has earned it a strong reputation for reliability, feature robustness, and performance. The first release of PostgreSQL 11 was on 2018-10-18 and you can check more details on the release page. Follow the few steps below to install PostgreSQL 11 on Debian 11 / Debian 10. Step 1: Add PostgreSQL Repository Start by ensuring everything is updated on your Debian 11 / Debian 10 system. sudo apt update [ -f /var/run/reboot-required ] && sudo reboot -f Then Import the repository signing key: sudo apt update sudo apt install vim curl gpg gnupg2 software-properties-common apt-transport-https lsb-release ca-certificates curl -fsSL https://www.postgresql.org/media/keys/ACCC4CF8.asc|sudo gpg --dearmor -o /etc/apt/trusted.gpg.d/postgresql.gpg Add the repository: echo "deb http://apt.postgresql.org/pub/repos/apt/ `lsb_release -cs`-pgdg main" |sudo tee /etc/apt/sources.list.d/pgdg.list Step 2: Install PostgreSQL 11 on Debian 11 / Debian 10 Now install PostgreSQL 11 on Debian 11 / Debian 10 by running the command below. sudo apt update sudo apt install postgresql-11 The service is usually started after installation. $ systemctl status [email protected] ● [email protected] - PostgreSQL Cluster 11-main Loaded: loaded (/lib/systemd/system/[email protected]; enabled-runtime; vendor preset: enabled) Active: active (running) since Wed 2022-05-18 20:12:39 UTC; 35s ago Process: 1070613 ExecStart=/usr/bin/pg_ctlcluster --skip-systemctl-redirect 11-main start (code=exited, status=0/SUCCESS) Main PID: 1070618 (postgres) Tasks: 7 (limit: 2340) Memory: 16.8M CPU: 124ms CGroup: /system.slice/system-postgresql.slice/[email protected] ├─1070618 /usr/lib/postgresql/11/bin/postgres -D /var/lib/postgresql/11/main -c config_file=/etc/postgresql/11/main/postgresql.conf ├─1070620 postgres: 11/main: checkpointer ├─1070621 postgres: 11/main: background writer ├─1070622 postgres: 11/main: walwriter ├─1070623 postgres: 11/main: autovacuum launcher ├─1070624 postgres: 11/main: stats collector └─1070625 postgres: 11/main: logical replication launcher May 18 20:12:36 postgresql.cloudlabske.io systemd[1]: Starting PostgreSQL Cluster 11-main... May 18 20:12:39 postgresql.cloudlabske.io systemd[1]: Started PostgreSQL Cluster 11-main. We need to set PostgreSQL admin user Password: $ sudo su - postgres postgres@deb10:~$ psql -c "alter user postgres with password 'StrongDBPassword'" ALTER ROLE postgres@deb10:~$ exit Step 3: Enable remote access (Optional) By default, access to PostgreSQL database server is only from localhost. $ ss -tunelp | grep 5432 tcp LISTEN 0 128 127.0.0.1:5432 0.0.0.0:* users:(("postgres",pid=15785,fd=3)) uid:111 ino:42331 sk:6 Edit PostgreSQL 11 configuration file if you want to change listening address: sudo vim /etc/postgresql/11/main/postgresql.conf Add below line under CONNECTIONS AND AUTHENTICATION section. listen_addresses = '*' # Don't do this if your server is on public network You can also specify server IP Address listen_addresses = '10.10.0.2' # Recommended for LAN connections to DB Server Restart postgresql after making a change sudo systemctl restart postgresql Confirm $ ss -tunelp | grep 5432 tcp LISTEN 0 128 0.0.0.0:5432 0.0.0.0:* uid:108 ino:74999 sk:a tcp LISTEN 0 128 [::]:5432 [::]:* uid:108 ino:75000 sk:b v6only:1 If you have an active UFW firewall, allow port 5432 for network connections.
sudo ufw allow 5432/tcp Step 4: Test PostgreSQL Installation Add a test database user: $ sudo su - postgres postgres@deb10:~$ createuser test_user1 Add the test database and grant ownership to test_user1: postgres@deb10:~$ createdb test_db -O test_user1 Set user password: postgres@deb10:~$ psql psql (11.16 (Debian 11.16-1.pgdg110+1)) Type "help" for help. postgres=# alter user test_user1 with password 'DBUserPassword'; ALTER ROLE postgres=# exit Login to test_db database: postgres@deb10:~$ psql -l | grep test_db test_db | test_user1 | UTF8 | en_US.UTF-8 | en_US.UTF-8 | postgres@deb10:~$ psql test_db psql (11.16 (Debian 11.16-1.pgdg110+1)) Type "help" for help. test_db=# Create a table and add some dummy data: test_db=# create table test_table ( id int,first_name text, last_name text ); CREATE TABLE test_db=# insert into test_table (id,first_name,last_name) values (1,'John','Doe'); INSERT 0 1 Show table data: test_db=# select * from test_table; id | first_name | last_name ----+------------+----------- 1 | John | Doe (1 row) test_db=# exit Let’s drop our test database to retain clean installation. postgres@deb10:~$ dropdb test_db That’s all. You have successfully installed PostgreSQL 11 on Debian 11 / Debian 10. Visit PostgreSQL official Documentation page for further reading.
0 notes
Text
Mac Postgres Password

Introduction
I am currently running postgres in a docker container for development purposes. I am able to connect to the container using psql from my mac by doing psql -h localhost -U someuser then typing the password. The password is the same as the username and it's a really simple password. This is a step-by-step guide to install PostgreSQL on a Mac OS machine. We will be installing PostgreSQL version 11.3 on Mac using the installer provided by EnterpriseDB in this article. There are three crucial steps for the installation of PostgreSQL as follows: Download PostgreSQL EnterpriseDB installer for Mac; Install PostgreSQL. Postgres.app is a full-featured PostgreSQL installation packaged as a standard Mac app. It includes everything you need to get started: we’ve even included popular extensions like PostGIS for geo data and plv8 for JavaScript.
PostgreSQL configuration without password on Mac for Rails - postgresqlconfigurationonmacforrails.md. Code language: SQL (Structured Query Language) (sql) Note that using the ALTER ROLE statement will transfer the password to the server in cleartext. In addition, the cleartext password may be logged in the psql’s command history or the server log. In this tutorial, you have learned how to change the password of a PostgreSQL user using the ALTER ROLE statement.
Postgres is a powerful and free object-relational database management system. It has gained a lot of momentum since its introduction in 1995 because of its robustness and powerful features it ships with out of the box. In this article, we’ll walk through the process of installing a Postgres database on a Mac OS X machine and set it up for Ruby on Rails development.
Install Postgres Database with Homebrew
Homebrew is a popular package manager for OS X. To install Postgres with Homebrew, follow the steps below:
The first thing to do is install Homebrew if you haven’t done so already. Homebrew site has a simple command that you have to paste in your terminal to do so. Make sure to accept the command line developer tools installation if prompted.

Next, run brew install postgres to install Postgres. It might take a little while to compile and install. After compilation is done, it’ll give you some instructions to finish setting it up.
The database will be initialized during installation, so there isn’t a need to run initdb to finish installation of Postgres via Homebrew. Near the end of the installation instructions you should see mention of the command brew services.
Mac Postgres Password Change
If you don’t already have brew services installed. Gem master rhinestone software. It may be installed withthis command: Earth stove 3340 manual.
And then you can run the following command to start Postgres as a background service:
Postgres will also restart automatically at login after you have run the command above. Once Postgres has started, we can use brew services to stop it manually:
Or we can also use brew services to restart Postgres:
Now you should have PostgreSQL all set up.
Mac Postgres Default Password
Set Up Postgres to Work with a Rails App
First, install the pg gem:
Make sure you include the pg gem in your Gemfile, and run
Now, set up your config/database.yml file to point to your Posgres database.
Let’s create the development and test databases:
Now you can run pending migrations, if there are any.
0 notes
Text
Options for legacy application modernization with Amazon Aurora and Amazon DynamoDB
Legacy application modernization can be complex. To reduce complexity and risk, you can choose an iterative approach by first replatforming the workload to Amazon Aurora. Then you can use the cloud-native integrations in Aurora to introduce other AWS services around the edges of the workload, often without changes to the application itself. This approach allows teams to experiment, iterate, and modernize legacy workloads iteratively. Modern cloud applications often use several database types working in unison, creating rich experiences for customers. To that end, the AWS database portfolio consists of multiple purpose-built database services that allow you to use the right tool for the right job based on the nature of the data, access patterns, and scalability requirements. For example, a modern cloud-native ecommerce solution can use a relational database for customer transactions and a nonrelational document database for product catalog and marketing promotions. If you’re migrating a legacy on-premises application to AWS, it can be challenging to identify the right purpose-built approach. Furthermore, introducing purpose-built databases to an application that runs on an old-guard commercial database might require extensive rearchitecture. In this post, I propose a modernization approach for legacy applications that make extensive use of semistructured data such as XML in a relational database. Starting in the mid-90s, developers began experimenting with storing XML in relational databases. Although commercial and open-source databases have since introduced native support for nonrelational data types, an impedance mismatch still exists between the relational SQL query language and access methods that may introduce data integrity and scalability challenges for your application. Retrieval of rows based on the value of an XML attribute can involve a resource-consuming full table scan, which may result in performance bottlenecks. Because enforcing accuracy and consistency of relationships between tables, or referential integrity, on nonrelational data types in a relational database isn’t possible, it may lead to orphaned records and data quality challenges. For such scenarios, I demonstrate a way to introduce Amazon DynamoDB alongside Amazon Aurora PostgreSQL-compatible edition, using the native integration of AWS Lambda with Aurora, without any modifications to your application’s code. DynamoDB is a fully managed key-value and document database with single-millisecond query performance, which makes it ideal to store and query nonrelational data at any scale. This approach paves the way to gradual rearchitecture, whereby new code paths can start to query DynamoDB following the Command-Query Responsibility Segregation pattern. When your applications are ready to cut over reads and writes to DynamoDB, you can remove XML from Aurora tables entirely. Solution overview The solution mirrors XML data stored in an Aurora PostgreSQL table to DynamoDB documents in an event-driven and durable way by using the Aurora integration with Lambda. Because of this integration, Lambda functions can be called directly from within an Aurora database instance by using stored procedures or user-defined functions. The following diagram details the solution architecture and event flows. The solution deploys the following resources and configurations: Amazon Virtual Private Cloud (Amazon VPC) with two public and private subnets across two AWS Availability Zones An Aurora PostgreSQL cluster in the private subnets, encrypted by an AWS KMS managed customer master key (CMK), and bootstrapped with a orders table with sample XML A pgAdmin Amazon Elastic Compute Cloud (Amazon EC2) instance deployed in the public subnet to access the Aurora cluster A DynamoDB table with on-demand capacity mode A Lambda function to transform XML payloads to DynamoDB documents and translate INSERT, UPDATE, and DELETE operations from Aurora PostgreSQL to DynamoDB An Amazon Simple Queue Service (Amazon SQS) queue serving as a dead-letter queue for the Lambda function A secret in AWS Secrets Manager to securely store Aurora admin account credentials AWS Identity and Access Management (IAM) roles granting required permissions to the Aurora cluster, Lambda function and pgAdmin EC2 instance The solution registers the Lambda function with the Aurora cluster to enable event-driven offloading of data from the postgres.orders table to DynamoDB, as numbered in the preceding diagram: When an INSERT, UPDATE, or DELETE statement is run on the Aurora orders table, the PostgreSQL trigger function invokes the Lambda function asynchronously for each row, after it’s committed. Every function invocation receives the operation code (TG_OP), and—as applicable—the new row (NEW) and the old row (OLD) as payload. The Lambda function parses the payload, converts XML to JSON, and performs the DynamoDB PutItem action in case of INSERT or UPDATE and the DeleteItem action in case of DELETE. If an INSERT, UPDATE or DELETE event fails all processing attempts or expires without being processed, it’s stored in the SQS dead-letter queue for further processing. The source postgres.orders table stores generated order data combining XML with relational attributes (see the following example of a table row with id = 1). You can choose which columns or XML attributes get offloaded to DynamoDB by modifying the Lambda function code. In this solution, the whole table row, including XML, gets offloaded to simplify querying and enforce data integrity (see the following example of a corresponding DynamoDB item with id = 1). Prerequisites Before deploying this solution, make sure that you have access to an AWS account with permissions to deploy the AWS services used in this post through AWS CloudFormation. Costs are associated with using these resources. See AWS Pricing for details. To minimize costs, I demonstrate how to clean up the AWS resources at the end of this post. Deploy the solution To deploy the solution with CloudFormation, complete the following steps: Choose Launch Stack. By default, the solution deploys to the AWS Region, us-east-2, but you can change this Region. Make sure you deploy to a Region where Aurora PostgreSQL is available. For AuroraAdminPassword, enter an admin account password for your Aurora cluster, keeping the defaults for other parameters. Acknowledge that CloudFormation might create AWS Identity and Access Management (IAM) resources. Choose Create stack. The deployment takes around 20 minutes. When the deployment has completed, note the provisioned stack’s outputs on the Outputs The outputs are as follows: LambdaConsoleLink and DynamoDBTableConsoleLink contain AWS Management Console links to the provisioned Lambda function and DynamoDB table, respectively. You can follow these links to explore the function’s code and review the DynamoDB table items. EC2InstanceConnectURI contains a deep link to connect to the pgAdmin EC2 instance using SSH via EC2 Instance Connect. The EC2 instance has PostgreSQL tooling installed; you can log in and use psql to run queries from the command line. AuroraPrivateEndpointAddress and AuroraPrivateEndpointPort contain the writer endpoint address and port for the Aurora cluster. This is a private endpoint only accessible from the pgAdmin EC2 instance. pgAdminURL is the internet-facing link to access the pgAdmin instance. Test the solution To test the solution, complete the following steps: Open the DynamoDB table by using the DynamoDBTableConsoleLink link from the stack outputs. Some data is already in the DynamoDB table because we ran INSERT operations on the Aurora database instance as part of bootstrapping. Open a new browser tab and navigate to the pgAdminURL link to access the pgAdmin instance. The Aurora database instance should already be registered. To connect to the Aurora database instance, expand the Servers tree and enter the AuroraAdminPassword you used to create the stack. Choose the postgres database and on the Tools menu, and then choose Query Tool to start a SQL session. Run the following INSERT, UPDATE, and DELETE statements one by one, and return to the DynamoDB browser tab to observe how changes in the Aurora postgres.orders table are reflected in the DynamoDB table. -- UPDATE example UPDATE orders SET order_status = 'pending' WHERE id < 5; -- DELETE example DELETE FROM orders WHERE id > 10; -- INSERT example INSERT INTO orders (order_status, order_data) VALUES ('malformed_order', ' error retrieving kindle id '); The resulting set of items in the DynamoDB table reflects the changes in the postgres.orders table. You can further explore the two triggers (sync_insert_update_delete_to_dynamodb and sync_truncate_to_dynamodb) and the trigger function sync_to_dynamodb() that makes calls to the Lambda function. In the pgAdmin browser tab, on the Tools menu, choose Search Objects. Search for sync. Choose (double-click) a search result to reveal it in the pgAdmin object hierarchy. To review the underlying statements, choose an object (right-click) and choose CREATE Script. Security of the solution The solution incorporates the following AWS security best practices: Encryption at rest – The Aurora cluster is encrypted by using an AWS KMS managed customer master key (CMK). Security – AWS Secrets Manager is used to store and manage Aurora admin account credentials. Identity and access management – The least privilege principle is followed when creating IAM policies. Network isolation – For additional network access control, the Aurora cluster is deployed to two private subnets with a security group permitting traffic only from the pgAdmin EC2 instance. To further harden this solution, you can introduce VPC endpoints to ensure private connectivity between the Lambda function, Amazon SQS, and DynamoDB. Reliability of the solution Aurora is designed to be reliable, durable, and fault tolerant. The Aurora cluster in this solution is deployed across two Availability Zones, with the primary instance in Availability Zone 1 and a replica in Availability Zone 2. In case of a failure event, the replica is promoted to the primary, the cluster DNS endpoint continues to serve connection requests, and the calls to the Lambda function continue in Availability Zone 2 (refer to the solution architecture earlier in this post). Aurora asynchronous calls to Lambda retry on errors, and when a function returns an error after running, Lambda by default retries two more times by using exponential backoff. With the maximum retry attempts parameter, you can configure the maximum number of retries between 0 and 2. Moreover, if a Lambda function returns an error before running (for example, due to lack of available concurrency), Lambda by default keeps retrying for up to 6 hours. With the maximum event age parameter, you can configure this duration between 60 seconds and 6 hours. When the maximum retry attempts or the maximum event age is reached, an event is discarded and persisted in the SQS dead-letter queue for reprocessing. It’s important to ensure that the code of the Lambda function is idempotent. For example, you can use optimistic locking with version number in DynamoDB by ensuring the OLD value matches the document stored in DynamoDB and rejecting the modification otherwise. Reprocessing of the SQS dead-letter queue is beyond the scope of this solution, and its implementation varies between use cases. It’s important to ensure that the reprocessing logic performs timestamp or version checks to prevent a newer item in DynamoDB from being overwritten by an older item from the SQS dead-letter queue. This solution preserves the atomicity of a SQL transaction as a single, all-or-nothing operation. Lambda calls are deferred until a SQL transaction has been successfully committed by using INITIALLY DEFERRED PostgreSQL triggers. Performance efficiency of the solution Aurora integration with Lambda can introduce performance overhead. The amount of overhead depends on the complexity of the PostgreSQL trigger function and the Lambda function itself, and I recommend establishing a performance baseline by benchmarking your workload with Lambda integration disabled. Upon reenabling the Lambda integration, use Amazon CloudWatch and PostgreSQL Statistics Collector to analyze the following: Aurora CPU and memory metrics, and resize the Aurora cluster accordingly Lambda concurrency metrics, requesting a quota increase if you require more than 1,000 concurrent requests Lambda duration and success rate metrics, allocating more memory if necessary DynamoDB metrics to ensure no throttling is taking place on the DynamoDB side PostgreSQL sustained and peak throughput in rows or transactions per second If your Aurora workload is bursty, consider Lambda provisioned concurrency to avoid throttling To illustrate the performance impact of enabling Lambda integration, I provisioned two identical environments in us-east-2 with the following parameters: AuroraDBInstanceClass – db.r5.xlarge pgAdminEC2InstanceType – m5.xlarge AuroraEngineVersion – 12.4 Both environments ran a simulation of a write-heavy workload with 100 INSERT, 20 SELECT, 200 UPDATE, and 20 DELETE threads running queries in a tight loop on the Aurora postgres.orders table. One of the environments had Lambda integration disabled. After 24 hours of stress testing, I collected the metrics using CloudWatch metrics, PostgreSQL Statistics Collector, and Amazon RDS Performance Insights. From an Aurora throughput perspective, enabling Lambda integration on the postgres.orders table reduces the peak read and write throughput to 69% of the baseline measurement (see rows 1 and 2 in the following table). # Throughput measurement INSERT/sec UPDATE/sec DELETE/sec SELECT/sec % of baseline throughput 1 db.r5.xlarge without Lambda integration 772 1,472 159 10,084 100% (baseline) 2 db.r5.xlarge with Lambda integration 576 887 99 7,032 69% 3 db.r5.2xlarge with Lambda integration 729 1,443 152 10,513 103% 4 db.r6g.xlarge with Lambda integration 641 1,148 128 8,203 81% To fully compensate for the reduction in throughput, one option is to double the vCPU count and memory size and change to the higher db.r5.2xlarge Aurora instance class at an increase in on-demand cost (row 3 in the preceding table). Alternatively, you can choose to retain the vCPU count and memory size, and move to the AWS Graviton2 processor-based db.r6g.xlarge Aurora instance class. Because of Graviton’s better price/performance for Aurora, the peak read and write throughput is at 81% of the baseline measurement (row 4 in the preceding table), at a 10% reduction in on-demand cost in us-east-2. As shown in the following graph, the DynamoDB table consumed between 2,630 and 2,855 write capacity units, and Lambda concurrency fluctuated between 259 and 292. No throttling was detected. You can reproduce these results by running a load generator script located in /tmp/perf.py on the pgAdmin EC2 instance. # Lambda integration on /tmp/perf.py 100 20 200 20 true # Lambda integration off /tmp/perf.py 100 20 200 20 false Additional considerations This solution doesn’t cover the initial population of DynamoDB with XML data from Aurora. To achieve this, you can use AWS Database Migration Service (AWS DMS) or CREATE TABLE AS. Be aware of certain service limits before using this solution. The Lambda payload limit is 256 KB for asynchronous invocation, and the DynamoDB maximum item size limit is 400 KB. If your Aurora table stores more than 256 KB of XML data per row, an alternative approach is to use Amazon DocumentDB (with MongoDB compatibility), which can store up to 16 MB per document, or offload XML to Amazon Simple Storage Service (Amazon S3). Clean up To avoid incurring future charges, delete the CloudFormation stack. In the CloudFormation console, change the Region if necessary, choose the stack, and then choose Delete. It can take up to 20 minutes for the clean up to complete. Summary In this post, I proposed a modernization approach for legacy applications that make extensive use of XML in a relational database. Heavy use of nonrelational objects in a relational database can lead to scalability issues, orphaned records, and data quality challenges. By introducing DynamoDB alongside Aurora via native Lambda integration, you can gradually rearchitect legacy applications to query DynamoDB following the Command-Query Responsibility Segregation pattern. When your applications are ready to cut over reads and writes to DynamoDB, you can remove XML from Aurora tables entirely. You can extend this approach to offload JSON, YAML, and other nonrelational object types. As next steps, I recommend reviewing the Lambda function code and exploring the multitude of ways Lambda can be invoked from Aurora, such as synchronously; before, after, and instead of a row being committed; per SQL statement; or per row. About the author Igor is an AWS enterprise solutions architect, and he works closely with Australia’s largest financial services organizations. Prior to AWS, Igor held solution architecture and engineering roles with tier-1 consultancies and software vendors. Igor is passionate about all things data and modern software engineering. Outside of work, he enjoys writing and performing music, a good audiobook, or a jog, often combining the latter two. https://aws.amazon.com/blogs/database/options-for-legacy-application-modernization-with-amazon-aurora-and-amazon-dynamodb/
0 notes
Link
0 notes
Text
Take PHP Expert’s Help to Accomplish your Assignment efficaciously
Without proper knowledge of any subject, assignment writing became the toughest task to do. When you are thinking to initiate your work, then you have to consider many things necessary for writing informative academic papers. For the PHP assignment, students require good knowledge of programming language. To get help for writing PHP homework, do a search for online academic writer services under PHP Assignment Help. Using experts’ help, scholars can finish their work on time without taking much stress.

While writing your PHP assignment, you need to search for relevant data and time to frame that data in the most appropriate manner. For that, you require to follow proper time management and search for valuable information to finish your PHP homework on time. A good understanding of PHP programming language will help you to write informative homework and provide high marks. If you can’t gather enough particulars for your PHP assignment, then taking an expert’s guidance would be beneficial for you.
What are the PHP programming language and its objectives?
It is a server-side scripting language used to create static as well as dynamic websites or any web applications. PHP stands for Hypertext Pre-processor which is a general-purpose programming language and created by Rasmus Lerdorf.
PHP coding is performed with a command-line interface (CLI) using HTML code or used in combination with different web content management, web frameworks, and web template systems.
Reasons for using PHP programming language in various software applications
PHP is free and open-source.
It has a short learning curve as compared to other programming languages like ASP, JSP, etc.
It also has large community documents.
PHP is supported by most web hosting servers support and this makes PHP a cost-effective choice.
PHP is regularly updated to meet the latest technology trends.
As PHP is a server scripting language, so you only require to install it on the server-side and your client computers; for PHP, you only require a web browser.
PHP works hand to hand with MySQL for better programming support. It doesn’t imply that you can’t use PHP with other database management systems. Users can use PHP with Postgres, Oracle, ODBC, and MS SQL Server, etc.
PHP is a cross-platform programming language that allows you to use your application on other operating systems including Windows, Linux, Mac OS, etc.
Why you need PHP experts’ support for writing your assignment?
When students want to score high marks, they need to organize their activities accordingly. They have to concentrate on their work and write an informative assignment. If they have doubts and don’t have sufficient knowledge to write their PHP assignment, then wasting time in searching for the most appropriate help is not worth it.
Do search for effective PHP Programming Help and connect with the trustworthy service providers. Get the best online writing services and finish your PHP assignment on time. Time to score good marks and enhance your academic performance using experts’ support.
Source Link: https://joyonlineassignmenthelp.wordpress.com/2019/11/08/take-php-experts-help-to-accomplish-your-assignment-efficaciously/
0 notes
Text
Full Stack Roadmap 2019
Becoming a full stack web developer seems an intimidating task, especially if you are completely new to the field of coding. As a beginner, you might think that you have a whole lot to learn within a short span of time. The languages, frameworks, libraries and databases along with everything else required is a whole long list of tools of full stack web development. If you start attempting to learn everything at the same time is setting yourself up to FAIL spectacularly. The easiest way to begin any work is to strategize with a road map. A road map is the best way to kick start your attempt to become a full stack web developer.

Tackle each layer one by one. Your objective should be to learn the bare minimum skill set so that you can start experimenting and honing your learned skills. Once you have mastered the basics, you can go ahead and learn full stack technologies which will give you an edge over other people. Follow a structured path and equip yourself steadily rather than trying to learn all over the web development spectrum.
This road map has multiple sections and is the go-to guide for organizing and selecting technologies to learn. The article mainly benefits the noobs but is also useful to the professional coders looking to become a full stack web developer. If you already have knowledge of some of the technologies we are going to talk about here, skip to the sections that will be useful to you. Feel free to customize this road map to suit your needs.
Front end technologies roadmap for a full stack web developer

You can start by learning the technologies required for the presentation or the front end layer. Follow this roadmap strategy if you wish to master front end development requisites. There are again the must learn, should learn and the value additions.
Basic languages
HTML- the HyperText Markup Language is the most basic and must know for any website you are contriving. You define and structure the content of a website.
CSS- this is used for styling websites and adding layouts, fonts and colours.
SQL- Structured Query Language, this is a basic language that is used for database management.
Front-end frameworks
BootStrap- An open-source toolkit for developing responsive, mobile first projects. Uses HTML,CSS and JavaScript. It helps design the website faster and easier. It has design templates for forms, buttons, tables, navigation etc., It also supports JavaScript plugins.
AngularJS- This a structural framework for dynamic web apps. The JavaScript-based open source web framework is maintained by Google and a community of corporations and individuals. They address challenges in a single-page application. It allows usage of HTML as the template language. It data-binding and dependency reduce the amount of coding required substantially.
ReactJS- A JavaScript library maintained by Facebook and a group of companies as well as individual developers. React is optimal for fetching fast-changing data that needs to be recorded. It is used for building user interfaces for single page applications. It allows users to create reusable UI components.
VueJS-This is yet another open-source JavaScript framework for single page applications and UIs.It is very compact in size and high on performance. The best option for new coders, it offers hand-picked the choicest features of other frameworks like Angular and React. It is known as the most approachable framework today.
Other programming languages required by a full stack developer:

You need to be proficient in multiple programming languages as most of the core processes for any business have to be written in them. It is not possible to master all of them in a short time, so we have a list of languages for you to begin with.
JavaScript- It is a just-in-time compiled programming language. It helps in adding dynamic features to your website is the predominant usage of JavaScript. This is used for both front end and back end operations. The JavaScript basics are easy to learn. Many of the front-end as well as back-end frameworks, like NodeJS and AngularJS, use JavaScript. It is widely used for aplication like chatbots using full stack technology.
TypeScript- Developed and maintained by Microsoft for development of large applications. A prerequisite if you want to learn Angular, this has recently become very popular. This is an addition to JavaScript and is always used along with JavaScript for features like type checking.
Python- This is a high-level, general-purpose language. It can be used on a server to create web applications, mathematics and server scripting. It connects to databases to read and manipulate files. It was designed for readability and runs on an interpreter system. It can also be used in a procedural, object-oriented or functional way.
Ruby- A dynamic, open source language, it is easy to learn and code. It focuses on productivity and simplicity.it can be used for web applications, servers, system utilities, backups and database works.
PHP- The most popular scripting language, it can be embedded into HTML. PHP scripts can only be interpreted on a server where PHP is installed. It is used to collect form data, send or receive cookies amongst other functions.
Back end technologies roadmap for a full stack web developer.
Developers need a back end framework so that an application can be created. It is the script-side of a dynamic application. A lot of options are available for back end frameworks.
Express-Express.js is a framework and is used as a web application for Node.js. It is a module of the NodeJS. It can be used for apps that are based on servers that will listen for connection requests from clients. It can be used for single-page, multi-page, and hybrid web applications. It is fast, easy to use and assertive.
NodeJS-This is an open-source, cross-platform in nature, that is runs across various platforms. it is a JavaScript runtime environment that executes JavaScript outside a browser.
Django- This is a high-level Python web framework that follows model-template-view architecture. It is used to simplify the creation of complex, database-driven websites. It is fast and promotes a clean design.
Ruby on Rails- This is a server-side web application framework based on the Ruby language. It provides default structures for databases, web services and web pages. It uses model-view-controller architecture. This is comparatively hard to learn as you have to learn multiple and independent concepts.
Database systems roadmap.
In today's scenario, there are tons of databases. Each company develops its own databases according to their requirements.
The objective of this roadmap is to learn and become a database administrator.
MySQL, SQLite, Postgres- These are Relational Database management system, and the data is stored in table-like schemes. This is good to store business data. These use SQL
MongoDB, Cassandra, Apache storm, Sphinx- These are the NoSQL databases. Their only commonality is that they do not use a relational database scheme. This type of database covers a wide range of technologies and can be used to find key-value DB, graph DBs, streaming DBs etc.,
VoltDB, MemSQL- These are a new kind of database, the NewSQL. They follow the relational scheme but instead of disks, they use memory. the advantage is that they outperform the traditional RDBMS but the limited amount of memory available is definitely a downside to this type of database.
Recommended additional skills for a full stack web developer.
Git- The most popular distributed version control system. It is fast and efficient. It has the capacity to handle small to very large projects. It is used to coordinate between programmers as well as track any changes made to any code stored in its repository. Check out the git basics before getting started. GitHub is the most widely used code repository and thus a must learn for an aspiring coder.
Machine Learning- A subset of AI, it is a top trending topic in 2018, machine learning is now being incorporated into various industries. It has entered the web development field as well. This provides the ability to learn and improve without being explicitly programmed. This is a good-to-learn skill for a full stack web developer.
SSH- The secure shell protocol is used to operate network services securely over an unsecured network. The SSH provides a secured remote login from one computer to another. It ensures the privacy and integrity of the data.
HTTP/HTTPS-HyperText Transfer Protocol (HTTP) is the protocol used by the world wide web. it defines how messages are transmitted, the actions taken by the Web servers and browsers when responding to commands. HTTPS is the secured version of HTTP. Here, the communication protocol is encrypted using Transport Layer Security. It ensures protection against man-in-the-middle attacks and eavesdropping.
Linux command-line basic-Having this skill is not a must but one you should definitely have. It is not necessarily easy or hard to learn and saves a lot of time. The job that otherwise consumes a lot of time when done manually, like organizing items on the back-end will be over very fast.
Data structures and algorithms-Data structures are just ways to store the data while an algorithm is a generic approach methodology to solve a problem or requirement. Every programmer needs to be familiar with these concepts. By themselves, they are not a core skill, but the more intuitive you are about these, the easier it is to solve issues or add requirements. The impacts are felt in efficiency, scalability and performance of an application. As a full stack developer, this will help immensely.
Character encoding-This is a must learn if you are planning on developing global applications. If there is no proper character encoding, you might end up with unreadable text on display, the data will not be properly processed and your content may not be found by the search engines.
Use this road map and start by equipping yourself on these basic to intermediate skills required to become a successful full stack developer. Keep adding to your skills to give more value- addition to your role and by extension to your organization.
#web development#webdesign#full stack web development#ui development#uxdeveloper#html5#css#learn react#angular#php#python
0 notes
Text
Clojure programming world: libraries and other tools

With the vibrant tech community, Clojure language has a good core of libraries, their collections and other ready-to-use tools. According to the 2019 year survey, 25% of Clojure users create or maintain open source solutions. Some programmers also check and fix issues (17%), or report on them (15%).

Although all these libs aim to simplify Clojure programming tasks, they may confuse a beginner. Sometimes, it’s difficult to understand how to put all of them together and find an optimal solution for a specific task. So, now I want to show you my favorite tools for programming in Clojure. We will talk about:
working with web server and endpoints
interaction with web server and database
routing on server
using GraphQL in Clojure programming
support of modular architecture
Let’s start the trip to the Clojure programming world!
Note: Moving from Java and other similar languages you should know that there aren’t any traditional frameworks in Clojure. Everything is based on libs and their collections. This makes the language more flexible and multi-purpose.
Clojure ecosystem includes libs of different complexity. Some of them are only a set of additional functions (for example, a library for working with time). Meanwhile, system libs provide a platform for creating the entire framework. Such libraries allow the programmer to present an application as a set of components, describe the connections between them, and so on. The library itself ensures the creation of dependency graphs. For example, it can convert components into more understandable things, like functions.
1. Ring
Purpose: convenient work with web server and endpoints
Code: https://github.com/ring-clojure/ring
The HTTP server abstraction is a key element of Clojure web stack. It enables simple work with web server and endpoints, which is essential for successful app development. Created in analogy with WSGI (Python) and Rack (Ruby), Ring abstracts the information of HTTP into a clear, unified API. As a result, the web developer can build modular systems consisted of components and share these components among various servers and applications.
How does Ring work?
It gets HTTP requests and returns HTTP responses. So, Ring isn’t a so-called web application framework.
Reasons for using Ring
As a dominant web library in Clojure programming, Ring is a nice choice for beginners. First of all, its main function is to provide a convenient interface for a wide range of web-servers. From this point of view, the technology is extremely useful and works perfectly.
Another Ring feature is providing a set of modules (‘middleware’). So, it allows you to use different pre-written libraries, compatible with each other.
Most of Clojure programmers choose Ring for endpoints because of its ability to use middlewares. For instance, these modules allow transforming required parameters from an URL to the Clojure code map. A web developer can easily write new middleware and integrate it into the ecosystem. For example, using the cemerick/friend library, you can fully manage the authorization process, apply different strategies (starting from the login and password, ending with oAuth), etc. Ring middleware helps to conveniently describe and start the process. It closes all endpoints that are prohibited for unauthorized users.
Experience in using Ring is important for working with other Clojure technologies. It is the first thing you can use to get an app moving.
2. Http-kit
Purpose: server start up
Code: https://github.com/http-kit/http-kit
The event-driven, highly effective HTTP server/client library includes WebSocket, as well as asynchronous support.
How does Http-kit work?
It’s a library for organizing a proper web server interaction. Http-kit is suitable for highly concurrent asynchronous or synchronous applications. As for WebSocket and HTTP long polling/streaming, it’s better to feature a unified API.
Reasons for using Http-kit
Flexible solution
Http-kit provides an opportunity of working both with sync and async systems. The first option is simple, while the second works faster. So, you can make a choice based on your specific purpose. Moreover, you can use the library with Ring. It works almost like the Jetty adapter.
Convenient usage
The library ensures support for WebSockets, as well as perfect handling of long-held HTTP requests. So, creating a real-time app becomes easier. What is more, it’s an open source project. The library is available on GitHub under the Apache License Version 2.0.
Excellent results
HTTP-kit shows high performance and works fast in spite of great loads. At the same time, each connection requires only a few kB of memory. A client/server that is written from scratch is available as a single ~90kB JAR with 0 dependencies and ~3k lines of clear code.
Many software developers consider HTTP-kit as a basic tool for Clojure programming.
3. Compojure and Bidi
Purpose: routing on server
Code: https://github.com/juxt/bidi, https://github.com/weavejester/compojure
Both Compojure and Bidi are technologies for routing in web apps. The first library is quite popular among the community, while the second one is known as a handy solution for writing in ClojureScript.
How do Compojure and Bidi work?
These small libraries ensure routing on a web server. As a result, a software developer can write applications that are composed of several separate parts.
What’s the difference between them?
The 2 libraries perform the same function. But, unlike Compojure, Bidi:
supports both clj and cljs
is isomorphic and extensible
The main difference is that in Bidi routes are data structures. There are no macros here. So, the library provides a convenient bi-directional approach and other advantages. Some web developers prefer Bidi because it shows each route of a particular handler. Moreover, there is an opportunity to read the routes from a configuration file, generate and transform them by functions and introspect. They work independently from handled requests. So, the developer can match on things that aren’t necessarily handlers (for example, keywords).
4. Lacinia
Purpose: implementation of GraphQL in Clojure programming
Code: https://github.com/walmartlabs/lacinia
This popular Clojure library is useful for those, who want to implement GraphQL while working with web APIs.
How does Lacinia work?
Originally, GraphQL is written in JavaScript. Lacinia is an official reference to this implementation. It is written in analogy with the initial specification. It can be called a backend-agnostic GraphQL query execution engine. So, the library provides contact between your data and the GraphQL client.
Reasons for using Lacinia
Using GraphQL, you can easily get a richer, more complicate Web API. Lacinia simplifies API development because it supports inline/named query fragments, GraphQL Schema Introspection, subscriptions, interfaces, unions, enums, inputs and custom scalars.
Written in an EDN-based schema language, the library perfectly works with GraphQL queries. It is built on Antlr4. Lacinia helps to rich efficient asynchronous query execution. You can plug it into any Clojure HTTP pipeline and use the companion library lacinia-pedestal for HTTP support.
5. HoneySQL and HugSQL
Purpose: successful database interaction
Code: https://github.com/jkk/honeysql, https://github.com/layerware/hugsql
Many web programmers feel more comfortable working with SQL technologies, such as Oracle, MS SQL, MySQL, PostgreSQL, SQLite, etc. HoneySQL and HugSQL are query builders that provide stable access to SQL databases in Clojure applications.
How do HoneySQL and HugSQL work?
Both libraries ensure embracing SQL in Clojure programming. So, you will be able to write SQL database commands even in Clojure web apps.
What’s the difference between them?
Using HugSQL, you start with writing separate SQL files and putting them in your application. The query constructor is inspired by another popular library, YeSQL. It not only parses SQL files into Clojure functions but is also suitable for more use cases than YeSQL. HugSQL is actively maintained. It has protocol-based adapters supporting multiple database libs.
HugSQL has several advantages due to 2 fundamental features:
the queries are written directly, one query for each required function;
the queries are written in SQL.
HugSQL pros
HugSQL provides separation of Clojure syntax and SQL semantics (WHAT and HOW).
We describe WHAT to do in Clojure
(get-user-emails-by-username “Alexandr Petrov”) ;-> [“[email protected]” “[email protected]”]
We describe HOW to do this in SQL
— :name get-user-emails-by-username :? :*
select user_emails.email from user_emails where user_emails.user_id = :id
As a result, we can change the logic of getting the data directly in SQL, without rewriting Clojure code. It’s useful when a database schema is changed, and the old query doesn’t return the needed structure.
Moreover, SQL itself is a much more powerful tool for working with a specific DBMS. It allows writing large complex queries with “join”, aggregations and Window Functions, which can be extremely difficult in Clojure.
Furthermore, SQL allows using benefits of a specific DBMS (for example, Postgres). It’s important if you are sure the database won’t be changed.
HugSQL cons
It’s difficult to change DBMS in the middle of the project. It will be necessary to check a lot of requests and carefully test syntax support and specific output.
You can pass parameters to SQL queries. But, in some cases, the parts of the queries must be depended on certain conditions. Although HugSQL snippets allow completing this task, more often you need to do this using Clojure.
HoneySQL doesn’t provide such separation of SQL and Clojure code. You will see the queries as a map.
HoneySQL pros
It’s independent of a specific implementation of the DBMS because it usually avoids direct SQL queries. Instead of them, it uses specific DSL.
It allows maintaining your own DSL based on Clojure functions/macros. You can also create a query builder with saving intermediate requests on the Clojure side. For example, if you need to define a user by ID or other complex logic, you can save part of the HoneySQL structure. It will show that we need exactly the user, not the goods or other data. This “fragment” can be substituted into the necessary queries. As a result, you will get a shorter code.
HoneySQL cons
It can be challenging to use benefits of a specific DBMS, as well as to write complex queries (for example, with Window Functions)
The Clojure programmer needs to separate the code for retrieving data and the code for processing this data. The separation leads to additional work on refactoring.
6. danielsz/system
Purpose: support of modular architecture
Code: https://github.com/danielsz/system
Helpful technology for developing highly modular applications in Clojure. The framework supports effective interaction between modules and has good compatibility with other parts of the varied Clojure ecosystem.
How does danielsz/system work?
The library allows a web programmer to use a component-based approach. So, you can build an application using modules/components and the connections between them. Each component is a special object. It has its own life cycle. The programmer describes how it starts, what it needs to start, and how it stops.
For example, our application consists of a web server and a database. It makes no sense to start the web server before the database is activated. We describe the database component, describe the server component, and the server’s dependency on the database. When launching the project, we indicate that we need to start the web server. The library will automatically try to activate the database. Then, if possible, it will start the server and transfer the finished activated database component to the web server component. Then, if necessary, the system will be stopped.
Reasons for using danielsz/system
Unlike the description of the entire application with a set of ordinary Clojure functions, the project description as components makes it easy to replace one component with another. For example, when testing an application, replacing one database with another, or turning it off completely, replacing it with the current data.
In the case of functions, you would change old functions with new ones. They will have the same name, which often causes bugs. danielsz/system is a ready-made set of solutions (for a web server, database, and much more), organized as a set of components.
I hope, now you better understand how to use Clojure and what tech solutions should be implemented in your project. My further articles will include the benefits of this powerful and beautiful language, as well as some tips on development of web applications, services, and APIs. So, subscribe to FreshCode blog, if you want to learn more about Clojure programming world.
The original article “Clojure programming world: frameworks and other tools” was published at freshcodeit.com.
0 notes
Link
Complete Web Development Masterclass Beginner To Advanced ##realdiscount ##UdemyReview #Advanced #BEGINNER #Complete #Development #Masterclass #Web Complete Web Development Masterclass Beginner To Advanced The Complete Web Development Masterclass: Beginner To Advanced The most comprehensive yet precise course on web development to build web development skills. If you aspire to become a professional web developer or if you want to get into the field of web development then this is the right course to start with. This course is specially designed to build a skillset around all the modern web development technologies which are in-demand by tech companies in 2018. Upon course completion, you will be able to build full-stack, mobile responsive, database oriented web applications. Here Is What You Get By Enrolling In This Course: Word-By-Word Explanation: In the entire course, I explain each line of code, without skipping a single line of code. Awesome Quality Content: 18 hours of HD Videos. Well Structured & Easy To Learn: Course has been specially designed to make it easy for the students to learn HTML5, CSS, Bootstrap4, JavaScript,ES6 Git & Github, VueJs, NodeJs, PostgreSQL. 24 X 7 Support: I will always be there to guide you in your journey to become Python expert. Note: Student queries and problems will be answered immediately. _________________________________________________________________________ Here Is Everything You Will Learn In This Complete Course: The Complete Course is divided into 12 Major sections Section 1: HTML5. Section 2: CSS. Section 3: Building A Portfolio Site. Section 4: Bootstrap 4. Section 5: Building A News Portal. Section 6: JavaScript. Section 7: ES6. Section 8: Git & Github. Section 9: VueJs. Section 10: NodeJs. Section 11: PostgreSQL. Section 12: Final Project:Medical Inventory Management Web App. First we start off by learning the basics of Web Development and installing the required tools to write HTML5 code. In this section we cover almost all the HTML5 concepts and learn how to layout the structure of HTML elements on the webpage. In the next section we learn the basics of CSS which will help us make our site look appealing. We will learn how we can add CSS to your existing HTML pages to make them more visually attractive. We will also learn about CSS flex box which will help us to make responsive layouts. Now as we know HTML & CSS, its now time to build something from the skills we have acquired. In this section we will build a portfolio site with HTML & CSS which will list all your skills. Moving along we now start learning Bootstrap 4, a CSS framework which enables us to build fully mobile responsive websites in no time. Bootstrap 4 will make your development speed 2X as faster as you no longer have to build components from scratch. Bootstrap has hundreds of built in components which we can use to build websites quickly and without any hassle. We will learn about the Bootstrap grid system and learn how to make responsive layouts with it. Once we master Bootstrap 4, its now time to build a fully mobile responsive news portal. In this section we will build a news portal which will work and look great on all of the devices like a computer, tablet and a smartphone. The best part about this news portal is that its completely built using Bootstrap and its components. Meaning we have not used a single line of CSS code to style the elements. The next section is all about JavaScript which is the most popular language for front end web development. We will start off by learning the basics of how JavaScript can be used in the browser to make websites more interactive. We will learn data types, functions, global and local scope, loops, exceptions and all of the other basics related to javaScript. At the end of this section, we also build a simple interest calculator using JavaScript and Bootstrap. Then we learn about ES6 or ECMAScript6 which is the latest version of JavaScript. We will learn some of the most relevant and new features of ES6 like the let and the const keywords. We then move towards learning Git & Github which is one of the most popular tools amongst web developers across the globe. We will start by learning what is Git and how Git can be used for version control. We will learn about all the important commands required to work with Git all with a practical example. Later we start learning GitHub and learn how GitHub can be used to collaborate with teams while working on a project. In the next section we learn about VueJS which is a progressive front end framework which helps us to build user interface components in an efficient way. VueJs is now being used by a lot of tech companies and is much easier to learn as compared to other similar frameworks like React. Many developers prefer VueJs over React because of its learning curve and the extensive documentation available online. In this section we will cover all the important aspects of VueJs. Once we finish learning the front end technologies, its now time to start learning about the backend. We now start learning about NodeJS which is a JavaScript runtime which allows us to run JavaScript on the server. NodeJS is extremely powerful and it allows us to configure server, connect to database, make queries and a lot more can be done using Node. In this section we will start learning Node right from the basics and we will build our very own server. We will also learn about the node package manager and learn how it can be used to install and use different node packages which are used to extend the functionality of our apps. Now once we know how about Node, we now need a database to be able to store and manage our data at the backend. Hence we move on to learn about Postgres which is a database used and trusted by large software companies. We will learn about PostgreSQL which is a structured query language used to query the Postgres database. We will learn how to create our very own database from scratch and how to setup the structure to store and manage our data. In the final section we apply everything we have learned in the entire course by building a fully functional medical inventory web application. This will be a complex database oriented application which will store data into the Postgres database and allow us to insert, update, delete and modify medicine records from the front end. We will learn how to build a complete web app from scratch right from building the database, configuring our server to building the front end. _________________________________________________________________________ So let's begin the journey of becoming an expert Web Developer. In addition to the Udemy 30-day money back guarantee,you have my personal guarantee that you will love what you learn in this course. If you ever have any questions please feel free to message me directly and I will do my best to get back to you as soon as possible! _________________________________________________________________________ Make sure to enroll in the course before the price changes. Take yourself one step closer towards becoming a professional web developer by clicking the "take this course button" now! Join the journey. Sincerely, Ashutosh Pawar Who this course is for: Beginners who want to get into web development Want to create own web applications using advanced technologies like Vue & Node Students who aspire to be a freelance web developer Complete beginners who want to start programming 👉 Activate Udemy Coupon 👈 Free Tutorials Udemy Review Real Discount Udemy Free Courses Udemy Coupon Udemy Francais Coupon Udemy gratuit Coursera and Edx ELearningFree Course Free Online Training Udemy Udemy Free Coupons Udemy Free Discount Coupons Udemy Online Course Udemy Online Training 100% FREE Udemy Discount Coupons https://www.couponudemy.com/blog/complete-web-development-masterclass-beginner-to-advanced/
0 notes
Text
The tools, they are a-changing
Building web services and smartphone apps, which is most of what I’ve been doing professionally at HappyFunCorp1 for the last decade or so used to be pretty straightforward. Not easy, but straightforward, especially when the client was a consumer startup, which so many of them were.
The more we did the better we got at it. Design and write two native apps, usually iOS first and Android second. Don’t skimp on the design. Connect them to a JSON API, usually written in Ruby on Rails, which also powered the web site. There’s always a web site; consumers might only see the side which is a minimal billboard for the app, but there’s essentially always also an admin site, to control features and aspects of the app.
Design isn’t as important for the admin site, so you can build that in something crude but effective like ActiveAdmin; why roll your own? Similarly, authentication is tricky and easy to get wrong, so use something like Devise, which comes with built-in hooks to Facebook and Twitter login. Design your database carefully. Use jQuery for dynamic in-browser manipulation since raw Javascript is such a nightmare. Argue about whether to use Rspec or Minitest for your server tests.
All there? OK, roll it out to your Heroku scaling environment, so you can simply “git push” to push to staging and production, with various levels of Postgres support, autoscaling, pipelines, Redis caching, Resque worker jobs, and so forth. If it’s a startup, keep them on Heroku to see if they catch on, if they find the fabled product-market fit, not least because it helps you iterate faster. If so, at some point you have to graduate them to AWS, because Heroku only scales so far and it does so very expensively. If not, well, “fail fast,” right?
Those were the days, my friends, those halcyon, long-gone days of (checks notes) five years ago. The days of a lot of grief, sure, but very little decision complexity. The smartphone boom was on, and the web boom was settling down, and everyone was still surfing those two tidal waves.
Today? Well, today we still are, neither of those waves have broken, per se, software is still eating the world, but things are … different. More of the world is being eaten, but it’s also happening more slowly, like growing 50% a year from a $1 billion base rather than 500% from $1 million. There are fewer starry-eyed founders with an app idea that they’re sure will change the world and funding enough to give it a shot. Those are still out there, sure, and more power to them, but the landscape is more complex, now.
Instead we see more big businesses, media and industrial and retail alike, realizing they must adapt and be devoured, experimenting with new tech projects with a combination of excitement and trepidation. Or requisitioning custom apps for very specific — but very useful — purposes, and requiring them to interface with their awkward pre-existing custom middleware just so. Or tech companies, even big household-name ones, outsourcing ancillary tools and projects in order to focus their in-house teams purely on their core competencies and business models. Our mix of clients has definitely shifted more towards enterprise in the last few years.
Which is not to say that startups don’t still come through our doors with bright ideas and inspiring PowerPoints on a fairly regular basis. As do super starry-eyed blockchain founders (granted, I’m sometimes a bit starry-eyed about blockchains myself) replacing the consumer-app founders of yore. I doubt we’re alone in having had a spate of blockchain startup projects late last year and early this, which has diminished to only a couple active at the moment. (Not least because the tooling is still so crude it reminds me of 90s command-line hacking.) But I strongly doubt that sphere is going away.
We haven’t dealt with as many AI projects as I would have expected by now, probably partly because AI talent is still so scarce and highly valued, and partly because it turns out a lot of seeming “AI” work can be done with simple linear regressions rather than by building and training and tuning deep-learning neural networks… although if you do those linear regressions with TensorFlow, it’s still “AI” buzzword-compliant, right? Right?
Most of all, though, the tools we use have changed. Nowadays when you want to build an app, you have to ask yourself: really native? (Java or Kotlin? Objective-C or Swift?) Or React Native? Or Xamarin? Or Google’s new Flutter thing? When you want to build a web site, you have to think: traditional? Or single-page, with React or Angular or Vue? As for the server — Go is a lot faster than Rails, you know, and oh, that elegant concurrency handling, but, oh, where is my map/filter/reduce? Javascript is still a clumsy language, but there are certain advantages to having one language across the stack, and Node is powerful and package-rich these days. And of course you’ll want it all containerized, because while Docker definitely adds another layer or two of configuration complexity, it’s usually worth it.
Unless you want to go fully “serverless,” at least for aspects, with Amazon Lambda or Google Firebase? Even if you don’t use Firebase for a datastore, how about for authentication, huh? And if you’re all containerized, and Kubernetized if/as appropriate, though maybe let’s not go the many-microservices route until you’re sure your product-market fit justifies it, then where do you want to roll it out, AWS or Azure or Google Cloud or Digital Ocean? Or do you want to use one of their PaaS services, like App Engine or Beanstalk, which, like Heroku, sorta kinda live between “serverless” and “bare metal virtual machines”?
I oversimplify, but you get my point. We’ve never had more options, as developers, more tools available to us … and we’ve never had to struggle more with analysis paralysis, because it’s awfully hard to determine which of the possible toolsets is the best one for any particular situation. Sometimes — often — we have to be happy with just selecting a good one. And that selection problem doesn’t look like it’s going to get easier anytime soon, I’m afraid. It’s a strange time to be a coder. We live and work all tangled up in an embarrassment of riches.
1Yes, that’s really our name. No, this TC column isn’t a full-time gig. (Which is something people frequently assume, because it’s so much more visible and to some people writing a column every week sounds like a lot of work, but no, I’m really a CTO.)
0 notes