#potteryhowto
Explore tagged Tumblr posts
Visit Tumblr Blog
Explore Tumblr blogs with no restrictions, modern design and the best experience.
Last Seen Tumblr Blogs


Fun Fact
Tumblr is available in 18 languages.
Text
I have acquired some rock hard clay! Joy... This is a 25lb block. Dry. Solid rock. I have 3 of these to try to rehydrate. I started with one already and had some fair success and did so quite simply.
I've done my fair share of research on how to rehydrate clay, asked some seasoned potters, and such. Much involved drilling holes, or putting it in a bucket to turn to mush.
I wanted something that wouldn't require TOTALLY reprocessing the clay. So on a whim I poured some water in the bag with one of the rocks. Dug a couple divots in the top and added some water. The divots were maybe a half inch deep, if that. I then tied that bad boy shut TIGHT! All the water went to the corners of the bag which is not optimal...I put it in a small tote and squished it to one side so the water level was most of the way up the side of the clay. Added some other items to keep it mushed.
I let it sit a few days, cracked it open today, flipped it while still in the bag, divots are now down. The clay that was at the bottom? Now viable, albeit wet, clay. After about 20 minutes out the 3/4 inch slab was dry enough to roll and form.
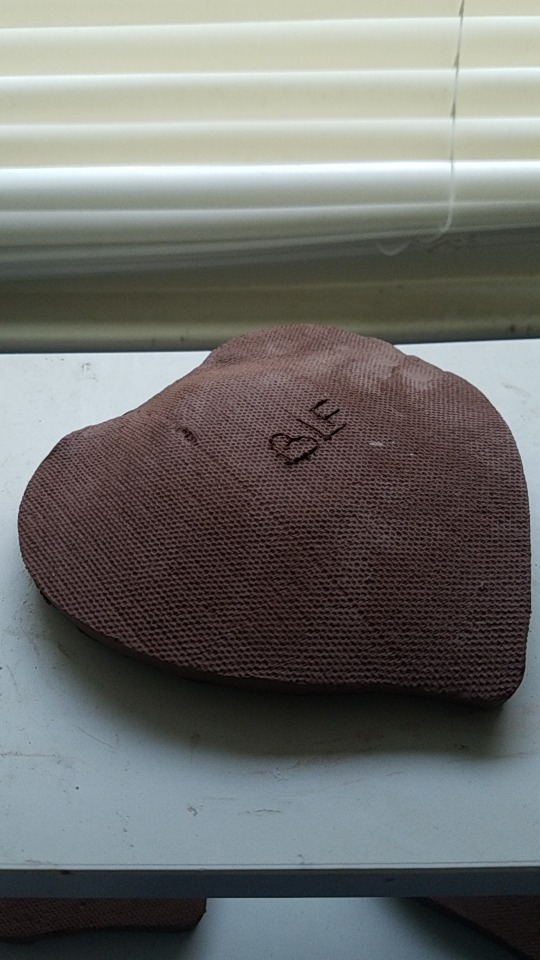
One of 5 pieces I was able to get out of my slab. These are drying and will go into a bisque fire so I can get a feel for how this stuff faired. This clay is actually pretty infamous, it's been floating around my parent's house for probably 20 years, my mom claiming she threw it in the back yard ages ago because it was dry. Well due to flooding it was found! And now I'm the proud owner of some age old, brand new, clay that happens to be low fire and the brand I use!
#pottery#ceramics#moonburncreations#dried clay tutorial#ceramics101#pottery101#rehydratingclay101#ceramicshowto#potteryhowto#itworkedforme
0 notes
Photo
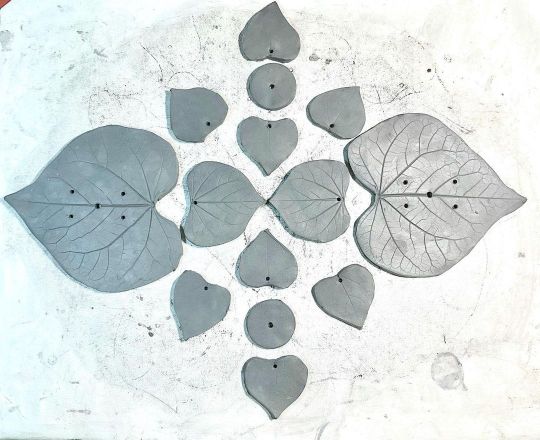
When you don’t roll a large enough slab to cut out TWO dinner plates, you cut one plate and TWO wind chimes!🤣 This is just the chimes, I’ve had NO luck with the dinner plates so I moved it and didn’t want to touch it again to take a photo. My mom has been bugging me to cut some leaves for chimes for ages! This one’s for you Mom! #ceramic #pottery #ceramicsofinstagram #potteryofinstagram #moonburncreations #etsy #etsyshop #etsysellersofinstagram #etsysmallbusiness #handmade #handmadeceramics #handmadepottery #ceramics101 #pottery101 #potteryhowto #ceramicshowto #makingpottery #makingceramics https://www.instagram.com/p/CSceyver40J/?utm_medium=tumblr
#ceramic#pottery#ceramicsofinstagram#potteryofinstagram#moonburncreations#etsy#etsyshop#etsysellersofinstagram#etsysmallbusiness#handmade#handmadeceramics#handmadepottery#ceramics101#pottery101#potteryhowto#ceramicshowto#makingpottery#makingceramics
0 notes
Photo

Ground ivy leaves making impressions. An in process of one of my latest pieces. Once I finish photos and listings it will be available in my shop. Happy 4th to anyone who celebrates! Be safe out there. #ceramic #pottery #ceramicsofinstagram #potteryofinstagram #moonburncreations #etsy #etsyshop #etsysellersofinstagram #etsysmallbusiness #shopsmall #womanownedbusiness #handmade #handmadeceramics #handmadepottery #ceramics101 #pottery101 #potteryhowto #ceramicshowto #makingpottery #makingceramics #leafdish #leafimprints #leafdesign #groundivy https://www.instagram.com/p/CQ6xbumDWwR/?utm_medium=tumblr
#ceramic#pottery#ceramicsofinstagram#potteryofinstagram#moonburncreations#etsy#etsyshop#etsysellersofinstagram#etsysmallbusiness#shopsmall#womanownedbusiness#handmade#handmadeceramics#handmadepottery#ceramics101#pottery101#potteryhowto#ceramicshowto#makingpottery#makingceramics#leafdish#leafimprints#leafdesign#groundivy
0 notes
Text
I came across an interesting bit of info recently while working on a commission piece. I was dabbling with using and also layering different styles of glaze on the same piece. The results were surprising to say the least!
Some background info, I'm a novice! It has only been 4 years since I began playing with ceramics on and off, mostly off. Life got in they way more often than I would have preferred and I just didn't work on clay for about a year at one point. I started with an Amaco Velvet Underglaze set of 12, 2 ounce colors. (It seems my original set is not available anymore, but they do have new sets, 4 total) I purchased a set with your basic primaries, and those colors that may be used most. Later, when I started with clay again I purchased some Duncan specialty glazes. I now use a mix of the two brands, namely Amaco Velvet Underglazes and Duncan Crystal, Courtyard, Artisan, Designer, Envision, Cover-coat, and Concepts. As a result of availability nearby I have ended up with A LOT of Duncan colors, which sadly I just found out Duncan Ceramics is no more, as the company was bought out by Mayco and only a handful of their original colors will continue to be available.
But, to continue, I decided to try using Amaco AND Duncan glazes together on one piece, I have only done this minimally in the past and ONLY with the Velvets and Cover-coats, which are both matte underglazes. This time I tried the Concepts (a gloss underglaze) and Courtyard textured types with the matte underglazes. On the piece I was using them more specifically for their color variation so I didn't have to mix my own. I have found making mixes can be hit or miss, you either waste glaze by making too much so you can do multiple layers of the exact color, or you mix too little to do enough layers and end up with an inconsistent color. I have avoided making mixes recently UNLESS I make a color I plan to use often and make a large amount.
Here is the piece before being fired, wet on the left and dry on the right:
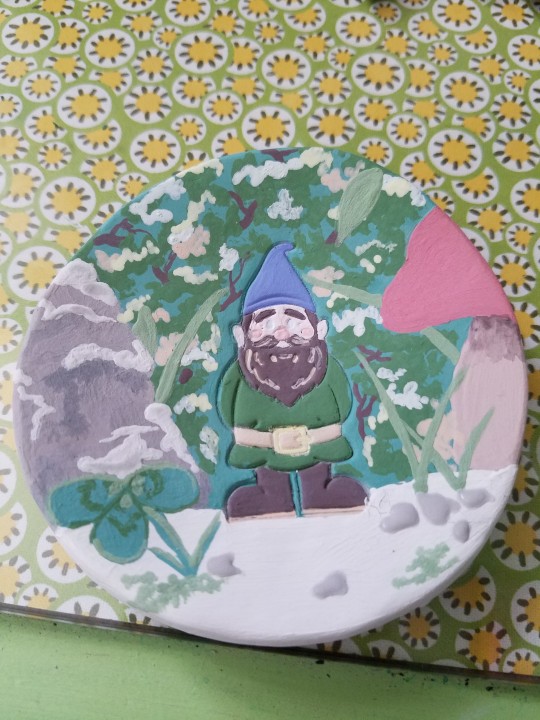

If you look at the rock and ground you can see where the majority of my different types of glaze layering occurred. The light shade of the ground is Duncan Artisan Cactus Sand, small rocks and highlights on the large rock are Duncan Concepts Light Gray, the moss on the ground is Amaco Velvet Dark Green. The miscellaneous bright green grass and leaves are Duncan Concepts Bright Kelp.
The D. Cactus Sand, D. Bright Kelp, and D. Light Gray are gloss when fired. And the A. Velvets are VERY matte, so I was unsure if they would play well together when fired. It's usually recommended that they're not used on top of one another.
ANYWAY, here is the result of doing just that!
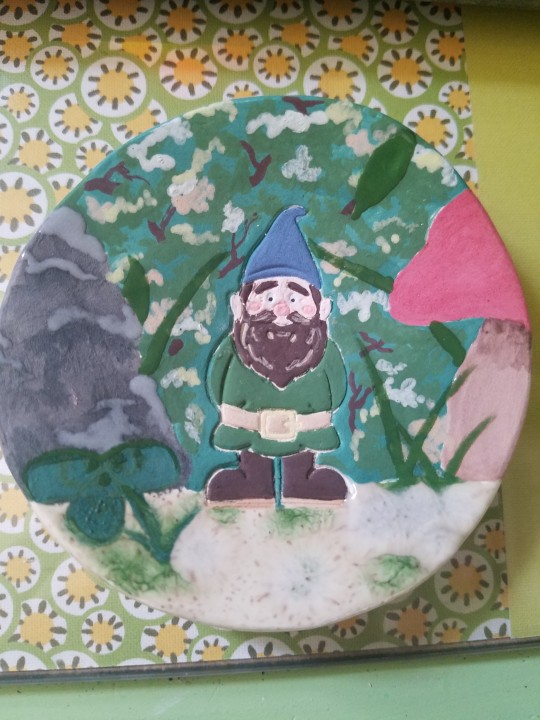
This is after firing, notice the D. Light Gray and A. Bright Green have melted into the D. Cactus Sand. The D. Bright Kelp did the same thing where it covered the D. Cactus Sand. The green veining is rather cool in my opinion, and the D. Light Gray causing the speckles in the D. Cactus Sand to starburst was a pretty neat result, as well. I absolutely LOVE the texture the ground has! The melting into each other has created a pattern I would not have been able to create otherwise!
So, in conclusion PLAY WITH YOUR GLAZES! Maybe don't do it on a customer piece in case the results are devastating, BUT I only did this because it was for a friend who told me to go nuts! So I was🤪 Test tiles are king when experimenting with such things, but don't listen to the "Golden rules" of ceramics or maybe the suggestions of manufacturers of mixing types of glaze. NOW as a disclaimer I would suggest doing research before mixing to make sure chemical make ups of the glaze combos are compatible and would not be DANGEROUS. But layering matte and gloss, or textured and not, could make for AWESOME results. So go make test tiles, do research, experiment, and enjoy! Also, DOCUMENT what you're doing, so if you have a COOL result you can duplicate! There is absolutely nothing worse than having a cool result and forgetting how you achieved it😭 Have fun learn from MY, or other's, mistakes AND successes!
#pottery#ceramics#moonburncreations#homedecor#handmade#etsyshop#bathroomdecor#pottery101#potteryhowto#ceramics101#ceramicshowto#glazeexperiments#glazing#firing#kilnfired#firingresults#glazemixing
0 notes
Text

What NOT to do with your magic box!!! Don't put items with alphabet pasta in them in the magic box and forget them. This is a 2 week science experiment I unwittingly created by doing just that. My garden markers broke during transfer to the kiln, I had pasta in them to create the letters and decided to throw them in the magic box to possibly be repaired. Not any more. They became trash because I didn't feel like fighting mold with my allergies. Lesson hopefully learned!
#pottery#moonburncreations#ceramics#handmade#ceramics101#pottery101#potteryhowto#ceramicshowto#magicbox#magicboxmistake#potterymistake#ceramicmistake#bigoops
0 notes
Text
Did you want to see the after of the galaxy stars I talked about on Nov. 14? Here they are!


Now if you remember, this is where they began (pic on left), and what I was going for (pic on right).


Unfortunately, I did not get the cosmic cloud wispyness I was hoping for. Though, I honestly think that was a result of the underglaze bleeding when the clear was applied. It is an ongoing trial and error project, but I don not consider these an "error" in any way. They still turned out very cool, and vibrant! OMG those colors! I should also mention that the star on the left in the first picture, the one with orange, was made to resemble a real nebula.

I used this photo from NASA, and Dr Ian O'Neill's article about the Orion nebula, for inspiration. The colors and swirls are just so beautiful!
My next step will be manually swirling the glazes while wet, aka taking a toothpick to them. Or I might just glaze and clear before firing. If I start with a thicker messy first coat of clear and let it get the colors a bit damp, I could possibly swirl with a toothpick to smooth the clear and get the effect I'm looking for. I'm not sure how to make it work but I rather like the idea of using real space objects for inspiration. I love the stars, Orion being my personal favorite, so using them as a source of inspiration will be easy peasy!
My next post will hopefully be the final for my experimental piece, with pasta letters, and I will let you in on the idea I've been playing with! It's honestly the main reason I made the piece. Until, next time!
#pottery#ceramics#moonburncreations#homedecor#handmade#etsyshop#bathroomdecor#kitchendecor#ceramicart#ceramics101#potter101#potteryart#space#stars#galaxies#NASA#potteryhowto#ceramicshowto#designexperiment#designinspo#etsyseller#supportsmallbusiness
0 notes
Photo

As a continuation of my post on Dec. 1. This is a before and after firing. I tested a few things with this piece, first being the alphabet pasta for making words. Which worked better than I expected honestly, the pasta completely burnt off leaving text that just needs a little smoothing. I also left glaze on the letters and cleaned it off to see if that made a difference, it didn't do much. The second thing I tested was silicone and rubber stamps being used with underglaze. The blue flower was made with a silicone stamp that squished WAY too much. The fox and bee were rubber stamps, I painted the underglaze on and stamped it, but it got dry and bled. I will have to experiment with better ways of doing this. Unless any seasoned potters have any tips?! The third thing I was testing was new underglazes. I was happy with the results, these were the green stems and bee's wings. I am happy with them, but didn't expect the gloss finish. I'm used to using Amaco velvets which are matte, and thought these were the same just in another brand. My next step will be a thick coat of clear and firing again. Then I will show you my plans for it!! #ceramics #pottery #handmade #potteryofinstagram #ceramicsofinstagram #homedecor #bathroomdecor #kitchendecor #handmadegifts #handmadepottery #handmadeceramics #pottery101 #ceramics101 #potteryhowto #ceramicshowto #etsyshop #etsysellersofinstagram #etsy #clay #design #design #experimentation https://www.instagram.com/p/CKbudXAj0Bg/?igshid=1ndpxykynuax2
#ceramics#pottery#handmade#potteryofinstagram#ceramicsofinstagram#homedecor#bathroomdecor#kitchendecor#handmadegifts#handmadepottery#handmadeceramics#pottery101#ceramics101#potteryhowto#ceramicshowto#etsyshop#etsysellersofinstagram#etsy#clay#design#experimentation
0 notes
Text
Update time! I bought new clay about a month ago. Good stuff, but NOT what I'm used to.

A lovely blob to work with right? For me, not so much. I've worked with MUCH drier clay (aka super OLD junk) since the beginning of my pottery excursion. I do slab pottery exclusively for right now, and rolling drier clay is easy peasy, doesn't stick much not a whole heck of a lot of surface flaws, it's basically cake. The whiplash I have received from working with NEW, incredibly MOIST, clay...just WOW! This stuff is a slab workers nightmare! IT. STICKS. TO. EVERYTHING!! My hands, my canvas, my rolling pin, ITSELF! So, I roll a bit and let it dry, then roll, and dry, rinse and repeat. It is STILL a pain!
That's not even the worst part, cut to trying to trim it and pull my shapes off my canvas, IMPOSSIBLE! The houses I made in a previous post were the worst to trim and pull off the canvas for drying.
NOTE: For flat pieces I cut and sandwich between drywall boards to prevent warping. Don't try to dry flat pieces in the open! They warp like crazy! Weight them down with a board on top to keep them nice and flat. It does take longer to dry but not much longer.
I HAD to take the pieces off the canvas for many reasons and it was just awful. I had to reshape EVERY piece because it stretched, sagged, tore. This was after drying for a few hours too!
TIP: if a piece with flat sides becomes deformed while moving, used a credit card, ruler, or flat protractor to reform by running them up and down the edge standing perpendicular to the clay on a flat surface. You can also use it to press the edge back in.
Anyway, I have been spoiled by old clay and it's perfection for slab work. I'm still debating what to do, leave the bulk clay open to dry, or spending more time allowing my slabs to dry. I'm not sure whether either will help enough or work for me. I do actually like the clay otherwise, it fires nicely, I just hate that getting there takes so much extra work.
#pottery#ceramics#moonburncreations#homedecor#handmade#etsyshop#ceramic art#ceramics101#pottery101#ceramicshowto#potteryhowto#newclayissues#trialanderror#I'mnewtopottery#learnfrommymostakes
0 notes
Text

The many emotions of working on art! This has been me recently. I have unfortunately neglected this blog because of all I have been juggling and trying to figure out. It took me weeks to organize a way to EFFICIENTLY create some digital art so I can work on another aspect of my designs, both for other ventures AND my ceramics. Due to bad coordination on my part, using a drawing tablet on a computer is impossible for my brain to wrap around, and working with archaic technology, it was a lot of trial and error to find a workable solution. FINALLY however, I did! And with an old, like circa 2014 tablet (you know AnCHieNt), and a god send FREE program Autodesk Sketchbook Pro, I was able to create the rough draft above. I now have 3 finished outlines AND 3 finished color pieces! I've been BUSY.
My next step will be some digital storage organization and a couple mini projects to get this show on the road.
Due to my work on this my ceramics have been put on a bit of a back burner. I still have some things in the works and shop updates on the way, but I really wanted to get my digital art up and running to make some aspects of the business more efficient. I also didn't expect doing so would take SO long!
Now that most of the situation is organized and some life things have calmed down I'm hoping to actively make more time for my Racer projects and my ceramics. I have some glazing to do! All my remaining pieces are rather detailed which means cutting out some decent chunks of time to paint, but I'm on it!
Check out my latest shop updates! And the ones COMING SOON! HERE ⬇️
#autodesksketchbook#sketchbookapp#ceramics101#pottery101#digital illustration#moonburncreations#digitalart#ceramics#pottery#ceramicart#potteryart#ceramichowto#potteryhowto#arthowto
0 notes
Photo

Next group of leaf dishes glazed and ready for the kiln. I really need to get another kiln shelf if I’m going to continue making these big dudes! Or make one?🤔 We’ll see... #ceramic #pottery #ceramicsofinstagram #potteryofinstagram #moonburncreations #etsy #etsyshop #etsysellersofinstagram #etsysmallbusiness #shopsmall #ceramics101 #pottery101 #potteryhowto #ceramicshowto #makingpottery #makingceramics #glazingpottery #leafdishes #naturedesigns https://www.instagram.com/p/CQER1-mDQ4o/?utm_medium=tumblr
#ceramic#pottery#ceramicsofinstagram#potteryofinstagram#moonburncreations#etsy#etsyshop#etsysellersofinstagram#etsysmallbusiness#shopsmall#ceramics101#pottery101#potteryhowto#ceramicshowto#makingpottery#makingceramics#glazingpottery#leafdishes#naturedesigns
0 notes