#pro makeup tips for beginners
Text
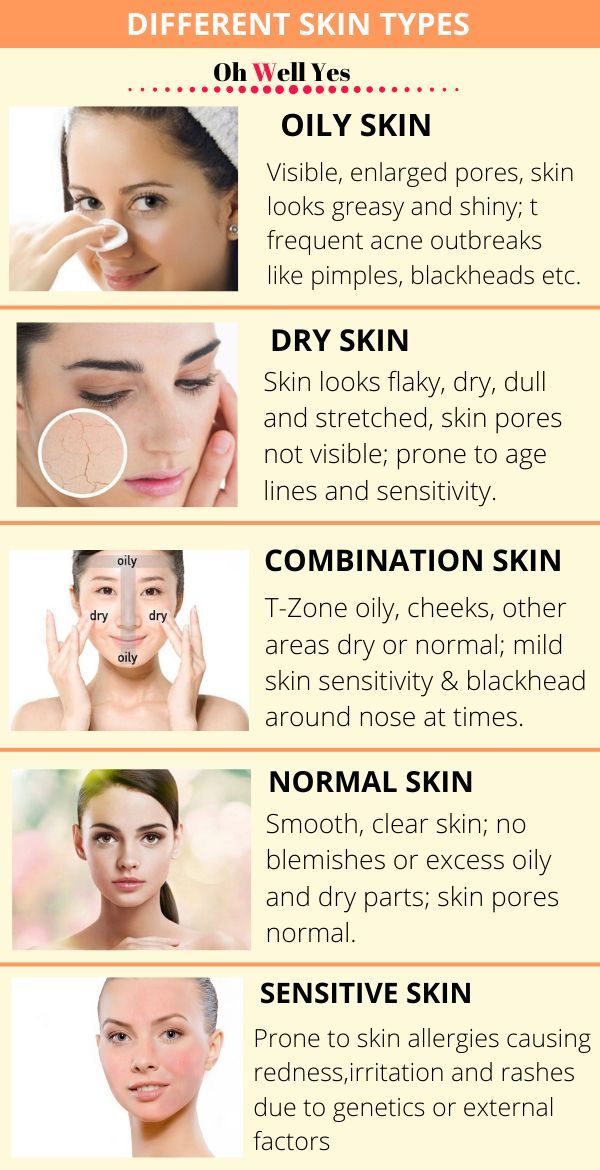
Makeup Tips for Different Skin Types - AZD Makeup & Skin Inc
Here are some makeup tips tailored to different skin types:
Dry Skin:
Start with a hydrating primer to create a smooth base.
Use a moisturizing foundation or a BB cream to add moisture and even out skin tone.
Avoid powder-based products as they can emphasize dry patches. Instead, opt for cream blushes and liquid highlighters for a dewy finish.
Set makeup with a hydrating setting spray to lock in moisture.
Oily Skin:
Begin with an oil-free mattifying primer to control shine and minimize pores.
Choose a matte or oil-free foundation to keep shine at bay throughout the day.
Use powder-based products such as pressed powder blushes and matte bronzers to set makeup and absorb excess oil.
Carry oil-absorbing sheets for touch-ups during the day.
Combination Skin:
Use a lightweight, oil-free moisturizer to hydrate dry areas without adding shine to oily zones.
Apply a mattifying primer to the T-zone to control oiliness.
Consider using a medium coverage foundation that balances hydration and oil control.
Use powder products on oily areas and cream or liquid products on dry areas for a balanced finish.
Sensitive Skin:
Look for makeup products labeled as hypoallergenic and fragrance-free to minimize irritation.
Conduct patch tests before trying new products to ensure they don't trigger allergic reactions.
Opt for mineral-based or natural makeup products, as they tend to be gentler on sensitive skin.
Remove makeup gently using micellar water or a mild cleanser to avoid aggravating sensitivity.
Normal Skin:
Lucky you! With normal skin, you have the flexibility to experiment with various makeup textures and finishes.
Choose a lightweight, moisturizing foundation for a natural look.
Experiment with different blush and bronzer formulas to find what works best for your preferences.
Set makeup with a translucent powder for a polished finish.
Enjoy experimenting with different makeup looks without worrying too much about specific skin concerns.
Regardless of skin type, it's crucial to cleanse your skin thoroughly before applying makeup and remove it completely at the end of the day to maintain skin health. Also, remember to wear sunscreen daily to protect your skin from harmful UV rays.
#professional makeup artist#professional makeup artist near me#professional makeup artist kit#professional makeup artist supplies#professional makeup artist classes#pro makeup artist near me#professional makeup artist course near me#professional costume makeup artist near me#professional makeup tips#professional makeup tips for beginners#pro makeup tips#pro makeup tips and tricks#pro makeup tips for beginners#professional beauty tips#professional makeup advice#professional makeup help#professional makeup artist tips#basic makeup tips for beginners#makeup tips for over 50#makeup tips for over 55#best pro makeup tips#pro eye makeup tips#pro makeup artist tips#how to do makeup like a pro#how to apply makeup like a pro
0 notes
Text
Upcoming events at Sims 2 Shenanigans
Sorry for the recent schedule-juggling. I’ve moved Hold That Pose up a week to make room on the calendar to do a makeup of A Light in the Darkness, due to some unforeseen technical difficulties. So those who were looking for some basic posing techniques, it’s a week earlier.
Saturday, July 8th at 13:00 (GMT -6)- Hold That Pose!
Host: Ocelotekatl
Topic: Posing tips & tricks
Tools needed: None, aside from TS2 itself. This is a presentation about helpful mods, tips, and techniques for getting that perfect pose in-game.
Approximate time: 1 hour
Suggested for: Beginners
This little workshop is intended to introduce in-game posing techniques.
Saturday, July 15th at 13:00 (GMT -6)- A Light in the Darkness (Redux)- Part 1
Host: Ocelotekatl
Topic: Creating Decorgal-style accessories, start-to-finish
Tools needed: SimPE, Photoshop, Milkshape
Approximate time: 1 hour
Suggested for: Intermediate to experienced creators. Some of the techniques discussed are a bit complex.
This is a redux of a previous workshop we presented about Decorgal-style accessories. Because it’s a bit on the long side, it’s being presented in two parts. Part 1 includes an introduction and building the base lamp object.
Saturday, July 22nd at 13:00 (GMT -6)- A Light in the Darkness (Redux)- Part 2
Host: Ocelotekatl
Topic: Creating Decorgal-style accessories, start-to-finish
Tools needed: SimPE, Photoshop, Milkshape
Approximate time: 1 hour
Suggested for: Intermediate to experienced creators. Some of the techniques discussed are a bit complex.
This is a redux of a previous workshop we presented about Decorgal-style accessories. Because it’s a bit on the long side, it’s being presented in two parts. Part 2 includes creating some basic hand overlays, building the accessory mesh, and testing.
Saturday, July 29th at 13:00 (GMT -6)- Object Lessons
Host: Ocelotekatl
Topic: Basic object creation
Tools needed: SimPE, something to mesh with (Blender/Milkshape), something to texture with (Photoshop, Paint Shop Pro, or GIMP).
Approximate time: 1 hour
Suggested for: Beginners
A redux of my basic object creation workshop.
Saturday, August 12th at 13:00 (GMT -6)- Skin to Win! (Part 1)
Host: Ocelotekatl
Topic: “Showerproof” (linked) skintones
Tools needed: SimPE, Body Shop.
Approximate time: 1 hour
Suggested for: Intermediate creators
A step-by-step workshop about making linked skintones.
Saturday, August 19th at 13:00 (GMT -6)- Skin to Win! (Part 2)
Host: Ocelotekatl
Topic: “Skinless” (texture-referenced) skintones
Tools needed: SimPE, Body Shop.
Approximate time: 1 hour
Suggested for: Intermediate creators
A step-by-step workshop about making linked skintones.
To RSVP or check your local time, check the event thingy at the top of the Discord.
If you haven’t joined yet, why aren’t you a member of the most amazing creator’s Discord ever? To join, click here:
https://discord.gg/tkNzjgsSTS
5 notes
·
View notes
Note
Do you know any good contour and bronzer products to use for beginners? (Preferably ones sold at drug stores) and also any tips for learning who to contour is always helpful:)
My personal favorites are the Lorac Pro Contour palette and the Lorac Tantalizer Baked Bronzer. They’re both powder products, not liquids/creams (although they have those available) and they blend very well. They’re also buildable products, so you can use just a little bit for a light look, or add more if you want a heavier or stronger contour look. I personally don’t use liquid or cream products for contouring because it’s just too harsh of a look for my face and my personal preference. Anytime I’ve tried them I end up looking like I dabbled in clown makeup 😂 So hopefully others will have recommendations for you if that’s more of what you’re interested in.
The video I’ll link below does use drug store products that are more affordable (I personally haven’t tried these) and I think she does a great job explaining the difference between contouring and bronzing as well 🦎
youtube
2 notes
·
View notes
Text
"How to Create a Natural, Everyday Makeup Look"
"How to Create a Natural, Everyday Makeup Look"
Introduction :
A natural, everyday makeup look is perfect for those who want to enhance their natural beauty without looking too made up or overdone. It is a versatile look that can be worn to work, school, or any casual occasion, and it is easy to achieve with the right products and techniques.
In this article, we will provide step-by-step instructions on how to create a natural, everyday makeup look, as well as some tips and product recommendations to help you achieve the perfect result. Whether you are a makeup beginner or a seasoned pro, this guide will provide you with all the information you need to create a beautiful, natural makeup look that is perfect for everyday wear.
10 Steps to a Natural, Everyday Makeup Look
Before applying any makeup, it is important to properly prepare your skin. This includes cleansing to remove any dirt, oil, or makeup residue, and moisturizing to help keep your skin hydrated and healthy.
When choosing a cleanser, opt for one that is suitable for your skin type and free from harsh chemicals. Follow up with a moisturizer to help lock in hydration and create a smooth, plump base for your makeup.
The Best Products for a Natural, Everyday Makeup Look
When it comes to foundation, the key is to find one that matches your skin tone and provides lightweight coverage. If you have oily or combination skin, look for a matte or oil-free foundation to help control shine.
If you have dry or sensitive skin, choose a hydrating or nourishing foundation to help provide some extra moisture. When applying foundation, use a small amount and blend it into your skin using a brush, sponge, or your fingers. Be sure to blend it well, especially along your hairline and jawline, to avoid any visible lines or streaks.

Concealer is a great tool for hiding any imperfections, such as blemishes, dark circles, or redness. When choosing a concealer, be sure to select one that is a shade or two lighter than your skin tone to help brighten and highlight the areas you are applying it to. Use a small amount and blend it in well, using a brush, sponge, or your fingers. You can also apply it under your eyes to help disguise any dark circles or puffiness.
Defining your eyebrows can help frame your face and give your makeup look a polished finish. Use a brow pencil or powder to fill in any sparse areas and shape your eyebrows to your desired shape. When filling in your brows, be sure to use short, light strokes to mimic the appearance of natural hairs. You can also use a brow gel or wax to help set and hold your brows in place.
The Perfect Natural Makeup Look for Your Skin Type
For a natural, everyday makeup look, opt for a neutral eyeshadow shade that is close to your skin tone and apply it all over your lid. You can also add a slightly darker shade to the crease of your eye to help add some definition and depth.
When applying eyeshadow, use a brush to blend it well and avoid any harsh lines or edges. You can also add a pop of color by applying a brighter eyeshadow shade to the inner corners of your eyes to help brighten and open them up.
To help brighten and open up your eyes, line your waterline (the inner rim of your lower eyelid) with a white or nude eyeliner. This will help to make your eyes look bigger and more awake.
You can also apply a thin line of black or brown eyeliner to your upper lashes for a subtle, defined look. When applying eyeliner, be sure to use a steady hand and take your time to ensure a clean, precise line.
Use an eyelash curler to curl your lashes, then apply a coat of mascara to add volume and length. Be sure to wiggle the brush at the base of your lashes and sweep it upwards to help separate and define your lashes.
You can also apply a coat of mascara to your bottom lashes for a more complete, balanced look. When selecting a mascara, consider your lash type and choose one that will provide the type of volume, length, or curl that you desire.
For a natural, everyday makeup look, choose a lip color that is a few shades darker than your natural lip color, such as a pink or nude shade. This will give your lips
Conclusion :
Here is a conclusion for the content on "How to Create a Natural, Everyday Makeup Look":
In conclusion, creating a natural, everyday makeup look requires proper skin preparation, a lightweight foundation, concealer to hide imperfections, defined eyebrows, neutral eyeshadow, brightened eyes, curled lashes and mascara, and a natural-looking lip color.
By following these steps and using the right products, you can achieve a polished, natural makeup look that is perfect for everyday wear. Remember to blend each product well and use a light hand to achieve the desired result.
With practice and experimentation, you can find the perfect makeup routine that works for you and your personal style.
5 notes
·
View notes
Text

Makeup Hacks: Know Basic Makeup Tips and Tricks you can do at Your Home!
Want flawless makeup at home? Discover essential makeup hacks and tricks that every woman should know. This guide shares easy-to-follow tips for perfecting your look with everyday products, from creating a natural glow to achieving the perfect cat-eye. Learn how to blend like a pro, make your makeup last longer, and get that perfect finish without stepping out. These makeup hacks are budget-friendly, beginner-friendly, and time-saving, making it easy for you to experiment with new looks right from the comfort of your home. Get ready to enhance your beauty routine effortlessly! Know more
0 notes
Text
Welcome to STUN BY AMI: Your Destination for Premium Makeup Products

At STUN BY AMI, we believe that makeup is more than just a tool for enhancing beauty—it's a form of self-expression, creativity, and empowerment. Specializing in a curated selection of high-quality, cruelty-free cosmetics, we aim to offer a diverse range of products that cater to every makeup lover, from beginners to pros.
Why Choose STUN BY AMI?
STUN BY AMI stands out in the beauty industry for our commitment to offering only the best. Our collection is carefully designed with premium ingredients to ensure that each product delivers exceptional performance. Whether you're looking for bold, eye-catching pigments or subtle, natural tones, we have something for everyone. Here's what makes us unique:
Cruelty-Free and Ethical
We understand that beauty should never come at the cost of ethics. That's why all of our products are 100% cruelty-free, meaning no animals are harmed in the production process. We’re passionate about offering makeup that looks good, feels good, and aligns with your values.
Highly Pigmented and Long-Lasting
Our makeup is formulated with high pigmentation to provide intense color payoff that lasts all day. From vibrant eyeshadow palettes to richly colored lipsticks, you won’t need to worry about fading or reapplying frequently.
Versatile Eyeshadow Palettes
Whether you're aiming for a neutral everyday look or a bold, glamorous style, our versatile eyeshadow palettes are designed to meet your needs. Each palette is packed with a variety of shades and finishes—from matte to shimmer—allowing endless possibilities for creativity.
Luxurious Lip Products
Our lipsticks and glosses are a fan favorite. Lightweight, comfortable, and packed with nourishing ingredients, they glide on effortlessly and provide a smooth, glossy, or matte finish. Available in a wide array of shades, they’re perfect for any occasion, whether you're going for a natural look or a dramatic statement.
Faux Mink Lashes
Take your look to the next level with our luxurious faux mink lash extensions. Lightweight and easy to apply, these lashes offer volume and length while maintaining a natural feel. Whether you prefer a subtle enhancement or a bold, dramatic effect, our lashes are perfect for completing your makeup look.
A Shopping Experience Tailored to You
At STUN BY AMI, our online store is designed to offer a seamless, enjoyable shopping experience. You’ll find detailed product descriptions, makeup tips, and reviews to help you choose the right products for your unique style. Plus, with easy navigation, fast shipping, and top-notch customer service, you can trust that your beauty needs will always be met with care.
Stay Connected
We’re not just a store, we’re a community! Follow us on social media to stay updated on the latest product launches, makeup tutorials, and exclusive offers. We love to see how our customers use STUN BY AMI products to create their own stunning looks, so don't forget to tag us in your posts!
Conclusion
Whether you’re new to makeup or a seasoned expert, STUN BY AMI has something for everyone. Our commitment to premium quality, cruelty-free products ensures that you’ll always feel good about what you’re putting on your skin. Explore our range today and find your new favorite beauty essentials!
Shop now at STUN BY AMI and let your beauty shine!

1 note
·
View note
Text
Best Eyeliner Stencil that you won’t Regret Buying

Are you dreaming of achieving the perfect cat eye, flawless top and bottom liners, or stunning winged eyeliner every time? Wondering if eyeliner stencils are effective and which ones are the best available at Sephora? Crafting the ideal wing can be challenging, but with the right eyeliner stencils and stamps, you can simplify the process effortlessly. Continue reading to discover how Best Eyeliner Stencil stencils can elevate your makeup routine and even learn about the investment required to start your own cosmetic line. Plus, explore our top picks for the best eyeliner stencils that you'll never regret purchasing.
Top Eyeliner Stencils You’ll Love
Beth Bender Beauty – Eye Candy Eyeliner Stencil Starter Pack with Gel Eyeliner & Brush
Do you aim to make your eyes pop with precision and definition? The Beth Bender Beauty Eye Candy Eyeliner Stencil Starter Pack is your go-to tool for creating trendy, professional-looking eyeliner effortlessly. This exclusive starter pack enhances your liner application, ensuring it stays perfectly in place for precise definitions. Crafted from gentle, hypoallergenic adhesive material, it suits all eye shapes and sizes.
Features:
30 Sheets (60 Individual Stencils): Versatile options for various eyeliner styles.
Step-by-Step Instruction Card: Easy guidance for flawless application.
Pro Tip Card: Expert advice to maximize your results.
Benefits:
Achieve impeccable eyeliner styles in minutes.
Experiment with creative gradient, rainbow, and artistic eye looks.
Effortlessly craft dynamic cat and winged eyeliner like a pro.
Stay on trend with versatile eye makeup designs anytime.
Application Tip: To minimize stickiness, peel the stencil and place it on your forearm before transferring it to your eyelid. This technique ensures a charming and precise wing every time.
TailaiMei 2-Piece Cat Eyeliner Stencils
Looking to create mesmerizing and unique cat eyes without the hassle of uneven glitter or misshapen liquid liner? The TailaiMei 2-Piece Cat Eyeliner Stencils are perfect for both beginners and seasoned makeup artists. These stencils allow you to design numerous individual looks effortlessly, making them ideal for parties or special occasions when time is limited.
Features:
Eco-Friendly Materials: Safe for your skin and the environment.
Dual Cat Shapes: Two stencil designs per pack for versatile looks.
Quick Application: Save time while achieving 10 different eye makeup shapes.
Pros:
Create flawless, captivating cat eyes with ease.
Suitable for all skill levels, from beginners to experts.
Perfect for on-the-go makeup application.
Winged Eyeliner Stencil
Seeking high-quality, flexible eyeliner stencils that cater to any eye shape? The Winged Eyeliner Stencil is designed to help you effortlessly achieve the perfect cat eye or winged eyeliner wherever you are. These stencils are easy to use and adaptable, ensuring a flawless application every time.
Features:
Versatile Fit: Compatible with any eye shape and size.
Simple Steps: Follow a few easy steps to create stunning eyeliner looks.
Pro Tips:
Use an eyeshadow base before applying the stencil for the best results.
Enhance the shape with liquid, gel, or pencil liner for a complete and polished look.
Pros:
Achieve perfect cat eyes and winged eyeliner in seconds.
Compatible with various eyeliner types, including gel, cream, and liquid.
Effortlessly create top and bottom liners.
LKE 2-in-1 Cat Eyeliner Stencil
Struggling with liquid eyeliner? The LKE 2-in-1 Cat Eyeliner Stencil makes it simple to achieve dramatic, feline-inspired eyes with minimal effort. This package includes two cat-shaped stencils and a style guide template, allowing you to create up to 10 different eye makeup looks.
Pros:
Delivers a prominent and intense eyeliner look.
Time-efficient and cost-effective application.
Easy two-step process for flawless cat eyeliner.
Long-lasting, sexy finish suitable for all eye shapes and sizes.
SEPHORA COLLECTION Cat Eye Velvet Eyeliner Applique Addiction
Looking for an eyeliner tool that sparks creativity and enhances your liner game? The SEPHORA COLLECTION Cat Eye Velvet Eyeliner Applique Addiction is perfect for crafting flawless liquid liner looks. These easy-to-use stickers help you achieve perfect cat eyes instantly, compatible with any eyeliner formula—be it pencil, pen, gel, cream, liquid, or powder.
Features:
Versatile Compatibility: Works with all types of eyeliners.
Instant Application: Simply peel and apply for a sparkling liner effect.
Eye-Catching Design: Creates a flirty, winged look that turns heads.
Pros:
Inspires creative and flawless eyeliner applications.
Simplifies the process of achieving the perfect cat eye.
Provides a long-lasting and striking finish.
Eyeliner stencils are a game-changer for anyone looking to enhance their eye makeup effortlessly. Whether you're a beginner or a makeup pro, these top-rated stencils from Beth Bender Beauty, TailaiMei, LKE, and SEPHORA COLLECTION offer versatile and reliable tools to achieve stunning eyeliner looks every time. Invest in these high-quality stencils and transform your makeup routine with precision and ease.
0 notes
Text
Makeup Must-Haves: The Essential Cosmetic Items for Every Beginner
Hey there, beautiful! Ready to dive into the dazzling world of makeup? Whether you're just starting out or looking to up your beauty game, we've got the lowdown on all the must-have cosmetic items you'll need to create stunning looks.
From essential cosmetic items to the best cosmetics makeup kit, this guide will have you feeling confident and fabulous in no time. Plus, we'll introduce you to some fabulous makeup kits that will make your makeup journey even more exciting. So, grab your brushes, and let's get glam!
The Basics: Your Essential Makeup Must-Haves
Foundation: The base of every great makeup look. Find a foundation that matches your skin tone perfectly for that flawless finish.

Concealer: Say goodbye to dark circles and blemishes! A good concealer is your best friend for achieving a smooth, even complexion.

Blush: Add a pop of this color cosmetic to your cheeks for a fresh, youthful glow. Cream or powder, the choice is yours!

Eyeshadow Palette: Experiment with different shades to create endless eye-catching looks. Start with a neutral palette if you're a beginner.

Mascara: Enhance those lashes! Mascara opens up your eyes and adds a touch of drama.

Eyeliner: From subtle lines to bold wings, eyeliner is essential for defining your eyes.

Lipstick: Whether you love bold reds or soft nudes, a good lipstick can transform your look in an instant.

Setting Spray: Keep your makeup in place all day long with a setting spray. No more midday touch-ups needed!

The Ultimate Makeup Kits
Now that you know the basics, it's time to introduce you to some fabulous cosmetics makeup kits that make getting started a breeze. Colorbar offers a range of makeup combo sets that are perfect for beginners and pros alike.
BE WHO YOU WANT TO BE - Makeup Kit by Colorbar
This all-in-one “Be Who You Want To Be- Makeup Kit’ is perfect for those who want to experiment with different looks. It includes a range of color cosmetics, from a universally-flattering highlighter, vibrant yet natural-looking blush, iconic 10-in-1 color correcting powder and three high-pigmented, opulent shades of eyeshadow. With this kit, you can truly "be who you want to be" and express your unique style.
Glitz Box by Colorbar
Ready to add some sparkle to your life? This spellbinding Glitz Box unwraps seven heavenly products Take Me As I Am Vegan Matte Lipstick, Cosmic Pouch, Intensely Rich Kajal, On the Go Mini Makeup Remover Wipes, 2 Vegan Nail Lacquers. This kit’s makeup combo set is perfect for those special occasions when you want to stand out.
Dazzle Box by Colorbar
The Dazzle Box is your go-to for creating show-stopping looks. This shimmering Dazzle Box unwraps ten mesmerizing products:

Take Me As I Am Vegan Matte Lipstick
Colorbar Powerkiss Vegan Matte Lipcolor
Sexy Twosome Blusher
Cosmic Soft Vanity Bag
Intensely Rich Kajal
On the Go Mini Makeup Remover Wipes
2 Vegan Nail Lacquers
White Deo For Women
Sindoor
This kit is perfect for makeup lovers who aren't afraid to make a statement.
Shopping for Cosmetics Products Online
Shopping for makeup has never been easier! With a plethora of cosmetics products online, you can find everything you need from the comfort of your home. When buying cosmetics online, one should keep certain things in mind such as checking reviews, verifying ingredients, ensuring the seller's authenticity, and comparing prices.
Many online stores offer detailed product descriptions, reviews, and even virtual try-on features to help you choose the perfect products. Plus, you can often find great deals and makeup combo sets that save you money while stocking up on all your beauty essentials.
Final Tips for Makeup Beginners
Practice makes perfect: Don't be afraid to experiment and make mistakes. The more you practice, the better you'll get.
Invest in good brushes: Quality brushes make a huge difference in the application and finish of your makeup.
Skincare first: Always start with a clean, moisturized face. Good skincare is the foundation of great makeup.
So there you have it, gorgeous! With these essential cosmetic items and the fabulous makeup kits, you're all set to embark on your makeup journey. Remember, makeup is all about having fun and expressing yourself. So go ahead, play with those colors, and create the looks that make you feel amazing. Happy glamming!
0 notes
Text
You won't believe 8 tips to try now video text welcome to another eye doctor uk video in this video, I'm going to show you eight of the best tried and tested phone repair tips and tricks that you simply cannot live without I've, kept these tips and tricks Up my sleeve for a little while, but I genuinely think some of these will really help you so whether you're a seasoned pro or an absolute beginner. I think you can take something away from this video and probably use it to make your life a little bit easier and your workflow a little bit more efficient, so sit back, relax and, let's start with tip one tip number one say goodbye. So if you've ever tried to remove a battery that is secured down with that nasty battery, adhesive and you've either snapped one of the pull tabs on an iphone one or there just aren't any pull types there like on a samsung phone you'll, be all too familiar With them, it's all too tempting to take some kind of prime tool and try and get underneath the battery to pop it out.
But, of course, using this technique puts the battery at risk of damage and potentially exploded. Instead, soak all around the battery with a generous glug of isopropyl alcohol and then leave it to soak for five to ten minutes once the isopropyl has done its magic. Take one of these suction cups, like the ifixit one that I've got here and attach it to the battery. You should be able to just pull upwards sort of like opening a book to separate the battery from the frame.
You'll probably also find that it's got these wrinkly sort of creases on the back of the battery wrap in there fear not just take a little squeegee tool and flatten out those ripples tip number two nine times out of ten. You don't need to replace the air speaker on the phone if you've been repairing devices for a while. You will know that esp speaker mesh, especially iphone airspeaker mesh, gets gunked up really bad with either earwax makeup or sweat and any other things that I don't really want to think about to solve this. You rarely even have to open up the phone.
Just add a couple of drops of isopropyl alcohol and play the sound that I've linked above me just here. The 165 hertz vibration is the perfect frequency to loosen up any blockages in that mesh. Don't just take my word for it either.
There are literally hundreds of comments on that same video, where people have even already tried replacing the speaker before trying that technique. The results for doing this will literally blow your eardrops tip number three in the previous tip. You might have noticed me using the cleaning brush with a clean room, wipe on the end of it. This is a really good way to clean up really dusty phone chassis, gunked up logic boards, all like in the previous tip, iphone air speakers just soak the clean room wipe in either some alcohol or some cleaning solution, whatever you're using and brush over it with either A toothbrush or other cleaning brush, you should know it's a big difference, especially when, using this trick to clean logic boards, when they're covered in flux, resin, dew or corrosion tip, number four tip number four, and probably one of my favorite time.
Saving tricks applies to ipad digitizers. If you've ever removed an ipad screen planning to reinstall. It later then touched it.
You'll know how tricky it can be to get the inside of the glass super clean and smear 3. Everyone knows that prevention is better than the cure. So take some of this very low tax cellophane tape and cover the inside of the digitizer in it from the minute that you've first remove it to prevent dust or smears getting onto the inside of the glass tip number five, whilst we're on the subject of ipads. If you've ever worked with them before, you'll know how frustrating it can be when the corners of them become dented and bent.
There are small grinding pens available for this, but my favorite tool that packs a lot more power. Is this dremel with pen type attachment and small grinding disc attached? I usually work slowly grinding a small bit away at a time.
You'll also notice that this 10 mil diameter disc, is pretty much the perfect size for the job once you've ground a bit away line up your glass and if it fits happy days, if not go over the corner again until it does fit, then finally make sure You take off any burrs left behind with a miniature file. You'll never get it perfect again, but I guarantee that your customers will be much more grateful for some light.
Abrasion marks on the edges, rather than a badly fitted digitizer, that's going to break very, very easily again tip number six if you're working on a device that you've never worked on before and you're worried about misplacing screws or other parts that you took out of the Phone already get yourself one of these magnetic whiteboard masks. You can mark up and label any screws, as you remove them to help you when it comes to putting stuff back together, another useful tool that I've found when disassembling unfamiliar devices or, if you can't figure out where one screw goes, it's head to ifixitcom and search For the model of the phone that you're, taking apart, followed by the word, tear down their site has loads of high quality images of devices taken apart already that you can use for reference when disassembling or reassembling a device tip number seven. This tip is a bit more gimmicky than the other tips that I've given you here, but it literally got millions and millions of views on both our tick tock and on our facebook page. So I thought it'd be best to share it with you as well.
Going back to the first tip talking about removing batteries, you can really speed up the process by using one of these electric screwdrivers to wind. The adhesive easily out of there simply pull a small amount of the pull tab and then stick it to the end of your electric screwdriver and just press. Go it'll, pull it out real nice and easy, and it just works tip number eight foreign guys.
I'm sorry! I've tricked you, they weren't, actually, eight tips, I've run out of ideas and my notes only went up to the ones what I've done before, but I thought, if I say hey, it makes it a nice even number, rather than a seven, so tip number eight is Just to like subscribe and hit the notification icon so that you can get updates the next time that I post. Thank you everybody for watching and I'll see you next time, foreign ``
0 notes
Text
The Ultimate Guide to Lash Remover: Everything You Need to Know

Eyelash extensions are now a common beauty item because they make it easier to get longer, fuller lashes without having to use mascara every day. Nevertheless, despite how much we adore our lash extensions, there comes a time when they must be removed. Lash removers come into play at this point. This guide will cover all aspects of lash removers, from their types to how to use them, so you can remove your lash extensions safely and effectively.
What is a Lash Remover?
A specialized product known as a lash remover is made to dissolve the adhesive that is used to attach eyelash extensions to your natural lashes. When you use the right lash remover, you can be sure that your natural lashes won't be damaged during the process of taking them out. There are many different types of lash removers, including liquids, gels, and creams, each of which has its own set of advantages.
Kinds of Lash Removers
Cream Lash Remover:
Pros: Cream lash removers are a great choice for beginners and people with sensitive eyes because they are thick and less likely to get into your eyes. Additionally, they are simpler to control during application.
Cons: When compared to other types, the thick consistency may require more time to use.
Remover for Gel Lash:
Pros: Gel lash removers quickly dissolve lash glue and are highly effective. They are likewise less inclined to dribble, giving a protected expulsion process.
Cons: Particularly for those who are new to using lash removers, they may be slightly more challenging to apply precisely.
Remover for Liquid Lash:
Pros: Liquid lash removers are the most rapid and efficient at removing the adhesive. They are great for use in business.
Cons: There is a greater risk of getting the product into your eyes, which can cause irritation, because they are runny.
How to Use a Lash Remover Safely
It is essential to use a lash remover correctly to avoid damaging your natural lashes or irritating your eyes. A step-by-step tutorial on how to use a lash remover can be found here:
Accumulate Your Provisions: A mirror, cotton pads or Q-tips, a lash remover, and a clean, flat surface to work on are all you'll need.
Get ready to see: Wash your face well and take off any makeup. This makes it more likely that the lash remover will be able to work well on a clean surface.
Put the Lash Remover on: Apply the lash remover to the base of your lash extensions gently with a Q-tip or cotton pad. To avoid pulling on your natural lashes, be gentle.
Observe the Adhesive Dissolving: Follow the directions that come with your lash remover. In most cases, it takes a few minutes for the adhesive to completely dissolve.
Take the Extensions Out: Using a clean cotton pad, gently slide the lash extensions off once the adhesive has dissolved. Apply a little bit more remover and wait a few more minutes if they don't easily come off.
Clean Your Lashes: Wash your eyes with a gentle cleanser to remove any lash remover residue after all extensions have been removed.
Tips for Keeping Natural Lashes Healthy :
When applying and removing lash extensions, you should always be gentle. Your natural lashes may break or fall out when you handle things rough.
Utilize Quality Items: To reduce the possibility of damage and irritation, make an investment in adhesives and lash removers of high quality.
Give Your Eyelashes Some TLC: If you want your natural lashes to recover and remain healthy between applications of lash extensions, think about taking breaks.
Conclusions :
In conclusion, anyone who enjoys eyelash extensions needs a lash remover. You can enjoy the beauty of extensions while maintaining the health of your natural lashes by knowing the various types and how to use them safely. To get the most out of your liquid, gel, or cream remover, use it with care and gentleness at all times. Happy Lashing!
1 note
·
View note
Text
The Ultimate Guide to Scary Makeup Mastery

In beauty and transformation, scary makeup stands out as a thrilling exploration of creativity and fear.
It's not just about changing your appearance; it's about storytelling, evoking emotion, and, perhaps most importantly, having fun with the darker side of the imagination. Whether you want to be the life of the Halloween party, an actor in a horror movie, or simply explore the art for personal enjoyment, mastering scary makeup can be an exhilarating journey. This guide is your compass through the shadowy path of scary makeup, from beginner's basics to professional effects, ensuring that every brushstroke contributes to an unforgettable transformation.

What is scary makeup?
A cornerstone of horror films and Halloween celebrations, scary makeup transcends mere cosmetic application to embody an art form that transforms the mundane into macabre. This genre of makeup styling plays with the elements of fear, intrigue, and the supernatural, allowing enthusiasts and artists to create visages that range from subtly eerie to downright terrifying.
Expert tips for mastering scary makeup
Before we dive into the nitty-gritty of scary makeup, let's gather some wisdom from the pros. These tips will hone your skills and ensure your scary makeup is effective and long-lasting.
Start with a clean canvas: Make sure your face is moisturised before applying makeup. This will help your makeup adhere better and last longer.
Invest in quality products: Quality makeup looks better and is gentler on your skin. This is especially important for makeup that will be on for a long time.
Layering is key: Build your makeup in layers to achieve depth and realism. This technique is especially effective for treating wounds, scars, and other textured effects.
Focus on the eyes: The eyes are often the focal point of scary makeup. Use contacts, exaggerated eyeliner, or shadows to make them more sinister.
Practice blending: Seamless blending is crucial to avoid harsh lines that can detract from the realism of your scary makeup. Take the time to blend edges and transitions smoothly.

Essential Scary Makeup Products and Tools
The proper arsenal of products and tools is crucial to creating effective scary makeup. Here's what you need to get started:
The palette of fat colours: This palette offers a wide range of colours for creating different effects, from bruises to ghostly pallor.
Liquid Latex: Perfect for creating textured skin, wounds, and ageing effects.
Fake Blood is a must for adding a gory touch to your makeup. You can choose different viscosities depending on the effect you're going for.
Special Effects Gelatin: Great for creating burns, blisters and flesh-like textures.
Rigid Collodion: Ideal for creating scarring effects. It folds the skin to mimic the look of scars.
Black and White Makeup: Essential for creating depth shadows and enhancing bone structure in your scary makeup.
Detail Brushes and Sponges: Essential for applying and blending makeup precisely.

Key Scary Makeup Techniques
Using specific techniques can take your scary makeup from good to truly terrifying. Here are a few to master:
Colour theory: Understanding which colours mimic bruises, veins, and decomposition can enhance the realism of your makeup.
Texture creation: Techniques such as stippling can create texture on the skin, making effects such as rotting flesh more believable.
Highlight and shadow: This can add depth to your makeup, making prosthetics and painted features more three-dimensional.
The Psychology Behind Scary Makeup
Scary makeup does more than change appearances; it taps into our primal fears and fascination with the unknown. By mimicking signs of disease, death, and decay, scary makeup evokes a visceral reaction rooted in our instinctive aversion to these universal signs of danger.

Scary Makeup Tutorial: Creating a Frightening Visage
Prepare your face
Begin with a clean, moisturised face. Apply a foundation to create a smooth base so your creepy makeup will adhere well and last longer.
Apply foundation
Apply a base coat of light or coloured foundation, depending on the desired effect. This sets the stage for more detailed work.
Use a sponge to ensure even coverage.
Consider using a shade lighter than your skin tone to create a ghostly effect.

Create depth and contour
Use dark shades to hollow out areas such as the eyes, cheeks, and temples to give the face a gaunt look.
Use blending brushes for smooth transitions.
Layer different shades for a more realistic effect.
Add special effects
Add liquid latex, gelatin, or rigid collodion for wounds, scars, and texture. Apply fake blood as needed for gory details.
Practice layering these materials to achieve the desired effect.
Use detail brushes for precision.
Finishing touches
Set your makeup with a setting powder or spray to ensure it stays in place throughout the event.
Pay attention to areas that may wrinkle or smudge.
Add finishing touches like false eyelashes or contact lenses to enhance the scary factor.

Celebrity Inspiration for Scary Makeup
Looking for ideas? These celebrities have nailed their scary makeup looks, providing plenty of inspiration for your next creation:
Bill Skarsgård as Pennywise
Bill Skarsgård's portrayal of Pennywise in It is a masterclass in scary makeup, combining exaggerated features with a chilling expression to bring the nightmarish clown to life.
Focus on the iconic red makeup and creepy smile.
Remember the eerily pale complexion and exaggerated forehead.
Doug Jones in Pan's Labyrinth
Doug Jones' roles in Pan's Labyrinth, particularly as the Pale Man, showcase the transformative power of scary makeup, using prosthetics and body paint to create a truly terrifying character.
Emulate the skin texture and creepy eye placement.
Capture the emaciated look with clever contouring.

Helena Bonham Carter as the Red Queen
While not traditionally "scary," Helena Bonham Carter's Red Queen in "Alice in Wonderland" features exaggerated makeup that can inspire whimsical, terrifying looks.
The oversized, heart-shaped lips and heavily lined eyes are key features.
Use white makeup to mimic her exaggeratedly pale skin.
Javier Botet's various roles
Known for his roles in horror films like Mama and The Conjuring 2, Javier Botet uses his unique physique and makeup to create deeply disturbing characters.
Study his use of elongated limbs and distorted body shapes.
Incorporate similar unsettling elements into your makeup.
Johnny Depp as Sweeney Todd
Johnny Depp's Sweeney Todd offers a more subdued but still haunting makeup look, with pale skin, darkened eyes, and strategically placed blood spatter.
The hollowed-out eyes and pale skin are essential.
Add subtle blood effects for a freshly "barbered" look.

Your partner in beauty and creativity
Ready to take your scary makeup to the next level? MOBILESTYLES connects you with professional makeup artists who can bring your scariest visions to life. Whether you're preparing for Halloween, a themed party, or a film production, our experts offer personalised beauty solutions at your doorstep. Embrace the art of transformation with MOBILESTYLES and let your imagination run wild!
0 notes
Text
Unlock Your Makeup Potential: Enroll in Jess Maas Beauty's Comprehensive Online Course
Are you ready to unleash your inner makeup artist? Whether you're a budding beauty enthusiast or an aspiring professional, Jess Maas Beauty invites you to embark on a transformative journey with our comprehensive online makeup course. With our expert guidance and flexible learning platform, you'll have the tools and knowledge to unlock your makeup potential and take your skills to the next level.
At Jess Maas Beauty, we believe that makeup is more than just a tool for enhancing beauty – it's a form of self-expression and empowerment. Our online course is designed to inspire creativity, build confidence, and equip you with the skills needed to excel in the dynamic world of makeup artistry.
So, what sets our online course apart from the rest?
First and foremost, our course is comprehensive. We leave no stone unturned as we guide you through every aspect of makeup artistry, from the basics to the advanced techniques. Whether you're learning how to perfect the perfect winged eyeliner or mastering the art of complexion perfection, our curriculum is carefully crafted to cover all the essential skills and knowledge you need to succeed.
But our commitment to excellence doesn't end there. What truly sets Jess Maas Beauty apart is our personalised approach to learning. When you enroll in our online course, you'll receive one-on-one guidance and feedback from industry expert Jess Maas herself. With years of experience working with renowned brands and celebrities, Jess brings a wealth of knowledge and expertise to the table, ensuring that you receive the highest quality instruction every step of the way.
Flexibility is another hallmark of our online course. We understand that life can be hectic, and finding time to pursue your passions can be challenging. That's why our online platform allows you to learn at your own pace, on your own schedule. Whether you're a busy parent, a full-time student, or juggling multiple jobs, our flexible learning platform makes it easy to fit your studies around your existing commitments.
But perhaps the most valuable aspect of our online course is the sense of community it fosters. When you enroll in Jess Maas Beauty's online course, you become part of a supportive community of like-minded individuals who share your passion for makeup. Connect with fellow students, share tips and tricks, and cheer each other on as you progress through the course. Our online forums and social media groups provide a space for collaboration, inspiration, and encouragement, ensuring that you never feel alone on your makeup journey.
At Jess Maas Beauty, we believe that makeup is for everyone – regardless of age, gender, or skill level. Whether you're a complete beginner or a seasoned pro, our online course has something for everyone. So why wait? Unlock your makeup potential and enroll in Jess Maas Beauty's comprehensive online course today. The world of beauty is waiting for you to make your mark.
0 notes
Text

Learn how to tailor your makeup to suit different face shapes with this detailed guide. Whether you have a round, oval, square, or heart-shaped face, this article offers expert tips on highlighting your best features and creating a balanced look. From contouring techniques to the perfect blush placement, discover how to enhance your natural beauty with makeup that complements your unique face shape. Perfect for both beginners and pros. know more
0 notes
Text
Unlocking Beauty Secrets.click here
As an avid makeup enthusiast, I'm always on the lookout for ways to enhance my skills and elevate my beauty routine. That's why stumbling upon "100 Makeup Tips" was like discovering a treasure trove of beauty wisdom neatly packaged into a convenient digital format.
Firstly, the comprehensiveness of the guide is astounding. From fundamental techniques to advanced tricks, this collection leaves no stone unturned. Whether you're a beginner eager to master the basics or a seasoned pro looking to refine your craft, there's something valuable for everyone.
What sets this guide apart is its practicality. Each tip is concise yet impactful, making it easy to implement them into your daily routine. Whether it's achieving the perfect winged eyeliner or mastering the art of contouring, the step-by-step instructions accompanied by clear illustrations ensure success is within reach.
Moreover, I appreciate the versatility of the guide. It caters to a diverse range of preferences, skin types, and makeup styles. Whether you prefer a natural, everyday look or daring avant-garde creations, you'll find inspiration aplenty within these pages.
Another aspect worth highlighting is the convenience of the digital format. Accessible across various devices, from smartphones to tablets, it's like having a beauty guru on-the-go whenever you need it. Plus, the PDF format allows for easy printing of specific tips or sections for quick reference.
Overall, "100 Makeup Tips" is a must-have addition to any beauty enthusiast's collection. It's not just a guide; it's a roadmap to unlocking your full beauty potential. Whether you're a makeup aficionado or a novice eager to explore the world of cosmetics, this digital gem is sure to become your go-to resource for all things beauty.CLICK HERE
#Makeup Tips#Beauty Tips#Cosmetics Advice#Makeup Techniques#Beauty Hacks#Makeup Secrets#Makeup Tricks#Beauty Guides#Makeup Tutorial#Makeup eBook#Beauty PDF#Cosmetics Handbook#Makeup Mastery#Makeup Essentials#Glamour Guide
1 note
·
View note
Text
Write For Us Makeup
Welcome to our comprehensive guide on write for us makeup is Whether you’re a makeup enthusiast or a beginner looking to enhance your beauty skills, you’ve come to the right place. In this article, we’ll delve deep into the world of makeup, covering everything from basic techniques to advanced tricks that will elevate your makeup game to the next level.
Understanding the Basics
Choosing the Right Products
The foundation of a flawless makeup look begins with selecting the right products. It’s essential to consider your skin type, undertone, and desired finish when choosing foundation, concealer, and other complexion products. Opt for formulas that complement your skin’s needs and enhance your natural beauty.
Preparing Your Canvas
Before applying makeup, it’s crucial to prep your skin properly. Start by cleansing your face to remove any dirt, oil, or impurities. Follow up with a hydrating moisturizer to ensure your skin is smooth and supple. Additionally, don’t forget to apply a primer to create a smooth base for your makeup and prolong its wear.
Perfecting the Base
Flawless Foundation Application
Achieving a flawless base is the key to a stunning makeup look. When applying foundation, use light, sweeping motions to blend the product evenly across your face. Focus on areas that need extra coverage, such as blemishes or redness, and build up the coverage gradually for a natural finish.
Concealing Imperfections
Concealer is your secret weapon for hiding imperfections and brightening the under-eye area. Choose a concealer that matches your skin tone and apply it sparingly to areas that need extra coverage. Remember to blend carefully for a seamless finish that looks natural and effortless.
Enhancing Your Features
Sculpting with Contour and Highlight
Contouring and highlighting are essential techniques for defining your facial features and adding dimension to your makeup look. Use a matte bronzer to contour the hollows of your cheeks, temples, and jawline, then apply a luminous highlighter to the high points of your face, such as the cheekbones, brow bones, and the bridge of the nose.
Accentuating the Eyes
The eyes are often considered the focal point of any makeup look. To enhance your eyes, start by priming the lids to ensure your eyeshadow stays in place all day. Then, experiment with different eyeshadow shades and textures to create depth and dimension. Don’t forget to add mascara and eyeliner to define your lashes and make your eyes pop!
Finishing Touches
Setting Your Makeup
To ensure your makeup lasts all day, it’s essential to set it with a setting spray or translucent powder. This will help lock in your makeup and prevent it from fading or melting throughout the day. Simply spritz the setting spray evenly over your face or use a fluffy brush to dust translucent powder over your makeup for a flawless finish.
Adding a Pop of Color
No makeup look is complete without a touch of color! Experiment with different blush and lipstick shades to add a pop of color to your cheeks and lips. Whether you prefer bold reds, soft pinks, or vibrant oranges, there’s a shade out there to suit every skin tone and personal style.
Conclusion
Congratulations, you’re now equipped with the knowledge and skills to master makeup like a pro! By following the tips and techniques outlined in this guide, you’ll be able to create stunning looks that enhance your natural beauty and boost your confidence. So go ahead, unleash your creativity, and embrace the transformative power of makeup!
Read More : taylor swift bun
Contact Us :
How to Submit Your Aricle: If you’re ready to contribute to BeautyGlitch.in, please send your article to [email protected]
0 notes
Last Seen Blogs

bihikingguy4
Luv2Chat

pablogavii
Fanpage for

fukame
JUST SHIP ZERLU

seenlyme
Untitled

mumaforat
Untitled