#professional makeup tips for beginners
Text
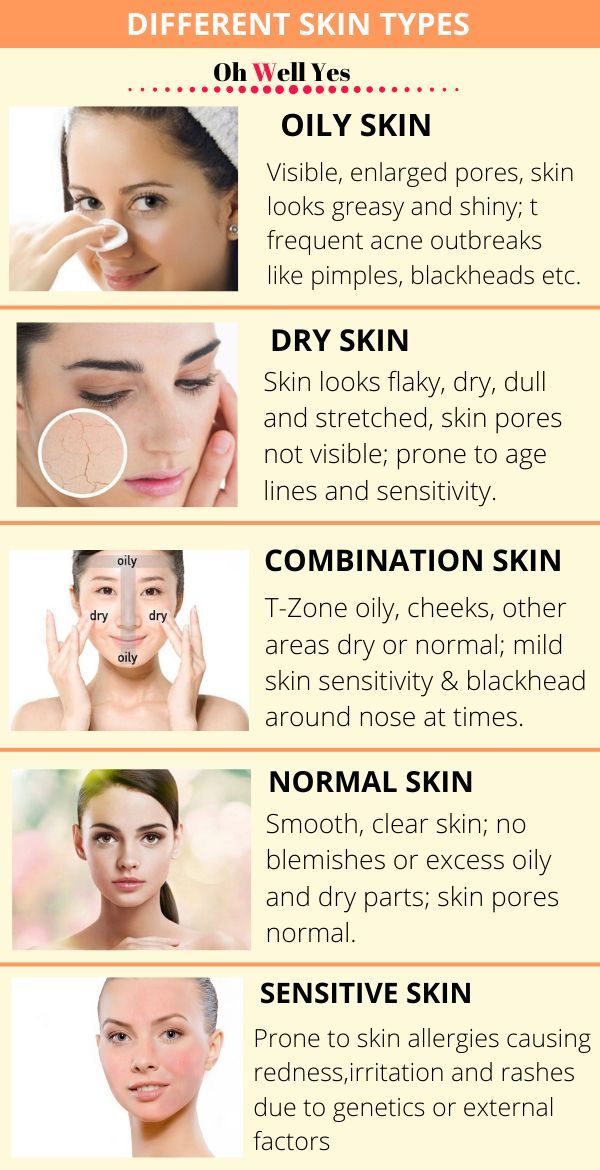
Makeup Tips for Different Skin Types - AZD Makeup & Skin Inc
Here are some makeup tips tailored to different skin types:
Dry Skin:
Start with a hydrating primer to create a smooth base.
Use a moisturizing foundation or a BB cream to add moisture and even out skin tone.
Avoid powder-based products as they can emphasize dry patches. Instead, opt for cream blushes and liquid highlighters for a dewy finish.
Set makeup with a hydrating setting spray to lock in moisture.
Oily Skin:
Begin with an oil-free mattifying primer to control shine and minimize pores.
Choose a matte or oil-free foundation to keep shine at bay throughout the day.
Use powder-based products such as pressed powder blushes and matte bronzers to set makeup and absorb excess oil.
Carry oil-absorbing sheets for touch-ups during the day.
Combination Skin:
Use a lightweight, oil-free moisturizer to hydrate dry areas without adding shine to oily zones.
Apply a mattifying primer to the T-zone to control oiliness.
Consider using a medium coverage foundation that balances hydration and oil control.
Use powder products on oily areas and cream or liquid products on dry areas for a balanced finish.
Sensitive Skin:
Look for makeup products labeled as hypoallergenic and fragrance-free to minimize irritation.
Conduct patch tests before trying new products to ensure they don't trigger allergic reactions.
Opt for mineral-based or natural makeup products, as they tend to be gentler on sensitive skin.
Remove makeup gently using micellar water or a mild cleanser to avoid aggravating sensitivity.
Normal Skin:
Lucky you! With normal skin, you have the flexibility to experiment with various makeup textures and finishes.
Choose a lightweight, moisturizing foundation for a natural look.
Experiment with different blush and bronzer formulas to find what works best for your preferences.
Set makeup with a translucent powder for a polished finish.
Enjoy experimenting with different makeup looks without worrying too much about specific skin concerns.
Regardless of skin type, it's crucial to cleanse your skin thoroughly before applying makeup and remove it completely at the end of the day to maintain skin health. Also, remember to wear sunscreen daily to protect your skin from harmful UV rays.
#professional makeup artist#professional makeup artist near me#professional makeup artist kit#professional makeup artist supplies#professional makeup artist classes#pro makeup artist near me#professional makeup artist course near me#professional costume makeup artist near me#professional makeup tips#professional makeup tips for beginners#pro makeup tips#pro makeup tips and tricks#pro makeup tips for beginners#professional beauty tips#professional makeup advice#professional makeup help#professional makeup artist tips#basic makeup tips for beginners#makeup tips for over 50#makeup tips for over 55#best pro makeup tips#pro eye makeup tips#pro makeup artist tips#how to do makeup like a pro#how to apply makeup like a pro
0 notes
Text

Effective Makeup Tips And Tricks For Beginners
Unlock the secrets of effective makeup tips and tricks for beginners. Learn essential techniques to enhance your features, from flawless foundation application to creating captivating eye looks. Our step-by-step tutorials and product recommendations will guide you through the world of makeup, helping you build confidence and creativity.
Embrace the art of makeup and embark on a transformative journey that empowers you to express your unique beauty with skill and ease.
↗ https://mymakeuptips.com/
#makeup tips online#Makeup Tips and Tricks#Makeup Tips And Tricks For Beginners#Natural Makeup Tricks#Professional Makeup Tips
1 note
·
View note
Text
The Basics of Skin Care
A 100 skincare tips for beginners:
Cleansing:
1. Cleanse your face twice a day.
2. Use a gentle, sulfate-free cleanser.
3. Avoid hot water, as it can strip natural oils.
4. Use a cleansing brush or washcloth for gentle exfoliation.
5. Remove makeup before bedtime.
6. Double cleanse if you wear heavy makeup.
7. Don't over-cleanse; it can lead to dryness.
Exfoliation:
8. Exfoliate 1-3 times a week, based on your skin type.
9. Choose chemical exfoliants like AHAs or BHAs.
10. Be gentle when physically exfoliating.
11. Avoid over-exfoliation to prevent irritation.
Moisturizing:
12. Use a moisturizer suitable for your skin type.
13. Apply moisturizer while your skin is slightly damp.
14. Don't forget your neck and chest.
15. Consider using a humidifier in dry climates.
Sun Protection:
16. Always wear sunscreen, even on cloudy days.
17. Use a broad-spectrum SPF of at least 30.
18. Reapply sunscreen every 2 hours.
19. Wear protective clothing and sunglasses.
20. Avoid tanning beds and excessive sun exposure.
Anti-Aging:
21. Use products with antioxidants like vitamin C.
22. Apply retinol at night for anti-aging benefits.
23. Consider peptides for collagen support.
24. Stay hydrated to maintain skin elasticity.
25. Get enough sleep for skin repair.
Hydration:
26. Drink plenty of water for overall skin health.
27. Use a hydrating serum or hyaluronic acid.
28. Avoid hot showers that can dry out your skin.
29. Limit alcohol and caffeine intake.
Acne Management:
30. Use salicylic acid for acne-prone skin.
31. Don't pop pimples; it can lead to scarring.
32. Change pillow cases regularly.
33. Maintain a balanced diet to reduce breakouts.
34. Consult a dermatologist for severe acne.
Skincare Routine:
35. Develop a consistent skincare routine.
36. Patch test new products.
37. Customize your routine based on your skin's needs.
38. Consider professional facials occasionally.
Makeup:
39. Clean makeup brushes and sponges regularly.
40. Avoid sharing makeup to prevent infections.
41. Choose non-comedogenic makeup products.
42. Remove makeup before going to bed.
Eye Care:
43. Use an eye cream to address under-eye concerns.
44. Be gentle when applying and removing eye makeup.
45. Get enough sleep to reduce under-eye puffiness.
Lifestyle:
46. Manage stress to prevent skin issues.
47. Get regular exercise for better blood flow.
48. Avoid smoking and secondhand smoke.
49. Limit alcohol consumption.
50. Eat a balanced diet rich in fruits and vegetables.
Special Treatments:
51. Use a face mask 1-2 times a week.
52. Try sheet masks for extra hydration.
53. Consider facial oils for added moisture.
54. Use a lip balm to prevent chapped lips.
Skin Conditions:
55. Consult a dermatologist for skin conditions.
56. Use products with soothing ingredients for sensitive skin.
57. Eczema-prone skin should avoid harsh products.
58. Rosacea-prone skin should use gentle, non-irritating products.
59. Psoriasis-prone skin may benefit from salicylic acid.
DIY Skincare:
60. Be cautious with DIY treatments; research first.
61. Natural ingredients like honey and aloe can be beneficial.
62. Avoid DIY recipes with harsh or abrasive ingredients.
63. Test DIY masks on a small area first.
Sleep:
64. Get 7-9 hours of sleep for skin regeneration.
65. Sleep on a silk or satin pillowcase to reduce friction.
Hands and Feet:
66. Moisturize hands and feet, especially in winter.
67. Use sunscreen on your hands to prevent age spots.
Body Skin Care:
68. Don't forget to moisturize your body.
69. Exfoliate your body regularly.
70. Take short, lukewarm showers to prevent dry skin.
Shaving:
71. Shave in the direction of hair growth.
72. Use a sharp, clean razor.
73. Apply a moisturizing shaving cream.
Hair Care:
74. Use a gentle shampoo and conditioner.
75. Avoid hot water when washing your hair.
76. Protect your hair from UV damage.
Hormonal Changes:
77. Adjust your skincare routine during hormonal changes.
78. Birth control can affect skin; consult a dermatologist.
79. Manage menopausal skin changes with skincare.
Allergies:
80. Be aware of allergens in skin care products.
81. Perform a patch test for new products.
82. Hypoallergenic products can be a safe choice.
Tattoo Care:
83. Follow aftercare instructions for tattoos.
84. Use a mild, fragrance-free lotion.
85. Avoid direct sunlight on a healing tattoo.
Skin Care Tools:
86. Cleanse skincare tools regularly.
87. Replace loofahs and brushes when they wear out.
Consult a Professional:
88. If you're unsure about a product, ask a dermatologist.
89. Consider professional treatments for specific concerns.
Inflammation:
90. Use products with anti-inflammatory ingredients.
91. Manage skin redness with calming products.
Massage:
92. Gently massage your face for better circulation.
93. Use upward motions to prevent sagging.
Eyes and Lips:
94. Use SPF lip balm to protect your lips.
95. Choose an eye cream with ingredients like caffeine.
Preventive Care:
96. Start a skincare routine early for preventive care.
97. Be patient; skincare results take time.
98. Embrace your natural beauty.
99. Avoid comparing your skin to others'.
100. Remember that skincare is individual; what works for one person may not work for another.
These tips can help you maintain healthy and radiant skin. However, always consult a dermatologist for personalized advice based on your skin's unique needs.
98 notes
·
View notes
Note
I’ve never tried makeup before and have absolutely no idea where to start. I’m really inspired by the passion for beauty and expression you show in your posts— do you have any suggestions as to where to begin when it comes to makeup?
Omg, I'm so excited to help you out!! I would definitely start with light make-up so let me show you some of my favourite and beginner-friendly products <33
My favourite everyday Lip products are the 'benetint' and the 'Laneige lip sleeping mask'. The benetint 'stains' your lips in a beautiful rosy colour and lasts all day! You can also use it as a blush on your cheeks and nose. <3 The Laneige lip mask is my go-to lip balm and is really great for the wintertime! :)
If you want to cover dark under eyes or blemishes, I really recommend the 'Nars radiant creamy concealer' and the 'too faced Prime + Poreless powder'. Just a few dots under your eyes are enough, and you can just blend it with your fingers and set it with the powder, which makes it stay all day!! <3
For lashes, I would definitely recommend a lash curler if that's scary for you (which I totally understand lol!!) You can just get a professional lash lift!! My favourite mascara at the moment is the 'better than "love making word" (Tumblr please don't ban me lmao) mascara by too faced'.
When you're just starting out, doing your brows is usually the most challenging part, I recommend getting them plugged professionally and starting by using a brow gel to shape them. My recommendation is the 'Got2b Glued 4 Brows'!!
When I was just starting out with make-up I was always watching NikkieTutorials on youtube, her looks are super interesting and her videos are fun to watch!! you can easily pick up some tips and tricks just by watching :)
If you guys want, I can definitely film a little make-up routine and show you how I do my usual makeup!! <33
124 notes
·
View notes
Text
Basic Makeup Tips: A Guide for Beginners
Welcome back! Today, I'm excited to share some of the essential makeup tips I've learned over the past few years. While I'm not a professional makeup artist, I've picked up some valuable insights that I think you'll find helpful. Let's get started!
Prepping your face before applying makeup

1. Cleanse your face using your facial cleanser or a facial pad. This is remove the impurities, dirt and oil from your skin.
2. Secondly, you go in with any serum of your choice. The serum helps to hydrate your skin. I highly recommend the Neutrogena Hydra Boost Serum.
3. Then go in with a moisturizer, I like to use La Roche Posay Double Repair face moisturizer.
4. Lastly, apply a hydrating sunscreen (SPF). I use the Supergoop Play Sunscreen.
~ This last part is optional, but applying primer can be done. Elf Pore Putty Primer is a must!!
Selecting the Right Foundation!
Undertones ૮₍ ˶• ༝ •˶ ₎ა

Choosing the right foundation
ʕ ᵔᴥᵔ ʔ
Discover Your Skin Tone Category Using the Six Options Provided in the Image Above!
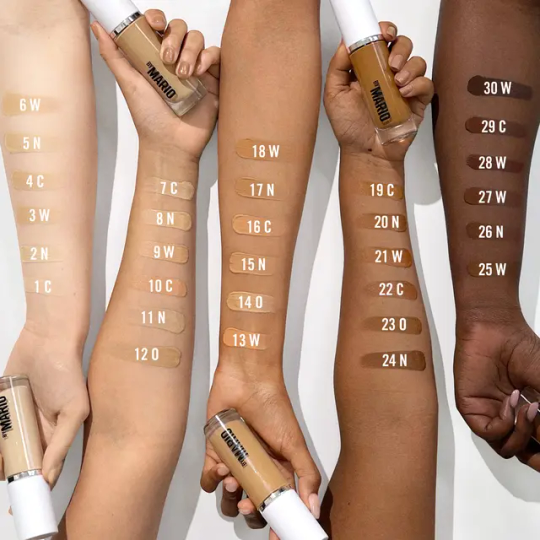
Now, all you have to do is see which color foundation is suitable for your skin!
Color corrector I bought ! ૮ ˶ᵔ ᵕ ᵔ˶ ა

Skin types ଘ(੭ˊᵕˋ)੭* ੈ✩‧₊˚

Choosing the Right Foundation for Your Skin Type ˚ʚ♡ɞ˚
Consider the following tips to pick the appropriate foundation for your skin type:
Oily skin: go for an oil-free matte foundation.
Dry skin: radiant foundation is your best friend.
Combination skin: opt for a hydrating oil-free foundation.
Conclusion of Today's Session!
Thank you for joining us today! I hope you enjoyed our session. Don't forget to come back next Sunday at 11:30 pm for our next meeting !
❤ (ɔˆз(ˆ⌣ˆc)

Stay safe beauties ꒰ᐢ. .ᐢ꒱₊˚⊹
3 notes
·
View notes
Text
Facepaint cosplay makeup tips from someone who’s been doing it for 7 years because fuck it why not:
(Keep in mind I work with primarily water based facepaints because they operate best with my skin type)
You will be blowing out (whatever color) facepaint snot out of your nose for 48 hours after wearing the facepaint. Do not be alarmed, happens to all of us, don’t ask me how.
Please do not do more then 2-3 layers the facepaint will begin cracking (far more then usual!) Depending on what brand, that number may vary slightly but not by much. Better a thin and patchy layer then a thick and crackly one. I usually do 2 coats max
If by the time you’ve done two layers there’s still a mistake, just leave it. Leave it alone. You will regret trying to add more paint to fix it, just trust me on that one.(If you really can’t help but fix the error then let the rest of the paint on your face dry before you do it, it’ll still result in a cracky finish but it’ll be less severe.)
Mehron paradise paints are excellent once you learn how to use them, but they’re a bit finicky and not as beginner friendly as people say they are imo. Try snazzaroo if it’s your first time working with facepaint ever! I’ve heard oil based facepaints work excellent on the right skin types, unfortunately mine is not, I have very oily skin, and the paint melted right off me within 30 minutes. It was great when it was first applied though! If you have average-to-dry skin, oil based paint might be an excellent option for you! Check it out, I can’t speak on it.
Facial hair, regardless how thick or thin it is, might make your facepaint do weird things in your jaw area. It reaaaallly varies person to person, for me its something I have to/want to shave.
Setting powder is a MUST after you’ve applied your even base layer before you start contouring. My life changed when I figured that out, and my facepaint started looking “professional” and actually lasting more then 2 hours. I can’t express how much I recommend mehron setting powder.
When you’re contouring or using any powder do not expect it to blend on water-based facepaint like it would on skin. The powder sticks very quickly to the paint and doesn’t want to budge, so it’s better to do thin layers until you’re satisfied, and blend quickly.
Expect it to be uncomfortable, especially your first time wearing it. Your entire face, neck, and maybe more are covered in paint, it’s gonna suck lmao. The good news is, once you’re used to it, you’re USED to it. I wore facepaint for 3 days straight 11 hours a day the other weekend, and forgot it was there almost immediately. However, if it burns or hurts, remove it immediately, that’s not the facepaint for you!
Don’t be afraid to make expressions! If your facepaint isn’t applied too thickly, it should move with you for a good amount of time before expressions begin to crack into it. (And even when it begins to inevitably wear down, your fun is more important then your facepaint.)
Your teeth might look yellow as fuck! Like gold yellow! It’s ok! First and foremost, yellow teeth are natural, secondly, the contrast between tooth color and the different colors of facepaint tend to make your tooth color appear differently then you’re used to.!
Put your contacts in BEFORE you paint your face and thank me later. :)
If you get paint stuck in your eyelashes, dampen your finger tips and gently strain it out of the lash between your thumb and index finger.
To avoid chapped lips, either find a lipstick in a color you can use, or mix a bit of eyeshadow and chapstick.
There’s no easy way to eat in facepaint, but the best advice I got for you is do not be afraid of eating weird. If you have to unhinge your jaw and clamp into a sandwhich to avoid fucking up your paint, just do it. I stopped caring what people thought of my facepaint eating ritual a long time ago. However, if you can opt for it, popcorn, m&ms, grapes, walnuts, and stuff like that are good to just throw in your mouth. (And of course, touch up paint is never bad to have on hand.)
Drink stuff through a straw! I repeat! If you can! Drink stuff through a straw!
And to conclude: Facepaint. Looks. Bad. Inherently. Facepaint will never look like skin up close. It will look like skin to someone over 5 feet away, and on a camera, but it will never look like actual skin. Expect small cracks even if you did your damndest with the base coat, expect your sweat to create a ring around your nose and eyelid. ESPECIALLY if you plan on wearing the paint for more then a couple hours. It’s inevitable, and it’s perfectly ok!! Even those of us who have been facepainting for years still have our sweat stain and forehead cracking days, it’s just in the business. Don’t let the internet fool you with filters!
Facepaint unfortunately takes a good couple attempts to get the hang of. Your first couple attempts might suck! They might! But please don’t let that stop you from filming videos or going to a convention. It’s a part of the learning curve, and before perfection, cosplay is SUPPOSED to be about fun, and any facepaint is good enough to have fun in.❤️
And ahhh don’t forget to take it off before bed!
Happy cosplaying!
#cosplay#Walt talks#Walt cosplays#cosplay tips#I don’t know if anyone on tumblr particularly cares about this but I’m posting it anyway because I might reference back to it if I ever fil#any facepaint tutorial videos
9 notes
·
View notes
Text
Mastering the Art of Makeup: Finding the Perfect Makeup Artist Near You and Exploring Makeup Tutorials
Introduction :
Makeup has the remarkable ability to enhance one's natural beauty and boost confidence. Whether you're preparing for a special occasion or simply wanting to explore different looks, the expertise of a skilled makeup artist can make all the difference. With the rise of social media and online tutorials, finding the perfect makeup artist near you and discovering makeup tutorials has never been easier. In this article, we will delve into the world of makeup artistry, discuss the benefits of professional makeup artists, and explore the vast array of makeup tutorials available to help you master the art of makeup.
I. The Role of Makeup Artists :
Makeup artists are the magicians behind flawless looks, utilizing their creativity, skill, and knowledge to transform faces into stunning canvases. From weddings and photo shoots to fashion runways and film sets, makeup artists play a vital role in the beauty industry. They possess an in-depth understanding of color theory, facial features, and various makeup techniques to bring out the best in every individual.
When seeking a makeup artist near you, it's essential to consider their experience, portfolio, and reviews from previous clients. A skilled makeup artist will take into account your skin tone, undertones, and personal style to create a customized look that enhances your natural features and complements your desired aesthetic. Their expertise in product selection and application ensures long-lasting and flawless makeup, leaving you feeling confident and radiant.
II. The Convenience of Local Makeup Artists :
In the digital age, finding a makeup artist near you has become incredibly convenient. A simple search using the keywords "makeup artist near me" will reveal a plethora of talented professionals ready to cater to your beauty needs. Choosing a local makeup artist offers numerous benefits, including easy communication, flexibility in scheduling appointments, and the ability to meet face-to-face for consultations and trials.
Furthermore, local makeup artists often have a deep understanding of the local beauty trends, weather conditions, and cultural preferences, allowing them to tailor their services to suit your specific needs. They may also have a network of contacts within the industry, such as photographers and hairstylists, which can be advantageous for special events or professional shoots.
III. Exploring Makeup Tutorials :
Thanks to the power of the internet, makeup tutorials have revolutionized the way people learn and experiment with makeup. Online platforms such as YouTube, Instagram, and beauty blogs are teeming with a wide range of tutorials that cater to beginners and experts alike.
Makeup tutorials offer step-by-step guidance on various makeup techniques, including contouring, highlighting, eyeshadow application, and achieving flawless base makeup. They provide valuable insights into product recommendations, tools, and application tips, allowing individuals to hone their skills at their own pace. Additionally, many tutorials focus on specific makeup looks, such as natural, glam, or editorial styles, giving viewers the opportunity to explore different aesthetics.
While makeup tutorials can be a valuable resource for self-learning, it's important to remember that practice and patience are key. Experimenting with different techniques, products, and color combinations will help you develop your unique style and become more proficient in makeup application.
Conclusion :
Makeup artists and makeup tutorials are powerful resources for anyone looking to enhance their beauty skills. By connecting with a talented makeup artist near you, you can experience the magic of professional makeup application firsthand. Simultaneously, exploring makeup tutorials empowers individuals to experiment with different looks, develop their skills, and embrace their creativity. Whether you're preparing for a special event or simply wanting to elevate your everyday makeup routine, the world of makeup artistry offers endless possibilities for self-expression and self-confidence.
1 note
·
View note
Note
Hi! Im just getting into makeup, and I was wondering if you could answer some of my makeup questions? (you don't have to though)
1. I have shaky hands, would liquid liner or pencil liner be better?
2. are there any specific brands that are really good for beginners?
3. how do I find my right lip shade/foundation shade without spending a bunch of extra money?
4. is foundation *necessary* for a really out-there makeup look?
5. how do you get such straight lines when doing eyeliner/eyeshadow? (and how do I do that? lol)
6. how do I get more confident wearing makeup out and about?
ok, that's all, thank you so much, your blog is so cool. and also you don't need to answer this if you don't want. :)
Hi! Of course! I'm not a professional MUA, I only do makeup on myself, so I'm not the most experienced person, but I'll share what I know in case it's useful.
Sorry I took some time to answer your message, you got some very good questions and I thought about recording videos showing how to do some of the tips I’m talking about to then show you, but I ended up not finding time for that until now, so maybe in the future... But for now, I tried to cover everything in here, so I’m sorry for the gigantic answer. 😅
1. Shaky hands
Here are some things that I do that help me when making precise lines/shapes:
A) Support: I do my makeup on a table, not standing. And when I’m doing eyeliner, to help my hands shake less, I wether support my elbow on the table or I support the side of my hand, or my pinkie finger, on my cheeks.
B) Mirror: I use a table mirror because you don’t need to hold them, like hand mirrors, and you can easily move them, so I can place the mirror in whatever angle or distance I need. The mirror I use have a fix height tho, so to adjust its height I improvise by putting some boxes underneath. There are some more fancy mirrors that are a lot better, mirrors that move to any angle or height and ones that have light on them, but they are more expensive, so I stick with the most basic ones.
C) Visibility: I use a ring light in front of my table while doing my makeup, and the mirror I got is normal in one side and has a 2x zoom on the other side, I also got a smaller one that has a zoom of 5x. I don’t know the proper name of those kinds of mirrors, so I call them “zoom mirrors" and they are great to help you see what you’re doing more closely.
D) Breathing: I also hold my breath while drawing lines on my face and stop drawing everytime I need to breathe.
E) Product: the best types of products for eyeliner:
Powder/pressed eyeshadow: the easiest product for doing eyeliner, in my opinion, is eyeshadow because you can do looks like this one that don’t need to be super sharp and you can always use the tape technique to get the wing straight;
Gel eyeliner: most people say this is the easiest to apply, however some gel eyeliners don’t dry completely and can easily ruin your makeup, so you’ll need to research for a good one before buying;
Liquid eyeliner: it’s the hardest but the most waterproof and “transfer proof” (some gel eyeliners are also waterproof, though) because they dry faster. But the biggest secret lies on the brushes...
F) Brush: the easiest brushes to do eyeliner with are small angled ones or small flat ones, because they are easier to make straight lines with. They are great for doing eyeliner using eyeshadow or gel liner, but I never tried with liquid liner so I don’t know how well this would work to be able to inform you, sorry. 😬
G) Calm: precision requires calm and patience, so eyeliner is definitely not something you should do when you’re running late, specially if you don’t have a lot of practice yet. You have to be slow and careful until you get more confident with it, so take your time. And try not to get nervous afraid of making mistakes because you can always fix anything, just remove the part that’s messed up, reapply the foundation or concealer (if you’re using any) and try again.
H) Practice: and, of course, practice consistently. The more you try the easier it gets. I don’t have super firm hands, but I paint since I was a kid so I already know how to deal with the amount of “shakiness” of my hands (Idk if this word exists in english, but I hope it does 😅). But doing straight lines on a face is different than doing it on paper because papers are plane, faces aren’t. So the best way of learning makeup is by practicing and adapting to yourself, you need to experiment to find the products, brushes and techquines that work best for you. But yes, in this process we can spend a lot of money, so I’m gonna share a few things I do for saving money with makeup...
Things I do because I’m poor 😬: I bought myself a while ago an eyeshadow palette that has a decent variety of colors, and I use the shadows for my eyes, of course, but I also use a dark brown eyeshadow to fill my brows, a medium tone brown to contour my face, warmer browns as bronzer, pink eyeshadows as blush, and if that palette had a light shimmery shade I would use it as a highligher too. So with only one eyeshadow palette that contains some pinks and browns you can already do a lot. And I don’t use concealer, I only use an affordable medium coverage foundation that already covers my dark circles quite well (you could also do the opposite and use only concealer).
~ x ~
2. Brands:
I haven’t tried enough brands and also most of the brands I use are only available in my country, so if you don’t live in Brazil you probably won’t have easy access to them. But I don't think that brands actually matters, because the same brand can have both good and bad products… So I usually look for some reviews on Youtube before buying any product, specially expensive ones. But, for begginers, I think is more important to pay attention to the texture of the products: powder, creamy, liquid, gel… Powder products are usually the easiest to blend. So between creamy highlighter and powder highlighter or creamy contour and powder contour, I prefer the powder ones (like I said, I use my eyeshadows for almost everything 😅). Brushes are important too: brushes with soft hairs are good for blending and brushes with firm hairs are good for precise lines. Here is a guide from Pinterest on what each brush shape is good for.
~ x ~
3. Lipstick and Foundation shades:
This is a very hard one, you really have to swatch some shades to use them as reference. And you'll probably never find the perfect shade, only shades that are good enough… Kkk
A) Foundation: Some makeup stores offer swatches of the products for you to try on yourself before buying, and some brands sell swatches online (a mini version of their products), so you can buy a few to try on before buying the bigger size product. But when I'm indecided between two foundation shades, I prefer to get the lightest one because then I can apply countour or bronzer around my face to look less pale. With a darker foundation, you can apply a lighter loose powder on top to make it less dark, but I personally prefer the bronzer option.
B) Lipstick: for lipstick I would recommend you to start with browns, reds and warm pinks (preferably not so bright) because these are shades that usually look good on everyone. Here are some examples from Pinterest: Image 1, Image 2, Image 3.
~ x ~
4. Is foundation necessary?
Makeup is not math so there's no right or wrong (just don't wear things that give you allergy, of course 😅), you can do it however you prefer and nobody can tell you otherwise. It's your face, your style… And I've already seen a few girls on Instagram do stunning both basic and glam makeup looks with no foundation on. I personally like to wear heavy foundation bc I like my makeup to look less natural and more like a porcelain doll, but it's just my personal style preference. In my opinion, there are no rules in fashion and makeup, we make our own styles for ourselves.
~ x ~
5. Straight lines
I believe I already answered that in the first question, but if you have any questions left, let me know.
~ x ~
6. Confidence to wear makeup
Now that's a question I can't help you a lot with bc I'm quite insecure with that too, kkk But I used to be more insecure, I couldn't even wear just a lipstick outside of my house and now I can wear basic makeup looks… but not creative ones. I wish I was brave enough to wear my most creative looks to go out, but I'm still not. 😅 I'm a very introverted person so I try not to call much attention bc if someone likes my makeup and comes talk to me about it I'll get extremelly nervous, so I like to be invisible, kkk. But what usually makes me feel more comfortable wearing makeup is to know that there are other people in the place where I am that are wearing makeup too. But specially going out with friends that are also wearing makeup. This way at least I don't feel alone, kkk. That’s how I do it.
But always remember that you're not harming anyone with your makeup, you're not commiting a crime and your personality is not defined by whatever stereotypes people have about people who wear makeup. So if somebody gets bothered with your makeup (unless you've litteraly written insults to other people on your face or something, kkk) they are overexaggerating, and this is their problem to fix, not yours. Other people don’t have to like your style, what matters is that you are feeling cool in what you’re wearing and nobody is being forced to look at you, so there’s nothing to feel bad about. And I know this is easier said than done, but let’s repeat it to ourselves until it we learn it. 😅
~ x ~
And that’s it, I hope I helped with something. Like I said, if you have any questions left, just ask.
And I'm so glad to know you like my blog, thank you very much!
Have a nice day/night! 🤗💕
4 notes
·
View notes
Text
The Best Makeup Routine for Special Occasions
Introduction:
The time is now to look stunning! Isn't dressing up and using your cosmetics collection to look your best the finest part of the holidays and special occasions? However, if you are not a makeup expert, those relentless and frighteningly original makeup photographs may make you feel less festive.
Be at ease! With the help of the Best Makeup Artist in Pune, you will appear stunning during the holiday season and beyond, we have very simple methods, and tips.
Here are 6 Step Makeup Steps:
1. Moisturizer
No matter what kind of skin you have, moisturize regularly. These days, water-based moisturizers are also accessible and good for acne-prone skin. Choose one that is non-oily and lightweight, and then massage a small bit of it all over your face and neck.
A flawless foundation for your makeup is made possible by moisturization. Even primer, which more recent marketing experts could lead you to believe is the most crucial basic step for Makeup, needs a basis to adhere to. Therefore, always use a moisturizer before putting on makeup.
2. Primer
Apply primer once your moisturizer has had a good few minutes to absorb. Use a single-ply tissue to quickly wipe away any residue that your moisturizer may have left behind after setting in.
Instead of choosing a primer solely because "you need a primer," consider what your skin requires. Each primer serves a specific purpose: some help reduce the visibility of pores, some help regulate oil production throughout the day, and some help blur or cover up flaws like fine lines, wrinkles, and redness.
3. Base Makeup Finishing
Depending on the kind of items you're using, this step may or may not be necessary. Apply a base makeup finish now if you plan to use powder-based products in the following steps. This will provide a basis for powder products to apply and mix on top of and allow liquid products to settle down and not crease later.
Use a fluffy brush to softly sprinkle base makeup finishing all over your face for light coverage or a sponge-like Beauty Blender to dab and press it all over for greater coverage. Use a translucent powder for this stage if you don't want any coverage at all.
4. Lip Liner and Lipstick
To line the lips, use a lip liner in the same color as the lipstick you're intending to use, such as the nude shade. This will help add some definition, give your lips a sharper appearance, and stop your lipstick from bleeding later. Applying the lip liner just outside of your lips will also give the impression that your lips are larger.
Apply your preferred lipstick shade next. Use the following beauty tip if you are concerned that your lipstick won't last all day.
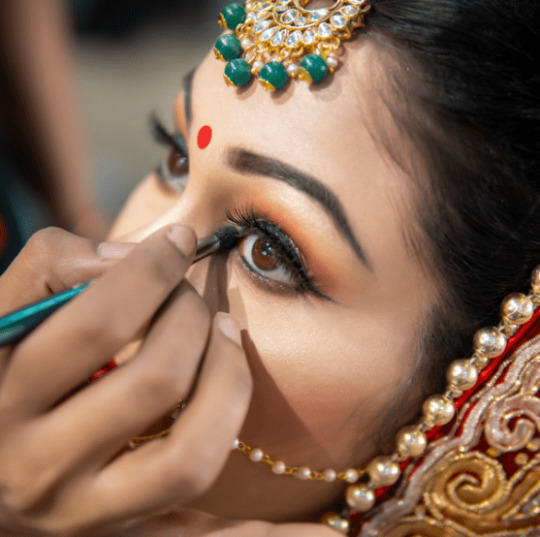
5. Eye Makeup
The phase that most cosmetics beginners and even some professionals find the most difficult.
Apply an eye makeup primer all over your lids first. Start with your eye makeup after giving it a few minutes to settle. Lighter colors will draw attention to the areas of the eye you want to focus on, such as the brow bone and inner corners, while darker colors will draw attention away from the areas you need to make them appear deeper, such as the crease.
Make sure to blend each eye shadow smoothly and avoid any sharp lines by using a quality set of eye makeup brushes.
6. Setting Spray
Setting sprays, again another optional but crucial step, can help keep your makeup in place. If you have skipped Step 3: base makeup finishing and are only using cream- or liquid-based products, you particularly need to complete this step.
A decent setting spray can also aid in eliminating any powdery feeling you may have left behind after applying all of your makeup layers if you have only used powder-based products. It will make everything look more polished and help everything blend.
#Best Makeup Artist in Pune#best makeover artist in india#bridal face look#bridal makeup#brioso services#brioso salon for ladies#parlor near me#bridal beauty services
3 notes
·
View notes
Text

Certainly! Here are some simple beauty tips that can help enhance your natural beauty and promote healthy skin:
Stay Hydrated: Drink plenty of water throughout the day to keep your skin hydrated and maintain its elasticity. Hydration is crucial for healthy-looking skin.
Get Enough Sleep: Aim for 7-9 hours of quality sleep each night. Sufficient sleep helps your skin repair and rejuvenate itself, leading to a refreshed and radiant complexion.
Cleanse Your Face Daily: Wash your face twice a day to remove dirt, oil, and impurities that can clog pores and lead to breakouts. Use a gentle cleanser suitable for your skin type.
Moisturize Regularly: Apply a moisturizer daily to keep your skin hydrated and prevent dryness. Choose a moisturizer that suits your skin type and contains ingredients like hyaluronic acid or glycerin to lock in moisture.
Use Sunscreen: Protect your skin from the sun's harmful UV rays by applying sunscreen with an SPF of 30 or higher every day, even on cloudy days. Sunscreen helps prevent premature aging, sunburn, and skin cancer.
Eat a Balanced Diet: Fuel your body with nutrient-rich foods, including fruits, vegetables, lean proteins, and whole grains. A balanced diet provides essential vitamins and antioxidants that promote healthy skin.
Exercise Regularly: Incorporate regular exercise into your routine to improve blood circulation, boost oxygen flow to the skin, and promote a healthy glow. Exercise also helps reduce stress, which can have a positive impact on your skin.
Practice Stress Management: Manage stress through relaxation techniques such as meditation, deep breathing exercises, yoga, or spending time in nature. Chronic stress can contribute to skin issues like acne, eczema, or premature aging.
Remove Makeup Before Bed: Always remove makeup before going to bed to allow your skin to breathe and regenerate overnight. Use a gentle makeup remover or cleansing oil followed by a facial cleanser to thoroughly cleanse your skin.
Avoid Touching Your Face: Minimize touching your face throughout the day to prevent the transfer of bacteria and dirt from your hands to your skin. Touching your face can exacerbate acne and other skin issues.
Stay Consistent: Consistency is key when it comes to skincare. Stick to your skincare routine and give products time to work before expecting to see results.
Smile: A genuine smile can instantly brighten your face and make you appear more beautiful. Don't forget to smile often and radiate positivity!
Incorporating these simple beauty tips into your daily routine can help you achieve healthy, glowing skin and enhance your natural beauty.
#Makeup Tips for Beginners#Makeup tips#professional makeup#makeup artist#makeup classes#online makeup tips#learn how to do makeup#Beginners makeup tips#professional makeup classes#facial learning#anti acne facials#anti aging facials#makeup guide#natural makeup look#makeup for beginners#step by step makeup#tips for healthy skin#how to do makeup at home
0 notes
Text

Get a classy professional look with Professional Makeup Tips For Women
Discover the art of achieving a classy and professional look with My Makeup Tips! Their expert guidance provides you with Professional Makeup Tips to elevate your cosmetic routine. Whether you're a makeup enthusiast or a novice, their step-by-step guides and insider tricks will help you perfect your foundation application, create stunning eye looks, and more.
With My Makeup Tips, you can master the techniques that will leave you looking polished and sophisticated for any occasion. Unleash your inner makeup artist and enhance your beauty with their game-changing advice!
#Makeup Tips Online#Makeup Tips and Tricks#Makeup Tips And Tricks For Beginners#Professional Makeup Tips#Natural Makeup Tricks
1 note
·
View note
Text
Easy and Natural Guy Makeup Tutorial

Hey there, beauty enthusiasts! Ready to dive into the world of men's makeup?
Today, we're exploring an easy, natural guy makeup tutorial perfect for beginners. Achieving that flawless, everyday look doesn't have to be complicated. Let's get started on your journey to a fresh and undetectable finish!

Prepping Your Skin
Before diving into makeup, it's essential to prep your skin. A well-prepped face ensures your makeup sits beautifully and lasts longer. Start with a good cleanser to remove any dirt or oil. Follow up with a moisturizer to hydrate your skin. Choose one with SPF to protect your skin from the sun.
Choosing the Right Products
Selecting the right products can make all the difference. Here are a few tips:
Moisturizer: Opt for one with SPF 50 for added protection.
Primer: Use a mattifying primer to control shine.
Foundation: Pick a shade that matches your neck to avoid any noticeable lines.
Applying the Base
Now, let's move on to the base makeup. This step is crucial for achieving a natural look.
Foundation Application
Applying foundation is easier than you think! Here’s a step-by-step guide:
Dot Foundation: Use a minimal amount and dot it on the outer corners of your face.
Blend: Work it into your skin using a brush or sponge, ensuring even coverage.
Focus Areas: Pay extra attention to blending around the hairline and jawline.
Concealer for a Fresh Look
Concealer is your best friend for hiding those pesky dark circles and blemishes.
Inner Corners: Apply a small amount to the inner corners of your eyes.
Blend Gently: Use your finger to pat it in, blending seamlessly with your foundation.
Spot Conceal: Dab on any blemishes or redness for a flawless finish.

Adding Color and Dimension
Once your base is set, it's time to add some life back into your face with a bit of color and dimension.
Subtle Contouring
Contouring can enhance your natural features without looking overdone.
Choose a Contour Stick: Opt for a shade slightly darker than your skin tone.
Apply Sparingly: Dab it under your cheekbones and along your jawline.
Blend Well: Use a brush to blend it out for a natural, shadowy effect.
Finishing Touches with Blush
Adding a touch of blush brings a healthy glow to your skin.
Select a Blush: Choose a subtle, natural shade.
Apply Lightly: Sweep it across your cheeks and nose for a sun-kissed look.
Blend Again: Ensure it melds well with your foundation and contour.

Perfecting the Details
The final steps are all about refining and perfecting your look.
Eyebrows and Lashes
Even the smallest details can make a big difference.
Eyebrows: Brush through your brows and fill in any sparse areas with a pencil.
Lashes: Use a light coat of mascara or cake eyeliner to darken your lashes without adding texture.
Setting Everything in Place
Setting your makeup ensures it stays put all day long.
Setting Powder: Apply a translucent powder to your T-zone to control shine.
Setting Spray: Finish with a hydrating setting spray for a natural glow.

Conclusion
And there you have it, a complete, easy, and natural guy makeup tutorial! With just a few simple steps, you can achieve a flawless, everyday look that enhances your natural features without being overly noticeable.
At MOBILESTYLES, we connect you with expert beauty professionals who can help you perfect your makeup skills. From skincare to advanced makeup techniques, our beauty on demand services are just a tap away. Download the MOBILESTYLES app today and start your journey to looking your best!
Feel free to ask any questions in the comments below, and don’t forget to subscribe for more beauty tips and tutorials. See you next time!
0 notes
Text
Elevate Your Skills with a Professional Makeup Course
A Professional Makeup Course is an essential step for anyone looking to advance their makeup artistry skills and pursue a career in the beauty industry. Whether you're a beginner wanting to break into the field or a seasoned artist seeking to refine your techniques, a Professional Makeup Course offers structured learning, hands-on practice, and expert guidance to help you reach your goals.
In this guide, we’ll explore the benefits of enrolling in a Professional Makeup Course, what you can expect from the curriculum, and the exciting career opportunities that await upon completion.
Why Enroll in a Professional Makeup Course?
The beauty industry is constantly evolving, with new trends, techniques, and products emerging regularly. By enrolling in a Professional Makeup Course, you stay ahead of the curve and ensure that your skills are up-to-date with the latest developments. Moreover, a professional certification demonstrates your commitment to excellence and boosts your credibility with potential clients or employers.
The structured learning provided by a Professional Makeup Course helps you master the art of makeup application from the ground up. You’ll be exposed to a variety of makeup techniques, from the basics of creating a flawless base to advanced methods like contouring, airbrushing, and high-fashion editorial makeup.
What to Expect from a Professional Makeup Course
A Professional Makeup Course covers a wide range of topics to ensure you develop the comprehensive skills needed to succeed in the beauty industry. Below are some key elements you’ll typically learn:
1. Foundation and Skin Prep
Creating a flawless base is crucial for any makeup look. In a Professional Makeup Course, you'll learn how to assess different skin types, prepare the skin for makeup, and apply foundation that enhances the complexion.
2. Color Theory and Customization
Understanding color theory is fundamental in makeup artistry. You’ll learn how to choose the right shades for different skin tones, how to mix colors to create custom looks, and how to use color correction techniques to neutralize imperfections.
3. Bridal and Special Occasion Makeup
One of the most lucrative aspects of a makeup artist’s career is bridal and special occasion makeup. A Professional Makeup Course will train you in creating long-lasting, camera-ready looks that enhance the natural beauty of clients for their big day or special event.
4. High Fashion and Editorial Techniques
If you're looking to work in fashion or editorial makeup, a Professional Makeup Course will cover techniques used in photoshoots, runway shows, and other high-fashion environments. These looks often involve creativity, precision, and the ability to work under pressure.
5. Special Effects (SFX) Makeup
For those interested in the film, TV, or theatre industries, many Professional Makeup Courses also offer training in special effects makeup. You’ll learn how to create realistic wounds, aging effects, and character transformations that bring scripts to life.
Hands-On Practice with Industry Experts
One of the most significant advantages of enrolling in a Professional Makeup Course is the hands-on experience you’ll gain. Many courses are taught by industry professionals who provide valuable insights and practical tips that aren’t always found in textbooks. You'll have the opportunity to practice your skills on models or clients in a real-world setting, ensuring you're ready for any professional situation.
This hands-on experience also helps you build a strong portfolio, which is crucial when seeking jobs or freelance work. A Professional Makeup Course typically includes portfolio-building opportunities, allowing you to showcase your best work to potential employers or clients.
Career Opportunities After a Professional Makeup Course
Completing a Professional Makeup Course opens the door to a wide range of career opportunities. You can pursue freelance work, join a beauty salon, work behind the scenes at fashion shows or photoshoots, or even enter the film and television industry. Whether you're aiming to work with brides, models, or actors, the skills you gain will set you apart in a competitive market.
Conclusion
A Professional Makeup Course is more than just a learning experience; it's an investment in your future as a makeup artist. With expert guidance, hands-on practice, and a comprehensive curriculum, you'll gain the confidence and skills needed to excel in the beauty industry. Whether you're starting from scratch or refining your existing techniques, a Professional Makeup Course will elevate your artistry to new heights.

For More:
Contact Us: 61434114878
Visit Us: https://www.academyofhairandmakeup.com/
Email: [email protected]
Timings : Mon and Wed: 10am–9pmTue-Sun: 10am–5pm
#Pro Makeup Artist Course#Pro Makeup Course#Professional Makeup Course Online#Professional Makeup Courses Melbourne#Professional Makeup Artist Course
0 notes
Text
Best Eyeliner Stencil that you won’t Regret Buying

Are you dreaming of achieving the perfect cat eye, flawless top and bottom liners, or stunning winged eyeliner every time? Wondering if eyeliner stencils are effective and which ones are the best available at Sephora? Crafting the ideal wing can be challenging, but with the right eyeliner stencils and stamps, you can simplify the process effortlessly. Continue reading to discover how Best Eyeliner Stencil stencils can elevate your makeup routine and even learn about the investment required to start your own cosmetic line. Plus, explore our top picks for the best eyeliner stencils that you'll never regret purchasing.
Top Eyeliner Stencils You’ll Love
Beth Bender Beauty – Eye Candy Eyeliner Stencil Starter Pack with Gel Eyeliner & Brush
Do you aim to make your eyes pop with precision and definition? The Beth Bender Beauty Eye Candy Eyeliner Stencil Starter Pack is your go-to tool for creating trendy, professional-looking eyeliner effortlessly. This exclusive starter pack enhances your liner application, ensuring it stays perfectly in place for precise definitions. Crafted from gentle, hypoallergenic adhesive material, it suits all eye shapes and sizes.
Features:
30 Sheets (60 Individual Stencils): Versatile options for various eyeliner styles.
Step-by-Step Instruction Card: Easy guidance for flawless application.
Pro Tip Card: Expert advice to maximize your results.
Benefits:
Achieve impeccable eyeliner styles in minutes.
Experiment with creative gradient, rainbow, and artistic eye looks.
Effortlessly craft dynamic cat and winged eyeliner like a pro.
Stay on trend with versatile eye makeup designs anytime.
Application Tip: To minimize stickiness, peel the stencil and place it on your forearm before transferring it to your eyelid. This technique ensures a charming and precise wing every time.
TailaiMei 2-Piece Cat Eyeliner Stencils
Looking to create mesmerizing and unique cat eyes without the hassle of uneven glitter or misshapen liquid liner? The TailaiMei 2-Piece Cat Eyeliner Stencils are perfect for both beginners and seasoned makeup artists. These stencils allow you to design numerous individual looks effortlessly, making them ideal for parties or special occasions when time is limited.
Features:
Eco-Friendly Materials: Safe for your skin and the environment.
Dual Cat Shapes: Two stencil designs per pack for versatile looks.
Quick Application: Save time while achieving 10 different eye makeup shapes.
Pros:
Create flawless, captivating cat eyes with ease.
Suitable for all skill levels, from beginners to experts.
Perfect for on-the-go makeup application.
Winged Eyeliner Stencil
Seeking high-quality, flexible eyeliner stencils that cater to any eye shape? The Winged Eyeliner Stencil is designed to help you effortlessly achieve the perfect cat eye or winged eyeliner wherever you are. These stencils are easy to use and adaptable, ensuring a flawless application every time.
Features:
Versatile Fit: Compatible with any eye shape and size.
Simple Steps: Follow a few easy steps to create stunning eyeliner looks.
Pro Tips:
Use an eyeshadow base before applying the stencil for the best results.
Enhance the shape with liquid, gel, or pencil liner for a complete and polished look.
Pros:
Achieve perfect cat eyes and winged eyeliner in seconds.
Compatible with various eyeliner types, including gel, cream, and liquid.
Effortlessly create top and bottom liners.
LKE 2-in-1 Cat Eyeliner Stencil
Struggling with liquid eyeliner? The LKE 2-in-1 Cat Eyeliner Stencil makes it simple to achieve dramatic, feline-inspired eyes with minimal effort. This package includes two cat-shaped stencils and a style guide template, allowing you to create up to 10 different eye makeup looks.
Pros:
Delivers a prominent and intense eyeliner look.
Time-efficient and cost-effective application.
Easy two-step process for flawless cat eyeliner.
Long-lasting, sexy finish suitable for all eye shapes and sizes.
SEPHORA COLLECTION Cat Eye Velvet Eyeliner Applique Addiction
Looking for an eyeliner tool that sparks creativity and enhances your liner game? The SEPHORA COLLECTION Cat Eye Velvet Eyeliner Applique Addiction is perfect for crafting flawless liquid liner looks. These easy-to-use stickers help you achieve perfect cat eyes instantly, compatible with any eyeliner formula—be it pencil, pen, gel, cream, liquid, or powder.
Features:
Versatile Compatibility: Works with all types of eyeliners.
Instant Application: Simply peel and apply for a sparkling liner effect.
Eye-Catching Design: Creates a flirty, winged look that turns heads.
Pros:
Inspires creative and flawless eyeliner applications.
Simplifies the process of achieving the perfect cat eye.
Provides a long-lasting and striking finish.
Eyeliner stencils are a game-changer for anyone looking to enhance their eye makeup effortlessly. Whether you're a beginner or a makeup pro, these top-rated stencils from Beth Bender Beauty, TailaiMei, LKE, and SEPHORA COLLECTION offer versatile and reliable tools to achieve stunning eyeliner looks every time. Invest in these high-quality stencils and transform your makeup routine with precision and ease.
0 notes
Text
A Complete Guide to Choosing the Right Makeup Classes in Bangalore
Makeup Classes in Bangalore
In today’s rapidly growing beauty industry, mastering makeup techniques is no longer just a hobby — it’s a career path filled with exciting opportunities. Bangalore, a city known for its dynamic culture and expanding fashion scene, is the perfect place to begin your journey as a makeup artist. Whether you’re a beginner or looking to sharpen your skills, selecting the right makeup classes in Bangalore is essential for your success.
Why Choose Makeup Classes in Bangalore?
The beauty industry in Bangalore is flourishing, offering numerous opportunities for makeup artists. From high-end fashion shows to the film industry, the demand for skilled professionals is continuously rising. By enrolling in top-tier makeup academies in Bangalore, you position yourself in the heart of this growing industry, opening doors to various career prospects.
Types of Makeup Courses Available
When it comes to makeup education, various courses cater to different needs and goals. Whether you’re looking for a brief introduction or an in-depth, long-term program, Bangalore offers it all.
Short-Term vs. Long-Term Makeup Courses
Short-term courses are great for beginners or those seeking to fine-tune particular skills. Long-term courses, however, dive deeper, covering everything from fundamental techniques to advanced artistry.
Specialized Makeup Courses
If you’re keen on niche areas such as bridal makeup, fashion makeup, or special effects, many academies offer specialized courses tailored to those interests.
Key Factors to Consider When Choosing a Makeup Course
Choosing the right makeup course is crucial to shaping your future career. Here are some essential considerations:
Accreditation and Certification
Ensure the course is accredited by recognized organizations, adding value to your qualifications.
Experienced Trainers
Learn from seasoned industry professionals who can provide practical insights and tips.
Balanced Curriculum
Look for courses that blend theory and hands-on practice, providing real-world experience through workshops, demonstrations, and internships.
Class Size and Environment
Smaller class sizes often offer a more personalized learning experience with greater interaction with instructors.
Overview of Makeup Courses at Orane International
At Orane International, the largest chain of beauty and nutrition institutes in India, we provide makeup courses in Bangalore designed to help students excel in the competitive beauty industry.
About Orane International
Known for excellence, Orane International offers a wide array of courses in beauty, makeup, cosmetology, and nutrition.
Makeup Courses Offered
We offer a range of makeup courses, from beginner to advanced levels, all designed to suit various learning needs.
Unique Features of Our Academy
Our curriculum stays up-to-date with the latest industry trends, and we provide placement assistance to help students secure meaningful careers.
Curriculum Breakdown
Our makeup courses cover a wide range of topics, ensuring you develop a comprehensive understanding of makeup artistry:
Basic Makeup Techniques
Learn essential techniques such as skin preparation, flawless foundation application, and contouring.
Advanced Makeup Techniques
Master complex techniques like airbrushing, color correction, and high-definition makeup.
Bridal Makeup
Specialize in bridal makeup, a highly lucrative niche within the industry.
Fashion and Editorial Makeup
Explore the world of creative makeup artistry for fashion shoots and editorials.
Special Effects Makeup
Dive into the art of special effects, ideal for those interested in film and television makeup.
Practical Training and Hands-On Experience
At Orane International, we believe that practical experience is key to becoming a successful makeup artist. Our courses include:
Workshops and Live Demonstrations
Participate in expert-led workshops and live demos showcasing various techniques.
Internships and Real-World Exposure
Gain invaluable experience through internships with leading salons and makeup artists.
Benefits of Learning at Orane International
Choosing Orane International for your makeup education offers several advantages:
Industry-Relevant Training
Our curriculum is designed to meet the demands of the beauty industry, ensuring that you’re job-ready upon graduation.
Modern Facilities
We provide state-of-the-art facilities, creating a conducive learning environment for all students.
Placement Support
Our placement assistance program helps graduates find rewarding careers in the beauty industry.
Career Opportunities After Completing a Makeup Course
Completing a makeup course can open the door to a variety of career paths:
Freelance Makeup Artist vs. Salon Professional
You can choose to freelance, work in a salon, or specialize in a niche like bridal or fashion makeup.
Opportunities in Fashion, Film, and TV
Makeup artists are in high demand in fashion shows, film productions, and television.
How to Enroll in a Makeup Course in Bangalore
Enrolling in a makeup course at Orane International is simple:
Admission Process
Visit our website, complete the application form, and submit the necessary documents.
Eligibility Criteria
Ensure you meet the basic eligibility requirements, which may vary depending on the course.
Important Dates
Check our website for course start dates and application deadlines.
Course Fees and Financial Aid
We offer competitive course fees and provide various financial aid options, including:
Course Fee Breakdown
Understand the costs involved in pursuing a makeup course.
Scholarships and Financial Assistance
Learn about scholarships and financial aid options available to support your education.
FAQs
How long is the makeup course?
Course durations vary from a few weeks for short-term programs to several months for advanced levels.
Are weekend classes available for working professionals?
Yes, we offer flexible weekend classes to accommodate working professionals.
What career opportunities are available after completing the course?
Graduates can work as freelance artists, in salons, or in niche areas like bridal or fashion makeup.
How do I apply for financial aid?
Financial aid applications are available on our website.
What are the qualifications required to enroll?
Basic educational qualifications are required, but specifics vary by course level.
Conclusion
Choosing the right makeup course in Bangalore is a key step towards a successful career in the beauty industry. At Orane International, we offer a comprehensive curriculum that combines theory with hands-on training. With industry-linked education, expert faculty, and modern facilities, we are confident that we can help you achieve your career goals. Don’t wait — enroll today and take the first step toward becoming a professional makeup artist.
#cosmetology course in hsr layout#makeup course in hsr layout#hair course in hsr layout#skin (beauty) course in hsr layout
0 notes
Text
Micro Eyebrow Pencil, Ultra-Fine Tip Liquid Eyebrow Pen, Natural Extra Fine Waterproof Brow with Two Tipped Micro-Fork, Smudge-proof Long Lasting, High Pigmented Black Eye Liner, 02 Black
Price: (as of – Details)
Micro Eyebrow Pencil, Ultra-Fine Tip Liquid Eyebrow Pen, Natural Extra Fine Waterproof Brow with Two Tipped Micro-Fork, Smudge-proof Long Lasting, High Pigmented Black Eye Liner, 02 Black Package Dimensions : 6.65 x 1.1 x 0.87 inches; 0.32 ounces Manufacturer : ZHAIXIU ASIN : B0D52K5BY4
【Eyebrow Makeup】Loved by both beginners and professionals, this…
0 notes
Last Seen Blogs

littlepurpleplanet
Bring me food or die!

mrathem
threshold.

lafiestacateringoff
La Fiesta Catering


wncs-lao
Tatsumaki Senpukyaku