#processing of exported SVG
Explore tagged Tumblr posts
Visit Tumblr Blog
Explore Tumblr blogs with no restrictions, modern design and the best experience.
Last Seen Tumblr Blogs


Fun Fact
US Tumblr user growth rate is estimated to slow down to 4.1%.
Text
Flag Making Tutorial
This will be a more technical step-by-step tutorial on how I make my flags (also a long post because I wanted to be thorough, plus I love flags lol).
The program I use is Inkscape, a free vector (.svg) editor program for pc.
I have templates set up, so the actual flag making process is pretty easy/quick.

Hotkeys/Locations/Other Reference
I'll be mentioning these options, so I thought to put them here all in one list. (They list the keyboard shortcuts first)
Snapping: magnet symbol (top right of screen), or under the adjacent arrow ◀️ symbol.
Document properties: shift+ctrl+D, or under the file menu (top left corner of screen). Display (1st tab) Guides (2nd tab) Grids (3rd tab)
Fill and Stroke: shift+ctrl+F, or under object (top of screen).
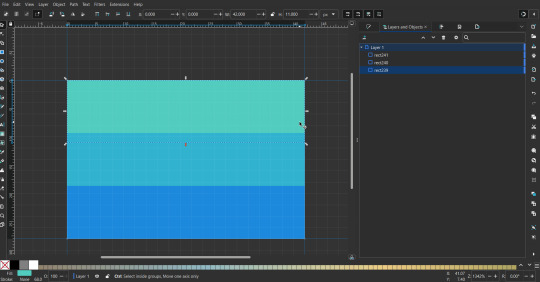
Layers and Objects: ctrl+shift+L, or under object (top of screen).
Align and Distribute: ctrl+shift+A, or under object (top of screen).
Import (Images): ctrl+i, under the file menu, or by dragging into the Inkscape window.
Save As: ctrl+shift+S, or under the file menu.
Export: shift+ctrl+E, or under the file menu.
Selector Tool: S, or cursor symbol (left side of screen). Click, or click and drag around the objects, to select them.
Locking a selection: lock symbol between the width and height boxes at the top of the screen.
Transform Selections: the width/height and x y position can be changed by typing in the X,Y,W,H boxes (near top middle of screen), or by dragging the corners/edges (resize) and inside the object (move).
Duplicate: ctrl+D.
Delete: delete key, or right click on the object.
Node Tool: N, or below the selector tool (left side of screen).
Rectangle Tool: R, or square symbol (left side of screen).
Pen Tool: B, or pen symbol (left side of screen).
Gradient Tool: G, gradient square symbol (left side of screen).
Mesh Tool: swirly square symbol (left side of screen).
Dropper Tool: D, or dropper symbol (left side of screen).
Undo: ctrl+Z.
Redo: ctrl+Y.
Creating the Template
Download Inkscape and open it, under the Time to Draw tab, click New Document.
First, snapping needs to be enabled, and under advanced mode enable grids and guide lines snapping. (This is crucial for making the stripes equally sized, spaced, and the overall flag in the right ratio.)
I'll be making a template with a 2:3 flag ratio.
Open document properties. (I like to move these types of windows to the right side.)
Under display, set the width to 42px and height to 28px.
Under guides, just click create guides around the current page.
Under grids, make sure rectangular grid is selected, and click new. (Grid units should be in px.) For the major grid line every option, change it to 2. (I also prefer to change the minor grid line color to be transparent.)
That's pretty much it, your template is done :D ! Just save it wherever you want. I like putting it in an easy-to-access flag folder, as it is needed to open it every time to make new flags.

You can use a different width / height / grid size / flag ratio if you want, these are just the numbers I'm comfortable with / used to.
Also, since this is a vector, the image can be infinitely big or small without any quality loss, so the small dimensions above don't actually translate to a low res image.
Creating the Flag
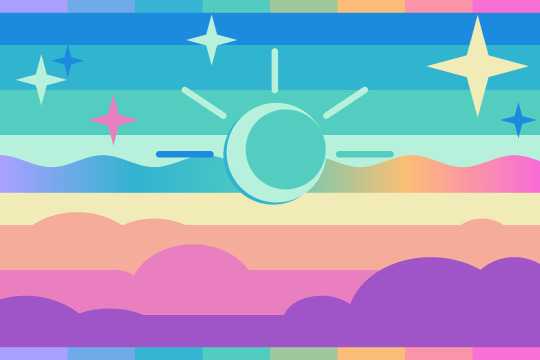
(I'll be using the rainbow flag to demonstrate.)
Start by having the template open.
You can import images (like .png/.jpg files) to color pick / reference if you want. Said images can be transformed (resized/moved) by selecting and transforming them using the options mentioned in reference. (This is optional, they should just be off to the side so they don't get in the way.)
To create the stripes, use the rectangle tool. Click and drag from one grid corner, to a lower grid corner.

While the rectangle is selected, use the dropper tool to pick a color from a imported image. You can also use the fill and stroke (shown on right) tab to create your own colors / edit colors / etc.
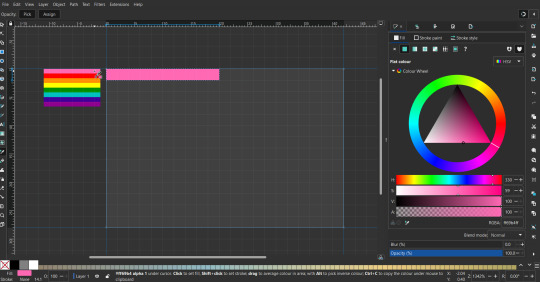
You can make these stripes however you want, they just need to all be equally sized. (They don't have to all have the same height, if you intentionally want that (like the demisexual flag for example).)
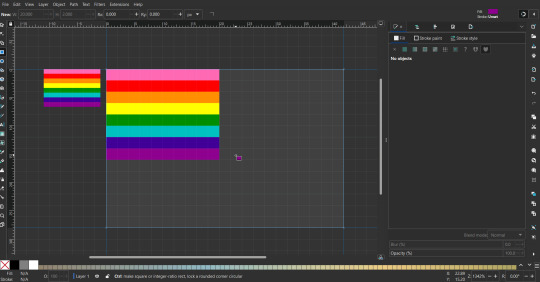
Then select all the stripes and transform them so that they fit the page.
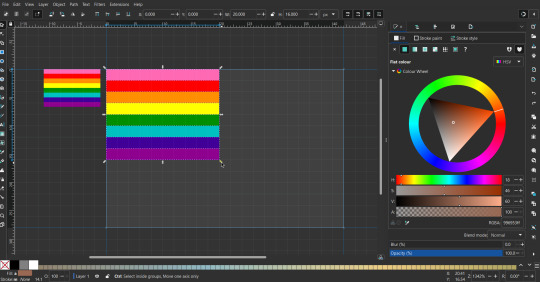
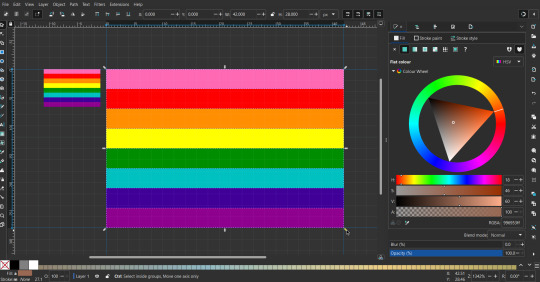
All that's left is to save/export it.
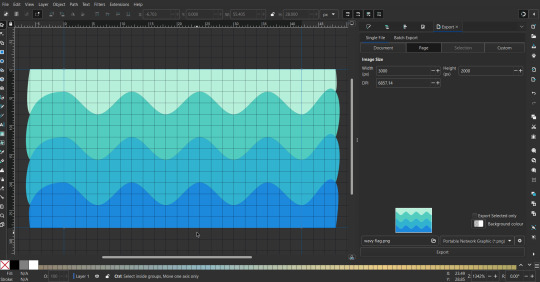
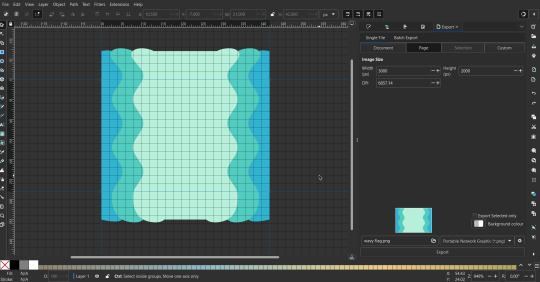
To export it, use the export tab, under single file, page, adjust the width and height (in px) to however high res you want your image to be. (I usually do 3000 by 2000.)
Type in the desired file name in the box next to the folder symbol, use the folder symbol to choose its export location (which can also be used to determine the file name and save/export it), the adjacent drop-down-menu to select what to save it as (,png, .jpg, .svg, etc.), and the gear symbol to adjust other settings (I leave it as default, with antialias turned off (set to 0)).
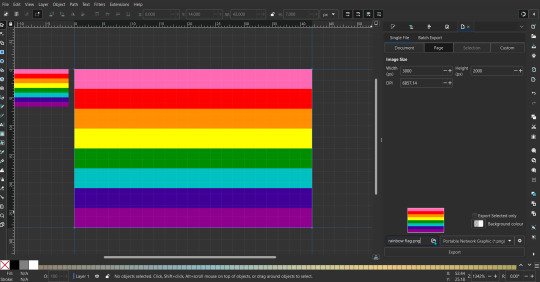
And done, you've made a flag :D 🏳️🌈
Extra Notes
Layers and Objects: a menu that can be used to manage objects. Like their layering position (whether they are above or below another object), and other options can also be done here instead of with keyboard shortcuts.
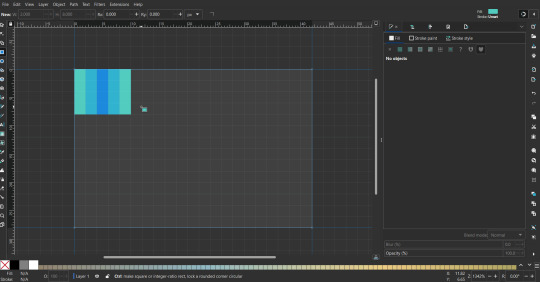
Vertically striped flags: it's very similar to above. You would just make the rectangles taller rather than wider.
Wavy stripes: first use the pen tool to create zigzags. (The pen tool works like a outline, so just click along the grid corners, and join the line at the end. The fill and stroke menu can be used to make it a solid colored shape, and remove/add outlines). The steepness/frequency of the zigzags is up to personal preference, they just need to extend off the page a bit. To create equally sized wavy stripes, have the all side lengths (highlighted in red) be equal except (depending on how you draw your zigzags) the first or last wave, which should have half the side length of the others.

Select everything, and with the node tool, select all the zigzag nodes (the corners don't need to be selected), and click make selected nodes smooth (half circle with point in middle symbol, at top of screen). (It'll likely look like it has weird lines in-between the waves, see glitch section at the end for how to fix that.)
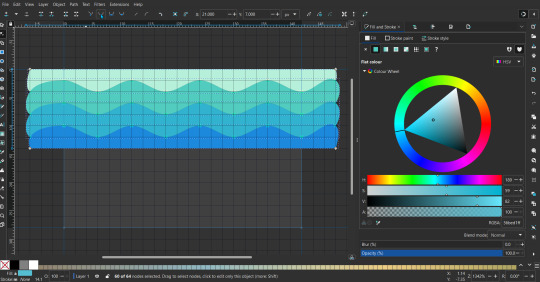
Then resize it all to the height of the canvas. And done :)
This can of course be vertical too.
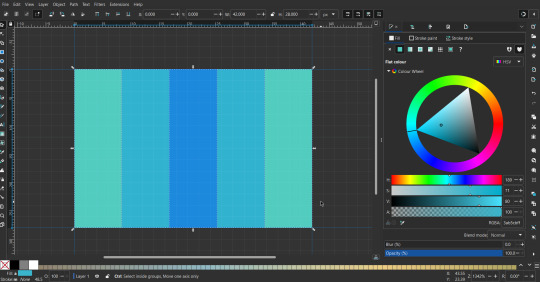
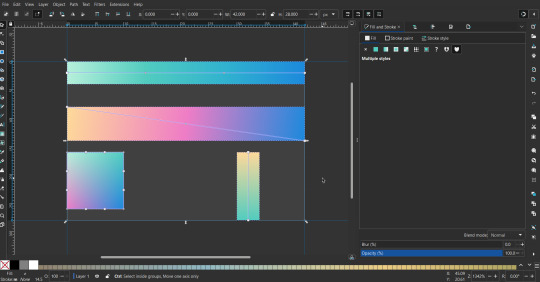
Gradients: You can use the fill and stroke dialogue, gradient tool, or mesh tool to do this.
To create the gradient, select the object, click the linear gradient symbol (gradient box) under fill and stroke. Or dragging / double clicking with the gradient/mesh tools. (The mesh tool is what I used to create the square gradient.)
To change the colors, click on the arrows or circles under fill and stroke, or by clicking the points on the shape, to select the nodes. Then use fill and stroke to change the colors.
To create new colors/stops, click on the plus+ symbol under stops (under fill and stroke), or double click on the gradient. Edit the new colors in fill and stroke again.
To change the location of stops, use stop offset under fill and stroke, or drag the nodes on the gradient. You can also move the end points on the object to make the gradient slanted or vertical.

Symbols: I make my own when I can (like the demi- triangle can be drawn with the pen tool, and resized to the correct proportions). When the symbol is too complicated, I import a .svg of it. Wikimedia commons is a great resource, and the popular twemoji comes in .svg format too. You could also edit it on over the .png in a rastor program if need be.
The align and distribute tab can be used to center symbols (or any other selected object). Select page for the relative to option, and use the symbols underneath to center/align it however you want. (You can also use different relative to options, like last selected, if you want to align it to an object instead.)
Deleting imported reference images: you can do this before saving it as a .svg, if you don't want to keep them / want to clean up the .svg file.
Antialiasing: an option that blurs things basically. A image with antialiasing off will be sharp pixels, while a image with antialiasing on will have transition colors between the main colors.
Below is an example. The left side is without antialiasing, and the right side is with antialiasing.

I can see why it might be preferable to have it on (like for diagonal shapes), but antialiasing can make recoloring .png (not .svg) files hard. The extra different colors messes with fill tools. I also think it looks cleaner without, so I prefer it off.
Exporting glitch: sometimes an exported image will have a thin line between the stripes, despite the fact the stripes are perfectly next to each other. (This seems to not just be a problem with Inkscape, but with vectors in general.)
Below is a zoomed in example of what it'd look like. The left side shows the stripes are all next to each other, but the right image has a transparent line in-between the stripes.
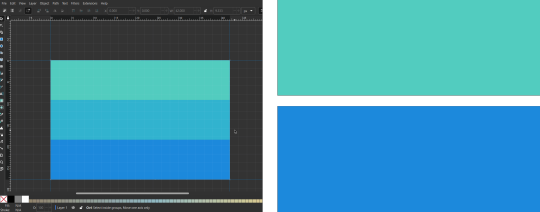
This can be fixed a number of ways.
You could select all the objects, and duplicate them twice.

Or overlap them. The stripes will still be the same size when overlapped, but they will technically be behind each other, so there will be no gap.
With all the different stuff mentioned, you can basically think of them as building blocks with the grid as reference. They can all be mixed and matched together.
I didn't mention all the options, just because there's that many different things you can do in Inkscape. I'd encourage you to play around with all the different options/tools yourself.
There's also some great Inkscape guides on YouTube, it's where I learned how to do a lot of this from (even if they're not for flags specifically, the concepts in those videos can be applied to flags).
Here's an overly elaborate flag I made, just to demonstrate some (but not all) of the things that can be done.
Anyways what a long post haha. But maybe this will be helpful for anyone interested in making (pride) flags.
215 notes
·
View notes
Text
learn to digitizing your embroidey designs

From Sketch to Stitch: A Comprehensive Guide to Digitizing Your Embroidery Designs
The world of embroidery has embraced the digital age, allowing you to transform your own unique designs into stunning stitched masterpieces. But how do you bridge the gap between a simple vector graphic and a complex stitching pattern? This comprehensive guide, crafted with 2500 words, will teach you the art of digitizing your embroidery designs, from software choices to stitch considerations and finishing touches. Before We Embark: Understanding SVGs and Embroidery Files Scalable Vector Graphics (SVGs): These text-based descriptions of images offer infinite scalability, making them perfect for digital design. Embroidery files: These contain specific instructions for your machine, including stitch types, colors, and placement (DST, EXP, JEF, PES formats are common). Step 1: Choosing the Right Software Consider these factors when selecting your digitizing software: Skill Level: Are you a beginner or an experienced digitizer? Some programs cater to novice users, while others offer advanced features. Budget: Free and paid options exist, each with varying capabilities and functionalities. Compatibility: Ensure the software outputs files compatible with your embroidery machine. Here are some popular choices: Free: Inkscape: A free vector graphics editor with the Ink/Stitch plugin for basic digitizing. Sewing & Embroidery Software (SERF): Free software with limited but beginner-friendly digitizing features. Paid: Wilcom Embroidery Studio: Offers powerful tools for advanced digitizing and editing. Embrilliance Enthusiast: User-friendly software with various features at a good price point. Brother PE Design: Ideal for beginners with Brother embroidery machines. Step 2: Preparing Your SVG Simplify the design: Remove unnecessary details or intricate lines that might not translate well to embroidery. Optimize colors: Limit your color palette to what your machine can handle (usually 6-12 colors). Convert to paths: Ensure all elements in your SVG are outlines (paths) for proper stitching. Step 3: Importing and Converting Import your cleaned-up SVG into your chosen software. Follow the software's specific instructions for converting to an embroidery file. This typically involves: Choosing stitch types: Select appropriate stitches for different parts of your design (satin stitch for filling, backstitch for outlines, etc.). Setting stitch parameters: Adjust stitch density, length, and direction for desired effects. Color mapping: Assign thread colors to different parts of your design. Step 4: Digitizing Tweaks and Adjustments Preview and test: Most software allows you to preview your design on a virtual embroidery machine. Check for stitching issues and adjust paths or settings if needed. Refine stitch types and parameters: Experiment with different stitch combinations to achieve the desired look and texture. Consider thread types and colors: Choose thread that complements your fabric and design aesthetic. Step 5: Export and Embroider! Once you're happy with your design, export it in a file format compatible with your embroidery machine. Transfer the file to your machine and prepare your fabric and thread. It's finally time to see your creation come to life! Embroider your design, following your machine's instructions. Bonus Tips for Success: Start simple: Begin with basic shapes and designs to get comfortable with the conversion process. Practice digitizing: The more you experiment, the better you'll understand how different stitches and settings affect your final outcome. Join online communities: Connect with other embroidery enthusiasts for tips, advice, and inspiration. Don't be afraid to ask for help: If you get stuck, consult software manuals, online tutorials, or seek assistance from experienced digitizers. Remember, with a little practice and this guide as your compass, you'll be well on your way to transforming your SVG dreams into beautiful embroidered realities! Further Resources: Websites: Needlework Tips and Techniques: https://www.needlework-tips-and-techniques.com/ Books: "The Complete Book of Digitizing" by Jeannette Douglas, "Digitizing Designs" by Laura Ashley YouTube Tutorials: CreativeBug Cutwork Embroidery Masterclass, Bluestone Creations Cutwork Basics Online Forums: Embroidery Forum With these additional resources and the knowledge you've gained, you Read the full article
3 notes
·
View notes
Text
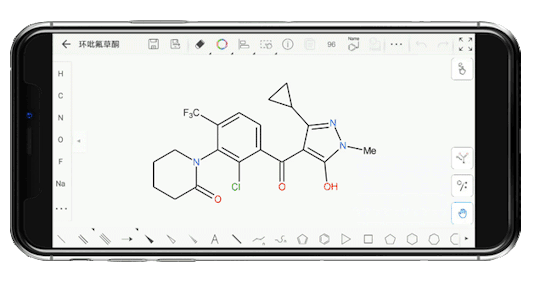
What organic chemistry software do you use daily???
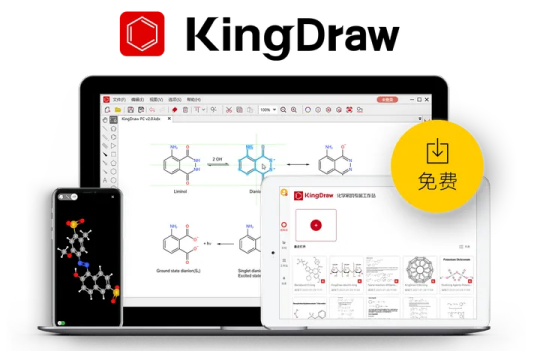
Calling all professionals and enthusiasts in the field of chemistry, as well as educators and fellow students — KingDraw is a must-used for you.
Easily install KingDraw with its user-friendly interface in simplified Chinese and English. Create chemical structures and reaction processes effortlessly, even if you’re a beginner.
Unlock the world of professional drawing with high-definition export and no copyright concerns!
KingDraw offers ACS1996 drawing templates and customizable options to meet various needs. Save files in formats like cdx, mol, SMILES, kdx, and export images as SVG or PNG. Perfect for professional image editing and publication editing.
Versatile and feature-rich supports multiple platforms — ideal for teaching and research!
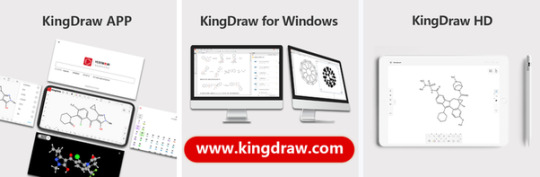
KingDraw supports multiple clients, including mobile phone (KingDraw APP), tablet (KingDraw HD), and computer (KingDraw PC), support multi-end data interworking, convenient for you to record chemical inspiration anytime and anywhere.
In addition to rich drawing functions, KingDraw also supports structural image recognition, intelligent gesture drawing, 3D model conversion, structural naming, chemical property calculation, compound information query (KDpedia), and other functions, suitable for daily work and learning, scientific research, teaching activities, and other scenarios.
Seamless integration with ChemDraw and Microsoft Office!
Effortlessly copy and paste your creations from KingDraw PC to ChemDraw, Word, PowerPoint, and more. Easily edit with just a double-click.
Get the free chemical editor KingDraw from Google Play and App Store:)
#stemeducation#stem studyblr#organic chemistry#chemistry class#chemblr#student life#uni studyblr#chemdraw#kingdraw
4 notes
·
View notes
Text
Harpy Eda Progress (random stuff because wow this project has been pure chaos)
Progress has been made but it’s all over the place since I’m procrastinating willingly on some things and forced to wait on others. So here is a bit progress update of random stuff
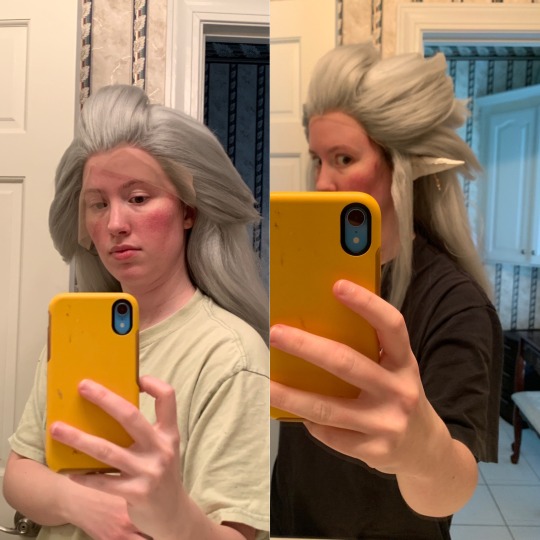
1. Wig
I bought a lace front in gray from Arda Wigs and one of their long white clip-on ponytails. I crimped both the ponytail and the wig, dismantled the ponytail’s mesh base, and took out the white wefts to glue them onto the main wig. Then I went back and teased almost the entire wig and steamed it to tone down the flyaways. I actually went through the spiking process twice because I hated the first version and didn’t account for the ears. (First version on the left, semi final version on the right)
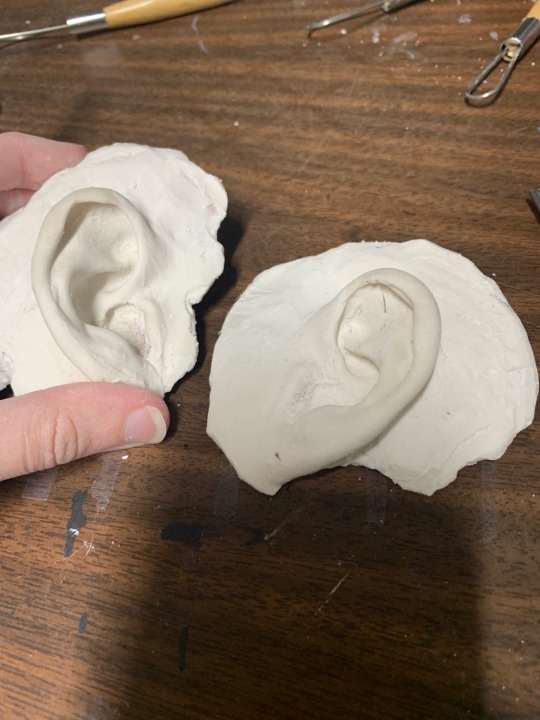
2. Ears
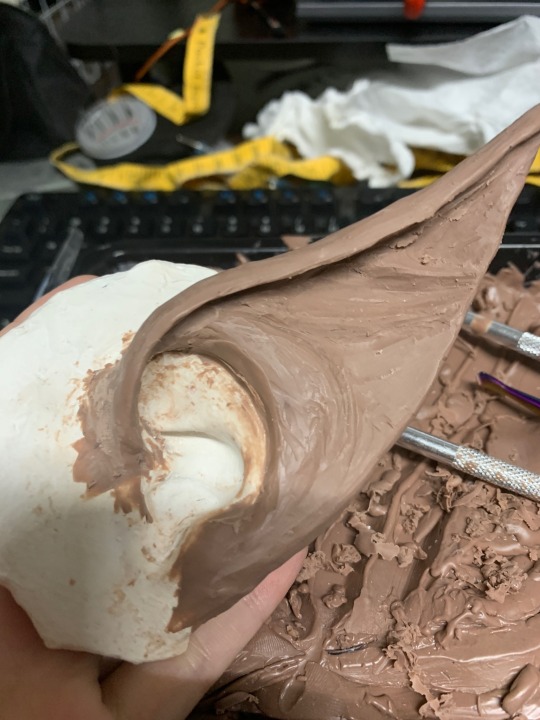
I have tiny baby ears so I wasn’t sure I could find prosthetics in my size that weren’t custom made (aka expensive). So naturally I decided to spend a lot of time- and some money- to make them myself. I went through the long process of live-casting my ears with alginate (the goopy stuff they use to take tooth impressions at the dentist) and made a plaster cast of my small baby ears. I did a sculpt with Monster Clay and did a second alginate mold and plaster cast to have a nice base for the final latex ears. For the actual ears, these are liquid latex tinted with white acrylic paint and they are brushed/dabbed onto the base ears in thin layers. After 15-20 layers, I have to apply a stupid amount of baby powder to keep the latex from sticking to itself, and then I can carefully peel them off the plaster masters. They just get glued on with Prosaide afterwards and are pretty comfortable to wear.


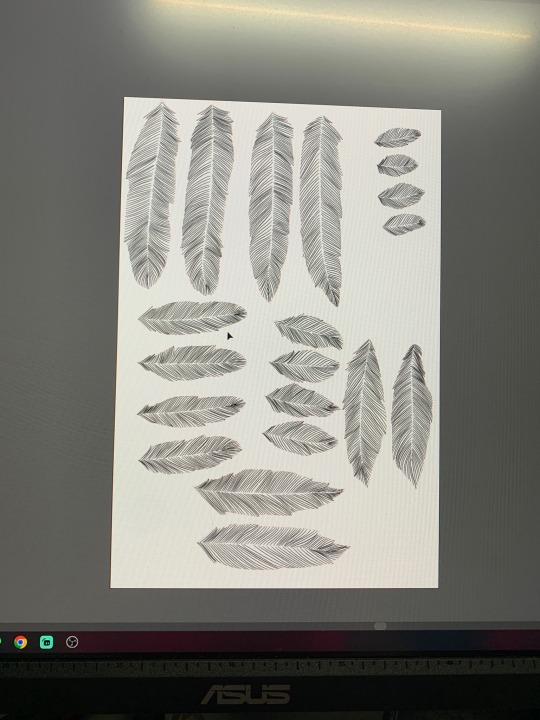
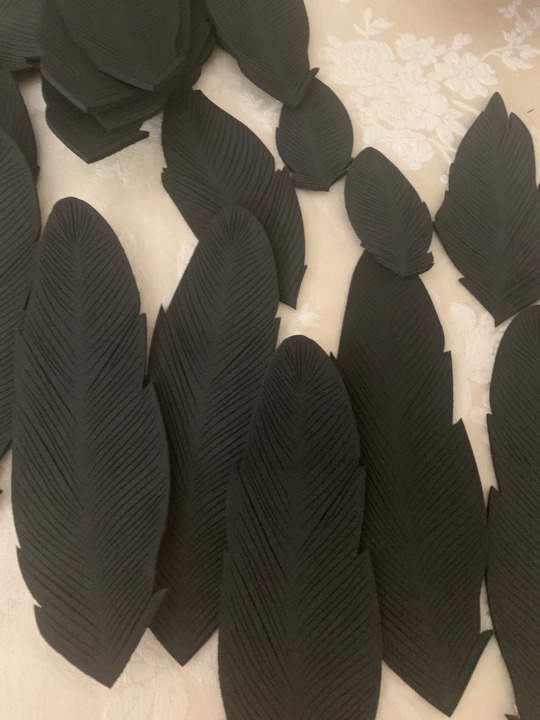
3. Feathers
I have been in Adobe Illustrator hell creating feather SVGs for the laser cutter software Lightburn so that I can have a machine cut EVA foam feathers for me while I’m busy avoiding my corset mock-up by doing a full fabric stash inventory. There are five feather sizes with four variants of shapes in each size. Every feather has a red outline and dozens of detail texture lines drawn as tapered lines. These are plopped onto appropriately sized art boards that match the cutting area of the laser cutter which is 15x15 inches. Adobe also exports SVGs at 72 ppi (pixels per inch) and Lightburn treats everything as 96 ppi so I had to rescale everything. (Yes, me and the owner of the laser cutter found this through trial and error). The end result is a gorgeous bunch of feathers that I did not have to engrave by hand. There’s currently about 120 out of over 400 feathers cut so far

Everything else is still in early stages or waiting to be done after something else finishes (like the dress or corset that will support the wings’ backplate)
3 notes
·
View notes
Text
What Are the Best Practices for Converting Figma to WordPress?
Are you seeking tips and tricks while converting your Figma to WordPress website?
You arrived at the right place.
What is Figma?
Figma is a popular vector graphic editor designer used to create user interfaces, illustrations, icons, and more.
The process of conversion started with converting the Figma design to code. The second method is to export as PNGs (Portable network graphics), JPGs, and SVGs (Scalable vector graphics). It is like other designing tools, like Adobe Photoshop (PSD), Sketch, etc.
Apart from the similarity with the other tools, Figma has a few unique features and functionalities that make it a valuable tool for designers.
Figma has become a famous alternative for building visual hierarchy websites and interactive web applications.
This platform is famous for its capability and flexibility, making this a unique one and one of the influential designing tools.
Whereas,
What is WordPress?
WordPress is a well-known CMS (Content management system) that powers more than 40% of all websites worldwide.
WordPress continues to influence the CMS ( content management system) industry and stays in competition.
Its extensive offerings of plugins that improve functionality, its user’s support community, and its adaptability make it a perfect choice for developers.
Let's walk over a few best approaches for Figma to WordPress conversion.
Top 5 Best Practices for Figma to WordPress Conversion
Let’s check out the best approaches while transferring files from Figma to WordPress. Check this following given below:
WordPress Installation:
One of the most important things to remember is to ensure you have a clean WordPress installation before converting your Figma design to WordPress. The installation will assist you in avoiding problems with current plugins and themes.
Choose theme compatible with Figma:
Look for a WordPress theme that integrates with Figma. A suitable theme will make converting your Figma design into a WordPress theme easier.
Employ a Child Theme:
If you are using a WordPress theme that supports Figma integration, it is recommended that you first establish a child theme. It enables you to modify the theme without compromising the original design.
Use Page Builder:
Page builders are an excellent approach to transforming your Figma design into a WordPress theme quickly and effortlessly. However, seek a page builder that integrates with Figma.
Testing:
Once you've transformed your Figma design into a WordPress theme, properly test it from beginning to end. Before publishing your website, test the Figma design to uncover potential concerns. If an issue arises, it may be resolved here.
Considering these few basics, you can ensure smooth Figma to WordPress conversions.
Looking for Figma to WordPress conversion?
TRooInbound is one of the well-known organizations having demonstrated years of experience.
We have an expert team of Figma and WordPress developers to offer any Figma to WordPress conversion services.
Our specialties include website development, application development, migration, digital marketing, and conversion services.
We have more than 5 years of industry experience with a demonstrated work portfolio. Our expert team is highly qualified for any web development project.
Why are you waiting for?
Contact us today!
#figma to WordPress#website design#website development#design to code#wordpress#wordpress website development#TRooInbound
5 notes
·
View notes
Text

How to Create a Logo Design in CorelDRAW: Step-by-Step Guide
Creating a standout logo is more than just combining shapes and text, it’s about capturing the identity of a brand in a memorable and scalable design. If you're looking to create professional, vector-based logos, then CorelDRAW is a top-tier choice. This guide walks you through everything from concept to completion in your logo design journey.
Why Use CorelDRAW for Logo Design?
CorelDRAW is a vector graphics editor known for its precision, scalability, and versatility. One of the core strengths of logo design in CorelDRAW is the control it gives you over shapes, colors, and typography. Since it's a vector-based tool, designs can be scaled from a business card to a billboard without losing quality.
Whether you're a beginner or experienced designer, CorelDRAW's tools like the Shape Tool, Bezier Tool, and the Interactive Fill Tool make designing logos more intuitive.
Step-by-Step Process
1. Set Up the Document
Start by creating a new document:
Choose print or web preset
Set DPI to 300 for high resolution
Choose CMYK for print or RGB for digital projects
2. Plan Your Concept
Before designing, brainstorm your brand values and sketch rough ideas:
What does the logo need to express?
Is it abstract, typographic, or a combination?
3. Build with Basic Shapes
Use tools like the Rectangle and Ellipse Tool to form the foundation. Combine shapes using Weld, Trim, and Intersect for creative customization.
4. Add Text and Style It
Use the Text Tool to insert your brand’s name
Select fonts that reflect the personality of the brand
Convert text to curves (Ctrl+Q) to manipulate it as a shape
5. Pick a Color Scheme
Stick with 2–3 brand colors for versatility
Use the Interactive Fill Tool for gradients
Test the design in black and white for clarity
6. Align and Arrange
Use Align and Distribute for precise placement
Snap to grid or use guidelines for structure
7. Apply Effects (Optional)
Keep effects like drop shadows or outlines minimal to maintain readability.
8. Save and Export
Save in .CDR format
Export in PNG (web), EPS/PDF (print), SVG (scalable use)
Pro Tips
Always prioritize simplicity
Check how your logo appears at different sizes
Avoid stock elements for originality
Common Mistakes
Using raster graphics that don’t scale
Overloading with details
Choosing trendy fonts over timeless ones
Conclusion
Designing a logo involves creativity and strategy. With its powerful vector tools and user-friendly interface, CorelDRAW remains a preferred choice among professionals for logo design in CorelDRAW. Follow these steps to create something unique and scalable. Now, go ahead and start crafting a visual identity that truly represents your brand!
#CorelDRAW#Logo design#Logo design tutorial#How to design a logo#CorelDRAW tutorial#CorelDRAW graphic design
0 notes
Text
Adobe Illustrator Classroom in a Book Chapter 15 & 16 Exercises - VCDM Visual Literacy: Elements of Design, Color and Typography
Chapter 15 Review Questions
Describe the difterence between linking and embedding in Illustrator.
2. How do you show options when importing masks?
3. What kinds of objects can be used as masks?
4. How do you create an opacity mask for a placed image?
5. Describe how to replace image with another image in a document.
My Responses
A linked file is a separate, external file connected to the Illustrator file by a link. A linked file does not add significantly to the size of the Illustrator file. The linked file must accompany the Illustrator file to preserve the link and ensure that the placed file appears when you open the Illustrator file. An embedded file becomes part of the Illustrator file. The increased Illustrator file size reflects the addition of the embedded file. Because the embedded file is part of the Illustrator file, no link can be broken. You can update linked and embedded files using the Relink button in the Links panel.
2. When placing an image using the File > Place command, in the Place dialog box, select the Show Import Options option. Selecting this will open the Import Options dialog box, where you can set options before placing. In macOS, if you don't see the options in the Import Options dialog box, click the Options button.
3. A mask can be a simple or compound path, and masks (such as an opacity mask) may be imported with placed Photoshop files. You can also create layer clipping masks with any shape that is the topmost object of a group or layer.
4. You create an opacity mask by placing the object to be used as a mask on top of the object to be masked. Then you select the mask and the objects) to be masked and either click the Make Mask button in the Transparency panel or choose Make Opacity Mask from the Transparency panel menu.
5. To replace a placed image with a different image, select the image in the Links panel. Then click the Relink button (or the Relink From CC Libraries button, and locate and select the replacement image. Click Place or Relink (if you clicked the Relink From CC Libraries button).
Chapter 16 Review Questions
Describe what packaging an Illustrator document does.
2. Why do you align content to the pixel grid?
3. Describe how you export an artboard.
4. Name image file types that can be chosen in the Export For Screens dialog box and Asset Export panel.
5. Describe the generic process for exporting assets with the Asset Export panel.
My Responses
Packaging is used to gather all of the necessary pieces of an Illustrator document. Packaging creates a copy of the Illustrator file, the linked images, and the necessary fonts (if desired), and gathers those copies into a folder.
2. Aligning content to the pixel grid creates a crisp appearance at the edges of artwork. When Snap To Pixel is enabled for supported artwork, all the horizontal and vertical segments in the object are aligned to the pixel grid.
3. To export an artboard, choose file > Export > Export As or File > Export > Export for Screens. In the Export For Screens dialog box that appears, you can choose between exporting artboards and exporting assets. You can choose to export all or a specific range of artboards.
4. The image file types that can chosen in the Export For Screens dialog box and the Asset Export panel are PNG, JPEG, SVG, PDF, OBJ, USDA, and GLTF.
5. To export assets using the Asset Export panel, the artwork to be exported needs to be collected in the Asset Export panel. Once it's in the panel, you can select the asset(s) to be exported, set the export settings, and then export.
0 notes
Text
How to Make a Digital Design: A Step-by-Step Guide

Digital design is an essential skill in today’s digital world, whether you’re creating graphics for social media, websites, branding, or digital art. Whether you’re a beginner or an aspiring professional, understanding the process can help you create visually appealing and functional designs. In this guide, we’ll break down the steps to making a digital design from start to finish.
Step 1: Define Your Purpose and Audience
Before you start designing, determine the goal of your design and your target audience. Ask yourself:
Is it for a website, social media, advertisement, or personal project?
Who will see this design? What are their preferences?
What emotions or actions do you want to evoke?
Having clarity on these points will help guide your design choices.
Step 2: Choose the Right Software
There are many digital design tools available, and selecting the right one depends on your project needs:
Adobe Photoshop – Best for photo editing and raster graphics.
Adobe Illustrator – Ideal for vector graphics and logo design.
Canva – User-friendly for beginners, great for social media and presentations.
Figma – Excellent for UI/UX design and collaboration.
Procreate – Perfect for digital painting and illustrations.
Step 3: Gather Inspiration and Plan Your Design
Before starting, gather inspiration from online sources such as Pinterest, Behance, or Dribbble. Create a mood board to organize color schemes, typography, and layout ideas.
Sketch your ideas on paper or use wireframing tools to map out the structure of your design before you dive into software.
Step 4: Set Up Your Canvas
Open your chosen software and set the appropriate dimensions for your design. Consider:
Resolution: Use 72 DPI for digital designs and 300 DPI for print designs.
Color Mode: RGB for screens, CMYK for print.
Aspect Ratio: Make sure it suits the platform where it will be displayed (e.g., Instagram post vs. website banner).
Step 5: Create a Strong Composition
A well-balanced layout improves readability and visual appeal. Follow design principles such as:
Rule of Thirds: Place key elements along grid lines for balance.
Alignment and Spacing: Keep elements aligned and maintain consistent spacing.
Hierarchy: Emphasize important elements through size, contrast, and placement.
Step 6: Choose Colors and Typography
Colors: Use a color palette that complements your design's theme. Tools like Adobe Color or Coolors can help.
Fonts: Select readable and appropriate fonts. Use font pairings that work well together (e.g., bold headings with simple body text).
Contrast: Ensure good contrast between text and background for readability.
Step 7: Add Graphics and Visual Elements
Enhance your design with:
Icons and illustrations
High-quality images
Shapes and lines to guide the viewer’s eye Make sure these elements blend well with the overall design.
Step 8: Use Layers and Effects Wisely
Most design software allows working with layers. Organize your layers and name them for easier editing. Use effects like:
Shadows and gradients for depth
Transparency and overlays for a modern look
Blending modes to merge images creatively
Step 9: Review and Refine
Take a step back and analyze your design. Check for:
Spacing and alignment issues
Color consistency
Readability of text Ask for feedback from peers and make necessary adjustments.
Step 10: Export in the Right Format
Save your design in the appropriate format:
PNG – High quality, supports transparency.
JPEG – Smaller file size, good for web use.
SVG – Scalable vector format, ideal for logos and icons.
PDF – Best for print and document sharing.
Conclusion
Creating a digital design involves planning, creativity, and technical skills. By following these steps, you can improve your design process and produce stunning visuals for any purpose. Keep practicing, stay updated with design trends, and experiment with new techniques to refine your skills. Happy designing!
1 note
·
View note
Text
Latest Java Charting Libraries are listed in this page Java offers immense flexibilities in running a number of web applications independent of the running platform and computer architecture. The two and three-dimensional representations through different types of bar graphs provided by Java have enhanced its popularity since its release. In recent years, Java libraries are being used less for web-based reporting since there are really powerful jQuery and JavaScript charting libraries available for client-side rendering. However, even now Java software is still run on millions of computers as the Java Charting Library offers varied interesting features to the users and web developers. The users can embed stunning 2D and 3D representations in the web through different types of graphs and charts imported from the Java charting library. JFreeChart This open source Java charting library offers users the maximum alternatives to represent their complex data in a simplified manner. It enables the extensive use of X-Y charts, Pie charts, Bar graphs, Gantt charts, Pareto charts, combination charts, wafer map charts and other special types of charts. In a nutshell, JFreeChart is a comprehensive charting package providing maximum charting options to the users. Axis, legends, and scales are automatically drawn and, the user can also place various markers on the plotted chart. The charts can be zoomed for a better view and can be regularly updated by the attendants of the Java charting library. The user can download the developer’s guide and follow the applications accordingly. JCC Kit This is another promising Java Charting library next to the JFree Chart. This charting library occupies very little disk space about less than 100kb and is very useful for designing charts based on scientific data. The flexibility of JCC Kit enables easy writing of applet programs that presents data on the web page without any prior knowledge of Java programming language. Automatic rescaling, creating legends and up gradation is possible with JCC Kit Charting library. OpenChart2 This Java charting is very useful and simplifies the interface for plotting 2-D charts. Following the basics of JOpenChart library, OpenChart2 offers a variety of charting features including advanced forms of bar graphs, pie charts and scatter plots. jCharts This open-source charting facility is very useful to display different types of charts through JSP’s, Servlet and Swing apps. The developer can download any Servlet container and follow the examples of jCharts. GRAL Graphing Library This Java Graphing Library enables high-quality plotting and charting. It can also import data from texts, audios, and videos and the plots can be produced in JPEG, EPS, PDF, PNG and SVG files. Users can also use GRAL for different types of data processing and this library also provides a Java Swing interface. charts4j This lightweight charts and graphs Java API enables to create charts programmatically using Google chart tools. It can be integrated into any web application or Swing, JSP, Servlet or GWT. JChart2D This charting library is meant for representing engineering data demanding high precision than colorful presentations. JChart2D, a Java component displays dynamic 2D charts offering automatic labeling scaling. Users carrying basic knowledge of Java Swing and AWT can use it to the best possible limit. It is preferred over JFreeChart due to its dynamic feature. JFreeReport This is another open source tool meant for generating reports or it can be assigned as Java Report Generator. It provides an on-screen print preview based on data via Java Swing’s Table Model Interface, and reports can either be generated from the printer or can be exported to various formats like PDF, XLS, HTML and many more. Jzy3D In designing simple three-dimensional charts like bar graphs and scatter plots, Jzy3D graphing library is very handy. This charting library is also useful in creating 2D graphs and plots.
There are also provisions to add color maps and different contours beside 3D charts. Jzy3D also enables a wide range of customization through various layout tools. JasperReports This useful open source Java reporting tool helps in delivering rich content on the screen or exporting to HTML, PDF, XML, XLS and CSV files and printer. This 100% Java-based program finds extensive use in various Web and Java applications (JEE) that produce dynamic content. The user can generate reports instantly in the most simplified manner and get them printed. Different types of projects and jobs need different projections and representations, and Java charting library offers a number of charting tools to represent their data in an understandable manner. All of these charting applications are open source software and can be downloaded for free. Hope you found this list useful. What java libraries do you use for creating reports and charts? Article Updates Article Updated on Jan 2025 - link to latest post. Article Updated on September 2021. Some HTTP links are updated to HTTPS. Updated broken links with latest URLs. Some minor text updates done. Content validated and updated for relevance in 2021. Updated on April 2019: Minor changes and updates to the introduction section, images are HTTPS now.
0 notes
Text
Best Tools for 2D & 3D Asset Creation for Game Developers
Game development requires high-quality assets to bring worlds to life, whether in 2D or 3D. Choosing the right tools can make a significant difference in your workflow, efficiency, and final game quality. In this blog, we’ll explore the best tools for 2D and 3D asset creation, catering to beginners and professionals alike

Best Tools for 2D Asset Creation
2D assets include sprites, textures, UI elements, and concept art. Whether you’re making a pixel-art platformer or a hand-painted RPG, the right tools can streamline your creative process.
1. Adobe Photoshop (Industry Standard for Digital Art & Textures)
Best for: Digital painting, UI design, texture creation
Adobe Photoshop is widely used for 2D asset creation due to its powerful painting, layering, and editing tools. Game developers use it to create textures, character sprites, and UI elements.
Advanced brush system for detailed artwork
Non-destructive editing with smart layers
Great for creating textures for 3D models
2. Aseprite (Best for Pixel Art & Sprites)
Best for: Pixel art, animated sprites, tilesets
Aseprite is a beloved tool for pixel artists, offering intuitive tools for creating animations and tilesets.
Timeline-based animation system
Onion skinning for smooth frame transitions
Affordable one-time purchase
3. Krita (Free & Open-Source Digital Painting)
Best for: Concept art, character design, hand-drawn assets
Krita is a free alternative to Photoshop with a focus on digital painting. It offers an impressive brush engine and customizable interface.
Free & open-source with no limitations
Excellent brush customization
Great for game concept art
4. Inkscape (Best for Vector Art & UI Elements)
Best for: UI design, scalable assets, vector graphics
Inkscape is a powerful, free vector graphics tool ideal for UI design and stylized 2D artwork.
Scalable vector graphics (SVG) support
Free and open-source
Good for icons, UI, and stylized graphics
Best Tools for 3D Asset Creation
Creating 3D assets requires tools that handle modeling, texturing, rigging, and animation. Whether you're an indie dev or part of a AAA studio, these tools offer the best solutions.
1. Blender (Best Free 3D Modeling & Animation Tool)
Best for: 3D modeling, sculpting, animation, texturing
Blender is a powerhouse for game developers, offering industry-standard tools for 3D asset creation, all for free.
Free & open-source with constant updates
Powerful sculpting, modeling, and animation tools
Built-in rendering engine (Eevee & Cycles)
2. Autodesk Maya (Industry Standard for 3D Animation)
Best for: 3D animation, rigging, high-end production
Maya is widely used in AAA studios for its superior rigging and animation tools.
Industry-standard for animation and rigging
Advanced toolset for complex 3D assets
Strong integration with game engines
3. ZBrush (Best for High-Detail Sculpting)
Best for: Character modeling, sculpting, high-poly assets
ZBrush specializes in high-detail sculpting, making it the go-to tool for character modeling and organic forms.
Unparalleled sculpting capabilities
Used in AAA games for characters and environments
High-resolution model generation for normal maps
4. Autodesk 3ds Max (Best for Architectural & Hard-Surface Modeling)
Best for: Hard-surface modeling, architectural assets
3ds Max is great for creating game environments, props, and vehicles due to its precision modeling tools.
Best for hard-surface modeling & environments
Widely used in the game industry
Excellent rendering capabilities
5. Substance Painter (Best for Texturing & Materials)
Best for: 3D texturing, PBR workflow, realistic materials
Substance Painter is the industry standard for texturing, allowing game developers to create realistic materials with a physically-based rendering (PBR) workflow.
Intuitive painting interface with real-time rendering
Seamless export to Unity & Unreal Engine
Advanced smart materials & masking tools
Choosing the Right Tool for Your Project
When selecting a tool for asset creation, consider the following:
Budget: Free tools like Blender, Krita, and Inkscape offer professional-quality features without cost.
Skill Level: Beginners may find Aseprite, Blender, or Inkscape more approachable than ZBrush or Maya.
Game Style: A pixel-art game benefits from Aseprite, while a hyper-realistic game requires Substance Painter and ZBrush.
Integration with Game Engines: Ensure your chosen tool supports seamless export to Unity, Unreal Engine, or Godot.
Final Thoughts
The right tools can elevate your game’s visual quality and streamline your workflow. Whether you’re creating a 2D platformer or a 3D open-world adventure, there’s a tool suited for your needs. Beginners can start with free options like Blender, Krita, and Inkscape, while professionals may invest in Autodesk Maya, Substance Painter, or ZBrush for advanced features.
0 notes
Text
Unlocking Creativity with Pixellab APK: A Comprehensive Guide
In today's digital age, graphic design and photo editing have become essential skills, whether for social media content creation, business marketing, or personal projects. Among the numerous tools available, Pixellab APK stands out as an innovative and accessible application for those looking to explore their creative side. This article takes a closer look at Pixellab APK, its features, and how it can elevate your graphic design game.
What is Pixellab APK?
Pixellab Mod APK (unlimited font download) is a free, user-friendly graphic design and photo editing application that brings a wealth of features to your fingertips. Available for Android devices, Pixellab allows users to create stunning visuals with ease. The app’s simplicity and powerful tools make it popular for both beginners and professionals in the fields of design, photography, and content creation.
The APK version of Pixellab is the installation file format for Android devices, allowing users to install the app directly from a trusted source, bypassing the need for Google Play Store installation. This can be especially useful when accessing newer versions or finding alternate installation sources.

Key Features of Pixellab APK
Text Editing and Typography: Pixellab provides robust text editing options. You can choose from a variety of fonts, adjust the size, color, alignment, and even apply unique text effects like shadows, 3D effects, and more. Whether you’re designing a social media post or a professional flyer, the app ensures your text stands out.
Stickers and Graphics: The app comes with an extensive library of free stickers, shapes, and graphic elements. These can be used to enhance your design, adding a fun or artistic flair to any project. The library is regularly updated, so there’s always something new to try.
Image Manipulation: Pixellab APK allows you to easily crop, rotate, and adjust your images. You can also apply filters to change the aesthetic of your photos. If you're working on a more complex design, Pixellab also supports layering, so you can combine images and elements seamlessly.
Background Removal: One of the standout features is the ability to remove backgrounds from images. Whether you need a transparent background for a logo or want to isolate an object, Pixellab makes the process easy and intuitive, saving you time compared to other editing tools.
Collage Maker: Pixellab also allows users to create photo collages. The app offers multiple templates and customization options, making it easy to arrange your photos into visually pleasing layouts.
Customizable Templates: For those who need quick results, Pixellab provides ready-to-use templates for social media posts, banners, invitations, and more. These templates are fully customizable, allowing you to personalize them with your own text, images, and design elements.
Shape and Path Drawing: If you want more control over your designs, Pixellab lets you draw shapes and paths with precision. This feature is excellent for users who want to create custom logos, infographics, or any other design with unique geometric elements.
Export and Sharing: Once you're satisfied with your design, Pixellab APK makes it simple to export your creation in various formats like PNG, JPEG, or SVG. You can also directly share your designs on social media platforms such as Instagram, Facebook, or Twitter, making it a great tool for content creators and marketers.
Benefits of Using Pixellab APK
Ease of Use: Pixellab’s interface is incredibly intuitive, meaning you don’t need to be a design expert to create stunning visuals. The app’s drag-and-drop feature simplifies the process.
Free to Use: Unlike many other design apps that charge for premium features, Pixellab is free. Most of its key features are available without any cost, making it an excellent option for budget-conscious users.
No Watermarks: Unlike other free apps, Pixellab doesn’t add a watermark to your designs, allowing you to create professional-quality graphics without any branding interference.
Regular Updates: Pixellab frequently updates its features and content library, ensuring that users always have access to the latest tools, stickers, fonts, and templates.
How to Install Pixellab APK
Installing Pixellab APK is a straightforward process. Here’s how you can do it:
Download the APK File: First, download the Pixellab APK file from a trusted source. Make sure you’re downloading from a reputable site to avoid potential security risks.
Allow Unknown Sources: Before installing the APK, go to your device settings, select "Security," and enable "Install from Unknown Sources" to allow installation of apps outside the Google Play Store.
Install the APK: Once the download is complete, open the APK file and follow the on-screen instructions to install the app.
Launch and Explore: Once installed, open Pixellab and start exploring its many features!
Who Should Use Pixellab?
Social Media Influencers & Content Creators: Pixellab is a powerful tool for quickly creating visually appealing posts, banners, and ads. Its easy-to-use templates and design options make it ideal for creating content that engages audiences.
Small Business Owners: Entrepreneurs and small business owners can use Pixellab to design promotional materials, flyers, logos, and other branding elements without needing professional software or hiring a designer.
Beginners in Graphic Design: If you’re new to graphic design, Pixellab is a perfect starting point. Its simple interface allows users to experiment with different tools and features without feeling overwhelmed.
Anyone Interested in Photo Editing: From simple retouching to advanced editing, Pixellab covers a wide range of photo editing needs. It’s a versatile tool for anyone interested in enhancing their photos. Related: Pixellab Mod APK
Conclusion
Pixellab APK is an excellent graphic design and photo editing tool for Android users. Whether you're a beginner or a seasoned designer, the app’s wide array of features and its intuitive interface make it a go-to choice for anyone looking to create stunning visuals. From social media content to professional marketing materials, Pixellab offers a powerful yet accessible platform to help bring your creative ideas to life. Download Pixellab APK today and start exploring your design potential!
0 notes
Text
Transforming Ideas into Visuals: The Art of Creating Effective Icons
Icons customized and unique: Expert Q&A Insights
1.What is the best image size for icons?
The best image size for icons typically ranges from 16x16 pixels to 512x512 pixels, depending on usage. Common sizes include 32x32 for web applications and 64x64 for desktop icons. For mobile apps, sizes like 48x48 and 72x72 are popular. Always consider using vector formats for scalability without loss of quality.
2. What is the difference between JPG and PNG icons?
The primary difference between JPG (or JPEG) and PNG icons lies in their respective compression methods and the quality retention of the images they produce. JPG utilizes a lossy compression technique, which significantly reduces file size by discarding some image data, ultimately sacrificing a degree of quality in the process. This format is particularly well-suited for photographs or images that contain a wide range of colors and gradients, as the loss of some detail is often imperceptible to the viewer. However, this characteristic makes JPGs less ideal for icons or graphics that require sharp edges, distinct lines, or clear contrasts, as the compression can lead to blurring and artifacts that compromise the visual integrity of the image. 3. How do I create a custom icon in Illustrator?
To create a custom icon in Illustrator, start by using the Pen Tool to draw your design. Use shapes and the Pathfinder tool to combine or subtract shapes as needed. Add colours and effects for depth. Finally, save your icon in your desired format (e.g., AI, SVG, PNG) by going to File > Save As or Export.
4. How do I make a custom icon image?
To create a custom icon image, use graphic design software like Adobe Illustrator or free tools like Canva or GIMP. Start with a square canvas, design your icon using shapes and colours, and keep it simple for clarity. Save your design in the appropriate format (like PNG or SVG) and ensure it meets size requirements for your intended use.
5. What is an icon illustration?
An icon illustration is a simplified graphic representation used to convey an idea, concept, or object clearly and quickly. Icons are often used in user interfaces, branding, and signage to enhance communication and understanding. They typically feature minimal detail and bold shapes, making them easily recognizable and effective in conveying messages immediately.

Visit: VS Website See: VS Portfolio
0 notes
Text
Best Alterations Software for Small Businesses
Tailors use alterations software to modify outfits. It has many advanced features that make the alteration process accurate and efficient. Tailors can adjust patterns and enter measurements into this software, which is a revolutionary innovation. The outfits fit the customers perfectly. Moreover, the software offers customization. In addition, it keeps customers’ information in its database. It is possible to schedule an appointment with this software. Additionally, the customers receive a notification when an appointment comes up.
Features of Efficient software for tailoring and alterations
Customization
Alterations software allows us to create and customize clothes’ designs. We don’t encourage manual alterations. However, we modify existing garments to the size that the customers desire. We also enter the dimensions that the client specifies into the alterations software. Then, the software changes the pattern and size of the dress.
The software has many templates for necklines and other dress parts. We combine those templates with size customization.
Geelus uses excellent garment alterations tracking software.
Material
We apply different fabrics to the design of the attire, ranging from cotton to silk. The software calculates how much fabric the dress needs to change its measurements. Moreover, we have a library of various fabrics. Our customers choose the fabric they want for their garments from there.
Client profiles
Geelus records its clients’ phone numbers, addresses, and emails. We also record their dress measurements and choices in the system. In addition, we check deadlines and modification information. Thus, we remain organized. We notify the clients by text message or email about the status of the alteration.
Workflow
We schedule the different alteration activities, dividing the tasks into categories and noting when we measure, cut, or stitch clothes.
We prioritize the more essential tasks, allowing us to allocate resources according to task preference. Moreover, we track inventories, as the software checks material stock, ensuring we always have everything in stock.
Export
The software changes the format of the pattern files. It usually uses SVG. Thus, we can use these formats with our sewing machines.
Additionally, the software removes seams or extra cloth from the garment, a vital step in dress alterations. We integrate our software with e-commerce websites to ensure smooth operation.
Analytics
We divide the project expenses according to fabric material and working hours. Moreover, the software monitors profits. In addition, it keeps an eye on customer preferences so that we can make good decisions. The software creates reports on stock usage and client communications. Furthermore, we can keep track of timelines accurately. Thus, it is an efficient software for tailoring and alterations.
Other features
The software has a mobile version. Thus, our customers can view dress patterns and measurements anytime and monitor project status.
Geelus uses cloud-based software for tailors. The information is stored in the cloud. Thus, our customers can access it from any device.
Moreover, we train our technicians so that they can learn the software’s features and use it efficiently. Hence, it benefits both newbies and experts.
Tools for garment alterations tracking software
Measurement
The alterations software has forms for providing measurements. For instance, the customer can enter the size of the hips and shoulders. Next, the software modifies dress sizes with those measurements.
Moreover, there are three-dimensional measurement tools. Thus, they capture the exact shape and size of the customer. Moreover, the software is able to convert one system to another, for example, centimeters to inches.
Pattern
The customer can change lines and curves to create complex designs. In addition, it removes gaps or seams in clothes, which is known as seam allowance. Thus, our company is very professional.
The software ensures that the cloth takes up the shape of the body. Furthermore, it can be created in various sizes, such as small or extra large.
Simulation
The simulation tool has three-dimensional avatars that wear the dress. Hence, you will get an idea about how the dress will look if someone wears it. Thus, you will not have any problem with fitting, and the alteration process will go smoothly.
The tool also gives a 360-degree view of the dress, allowing you to observe different details like shape and size. It also has a feature called material simulation, which lets you understand how various materials look on the attire. In addition, it considers the fabric’s weight and material.
Alteration
The technicians can alter the dress using alteration tools. They can shorten or lengthen hems and sleeves. The customer can provide real-time feedback on the alterations. First, they look at the design and measurements. Next, they ask you to make any changes if needed. The alteration tool can change the dress size to fit numerous body sizes. This helps make uniforms or match attires.
Sewing
The sewing tool can accurately cut and stitch the dress. Moreover, it can identify stitch lines and thus help our technicians place the seam. In addition, it does not waste fabric.
Therefore, Geelus can provide affordable software for alteration shops.
Fabric
The fabric calculator tool can estimate the amount of material a technician needs to make an outfit. Moreover, the technician can use different colours and sizes so that the outfit will look like real-life clothes in the software.
This tool also monitors stock, so you will always have an inventory of dress materials. Moreover, it keeps track of dress embellishments.
Styling variation
This tool allows you to change styles. Thus, you can change a halter neckline to a round neckline. You can also add embellishments. For instance, you can embellish with beads, buttons, or lace. Hence, it enhances the outfit. Moreover, you can test different colour combinations.
What is online appointment scheduling for tailors?
If you want to use alterations software, you need to book an appointment. Our booking method is online and through social media. Moreover, we offer extra information, such as outfit and fabric choices. In addition, we can help you with any problems you may face. This is known as online appointment scheduling for tailors.
Our software integrates with Google Calendar, so you can make booking choices. If any time is available, the software updates it. We discuss all our services and the time and cost needed to complete each task. In addition, we let you book numerous appointments together. For instance, you can book fitting and stitching services together.
Furthermore, the app provides the latest outfit updates. The software offers technician profiles. Thus, you can select a technician who has expertise. In addition, the software assigns activities if a technician is available or has skills.
The alterations software has a mobile app, so you can book an appointment from your mobile. Our technicians can see appointments and contact customers on the app dashboard, and they can update when they are available. If you cancel a booking, the tailor receives a push notification.
We take deposits when you book a service, which lowers the chance of cancellations. You can pay us fully or partially when you book. Our payment method is PayPal. You can book appointments during our business hours. However, you cannot book during breaks and vacations. Moreover, you can ask us to allocate time for each service. For example, you can assign one hour for fitting, etc.
Conclusion
Alterations software is a landmark in the tailoring industry. It has revolutionized outfit modification. In addition, it is very innovative, practical, and modern. Our tailors are very skilled and efficient. The software has many features, such as customization and inventory tracking. It helps your business compete with the big companies. Thus, you will achieve long-term success in the tailoring business.
1 note
·
View note
Text
Unleash Your Team Spirit: The Ultimate Buffalo Bills Tumbler SVG Design Guide
Are you a die-hard Buffalo Bills fan looking to showcase your team spirit in a unique and creative way? Or perhaps a designer seeking fresh and vibrant ideas for your next project? Look no further! Our Buffalo Bills Tumbler SVG Design Guide is your go-to resource for crafting stunning, personalized tumblers that celebrate your favorite team. Whether you're a seasoned designer or just starting out, this comprehensive guide will equip you with everything you need to create eye-catching Buffalo Bills tumblers that you’ll be proud to show off.

Why Customize Your Buffalo Bills Tumbler?
Customizing a Buffalo Bills Tumbler isn’t just about having a personalized drinkware item; it’s about expressing your loyalty and passion for the team in a tangible way. Imagine sipping your favorite beverage from a tumbler adorned with the iconic Buffalo Bills logo, team colors, and perhaps even your favorite player’s number. It’s a perfect blend of functionality and fandom, making every sip a celebration of team pride.
Benefits of a Customized Buffalo Bills Tumbler
Personal Expression: Showcase your unique style and dedication to the Buffalo Bills.
Durability and Quality: High-quality SVG designs ensure your tumbler remains vibrant and long-lasting.
Versatility: Perfect for game days, workouts, office use, or as a thoughtful gift for fellow fans.
Eco-Friendly: Reusable tumblers reduce the need for single-use cups, contributing to environmental sustainability.
Getting Started with Buffalo Bills Tumbler SVG Designs
Creating a customized Buffalo Bills tumbler is easier than you might think. With the right tools and a bit of creativity, you can design a tumbler that stands out and truly represents your team spirit. Here’s how to get started:
Essential Tools and Resources
To design your Buffalo Bills tumbler, you’ll need some basic tools:
Design Software: Programs like Adobe Illustrator, CorelDRAW, or free alternatives like Inkscape are perfect for creating SVG designs.
SVG Files: Access high-quality Buffalo Bills SVG files from SVGBank to ensure your designs are crisp and professional.
Tumbler Template: Having a template helps in visualizing how your design will look on the tumbler.
Step-by-Step Design Process
Choose Your Design Elements: Start by selecting the key elements you want to include, such as the team logo, colors, player numbers, and any other relevant graphics.
Create the Design: Using your chosen design software, arrange the elements in a visually appealing way. Ensure that the colors align with the Buffalo Bills’ palette – primarily royal blue, red, and white.
Optimize for Printing: Make sure your SVG files are optimized for printing. This includes ensuring that all lines are clean and the design is scalable without losing quality.
Preview and Adjust: Use a tumbler template to preview your design. Make any necessary adjustments to ensure the design looks great from all angles.
Finalize and Export: Once satisfied, export your design in SVG format, ready for printing or sharing.
Pro Tips for Vibrant and Durable Designs
Creating a Buffalo Bills tumbler that not only looks great but also stands the test of time requires attention to detail. Here are some pro tips to elevate your designs:
Use High-Contrast Colors
Ensure that your design elements contrast well with the tumbler’s base color. This makes your design pop and enhances visibility from a distance, perfect for game days.
Incorporate Team Symbols
Integrate recognizable Buffalo Bills symbols like the charging buffalo, team logo, or stadium silhouette. These elements instantly convey team spirit and create a strong visual impact.
Layer Your Designs
Experiment with layering different design elements to add depth and dimension to your tumbler. For instance, place the team logo as a central element and layer player numbers or slogans around it.
Test for Durability
Choose materials and printing methods that ensure your design remains vibrant and durable through regular use. High-quality inks and protective coatings can help preserve your design’s integrity.
Creative Uses for Your Buffalo Bills Tumbler SVG Designs
Once you’ve mastered the basics, the possibilities are endless! Here are some creative ways to use your Buffalo Bills tumbler SVG designs:
Personalized Gifts
Custom tumblers make thoughtful gifts for friends and family who share your love for the Buffalo Bills. Personalize them with names, favorite player numbers, or special dates to add an extra touch of meaning.
Merchandise for Fans
If you’re running a fan shop or looking to expand your product offerings, personalized tumblers are a fantastic addition. They cater to fans looking for unique and functional merchandise that reflects their loyalty.
Promotional Items
For businesses or organizations looking to promote events or team spirit, customized tumblers serve as excellent promotional items. They’re practical, stylish, and a great way to spread the Buffalo Bills pride.
Home and Office Decor
Add a touch of Buffalo Bills spirit to your home or office with a customized tumbler. It’s a constant reminder of your favorite team and a great conversation starter.
Explore More with SVGBank
At SVGBank, we’re dedicated to providing high-quality SVG designs that empower creators and fans alike. Our Free Buffalo Bills SVG collection offers a variety of designs to get you started, and our premium options provide even more customization possibilities.
Why Choose SVGBank?
Extensive Collection: From logos to creative team motifs, our collection has something for every Buffalo Bills enthusiast.
High-Quality Files: Ensure your designs are professional and ready for printing with our meticulously crafted SVG files.
User-Friendly: Easy to download and compatible with various design software, making the design process seamless.
Supportive Community: Join a community of like-minded creators and fans who share tips, ideas, and their latest creations.
Get Started Today!
Ready to create your very own Buffalo Bills tumbler? Dive into our Buffalo Bills Tumbler SVG Design Guide and unleash your creativity. Whether you’re designing for personal use, gifts, or merchandise, our guide provides all the tools and inspiration you need to bring your vision to life.
Call to Action
Don’t wait! Explore our extensive collection of Buffalo Bills SVG designs, download your favorites, and start customizing your tumbler today. For even more creative options, check out our Free Buffalo Bills SVG collection and take the first step towards creating a truly personalized and vibrant Buffalo Bills tumbler.
Celebrate your team with every sip and let your creativity shine. Visit SVGBank now and discover the endless possibilities waiting for you!
Conclusion
Creating a customized Buffalo Bills tumbler is a fantastic way to express your team pride and showcase your creativity. With our Buffalo Bills Tumbler SVG Design Guide, you have all the resources and inspiration you need to design a tumbler that’s as unique as your fandom. Whether you’re a fan, a designer, or a business owner, our guide and extensive SVG collections at SVGBank make it easy to bring your Buffalo Bills-inspired creations to life. So grab your design tools, explore our resources, and start crafting a tumbler that truly represents your love for the Buffalo Bills!
Source: Buffalo Bills Tumbler SVG Design Guide
0 notes
Text
Effortless Figma to Elementor Conversion for Your WordPress Needs
When it comes to building dynamic, aesthetically appealing websites for WordPress, the integration of design tools with page builders is crucial. Figma and Elementor are two powerful platforms that, when combined, can take your web design to the next level. The process of converting Figma designs into Elementor layouts might seem daunting at first, but with the right strategies and tools, the transition from Figma to Elementor can be incredibly seamless. This guide will help you understand how to effortlessly perform a figma to elementor conversion, ensuring your website looks exactly as envisioned and functions perfectly.
Understanding Figma to Elementor Conversion
Figma is a popular design tool widely used by UX/UI designers to create wireframes, prototypes, and high-fidelity mockups. Elementor, on the other hand, is a drag-and-drop page builder for WordPress that allows users to build stunning websites without needing to write a single line of code. The combination of these two tools makes designing and building a website faster and more efficient.
The key to a successful Figma to Elementor conversion lies in understanding the relationship between a static design and the dynamic elements that Elementor offers. While Figma provides an accurate visual representation of how a page should look, Elementor helps translate that design into a fully functional website. With the right workflow, converting your Figma designs into Elementor pages becomes a straightforward task.
Preparing Your Figma Design for Elementor
Before diving into the actual Figma to Elementor conversion, it’s important to ensure that your Figma design is structured in a way that is compatible with Elementor. Start by ensuring that your design is clean, organized, and broken down into sections that make sense for a web page layout. Proper use of grids, alignments, and spacing in Figma will make the conversion process smoother.
Additionally, ensure that all the images, typography, and colors used in your Figma design are clearly defined. By keeping a consistent design language, you’ll save time when transferring assets into Elementor. It’s also helpful to export Figma elements like icons, logos, and images in high-quality formats that are optimized for the web. This will ensure that the design’s integrity remains intact when using Elementor.
Tools for Effortless Figma to Elementor Conversion
There are several tools available that can significantly speed up the Figma to Elementor conversion process. For instance, there are plugins that allow you to import your Figma design directly into Elementor, reducing the manual effort of recreating each element. These tools automatically map the visual elements from Figma to their Elementor counterparts, preserving the design’s layout, typography, and other key components.
Additionally, using a Figma-to-HTML converter can also streamline the conversion. This tool generates an HTML version of your Figma design, which can then be imported into Elementor as custom HTML. Once you have the design in Elementor, you can further refine it using Elementor’s advanced styling options to ensure that it matches the original Figma design.
Steps for Converting Figma to Elementor
The process of converting Figma to Elementor involves several key steps that can be broken down into manageable tasks. First, begin by preparing your design files in Figma for export. This involves ensuring that all elements are grouped and organized in layers, so they can be easily manipulated once in Elementor.
Next, export the Figma files you need, such as images, icons, and any other assets you want to keep. These files should be saved in a web-friendly format, such as PNG or SVG, ensuring that they retain their clarity and resolution when used on your WordPress website. Now, create a new page or post in WordPress and open it with Elementor. Begin the process of building your page by replicating the design structure from Figma, using Elementor’s widgets to add elements like text, images, and buttons.
For more advanced users, Elementor allows custom CSS and HTML integration, which can be used to fine-tune the design to match Figma precisely. During this stage of the Figma to Elementor conversion, be mindful of responsiveness. Make sure your design looks great on both desktop and mobile devices by utilizing Elementor’s responsive editing features.
Customizing Your Elementor Design
Once the basic structure of your page is built, it’s time to dive into the customization options that Elementor offers. Elementor’s theme builder allows you to fine-tune the design by customizing headers, footers, and even global design settings like fonts, colors, and spacing. This gives you full control over the look and feel of your website while keeping it in line with the original Figma design.
You can also take advantage of Elementor’s advanced features, such as animations, hover effects, and dynamic content. These features enable you to add interactivity and visual appeal to your website, which might not be possible with static Figma designs alone.
Testing and Refining Your Figma to Elementor Conversion
After the Figma to Elementor conversion is complete, it’s important to thoroughly test your website for functionality and visual consistency. This includes checking how it looks on different devices and browsers to ensure that your design remains responsive and fully functional across various platforms. You may need to adjust certain elements for optimal display, especially for mobile users.
Additionally, check for any broken links, missing images, or alignment issues that might have occurred during the conversion process. Elementor’s preview mode allows you to see how your design will look once published, which is an essential step before going live with the new page.
Conclusion
The process of Figma to Elementor conversion doesn’t have to be time-consuming or complicated. With careful planning, the right tools, and an understanding of how to leverage both platforms effectively, you can easily turn your Figma designs into fully functional WordPress pages. Whether you’re a designer or developer, mastering this workflow will help streamline your web design process and ensure that your website looks exactly as envisioned.
1 note
·
View note
Text
Can you convert Adobe XD to HTML?
Yes, you can convert Adobe XD to HTML, but the process involves multiple steps. Adobe XD is a design tool used to create user interfaces and prototypes, while HTML is the coding language used to build websites. To convert XD designs into a functional HTML website, you generally need to:
Export Assets: Extract images, icons, and other elements from the Adobe XD file. Adobe XD allows you to export these as PNG, SVG, or JPG formats.
Write HTML & CSS: You'll need to manually code the structure of the website in HTML and style it using CSS to match the design created in Adobe XD. This also involves making the site responsive for different devices and screen sizes.
Add JavaScript (Optional): If your design includes dynamic elements like sliders or forms, you’ll need to use JavaScript to bring these functionalities to life.
However, manually converting XD designs to HTML can be time-consuming and requires a good understanding of coding. That's where services like Figma2HTML come in. Although named for Figma, Figma2HTML also specializes in converting Adobe XD designs into clean, responsive HTML/CSS code.
With Figma2HTML, you can hand off your XD design to a team of experts, who will transform it into pixel-perfect HTML, CSS, and JavaScript. This service can save you both time and effort, ensuring your website is fully functional and professionally coded without you needing to dive into the technical details.
If you're looking for an efficient and high-quality solution, check out Figma2HTML to streamline your design-to-development process!

0 notes