#project3d
Explore tagged Tumblr posts
Visit Tumblr Blog
Explore Tumblr blogs with no restrictions, modern design and the best experience.
Last Seen Tumblr Blogs


Fun Fact
Tumblr’s website traffic is steadily declining.
Video
Les comparto un pequeño gameplay del proyecto del primer parcial, no es mucho pero es trabajo honesto jaja, espero les guste 🙂👌 Música: Heaven's night from Silent Hill 2 #unreal #unrealengine #project3d #projecto #gameplay https://www.instagram.com/p/CUY21LTlr2d/?utm_medium=tumblr
6 notes
·
View notes
Photo

Headphone visualization 3d model
#3d#visualización#visualization#3dvisualization#productvisualization#graphics3d#modeling3d#project3d
0 notes
Photo

Did you know that your project can appear here in our feed? See how easy it is! 1. Access our page on #3DWarehouse (link in the bio) 2. Build a 3D project using our products 3. Publish it in your feed, here on #Instagram, and check @arbobath ! + We look forward to seeing your proposal! #Arbo #ArboBath #ArboBathware #sketchup #project3D (at Arbobath) https://www.instagram.com/p/CKREjP9rboI/?igshid=aeubswqqvy60
0 notes
Photo

Vai aí um SUPER spoiler do projeto para o meu cantinho, esta é apenas a maquete 3D. Estou ansiosa para iniciar este lindo projeto 😩😅😍 E logo teremos vídeo falando sobre isso hein, fiquem ligados 😊😁 E se você ainda não se inscreveu, corre lá no meu canal - link na bio. Obrigada @waoi_interiordesign pela super parceria 🤩🤗 #interiordesign #designdeinteriores #design #inspiracao #homedecor #decoration #homeprojects #home #pinterest #homeoffice #room #reference #maqueteeletronica #project3d #3dmodelling #project #residencial #cantinhodajhe #jenniferfrança (em São Paulo, Brazil)
#cantinhodajhe#3dmodelling#interiordesign#residencial#maqueteeletronica#room#homeoffice#project#project3d#inspiracao#home#jenniferfrança#decoration#designdeinteriores#pinterest#homedecor#homeprojects#design#reference
0 notes
Text
Perfecting the Look (14th Feb 2022 - Week 4)
This week Richard introduced us to 3D tracking. He told us about the camera node, scanline renderer and scene node. The camera node is used to access 3D scenario of the image. Scanline renderer is used to convert 3D into 2D. Scene mode works like a merge node but it is used for 3D tracking. We can change the view from 2D to 3D and vice versa by pressing the SPACE key. We can also change the view from top right corner of the viewer.
Richard also told us how to move and operate the camera in 3D perspective.

Richard introduced us to the card node and grid node. A card node is a 2D plane that we can attach to another node. The grid node is used to give the geometrical models a grid. We arranged the plane in such a way that it matches the ground of the image. It took some time to adjust the camera angle and to match the place to the background image.
This is how it looks.

After this, we added a cube and attached a checkerboard to that cube. We can add a checkerboard in the same way we add nodes just by pressing the tab key on the node graph. The checkerboard adds texture to the geometrical shape when we attach both.

After some time Richard told us to add Project3D node and link the card to it. After attaching a card we needed to attach Project3D node to the image. We applied the same technique on the pillars on the right side. We took a cube and attached it to the grid node.
This is how it looked like.

Richard told us to go to vertex selection. At this point, I was feeling really hungry and lost track of what Richard was telling us. Finally, we went to the cafe and had our lunch.
After the lunch break, Richard gave us a tutorial to complete and work according to it. But I needed to complete previous work. So I jumped back to the station again and started working on vertex selection. I aligned the vertex just like that pillar. It took some time to get me to that point as I asked my friends about how it works. Now that the cube has replaced the pillar we were asked to add a sphere.
After adding the sphere, I attached a checkerboard to it.
This is the node graph so far.

Then I placed the sphere behind the pillar/cube from 3D view.
At the end it looked like this,

Thanks for your time!
0 notes
Text
Nuke
I merged the layers in Photoshop so that I have only elements I need to put into 3D space (and not all the adjustments as well) and started working in nuke.

I did a breakdown of all 19 layers and started doing projections.
I also left myself ‘a node’ to remember where would be the best place to add mist/fog afterward. I want to have everything in 3D space first.
Something isn’t working now, I can’t see the objects. I thought that maybe it has to do with me connecting pipeline to the dot and not the render camera itself. But it was working earlier so I was confused...until I saw this.

None of the project3D nodes is connected to the projection camera. Mystery solved.
When I connected all the elements and created full image again I saw that when it’s in 3D space, part of the sky is overlaying on other clouds which didn’t happen in Photoshop.

I went through the layers to see which exactly it was and roto-ed that part out.

0 notes
Photo

Continuação do projeto! Agora é escolher os materiais e partir para confecção lacas de sinalização. #awxrio #awx #rendering #render #3ds #3dsmax #vrayrender #vray #architecture #arquitetura #volumetria #comment #comments #boatarde #follome #followme #like #likes #like4like #like4follow #likeforlike #project3D #gasstation #mateuskria (em Rio de Janeiro, Brazil)
#comment#render#3ds#project3d#rendering#mateuskria#likes#volumetria#follome#comments#likeforlike#followme#gasstation#awx#vray#awxrio#like4like#arquitetura#like#boatarde#architecture#3dsmax#like4follow#vrayrender
0 notes
Video
Para ser un proyecto de rápido no está mal 😊 Créditos para el modelador del avión 👌 Música: Top Gun Anthem #3d #objeto3d #plane #avion #blackmagicfusion #project #project3d #animacion #animation #cielo #sky https://www.instagram.com/p/CRz6u4VpJWm/?utm_medium=tumblr
1 note
·
View note
Photo
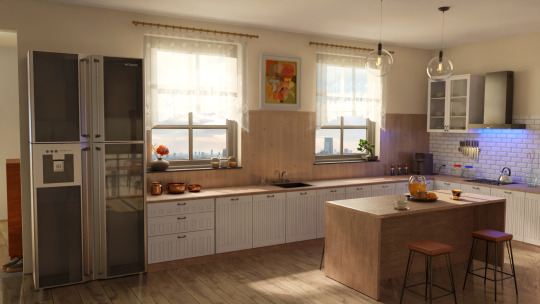
3d and 2d graphics, visualization of the kitchen.
#visualization#architecturalvisualization#3dvisualization#interiorvisualization#visualizationarchitecture#visualization3d#graphic3d#modeling3d#texturing#architecture#project3d#kitchendesign#kitchenvisualization
0 notes
Text
SaintBrix new Mixtape
"Saintbrix is releasing his new Mixtape PROJECT 3D August 25th. After it was pushed back for couple of months, He finally get to hear what we been waiting on since the end of 2013.
0 notes
Video
Para ser un proyecto de rápido no está nada mal 😊 Créditos para el modelador del avión 👌 Música: Top Gun Anthem #project #blackmagicfusion #3d #plane #objeto3d #animación3d #animation #aviones #avion #cielo #sky #project3d https://www.instagram.com/p/CRz5_IgJ2my/?utm_medium=tumblr
1 note
·
View note