#queryparams
Explore tagged Tumblr posts
Visit Tumblr Blog
Explore Tumblr blogs with no restrictions, modern design and the best experience.
Last Seen Tumblr Blogs


Fun Fact
If you dial 1-866-584-6757, you can leave an audio post for your followers.
Text
Angular Routing: Everything you need to know by Abdelfattah Ragab
Angular Routing: Everything you need to know by Abdelfattah Ragab
Welcome to the book “Angular Routing: Everything you need to know”. In this book, I explain everything you need to know about Angular routing. Routing helps you to change what the user sees in a single-page app. In this book, you will learn how to implement common routing tasks. You will learn how to set up routes, retrieve route information, display 404 pages, prevent unauthorized access, and much more. By the end of this book, you will be confident working with routing in your Angular application and be able to handle all kinds of scenarios. Let us get started.
Available on https://shop.tredition.com and https://www.amazon.com

0 notes
Text
Understanding Router State in Angular 7: Passing Data Through Angular RouterState
Angular application is divided into Components; those components help divide the business logic into separate files for better understanding. While working with this component-based architecture, it sometimes happens that one component is dependent on another component for further processing so that it passes data from one component to another.
There are various ways by which we can pass data from one component to another. Angular 7.2.0 introduced a new way to pass data using State Object while navigating between routed components. The benefit of using a state object is that you can share data between routed components with routeParams without displaying it on the URL segment, unlike queryParams in Angular.
Tutorial Goal: Passing Data Through Angular RouterState
Before developing the demo application, let’s see what the demo app is about. We will build a blog application having three web pages – Home, Categories, and Blog by Categories. As per our blog title – Passing data through Angular RouterState, we will see how to pass data from the Categories component to the Blog by Categories component.
Create Angular Application
Configure Angular Project
Configure Routes
Basic User Interface
Passing Data
Receiving Data
#Angular#routerstate#tutorial#frontenddev#Application#technology#remotework#softwaredevelopment#agile#development#programming
1 note
·
View note
Text
How Angular Routing Works and What is Routing?
New Post has been published on https://sagarjaybhay.net/what-is-routing-angular-how-routing-works-angular/
How Angular Routing Works and What is Routing?

In this article, we will understand How Angular Routing Works and What is the Meaning Of routing In Angular By Sagar Jaybhay.`
What is the Meaning Of routing In Angular
Routing basically means navigating between pages. You have seen many sites with links that direct you to a new page.
The Angular Router enables you to show different components and data to the user based on where the user is in the application. The router enables navigation from one view to the next as users perform tasks.
Angular Routing
Routing Collection is a place where we specify the URLs and components where loaded.
If you create an angular project using cli command then it will automatically add your_app_name-routing.module.ts file where we can define routes.
import NgModule from '@angular/core'; import Routes, RouterModule from '@angular/router'; import HomeComponent from "./home/home.component"; import LeftmenuComponent from "./leftmenu/leftmenu.component"; import SupplierComponent from "./supplier/supplier.component"; import CustomerComponent from './Customer.component'; const routes: Routes = [ path:'Home',component:HomeComponent, path:'Customer',component:CustomerComponent, path:'Supplier',component:SupplierComponent, path:'',component:HomeComponent ]; @NgModule( imports: [RouterModule.forRoot(routes)], exports: [RouterModule] ) export class AppRoutingModule
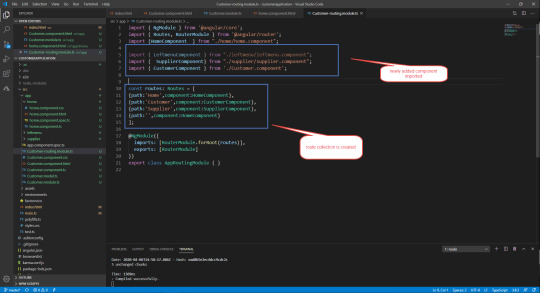
This file needs to add in our main module file by default it is added but if it is not added by default you can go add this in this location.

But for this path, we need to modify some of the Html code like below.
<p>home works!</p> <a [routerLink]="['Home']">Home</a> <br/> <a [routerLink]="['Customer']">Customer</a> <br/> <a [routerLink]="['Supplier']">Supplier</a> <br/> <hr> <br/> <br/> <br/> <div> <router-outlet></router-outlet> </div>
In the above code, we use 2 different directives routerLink and router-outlet.
base href
Most routing applications should add an <base> element to the index.html as the first child in the <head> tag to tell the router how to compose navigation URLs.
If the app folder is the application root, as it is for the sample application, set the href value exactly as shown here.
src/index.html (base-href)
content_copy<base href="/">
routerLink
This is used to generate a router link. In our case http://localhost:4200/Home you can pass a parameter to the route by using the following way.
a [routerLink]="['/user/bob']" [queryParams]="debug: true" fragment="education"> link to the user component </a>
If you want to preserve state in the browser you can use state variable.
<a [routerLink]="['/user/bob']" [state]="tracingId: 123"> link to the user component </a>
router-outlet
It is used to placed dynamically added content in our case it is a component that is associated with view. Each outlet can have a unique name, determined by the optional name attribute. The name cannot be set or changed dynamically. If not set, the default value is “primary”.
<router-outlet></router-outlet> <router-outlet name='left'></router-outlet> <router-outlet name='right'></router-outlet>
A router outlet emits an activate event when a new component is instantiated, and a deactivate event when a component is destroyed.
<router-outlet (activate)='onActivate($event)' (deactivate)='onDeactivate($event)'></router-outlet>
GitHub Project Link: – https://github.com/Sagar-Jaybhay/angular9
1 note
·
View note
Video
youtube
Rutas hijas, párametros y QueryParams en Angular - 28 Días aprendiendo A...
0 notes
Text
Understanding Router State in Angular 7: Passing Data Through Angular RouterState
Introduction
Angular application is divided into Components; those components help divide the business logic into separate files for better understanding. While working with this component-based architecture, it sometimes happens that one component is dependent on another component for further processing so that it passes data from one component to another.
There are various ways by which we can pass data from one component to another. Angular 7.2.0 introduced a new way to pass data using State Object while navigating between routed components. The benefit of using a state object is that you can share data between routed components with routeParams without displaying it on the URL segment, unlike queryParams in Angular.
Tutorial Goal: Passing Data Through Angular RouterState
Before developing the demo application, let’s see what the demo app is about. We will build a blog application having three web pages – Home, Categories, and Blog by Categories. As per our blog title – Passing data through Angular RouterState, we will see how to pass data from the Categories component to the Blog by Categories component.
Check the below video for the user interface of the demo app. In the video, check the console for the data which has been passed using routerState.
youtube
Create Angular Application
To create a new angular application, type the below command:-
ng new my-blog-app
Note– You can name it whatever you want instead of my-blog-app. We are going to create a sample blog application here.
Answer the series of questions to create your project successfully. Make sure that you choose YES for – Would you like to add Angular routing? This will create a file app-routing.module.ts where we will be adding our project routes.
Configure Angular Project
Angular Project Structure

Read more for Angular Generate Components
0 notes
Text
The Best Kids Books Of 2018 To Help You Not Raise A Jerk
With everything going on in the world, parents have to make a lot of decisions about how they teach their kids about other cultures. Raising tolerant and accepting children is a complicated task, but a vital part of it is teaching kids to appreciate the differences among us all, and exposing them to it all at an early age.
If you’re not sure how to approach certain subjects like diversity, feminism, immigration and special needs, books can provide many teachable moments about the world they live in. Stories expose us to different places, people and lifestyles in a comfortable and entertaining way. They also allow children to put themselves in the character’s shoes and learn to empathize with people who are different.
Whether it’s representation for minorities or strong female leads, learning to be an ally for LGBTQ, immigrants, and disabled communities, or embracing body positivity, all of these books can teach your child about acceptance of themselves and respect for others.
We’ve rounded up some of our favorite children’s books that promote acceptance and tolerance — but remember, these books are just a start on the path to raising a kid who’s not a jerk.
And just so you know, HuffPost may receive a share from purchases made via links on this page.
1. Children’s Books With Diverse Representation
Books To Help You Raise An Accepting Child - Representation
SEE GALLERY
2. Children’s Books About Immigration
Books To Help You Raise An Accepting Child - Immigration
SEE GALLERY
3. Children’s Books About Feminism
Books To Help You Raise An Accepting Child - Feminism
SEE GALLERY
4. Children’s Books With LGBTQ Representation
Books To Help You Raise An Accepting Child - LGBTQ
SEE GALLERY
5. Children’s Books About Disabilities And Special Needs
Books To Help You Raise An Accepting Child - Disabilities/Special Needs
SEE GALLERY
6. Children’s Books About Body Positivity
Books To Help You Raise An Accepting Child - Body Positivity
SEE GALLERY
7. Children’s Books About Embracing All Differences
Books To Help You Raise An Accepting Child - Embracing All Differences
SEE GALLERY

Source: https://www.huffpost.com/entry/best-kids-books-of-2018_n_5be44ceee4b0769d24ca58d5
1 note
·
View note
Quote
If you have access to the JAX-RS API and an implementation in your projects (many do), then you can use JAX-RS’ UriBuilder to conveniently create URIs via builder pattern using resolvable placeholder. Have a look at the following example: 1 2 3 4 5 6 7 String host = System.getProperty("host", "localhost"); String port = System.getProperty("port", "8080"); URI uri = UriBuilder.fromUri("http://{host}:{port}/examples") .path("123") .queryParam("sort", "name") .build(host, port); Depending on whether the system properties are present, the resulting uri will be http://localhost:8080/examples/123?sort=name, or any host and port which is overridden. This is a convenient way to create flexible URIs for tests where the target system may change for different scopes. This API is available in everything that supports JAX-RS, for example Open Liberty, Quarkus, or other Jakarta or MicroProfile implementations.
http://damianfallon.blogspot.com/2020/04/quickly-creating-uris-with-uribuilder_97.html
0 notes
Link
Spring以前 業務で使うシステムはサーバー間で連携することが多い。2019年現在ではREST apiに対してjsonやprotocolbufferで呼び出す事が当たり前のように行われているが、まだjsonも発見されていない時代はもっと複雑な仕組みが取られていた1。異機種間でやりとりするためのCORBAや、機種に依存しないデータプロトコルのASN.1なども利用されていたが、仕様は複雑でそれぞれをハンドリングするライブラリは有償で売られ、ベンダーからサポートを受けながら使用するようなものだった。 RMI Javaの世界ではJava同士でやりとりするためのRMIが定義され、比較的に楽にRPCできるようになった2。とはいえhttpでrestをコールすることに比べたらアホみたいな複雑さである。 https://docs.oracle.com/javase/jp/1.3/guide/rmi/getstart.doc.html J2EE そのRMIの使い方に一定のルール���設け、EJBを始め様々な指針を提示したのがJ2EEである。実装者がそれぞれに試行錯誤して苦労するような無駄は減ったが、代償として仕様はさらに複雑化した。 Spring 獲得できる機能に対して、設定や規約が悪夢のように複雑なJ2EEのアンチテーゼとして登場したのがSpringである。DIと組み合わせることでソースを綺麗に保つことができた。Clientクラスからサーバー上にあるServer#method()を呼び出すソースは以下だ。 class Client { private Server server; public void setServer(Server value) { server = value; } public void action(){ server.method(); } } もちろん適切な設定ファイルが必要になる3。が、開発時はローカル(というか同一JVM内)にあるserver.method()を直接呼び出して検証し、設定ファイルを差し替えるだけででserverの中身がテスト用のモックになったり本番用のリモート呼び出し版になったりするのは便利だった。素のRMIなら開発時もローカルにRMIサーバーを上げてrmi://localhostで接続し、テスト環境では設定ファイルでrmi://serverhostに変更するだけとか、RMIのオーバーヘッドが嫌ならデバッグフラグを立てておき呼び出し時にif文でローカル実行かRPCかを呼び分けるようにする程度だったから、結構な進化である。RMIのオーバーヘッドはhttpに較べればかなり小さいが、開発時にもいちいち上げなければいけないのは面倒だ。メインサービスのhttpは忘れないが、別途rmiserverだけ起動、とかいう手順が必要だと忘れがちになったり、逆に常に同時に立ち上げるスクリプトを使っていると、httpが生きているのにrmiにつながらない時に開発メンバーが「どうすればいいかわからない」状態になることがある。 SpringはDIコンテナではあるが、そのDIでリモート呼出を簡単にしてくれた事に大きな功績があった。このように実装を切り分ける方法にはDIの前にServiceLocatorがあった。先程のサンプルを書き換えるとこうなる。 class Client { private Server server = Locator.find(Service.class); public void action(){ server.method(); } } アプリの初期化時にFactoryに適切なServerクラスのインスタンスを登録しておく。もちろん設定ファイルを見てローカルかリモートか変更できるようになる。デメリットはServiceLocatorに対する依存が発生することだ。細かいことは割愛するがマーチン・ファウラーのブログの日本語訳のリンクを貼っておくので読んでほしい4。 Inversion of Control コンテナと Dependency Injection パターン 歴史は繰り返す メインフレームにダム端末を繋いでい��時代から、コンピュータの性能が向上したことでダウンサイジングがブームとなりUNIXワークステーションやPCで処理を行う流れとなり、管理の煩雑さやセキュリティの問題から巨大なサーバーにシンクライアントや仮想デスクトップで接続するという逆行が起きている。データ通信の世界ではシリアル通信から、同時接続で速度を向上させるためパラレルの通信技術が発展した。しかし技術革新でかなり高い周波数で通信できるようになると、今度は複数ある通信経路の同期をとるのが大変になりシリアル通信のSATAに揺り戻しが起きている。 プログラミング言語の世界も同じだ。C言語が世界を席巻していた頃、可読性の低いソースが氾濫していた。インターネットはまだ普及していないし、接続しても毒にも薬にもならない企業ページか、カウンターcgiの設置された個人ページばかり、最新の情報と言えば雑誌だ5。オンラインのコミュティがないのだからオフラインミーティングもない(Niftyなどのパソコン通信ではオフ会もあった、というかオフ会の言葉の発祥がそのへんだと思う)。よく練られたベストプラクティスが無い中、平凡なプログラマが書くコードというのはそれはもう十人十色で、変数名が意味不明に略されていたり、一つのものに対してもいろんな名前がついていたり、読み解くのに一苦労だ。 ここにC++によるオブジェクト指向の波がやって来る。Cでしか書いたことない人��は「コメントに"//"が使えるC言語」6とか、「困ったらextern Cで書けばいいから」とか言っちゃうし、継承をよくわかってないまま使って単に可読性を悪化させただけだったりした。boostはまだ来ない。オペレーターオーバーロードで演算子の持つ意味が特定のクラスでは異なっていたり、ダイアモンド継承による問題もあった。技術者レベルはCの時代に比べミジンコほどしか上がってないのに、言語の機能と複雑度は爆発的に増えた。 省略名で苦労するなら長い名前でいいじゃん c/c++で蔓延していたユニークな変数名・略名からの揺り戻しとして「変数名を省略するなブーム」が起きる。過去はみんな640x480のCRT(またはそれ以下の解像度のモノクロ液晶)で仕事をしていたので、変数名が長いとソースの右端が途切れて読みにくかったのである。マウスもなかったし。 Windows95,MacはSystem7-漢字Talk7.5くらいで、800x600や1024x7686英語名での間違いとかもあり、大事なのはプロジェクトで用語辞書を定義して一貫性をもたせることであって名前を省略しなければいいというものでもない。google spreadsheetのようにフリーでwikiよりも気軽に編集できる辞書スプレッドシートが使えるようになった時代背景も大きい。 インターフェース、セッター、ゲッター...「すいませんこれ手で書くの?」 そして、オブジェクトの状態を隠蔽し振る舞いだけ公開しろということでprivateメンバを作成し、publicなgetter/setterを作成するのである。2019年にこれを手打ちしている猿はいないと思うが、Eclipseは随分前から自動生成をサポートし、JavaではLombokによりアノテーションだけで任意のアクセッサをプリコンパイルしてくれ、モダンな言語はproperty機能を備え(Delphiからあったし、なんならC#はDelphiだが)、Scalaではそもそもメンバ変数もpublicにすることが推奨され出した。これは「変数にしとこうと思ったけど、やっぱ関数にする」みたいな時にインターフェースを変えないまま差し込めるからだ。そもそも振る舞いだけ公開するならアクセッサを用意しては駄目で「Tell, Don't Ask」の原則にしたがって相手のオブジェクトに対してやって欲しい命令をだす方が望ましいのである。 XML地獄 さて話をSpringに戻そう。ServiceLocatorでは利用側のプログラムが任意のタイミングで取り出すので、実装を差し替えたいクラスだけ設定しておけばよかった。しかしDIコンテナではDIコンテナがインスタンスを生成し、その生成時にインスタンスは別のDIで差し替え可能なインスタンスを持つため、DIで差し替え可能なメンバーを持つクラスすべてをDIコンテナに登録しなくてはならなかった。そのため登録する項目数はかなり多く、spring起動時に依存関係を解決するため起動��遅かった。でもJ2EEのクソ設計に比べれば随分スマートだったので広く受け入れられた。当時は設定ファイルと言えばxmlで7、Springを始めとしたJava界隈はXML地獄の様相を呈していく。 設定より規約 ここは本題と外れるので余談となるが、このような状況で登場したRuby On Rails(以下RoR)は、設定を多数管理するよりも「規約をつくってそれにのっとっていればうまく動くよ」というスタンスで人口に膾炙し、後にRoRのフォロワーを多数輩出した。XML地獄から脱出する大きなムーブメントとなった功績は大きい。ただ「設定より規約」では規約をすべて頭に入れておかないと「これ、どこにも定義されてないんだけどどうやって動いてるの???」となり保守性が悪くなる。少ない規約で運用できるなら非常に有用だと思う。Spring DIに影響されRoRを後追いした日本ローカルなSeasar2では、どちらも劣化コピーだった上にアレがアレだったんで消えた。 アノテーションの是非 SpringはXMLからの脱却に、アノテーションを選択した。確かに設定ファイルは減った。意味不明な設定ファイルの項目があったとき、XMLなら項目名でgrepをかけてどういう処理をしているのか探し出すことができた。アノテーションの場合IDEからコントロールクリックで飛べるが、そこにはアノテーションとしての定義しかなく、実際はDIコンテナからインスタンスを生成する時に、対象となるクラスについているアノテーションを見て挙動を変えるわけで、ベテランじゃないと処理が負えなくなった。 そしてServiceLocatorの事を思い出してほしい。あれにデメリットがあるとされたのは、Locatorに対する依存があるからだ。設定ファイルからアノテーションのに移したということは、アノテーションをimportしアノテーションに依存する。ServiceLocatorに対する最大の優位点まで捨ててしまった。後にCDIとしてDI系のアノテーションが標準化されるが、springがやり始めた時は完全にspring依存で替えの効かないシステムになったのである。 アノテーションの例としてこれを見てほしい。 きしだのはてなより引用: https://nowokay.hatenablog.com/entry/20131108/1383882109 import javax.enterprise.context.ApplicationScoped; import javax.inject.Inject; import javax.inject.Named; import javax.ws.rs.GET; import javax.ws.rs.Path; import javax.ws.rs.QueryParam; @Named @ApplicationScoped @Path("/calc") public class CalcService { @Inject CalcLogic logic; @Path("add") @GET public Result add( @QueryParam("left") int p1, @QueryParam("right") int p2) { int ans = logic.add(p1, p2); return new Result(p1, p2, ans); } } (筆者による改行変更あり) ブログオーナーのきしださんは「便利」とおっしゃられているが、これはJavaにおけるWeb開発、DIの知識があるから「すげー少ない労力でかける」のであって、初見の人からしたら「このアノテーションは一体全部でいくつあって、そのうちどれとどれをマスターしておく必要があるのか、@GETに対しては@POSTや@PUTがあるだろうというのは想像できるが、じゃあ添付ファイルはどうやって取得するの?@Pathはアプリ起動時に自動的にこのクラスが読み込まれてservlet containerのルーティングに登録されるの?とか不安要素いっぱいすぎる。 ここで同じことをするsparkframework8+ServiceLocatorのサンプルを見てほしい。ServiceLocatorはサンプルとしてimport,他に依存するのはSparkframeworkだけである。 import static spark.Spark.*; import com.example.ServiceLocator; public class HelloWorld { public static void main(String[] args) { get("/hello", (req, res) { CalcLogic logic = ServiceLocator.get(CalcLogic.class); int p1 = intParam("left"); int p2 = intParam("right"); int ans = logic.add(p1, p2); return new Result(p1, p2, ans); } } private static int intParam(Request req, String key){ return Integer.valueOf(req.params(key)); } } アノテーションはひとつもなく同じことをしている。static import Spark.*してgetメソッドが使ってしまうあたりは依存関係が明確でないが、IDEでコントロールクリックすれば飛んで処理が追える。膨大なJ2EEやSpringのドキュメントにあらかじめ目を通しておかなくても、実際に書いてあるシンプルなコードから追えるのである。ちなみに上のソースは1行メソッドのためにわざわざintParam()を定義しているので、直に書けば3行短くなる。それより引数でもらってきたp1とp2を返す意味がわからん(だって呼び出し側が渡してきたパラメータなんだから呼び出し側は持ってるでしょ)ので、intParamは残しつつ無駄を省くとこう import static spark.Spark.*; import com.example.ServiceLocator; public class HelloWorld { public static void main(String[] args) { get("/hello", (req, res) { CalcLogic logic = ServiceLocator.get(CalcLogic.class); return new Result(logic.add(intParam("left"), intParam("right"))); } } private static int intParam(Request req, String key){ return Integer.valueOf(req.params(key)); } } おそらくSparkFrameworkの代わりにNinjaFrameworkを使っても似たようなものだろう。学習コストが違いすぎる。Springは当時眩しかったが、今では腐臭を放ち始めている。 Springの終焉 いつ終わっていたのか?Springの作者はRederick "Rod" Johnsonであるが、彼がScala言語を開発しているtypesafeにジョインした2012年、既に作者から見切りをつけられていたのではないだろうか。おそらく創始者としての責任感は感じていただろうから、実際にジョインした2012よりも前の段階から、すでにSpringは最先端の技術ではなく、より良い方法を追求しようとしていたのだと想像する。まあここはあくまで個人の想像だし、本人はまかりまちがっても「いやあ実はSpringなんてとっくに見切っててさあ」なんて思ってても公言できる立場ではないので、確認する術はない。 Micronauts お、マイクロサービス特化のあたらしいフレームワーク?いい線いくのかと思ったけど思想が完全に「Springつらいから軽量Springを作る」になっていてアノテーション使いまくりでやばい。過去にLinusは「Subversionプロジェクトは無意味、CVSからほとんど進化してないのに多大なリソースをつぎ込んでいる」と批判してgitのベースを作ったが、ちょうどそんな漢字だと思う。MicronautsはSpringのつらさをちょっと軽減してくれるだけで、根本的な問題がなにも解決していない 今後 当然「じゃあ何を使うのか」という話になるわけだが、筆者は今の所Kotlin+SparkFramework+Expose(ORM)を使っているものの、ここがゴールだという気は全然しない。まずKotlinってJavaの知識が必要だし、gradleってmavenの知識が必要だし、す��く過渡期の中途半端なプロダクトという感じ。ExposeはマクロのないKotlinではボイラープレートが多すぎてまだまだつらい。kaptでどうにかなるのか?AndroidのおかげでKotlinは今後もシェアを伸ばすだろうけど、じゃあ全部Kotlinでいいかって言われるとうーん、となる。パターンマッチがないのも辛い、kotlin2.0で入って欲しい。あとJVMがでかくて、せっかくalpineでdocker imageつくってもJVMいれた時点でお腹痛くなってくる。busyboxの意味とは。 今はGoを試そうとしている。今度ジェネリクスも入るらしいからそれを待ちたい。まともなMaybe/Eitherが使えるようになったら良いかもしれないけど、Goの型システムでいけるのだろうか?無理そうな気がする。 言語機能的にはRustくらい欲しいが、Rustが10年後どれくらい使われているかを考えると、業務で使うのは怖い気がする(業種によるけど)。
0 notes
Text
[bug] Ember & transitions with queryParams
I have found the quite important bug in Ember. When there is an attempt to transition from one route to another and queryparams (e.g. activeTab) is used it ends with stack trace (ember issue #15749). It looks like regression and I hope it will be fixed soon. If not, it looks like a simple patch that will help in my case only should be easy to do.
0 notes
Text
Angular Routing
Welcome to the book “Angular Routing”. In this book, I explain everything you need to know about Angular routing. Routing helps you to change what the user sees in a single-page app. In this book, you will learn how to implement common routing tasks. You will learn how to set up routes, retrieve route information, display 404 pages, prevent unauthorized access, and much more. By the end of this book, you will be confident working with routing in your Angular application and be able to handle all kinds of scenarios. Let us get started.
#angularrouting #guards #resolvers #canActivate #pathmatch #params #queryparams #nestedroutes #scrollpositionrestration #routerevents #routertracing

— — — — — — — — — — — — — — — — — — — — — — — — — — -
Join our affiliate program to promote Angular and React courses.
You will only receive money when sales are made, and these should be through your link. Then you will receive 45% commission.
Sign up:
#angular #react #affiliate #commission
0 notes
Text
this is gold!, query parameters
query parameters from ActivatedRoute.
To receive them, you could put them into your component's OnInit function like this:
private accesstoken; private code; constructor(private route: ActivatedRoute) { } ngOnInit() { // Capture the access token and code this.route .queryParams .subscribe(params => { this.accesstoken = params['#access_token']; this.code = params['code']; }); // do something with this.code and this.accesstoken }
There's more examples in the link I put above. You may have problems with angular because the router also identifies fragments, which start with the #... If angular does identify it as a fragment, then you can just subscribe to the fragment observable from ActivatedRoute and do it that way.
I'm not sure if you're being redirected. If you are, the could look into using the preserveQueryParams navigation option, something like this.
this.router.navigate([redirect], {preserveQueryParams: true});
0 notes
Text
router-outlet
Angular includes the component when it finds router-outlet directive in html.
<router-outlet></router-outlet>
Passing params in routing:
<a [routerLink]="['/events']" [queryParams]="{ foo: 'foo', bar: 'bar' }" routerLinkActive="active"> {{event.name}} </a>
0 notes
Quote
If you have access to the JAX-RS API and an implementation in your projects (many do), then you can use JAX-RS’ UriBuilder to conveniently create URIs via builder pattern using resolvable placeholder. Have a look at the following example: 1 2 3 4 5 6 7 String host = System.getProperty("host", "localhost"); String port = System.getProperty("port", "8080"); URI uri = UriBuilder.fromUri("http://{host}:{port}/examples") .path("123") .queryParam("sort", "name") .build(host, port); Depending on whether the system properties are present, the resulting uri will be http://localhost:8080/examples/123?sort=name, or any host and port which is overridden. This is a convenient way to create flexible URIs for tests where the target system may change for different scopes. This API is available in everything that supports JAX-RS, for example Open Liberty, Quarkus, or other Jakarta or MicroProfile implementations.
http://damianfallon.blogspot.com/2020/04/quickly-creating-uris-with-uribuilder_6.html
0 notes
Quote
If you have access to the JAX-RS API and an implementation in your projects (many do), then you can use JAX-RS’ UriBuilder to conveniently create URIs via builder pattern using resolvable placeholder. Have a look at the following example: 1 2 3 4 5 6 7 String host = System.getProperty("host", "localhost"); String port = System.getProperty("port", "8080"); URI uri = UriBuilder.fromUri("http://{host}:{port}/examples") .path("123") .queryParam("sort", "name") .build(host, port); Depending on whether the system properties are present, the resulting uri will be http://localhost:8080/examples/123?sort=name, or any host and port which is overridden. This is a convenient way to create flexible URIs for tests where the target system may change for different scopes. This API is available in everything that supports JAX-RS, for example Open Liberty, Quarkus, or other Jakarta or MicroProfile implementations.
http://damianfallon.blogspot.com/2020/04/quickly-creating-uris-with-uribuilder.html
0 notes
Text
queryParams and replaceState
Although queryParams have to be set in controllers:
queryParams: [x,y,z]
Other parts of configuration (alias, replace) has to be written in route’s queryParams.
queryParams: { x: { replace: true} }
0 notes