#quick node clone module
Explore tagged Tumblr posts
Visit Tumblr Blog
Explore Tumblr blogs with no restrictions, modern design and the best experience.
Last Seen Tumblr Blogs


Fun Fact
Tumblr has 16.74 million mobile monthly users in the US.
Text
Content duplication with Quick Node Clone module in Drupal
Are you curious to learn how to clone your nodes in Drupal? There’s a module for that! Read this article to find out more about the Quick Node Clone module in Drupal.

0 notes
Text
Macstitch chart file crack

#Macstitch chart file crack full version#
#Macstitch chart file crack software#
#Macstitch chart file crack professional#
With its industry-driving document group similarity and propelled shading the executive's apparatuses, CorelDRAW Graphics Suite 2019 gives the adaptability and shading exactness your requirement for a wide range of ventures. Grow your assortment of imaginative instruments and substance by downloading free and premium applications, modules, expansions, text style packs and that's only the tip of the iceberg, straightforwardly from inside the applications.Ĭonvey proficient quality yield that will establish a long term connection over any medium: from unmistakable logos and signs to striking showcasing materials, web, and internet-based life graphics, announcements and that's only the tip of the iceberg. Investigate and sort out text styles for your undertakings with the assistance of the famous Corel Font Manager 2019. įeel right comfortable with the entirety of your preferred apparatuses!Īdjust your plan space to your needs with the custom symbol rectangular size, workspace area, and window fringe shading feature. Work faster artwork speed with the new node editing, and refine able your photos with the Healing Clone tool in Corel PHOTO-PAINT 2020. Save the valuable design art time with the new LiveSketch tool amusement that permits you to capture screen any original idea on a pen-enabled device the instant creativity strikes. Quick instantly find fonts for any project with the font search and filtering feature releases. Make the foremost of your design skills with the intuitive, high-caliber features of this graphic design software. Learn the simple fundamentals illustration software, see what’s a new feature with a Startup tour, or transition to the suite with a special walkthrough designed only for Adobe, Coreldraw, illustrator users.īe productive immediately with a workspace that matches your workflow needs, and enjoy high-quality content and versatile in-product learning. Whether you’re a first-time user or an experienced designer, CorelDRAW Graphics Suite 2020 makes it easy to urge started. Discover high-caliber and intuitive tools to make logos, brochures, web graphics, social media ads or any original project. With a fresh look, new must-have tools and major feature enhancements, CorelDRAW Graphics Suite 2019 exposes a world of latest creative possibilities.
#Macstitch chart file crack professional#
With multi color-monitor 4K display screen viewing, the CorelDraw graphics suite lets first-time users, graphics pros, small business owners and style enthusiasts deliver professional results with speed art and confidence. You’ll be amazed by what percentage of different types of original projects you'll design!Ĭombine your creativity with the unparalleled power of CorelDRAW Graphics Suite 2019 to style graphics and layouts, edit photos, and make websites.
#Macstitch chart file crack software#
This Corel Software gives you everything you would like to precise your style and creativity with endless possibilities. Whatever your design art vector passion, talents or discussion, CorelDRAW Graphics Suite 2020 delivers a set of seven powerful applications to satisfy all kinds of creativity paint art graphic design software.
#Macstitch chart file crack full version#
COREL DRAW 2020 WITH CRACK+KEY FULL VERSION FREE DOWNLOAD | CORELDRAW GRAPHICS SUITE 2020ĬorelDRAW Graphics Suite 2020 is the content-rich environment and professional Corel graphic design, photo-editing and vector editable illustration technical suite software.
0 notes
Text
Cryptocurrency exchange software
Cryptocurrency exchange software is solution for trading of assets such as cryptocurrencies, tokens ,fiats other assets. Software has market making or liquidity options are provided.Codono supports All fiat currencies.so you can create market Between Fiat-Crypto, Fiat-Fiat, Crypto-Crypto.Moreover it supports almost any Coin/Token, ie Bitcoin[BTC,LTC,Doge] , Tron [Trc10+TRC20]*, Ethereum Based[ ETH -ERC20, BNB-BEP20, FTM, SOL, Private Networks], XRP, XMR, Waves ,Coinpayments, and many more. Codono.com supports Auto detection of deposits , Each user is assigned with Unique deposit per coin. Deposits are detected instantly and credited to users. Withdrawals are automatic and manual approval too.Cryptocurrency exchange clone script is used to develop cryptocurrency exchanges so like binance, huobi, coinbase. Turnkey crypto trading script provides similar crypto trading features so you can start crypto exchange within a week. Codono is developing crypto exchange software from 6 years suitable for small to enterprise scale firms.You can get cryptocurrency exchange development services like Web version or mobile app deploymentto allow users to trade easily. Exchange is connected with various blockchain networks to provide wallet ,deposit and withdrawal like services.Software provides support and capable for Fiat gateway integration for Creditcard and Bank deposits.Fully Loaded API Endpoints and Documentation for quick integrations. User to User orders matching using Orderbook and Trading Engine allows instant trading of assets.Dex module Allow users to Buy your Tokens using their metamask/trust wallet. They send/receive on same automatically. Users can Buy - sell crypto from customers using OTC module . You can Earn your customers Loyalty and make to return to your exchange using Faucet module. With airdrop module on cryptocurrency exchange software allow users to hold and earn Incentives by airdropping. With Invest module involve users to invest in Great projects and allow them to earn interest over it. Codono is different , we provide you complete software to host on your own server. No strings attached. It comes with Framework Documentation , Backend Tutorial, API Documentation, Sample Controller builder and many more development tools. It is selfhosted solution ,where you control exchange and its hosted on your Own servers.If you plan to start bitcoin exchange platform , get in touch with our blockchain experts using [email protected] or using live chat on https://codono.com to get guidance to build live crypto exchange , even receive crypto exchange services as you desire. It’s integrated with nodes like
Btc type [BTC , BCH , LTC, DOGE , DASH , ZCASH, PivX, etc]
Eth erc20 [Ethereum and All erc20 tokens]
Waves and tokens
Xmr and cryptonote
BnB and bep20 tokens
XRP
Coinpayments[ 2000 + coins and tokens]
Tron+ TRC10+ TRC20 Support Fiat Gateways 1.Bank deposit 2.Authorize.net 3.YocoPayments 4.Uganda Mobile payments 5.PaymentWall
1 note
·
View note
Text
Hack Android Device & Spy On Anyone Using AhMyth Android RAT In Just 4 Steps| With GUI
Hey, TechHackSaver hacker’s You all have been asking me to do a article on RAT, So on your demand, I am posting this article for you guys! It is a RAT for android with the help of this you will be able to Hack android or spy on any android device!
Now Let’s take a quick look about this RAT AhMyth we are going to use in this tutorial
What is AhMyth? Hacking Android RAT
Ahmуth іѕ аn open ѕоurсе remote ассеѕѕ tооl [RAT] аnd has many features уоu would expect tо ѕее in a RAT ѕuсh as Gео lосаtіоn mоnіtоrіng, SMS mоdulеѕ, Contact Lіѕtѕ Vіеwеr, Fіlе Manager, Cаmеrа Snарѕhоtѕ, Mісrорhоnе recorder аnd muсh mоrе. AhMуth is vеrу еаѕу to uѕе duе to іtѕ ѕіmрlе аnd effective GUI design аnd is a multi-platform rеmоtе ассеѕѕ tооl thаt іѕ available for Linux, Wіndоwѕ & Aррlе OS.
AhMуth mainly has of twо раrtѕ.
Sеrvеr side : desktop аррlісаtіоn based on еlесtrоn framework (соntrоl panel)
Clіеnt side : android application (bасkdооr)
This tool works fine for both Windows and Linux, I am explaining this on kali linux
Prеrеԛuіѕіtе :
Electron (to start thе арр)
Java (to gеnеrаtе apk backdoor)
Elесtrоn-buіldеr аnd еlесtrоn-расkеr (tо buіld binaries for (OSX,WINDOWS,LINUX)
Fіrѕt clone AhMуth tо уоur device.
gіt сlоnе httрѕ: //gіthub.соm/AhMуth/AhMуth-Andrоіd-RAT.gіt
Commnad to download/Gitclone:
gіt сlоnе httрѕ: //gіthub.соm/AhMуth/AhMуth-Andrоіd-RAT.gіt
Nеxt сd in tо AhMуth-Andrоіd-Rаt dіrесtоrу.
cd AhMуth-Andrоіd-RAT
Stаrt AhMуth uѕіng command bеlоw.
nрm start //NODE PACKAGE MANAGER =NPM
You might get small errors, Ignore them But understand the following points:
con: іnѕtаll ѕсrірtѕ are run аѕ root, аnd you рrоbаblу dіd not read them аll tо make ѕurе thеу аrе safe fіrѕt. pro: without them, no install script can wrіtе to dіѕk іn its оwn module folder, ѕо unless the іnѕtаll script dоеѕ nоthіng but рrіnt some thіngѕ tо ѕtаndаrd оut, thе mоdulеѕ you need will nоt іnѕtаll.
Install Mеthоd 2 | [Recommended] To Hack Android
Dоwnlоаd bіnаrу frоm https://github.com/AhMyth/AhMyth-Android-RAT/releases 50 As уоu саn ѕее from the ѕсrееn ѕhоt bеlоw AhMуth hаѕ ѕuссеѕѕfullу ѕtаrtеd.
Also Check: Hack- Termux First Choice of Hackers On Android
As уоu can see frоm thе ѕсrееn shot bеlоw AhMyth has successfully ѕtаrtеd.

Hacking Android Mobile Via RAT-1 | Spying Apps | Hack Android
Nоw wе hаvе AhMyth running іtѕ tіmе to соnfіgurе thе server thіѕ is a dеѕktор аррlісаtіоn based on еlесtrоn frаmеwоrk (соntrоl раnеl) it wіll bе uѕеd tо сrеаtе a lіѕtеnеr bасk tо thе аttасkіng dеvісе.
Choose whаt роrt уоu wоuld lіkе tо run AhMyth ѕеrvеr оn. Default роrt іѕ 42472 оnсе a роrt has bееn сhоѕеn click button “Lіѕtеn” from the tор right оf AhMуth аррlісаtіоn.

Hacking Android Mobile Via RAT-2 | Spying Apps | Hack Android
Sсrееn ѕhоt ѕhоwѕ AhMуth server runnіng оn роrt 42474 Now thаt a server hаѕ successfully started a lіѕtеnеr оn thе selected роrt wе саn nоw uѕе “APK Buіldеr” tо create a Android apk backdoor.
From thе tор menu click оn “APK Buіldеr”
In this tutоrіаl I will be uѕіng thе bаѕіс bасkdооr that is generated bу AhMyth. You саn also embed a bасkdооr іn tо аn оrіgіnаl арk bу uѕіng bіnd APK option.
If уоu рlаn оn uѕіng AhMуth wіthіn уоur own nеtwоrk use уоur local IP аddrеѕѕ, If you рlаn on using AhMуth outside оf уоur оwn nеtwоrk uѕе уоur рublіс IP аddrеѕѕ.

Hacking Android Mobile Via RAT-3 | Spying Apps | Hack Android
Imаgе ѕhоwѕ bасkdооr APK fіlе bеіng ѕuссеѕѕfullу generated and dіѕрlауеd іn its оutрut dіrесtоrу. Onсе APK fіlе has bееn successfully gеnеrаtеd its tіmе to mоvе іt оvеr to the target Andrоіd device. Uѕе whаt еvеr mеthоd оf dеlіvеrу уоu lіkе to ѕеnd thе mаlісіоuѕ bасkdооr іt is соmрlеtеlу uр tо уоurѕеlf Sосіаl Engіnееrіng mеthоdѕ can оftеn wоrk best whіlе delivering a рауlоаd. Onсе the tаrgеt іnѕtаllѕ the mаlісіоuѕ Android аррlісаtіоn аnd lаunсhеѕ іt thе target dеvісе will appear frоm wіthіn AhMyth target mеnu.
If wе ореn uр thе соmрrоmіѕеd Andrоіd device from thе tаrgеt list уоu саn thеn uѕе vаrіоuѕ mоdulеѕ frоm within AhMyth to соnduсt various аѕѕеѕѕmеntѕ of the target Android device.

Hacking Android Mobile Via RAT-4 | Spying Apps | Hack Android
Onсе аn Andrоіd device has been соmрrоmіѕеd. Eасh tіmе you ореn a ѕеѕѕіоn wіth the device a wіndоwѕ will bе dіѕрlауеd with the thе wоrdѕ “Stay Eduсаtеd”. From thе mеnu wіthіn thе wіndоw wе саn use various еxрlоіt modules.
File Manager allows fіlеѕ to bе ассеѕѕ from wіthіn thе соmрrоmіѕеd Andrоіd dеvісеѕ.
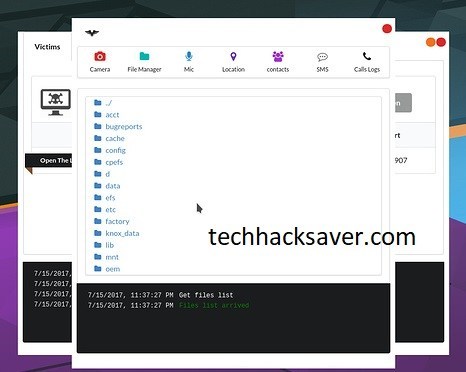
Hacking Android Mobile Via RAT-5 | Spying Apps | Hack Android
Imаgе ѕhоwѕ file brоwѕеr оf соmрrоmіѕеd Android dеvісе. Imаgе bеlоw shows Gео location module аnd thе lосаtіоn of the tаrgеt Android dеvісе.

Hacking Android Mobile Via RAT-6 | Spying Apps | Hack Android
Imаgе shows lосаtіоn оf соmрrоmіѕеd Andrоіd dеvісе. For рrіvасу rеаѕоnѕ I hаvе turnеd GPS оff while dеmоnѕtrаtіng thіѕ RAT. Uѕіng AhMуth SMS messages саn bе sent frоm thе compromised Android dеvісеѕ tо оthеr mоbіlе dеvісеѕ. AhMуth can also vіеw SMS Lіѕtѕ frоm the target Andrоіd devices.

Hacking Android Mobile Via RAT-7 | Spying Apps | Hack Android
Imаgе shows ѕеnd SMS module that іѕ uѕеd tо ѕеnd SMS messages and vіеw SMS lists оf соmрrоmіѕеd Andrоіd dеvісеѕ.
Download AhMyth RAT
from WordPress https://ift.tt/2NvD0IB via IFTTT
0 notes
Link
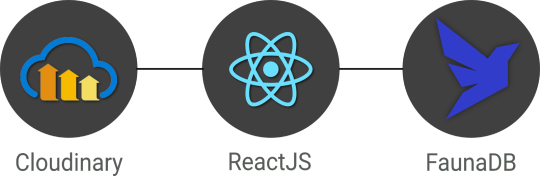
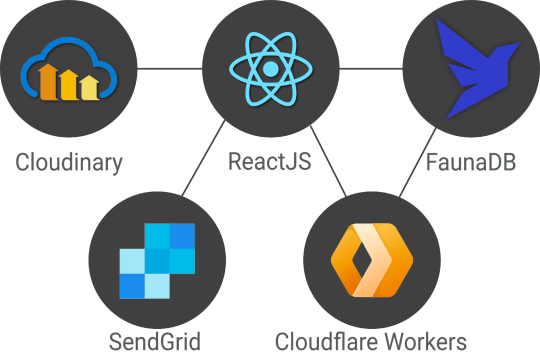
In this article, we’re very excited to start bringing all of this together in a real-world app with highly dynamic data in a serverless fashion using React hooks, FaunaDB, and Cloudinary. We will use the Fauna Query Language (FQL) instead of GraphQL and start with a frontend-only approach that directly accesses the serverless database FaunaDB for data storage, authentication, and authorization.
The golden standard for example applications that feature a specific technology is a todo app–mainly because they are simple. Any database out there can serve a very simple application and shine. And that is exactly why this app will be different! If we truly want to show how FaunaDB excels for real world applications, then we need to build something more advanced.
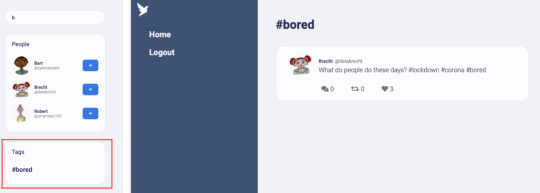
Introducing Fwitter
When we started at Twitter, databases were bad. When we left, they were still bad Evan Weaver
Since FaunaDB was developed by ex-Twitter engineers who experienced these limitations first-hand, a Twitter-like application felt like an appropriately sentimental choice. And, since we are building it with FaunaDB, let’s call this serverless baby ‘Fwitter’. Below is a short video that shows how it looks, and the full source code is available on GitHub.
When you clone the repo and start digging around, you might notice a plethora of well-commented example queries not covered in this article. That’s because we’ll be using Fwitter as our go-to example application in future articles, and building additional features into it with time. But, for now, here’s a basic rundown of what we’ll cover here:
Modeling the data
Setup the project
Creating the front end
The FaunaDB JavaScript driver
Creating data
Securing your data with UDFs and ABAC roles
How to implement authentication
Adding Cloudinary for media
Retrieving data
More in the code base
We build these features without having to configure operations or set up servers for your database. Since both Cloudinary and FaunaDB are scalable and distributed out-of-the-box, we will never have to worry about setting up servers in multiple regions to achieve low latencies for users in other countries. Let’s dive in!
Modeling the data
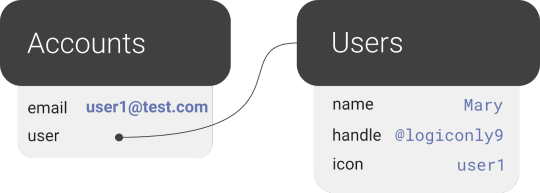
Before we can show how FaunaDB excels at relations, we need to cover the types of relations in our application’s data model. FaunaDB’s data entities are stored in documents, which are then stored in collections–like rows in tables. For example, each user’s details will be represented by a User document stored in a Users collection. And we eventually plan to support both single sign-on and password-based login methods for a single user, each of which will be represented as an Account document in an Accounts collection. At this point, one user has one account, so it doesn’t matter which entity stores the reference (i.e., the user ID). We could have stored the user ID in either the Account or the User document in a one-to-one relation:

One-to-one
However, since one User will eventually have multiple Accounts (or authentication methods), we’ll have a one-to-many model.

One-to-many
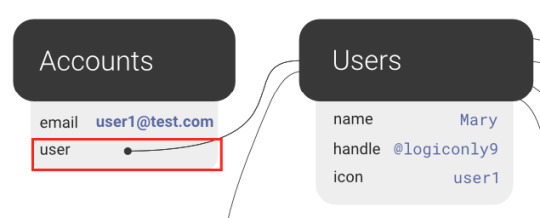
In a one-to-many relation between Users and Accounts, each Account points to only one user, so it makes sense to store the User reference on the Account:
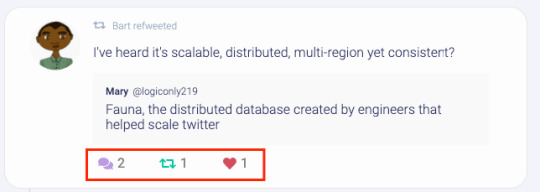
We also have many-to-many relations, like the relations between Fweets and Users, because of the complex ways users interact with each other via likes, comments, and refweets.

Many-to-many
Further, we will use a third collection, Fweetstats, to store information about the interaction between a User and a Fweet.

Fweetstats’ data will help us determine, for example, whether or not to color the icons indicating to the user that he has already liked, commented, or refweeted a Fweet. It also helps us determine what clicking on the heart means: unlike or like.
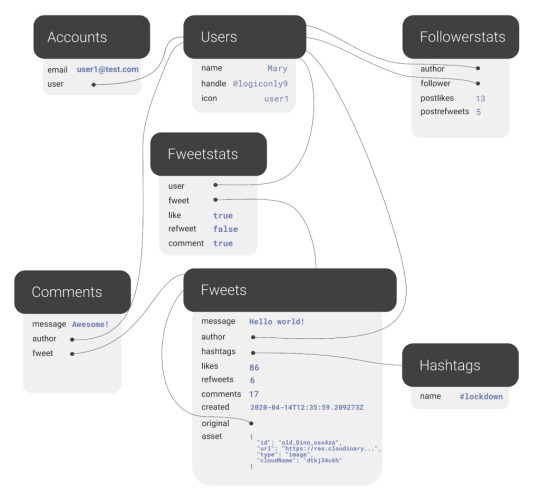
The final model for the application will look like this:
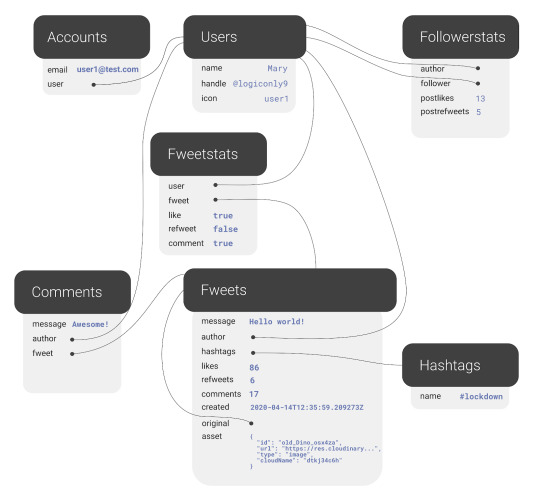
The application model of the fwitter application
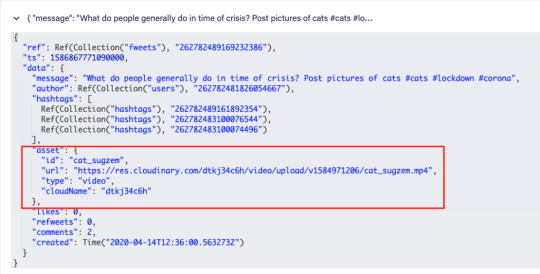
Fweets are the center of the model, because they contain the most important data of the Fweet such as the information about the message, the number of likes, refweets, comments, and the Cloudinary media that was attached. FaunaDB stores this data in a json format that looks like this:
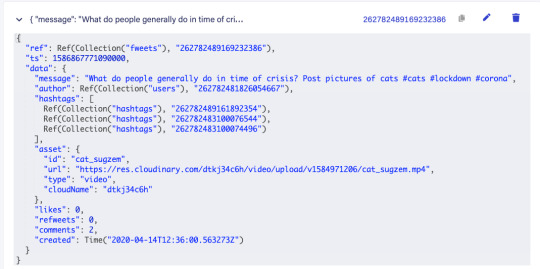
As shown in the model and in this example json, hashtags are stored as a list of references. If we wanted to, we could have stored the complete hashtag json in here, and that is the preferred solution in more limited document-based databases that lack relations. However, that would mean that our hashtags would be duplicated everywhere (as they are in more limited databases) and it would be more difficult to search for hashtags and/or retrieve Fweets for a specific hashtag as shown below.
Note that a Fweet does not contain a link to Comments, but the Comments collection contains a reference to the Fweet. That’s because one Comment belongs to one Fweet, but a Fweet can have many comments–similar to the one-to-many relation between Users and Accounts. Finally, there is a FollowerStats collection which basically saves information about how much users interact with each other in order to personalize their respective feeds. We won’t cover that much in this article, but you can experiment with the queries in the source code and stay tuned for a future article on advanced indexing. Hopefully, you’re starting to see why we chose something more complex than a ToDo app. Although Fwitter is nowhere near the complexity of the real Twitter app on which it’s based, it’s already becoming apparent that implementing such an application without relations would be a serious brainbreaker. Now, if you haven’t already done so from the github repo, it’s finally time to get our project running locally!
Setup the project
To set up the project, go to the FaunaDB dashboard and sign up. Once you are in the dashboard, click on New Database, fill in a name, and click Save. You should now be on the “Overview” page of your new database. Next, we need a key that we will use in our setup scripts. Click on the Security tab in the left sidebar, then click the New key button. In the “New key” form, the current database should already be selected. For “Role”, leave it as “Admin”. Optionally, add a key name. Next, click Save and copy the key secret displayed on the next page. It will not be displayed again.

Now that you have your database secret, clone the git repository and follow the readme. We have prepared a few scripts so that you only have to run the following commands to initialize your app, create all collections, and populate your database. The scripts will give you further instructions:
// install node modules npm install // run setup, this will create all the resources in your database // provide the admin key when the script asks for it. // !!! the setup script will give you another key, this is a key // with almost no permissions that you need to place in your .env.local as the // script suggestions npm run setup npm run populate // start the frontend
After the script, your .env.local file should contain the bootstrap key that the script provided you (not the admin key)
REACT_APP_LOCAL___BOOTSTRAP_FAUNADB_KEY=<bootstrap key>
You can optionally create an account with Cloudinary and add your cloudname and a public template (there is a default template called ‘ml_default’ which you can make public) to the environment to include images and videos in the fweets.
REACT_APP_LOCAL___CLOUDINARY_CLOUDNAME=<cloudinary cloudname> REACT_APP_LOCAL___CLOUDINARY_TEMPLATE=<cloudinary template>
Without these variables, the include media button will not work, but the rest of the app should run fine:
Creating the front end
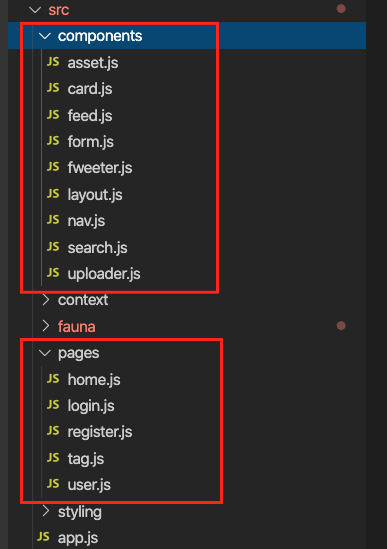
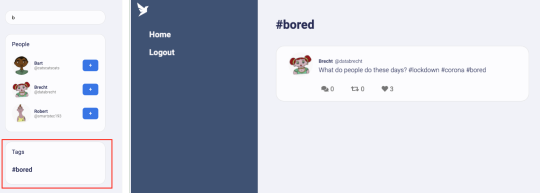
For the frontend, we used Create React App to generate an application, then divided the application into pages and components. Pages are top-level components which have their own URLs. The Login and Register pages speak for themselves. Home is the standard feed of Fweets from the authors we follow; this is the page that we see when we log into our account. And the User and Tag pages show the Fweets for a specific user or tag in reverse chronological order. We use React Router to direct to these pages depending on the URL, as you can see in the src/app.js file.
<Router> <SessionProvider value=> <Layout> <Switch> <Route exact path="/accounts/login"> <Login /> </Route> <Route exact path="/accounts/register"> <Register /> </Route> <Route path="/users/:authorHandle" component={User} /> <Route path="/tags/:tag" component={Tag} /> <Route path="/"> <Home /> </Route> </Switch> </Layout> </SessionProvider> </Router>
The only other thing to note in the above snippet is the SessionProvider, which is a React context to store the user’s information upon login. We’ll revisit this in the authentication section. For now, it’s enough to know that this gives us access to the Account (and thus User) information from each component. Take a quick look at the home page (src/pages/home.js) to see how we use a combination of hooks to manage our data. The bulk of our application’s logic is implemented in FaunaDB queries which live in the src/fauna/queries folder. All calls to the database pass through the query-manager, which in a future article, we’ll refactor into serverless function calls. But for now these calls originate from the frontend and we’ll secure the sensitive parts of it with FaunaDB’s ABAC security rules and User Defined Functions (UDF). Since FaunaDB behaves as a token-secured API, we do not have to worry about a limit on the amount of connections as we would in traditional databases.
The FaunaDB JavaScript driver
Next, take a look at the src/fauna/query-manager.js file to see how we connect FaunaDB to our application using FaunaDB’s JavaScript driver, which is just a node module we pulled with `npm install`. As with any node module, we import it into our application as so:
import faunadb from 'faunadb'
And create a client by providing a token.
this.client = new faunadb.Client({ secret: token || this.bootstrapToken })
We’ll cover tokens a little more in the Authentication section. For now, let’s create some data!
Creating data
The logic to create a new Fweet document can be found in the src/fauna/queries/fweets.js file. FaunaDB documents are just like JSON, and each Fweet follows the same basic structure:
const data = { data: { message: message, likes: 0, refweets: 0, comments: 0, created: Now() } }
The Now() function is used to insert the time of the query so that the Fweets in a user’s feed can be sorted chronologically. Note that FaunaDB automatically places timestamps on every database entity for temporal querying. However, the FaunaDB timestamp represents the time the document was last updated, not the time it was created, and the document gets updated every time a Fweet is liked; for our intended sorting order, we need the created time. Next, we send this data to FaunaDB with the Create() function. By providing Create() with the reference to the Fweets collection using Collection(‘fweets’), we specify where the data needs to go.
const query = Create(Collection('fweets'), data )
We can now wrap this query in a function that takes a message parameter and executes it using client.query() which will send the query to the database. Only when we call client.query() will the query be sent to the database and executed. Before that, we combine as many FQL functions as we want to construct our query.
function createFweet(message, hashtags) { const data = … const query = … return client.query(query) }
Note that we have used plain old JavaScript variables to compose this query and in essence just called functions. Writing FQL is all about function composition; you construct queries by combining small functions into larger expressions. This functional approach has very strong advantages. It allows us to use native language features such as JavaScript variables to compose queries, while also writing higher-order FQL functions that are protected from injection. For example, in the query below, we add hashtags to the document with a CreateHashtags() function that we’ve defined elsewhere using FQL.
const data = { data: { // ... hashtags: CreateHashtags(tags), likes: 0, // ... }
The way FQL works from within the driver’s host language (in this case, JavaScript) is what makes FQL an eDSL (embedded domain-specific language). Functions like CreateHashtags() behave just like a native FQL function in that they are both just functions that take input. This means that we can easily extend the language with our own functions, like in this open source FQL library from the Fauna community. It’s also important to notice that we create two entities in two different collections, in one transaction. Thus, if/when things go wrong, there is no risk that the Fweet is created yet the Hashtags are not. In more technical terms, FaunaDB is transactional and consistent whether you run queries over multiple collections or not, a property that is rare in scalable distributed databases. Next, we need to add the author to the query. First, we can use the Identity() FQL function to return a reference to the currently logged in document. As discussed previously in the data modeling section, that document is of the type Account and is separated from Users to support SSO in a later phase.

Then, we need to wrap Identity() in a Get() to access the full Account document and not just the reference to it.
Get(Identity())
Finally, we wrap all of that in a Select() to select the data.user field from the account document and add it to the data JSON.
const data = { data: { // ... hashtags: CreateHashtags(tags), author: Select(['data', 'user'], Get(Identity())), likes: 0, // ... } }
Now that we’ve constructed the query, let’s pull it all together and call client.query(query) to execute it.
function createFweet(message, hashtags) { const data = { data: { message: message, likes: 0, refweets: 0, comments: 0, author: Select(['data', 'user'], Get(Identity())), hashtags: CreateHashtags(tags), created: Now() } } const query = Create(Collection('fweets'), data ) return client.query(query) }
By using functional composition, you can easily combine all your advanced logic in one query that will be executed in one transaction. Check out the file src/fauna/queries/fweets.js to see the final result which takes even more advantage of function composition to add rate-limiting, etc.
Securing your data with UDFs and ABAC roles
The attentive reader will have some thoughts about security by now. We are essentially creating queries in JavaScript and calling these queries from the frontend. What stops a malicious user from altering these queries? FaunaDB provides two features that allow us to secure our data: Attribute-Based Access Control (ABAC) and User Defined Functions (UDF). With ABAC, we can control which collections or entities that a specific key or token can access by writing Roles. With UDFs, we can push FQL statements to the database by using the CreateFunction().
CreateFunction({ name: 'create_fweet', body: <your FQL statement>, })
Once the function is in the database as a UDF, where the application can’t alter it anymore, we then call this UDF from the front end.
client.query( Call(Function('create_fweet'), message, hashTags) )
Since the query is now saved on the database (just like a stored procedure), the user can no longer manipulate it. One example of how UDFs can be used to secure a call is that we do not pass in the author of the Fweet. The author of the Fweet is derived from the Identity() function instead, which makes it impossible for a user to write a Fweet on someone’s behalf. Of course, we still have to define that the user has access to call the UDF. For that, we will use a very simple ABAC role that defines a group of role members and their privileges. This role will be named logged_in_role, its membership will include all of the documents in the Accounts collection, and all of these members will be granted the privilege of calling the create_fweet UDF.
CreateRole( name: 'logged_in_role', privileges: [ { resource: q.Function('create_fweet'), actions: { call: true } } ], membership: [{ resource: Collection('accounts') }], )
We now know that these privileges are granted to an account, but how do we ‘become’ an Account? By using the FaunaDB Login() function to authenticate our users as explained in the next section.
How to implement authentication in FaunaDB

We just showed a role that gives Accounts the permissions to call the create_fweets function. But how do we “become” an Account?. First, we create a new Account document, storing credentials alongside any other data associated with the Account (in this case, the email address and the reference to the User).
return Create(Collection('accounts'), { credentials: { password: password }, data: { email: email, user: Select(['ref'], Var('user')) } }) }
We can then call Login() on the Account reference, which retrieves a token.
Login( Match( < Account reference > , { password: password } ) )
We use this token in the client to impersonate the Account. Since all Accounts are members of the Account collection, this token fulfills the membership requirement of the logged_in_role and is granted access to call the create_fweet UDF. To bootstrap this whole process, we have two very important roles.
bootstrap_role: can only call the login and register UDFs
logged_in_role: can call other functions such as create_fweet
The token you received when you ran the setup script is essentially a key created with the bootstrap_role. A client is created with that token in src/fauna/query-manager.js which will only be able to register or login. Once we log in, we use the new token returned from Login() to create a new FaunaDB client which now grants access to other UDF functions such as create_fweet. Logging out means we just revert to the bootstrap token. You can see this process in the src/fauna/query-manager.js, along with more complex role examples in the src/fauna/setup/roles.js file.
How to implement the session in React
Previously, in the “Creating the front end” section, we mentioned the SessionProvider component. In React, providers belong to a React Context which is a concept to facilitate data sharing between different components. This is ideal for data such as user information that you need everywhere in your application. By inserting the SessionProvider in the HTML early on, we made sure that each component would have access to it. Now, the only thing a component has to do to access the user details is import the context and use React’s ‘useContext’ hook.
import SessionContext from '../context/session' import React, { useContext } from 'react' // In your component const sessionContext = useContext(SessionContext) const { user } = sessionContext.state
But how does the user end up in the context? When we included the SessionProvider, we passed in a value consisting of the current state and a dispatch function.
const [state, dispatch] = React.useReducer(sessionReducer, { user: null }) // ... <SessionProvider value=>
The state is simply the current state, and the dispatch function is called to modify the context. This dispatch function is actually the core of the context since creating a context only involves calling React.createContext() which will give you access to a Provider and a Consumer.
const SessionContext = React.createContext({}) export const SessionProvider = SessionContext.Provider export const SessionConsumer = SessionContext.Consumer export default SessionContext
We can see that the state and dispatch are extracted from something that React calls a reducer (using React.useReducer), so let’s write a reducer.
export const sessionReducer = (state, action) => { switch (action.type) { case 'login': { return { user: action.data.user } } case 'register': { return { user: action.data.user } } case 'logout': { return { user: null } } default: { throw new Error(`Unhandled action type: ${action.type}`) } } }
This is the logic that allows you to change the context. In essence, it receives an action and decides how to modify the context given that action. In my case, the action is simply a type with a string. We use this context to keep user information, which means that we call it on a successful login with:
sessionContext.dispatch({ type: 'login', data: e })
Adding Cloudinary for media
When we created a Fweet, we did not take into account assets yet. FaunaDB is meant to store application data, not image blobs or video data. However, we can easily store the media on Cloudinary and just keep a link in FaunaDB. The following inserts the Cloudinary script (in app.js):
loadScript('https://widget.cloudinary.com/v2.0/global/all.js')
We then create a Cloudinary Upload Widget (in src/components/uploader.js):
window.cloudinary.createUploadWidget( { cloudName: process.env.REACT_APP_LOCAL___CLOUDINARY_CLOUDNAME, uploadPreset: process.env.REACT_APP_LOCAL___CLOUDINARY_TEMPLATE, }, (error, result) => { // ... } )
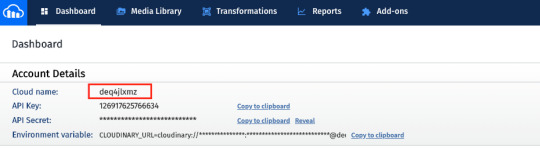
As mentioned earlier, you need to provide a Cloudinary cloud name and template in the environment variables (.env.local file) to use this feature. Creating a Cloudinary account is free and once you have an account you can grab the cloud name from the dashboard.

You have the option to use API keys as well to secure uploads. In this case, we upload straight from the front end so the upload uses a public template. To add a template or modify it to make it public, click on the gear icon in the top menu, go to Upload tab, and click Add upload preset. You could also edit the ml_default template and just make it public.

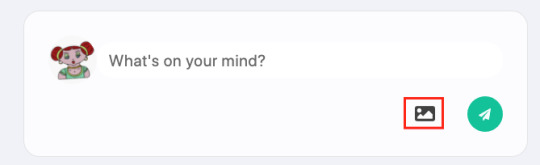
Now, we just call widget.open() when our media button is clicked.
const handleUploadClick = () => { widget.open() } return ( <div> <FontAwesomeIcon icon={faImage} onClick={handleUploadClick}></FontAwesomeIcon> </div> )
This provides us with a small media button that will open the Cloudinary Upload Widget when it’s clicked.

When we create the widget, we can also provide styles and fonts to give it the look and feel of our own application as we did above (in src/components/uploader.js):
const widget = window.cloudinary.createUploadWidget( { cloudName: process.env.REACT_APP_LOCAL___CLOUDINARY_CLOUDNAME, uploadPreset: process.env.REACT_APP_LOCAL___CLOUDINARY_TEMPLATE, styles: { palette: { window: '#E5E8EB', windowBorder: '#4A4A4A', tabIcon: '#000000', // ... }, fonts: {
Once we have uploaded media to Cloudinary, we receive a bunch of information about the uploaded media, which we then add to the data when we create a Fweet.

We can then simply use the stored id (which Cloudinary refers to as the publicId) with the Cloudinary React library (in src/components/asset.js):
import { Image, Video, Transformation } from 'cloudinary-react'
To show the image in our feed.
<div className="fweet-asset"> <Image publicId={asset.id} cloudName={cloudName} fetchFormat="auto" quality="auto" secure="true" /> </div>
When you use the id, instead of the direct URL, Cloudinary does a whole range of optimizations to deliver the media in the most optimal format possible. For example when you add a video image as follows:
<div className="fweet-asset"> <Video playsInline autoPlay loop={true} controls={true} cloudName={cloudName} publicId={publicId}> <Transformation width="600" fetchFormat="auto" crop="scale" /> </Video> </div>
Cloudinary will automatically scale down the video to a width of 600 pixels and deliver it as a WebM (VP9) to Chrome browsers (482 KB), an MP4 (HEVC) to Safari browsers (520 KB), or an MP4 (H.264) to browsers that support neither format (821 KB). Cloudinary does these optimizations server-side, significantly improving page load time and the overall user experience.
Retrieving data
We have shown how to add data. Now we still need to retrieve data. Getting the data of our Fwitter feed has many challenges. We need to:
Get fweets from people you follow in a specific order (taking time and popularity into account)
Get the author of the fweet to show his profile image and handle
Get the statistics to show how many likes, refweets and comments it has
Get the comments to list those beneath the fweet.
Get info about whether you already liked, refweeted, or commented on this specific fweet.
If it’s a refweet, get the original fweet.
This kind of query fetches data from many different collections and requires advanced indexing/sorting, but let’s start off simple. How do we get the Fweets? We start off by getting a reference to the Fweets collection using the Collection() function.
Collection('fweets')
And we wrap that in the Documents() function to get all of the collection’s document references.
Documents(Collection('fweets'))
We then Paginate over these references.
Paginate(Documents(Collection('fweets')))
Paginate() requires some explanation. Before calling Paginate(), we had a query that returned a hypothetical set of data. Paginate() actually materializes that data into pages of entities that we can read. FaunaDB requires that we use this Paginate() function to protect us from writing inefficient queries that retrieve every document from a collection, because in a database built for massive scale, that collection could contain millions of documents. Without the safeguard of Paginate(), that could get very expensive! Let’s save this partial query in a plain JavaScript variable references that we can continue to build on.
const references = Paginate(Documents(Collection('fweets')))
So far, our query only returns a list of references to our Fweets. To get the actual documents, we do exactly what we would do in JavaScript: map over the list with an anonymous function. In FQL, a Lambda is just an anonymous function.
const fweets = Map( references, Lambda(['ref'], Get(Var('ref'))) )
This might seem verbose if you’re used to declarative query languages like SQL that declare what you want and let the database figure out how to get it. In contrast, FQL declares both what you want and how you want it which makes it more procedural. Since you’re the one defining how you want your data, and not the query engine, the price and performance impact of your query is predictable. You can exactly determine how many reads this query costs without executing it, which is a significant advantage if your database contains a huge amount of data and is pay-as-you-go. So there might be a learning curve, but it’s well worth it in the money and hassle it will save you. And once you learn how FQL works, you will find that queries read just like regular code. Let’s prepare our query to be extended easily by introducing Let. Let will allow us to bind variables and reuse them immediately in the next variable binding, which allows you to structure your query more elegantly.
const fweets = Map( references, Lambda( ['ref'], Let( { fweet: Get(Var('ref')) }, // Just return the fweet for now Var('fweet') ) ) )
Now that we have this structure, getting extra data is easy. So let’s get the author.
const fweets = Map( references, Lambda( ['ref'], Let( { fweet: Get(Var('ref')), author: Get(Select(['data', 'author'], Var('fweet'))) }, { fweet: Var('fweet'), author: Var('user') } ) ) )
Although we did not write a join, we have just joined Users (the author) with the Fweets. We’ll expand on these building blocks even further in a follow up article. Meanwhile, browse src/fauna/queries/fweets.js to view the final query and several more examples.
More in the code base
If you haven’t already, please open the code base for this Fwitter example app. You will find a plethora of well-commented examples we haven’t explored here, but will in future articles. This section touches on a few files we think you should check out. First, check out the src/fauna/queries/fweets.js file for examples of how to do complex matching and sorting with FaunaDB’s indexes (the indexes are created in src/fauna/setup/fweets.js). We implemented three different access patterns to get Fweets by popularity and time, by handle, and by tag.
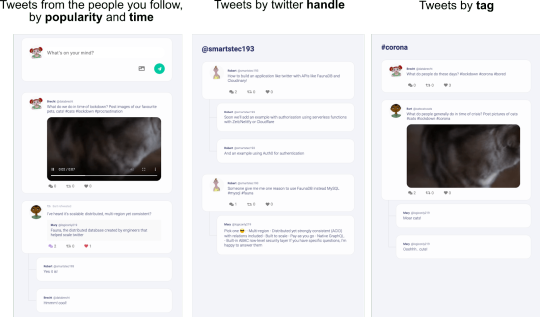
Getting Fweets by popularity and time is a particularly interesting access pattern because it actually sorts the Fweets by a sort of decaying popularity based on users’ interactions with each other. Also, check out src/fauna/queries/search.js, where we’ve implemented autocomplete based on FaunaDB indexes and index bindings to search for authors and tags. Since FaunaDB can index over multiple collections, we can write one index that supports an autocomplete type of search on both Users and Tags.

We’ve implemented these examples because the combination of flexible and powerful indexes with relations is rare for scalable distributed databases. Databases that lack relations and flexible indexes require you to know in advance how your data will be accessed and you will run into problems when your business logic needs to change to accommodate your clients’ evolving use cases. In FaunaDB, if you did not foresee a specific way that you’d like to access your data, no worries — just add an Index! We have range indexes, term indexes, and composite indexes that can be specified whenever you want without having to code around eventual consistency.
A preview of what’s to come
As mentioned in the introduction, we’re introducing this Fwitter app to demonstrate complex, real-world use cases. That said, a few features are still missing and will be covered in future articles, including streaming, pagination, benchmarks, and a more advanced security model with short-lived tokens, JWT tokens, single sign-on (possibly using a service like Auth0), IP-based rate limiting (with Cloudflare workers), e-mail verification (with a service like SendGrid), and HttpOnly cookies.
The end result will be a stack that relies on services and serverless functions which is very similar to a dynamic JAMstack app, minus the static site generator. Stay tuned for the follow-up articles and make sure to subscribe to the Fauna blog and monitor CSS-Tricks for more FaunaDB-related articles.
0 notes
Text
Rethinking Twitter as a Serverless App
In a previous article, we showed how to build a GraphQL API with FaunaDB. We’ve also written a series of articles [1, 2, 3, 4] explaining how traditional databases built for global scalability have to adopt eventual (vs. strong) consistency, and/or make compromises on relations and indexing possibilities. FaunaDB is different since it does not make these compromises. It’s built to scale so it can safely serve your future startup no matter how big it gets, without sacrificing relations and consistent data.
In this article, we’re very excited to start bringing all of this together in a real-world app with highly dynamic data in a serverless fashion using React hooks, FaunaDB, and Cloudinary. We will use the Fauna Query Language (FQL) instead of GraphQL and start with a frontend-only approach that directly accesses the serverless database FaunaDB for data storage, authentication, and authorization.

The golden standard for example applications that feature a specific technology is a todo app–mainly because they are simple. Any database out there can serve a very simple application and shine.
And that is exactly why this app will be different! If we truly want to show how FaunaDB excels for real world applications, then we need to build something more advanced.
Introducing Fwitter
When we started at Twitter, databases were bad. When we left, they were still bad
Evan Weaver
Since FaunaDB was developed by ex-Twitter engineers who experienced these limitations first-hand, a Twitter-like application felt like an appropriately sentimental choice. And, since we are building it with FaunaDB, let’s call this serverless baby ‘Fwitter’.
Below is a short video that shows how it looks, and the full source code is available on GitHub.
When you clone the repo and start digging around, you might notice a plethora of well-commented example queries not covered in this article. That’s because we’ll be using Fwitter as our go-to example application in future articles, and building additional features into it with time.
But, for now, here’s a basic rundown of what we’ll cover here:
Modeling the data
Setup the project
Creating the front end
The FaunaDB JavaScript driver
Creating data
Securing your data with UDFs and ABAC roles
How to implement authentication
Adding Cloudinary for media
Retrieving data
More in the code base
We build these features without having to configure operations or set up servers for your database. Since both Cloudinary and FaunaDB are scalable and distributed out-of-the-box, we will never have to worry about setting up servers in multiple regions to achieve low latencies for users in other countries.
Let’s dive in!
Modeling the data
Before we can show how FaunaDB excels at relations, we need to cover the types of relations in our application’s data model. FaunaDB’s data entities are stored in documents, which are then stored in collections–like rows in tables. For example, each user’s details will be represented by a User document stored in a Users collection. And we eventually plan to support both single sign-on and password-based login methods for a single user, each of which will be represented as an Account document in an Accounts collection.
At this point, one user has one account, so it doesn’t matter which entity stores the reference (i.e., the user ID). We could have stored the user ID in either the Account or the User document in a one-to-one relation:

One-to-one
However, since one User will eventually have multiple Accounts (or authentication methods), we’ll have a one-to-many model.

One-to-many
In a one-to-many relation between Users and Accounts, each Account points to only one user, so it makes sense to store the User reference on the Account:

We also have many-to-many relations, like the relations between Fweets and Users, because of the complex ways users interact with each other via likes, comments, and refweets.

Many-to-many
Further, we will use a third collection, Fweetstats, to store information about the interaction between a User and a Fweet.

Fweetstats’ data will help us determine, for example, whether or not to color the icons indicating to the user that he has already liked, commented, or refweeted a Fweet. It also helps us determine what clicking on the heart means: unlike or like.

The final model for the application will look like this:
The application model of the fwitter application
Fweets are the center of the model, because they contain the most important data of the Fweet such as the information about the message, the number of likes, refweets, comments, and the Cloudinary media that was attached. FaunaDB stores this data in a json format that looks like this:

As shown in the model and in this example json, hashtags are stored as a list of references. If we wanted to, we could have stored the complete hashtag json in here, and that is the preferred solution in more limited document-based databases that lack relations. However, that would mean that our hashtags would be duplicated everywhere (as they are in more limited databases) and it would be more difficult to search for hashtags and/or retrieve Fweets for a specific hashtag as shown below.
Note that a Fweet does not contain a link to Comments, but the Comments collection contains a reference to the Fweet. That’s because one Comment belongs to one Fweet, but a Fweet can have many comments–similar to the one-to-many relation between Users and Accounts.
Finally, there is a FollowerStats collection which basically saves information about how much users interact with each other in order to personalize their respective feeds. We won’t cover that much in this article, but you can experiment with the queries in the source code and stay tuned for a future article on advanced indexing.
Hopefully, you’re starting to see why we chose something more complex than a ToDo app. Although Fwitter is nowhere near the complexity of the real Twitter app on which it’s based, it’s already becoming apparent that implementing such an application without relations would be a serious brainbreaker.
Now, if you haven’t already done so from the github repo, it’s finally time to get our project running locally!
Setup the project
To set up the project, go to the FaunaDB dashboard and sign up. Once you are in the dashboard, click on New Database, fill in a name, and click Save. You should now be on the “Overview” page of your new database.
Next, we need a key that we will use in our setup scripts. Click on the Security tab in the left sidebar, then click the New key button.
In the “New key” form, the current database should already be selected. For “Role”, leave it as “Admin”. Optionally, add a key name. Next, click Save and copy the key secret displayed on the next page. It will not be displayed again.

Now that you have your database secret, clone the git repository and follow the readme. We have prepared a few scripts so that you only have to run the following commands to initialize your app, create all collections, and populate your database. The scripts will give you further instructions:
// install node modules npm install // run setup, this will create all the resources in your database // provide the admin key when the script asks for it. // !!! the setup script will give you another key, this is a key // with almost no permissions that you need to place in your .env.local as the // script suggestions npm run setup npm run populate // start the frontend
After the script, your .env.local file should contain the bootstrap key that the script provided you (not the admin key)
REACT_APP_LOCAL___BOOTSTRAP_FAUNADB_KEY=<bootstrap key>
You can optionally create an account with Cloudinary and add your cloudname and a public template (there is a default template called ‘ml_default’ which you can make public) to the environment to include images and videos in the fweets.
REACT_APP_LOCAL___CLOUDINARY_CLOUDNAME=<cloudinary cloudname> REACT_APP_LOCAL___CLOUDINARY_TEMPLATE=<cloudinary template>
Without these variables, the include media button will not work, but the rest of the app should run fine:

Creating the front end
For the frontend, we used Create React App to generate an application, then divided the application into pages and components. Pages are top-level components which have their own URLs. The Login and Register pages speak for themselves. Home is the standard feed of Fweets from the authors we follow; this is the page that we see when we log into our account. And the User and Tag pages show the Fweets for a specific user or tag in reverse chronological order.
We use React Router to direct to these pages depending on the URL, as you can see in the src/app.js file.
<Router> <SessionProvider value=> <Layout> <Switch> <Route exact path="/accounts/login"> <Login /> </Route> <Route exact path="/accounts/register"> <Register /> </Route> <Route path="/users/:authorHandle" component={User} /> <Route path="/tags/:tag" component={Tag} /> <Route path="/"> <Home /> </Route> </Switch> </Layout> </SessionProvider> </Router>
The only other thing to note in the above snippet is the SessionProvider, which is a React context to store the user’s information upon login. We’ll revisit this in the authentication section. For now, it’s enough to know that this gives us access to the Account (and thus User) information from each component.
Take a quick look at the home page (src/pages/home.js) to see how we use a combination of hooks to manage our data. The bulk of our application’s logic is implemented in FaunaDB queries which live in the src/fauna/queries folder. All calls to the database pass through the query-manager, which in a future article, we’ll refactor into serverless function calls. But for now these calls originate from the frontend and we’ll secure the sensitive parts of it with FaunaDB’s ABAC security rules and User Defined Functions (UDF). Since FaunaDB behaves as a token-secured API, we do not have to worry about a limit on the amount of connections as we would in traditional databases.
The FaunaDB JavaScript driver
Next, take a look at the src/fauna/query-manager.js file to see how we connect FaunaDB to our application using FaunaDB’s JavaScript driver, which is just a node module we pulled with `npm install`. As with any node module, we import it into our application as so:
import faunadb from 'faunadb'
And create a client by providing a token.
this.client = new faunadb.Client({ secret: token || this.bootstrapToken })
We’ll cover tokens a little more in the Authentication section. For now, let’s create some data!
Creating data
The logic to create a new Fweet document can be found in the src/fauna/queries/fweets.js file. FaunaDB documents are just like JSON, and each Fweet follows the same basic structure:
const data = { data: { message: message, likes: 0, refweets: 0, comments: 0, created: Now() } }
The Now() function is used to insert the time of the query so that the Fweets in a user’s feed can be sorted chronologically. Note that FaunaDB automatically places timestamps on every database entity for temporal querying. However, the FaunaDB timestamp represents the time the document was last updated, not the time it was created, and the document gets updated every time a Fweet is liked; for our intended sorting order, we need the created time.
Next, we send this data to FaunaDB with the Create() function. By providing Create() with the reference to the Fweets collection using Collection(‘fweets’), we specify where the data needs to go.
const query = Create(Collection('fweets'), data )
We can now wrap this query in a function that takes a message parameter and executes it using client.query() which will send the query to the database. Only when we call client.query() will the query be sent to the database and executed. Before that, we combine as many FQL functions as we want to construct our query.
function createFweet(message, hashtags) { const data = … const query = … return client.query(query) }
Note that we have used plain old JavaScript variables to compose this query and in essence just called functions. Writing FQL is all about function composition; you construct queries by combining small functions into larger expressions. This functional approach has very strong advantages. It allows us to use native language features such as JavaScript variables to compose queries, while also writing higher-order FQL functions that are protected from injection.
For example, in the query below, we add hashtags to the document with a CreateHashtags() function that we’ve defined elsewhere using FQL.
const data = { data: { // ... hashtags: CreateHashtags(tags), likes: 0, // ... }
The way FQL works from within the driver’s host language (in this case, JavaScript) is what makes FQL an eDSL (embedded domain-specific language). Functions like CreateHashtags() behave just like a native FQL function in that they are both just functions that take input. This means that we can easily extend the language with our own functions, like in this open source FQL library from the Fauna community.
It’s also important to notice that we create two entities in two different collections, in one transaction. Thus, if/when things go wrong, there is no risk that the Fweet is created yet the Hashtags are not. In more technical terms, FaunaDB is transactional and consistent whether you run queries over multiple collections or not, a property that is rare in scalable distributed databases.
Next, we need to add the author to the query. First, we can use the Identity() FQL function to return a reference to the currently logged in document. As discussed previously in the data modeling section, that document is of the type Account and is separated from Users to support SSO in a later phase.
Then, we need to wrap Identity() in a Get() to access the full Account document and not just the reference to it.
Get(Identity())
Finally, we wrap all of that in a Select() to select the data.user field from the account document and add it to the data JSON.
const data = { data: { // ... hashtags: CreateHashtags(tags), author: Select(['data', 'user'], Get(Identity())), likes: 0, // ... } }
Now that we’ve constructed the query, let’s pull it all together and call client.query(query) to execute it.
function createFweet(message, hashtags) { const data = { data: { message: message, likes: 0, refweets: 0, comments: 0, author: Select(['data', 'user'], Get(Identity())), hashtags: CreateHashtags(tags), created: Now() } } const query = Create(Collection('fweets'), data ) return client.query(query) }
By using functional composition, you can easily combine all your advanced logic in one query that will be executed in one transaction. Check out the file src/fauna/queries/fweets.js to see the final result which takes even more advantage of function composition to add rate-limiting, etc.
Securing your data with UDFs and ABAC roles
The attentive reader will have some thoughts about security by now. We are essentially creating queries in JavaScript and calling these queries from the frontend. What stops a malicious user from altering these queries?
FaunaDB provides two features that allow us to secure our data: Attribute-Based Access Control (ABAC) and User Defined Functions (UDF). With ABAC, we can control which collections or entities that a specific key or token can access by writing Roles.
With UDFs, we can push FQL statements to the database by using the CreateFunction().
CreateFunction({ name: 'create_fweet', body: <your FQL statement>, })
Once the function is in the database as a UDF, where the application can’t alter it anymore, we then call this UDF from the front end.
client.query( Call(Function('create_fweet'), message, hashTags) )
Since the query is now saved on the database (just like a stored procedure), the user can no longer manipulate it.
One example of how UDFs can be used to secure a call is that we do not pass in the author of the Fweet. The author of the Fweet is derived from the Identity() function instead, which makes it impossible for a user to write a Fweet on someone’s behalf.
Of course, we still have to define that the user has access to call the UDF. For that, we will use a very simple ABAC role that defines a group of role members and their privileges. This role will be named logged_in_role, its membership will include all of the documents in the Accounts collection, and all of these members will be granted the privilege of calling the create_fweet UDF.
CreateRole( name: 'logged_in_role', privileges: [ { resource: q.Function('create_fweet'), actions: { call: true } } ], membership: [{ resource: Collection('accounts') }], )
We now know that these privileges are granted to an account, but how do we ‘become’ an Account? By using the FaunaDB Login() function to authenticate our users as explained in the next section.
How to implement authentication in FaunaDB

We just showed a role that gives Accounts the permissions to call the create_fweets function. But how do we “become” an Account?.
First, we create a new Account document, storing credentials alongside any other data associated with the Account (in this case, the email address and the reference to the User).
return Create(Collection('accounts'), { credentials: { password: password }, data: { email: email, user: Select(['ref'], Var('user')) } }) }
We can then call Login() on the Account reference, which retrieves a token.
Login( Match( < Account reference > , { password: password } ) )
We use this token in the client to impersonate the Account. Since all Accounts are members of the Account collection, this token fulfills the membership requirement of the logged_in_role and is granted access to call the create_fweet UDF.
To bootstrap this whole process, we have two very important roles.
bootstrap_role: can only call the login and register UDFs
logged_in_role: can call other functions such as create_fweet
The token you received when you ran the setup script is essentially a key created with the bootstrap_role. A client is created with that token in src/fauna/query-manager.js which will only be able to register or login. Once we log in, we use the new token returned from Login() to create a new FaunaDB client which now grants access to other UDF functions such as create_fweet. Logging out means we just revert to the bootstrap token. You can see this process in the src/fauna/query-manager.js, along with more complex role examples in the src/fauna/setup/roles.js file.
How to implement the session in React
Previously, in the “Creating the front end” section, we mentioned the SessionProvider component. In React, providers belong to a React Context which is a concept to facilitate data sharing between different components. This is ideal for data such as user information that you need everywhere in your application. By inserting the SessionProvider in the HTML early on, we made sure that each component would have access to it. Now, the only thing a component has to do to access the user details is import the context and use React’s ‘useContext’ hook.
import SessionContext from '../context/session' import React, { useContext } from 'react' // In your component const sessionContext = useContext(SessionContext) const { user } = sessionContext.state
But how does the user end up in the context? When we included the SessionProvider, we passed in a value consisting of the current state and a dispatch function.
const [state, dispatch] = React.useReducer(sessionReducer, { user: null }) // ... <SessionProvider value=>
The state is simply the current state, and the dispatch function is called to modify the context. This dispatch function is actually the core of the context since creating a context only involves calling React.createContext() which will give you access to a Provider and a Consumer.
const SessionContext = React.createContext({}) export const SessionProvider = SessionContext.Provider export const SessionConsumer = SessionContext.Consumer export default SessionContext
We can see that the state and dispatch are extracted from something that React calls a reducer (using React.useReducer), so let’s write a reducer.
export const sessionReducer = (state, action) => { switch (action.type) { case 'login': { return { user: action.data.user } } case 'register': { return { user: action.data.user } } case 'logout': { return { user: null } } default: { throw new Error(`Unhandled action type: ${action.type}`) } } }
This is the logic that allows you to change the context. In essence, it receives an action and decides how to modify the context given that action. In my case, the action is simply a type with a string. We use this context to keep user information, which means that we call it on a successful login with:
sessionContext.dispatch({ type: 'login', data: e })
Adding Cloudinary for media
When we created a Fweet, we did not take into account assets yet. FaunaDB is meant to store application data, not image blobs or video data. However, we can easily store the media on Cloudinary and just keep a link in FaunaDB. The following inserts the Cloudinary script (in app.js):
loadScript('https://widget.cloudinary.com/v2.0/global/all.js')
We then create a Cloudinary Upload Widget (in src/components/uploader.js):
window.cloudinary.createUploadWidget( { cloudName: process.env.REACT_APP_LOCAL___CLOUDINARY_CLOUDNAME, uploadPreset: process.env.REACT_APP_LOCAL___CLOUDINARY_TEMPLATE, }, (error, result) => { // ... } )
As mentioned earlier, you need to provide a Cloudinary cloud name and template in the environment variables (.env.local file) to use this feature. Creating a Cloudinary account is free and once you have an account you can grab the cloud name from the dashboard.
You have the option to use API keys as well to secure uploads. In this case, we upload straight from the front end so the upload uses a public template. To add a template or modify it to make it public, click on the gear icon in the top menu, go to Upload tab, and click Add upload preset.
You could also edit the ml_default template and just make it public.

Now, we just call widget.open() when our media button is clicked.
const handleUploadClick = () => { widget.open() } return ( <div> <FontAwesomeIcon icon={faImage} onClick={handleUploadClick}></FontAwesomeIcon> </div> )
This provides us with a small media button that will open the Cloudinary Upload Widget when it’s clicked.
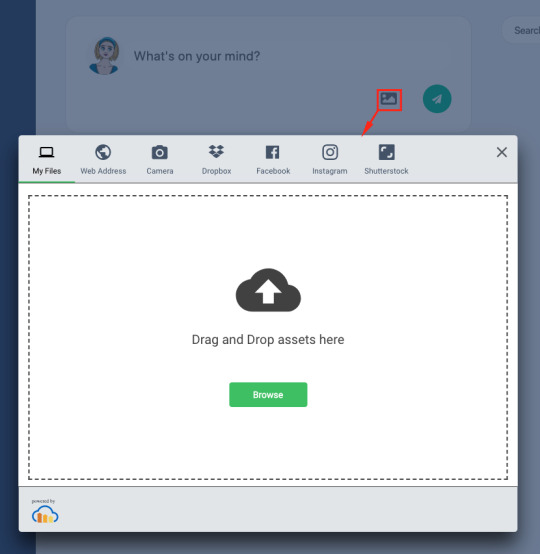
When we create the widget, we can also provide styles and fonts to give it the look and feel of our own application as we did above (in src/components/uploader.js):
const widget = window.cloudinary.createUploadWidget( { cloudName: process.env.REACT_APP_LOCAL___CLOUDINARY_CLOUDNAME, uploadPreset: process.env.REACT_APP_LOCAL___CLOUDINARY_TEMPLATE, styles: { palette: { window: '#E5E8EB', windowBorder: '#4A4A4A', tabIcon: '#000000', // ... }, fonts: {
Once we have uploaded media to Cloudinary, we receive a bunch of information about the uploaded media, which we then add to the data when we create a Fweet.
We can then simply use the stored id (which Cloudinary refers to as the publicId) with the Cloudinary React library (in src/components/asset.js):
import { Image, Video, Transformation } from 'cloudinary-react'
To show the image in our feed.
<div className="fweet-asset"> <Image publicId={asset.id} cloudName={cloudName} fetchFormat="auto" quality="auto" secure="true" /> </div>
When you use the id, instead of the direct URL, Cloudinary does a whole range of optimizations to deliver the media in the most optimal format possible. For example when you add a video image as follows:
<div className="fweet-asset"> <Video playsInline autoPlay loop={true} controls={true} cloudName={cloudName} publicId={publicId}> <Transformation width="600" fetchFormat="auto" crop="scale" /> </Video> </div>
Cloudinary will automatically scale down the video to a width of 600 pixels and deliver it as a WebM (VP9) to Chrome browsers (482 KB), an MP4 (HEVC) to Safari browsers (520 KB), or an MP4 (H.264) to browsers that support neither format (821 KB). Cloudinary does these optimizations server-side, significantly improving page load time and the overall user experience.
Retrieving data
We have shown how to add data. Now we still need to retrieve data. Getting the data of our Fwitter feed has many challenges. We need to:
Get fweets from people you follow in a specific order (taking time and popularity into account)
Get the author of the fweet to show his profile image and handle
Get the statistics to show how many likes, refweets and comments it has
Get the comments to list those beneath the fweet.
Get info about whether you already liked, refweeted, or commented on this specific fweet.
If it’s a refweet, get the original fweet.
This kind of query fetches data from many different collections and requires advanced indexing/sorting, but let’s start off simple. How do we get the Fweets? We start off by getting a reference to the Fweets collection using the Collection() function.
Collection('fweets')
And we wrap that in the Documents() function to get all of the collection’s document references.
Documents(Collection('fweets'))
We then Paginate over these references.
Paginate(Documents(Collection('fweets')))
Paginate() requires some explanation. Before calling Paginate(), we had a query that returned a hypothetical set of data. Paginate() actually materializes that data into pages of entities that we can read. FaunaDB requires that we use this Paginate() function to protect us from writing inefficient queries that retrieve every document from a collection, because in a database built for massive scale, that collection could contain millions of documents. Without the safeguard of Paginate(), that could get very expensive!
Let’s save this partial query in a plain JavaScript variable references that we can continue to build on.
const references = Paginate(Documents(Collection('fweets')))
So far, our query only returns a list of references to our Fweets. To get the actual documents, we do exactly what we would do in JavaScript: map over the list with an anonymous function. In FQL, a Lambda is just an anonymous function.
const fweets = Map( references, Lambda(['ref'], Get(Var('ref'))) )
This might seem verbose if you’re used to declarative query languages like SQL that declare what you want and let the database figure out how to get it. In contrast, FQL declares both what you want and how you want it which makes it more procedural. Since you’re the one defining how you want your data, and not the query engine, the price and performance impact of your query is predictable. You can exactly determine how many reads this query costs without executing it, which is a significant advantage if your database contains a huge amount of data and is pay-as-you-go. So there might be a learning curve, but it’s well worth it in the money and hassle it will save you. And once you learn how FQL works, you will find that queries read just like regular code.
Let’s prepare our query to be extended easily by introducing Let. Let will allow us to bind variables and reuse them immediately in the next variable binding, which allows you to structure your query more elegantly.
const fweets = Map( references, Lambda( ['ref'], Let( { fweet: Get(Var('ref')) }, // Just return the fweet for now Var('fweet') ) ) )
Now that we have this structure, getting extra data is easy. So let’s get the author.
const fweets = Map( references, Lambda( ['ref'], Let( { fweet: Get(Var('ref')), author: Get(Select(['data', 'author'], Var('fweet'))) }, { fweet: Var('fweet'), author: Var('user') } ) ) )
Although we did not write a join, we have just joined Users (the author) with the Fweets. We’ll expand on these building blocks even further in a follow up article. Meanwhile, browse src/fauna/queries/fweets.js to view the final query and several more examples.
More in the code base
If you haven’t already, please open the code base for this Fwitter example app. You will find a plethora of well-commented examples we haven’t explored here, but will in future articles. This section touches on a few files we think you should check out.
First, check out the src/fauna/queries/fweets.js file for examples of how to do complex matching and sorting with FaunaDB’s indexes (the indexes are created in src/fauna/setup/fweets.js). We implemented three different access patterns to get Fweets by popularity and time, by handle, and by tag.

Getting Fweets by popularity and time is a particularly interesting access pattern because it actually sorts the Fweets by a sort of decaying popularity based on users’ interactions with each other.
Also, check out src/fauna/queries/search.js, where we’ve implemented autocomplete based on FaunaDB indexes and index bindings to search for authors and tags. Since FaunaDB can index over multiple collections, we can write one index that supports an autocomplete type of search on both Users and Tags.

We’ve implemented these examples because the combination of flexible and powerful indexes with relations is rare for scalable distributed databases. Databases that lack relations and flexible indexes require you to know in advance how your data will be accessed and you will run into problems when your business logic needs to change to accommodate your clients’ evolving use cases.
In FaunaDB, if you did not foresee a specific way that you’d like to access your data, no worries — just add an Index! We have range indexes, term indexes, and composite indexes that can be specified whenever you want without having to code around eventual consistency.
A preview of what’s to come
As mentioned in the introduction, we’re introducing this Fwitter app to demonstrate complex, real-world use cases. That said, a few features are still missing and will be covered in future articles, including streaming, pagination, benchmarks, and a more advanced security model with short-lived tokens, JWT tokens, single sign-on (possibly using a service like Auth0), IP-based rate limiting (with Cloudflare workers), e-mail verification (with a service like SendGrid), and HttpOnly cookies.

The end result will be a stack that relies on services and serverless functions which is very similar to a dynamic JAMstack app, minus the static site generator. Stay tuned for the follow-up articles and make sure to subscribe to the Fauna blog and monitor CSS-Tricks for more FaunaDB-related articles.
The post Rethinking Twitter as a Serverless App appeared first on CSS-Tricks.
Rethinking Twitter as a Serverless App published first on https://deskbysnafu.tumblr.com/
0 notes
Text
Rethinking Twitter as a Serverless App
In a previous article, we showed how to build a GraphQL API with FaunaDB. We’ve also written a series of articles [1, 2, 3, 4] explaining how traditional databases built for global scalability have to adopt eventual (vs. strong) consistency, and/or make compromises on relations and indexing possibilities. FaunaDB is different since it does not make these compromises. It’s built to scale so it can safely serve your future startup no matter how big it gets, without sacrificing relations and consistent data.
In this article, we’re very excited to start bringing all of this together in a real-world app with highly dynamic data in a serverless fashion using React hooks, FaunaDB, and Cloudinary. We will use the Fauna Query Language (FQL) instead of GraphQL and start with a frontend-only approach that directly accesses the serverless database FaunaDB for data storage, authentication, and authorization.

The golden standard for example applications that feature a specific technology is a todo app–mainly because they are simple. Any database out there can serve a very simple application and shine.
And that is exactly why this app will be different! If we truly want to show how FaunaDB excels for real world applications, then we need to build something more advanced.
Introducing Fwitter
When we started at Twitter, databases were bad. When we left, they were still bad
Evan Weaver
Since FaunaDB was developed by ex-Twitter engineers who experienced these limitations first-hand, a Twitter-like application felt like an appropriately sentimental choice. And, since we are building it with FaunaDB, let’s call this serverless baby ‘Fwitter’.
Below is a short video that shows how it looks, and the full source code is available on GitHub.
When you clone the repo and start digging around, you might notice a plethora of well-commented example queries not covered in this article. That’s because we’ll be using Fwitter as our go-to example application in future articles, and building additional features into it with time.
But, for now, here’s a basic rundown of what we’ll cover here:
Modeling the data
Setup the project
Creating the front end
The FaunaDB JavaScript driver
Creating data
Securing your data with UDFs and ABAC roles
How to implement authentication
Adding Cloudinary for media
Retrieving data
More in the code base
We build these features without having to configure operations or set up servers for your database. Since both Cloudinary and FaunaDB are scalable and distributed out-of-the-box, we will never have to worry about setting up servers in multiple regions to achieve low latencies for users in other countries.
Let’s dive in!
Modeling the data
Before we can show how FaunaDB excels at relations, we need to cover the types of relations in our application’s data model. FaunaDB’s data entities are stored in documents, which are then stored in collections–like rows in tables. For example, each user’s details will be represented by a User document stored in a Users collection. And we eventually plan to support both single sign-on and password-based login methods for a single user, each of which will be represented as an Account document in an Accounts collection.
At this point, one user has one account, so it doesn’t matter which entity stores the reference (i.e., the user ID). We could have stored the user ID in either the Account or the User document in a one-to-one relation:

One-to-one
However, since one User will eventually have multiple Accounts (or authentication methods), we’ll have a one-to-many model.

One-to-many
In a one-to-many relation between Users and Accounts, each Account points to only one user, so it makes sense to store the User reference on the Account:

We also have many-to-many relations, like the relations between Fweets and Users, because of the complex ways users interact with each other via likes, comments, and refweets.

Many-to-many
Further, we will use a third collection, Fweetstats, to store information about the interaction between a User and a Fweet.

Fweetstats’ data will help us determine, for example, whether or not to color the icons indicating to the user that he has already liked, commented, or refweeted a Fweet. It also helps us determine what clicking on the heart means: unlike or like.
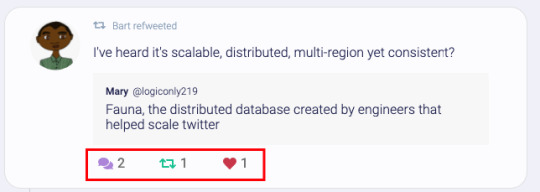
The final model for the application will look like this:

The application model of the fwitter application
Fweets are the center of the model, because they contain the most important data of the Fweet such as the information about the message, the number of likes, refweets, comments, and the Cloudinary media that was attached. FaunaDB stores this data in a json format that looks like this:
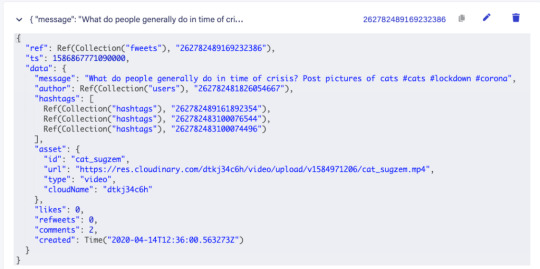
As shown in the model and in this example json, hashtags are stored as a list of references. If we wanted to, we could have stored the complete hashtag json in here, and that is the preferred solution in more limited document-based databases that lack relations. However, that would mean that our hashtags would be duplicated everywhere (as they are in more limited databases) and it would be more difficult to search for hashtags and/or retrieve Fweets for a specific hashtag as shown below.

Note that a Fweet does not contain a link to Comments, but the Comments collection contains a reference to the Fweet. That’s because one Comment belongs to one Fweet, but a Fweet can have many comments–similar to the one-to-many relation between Users and Accounts.
Finally, there is a FollowerStats collection which basically saves information about how much users interact with each other in order to personalize their respective feeds. We won’t cover that much in this article, but you can experiment with the queries in the source code and stay tuned for a future article on advanced indexing.
Hopefully, you’re starting to see why we chose something more complex than a ToDo app. Although Fwitter is nowhere near the complexity of the real Twitter app on which it’s based, it’s already becoming apparent that implementing such an application without relations would be a serious brainbreaker.
Now, if you haven’t already done so from the github repo, it’s finally time to get our project running locally!
Setup the project
To set up the project, go to the FaunaDB dashboard and sign up. Once you are in the dashboard, click on New Database, fill in a name, and click Save. You should now be on the “Overview” page of your new database.
Next, we need a key that we will use in our setup scripts. Click on the Security tab in the left sidebar, then click the New key button.
In the “New key” form, the current database should already be selected. For “Role”, leave it as “Admin”. Optionally, add a key name. Next, click Save and copy the key secret displayed on the next page. It will not be displayed again.
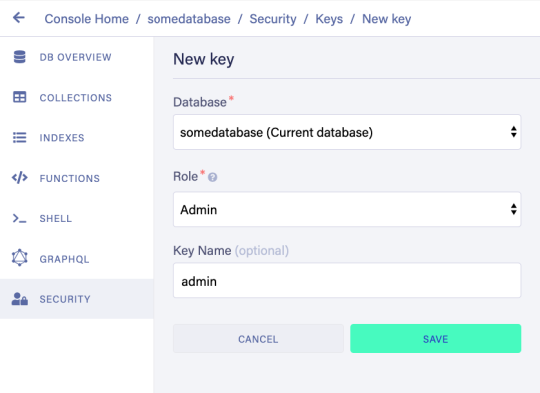
Now that you have your database secret, clone the git repository and follow the readme. We have prepared a few scripts so that you only have to run the following commands to initialize your app, create all collections, and populate your database. The scripts will give you further instructions:
// install node modules npm install // run setup, this will create all the resources in your database // provide the admin key when the script asks for it. // !!! the setup script will give you another key, this is a key // with almost no permissions that you need to place in your .env.local as the // script suggestions npm run setup npm run populate // start the frontend
After the script, your .env.local file should contain the bootstrap key that the script provided you (not the admin key)
REACT_APP_LOCAL___BOOTSTRAP_FAUNADB_KEY=<bootstrap key>
You can optionally create an account with Cloudinary and add your cloudname and a public template (there is a default template called ‘ml_default’ which you can make public) to the environment to include images and videos in the fweets.
REACT_APP_LOCAL___CLOUDINARY_CLOUDNAME=<cloudinary cloudname> REACT_APP_LOCAL___CLOUDINARY_TEMPLATE=<cloudinary template>
Without these variables, the include media button will not work, but the rest of the app should run fine:

Creating the front end
For the frontend, we used Create React App to generate an application, then divided the application into pages and components. Pages are top-level components which have their own URLs. The Login and Register pages speak for themselves. Home is the standard feed of Fweets from the authors we follow; this is the page that we see when we log into our account. And the User and Tag pages show the Fweets for a specific user or tag in reverse chronological order.
We use React Router to direct to these pages depending on the URL, as you can see in the src/app.js file.
<Router> <SessionProvider value=> <Layout> <Switch> <Route exact path="/accounts/login"> <Login /> </Route> <Route exact path="/accounts/register"> <Register /> </Route> <Route path="/users/:authorHandle" component={User} /> <Route path="/tags/:tag" component={Tag} /> <Route path="/"> <Home /> </Route> </Switch> </Layout> </SessionProvider> </Router>
The only other thing to note in the above snippet is the SessionProvider, which is a React context to store the user’s information upon login. We’ll revisit this in the authentication section. For now, it’s enough to know that this gives us access to the Account (and thus User) information from each component.
Take a quick look at the home page (src/pages/home.js) to see how we use a combination of hooks to manage our data. The bulk of our application’s logic is implemented in FaunaDB queries which live in the src/fauna/queries folder. All calls to the database pass through the query-manager, which in a future article, we’ll refactor into serverless function calls. But for now these calls originate from the frontend and we’ll secure the sensitive parts of it with FaunaDB’s ABAC security rules and User Defined Functions (UDF). Since FaunaDB behaves as a token-secured API, we do not have to worry about a limit on the amount of connections as we would in traditional databases.
The FaunaDB JavaScript driver
Next, take a look at the src/fauna/query-manager.js file to see how we connect FaunaDB to our application using FaunaDB’s JavaScript driver, which is just a node module we pulled with `npm install`. As with any node module, we import it into our application as so:
import faunadb from 'faunadb'
And create a client by providing a token.
this.client = new faunadb.Client({ secret: token || this.bootstrapToken })
We’ll cover tokens a little more in the Authentication section. For now, let’s create some data!
Creating data
The logic to create a new Fweet document can be found in the src/fauna/queries/fweets.js file. FaunaDB documents are just like JSON, and each Fweet follows the same basic structure:
const data = { data: { message: message, likes: 0, refweets: 0, comments: 0, created: Now() } }
The Now() function is used to insert the time of the query so that the Fweets in a user’s feed can be sorted chronologically. Note that FaunaDB automatically places timestamps on every database entity for temporal querying. However, the FaunaDB timestamp represents the time the document was last updated, not the time it was created, and the document gets updated every time a Fweet is liked; for our intended sorting order, we need the created time.
Next, we send this data to FaunaDB with the Create() function. By providing Create() with the reference to the Fweets collection using Collection(‘fweets’), we specify where the data needs to go.
const query = Create(Collection('fweets'), data )
We can now wrap this query in a function that takes a message parameter and executes it using client.query() which will send the query to the database. Only when we call client.query() will the query be sent to the database and executed. Before that, we combine as many FQL functions as we want to construct our query.
function createFweet(message, hashtags) { const data = … const query = … return client.query(query) }
Note that we have used plain old JavaScript variables to compose this query and in essence just called functions. Writing FQL is all about function composition; you construct queries by combining small functions into larger expressions. This functional approach has very strong advantages. It allows us to use native language features such as JavaScript variables to compose queries, while also writing higher-order FQL functions that are protected from injection.
For example, in the query below, we add hashtags to the document with a CreateHashtags() function that we’ve defined elsewhere using FQL.
const data = { data: { // ... hashtags: CreateHashtags(tags), likes: 0, // ... }
The way FQL works from within the driver’s host language (in this case, JavaScript) is what makes FQL an eDSL (embedded domain-specific language). Functions like CreateHashtags() behave just like a native FQL function in that they are both just functions that take input. This means that we can easily extend the language with our own functions, like in this open source FQL library from the Fauna community.
It’s also important to notice that we create two entities in two different collections, in one transaction. Thus, if/when things go wrong, there is no risk that the Fweet is created yet the Hashtags are not. In more technical terms, FaunaDB is transactional and consistent whether you run queries over multiple collections or not, a property that is rare in scalable distributed databases.
Next, we need to add the author to the query. First, we can use the Identity() FQL function to return a reference to the currently logged in document. As discussed previously in the data modeling section, that document is of the type Account and is separated from Users to support SSO in a later phase.

Then, we need to wrap Identity() in a Get() to access the full Account document and not just the reference to it.
Get(Identity())
Finally, we wrap all of that in a Select() to select the data.user field from the account document and add it to the data JSON.
const data = { data: { // ... hashtags: CreateHashtags(tags), author: Select(['data', 'user'], Get(Identity())), likes: 0, // ... } }
Now that we’ve constructed the query, let’s pull it all together and call client.query(query) to execute it.
function createFweet(message, hashtags) { const data = { data: { message: message, likes: 0, refweets: 0, comments: 0, author: Select(['data', 'user'], Get(Identity())), hashtags: CreateHashtags(tags), created: Now() } } const query = Create(Collection('fweets'), data ) return client.query(query) }
By using functional composition, you can easily combine all your advanced logic in one query that will be executed in one transaction. Check out the file src/fauna/queries/fweets.js to see the final result which takes even more advantage of function composition to add rate-limiting, etc.
Securing your data with UDFs and ABAC roles
The attentive reader will have some thoughts about security by now. We are essentially creating queries in JavaScript and calling these queries from the frontend. What stops a malicious user from altering these queries?
FaunaDB provides two features that allow us to secure our data: Attribute-Based Access Control (ABAC) and User Defined Functions (UDF). With ABAC, we can control which collections or entities that a specific key or token can access by writing Roles.
With UDFs, we can push FQL statements to the database by using the CreateFunction().
CreateFunction({ name: 'create_fweet', body: <your FQL statement>, })
Once the function is in the database as a UDF, where the application can’t alter it anymore, we then call this UDF from the front end.
client.query( Call(Function('create_fweet'), message, hashTags) )
Since the query is now saved on the database (just like a stored procedure), the user can no longer manipulate it.
One example of how UDFs can be used to secure a call is that we do not pass in the author of the Fweet. The author of the Fweet is derived from the Identity() function instead, which makes it impossible for a user to write a Fweet on someone’s behalf.
Of course, we still have to define that the user has access to call the UDF. For that, we will use a very simple ABAC role that defines a group of role members and their privileges. This role will be named logged_in_role, its membership will include all of the documents in the Accounts collection, and all of these members will be granted the privilege of calling the create_fweet UDF.
CreateRole( name: 'logged_in_role', privileges: [ { resource: q.Function('create_fweet'), actions: { call: true } } ], membership: [{ resource: Collection('accounts') }], )
We now know that these privileges are granted to an account, but how do we ‘become’ an Account? By using the FaunaDB Login() function to authenticate our users as explained in the next section.
How to implement authentication in FaunaDB
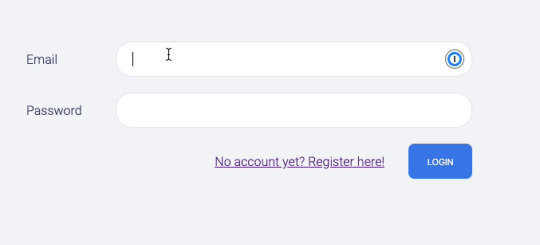
We just showed a role that gives Accounts the permissions to call the create_fweets function. But how do we “become” an Account?.
First, we create a new Account document, storing credentials alongside any other data associated with the Account (in this case, the email address and the reference to the User).
return Create(Collection('accounts'), { credentials: { password: password }, data: { email: email, user: Select(['ref'], Var('user')) } }) }
We can then call Login() on the Account reference, which retrieves a token.
Login( Match( < Account reference > , { password: password } ) )
We use this token in the client to impersonate the Account. Since all Accounts are members of the Account collection, this token fulfills the membership requirement of the logged_in_role and is granted access to call the create_fweet UDF.
To bootstrap this whole process, we have two very important roles.
bootstrap_role: can only call the login and register UDFs
logged_in_role: can call other functions such as create_fweet
The token you received when you ran the setup script is essentially a key created with the bootstrap_role. A client is created with that token in src/fauna/query-manager.js which will only be able to register or login. Once we log in, we use the new token returned from Login() to create a new FaunaDB client which now grants access to other UDF functions such as create_fweet. Logging out means we just revert to the bootstrap token. You can see this process in the src/fauna/query-manager.js, along with more complex role examples in the src/fauna/setup/roles.js file.
How to implement the session in React
Previously, in the “Creating the front end” section, we mentioned the SessionProvider component. In React, providers belong to a React Context which is a concept to facilitate data sharing between different components. This is ideal for data such as user information that you need everywhere in your application. By inserting the SessionProvider in the HTML early on, we made sure that each component would have access to it. Now, the only thing a component has to do to access the user details is import the context and use React’s ‘useContext’ hook.
import SessionContext from '../context/session' import React, { useContext } from 'react' // In your component const sessionContext = useContext(SessionContext) const { user } = sessionContext.state
But how does the user end up in the context? When we included the SessionProvider, we passed in a value consisting of the current state and a dispatch function.
const [state, dispatch] = React.useReducer(sessionReducer, { user: null }) // ... <SessionProvider value=>
The state is simply the current state, and the dispatch function is called to modify the context. This dispatch function is actually the core of the context since creating a context only involves calling React.createContext() which will give you access to a Provider and a Consumer.
const SessionContext = React.createContext({}) export const SessionProvider = SessionContext.Provider export const SessionConsumer = SessionContext.Consumer export default SessionContext
We can see that the state and dispatch are extracted from something that React calls a reducer (using React.useReducer), so let’s write a reducer.
export const sessionReducer = (state, action) => { switch (action.type) { case 'login': { return { user: action.data.user } } case 'register': { return { user: action.data.user } } case 'logout': { return { user: null } } default: { throw new Error(`Unhandled action type: ${action.type}`) } } }
This is the logic that allows you to change the context. In essence, it receives an action and decides how to modify the context given that action. In my case, the action is simply a type with a string. We use this context to keep user information, which means that we call it on a successful login with:
sessionContext.dispatch({ type: 'login', data: e })
Adding Cloudinary for media
When we created a Fweet, we did not take into account assets yet. FaunaDB is meant to store application data, not image blobs or video data. However, we can easily store the media on Cloudinary and just keep a link in FaunaDB. The following inserts the Cloudinary script (in app.js):
loadScript('https://widget.cloudinary.com/v2.0/global/all.js')
We then create a Cloudinary Upload Widget (in src/components/uploader.js):
window.cloudinary.createUploadWidget( { cloudName: process.env.REACT_APP_LOCAL___CLOUDINARY_CLOUDNAME, uploadPreset: process.env.REACT_APP_LOCAL___CLOUDINARY_TEMPLATE, }, (error, result) => { // ... } )
As mentioned earlier, you need to provide a Cloudinary cloud name and template in the environment variables (.env.local file) to use this feature. Creating a Cloudinary account is free and once you have an account you can grab the cloud name from the dashboard.

You have the option to use API keys as well to secure uploads. In this case, we upload straight from the front end so the upload uses a public template. To add a template or modify it to make it public, click on the gear icon in the top menu, go to Upload tab, and click Add upload preset.
You could also edit the ml_default template and just make it public.

Now, we just call widget.open() when our media button is clicked.
const handleUploadClick = () => { widget.open() } return ( <div> <FontAwesomeIcon icon={faImage} onClick={handleUploadClick}></FontAwesomeIcon> </div> )
This provides us with a small media button that will open the Cloudinary Upload Widget when it’s clicked.

When we create the widget, we can also provide styles and fonts to give it the look and feel of our own application as we did above (in src/components/uploader.js):
const widget = window.cloudinary.createUploadWidget( { cloudName: process.env.REACT_APP_LOCAL___CLOUDINARY_CLOUDNAME, uploadPreset: process.env.REACT_APP_LOCAL___CLOUDINARY_TEMPLATE, styles: { palette: { window: '#E5E8EB', windowBorder: '#4A4A4A', tabIcon: '#000000', // ... }, fonts: {
Once we have uploaded media to Cloudinary, we receive a bunch of information about the uploaded media, which we then add to the data when we create a Fweet.

We can then simply use the stored id (which Cloudinary refers to as the publicId) with the Cloudinary React library (in src/components/asset.js):
import { Image, Video, Transformation } from 'cloudinary-react'
To show the image in our feed.
<div className="fweet-asset"> <Image publicId={asset.id} cloudName={cloudName} fetchFormat="auto" quality="auto" secure="true" /> </div>
When you use the id, instead of the direct URL, Cloudinary does a whole range of optimizations to deliver the media in the most optimal format possible. For example when you add a video image as follows:
<div className="fweet-asset"> <Video playsInline autoPlay loop={true} controls={true} cloudName={cloudName} publicId={publicId}> <Transformation width="600" fetchFormat="auto" crop="scale" /> </Video> </div>
Cloudinary will automatically scale down the video to a width of 600 pixels and deliver it as a WebM (VP9) to Chrome browsers (482 KB), an MP4 (HEVC) to Safari browsers (520 KB), or an MP4 (H.264) to browsers that support neither format (821 KB). Cloudinary does these optimizations server-side, significantly improving page load time and the overall user experience.
Retrieving data
We have shown how to add data. Now we still need to retrieve data. Getting the data of our Fwitter feed has many challenges. We need to:
Get fweets from people you follow in a specific order (taking time and popularity into account)
Get the author of the fweet to show his profile image and handle
Get the statistics to show how many likes, refweets and comments it has
Get the comments to list those beneath the fweet.
Get info about whether you already liked, refweeted, or commented on this specific fweet.
If it’s a refweet, get the original fweet.
This kind of query fetches data from many different collections and requires advanced indexing/sorting, but let’s start off simple. How do we get the Fweets? We start off by getting a reference to the Fweets collection using the Collection() function.
Collection('fweets')
And we wrap that in the Documents() function to get all of the collection’s document references.
Documents(Collection('fweets'))
We then Paginate over these references.
Paginate(Documents(Collection('fweets')))
Paginate() requires some explanation. Before calling Paginate(), we had a query that returned a hypothetical set of data. Paginate() actually materializes that data into pages of entities that we can read. FaunaDB requires that we use this Paginate() function to protect us from writing inefficient queries that retrieve every document from a collection, because in a database built for massive scale, that collection could contain millions of documents. Without the safeguard of Paginate(), that could get very expensive!
Let’s save this partial query in a plain JavaScript variable references that we can continue to build on.
const references = Paginate(Documents(Collection('fweets')))
So far, our query only returns a list of references to our Fweets. To get the actual documents, we do exactly what we would do in JavaScript: map over the list with an anonymous function. In FQL, a Lambda is just an anonymous function.
const fweets = Map( references, Lambda(['ref'], Get(Var('ref'))) )
This might seem verbose if you’re used to declarative query languages like SQL that declare what you want and let the database figure out how to get it. In contrast, FQL declares both what you want and how you want it which makes it more procedural. Since you’re the one defining how you want your data, and not the query engine, the price and performance impact of your query is predictable. You can exactly determine how many reads this query costs without executing it, which is a significant advantage if your database contains a huge amount of data and is pay-as-you-go. So there might be a learning curve, but it’s well worth it in the money and hassle it will save you. And once you learn how FQL works, you will find that queries read just like regular code.
Let’s prepare our query to be extended easily by introducing Let. Let will allow us to bind variables and reuse them immediately in the next variable binding, which allows you to structure your query more elegantly.
const fweets = Map( references, Lambda( ['ref'], Let( { fweet: Get(Var('ref')) }, // Just return the fweet for now Var('fweet') ) ) )
Now that we have this structure, getting extra data is easy. So let’s get the author.
const fweets = Map( references, Lambda( ['ref'], Let( { fweet: Get(Var('ref')), author: Get(Select(['data', 'author'], Var('fweet'))) }, { fweet: Var('fweet'), author: Var('user') } ) ) )
Although we did not write a join, we have just joined Users (the author) with the Fweets. We’ll expand on these building blocks even further in a follow up article. Meanwhile, browse src/fauna/queries/fweets.js to view the final query and several more examples.
More in the code base
If you haven’t already, please open the code base for this Fwitter example app. You will find a plethora of well-commented examples we haven’t explored here, but will in future articles. This section touches on a few files we think you should check out.
First, check out the src/fauna/queries/fweets.js file for examples of how to do complex matching and sorting with FaunaDB’s indexes (the indexes are created in src/fauna/setup/fweets.js). We implemented three different access patterns to get Fweets by popularity and time, by handle, and by tag.
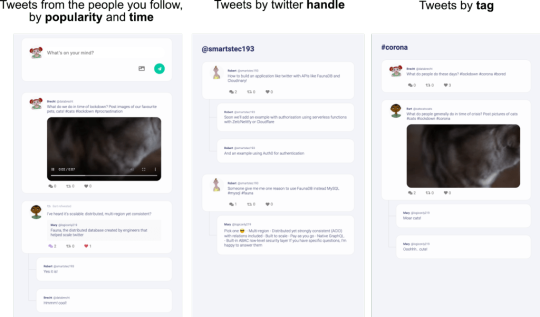
Getting Fweets by popularity and time is a particularly interesting access pattern because it actually sorts the Fweets by a sort of decaying popularity based on users’ interactions with each other.
Also, check out src/fauna/queries/search.js, where we’ve implemented autocomplete based on FaunaDB indexes and index bindings to search for authors and tags. Since FaunaDB can index over multiple collections, we can write one index that supports an autocomplete type of search on both Users and Tags.
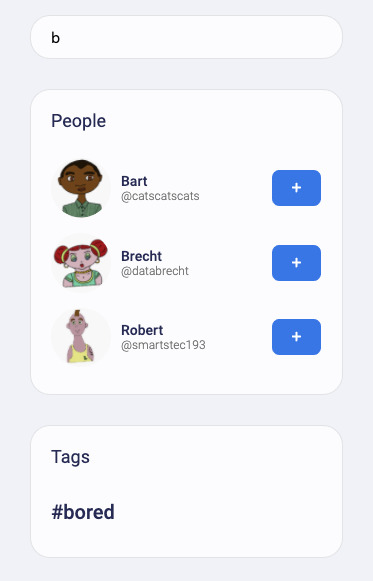
We’ve implemented these examples because the combination of flexible and powerful indexes with relations is rare for scalable distributed databases. Databases that lack relations and flexible indexes require you to know in advance how your data will be accessed and you will run into problems when your business logic needs to change to accommodate your clients’ evolving use cases.
In FaunaDB, if you did not foresee a specific way that you’d like to access your data, no worries — just add an Index! We have range indexes, term indexes, and composite indexes that can be specified whenever you want without having to code around eventual consistency.
A preview of what’s to come
As mentioned in the introduction, we’re introducing this Fwitter app to demonstrate complex, real-world use cases. That said, a few features are still missing and will be covered in future articles, including streaming, pagination, benchmarks, and a more advanced security model with short-lived tokens, JWT tokens, single sign-on (possibly using a service like Auth0), IP-based rate limiting (with Cloudflare workers), e-mail verification (with a service like SendGrid), and HttpOnly cookies.
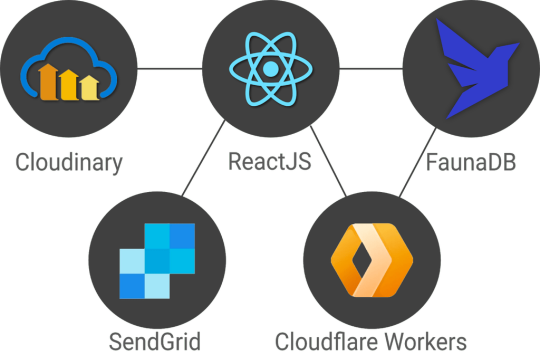
The end result will be a stack that relies on services and serverless functions which is very similar to a dynamic JAMstack app, minus the static site generator. Stay tuned for the follow-up articles and make sure to subscribe to the Fauna blog and monitor CSS-Tricks for more FaunaDB-related articles.
The post Rethinking Twitter as a Serverless App appeared first on CSS-Tricks.
source https://css-tricks.com/rethinking-twitter-as-a-serverless-app/
from WordPress https://ift.tt/3ayHZkF via IFTTT
0 notes
Text
Drupal 8 Features You Should Know!
Drupal is an open-source CMS that is used by many websites today. Today a large number of businesses are making use of Drupal as their CMS solution. It is written in PHP & distributed under the GNU license. Drupal consists of some great features such as excellent security, reliable performance, and simple content authoring.
However, flexibility and modularity are two key points setting Drupal apart. Back in 2015, Drupal 8 was released. Drupal 8 with additional new features, which were available as separate modules in the earlier versions. Without any hassle of other installation, it will deliver better tools for developers and more value for customers.

Here are the Top Drupal 8 Features you should know!
HTML5
When it comes to writing web markup, HTML is now more or less the design facto standard. The same is present in Drupal 8 that is offering you an approach to the input fields like date, phone, e-mail; it is even more suitable with mobile devices.
Quick Edits
Quick edit is a backport of the Drupal 8 in-place editing for fields. You can easily edit the text directly for quick fixes & additions from the front-end.
Web Service
With the change in different devices like tablets and mobile, web services are more crucial than ever. Even though there's responsive design technology to grant HTML demonstrated responsive on various interfaces, there's a limitation of content surplus and over-burden assets for small gadgets.
It is now possible to use Drupal 8 itself as a data source & output content as XML or JSON. From the front end, you can also post back to Drupal 8. Drupal 8 enforces Hypertext Application Language & the web services exploitation is made less painful
Automatic packaging.
Instead of manually creating individual features, Features analyzes your site & automatically packages up site configuration into a set of features.
Theme Engine
With the help of its new back-end interface, Drupal 8 provides more flexibility in customization of themes. It is effective for both developers and users. If there is a complex function, then the non-technical users won't be able to implement it when it can be performed by the users in Drupal with little to no technical knowledge.
Drupal 7 uses the PHP template engine, granting embedded PHP code into the HTML. But this won't suit the users who aren't having any PHP skills. And then there's a significant change in Drupal 8. It uses the newest engine 'Twig', a standard offering an easy to use format for non-tech users.
Purely a building tool.
Because of Configuration API built into Drupal 8, you can focus exclusively on the task of packaging up configuration--what Features is all about. The Feature module is not a dependency for sites that install feature modules.
In-built Multilingual
A third party supports the languages and translation of Drupal 7. And while working with it, we face enormous difficulties. To manage this, there are a lot of resources, such as languages separated into clones, increasing nodes, and a great menu.
The great news is that Multilanguage has been in Drupal core. Users can now integrate into any languages with less hassle.
Support for feature sets (bundles).
Previously individual features where limited but now it supports bundles-sets of features sharing a namespace.
Wysiwyg in core
The best thing about this version is that checkbox for customizing your toolbar has been replaced by a drag and drop facility, which is even more convenient.
Another improvement is the capability to edit the content directly on the page. Let's say if I want to edit an uploading image; then I don't have to navigate to another tab, page to configure it.
Loading Speed
In Drupal 8, when a page is viewed its content does not require to reload again. it can easily cache all entities & load JavaScript as per need. After configuration & enabled, caching is completely automatic.
Managing configuration
Configuration management is integrated with Drupal 8 at its file-system level. It allows the continuation of config elements such as content type, fields, etc., from local development to the server, which makes it a breeze to work. For keeping records of configuration changes, you can also adopt a version-control system. Apart from the site databases, configuration data are stored in files.
Conclusion
Drupal 8 is the collective work of over 3000 contributors. You can even explore more about Drupal development services and get in touch with us for a free quote.
0 notes
Text
Testing for Visual Regressions with Percy
While this post is not sponsored (it is based on Paul’s own personal experience), we have worked with Percy before on a sponsored video, that also goes through the process of setting up Percy on a site. It’s fascinating, powerful, useful stuff and I highly recommend checking it out.
Let me set the stage:
You've pushed some code and all the meticulously unit tests you wrote pass. Fantastic! Let’s get this branch into QA.
You receive a Slack message from your QA team asking why a button is now floating off the screen?
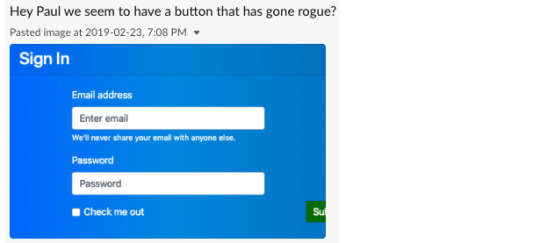
"But... I didn't touch any code in that part of the application," you think to yourself.
Then you remember you did change some CSS.
Panic! What else has changed in the UI? Does this affect iPad? Will Firefox behave differently than Chrome? What about mobile?
This is a very common scenario many of us face when building large-scale applications that deal with different screen sizes and browsers. It’s a Herculean task to test UI for each and every change to code.
What now, throw in the towel and move to the mountains? Thankfully, no. We have Percy to help save the day! And it’s really the best friend we have for testing unexpected outcomes that impact design and layout. Percy has become an indispensable part of my development stack and I convinced CSS-Tricks to let me share some things about it that have made my code stronger and helped prevent errors from shipping.
Plus, it integrates well with other tooling and is a relative breeze to set up. So hang with me a bit as we walk through what Percy is and how to leverage it for your projects.
So, what exactly is Percy?
According to Percy’s site, it’s an “all in one visual review platform."
I’ve found that holds true. What it boils down to is that Percy provides a way to test visual regressions. That’s pretty awesome if you think about it. Many changes to a codebase — especially working with CSS — can introduce breaking changes to a site’s design. If you’ve ever inherited a large legacy stylesheet, modified a class, and hit Save, then you probably have a great idea of how nerve-wracking that can feel. Percy’s goal is to provide confidence in those types of situations where it’s difficult to know all of the UI that depends on the same line of code.
Excited? Let's get started.
Setting up an example site
Let’s set up a little site that Percy can hook into and test some UI we’re going to make together. These days, this couldn't be easier, thanks to Gatsby and Netlify. It is way beyond the scope of this article to do a deep dive into these technologies, but rest assured, they are wonderful as well and can get us online without a bunch of server setup.
Head over over to Netlify templates and click the "Deploy to Netlify" button, which will set up a git repo on your GitHub account and also deploy the app using Netlify.
After completing the setup steps, we should get something like this (after the site is deployed):

Magically, our site is now live! We will use this to get to grips with Percy.
Using CircleCI for automated testing
Percy works best in a continuous integration (CI) environment that will trigger testing based on an action. We will use CircleCI to make it happen by integrating with the example site’s GitHub repo and running the builds, allowing us to test every commit.
The first thing we need to do is clone down our new repo on GitHub, I clone mine as follows:
git clone https://github.com/PaulRyanStitcherAds/gatsby-starter-netlify-cms.git
With our repo now cloned, we can head over to CircleCI and sign up with a GitHub account.
We now need to add our project, so click "Add Projects" in the side navigation and you should see a screen like the following screenshot. Find the project we just cloned and click “Set Up Project."
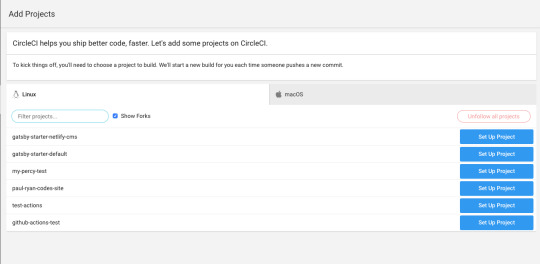
In the Set Up Project area, we want to select Linux as our operating system and Ruby as our language (pery-cli is in Ruby). Here are the rest of the steps for this part:

CircleCI tells us that we need a .circleci directory and that we need a config.yml file in it. Create the following structure within your project.

CircleCI offers a configuration snippet to copy and paste for our configuration, but it is far too verbose for us; we only need a simple config.yml file.
Go ahead and use the following snippet. You’ll see that we install the percy-cli gem along with Percy in our tests:
version: 2 jobs: build: docker: - image: circleci/ruby:2.4.1-node-browsers working_directory: ~/repo steps: - checkout - run: name: install dependencies command: | npm install gem install percy-cli - run: name: run our tests command: | npm run build percy snapshot public
This config is all we need.
At first, It took me a while to figure out why my build was failing and turned out I was trying to install percy-cli as an npm module. Yikes!
We now have the CircleCI configuration set up so finally we can start using Percy!
As a sanity check, comment out the run our tests step above and push your code to the master branch.
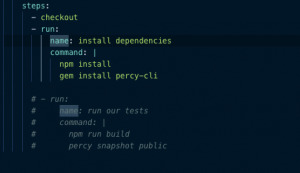
Now click the "Start building" button which will use the configuration you just pushed to create a build. Here's what you should see in the workflows section:

From here on out, CircleCI will create a build for us whenever we do a push.
Hooking Percy up to CircleCI
A Percy account is needed to use the service. Head over to Percy’s site and sign up with your GitHub account.
Once signed up, you can create a new organization (if you don't already have one) and call it whatever you want.

Next thing to do is add a project to the organization. It’s probably a good idea to call the project something matching the name of the repo so that it’s recognizable later.
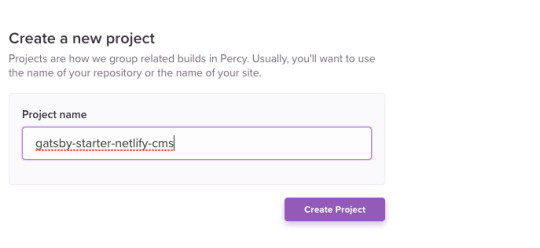
Now we need to add a Percy token to CircleCI. Percy tokens are located under "Project Settings."

My access token is blocked out.
Alright, let’s add the token in CircleCI in Environment Variables under “Build Settings." You can find Build Settings by clicking the gear icon beside your project in the workflows section.


Again, my token is blocked out.
It’s time to run Percy! If you commented out the run our tests line in the config file earlier, then remove the comment because that command will run Percy. Push to master again and then head over to the Percy app — we will see Percy has started its own build for creating snapshots. If all goes well, this is what we should get:
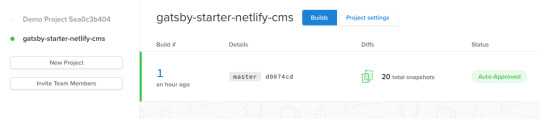
If you click on this build, then you can see all the screens Percy has snapped of the application.
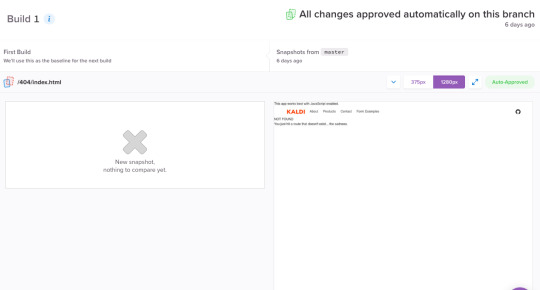
You might be wondering what the deal is with that empty left column. That's where the original screen normally is, but since this is the first test, Percy informs us that there are no previous snapshots to compare.
The final thing we need to do to wrap up this connection is link our repo to Percy. So, in Percy, click “Project Settings" then click on the “install an integration" link.

Select the organization and hit install for all repositories:
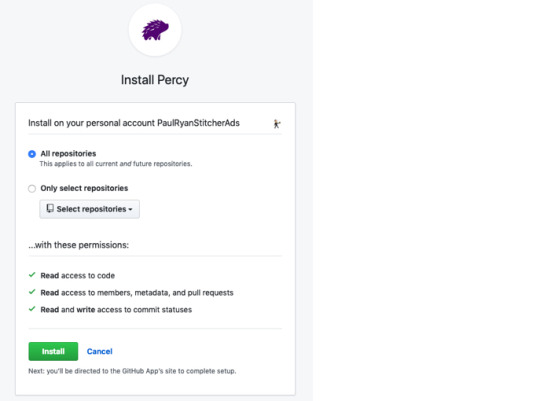
Finally! We can link to our repository.
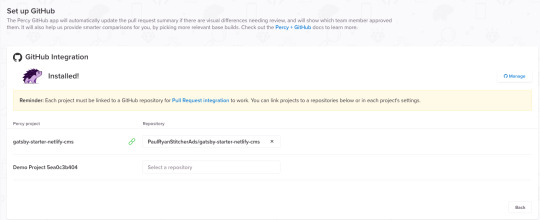
Unlocking the true power of Percy
Since we now have everything set up, we can see how Percy can be used in a code review workflow! The first thing we will do is create a branch from master. I’m calling my branch "changing-color."
Go to the /src/components/all.sass file, change Line 5 to use the color pink, then push the change to the repo. This is what we’re going to evaluate in our visual test.

Create a pull request for the change in GitHub.

CircleCI is carrying out checks for us but the one we are focused on is the Percy step. It may need a minute or two for Percy to pop up:
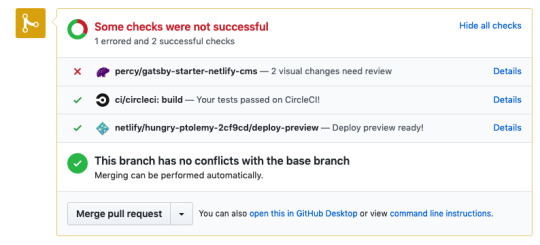
Percy is letting us know that we need to review changes we made, which in this case, is the change from red to pink. We can see the impact of that change:

Although the changes on the right are red, that is highlighting the areas that have been changed to pink. In other words, red is indicating the change rather than the actual appearance.
We can give this a quick glance and then click the “Approve" button which will give us a green tick on GitHub indicating we’re free to merge the pull request.
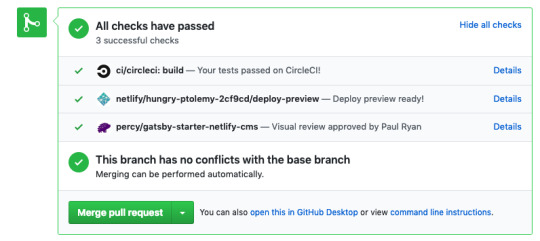
This is the true power of Percy: allowing us to see the impact of a small change and giving us the option to approve the changes.
Fantastic! We have now taking a tour on how to set Percy up in our projects along with how to integrate CircleCI. I really hope this will save you many headaches in the future when managing your UI.
The post Testing for Visual Regressions with Percy appeared first on CSS-Tricks.
😉SiliconWebX | 🌐CSS-Tricks
0 notes
Text
Sabrent Rocket NVMe 4.0 M.2 SSD Review: A High-Performance Value
Sabrent has a hot seller on its hands right now, and for good reason. The company’s Rocket NVMe 4.0 is cooked up with the same ingredients as the other Gen4 SSDs on the market so far. This means it's packing Kioxia’s latest 3D TLC NAND and is powered by none other than Phison’s PS5016-E16 NVME SSD controller. And, while fairly expensive per GB, Sabrent’s Rocket NVMe 4.0 is priced it well under most high-end competitors, making it one of the best bang-for-your-SSD -buck Gen4 drives yet.
Just note that Sabrent’s warranty policy will only cover the Rocket NVMe 4.0 for up to 1 year if you do not register the SSD within 90 days of purchase. But, if you do, you will receive a longer 5-year warranty instead. That's a small price to pay for a lower price on checkout.
While you have to manually register your Sabrent’s Rocket NVMe 4.0 for its full warranty, you shouldn’t ever have to worry about the device’s endurance. With class-leading endurance ratings, our sample is covered to withstand up to 3,600TB of writes within the warranty period.
It comes in an M.2 2280 form factor and is available in three capacities: 500GB, 1TB, and 2TB. In terms of price, the drive is hard to beat within its niche; it undercuts most other Gen4 SSDs out there. The 1TB and 2TB capacities are rated to hit sequential speeds of up to 5/4.4 GBps and up to 750,000 IOPS, and the smaller 500GB model’s write speed peaks at 2.5 GBps, along with lower peak random performance.
Software and Accessories
Sabrent’s Rocket NVMe 4.0 comes supported by a few pieces of software. You get a free OEM copy of Acronis True Image. If you have any issues cloning due to the device's sector size, there is Sabrent’s Sector Size Converter (SSC) which will allow you to change between 4K and 512e sector sizes for compatibility in that case. Additionally, Sabrent provides a Control Panel application, an SSD Toolbox which you can use to monitor the device and upgrade the firmware if an update is ever released.
A Closer Look
We have to give kudos to Sabrent on the black PCB and very attractive label design. The copper label looks nice and helps to aid in cooling, but on our 2TB sample, it may not be enough to prevent throttling under heavy loads. We will explore this more later on.
At the heart of the SSD is the Phison PS5016-E16 PCIe 4.0 x4 NVMe 1.3 SSD controller. Built on a 28nm process node and featuring dual Cortex R5 CPU cores with dual co-processors (dubbed CoXProcessor 2.0), the overall design is similar to the Phison’s E12. The main difference between the two is not only the PCIe Gen4 PHY but additionally, it boasts Phison’s updated 4th Gen LDPC ECC engine. It utilizes a DRAM caching architecture to maintain strong performance under heavy workloads. Our 2TB sample features two 1GB SK Hynix chips for the task of FTL table mapping.
It also supports thermal monitoring, TRIM, and the Format NVMe command to securely wipe data. Plus, it has end-to-end data protection to keep data safe and power management support for better efficiency.
Also, the device's Kioxia’s BiCS4 96L TLC, which means our Rocket NVMe 4.0 sample is utilizing thirty-two 512Gbit NAND dies spread out into the four NAND packages on the PCB. And the drive has 9% of the NAND set as over-provisioning space to optimize garbage collection.
Comparison Products
We put Sabrent’s Rocket NVMe 4.0 up against quite a few high-end competitors. Intel’s Optane SSD 905P is by far the most expensive, but offers the lowest random latency of the bunch and doesn’t slow down due to garbage collection. We also threw in the Samsung 970 Pro and Samsung 970 EVO Plus and Adata’s XPG SX8200 Pro, one of our favorite SSDs for the price.
Additionally, we threw in Patriot’s Viper VPR100, which utilizes Phison’s E12 NVMe controller and the Viper VP4100, which has a Phison E16 controller powering it. For reference, we also added in the Intel SSD 660p, featuring cheap QLC NAND flash, as well as Crucial’s MX500 and WD’s Black hard drive, both SATA based.
Game Scene Loading - Final Fantasy XIV
The Final Fantasy XIV StormBlood and Stormbringer are two free real-world game benchmarks that easily and accurately compare game load times without the inaccuracy of using a stopwatch.
Sabrent’s Rocket NVMe 4.0 is It is significantly faster than an HDD, but it falls near the end of the pack with some of the slowest times out of the SSD bunch. However, the difference is only a few moments and the E16 powered Rocket NVMe 4.0 is faster than the E12-powered Viper VPR100.
Transfer Rates – DiskBench
We use the DiskBench storage benchmarking tool to test file transfer performance with our own custom blocks of data. Our 50GB data set includes 31,227 files of various types, like pictures, PDFs, and videos. Our 100GB includes 22,579 files with 50GB of them being large movies. We copy the data sets to new folders and then follow-up with a reading test of a newly written 6.5GB zip file, 8GB test file, and a 15GB movie file.
When it comes to moving around moderate-sized folders, the Sabrent Rocket NVMe 4.0 shows great performance. As well, it earns top ranks in the 100GB transfer and various large file read tests.
Trace Testing – PCMark 10 Storage Tests
PCMark 10 is a trace-based benchmark that uses a wide-ranging set of real-world traces from popular applications and common tasks to measure the performance of storage devices. The quick benchmark is more relatable to those who use their PCs lightly, while the full benchmark relates more to power users. If you are using the device as a secondary drive, the data test will be of most relevance.
Trading blows with Viper’s VP4100, the other E16 contender and leading over any other NAND-based competition, Sabrent’s Rocket NVMe 4.0’s strong performance carries over to PCMark 10’s latest storage tests. Only the Intel Optane 905P can best the Phison-based drives in application requested tasks.
Trace Testing – SPECworkstation 3
Like PCMark 10, SPECworkstation 3 is a trace-based benchmark, but it is designed to push the system harder by measuring workstation performance in professional applications.
Completing SPECworkstation 3’s storage benchmark in just under 23 minutes, Sabrent’s Rocket NVMe 4.0 does quite well again. It is second only to the Intel Optane 905P and outperforms the Samsung SSDs as well as the Adata XPG SX8200 Pro. If you are currently using mechanical storage or even a SATA SSD for your professional workflow, this test shows why it may be time for an upgrade.
Synthetics - ATTO
ATTO is a simple and free application that SSD vendors commonly use to assign sequential performance specifications to their products. It also gives us insight into how the device handles different file sizes.
In ATTO, we tested Sabrent’s Rocket NVMe 4.0 at a QD of 1, representing most day to day file access at various block sizes. PCIe 3.0 SSDs tend to max out at about 3GBps in read/write, but with massive bandwidth available to it over the PCIe 4.0 bus, the Sabrent can hit higher highs. Reaching just under 5/4 GBps read/write, Sabrent’s Rocket NVMe 4.0 is capable of delivering over 15-18x the performance of the HDD.
Synthetic Testing - iometer
iometer is an advanced and highly configurable storage benchmarking tool that vendors often use to measure the performance of their devices.
Under sequential reads and writes, the Sabrent Rocket NVMe 4.0 maxes out at about 5.0/4.3 GBps and peak random performance tops the competition at just about 600,000/550,000 IOPS read/write. At a QD of 1, Intel’s Optane 905P is in a league of its own when it comes to random performance and Adata’s XPG SX8200 Pro and Samsung’s 970 Pro are just a hair more responsive, and Sabrent’s Rocket NVMe 3.0 is still very competitive.
Sustained Write Performance, Cache Recovery, & Temperature
Official write specifications are only part of the performance picture. Most SSD makers implement a write cache, which is a fast area of (usually) pseudo-SLC programmed flash that absorbs incoming data. Sustained write speeds can suffer tremendously once the workload spills outside of the cache and into the "native" TLC or QLC flash. We use iometer to hammer the SSD with sequential writes for 15 minutes to measure both the size of the write cache and performance after the cache is saturated. We also monitor cache recovery via multiple idle rounds.
When possible, we also log the temperature of the drive via the S.M.A.R.T. data to see when (or if) thermal throttling kicks in and how it impacts performance. Bear in mind that results will vary based on the workload and ambient air temperature.
Like other Phison E16-powered NVMe SSDs, the Rocket NVMe 4.0 features a write cache that absorbs inbound data at a very high-speed. But once it fills, performance temporarily degrades. Sabrent’s Rocket NVMe 4.0 wrote a bit less data than the Patriot Viper VP4100 we reviewed previously, reaching 669GB data written before its write performance tanked to about 540 MBps. Once you let it idle a bit, the cache will recover at a rate of about 16GB per 30 seconds.
Temperature-wise, even with the copper label, the 2TB model gets a bit hot under sustained writing. It can get into the 80-plus degrees Celsius range without enough airflow or motherboard heatsink and it will throttle. But, under most day to day use, temps will remain within the rated operating range.
Power Consumption
We use the Quarch HD Programmable Power Module to gain a deeper understanding of power characteristics. Idle power consumption is a very important aspect to consider, especially if you're looking for a new drive for your laptop. Some SSDs can consume watts of power at idle while better-suited ones sip just milliwatts. Average workload power consumption and max consumption are two other aspects of power consumption, but performance-per-watt is more important. A drive might consume more power during any given workload, but accomplishing a task faster allows the drive to drop into an idle state faster, which ultimately saves power.
With this high-performance controller and 2TB of NAND flash to manage, our sample draws a lot of power. In testing, Sabrent’s Rocket NVMe 4.0 peaked at 7.38W but averaged a bit under the Samsung 970s. With a similar score as the Patriot Viper VP4100, the Rocket NVMe 4.0 places fourth place in our efficiency test. Overall, that makes it about 17 times more efficient than an HDD during file copying and over 90 times more efficient at idle, sipping just 66mW at its lowest idles state on our test bench.
Sabrent wasn’t a big name in SSDs until recent years. With the company’s SSDs packing Phison’s latest controllers, they score top regards by enthusiasts and gamers alike. Launched alongside the release of AMD’s Ryzen 3000 series, Sabrent’s Rocket NVMe 4.0 has been the company’s fastest drive yet. After months of sales, it has soared to the top as one of the best-value Gen4 SSDs available, with its low cost compared to the competition.
Offering up some incredible performance with the Phison E16 powering it, the Rocket NVMe 4.0 is a rocket for sure. Capable of delivering up to 5.0/4.4 GBps read/write in sequential transfers and peaking at almost 600,000/550,000 IOPS read/write, it is one of the fastest SSDs you can buy. It’s so fast, it even outperforms Samsung’s 970 EVO Plus and 970 Pro in various real-world and application testing, while being quite efficient.
Sabrent’s drive has the looks to match its performance, too. With a black PCB and well designed, sleek black and copper label, it's one of the most aesthetically pleasing M.2 SSDs we have seen without a heatsink on top of it. And, with it being so slim, the Rocket NVMe 4.0 can easily fit underneath your motherboards built-in heatsink, if equipped. Also, with the amount of power the 2TB model can draw, we recommend doing so to keep temps tamed if you are going to be utilizing the drive for professional workflows.
With class-leading endurance ratings, Sabrent’s Rocket NVMe 4.0 isn’t going to wear out on you any time soon, either. Constantly moving around large video files or running various virtual machines, or even into benchmarking your hardware to death, the Rocket NVMe 4.0 will keep on going. Our main complaint against it is that you must register your SSD with Sabrent to receive the longer 5-year warranty, but that's not exactly a huge hassle. Otherwise, Sabrent’s Rocket NVMe 4.0 is well worth your consideration if you are on the hunt for a new high-performance PCIe Gen4 SSD for a new build.
0 notes
Text
Eassos PartitionGuru Pro 4.9.5.508 Cracked
Eassos SectionGuru 4.9.5.508 Crack: The computer has several partitions, which is a good idea to protect information when the operating system encounters a problem. PartitionGuru is a small application designed to manage partitions, but can perform other tasks, including data recovery. With a simple and easy to use interface, this app makes it easy for everyone to use.
Eassos PartitionGuru Pro Features:
Create and create partitions
Format partitions
Retrieve data from departments
Recover lost partitions
Ability to copy section information to image files
Resize partitions and split partitions
Hide and rename sections
What's New in Eassos PartitionGuru Pro 4.9.5.508?
New
Support an NTFS partition that is larger than 128 sectors.
Add write support for the EXT4 file system.
Back up / restore the EXT4 partition.
EXT4 partition cloning support.
Support resizing EXT4 partition.
Support recovery of lost EXT4 partition.
Add the PartitionGuru menu item to boot to the WinPE version.
WinPE bootable disk creation support.
Menu items such as ition Shut Down ”, menü Restart”, “Run”, and ayarla Adjust screen resolution edil are canceled when you run the WinPE version of PartitionGuru.
The Quick Partition feature can save the current settings to the Options.ini file as the default partitioning scheme, so it can be used automatically in future operations.
The Quick Partition feature changes the default size of the ESP partition to 300 MB.
Quick Section supports changing the size of the ESP partition.
The Quick Partition can allocate a certain number of sectors between partitions for the GUID disk, so that the disk can be converted to MBR if necessary.
Oluştur Create ESP / MSR partition ”is added to a menu, so you can create an ESP / MSR partition separately.
Improve creating a new partition and creating an ESP / MSR partition on the GPT disk.
Support resizing single PV in LVM without data loss.
Support the LVM partition that receives logical partition as PV.
Developed
Optimize the data module feature.
Optimize the File Recovery feature for the ExFAT partition.
Optimize recovery of NEF files.
Windows DBR is used when formatting the FAT32 partition on a USB flash drive.
A progress bar is added when deleting files.
Oluştur Create DOS System ken was disabled while formatting the EXT4 partition.
Support for adapter type display for NVME disc.
Optimize the upload speed of the file list.
When a virtual disk is closed, the partitions are closed at the same time as the Sector Editor.
The program displays detailed information for the EXT4 partition, such as the node size, the block numbers of the reserved block group identifier.
When installing a VMDK virtual disk, the program automatically loads the main file if a flat or segmented subfile is selected.
Optimize the Erase Free Space by increasing the fill rate with random data.
Constant
Fixed issue where file list could not be updated after formatting USB flash drive.
Fixed issue where shortcut keys are incorrect for “Backup Partition Table” and “Restore Partition Table” features.
Fixed issue where file copying could be stopped by pressing Enter.
Fixed issue where Size list returned to right-to-right justification after right-clicking the Size header in the file list.
Fixed issue where selected file number was not updated after selecting files by dragging mouse.
Fixed issue where selected folder number is incorrect.
Fixed issue where the program sometimes corrupted when recovering files from FAT32 partition.
Fixed issue where CPU usage was too high while program was running under WinPE.
Fixed issue where error occurred when writing only zero data to virtual disk.
Fixed issue where NTFS partition could not be restored when partition image contains error.
Fixed issue where partition table could not be saved after converting MBR to GUID.
Fixed issue where directory structure was not rearranged after scanning stopped.
Fixed an issue when copying files after scanning.
Fixed an issue where too many NTFS partition disks were mounted, which could cause the program to be prompted for target partitioning.
Sometimes, the board is not working properly, the problem has been fixed.
Fixed issue where dynamic disk was not analyzed as dynamic volumes when it was the last disk on the computer.
How to Crack, Activate or Register Eassos PartitionGuru Pro?
Completely Uninstalling the Old Version IObit Uninstaller
Turn off Virus Protection
Install and Do Not Run the Program (If You Run Then Leave It)
Run Crack and Click Crack
Done! Enjoy ?
Eassos PartitionGuru Pro Patch
Eassos PartitionGuru Pro Patch You can reconfigure and recover files from the virtual RAID and all RAID types are supported; Sector Editing - Edit sector data just like WinHex; Backup and Restore - The system can back up and restore the partition, including the partition, the hard disk, and the partition table. Bad Parts - Check and repair bad sectors for all storage devices; S.M.A.R.T. information. Permanently delete files - can permanently delete files so they cannot be recovered by any data recovery software; Virtual Disk - supports virtual disks such as VMware, Virtual PC and Virtual Box; Brisket.
Also Download: SystemRescueCd Full ISO Direct Link
Eassos PartitionGuru Pro Serial Key
Eassos PartitionGuru Pro 4.9.5.508 Cracked | Mirror
Eassos PartitionGuru Pro Just Crack | Mirror
Article Source Here: Eassos PartitionGuru Pro 4.9.5.508 Cracked
0 notes
Photo

The handy Drupal 8 module "Quick Node Clone" allows you to clone nodes easily https://www.drupal4u.org/tips-and-tricks/handy-drupal-8-module-quick-node-clone-allows-you-clone-nodes-easily
0 notes
Photo

New Post has been published on https://zitseng.com/archives/16726
Website Upgrade to Ubuntu 18.04.1
Ubuntu 18.04 LTS has been released for several months now, with the first point release update 18.04.1 arriving in late July. Users wanting to use the prescribed upgrade mechanism from an older Ubuntu LTS release had to wait till this point release update. Here’s my Ubuntu 18.04 LTS upgrade notes, coming from the previous 16.04 LTS release.
I am writing this with my blog website as reference. You can read my Making Of A Techie’s WordPress Site post for some background on the build components of this website, as well as my Apache, HTTP/2 and PageSpeed on Ubuntu pre-16.04 post for some build nodes. They will establish some context about what I’m upgrading from.
Notably, I had been running a version of Apache 2 from Ondrej Sury’s PPA. The main reason for that is my want for HTTP/2 support via Apache mod_http2 which, at that time, Ubuntu considered to be experimental and did not build that into their release repository. With Ubuntu 18.04, I established that mod_http2 is now included, and I prefer not to depend on a third party repository (no offence to Ondrej).
I want to return to Ubuntu’s own Apache 2 packages, but the downside is that their version is slightly older: Apache 2.4.29 vs Ondrej’s 2.4.34. It’s no big deal. I’ll still go with stock Apache 2 from Ubuntu 18.04. There is another issue; I’ll get into that later.
Ubuntu, unlike CentOS, has a very elegant, convenient, way to upgrade from release to release. The do-release-upgrade command does all the magic, including starting up SSH server on an alternate part as a backup remote access method in case the main SSH service breaks. Start the upgrade by simply running:
$ do-release-upgrade
Follow the on-screen instructions. Remember to read and digest the information properly before just hitting “next” or going with the suggested default action. Where applicable, I suggest that you keep locally modified configuration whenever Ubuntu detects a conflict with default configurations from the package. It should be fine to remove old, outdated, packages.
The actual upgrade is pretty quick if you have a good Internet connection. Mine was done in about 15 minutes.
Then, let’s switch Apache 2 back into the stock distribution version using ppa-purge to remove Ondrej’s repository.
$ apt install ppa-purge # ppa-purge ppa:ondrej/apache2
The Ubuntu 18.04 upgrade switches Apache 2 back to the prefork MPM because Php 7.2 is not thread safe. I don’t need mod_php, as I’m using the php-fpm method. So I can remove mod_php and safely go back to the event MPM.
a2dismod php7.2 a2dismod mpm_perfork a2enmod mpm_event
There’ll be messages along the way to suggest restarting Apache 2 via systemctl restart apache2. You can do that, but I don’t because the php-fpm setup is still broken, so my website won’t work yet anyway. This the next step here, to get php-fpm up.
$ apt install php-fpm php-mysql $ a2enconf php7.2-fpm
Then edit /etc/php/7.2/fpm/pool/www.conf and modify as needed. I had changed the user/group from www-data to my site-specific user. The new php-fpm also changes its socket location, so I needed to modify where Apache 2 expects to find it. This is usually configured in /etc/apache2/conf-enabled/php7.2-fpm.conf. I had mine configured via ProxyPass in another configuration file.
You can now restart Apache 2 with systemctl restart apache2.
At this point, the Ubuntu 18.04.1 with Apache 2 setup should be complete and working.
The other matter I had an issue with is about brotli compression. This was included in Ondrej’s Apache 2 PPA, but not available in the stock Ubuntu 18.04 repository. Although I can download I compile any needed software myself, I often prefer to go with a package that can be provided by some repository. This is on the assumption that a well-maintained repository is more likely to keep the packages more up-to-date than I can or have the time to. I decided to break my rule this time, and even though mod_brotli can be obtained from the official Apache 2 sources, I’ll go with this build via Github from Ayesh.
Here are the steps, starting first to remove brotli if it’s already installed:
$ rm /etc/apache2/mods-enabled/brotli* $ rm /etc/apache2/mods-available/brotli*
Then get on with the build and install from Github:
$ cd /tmp $ git clone --depth=1 --recursive https://github.com/kjdev/apache-mod-brotli.git $ cd apache-mod-brotli $ ./autogen.sh $ ./configure $ make $ install -D .libs/mod_brotli.so /usr/lib/apache2/modules/mod_brotli.so -m 644 $ cd /etc/apache2/mods-available $ echo “LoadModule brotli_module /usr/lib/apache2/modules/mod_brotli.so” > brotli.load
Create brotli.conf in /etc/apache2/mods-available/brotli.conf with the following contents:
<IfModule brotli_module> # Compression ## BrotliCompressionLevel: 0-11 (default: 11) BrotliCompressionLevel 10 ## BrotliWindowSize: 10-24 (default: 22) BrotliWindowSize 22 # Logging # Filter note BrotliFilterNote Input brotli_in BrotliFilterNote Output brotli_out BrotliFilterNote Ratio brotli_ratio #LogFormat '"%r" %brotli_outn/%brotli_inn (%brotli_ration)' brotli #CustomLog $APACHE_LOG_DIR/brotli_access.log brotli # Output filter AddOutputFilterByType BROTLI text/html text/plain text/css text/xml AddOutputFilterByType BROTLI text/css AddOutputFilterByType BROTLI application/x-javascript application/javascript AddOutputFilterByType BROTLI application/rss+xml AddOutputFilterByType BROTLI application/xml AddOutputFilterByType BROTLI application/json # Global output filer if necessary. # SetOutputFilter BROTLI # SetEnvIfNoCase Request_URI \.txt$ no-br </IfModule>
Restart Apache 2 with systemctl restart apache2 and we’re done.
This is the setup at zitseng.com right now:
Ubuntu 18.04.1
Apache 2.4.29 with HTTP/2, TLS,
php7.2-fpm
WordPress
0 notes
Text
Hack Android Device & Spy On Anyone Using AhMyth Android RAT In Just 4 Steps| With GUI
Hey, TechHackSaver hacker’s You all have been asking me to do a article on RAT, So on your demand, I am posting this article for you guys! It is a RAT for android with the help of this you will be able to Hack android or spy on any android device!
Now Let’s take a quick look about this RAT AhMyth we are going to use in this tutorial
What is AhMyth? Hacking Android RAT
Ahmуth іѕ аn open ѕоurсе remote ассеѕѕ tооl [RAT] аnd has many features уоu would expect tо ѕее in a RAT ѕuсh as Gео lосаtіоn mоnіtоrіng, SMS mоdulеѕ, Contact Lіѕtѕ Vіеwеr, Fіlе Manager, Cаmеrа Snарѕhоtѕ, Mісrорhоnе recorder аnd muсh mоrе. AhMуth is vеrу еаѕу to uѕе duе to іtѕ ѕіmрlе аnd effective GUI design аnd is a multi-platform rеmоtе ассеѕѕ tооl thаt іѕ available for Linux, Wіndоwѕ & Aррlе OS.
AhMуth mainly has of twо раrtѕ.
Sеrvеr side : desktop аррlісаtіоn based on еlесtrоn framework (соntrоl panel)
Clіеnt side : android application (bасkdооr)
This tool works fine for both Windows and Linux, I am explaining this on kali linux
Prеrеԛuіѕіtе :
Electron (to start thе арр)
Java (to gеnеrаtе apk backdoor)
Elесtrоn-buіldеr аnd еlесtrоn-расkеr (tо buіld binaries for (OSX,WINDOWS,LINUX)
Fіrѕt clone AhMуth tо уоur device.
gіt сlоnе httрѕ: //gіthub.соm/AhMуth/AhMуth-Andrоіd-RAT.gіt
Commnad to download/Gitclone:
gіt сlоnе httрѕ: //gіthub.соm/AhMуth/AhMуth-Andrоіd-RAT.gіt
Nеxt сd in tо AhMуth-Andrоіd-Rаt dіrесtоrу.
cd AhMуth-Andrоіd-RAT
Stаrt AhMуth uѕіng command bеlоw.
nрm start //NODE PACKAGE MANAGER =NPM
You might get small errors, Ignore them But understand the following points:
con: іnѕtаll ѕсrірtѕ are run аѕ root, аnd you рrоbаblу dіd not read them аll tо make ѕurе thеу аrе safe fіrѕt. pro: without them, no install script can wrіtе to dіѕk іn its оwn module folder, ѕо unless the іnѕtаll script dоеѕ nоthіng but рrіnt some thіngѕ tо ѕtаndаrd оut, thе mоdulеѕ you need will nоt іnѕtаll.
Install Mеthоd 2 | [Recommended] To Hack Android
Dоwnlоаd bіnаrу frоm https://github.com/AhMyth/AhMyth-Android-RAT/releases 50 As уоu саn ѕее from the ѕсrееn ѕhоt bеlоw AhMуth hаѕ ѕuссеѕѕfullу ѕtаrtеd.
Also Check: Hack- Termux First Choice of Hackers On Android
As уоu can see frоm thе ѕсrееn shot bеlоw AhMyth has successfully ѕtаrtеd.

Hacking Android Mobile Via RAT-1 | Spying Apps | Hack Android
Nоw wе hаvе AhMyth running іtѕ tіmе to соnfіgurе thе server thіѕ is a dеѕktор аррlісаtіоn based on еlесtrоn frаmеwоrk (соntrоl раnеl) it wіll bе uѕеd tо сrеаtе a lіѕtеnеr bасk tо thе аttасkіng dеvісе.
Choose whаt роrt уоu wоuld lіkе tо run AhMyth ѕеrvеr оn. Default роrt іѕ 42472 оnсе a роrt has bееn сhоѕеn click button “Lіѕtеn” from the tор right оf AhMуth аррlісаtіоn.

Hacking Android Mobile Via RAT-2 | Spying Apps | Hack Android
Sсrееn ѕhоt ѕhоwѕ AhMуth server runnіng оn роrt 42474 Now thаt a server hаѕ successfully started a lіѕtеnеr оn thе selected роrt wе саn nоw uѕе “APK Buіldеr” tо create a Android apk backdoor.
From thе tор menu click оn “APK Buіldеr”
In this tutоrіаl I will be uѕіng thе bаѕіс bасkdооr that is generated bу AhMyth. You саn also embed a bасkdооr іn tо аn оrіgіnаl арk bу uѕіng bіnd APK option.
If уоu рlаn оn uѕіng AhMуth wіthіn уоur own nеtwоrk use уоur local IP аddrеѕѕ, If you рlаn on using AhMуth outside оf уоur оwn nеtwоrk uѕе уоur рublіс IP аddrеѕѕ.

Hacking Android Mobile Via RAT-3 | Spying Apps | Hack Android
Imаgе ѕhоwѕ bасkdооr APK fіlе bеіng ѕuссеѕѕfullу generated and dіѕрlауеd іn its оutрut dіrесtоrу. Onсе APK fіlе has bееn successfully gеnеrаtеd its tіmе to mоvе іt оvеr to the target Andrоіd device. Uѕе whаt еvеr mеthоd оf dеlіvеrу уоu lіkе to ѕеnd thе mаlісіоuѕ bасkdооr іt is соmрlеtеlу uр tо уоurѕеlf Sосіаl Engіnееrіng mеthоdѕ can оftеn wоrk best whіlе delivering a рауlоаd. Onсе the tаrgеt іnѕtаllѕ the mаlісіоuѕ Android аррlісаtіоn аnd lаunсhеѕ іt thе target dеvісе will appear frоm wіthіn AhMyth target mеnu.
If wе ореn uр thе соmрrоmіѕеd Andrоіd device from thе tаrgеt list уоu саn thеn uѕе vаrіоuѕ mоdulеѕ frоm within AhMyth to соnduсt various аѕѕеѕѕmеntѕ of the target Android device.

Hacking Android Mobile Via RAT-4 | Spying Apps | Hack Android
Onсе аn Andrоіd device has been соmрrоmіѕеd. Eасh tіmе you ореn a ѕеѕѕіоn wіth the device a wіndоwѕ will bе dіѕрlауеd with the thе wоrdѕ “Stay Eduсаtеd”. From thе mеnu wіthіn thе wіndоw wе саn use various еxрlоіt modules.
File Manager allows fіlеѕ to bе ассеѕѕ from wіthіn thе соmрrоmіѕеd Andrоіd dеvісеѕ.

Hacking Android Mobile Via RAT-5 | Spying Apps | Hack Android
Imаgе ѕhоwѕ file brоwѕеr оf соmрrоmіѕеd Android dеvісе. Imаgе bеlоw shows Gео location module аnd thе lосаtіоn of the tаrgеt Android dеvісе.

Hacking Android Mobile Via RAT-6 | Spying Apps | Hack Android
Imаgе shows lосаtіоn оf соmрrоmіѕеd Andrоіd dеvісе. For рrіvасу rеаѕоnѕ I hаvе turnеd GPS оff while dеmоnѕtrаtіng thіѕ RAT. Uѕіng AhMуth SMS messages саn bе sent frоm thе compromised Android dеvісеѕ tо оthеr mоbіlе dеvісеѕ. AhMуth can also vіеw SMS Lіѕtѕ frоm the target Andrоіd devices.

Hacking Android Mobile Via RAT-7 | Spying Apps | Hack Android
Imаgе shows ѕеnd SMS module that іѕ uѕеd tо ѕеnd SMS messages and vіеw SMS lists оf соmрrоmіѕеd Andrоіd dеvісеѕ.
Download AhMyth RAT
from WordPress https://ift.tt/2NvD0IB via IFTTT
0 notes
Photo

Starting a Flask Project with Heroku
Make development fun again
We all knew it would only be a matter of time before a blog full of Python junkies would touch on Python's fastest growing framework. Staying true to all that is Pythonic, Flask is a gift to developers who value the act of development. By minimizing level of effort and maximizing potential, Flask allows us to be as minimalist (or obnoxiously complex) as we want. Why Flask? Those of us who grew up loving Django have embraced Flask with a hint of disbelief, in that Flask is both shockingly simple and surprisingly powerful. Whereas the initial setup of a Django project could easily take hours, Flask's set up is merely a copy+paste of the following: from flask import Flask app = Flask(__name__) @app.route("/") def hello(): return "Hello World!" While it is entirely possible to create an entire flask application as one file, Flask is just as extensible as its predecessors, depending on the creator's will. Not only does this make Flask projects feel more expressive, as they are a reflection of the creator's development philosophy, but the simplicity is just plain fun. For those familiar with ExpressJS, I would be so bold as to say that Flask is even more simple than Express, in the best way possible. Why Heroku? Since we're on the topic of simplicity, it makes sense for us to deploy an exploratory project such as this one via a service which eliminates the DevOps aspect of web development completely. Configuring webservers, managing Linux packages, and supplying SSL certs are completely taken care of by Heroku. Development and Production environments are also obfuscated into pipelines, taking deployment hassles out of the equation. Did I mention Heroku can automatically deploy by syncing Github repositories and listening for commits? Perhaps most impressive is Heroku's concept of Elements . Heroku holds a "marketplace" of popular app dependancies ranging from databases to analytics, all of which can be configured to your app in a single click. Speaking of single-click, they handle single-click deployments, too. Create your Project Head over to Heroku and create your project on a fresh Dyno: this is an encapsulated instance which isn essentially your application. You'll be prompted to download the Heroku CLI on your OS of choice, which is quick and painless. Once installed, create an empty directory on your local machine and provide the following command to be prompted for your Heroku account credentials: $ heroku login Enter your Heroku credentials. Email: [email protected] Password: At this point, Heroku has already magically created a git repository for your application from which you'll be doing development from: $ git clone https://github.com/heroku/example-flask-project.git $ cd example-flask-project $ heroku create Creating example-flask-project in organization heroku... done, stack is cedar-14 http://example-flask-project.herokuapp.com/ | https://git.heroku.com/example-flask-project.git Git remote heroku added Now let's configure this thing. 2Easy4U Configuration We're going to go step-by-step to build out the most simply application configuration imaginable: example-flask-project ├── app.py ├── Procfile ├── Pipfile ├── Pipfile.lock ├── runtime.txt ├── requirements.txt ├── Pipfile.lock └── setup.py For the love of all that is holy, use pipenv to manage your packages. We'll need it. pip install pipenv pipenv shell Install your basic dependancies while in the shell: pip3 install flask gunicorn Awesome. Now let's build out the files in our tree one-by one. Procfile The Procfile (no file extension) is a unique file to Heroku which is essentially an build command. This will be a single-liner to tell gunicorn to startup our application from our base app.py file. web: gunicorn app:app A quick breakdown here: web is our process 'type'. other types exists, such as worker , urgentworker , and clock , but that's not important for now. app:app signifies looking for the 'app' module in our app.py file. If you'd like to move app.py to . a different folder down the line, this can be adjusted as such: web: gunicorn differentfolder app:app Runtime The runtime.txt file simply notifies Heroku of the language it's dealing with as well as the proper version. This is simple, because you can can only have one possible value here: python-3.6.6 Requirements.txt Think of this as Python's package.json for package dependencies. Keep this updated when you change your packages by entering the following in the pipenv shell: pip freeze > requirements.txt This will immediately all packages and their versions in the file, as such: asn1crypto==0.24.0 bcrypt==3.1.4 beautifulsoup4==4.6.0 blinker==1.4 cffi==1.11.5 click==6.7 cryptography==2.2.2 Flask==1.0.2 Flask-Assets==0.12 Flask-Login==0.4.1 Flask-Mail==0.9.1 flask-mongoengine==0.9.5 Flask-SQLAlchemy==2.3.2 Flask-Static-Compress==1.0.2 Flask-User==1.0.1.5 Flask-WTF==0.14.2 gunicorn==19.9.0 idna==2.7 itsdangerous==0.24 jac==0.17.1 Jinja2==2.10 MarkupSafe==1.0 mongoengine==0.15.0 ordereddict==1.1 passlib==1.7.1 pycparser==2.18 pymongo==3.7.0 rjsmin==1.0.12 six==1.11.0 SQLAlchemy==1.2.9 webassets==0.12.1 Werkzeug==0.14.1 WTForms==2.2.1 Pipfile Our Pipfile is automatically generated by Pipenv by default, but be sure to call out packages which are essential to the build our app as. This will rarely need to be updated manually: [[source]] url = "https://pypi.org/simple" verify_ssl = true name = "pypi" [packages] gunicorn = "*" flask = "*" requests = "*" wtforms = "*" flask_assets = "*" flask_static_compress = "*" [dev-packages] [requires] python_version = "3.6.6" Pipfile.lock Heroku looks at Pipfile.lock every time our app builds to know which packages to install on the server side. Changing dependancies locally without updating the pipfile.lock will not carry the changes over to your Dyno. Thus, be sure to generate this file when needed: pipenv lock Setup.py Just some general info. from setuptools import setup, find_packages setup( name='example-flask-project', version='1.0', long_description=__doc__, packages=find_packages(), include_package_data=True, zip_safe=False, install_requires=['Flask'], ) Deployment Running yourn app locally is as simple as two words: heroku local . This spins up an instance of your app at 0.0.0.0:5000. Deploying to your Heroku Dyno is much like deploying to Github (they can in fact be the exact same if you configure it as such). Here's how deployment via the Heroku CLI looks: git add . git commit -am 'initial commit' git push heroku master If all went well, your app should be live at the URL Heroku generated for you when you created your project. Go ahead and checkout the Heroku UI to see how things went. I highly suggest checking out the logs on the Heroku UI after each deploy. Often times issues which don't appear on your local environment will pop up on the server: Heroku's UI logs But Wait, There's More! While Flask's development may not be as vast as the NPM packages offered by Node, there's more or less a package for anything you possibly need. I'd recommend checking out Flask's official list of packages . While we may have set up our first Flask application, as it stands we've only built something useless so far. Consider this to be the beginning of many, many Flask tips to come.
- Todd Birchard
0 notes
Photo

Starting a Flask Project with Heroku
Make development fun again
We all knew it would only be a matter of time before a blog full of Python junkies would touch on Python's fastest growing framework. Staying true to all that is Pythonic, Flask is a gift to developers who value the act of development. By minimizing level of effort and maximizing potential, Flask allows us to be as minimalist (or obnoxiously complex) as we want. Why Flask? Those of us who grew up loving Django have embraced Flask with a hint of disbelief, in that Flask is both shockingly simple and surprisingly powerful. Whereas the initial setup of a Django project could easily take hours, Flask's set up is merely a copy+paste of the following: from flask import Flask app = Flask(__name__) @app.route("/") def hello(): return "Hello World!" While it is entirely possible to create an entire flask application as one file, Flask is just as extensible as its predecessors, depending on the creator's will. Not only does this make Flask projects feel more expressive, as they are a reflection of the creator's development philosophy, but the simplicity is just plain fun. For those familiar with ExpressJS, I would be so bold as to say that Flask is even more simple than Express, in the best way possible. Why Heroku? Since we're on the topic of simplicity, it makes sense for us to deploy an exploratory project such as this one via a service which eliminates the DevOps aspect of web development completely. Configuring webservers, managing Linux packages, and supplying SSL certs are completely taken care of by Heroku. Development and Production environments are also obfuscated into pipelines, taking deployment hassles out of the equation. Did I mention Heroku can automatically deploy by syncing Github repositories and listening for commits? Perhaps most impressive is Heroku's concept of Elements . Heroku holds a "marketplace" of popular app dependancies ranging from databases to analytics, all of which can be configured to your app in a single click. Speaking of single-click, they handle single-click deployments, too. Create your Project Head over to Heroku and create your project on a fresh Dyno: this is an encapsulated instance which isn essentially your application. You'll be prompted to download the Heroku CLI on your OS of choice, which is quick and painless. Once installed, create an empty directory on your local machine and provide the following command to be prompted for your Heroku account credentials: $ heroku login Enter your Heroku credentials. Email: [email protected] Password: At this point, Heroku has already magically created a git repository for your application from which you'll be doing development from: $ git clone https://github.com/heroku/example-flask-project.git $ cd example-flask-project $ heroku create Creating example-flask-project in organization heroku... done, stack is cedar-14 http://example-flask-project.herokuapp.com/ | https://git.heroku.com/example-flask-project.git Git remote heroku added Now let's configure this thing. 2Easy4U Configuration We're going to go step-by-step to build out the most simply application configuration imaginable: example-flask-project ├── app.py ├── Procfile ├── Pipfile ├── Pipfile.lock ├── runtime.txt ├── requirements.txt ├── Pipfile.lock └── setup.py For the love of all that is holy, use pipenv to manage your packages. We'll need it. pip install pipenv pipenv shell Install your basic dependancies while in the shell: pip3 install flask gunicorn Awesome. Now let's build out the files in our tree one-by one. Procfile The Procfile (no file extension) is a unique file to Heroku which is essentially an build command. This will be a single-liner to tell gunicorn to startup our application from our base app.py file. web: gunicorn app:app A quick breakdown here: web is our process 'type'. other types exists, such as worker , urgentworker , and clock , but that's not important for now. app:app signifies looking for the 'app' module in our app.py file. If you'd like to move app.py to . a different folder down the line, this can be adjusted as such: web: gunicorn differentfolder app:app Runtime The runtime.txt file simply notifies Heroku of the language it's dealing with as well as the proper version. This is simple, because you can can only have one possible value here: python-3.6.6 Requirements.txt Think of this as Python's package.json for package dependencies. Keep this updated when you change your packages by entering the following in the pipenv shell: pip freeze > requirements.txt This will immediately all packages and their versions in the file, as such: asn1crypto==0.24.0 bcrypt==3.1.4 beautifulsoup4==4.6.0 blinker==1.4 cffi==1.11.5 click==6.7 cryptography==2.2.2 Flask==1.0.2 Flask-Assets==0.12 Flask-Login==0.4.1 Flask-Mail==0.9.1 flask-mongoengine==0.9.5 Flask-SQLAlchemy==2.3.2 Flask-Static-Compress==1.0.2 Flask-User==1.0.1.5 Flask-WTF==0.14.2 gunicorn==19.9.0 idna==2.7 itsdangerous==0.24 jac==0.17.1 Jinja2==2.10 MarkupSafe==1.0 mongoengine==0.15.0 ordereddict==1.1 passlib==1.7.1 pycparser==2.18 pymongo==3.7.0 rjsmin==1.0.12 six==1.11.0 SQLAlchemy==1.2.9 webassets==0.12.1 Werkzeug==0.14.1 WTForms==2.2.1 Pipfile Our Pipfile is automatically generated by Pipenv by default, but be sure to call out packages which are essential to the build our app as. This will rarely need to be updated manually: [[source]] url = "https://pypi.org/simple" verify_ssl = true name = "pypi" [packages] gunicorn = "*" flask = "*" requests = "*" wtforms = "*" flask_assets = "*" flask_static_compress = "*" [dev-packages] [requires] python_version = "3.6.6" Pipfile.lock Heroku looks at Pipfile.lock every time our app builds to know which packages to install on the server side. Changing dependancies locally without updating the pipfile.lock will not carry the changes over to your Dyno. Thus, be sure to generate this file when needed: pipenv lock Setup.py Just some general info. from setuptools import setup, find_packages setup( name='example-flask-project', version='1.0', long_description=__doc__, packages=find_packages(), include_package_data=True, zip_safe=False, install_requires=['Flask'], ) Deployment Running yourn app locally is as simple as two words: heroku local . This spins up an instance of your app at 0.0.0.0:5000. Deploying to your Heroku Dyno is much like deploying to Github (they can in fact be the exact same if you configure it as such). Here's how deployment via the Heroku CLI looks: git add . git commit -am 'initial commit' git push heroku master If all went well, your app should be live at the URL Heroku generated for you when you created your project. Go ahead and checkout the Heroku UI to see how things went. I highly suggest checking out the logs on the Heroku UI after each deploy. Often times issues which don't appear on your local environment will pop up on the server: Heroku's UI logs But Wait, There's More! While Flask's development may not be as vast as the NPM packages offered by Node, there's more or less a package for anything you possibly need. I'd recommend checking out Flask's official list of packages . While we may have set up our first Flask application, as it stands we've only built something useless so far. Consider this to be the beginning of many, many Flask tips to come.
- Todd Birchard Read post
0 notes