#quick startapps
Explore tagged Tumblr posts
Visit Tumblr Blog
Explore Tumblr blogs with no restrictions, modern design and the best experience.
Last Seen Tumblr Blogs


Fun Fact
Tumblr is available in 18 languages.
Text
#custom mobile app development services#ios app development#mobile game development#android app development#app development#web development#quick startapps#mobile app development#app development company#software development
2 notes
·
View notes
Text
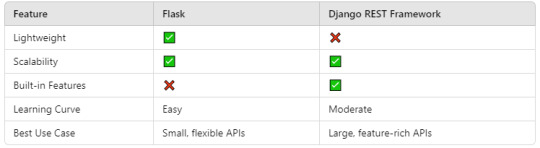
Building RESTful APIs with Python and Flask/Django

RESTful APIs (Representational State Transfer) allow applications to communicate over HTTP, making them essential for modern web and mobile applications.
Python provides two popular frameworks for building REST APIs: Flask (lightweight and flexible) and Django REST Framework (DRF) (powerful and feature-rich).
1. Building a REST API with Flask
Installing Flask and Flask-RESTful
bashpip install flask flask-restful
Creating a Simple Flask REST API
pythonfrom flask import Flask, request, jsonify from flask_restful import Api, Resourceapp = Flask(__name__) api = Api(app)class HelloWorld(Resource): def get(self): return {"message": "Hello, World!"}api.add_resource(HelloWorld, "/")if __name__ == "__main__": app.run(debug=True)
Flask Key Features for REST APIs
Minimal setup with flexible architecture.
Supports JSON responses out-of-the-box.
Works well with SQLAlchemy for database integration.
2. Building a REST API with Django REST Framework (DRF)
Installing Django and DRF
bashpip install django djangorestframewor
Setting Up a Django REST API
Create a Django Project
bash
django-admin startproject myapi cd myapi
Create an App
bash
python manage.py startapp api
Define a Model (models.py)
python
from django.db import models class Item(models.Model): name = models.CharField(max_length=255) description = models.TextField()
Create a Serializer (serializers.py)
python
from rest_framework import serializers from .models import Item class ItemSerializer(serializers.ModelSerializer): class Meta: model = Item fields = '__all__'
Create a View (views.py)
python
from rest_framework import generics from .models import Item from .serializers import ItemSerializer class ItemListCreate(generics.ListCreateAPIView): queryset = Item.objects.all() serializer_class = ItemSerializer
Define URL Patterns (urls.py)
python
from django.urls import path from .views import ItemListCreate urlpatterns = [ path('items/', ItemListCreate.as_view(), name='item-list'),
Run the Server
bash
python manage.py runserver
Django REST Framework Key Features
Built-in authentication and permissions.
Powerful serialization and deserialization.
Browsable API for quick testing.
Choosing Between Flask and Django REST Framework
WEBSITE: https://www.ficusoft.in/python-training-in-chennai/
0 notes
Text
not pixel how to play
https://t. me/notpixel/app? startapp=f448119548_s601348 is a new free game from Notcoin team where you have to paint pixels and in return get PX points, which will be converted into real tokens that can be sold.
The game from beta-testing came out very recently, 23.09.2024, so start playing and mint tokens not too late. Listing of the PX coin is promised in November. Next, we will learn how to play Noticpixel.
It’s really very simple:
1. Log in to the bot https://t. me/notpixel/app? startapp=f448119548_s601348
2. Next, simply color the cells with any color
3. Do not forget to pump the boosters for accelerating the pharma
We will now break down each section of the game separately.
The game has a virtual canvas of pixels: a square of 1000x1000 pixels, each of which can be painted over, and when painting pixels earn $PX tokens.
Short video of how NotPixel game works on pixel blur, on the example of our drawing, please note, when painting pixels from the top, the balance $PX is added.
VIDEO
There are some key points to note:
* Energy
* Busta
* Tasks
* Passive farm and PX balance
Energy, its limit you can see when you click on the pixel map, in the screenshot below I show that the maximum amount of energy is 10, you have 5 at the start. It’s replenishable to increase the limit and speed of recovery, you need to raise the boosters.
Energy is spent on principle 1 pixel = 1 energy, for 1 pixel you are awarded PX points.
Photo
Next it is important to talk about boosts, find them by clicking on top of your balance, section «Boosts». there are 3 types of rolling:
* Paint Reward - a reward in PX for 1 pinned pixel, the higher the level, the higher the reward, the maximum level 7.
* Recharging Speed - the faster the energy recovery, the higher the level, the higher the speed, maximum level 11.
* Energy Limit - the amount of energy to cover, maximum level 6, increase the limit to 10 pixels.
Photo
How to better roll in NotPixel? The strategy of rolling improvements is based on you to paint more pixels. So first we increase the number of available pixels and the speed of energy recovery.
How to quickly move the boosts? Here come to help tasks, you will find them by clicking on top of your balance, section «Tasks».
In general, there is not much to tell about, do tasks, get a reward in PX, spend it on boosts.
Photo
The game also has a passive farm, you can find it by clicking on balance above, on the page opened will see «Claim» button, as understood, the more pixels are colored - the higher the speed of mining. You can collect the reward once an hour.
Photo
How else can you earn extra PX? With the help of the referral system, as in many other games. To do this, click on «Invite bouns» in the screenshot above, and you will be taken to the page with the reference program.
How else can you earn extra PX? With the help of the referral system, as in many other games. To do this, click on «Invite bouns» in the screenshot above, and you will be taken to the page with the reference program.
When listing NotPixel
Many are interested in this issue, and also worried about how to take money out of the game Note Pixel. We will find out about this later, as well as the price of their token on crypto exchanges. According to preliminary information from their channel, the listing of Not Pixel is likely to be in November 2024.
But in the meantime we can play the game without any investments and hope for a quick listing to make money from this game on Telegram.
Price per token = Market Capitalization / Total Supply
Price per token = $500 million / 100 billion
= $0.005 per token
In this scenario, the initial price of each Not Pixel token is estimated at $0.005 or 0.5 cents.
1 note
·
View note
Text
🚀 Elevate Your Crypto Project with #MemexZone! 🌟
✅Quick Launch: Deploy your project smoothly with our user-friendly interface.
✅Community Engagement: Connect with an active community eager to support and promote your initiative.
https://t.me/Memexappbot/app?startapp=1_1153818159

0 notes
Photo

How to Prototype a Web App with Django and Vue.js
Wouldn’t it be cool if you could prototype a custom web application that’s responsive (mobile-ready), reactive (light-speed fast), with a full-featured admin interface to manage the content — all in no time? Actually, using Django and Vue.js, you can! 😁
0. Introduction: Full Stack Development 101
I’ll cover how to prototype a custom web app, and to keep it as short and sweet as possible, the context information here will be rather brief. However, I will provide — hopefully — enough resources so that you know where to go should you need more information.
To this end I’ll fully mash up data management, presentation, and routing between Django and Vue.js — so get ready!
About Django

You may know of Django, the Python-based web framework for perfectionists with deadlines that’s ridiculously fast, reassuringly secure, and exceedingly scalable. But if you don’t know much about it, this article will serve as an extremely fast hands-on introduction.
About Vue.js

Same deal with Vue.js, the progressive JavaScript framework that’s approachable, versatile, and performant. If you aren’t familiar with it, here you’ll get a quick-and-dirty introduction.
I’ll also cover two official Vue.js libraries:
Vue Router for route/view mapping
Vuex for state management
Python + JavaScript = WIN!

For this article, we’ll set a publishing project with a basic database schema to save authors and articles, and a minimal user interface (UI) to interact with them.

Hopefully, this will serve as a toy program to understand how to integrate Django using Python code on the back end with a JavaScript framework on the front end, that you can adapt later to your own needs.
1. Setting Up a Django Project
Very quickly, we’ll set up a project from scratch. If you already know how to handle Django projects, you can skip this section. We’ll assume you already have Python installed.
For a more in-depth guide, see How to install Django on the Django documentation site.
Python Virtual Environment
Let’s open a console and create a virtual environment (see Virtual Environments and Packages for more info):
$ virtualenv myenvironment
Using base prefix 'c:\\users\\luzdealba\\appdata\\local\\programs\\python\\python37' New python executable in C:\Users\luzdealba\Development\myenvironment\Scripts\python.exe Installing setuptools, pip, wheel … done
Don’t mind the paths, as these will change from system to system.
Let’s access and activate the virtual environment.
On Windows:
$ cd myenvironment $ Scripts\activate
On macOS and Linux:
$ cd myenvironment $ source bin/activate
Django Package
Let’s install Django:
(myenvironment) $ pip install django
Collecting django Downloading Django-3.0.3-py3-none-any.whl (7.5 MB) Collecting sqlparse>=0.2.2 Downloading sqlparse-0.3.1-py2.py3-none-any.whl (40 kB) Collecting pytz Using cached pytz-2019.3-py2.py3-none-any.whl (509 kB) Collecting asgiref~=3.2 Downloading asgiref-3.2.3-py2.py3-none-any.whl (18 kB) Installing collected packages: sqlparse, pytz, asgiref, django Successfully installed asgiref-3.2.3 django-3.0.3 pytz-2019.3 sqlparse-0.3.1
One more time, don’t mind about program versions and file sizes as these will vary.
The Project
Let’s start a project called myproject:
(myenvironment) $ django-admin startproject myproject
Let’s access the project:
(myenvironment) $ cd myproject
The App
Start an app called myapp:
(myenvironment) $ django-admin startapp myapp
And add myapp.apps.MyappConfig to the INSTALLED_APPS constant list in myproject/settings.py to enable the app.
2. Setting Up the Database with Django
Here we’ll define the back-end database with Django, which we’ll later integrate with a front-end storage with Vuex.
Django Models
Models are Django’s way to implement an object-relational database management system (ORDBMS). In other words, plain text files where you can define database tables and fields, and from where these will propagate to the application layer and the DB engine.
Let’s code the following models for our app in myapp/models.py:
from django.db import models class Article(models.Model): """Table schema to store articles.""" name = models.CharField(max_length=64) author = models.ForeignKey('myapp.Author', on_delete=models.CASCADE) content = models.TextField() slug = models.CharField(default='', max_length=64) def __str__(self): return '%s' % self.name class Author(models.Model): """Table schema to store auhtors.""" name = models.CharField(max_length=64) slug = models.CharField(default='', max_length=64) def __str__(self): return '%s' % self.name
Notice that we implemented a URL slug for both articles and authors.
For more information, see Model API reference on the Django documentation site.
Django Admin
Before we can manage these models through the admin site, we’ll first need to register them so that Django makes them available to us.
Let’s simply edit myapp/admin.py so that it looks like this:
from django.contrib import admin from .models import Article from .models import Author # register models to use in admin site admin.site.register(Article) admin.site.register(Author)
Read more about the Django admin site on the Django documentation site.
Django Migrations
From the Django’s Migrations documentation:
Migrations are Django’s way of propagating changes you make to your models (adding a field, deleting a model, etc.) into your database schema.
In short: migrations do everything; no SQL commands required.
First, let’s create the migration files:
(myenvironment) $ python manage.py makemigrations
Migrations for 'myapp': myapp\migrations\0001_initial.py - Create model Author - Create model Article
Now let’s use that information to update the database:
(myenvironment) $ python manage.py migrate
Operations to perform: Apply all migrations: admin, auth, contenttypes, myapp, sessions Running migrations: Applying contenttypes.0001_initial... OK Applying auth.0001_initial... OK Applying admin.0001_initial... OK Applying admin.0002_logentry_remove_auto_add... OK Applying admin.0003_logentry_add_action_flag_choices... OK Applying contenttypes.0002_remove_content_type_name... OK Applying auth.0002_alter_permission_name_max_length... OK Applying auth.0003_alter_user_email_max_length... OK Applying auth.0004_alter_user_username_opts... OK Applying auth.0005_alter_user_last_login_null... OK Applying auth.0006_require_contenttypes_0002... OK Applying auth.0007_alter_validators_add_error_messages... OK Applying auth.0008_alter_user_username_max_length... OK Applying auth.0009_alter_user_last_name_max_length... OK Applying auth.0010_alter_group_name_max_length... OK Applying auth.0011_update_proxy_permissions... OK Applying myapp.0001_initial... OK Applying sessions.0001_initial... OK
Don’t mind the long list. That’s because that was our first migration, so not only our Author and Article tables were created, but also all of Django’s default schemas.
For more info, see Migration operations in the Django documentation site.
3. A Basic Interface with Vue Components in a Django Template
Here’s one of the most interesting parts of the mashup, as we’ll mix closely related tools from different technologies.
Django View

Django goes by the model–view–controller (MVC) software design pattern, which divides the related program logic into three interconnected elements.
We’ll code the following view in myapp/views.py:
Continue reading How to Prototype a Web App with Django and Vue.js on SitePoint.
by Lucero del Alba via SitePoint https://ift.tt/2yNyL7h
0 notes
Text
Getting Started with Phyton and Django - Hello World Web App
Have you ever heard anything about Phyton? If you're reading this, I bet you do! Python is an interpreted, high-level, general-purpose programming language with an object-oriented approach: it was created by Guido van Rossum in 1991 and constantly updated ever since. It's dynamically typed and supports multiple programming paradigms, including procedural, object-oriented, and functional programming. Phyton went through two major upgrades: the first in 2000, with the release of the 2.0 version, which introduced a garbage collection system capable of collecting reference cycles; the second in 2008 with the release of Python 3.0, which was a major revision - mostly backward-incompatible - of the language. Following the Phyton 3.0 release, most developers chose to stick to the 2.x version, which eventually led to extended support for Python 2.7 (the last release in the 2.x series) up to 2020. As of today, all the main resources for Phyton and CPython (an open-source implementation of Phyton) are maintained and managed by the Phyton Software Foundation, a non-profit organization.
Phyton 2 vs Phyton 3
Python 2 and Phyton 3 are the two major versions of Phyton that are still used nowadays. These two versions are quite different: although Phyton 3 arguably has a better syntax, is more semantically correct and supports newer features, most developers chose to stick with Phyton 2 until recent years thanks to a much wider database of libraries and resources available on the web. Although there still is a bit of a debate in the coding community about which Python version was the best one to learn nowadays (Python 2.7 vs 3.5), there is now a general consensus on considering Phyton 3 the most appropriate choice for newcomers and also for those who want to update their coding skills. For this very reason, in this quick tutorial, we're going to use the Phyton 3 syntax.
Console, Desktop, or Web?
Just like most programming languages, such as Java, C# and so on, Phyton can be used for a number of different purposes. The most common scenarios are: Console Applications: console applications are programs designed to be used via a text-only computer interface, such as a text terminal, the command line interface of some operating systems (Unix, DOS, etc.). Common examples include openssl, ping, telnet, defrag, chkdsk, and the likes. Desktop Applications: desktop applications are programs designed to be used via a Graphical User Interface (GUI): such GUI can either be designed by making use of the operating system native libraries or made from scratch using the language native elements (or specifically designed GUI frameworks). Typical examples of desktop applications include Photoshop, Thunderbird, Chrome, and so on. Desktop application development dominated the software world for many years and are still widely used, even if the broadband + Internet combo is making web-based applications more appealing year after year. Web Applications: web applications or web apps are client-server computer programs where the client - including the user interface (UI) and the client-side logic - runs in a web browser: common examples include webmail (such as GMail), e-banking websites, and so on. On a more general basis, we could say that most interactive websites can be defined as web applications, from the CMS who can help you to write an essay on time management to more complex, fully packaged products such as Wordpress and Joomla. In this tutorial, for the sake of simplicity, we'll talk about the latter: therefore, our Hello World sample will be a (minimal) Web Application.
Phyton Web Frameworks
The first thing you have to do before starting is to pick a decent Phyton Web Frameworks: although you can write Phyton using any text editor (including Notepad), you should definitely stick with a GUI framework to benefit from very useful features such as syntax highlighting, built-in compiler/debugger, folder tree lists, windows tiling, and so on. These are the most popular high-level web frameworks for Phyton available nowadays. Django The Web framework for perfectionists (with deadlines). Django makes it easier to build better Web apps more quickly and with less code. Django is a high-level Python Web framework that encourages rapid development and clean, pragmatic design. It lets you build high-performing, elegant Web applications quickly. Django focuses on automating as much as possible and adhering to the DRY (Don't Repeat Yourself) principle. TurboGears The rapid Web development web framework you've been looking for. Combines SQLAlchemy (Model) or Ming (MongoDB Model), Genshi (View), Repoze and Tosca Widgets. Create a database-driven, ready-to-extend application in minutes. All with designer-friendly templates, easy AJAX on the browser side and on the server side, with an incredibly powerful and flexible Object Relational Mapper (ORM), and with code that is as natural as writing a function. After reviewing the Documentation, check out the Tutorials web2py All in one package with no further dependencies. Development, deployment, debugging, testing, database administration and maintenance of applications can be done via the provided web interface, but not required. web2py has no configuration files, requires no installation, can be run off a USB drive: it uses Python for the Model, View and the Controller. It main features include: a built-in ticketing system to manage errors; internationalization engine and pluralization, caching system; flexible authentication system (LDAP, MySQL, janrain & more); Available for Linux, BSD, Windows, and Mac OSX; works with MySQL, PostgreSQL, SQLite , Firebird, Oracle, MSSQL and the Google App Engine via an ORM abstraction layer.
Hello World in Phyton
Before installing Django, let’s see how we can generate a sample "Hello World" web page using Python. From a Linux shell, open your favorite text editor (mine is nano, but you can also use vi or anything else) and type the following: #!/usr/bin/env python import textwrap from six.moves.BaseHTTPServer import BaseHTTPRequestHandler, HTTPServer class HelloRequestHandler(BaseHTTPRequestHandler): def do_GET(self): if self.path != '/': self.send_error(404, "Object not found") return self.send_response(200) self.send_header('Content-type', 'text/html; charset=utf-8') self.end_headers() response_text = textwrap.dedent('''\ Hello World
Hello, World!
... Here we are! ''') self.wfile.write(response_text.encode('utf-8')) server_address = ('', 8000) httpd = HTTPServer(server_address, HelloRequestHandler) httpd.serve_forever() ... And that's pretty much it! This simple program can be executed and then tested by visiting http://localhost:8000/ with any browser.
Hello World with Django
Writing a Hello World sample web page with Django is definitely more difficult than doing it using blue Phyton... But there's a tremendous advantage in doing that: the scaling factor. If you're dealing with a more complex web application, you won't be able to write it using pure Phyton without losing control over the code pretty soon. The good thing about Django is that, once you learn the basics, you'll be able to deal with your projects in a comfortable fashion and with a great learning curve. Installing Django The first thing to do is to make sure that you have Django installed. Assuming you are using virtualenv, the following command should suffice: > pip install django Right after that, we need to create a Django project and a Django app: > django-admin startproject hello_world_project > cd hello_world_project > python manage.py startapp hello We now have a project called hello_world_project and an app named hello. When we executed python manage.py startapp hello, Django created a folder called hello with several files inside it. In this sample tutorial we won't use most of these files, hence we can delete them: the file that can be deleted are the following: hello/admin.py hello/models.py the whole hello/migrations folder. Writing the code Once done, edit the hello/views.py file in the following way: import textwrap from django.http import HttpResponse from django.views.generic.base import View class HomePageView(View): def dispatch(request, *args, **kwargs): response_text = textwrap.dedent('''\ Hello World
Hello, World!
... Here we are! ''') return HttpResponse(response_text) As we can see, we have basically created a Phyton class, which in Django is called a view. More specifically, this will be the class that will output the same HTML snippet we previously wrote using pure Phyton. Right after that, create a new hello/urls.py file with the following contents: from django.conf.urls import patterns, url from hello.views import HomePageView urlpatterns = patterns( '', url(r'^$', HomePageView.as_view(), name='home'), ) Next, edit the hello_world_project/urls.py file to make it looks like this: from django.conf.urls import patterns, include, url urlpatterns = patterns( '', url(r'', include('hello.urls')), ) As we can see by looking at the code, these urls.py files are the routing system that will be used by Django to understand what view to load whenever a specific URL is requested by a user. In a nutshell, we just told to our main project routing file (hello_world_project/urls.py) to route all the requests pointing to the site root to the app routing file (hello/urls.py), which in turn will point to the HomePageView view, that will then be executed - eventually returning the HTML content. The last thing we need to do is to edit the hello_world_project/settings.py file and remove some unused stuff that could prevent our sample web application from running. Around line 30, find a variable called INSTALLED_APPS: remove the first four items of the sequence and add 'hello' to the end. INSTALLED_APPS = ( 'django.contrib.messages', 'django.contrib.staticfiles', 'hello', ) Immediately after these lines, find the MIDDLEWARE_CLASSES variable and remove the line containing SessionAuthenticationMiddleware. MIDDLEWARE_CLASSES = ( 'django.contrib.sessions.middleware.SessionMiddleware', 'django.middleware.common.CommonMiddleware', 'django.middleware.csrf.CsrfViewMiddleware', 'django.contrib.auth.middleware.AuthenticationMiddleware', 'django.contrib.messages.middleware.MessageMiddleware', 'django.middleware.clickjacking.XFrameOptionsMiddleware', ) That's it: our Django web application is ready. You can start it by typing the following: > python manage.py runserver And then visit http://localhost:8000/ in your browser to see it in action.
Conclusion
That's pretty much about it. If you are interested in Phyton and you would like to go further, we strongly suggest to visit one of the following resources: PhytonTips.com FullStackPhyton The Hitchhiker's Guide to Python ... and so on. See you next time, and... happy coding! Read the full article
0 notes
Text
Django
What is Django:
Django not only used for making websites, rather than it is used for creating web applications. Django can be used to create dynamic high-security web applications.

Django is an open source web application framework, written in Python. A web framework that is a set of components that helps to develop websites faster and easier.
For authentication, one of the most powerful parts of Django is the automatic admin interface. It reads metadata from your models to provide a quick, model-centric interface.
Django Design Principles:
Less Coding − Less code so in turn a quick development.
Don’t Repeat Yourself (DRY) − everything should be developed only in exactly one place instead of repeating it again and again.
Fast Development − Django’s philosophy is to do all it can to facilitate hyper-fast development.
Clean Design − Django strictly maintains a clean design principle. throughout its own code and makes it easy to follow best web-development practices.
Loosely Coupled − Django aims to make each element of its stack independent of the others.
How to start Django Project:
Step 1: django-admin startproject mysite
Step 2: python manage.py startapp webapp
Step 3: To create the first view,
Open the file webapp/views.py

We import the class HttpResponse from the django.http module to render to the specific html pages.
The view returns an HttpResponse object that contains the generated response. Each view function is responsible for returning an HttpResponse object.
Step 4: In the next step to specify the root, URLconf at the webapp/urls.py path,
we need to write:

We have specified the paths for admin, index and home.
Step 5: To run the app, we have to write:
$ Python manage.py runserver
Step 6: For migration, to create the tables in the database, we need to write the command:
$ Python manage.py migrate
Step 7: To create the models we will write:

here we have created models for Question, Choice and Board.
Finally the output is:

Source: Django
0 notes
Text
The Top 10 media options for Mobile Advertising and how you can use them?
Mobile Advertising is vital for better visibility today…It has become increasingly important to be at the right place at the right time and since mobile goes where the person goes, your ads can capture user attention more effectively. In an ever-growing mobile space, marketers have to focus on right sources that can help them reach their target audience optimally. Taking cues from AppsFlyer, this article will help you look into some of the best media sources for mobile ads.
Quick Refresher! What is Mobile Advertising?
Mobile advertising is advertising on mobile devices like smart phones,tablets or PDAs with wireless connections. Advertising could be done through SMS, MMS, or advertisements in apps that are location based, banner, interstitial, native or video ads. These are generally personalized ads capitalizing on user preference or location.
Here are the top 10 best performing mobile advertising options:
AppsFlyer, an analytics company recently released its V edition of Performance Index ranking the best media sources in mobile advertising for the period January to June 2017. It evaluated 250 media networks, 6 billion installs, 5500 apps and 80 billion sessions. These rankings measured three factors volume, retention score and average sessions per user. Here are the ten that made it to the universal power rankings. For the detailed report click here.
Rankings
Gaming
Non-Gaming
1
Facebook
Facebook
2
Google AdWords
Google AdWords
3
Unity Ads
Search Ads
4
Search Ads
Twitter
5
APPLovin
AdColony
6
Chartboost
Vungle
7
Vungle
AppLovin
8
AdColony
MundoMedia
9
LiftOff
YouAppi
10
Twitter
CM
So what could these Power Rankings mean for your business?
Let’s take a bird’s eye view of what some of these media sources have to offer and how you could leverage them for your mobile marketing goals:
1. As Facebook emerges as a titan, it naturally makes for a good habitat for your brand. Facebook has their own Ads Manager mobile site and Ads Manager App. Using the app, you can create and edit ads, manage their budgets and schedules, monitor their performance and get push notifications. The Ads Manager app helps you manage your campaigns on-the-go. If you are looking to expand your campaigns beyond Facebook to mobile apps,then Facebook's Audience Network is for you. It’s a neat collection of mobile apps where Facebook advertisers can serve ads using a range of analytical and targeting tools. Advertisers can even enable “Audience Network” in placement section for FB to run ads on a particular Audience Network.
2. Tech giant Google is not far behind in this race. Just like Facebook Ads Manager, Google Adwords allows you to be where your user is. There are a plethora of options, with the kind of ads you want to choose from search-based ads, display ads, mobile app ad, even video ads. Like FB’s Ads Manager app, you can measure how your ads are performing, optimize your ads and manage your budgets. Google Adwords provides a lot of flexibility to reach a global or local audience. To monetize your mobile app through in-app advertising Google also has AdMob. Display ads as banner, interstitial, video or native ads. You can optimize your revenues by adjusting positions of other ad networks in AdMob mediation stack.
3. Search Ads by Apple offers high ROI, good quality audience and increased visibility. A basic plan lets you pay only for installs, track ad performance and requires minimal management. You can put your marketing expertise to use by using the Advanced plan, in which case you can decide your keywords and audience, view detailed reports and pay per click.
Eager to know more about IoT and Mobile Trends to Watch in 2018? Catch what Adam Fingerman, Co-Founder and Chief Experience Officer, ArcTouch has to say.
4. Social media heavyweight Twitter, also qualifies to be one of the best sources of retention.
5. Then there’s Unity Ads who spearheaded integration of video ads as part of mobile games. It helped monetize the entire player base with ‘rewarded’ videos. Ads are a natural part of games and offer high Average Revenue Per User (ARPU).
6. AppLovin targets and reengages existing audiences and retains them based on previously downloaded applications while trying to match new customers based on their age, roigender, family income etc.
7. AdColony a mobile video advertising networking platform has a wide reach. If you want to reach a global target audience AdColony provides you with a responsive user-base. Pre-roll videos are highly engaging as it selects quality ad content and can serve videos to all kinds of devices, at all kinds of speed.
8. Vungle:- To attract audiences, Vungle uses engaging and interactive videos. Vungle’s Programmatic offering includes premium inventory, scalable ad buying and easy access. Vungle uses engaging and interactive videos. Vungle’s Programmatic offering includes premium inventory, scalable ad buying and easy access.
AppsFlyer results also saw a high surge in video ad based retention. If a user has previously seen a video preview of a game, he is more likely to engage in the game. So Vungle, AdColony, UnityAds might just be the next trending networks.
9. Chartboost helps you keep your user base together. Chartboost targets gamers primarily, so publishers choose to promote new game apps within existing gaming apps. It focuses on installs and gamers who are generally interested in new alternatives from a rich user base. This platform also provides analytics that can be used as insights to improve campaigns.
10. Millennial Media provides a bouquet of advertising options across all device types and OS platforms. It offers self service solutions for developers to run their own brand ads.
Some others that could be on your watch list could be MundoMedia, LiftOff, YouAppi, CM, LeadBolt, Smaato, Supersonic, StartApp, InMobi and Flurry. There is no dearth of options available in the fast-evolving world of mobile advertising. But marketers need to first have clarity on whom they want to reach, and what the outcomes should be, in order to zero in on the best media platform for their ads.
.global table td { padding: 0px !important; border-bottom: 1px solid #717171; }
This article was first appeared on MarTech Advisor
0 notes
Text
MP4 video downloader With Admob Native & Startapp (Full Applications)
=== DOWNLOAD APK TO TEST === ==Admob== http://www.mediafire.com/file/ebezfqgys2qmhgl/mp4downloader_appmobicreator.apk https://mega.nz/#!UigyDSxA!yfHC45nodRpeFNxC8uJlmdHr6bm2Fw2HgRNwtxVH_D8 ==Startapp== http://www.mediafire.com/file/gc7b73no88f8gf1/mp4downloader_startapp_appmobicreator.apk https://mega.nz/#!gqpzWbiS!pJyZ63Gle6pI1kOz9VTfINbJsnHCjt4KdskWbu3Yjkk One of the best tool to download any MP4 videos from any websites MP4 video downloader is android application that let you to download any video from website while you watching it . once when you download all videos you can watch them without connection any time for free and also have more ability to share MP4 video with your friends or social network . features : Android Studio 100% Easy to Reskin you ca upload to playstore directly Simple Interface for app MP4 video downloader Download video MP4 from Websites Compatibility With Marshmallow android 6.+ & Nougat Easily Download Image, GIF and Video From SOcial Network Simple Interface for app MP4 video downloader Admob Banner , Interstitial and Native ADS Integration StartApp Banner & Interstitial Download MP4 video from Direct Link Search video MP4 from websites Settings Activity Quick and easy Manager video Ability to share video to your friends or social network watching movie video without connection after downloading for free 100%.
0 notes
Text
#custom mobile app development services#ios app development#mobile game development#app development#android app development#mobile app development#quick startapps#web development#app development company#software development
1 note
·
View note
Photo


Google+ does not support the function like Twitter's timeline or Facebook's page-plugin. But it is possible to implement the similar function by utilizing Google+ API and embedded post function.
Open Google API console from here and create a project by following this guide. Download JavaScript quick-start app and unzip gplus-quickstart-javascript-master.zip. You will be able to utilize quick-start app by replacing YOUR_CLIENT_ID in the index.html by the Client ID which is got from API console. (The download file is compressed and you need to open the file's page source and download.)
Since it is just showing profile modify it to show timeline as follows.
<!DOCTYPE html> <html> <head> <title>Google+ Follow</title> <script src="//ajax.googleapis.com/ajax/libs/jquery/2.1.4/jquery.min.js" ></script> <meta name="google-signin-client_id" content="YOUR_CLIENT_ID"></meta> <script src="https://apis.google.com/js/platform.js" async defer> {"parsetags": "explicit"} </script> <script> $(function() { $.fn.appendFrame = function(width,height,rate,i){ $(this).append($("<div style=\"width:" + width + "px;height:" + height + "px;overflow-x:hidden;border:0 solid #999\"><div style=\"width:" + width + "px;height:" + height + "px;overflow:hidden;\"><div id=\"activity" + i +"\" style=\"transform:scale(" + rate + ");-o-transform:scale(" + rate + ");-webkit-transform:scale(" + rate + ");-moz-ransform:scale(" + rate + ");-ms-transform:scale(" + rate + ");transform-origin:0 0;-o-transform-origin:0 0;-webkit-transform-origin:0 0;-moz-transform-origin:0 0;-ms-transform-origin:0 0;\"></div></div></div>")); } width = window.innerWidth; height = Number(width) + 100; rate = (window.innerWidth)/495; for (i=0;i<20;i++) $("#embedded").appendFrame(width, height, rate, i); } }); </script> </head> <body style="overflow: scroll"> <div style="padding:10px;display:table;width:100%"> <a href="https://plus.google.com/collection/A5trkB" target="_blank" style="text-decoration: none;"><div id="image"></div> <h3>Japanese Manga Review</h3></a></div> <div id="embedded"></div> <div id="gConnect"> <div id="signin-button"></div> </div> <div id="authOps" style="display:none"> <button id="disconnect" >Disconnect your Google account from this app</button> </div> <div id="loaderror"> This section will be hidden by jQuery. If you can see this message, you may be viewing the file rather than running a web server.<br /> The sample must be run from http or https. See instructions at <a href="https://developers.google.com/+/quickstart/javascript"> https://developers.google.com/+/quickstart/javascript</a>. </div> <script type="text/javascript"> var auth2 = {}; var helper = (function() { return { onSignInCallback: function(authResult) { $('#authResult').html('Auth Result:<br/>'); for (var field in authResult) { $('#authResult').append(' ' + field + ': ' + authResult[field] + '<br/>'); } if (authResult.isSignedIn.get()) { $('#authOps').show('slow'); $('#gConnect').hide(); helper.activities(); } else { if (authResult['error'] || authResult.currentUser.get().getAuthResponse() == null) { console.log('There was an error: ' + authResult['error']); } $('#authResult').append('Logged out'); $('#authOps').hide('slow'); $('#gConnect').show(); } console.log('authResult', authResult); }, disconnect: function() { auth2.disconnect(); }, activities: function() { gapi.client.plus.activities.list({ 'userId': 'me', 'collection': 'public' }).then(function(res) { var activities = res.result; $('#activities').empty(); var temp = {}; for (var activityIndex in activities.items) { activity = activities.items[activityIndex]; if ( activityIndex == 0 ) { $('#image').empty(); $('#image').append('<img src="' + activity.actor.image.url + '" align="left" hspace="10">'); } temp['href'] = activity.url; gapi.post.render("activity" + activityIndex, temp); } }); } }; })(); $(document).ready(function() { $('#disconnect').click(helper.disconnect); $('#loaderror').hide(); if ($('meta')[0].content == 'YOUR_CLIENT_ID') { } }); var updateSignIn = function() { console.log('update sign in state'); if (auth2.isSignedIn.get()) { console.log('signed in'); helper.onSignInCallback(gapi.auth2.getAuthInstance()); }else{ console.log('signed out'); helper.onSignInCallback(gapi.auth2.getAuthInstance()); } } function startApp() { gapi.load('auth2', function() { gapi.client.load('plus','v1').then(function() { gapi.signin2.render('signin-button', { scope: 'https://www.googleapis.com/auth/plus.login', fetch_basic_profile: false }); gapi.auth2.init({fetch_basic_profile: false, scope:'https://www.googleapis.com/auth/plus.login'}).then( function (){ console.log('init'); auth2 = gapi.auth2.getAuthInstance(); auth2.isSignedIn.listen(updateSignIn); auth2.then(updateSignIn); }); }); }); } </script> <script src="https://apis.google.com/js/client:platform.js?onload=startApp"></script> </body> </html>
It will be shown like this by calling the above in iframe or child dialog.
0 notes
Text
Bored of this market?
Need a rush while earning $XVM?
Scribbles have just landed on TG with our own Tap To Earn 🚰
One finger is all it takes 😉
https://t.me/scribbld_bot/start?startapp=1153818159
Let’s earn crypto rewards together with this fun tap-to-earn game. Quick and easy tasks for big rewards. Ready to join? Tap the link!🚀

0 notes
Text
#custom mobile app development services#ios app development#mobile game development#app development#web development#android app development#mobile app development#app development company#software development#quick startapps
1 note
·
View note
Text
youtube
How to Develop Apps | Introduction to Android Studio
Quick Startapps is extremely experienced in building a wide array of social apps, productivity apps, games, and e-commerce apps for brands around the world.
BUY SOURCE CODE & AIA FILES
https://quickstartappss.com/store/
WE DEVELOP ANDROID & IOS APPS, WEBS APPS AND GAMES
Do you want to build your dream project? Contact us
Whats App: https://wa.me/923325592620
Mobile: +923325592620
Facebook: / quickstartapps
Email: [email protected] Website: https://quickstartappss.com/
Office Located at: Office # 09, Lower Ground Akbri Plaza, MPCHS E-11/1, Islamabad Pakistan
Pin Location: https://goo.gl/maps/Y6NMVugbi6exdjh98
#mobile app developer#app developers#quick startapps#mobile app developer course#android studio#android app development tutorial for beginners bangla#android development#android studio tutorial for beginners#ios app development#software company#web development#software development#mobile game development#custom mobile app development services#Youtube
1 note
·
View note

