#reactnativecourse
Explore tagged Tumblr posts
Visit Tumblr Blog
Explore Tumblr blogs with no restrictions, modern design and the best experience.
Last Seen Tumblr Blogs


Fun Fact
Celebrities use Tumblr as well.
Text

0 notes
Text
0 notes
Photo

The institute has tie-ups with leading IT companies and helps students in job placement after the completion of their courses.Croma Campus is an Indian training institute that provides various courses in software development, data science, digital marketing, and more.
0 notes
Link
Bismilsoft One Of the Best IT Training Course Are you just starting to learn React Native and you are already overwhelmed by those “big words” in the production?
0 notes
Text

Join our free Demo Session on the React JS Course at React Masters with 100% placement assistance and weekly mock interviews.
Date: 05.02.2025
Time: 8.00 PM
Mobile :+918466044555
#react js online training#placement service#reactnative#job support#reactjscourse#mock interviews#react course#web design#web development#reactnativecourse#reactjs
1 note
·
View note
Text
React Native Reanimated Installation
React Native Reanimated is a powerful library that creates smooth, complex animations in React Native applications.
This article walks you through its installation process while covering essential topics related to React Native development.
What is React Native?
React Native is a popular open-source framework created by Meta (formerly Facebook) that allows developers to build mobile applications for iOS and Android using JavaScript and React.
With React Native, you can create cross-platform apps with a single codebase, reducing development time and cost.
Why is React Native Good?
Cross-Platform Development: Write once, run on both iOS and Android.
Large Community Support: React Native has a vast and active developer community for support.
Reusable Components: React Native allows code reuse, making development efficient.
Performance: By utilizing native components, React Native ensures near-native performance.
Integration with Native Code: You can integrate React Native with existing native apps and third-party libraries.
What is React Native Gesture Handler?
React Native Gesture Handler is an essential library for handling touch gestures in React Native applications. It provides advanced gesture recognition and makes animations and interactions smoother and more intuitive.
Why Use React Native Gesture Handler?
It reduces the complexity of handling gestures in mobile apps.
Works seamlessly with libraries like React Native Reanimated to create fluid animations.
Offers better performance compared to React Native’s built-in gesture system.
Using React Native CLI for Development
React Native CLI is the official tool for creating and managing React Native projects. It provides full control over the development process.
How to Install React Native Using CLI
Install Node.js: Download and install Node.js from the official website.
Install React Native CLI:bashCopyEdit
npm install -g react-native-cli
3. Create a New Project :
react-native init MyProject
4. Start the Development Server:
cd MyProject npx react-native run-android
React Native Reanimated Installation
React Native Reanimated is a library designed to handle complex animations with smooth performance. Follow these steps for installation:
Step 1: Install Dependencies
Ensure you have React Native and React Native Gesture Handler installed:
npm install react-native-gesture-handler react-native-reanimated
Step 2: Configure Babel Plugin
Add the react-native-reanimated/plugin to your babel.config.js file:
module.exports = { presets: ['module:metro-react-native-babel-preset'], plugins: ['react-native-reanimated/plugin'], };
Step 3: Link Native Modules
For React Native versions below 0.60, use:
react-native link react-native-reanimated
Step 4: Rebuild the Project
Run your project after installation:
npx react-native run-android npx react-native run-ios
Common Issues During Installation
Babel Plugin Errors: Ensure the plugin is correctly added to babel.config.js.
Build Failures: Clear the cache using:
npm start --reset-cache
Dependency Mismatch: Verify compatibility between React Native, Reanimated, and Gesture Handler versions.
Final Thoughts
React Native Reanimated is a must-have library for developers aiming to create visually appealing and interactive mobile applications.
When paired with React Native Gesture Handler, it elevates the user experience with smooth animations and responsive gestures.
Start exploring React Native Reanimated today, and bring your app’s animations to life!
#reactjs#react js online training#reactjscourse#reactnative#react course#react native#web design#web development#reactnativecourse
1 note
·
View note
Text
The major difference between Redux vs Flux in React
When building large-scale React applications, managing the state effectively is crucial.
Both Redux and Flux are popular tools for state management, but they differ in approach and structure.
Let’s explore the key differences between these two architectures:
1. Architectural Style
Flux: Follows a unidirectional data flow. It has multiple stores, each responsible for specific parts of the application’s state.
Redux: Also adheres to a unidirectional flow but centralizes all state into a single store, ensuring simplicity and predictability.
2. Complexity
Flux: Requires developers to manage multiple stores, making it more complex for larger applications.
Redux: Simplifies state management with one store and eliminates redundancy, making it more scalable.
3. State Mutations
Flux: Allows state mutations directly within stores using the dispatcher.
Redux: Enforces immutability by utilizing pure functions called reducers for state changes, ensuring better control and debugging.
4. Debugging and Tooling
Flux: Lacks standardized tools, making debugging more manual and less efficient.
Redux: Offers powerful developer tools like the Redux DevTools, which provide time travel, action tracking, and state inspection.
5. Popularity and Community Support
Flux: Developed by Facebook, but its usage has diminished over time.
Redux: Gained wider adoption, with a strong community and extensive documentation.
Conclusion
While both Flux and Redux have their merits, Redux is generally preferred for its simplicity, robust tooling, and community support. However, developers may choose Flux for smaller projects requiring less structure.
#ReactJS#Redux#FluxArchitecture#WebDevelopment#StateManagement#FrontendDevelopment#TechInsights#ReactTools#react course#react js online training#reactnativecourse#placement service
0 notes
Text
Why Choose React Framework for Your Next Web Development Project?
Are you looking for a modern, efficient, and powerful framework to build your next web application? React, a popular JavaScript library developed by Facebook, might be the perfect choice for your project.
React is celebrated among developers and stands out in web development.
1. What is React?
React is a JavaScript library for building user interfaces, particularly single-page applications. It allows developers to create reusable components, making the development process faster, more efficient, and easier to maintain.
2. Key Features of React Framework
Component-Based Architecture: React applications are built using small, reusable pieces of code called components. This modular approach simplifies development and enhances reusability.
Virtual DOM: React uses a Virtual DOM, which improves app performance by updating only the components that have changed instead of re-rendering the entire page.
Unidirectional Data Flow: This feature ensures that data flows in a single direction, making debugging and state management more predictable.
Rich Ecosystem: React has a vast ecosystem of libraries and tools, allowing developers to build robust and feature-rich applications.
3. Advantages of Using React
Fast Rendering: Thanks to the Virtual DOM, React offers blazing-fast rendering speeds.
Scalability: React is suitable for projects of all sizes, from small websites to large-scale applications.
Community Support: With an active and large developer community, you’ll find solutions, libraries, and tutorials for almost any challenge.
SEO-Friendly: React allows developers to build applications that are optimized for search engines, enhancing visibility.
4. Why React is a Developer's Favorite
React’s simplicity and flexibility make it an ideal choice for both beginners and experienced developers.
Its syntax is easy to learn, especially if you have a basic understanding of JavaScript.
Furthermore, its ability to integrate seamlessly with other libraries and frameworks offers endless possibilities for creating dynamic, interactive web applications.
5. Use Cases of React
React is perfect for:
Single-page applications
E-commerce platforms
Social media applications
Interactive dashboards
Progressive Web Apps (PWAs)
Start Your React Journey Today!
React is more than just a framework; it's a revolution in web development.
Whether you’re building a simple app or a complex interface, React can help you achieve your goals efficiently and effectively.
If you’re eager to learn React, now is the time! Enroll in a React course or explore its extensive documentation to start building amazing web applications.
👉 Ready to dive into React? Let’s build something extraordinary!
Feel free to share your thoughts or questions about React in the comments below. Let’s keep the conversation going! 🚀
#ReactJS #WebDevelopment #JavaScript #ReactFramework #CodingLife
#react js online training#react course#reactnative#placement service#reactnativecourse#job support#web design#reactjscourse#web development#reactjs#reactframework#reactjsframework
0 notes
Text

What is Lazy Loading?
Lazy loading, or "code-splitting," is a process where code or resources are loaded only when they are required. In a typical React application, if all components are loaded at once, it can lead to performance issues, especially if the application has many large or resource-heavy components. By lazy loading, React applications can load components incrementally, which results in faster load times and reduced resource usage.
For example, if a user is on the homepage of a web application, there’s no need to load components for other pages, such as "About" or "Contact," until the user navigates to those pages. Lazy loading ensures that only the homepage components are initially loaded, keeping the app lightweight.
Here’s how to implement lazy loading in React:
Using React.lazy(): Wrap the component you want to lazy load with React.lazy().
Using Suspense for Fallback UI: Place the lazy-loaded component within a Suspense component and define a fallback UI for when the component is loading.
#react course#reactnative#job support#lazy loading#reactnativecourse#web design#placement service#react js online training#web development#reactjs#reactjscourse
0 notes
Text
State Management in React
🌟 Understanding State Management in React JS 🌟
React's state management is key to building dynamic and responsive apps, but as apps grow, managing state can get tricky! Here’s a quick overview:
🔄 What is State Management?
State management in React handles and shares data across components. Think of it as a way to keep your app’s data flow smooth, making sure each component displays the right data at the right time!
💡 Why is it Important?
1️⃣ Consistency: Keeps the UI up-to-date with the latest data 2️⃣ Performance: Avoids unnecessary re-renders 3️⃣ Scalability: Essential for large, complex applications
⚙️ Tools for State Management
useState & useReducer: Great for managing local state in functional components
Context API: Ideal for simple global state
Redux & MobX: Perfect for larger applications needing centralized state
Understanding React JS state management is the first step to mastering React! #ReactJS #StateManagement #WebDevelopment
#react js online training#reactnative#job support#reactjscourse#reactnativecourse#web development#placement service
0 notes
Text
React Router Installation and Configuration
A Comprehensive Guide to React Router: Installation and Configuration
React Router is an essential library for creating dynamic and navigable single-page applications (SPAs) in React. It enables developers to map different URLs to specific components, allowing users to navigate between pages without the need to reload the entire application. In this article, we will cover the installation and basic configuration of React Router, setting you up to create efficient and user-friendly web applications.
1. Why Use React Router?
React Router is widely used in React applications due to its flexibility and powerful features. It allows you to:
Manage Navigation: Seamlessly handle navigation between different components or pages.
Dynamic Routing: Create dynamic routes that respond to user inputs or interactions.
Nested Routes: Organize your application with nested routes, allowing complex UI structures.
Easy Redirection: Implement redirections and conditional rendering based on user actions or authentication status.
2. Installation of React Router
To start using React Router, you first need to install it. React Router has different packages for web and native applications. For web applications, you'll use react-router-dom. Follow these steps to install React Router in your React project:
Install React Router: Open your terminal in the root directory of your React project and run the following command:
npm install react-router-dom
Or if you're using Yarn: yarn add react-router-dom
Update Your React Project: Ensure that your React project is up-to-date with the latest versions of React and React DOM to avoid any compatibility issues.
3. Basic Configuration of React Router
Once installed, you can configure React Router in your application. Here’s how you can set up basic routing:
Import BrowserRouter: In your index.js or App.js file, import BrowserRouter from react-router-dom. This component wraps your entire application and enables routing.
import { BrowserRouter as Router } from 'react-router-dom';
Create Routes: Define your routes within the Router component using Route components. Each Route specifies a path and the component that should render when the path matches the URL.
import { Route, Switch } from 'react-router-dom'; import Home from './components/Home'; import About from './components/About'; function App() { return ( <Router> <Switch> <Route exact path="/" component={Home} /> <Route path="/about" component={About} /> </Switch> </Router> ); }
<Switch>: Ensures that only one route is rendered at a time.
<Route>: Defines individual routes; the exact prop ensures the route only matches the specified path exactly.
Linking Between Routes: To navigate between different routes, use the Link component from react-router-dom instead of traditional anchor tags.
import { Link } from 'react-router-dom'; function Navbar() { return ( <nav> <Link to="/">Home</Link> <Link to="/about">About</Link> </nav> ); }
4. Advanced Configuration
React Router offers advanced configurations, such as nested routes, route parameters, and programmatic navigation.
Nested Routes: To create nested routes, simply nest Route components within each other.
Route Parameters: Use parameters in paths to capture dynamic values from the URL.
Programmatic Navigation: Use the useHistory or useNavigate hooks to navigate programmatically within your components.
5. Conclusion
React Router is a robust tool for managing navigation in React applications. With simple installation and configuration, you can create a fully navigable single-page application. By understanding the basics of routing and how to implement them, you can enhance the user experience and create more dynamic web applications. As you become more familiar with React Router, you can explore its advanced features to further optimize your application’s navigation.
#reactjscourse#job support#react js online training#placement service#reactjs#reactnativecourse#web development#web design
0 notes
Text
Importance of React Router Properties
Hey Tumblr friends! 🌟 Today, let's dive into the essentials of React Router, the go-to library for routing in React applications. Here's a snapshot of React Router & its key properties:
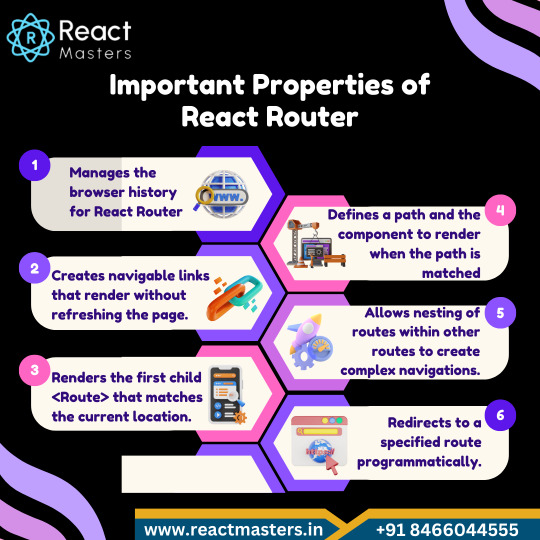
Declarative Routing 📝
Define routes using JSX, making your routing logic intuitive and readable.
Dynamic Routing 🚀
Handle dynamic segments in your URL, perfect for user profiles or product pages.
Nested Routes 🌳
Organize your routes in a hierarchical manner, mirroring your app's structure.
Route Matching 🔍
React Router matches routes intelligently, offering flexibility with exact and partial matches.
History Management 🕰️
Seamlessly integrates with browser history, enabling navigation controls like back and forward.
URL Parameters & Query Strings 🔗
Pass data through the URL, making your app's state sharable and bookmarkable.
Redirection & Authentication 🔒
Easily manage access control and redirection, crucial for protected routes.
React Router transforms how we navigate React apps, making routing clear and powerful. Whether you're building a simple site or a complex web app, it’s a must-have in your toolkit! 🛠️💖
#react js online training#reactjscourse#reactnativecourse#reactnative#react course#web development#job support#placement service#react router
1 note
·
View note
Text
Concept of React Router
React Router is a powerful library that enables seamless navigation and routing in React applications. Understanding the core concepts of React Router is essential for building dynamic, user-friendly single-page applications. This guide covers the fundamental concepts and provides practical examples to help you master React Router.
Core Concepts of React Router
1. Router Component
The Router component is the foundation of React Router. It wraps your entire application and enables routing functionality.
BrowserRouter: Uses the HTML5 history API to keep your UI in sync with the URL.
HashRouter: Uses the hash portion of the URL (i.e., window.location.hash) to keep your UI in sync with the URL.
import { BrowserRouter } from 'react-router-dom';
function App() { return ( ); }
export default App;
2. Route Component
The Route component is used to define a mapping between a URL path and a component. It renders the specified component when the URL matches the path.
import { Route, Routes } from 'react-router-dom';
function App() { return ( } /> } /> } /> ); }
function Home() { return
Home Page
; }
function About() { return
About Page
; }
function Contact() { return
Contact Page
; }
3. Link Component
The Link component is used to create navigational links in your application. It works similarly to an HTML anchor tag but prevents full-page reloads.
import { Link } from 'react-router-dom';
function Navbar() { return ( Home About Contact ); }
4. useNavigate Hook
The useNavigate hook allows you to programmatically navigate to different routes.
import { useNavigate } from 'react-router-dom';
function Home() { const navigate = useNavigate();
const goToAbout = () => { navigate('/about'); };
return (
Home Page
Go to About ); }
5. Dynamic Routing
Dynamic routing allows you to pass parameters through the URL. This is useful for creating pages that depend on dynamic data, such as user profiles or product details.
import { useParams } from 'react-router-dom';
function App() { return ( } /> ); }
function User() { const { id } = useParams(); return
User ID: {id}
; }
6. Nested Routes
Nested routes allow you to define routes within other routes. This is particularly useful for layouts that require sub-sections, such as dashboards.
function Dashboard() { return (
Dashboard
} /> } /> ); }
function Profile() { return
Profile Page
; }
function Settings() { return
Settings Page
; }
7. Protected Routes
Protected routes restrict access to certain parts of your application based on authentication status.
import { Navigate } from 'react-router-dom';
function ProtectedRoute({ element, isAuthenticated }) { return isAuthenticated ? element : ; }
function App() { const isAuthenticated = false; // Replace with actual authentication logic
return ( } /> } /> } />} /> ); }
8. Handling 404 Pages
Handling 404 pages ensures that users are informed when they navigate to an undefined route.
function NotFound() { return
404 Not Found
; }
function App() { return ( } /> } /> } /> ); }
Diagram: Basic React Router Flow
graph LR A[BrowserRouter] --> B[Routes] B --> C[Route path="/"] B --> D[Route path="/about"] B --> E[Route path="/contact"] B --> F[Route path="*"] C --> G[Home] D --> H[About] E --> I[Contact] F --> J[NotFound]
Conclusion
Mastering React Router is crucial for building efficient and user-friendly React applications. By understanding and utilizing its core concepts—such as Router, Route, Link, and dynamic routing—you can create a seamless navigation experience for your users. Explore these concepts further and practice implementing them to enhance your React development skills.
Hope you liked the article on React Router for any query visit: https://reactmasters.in/ or free demo sessions kindly contact us at Mob:+91 84660 44555
0 notes
Text
React JS Training at React Masters
Hey everyone! 👋
🌙✨ Eid Mubarak from React Masters! ✨🌙
To all our incredible learners and team members at React Masters, we wish you a joyous and blessed Eid! May this special occasion bring you happiness, peace, and prosperity.
As we celebrate the end of Ramadan, we reflect on the values of perseverance, learning, and growth — qualities that we see every day in our React training sessions. Whether you’re just beginning your journey with React or honing your advanced skills, your dedication and enthusiasm inspire us.
On this festive day, we hope you find time to relax, enjoy delicious food, and cherish moments with your loved ones. Let’s take this spirit of unity and community back to our coding sessions, where every line of code contributes to building a brighter future together.
🌐 Happy Coding and Eid Mubarak! 🌐

Are you ready to take your web development game to the next level? 🚀 Join us at React Masters for an immersive and hands-on training experience in React.js!
Why React Masters?
Expert Instructors: Learn from industry professionals who have mastered React and have years of real-world experience.
Comprehensive Curriculum: From the basics to advanced concepts, we've got you covered.
Hands-On Projects: Build real-world applications and get practical experience.
Community Support: Join a vibrant community of learners and mentors who are there to support you every step of the way.
Flexible Learning: Online and in-person options to suit your schedule.
What You’ll Learn:
React Fundamentals: Components, Props, State, and Lifecycle.
Advanced Concepts: Hooks, Context API, and Performance Optimization.
State Management: Redux and other state management tools.
Real-world Applications: Deploying and maintaining React applications.
Ready to become a React pro? Enroll now and transform your skills! 🌐
🔗 Sign Up Today: www.reactmasters.in
📸 Follow Us for updates and free tutorials!
Twitter: https://x.com/Reactmasters_
Instagram: https://www.instagram.com/reactmasters.in/
Facebook: https://www.facebook.com/reactmasters/
Let’s build something amazing together! 💻✨
#react js online training#reactjs#reactnativecourse#job support#web design#placement service#react course
0 notes
Text
REACTJS STATE MANAGEMENT
Table of Contents
Introduction
Understanding State in ReactJS
Why State Management is Crucial
Types of State in ReactJS
Local State
Global State
Server State
URL State
Common State Management Libraries in ReactJS
Redux
Context API
MobX
Recoil
React Native State Management
Best Practices for State Management in ReactJS
Examples of State Management in ReactJS
Simple Counter App
Todo List App
Advanced State Management Techniques
Middleware in Redux
Using Hooks for State Management
Challenges and Limitations of State Management in ReactJS
Future Trends in State Management
Conclusion
1. Introduction
State management is a fundamental aspect of ReactJS, a popular JavaScript library used for building user interfaces. It ensures that your application behaves predictably and efficiently by managing the state of different components. This article provides a comprehensive overview of ReactJS state management, covering various types, libraries, best practices, and real-world examples.
2. Understanding State in ReactJS
In ReactJS, state refers to a JavaScript object that holds dynamic information about a component. This data can change over time, leading to re-rendering of the component to reflect the latest state. Proper state management is vital for maintaining consistency and performance in your application.
3. Why State Management is Crucial
State management is crucial because it helps in:
Maintaining a consistent user interface
Managing data flow between components
Optimizing performance by preventing unnecessary re-renders
Ensuring that components remain decoupled and manageable
4. Types of State in ReactJS
4.1 Local State
Local state is confined to a single component. It is managed using the useState hook in functional components or the this.state and this.setState in class components.
4.2 Global State
Global state is shared across multiple components. It is typically managed using state management libraries like Redux or Context API.
4.3 Server State
Server state refers to data fetched from an external server. It is managed using data-fetching libraries like Axios or SWR, and needs to be synchronized with the local state.
4.4 URL State
URL state is part of the URL query string or path. It is useful for maintaining navigation state and can be managed using React Router.
5. Common State Management Libraries in ReactJS
5.1 Redux
Redux is a widely used state management library that follows a strict unidirectional data flow. It involves three core concepts: actions, reducers, and the store.
5.2 Context API
The Context API is a built-in feature of React that allows you to share state across components without prop drilling. It is suitable for small to medium-sized applications.
5.3 MobX
MobX is a reactive state management library that simplifies the management of observable state. It is known for its simplicity and ease of use.
5.4 Recoil
Recoil is a state management library for React that provides a more flexible approach than Context API or Redux. It allows you to create shared state and derived state.
6. React Native State Management
State management in React Native follows the same principles as ReactJS, with additional considerations for mobile app performance. Libraries like Redux and Context API are commonly used, along with AsyncStorage for persisting state.
7. Best Practices for State Management in ReactJS
Use local state for simple, isolated components
Use global state management for shared data
Avoid excessive state nesting
Normalize state shape
Keep state minimal and relevant to UI
Use memoization and selectors to optimize performance
8. Examples of State Management in ReactJS
8.1 Simple Counter App
A simple counter app demonstrates basic local state management using the useState hook.
8.2 Todo List App
A todo list app illustrates more complex state management, involving local state for individual items and global state for the list.
9. Advanced State Management Techniques
9.1 Middleware in Redux
Middleware in Redux allows for handling side effects, such as asynchronous actions or logging. Popular middleware libraries include Redux Thunk and Redux Saga.
9.2 Using Hooks for State Management
React hooks like useReducer and useContext provide powerful tools for managing state and side effects in functional components.
10. Challenges and Limitations of State Management in ReactJS
Complexity in managing large applications
Performance issues with deep state trees
The learning curve for libraries like Redux
Boilerplate code in some state management patterns
11. Future Trends in State Management
Future trends in state management may include:
Improved integration with server-side rendering (SSR)
More declarative state management approaches
Enhanced tooling for debugging and performance optimization
Wider adoption of newer libraries like Recoil
12. Conclusion
Effective state management is essential for building robust and scalable ReactJS applications. By understanding the various types of state, leveraging appropriate libraries, and following best practices, developers can ensure their applications remain performant and maintainable.
#react js online training#reactjs#reactjscourse#placement service#job support#reactnative#react course#web design#reactnativecourse#teaching#reactstatemanagement#react developer tools
1 note
·
View note
Text

Hey Tumblrs! 🌟
Today, let's dive into the world of React, one of the hottest libraries for building user interfaces. Whether you're a seasoned developer or just getting started, understanding the ins and outs of React can give you a serious edge. So, let's explore the advantages and disadvantages of React!
🌟 Advantages of React
1. Component-Based Architecture
React's component-based architecture allows you to build encapsulated components that manage their own state. This modular approach makes your code more readable, maintainable, and reusable.
2. Virtual DOM
React uses a virtual DOM to optimize updates, making it incredibly fast. The virtual DOM updates only the parts of the actual DOM that have changed, improving performance and providing a smoother user experience.
3. Reusable Components
React encourages the creation of reusable components. This means you can build a library of components that can be used across different parts of your application, saving time and effort.
4. Strong Community Support
With a large and active community, React boasts extensive resources, libraries, and tools. Whether you're looking for tutorials, plugins, or support, the React community has got your back.
5. SEO-Friendly
React's ability to run on the server side helps improve SEO. With server-side rendering (SSR), search engines can crawl your pages more effectively, boosting your website's visibility.
🚫 Disadvantages of React
1. Steep Learning Curve
React has a learning curve, especially if you're new to JavaScript frameworks. Understanding JSX, components, and state management can be challenging at first.
2. Rapidly Changing Environment
The React ecosystem evolves quickly, with frequent updates and new tools. Keeping up with the latest changes can be daunting, especially for those who prefer a more stable environment.
3. Complex State Management
Managing state in larger applications can become complex. While libraries like Redux help, they also add additional layers of complexity and require more learning.
4. Lack of Official Documentation for Some Libraries
While React's core documentation is excellent, some third-party libraries and tools may lack comprehensive documentation, making it harder to integrate and use them effectively.
5. JSX Syntax
JSX, while powerful, can be off-putting for new developers. It mixes HTML with JavaScript, which can be confusing and lead to a steeper initial learning curve.
Conclusion
React is a powerful tool for building dynamic and high-performing user interfaces. Its advantages, like component reusability and strong community support, make it a top choice for many developers. However, it's essential to be aware of its disadvantages, such as the steep learning curve and rapidly changing environment.
What do you think about React? Share your thoughts and experiences in the comments below! 👇 Let’s chat!
Happy coding! 💻✨
#react js online training#reactnative#job support#placement service#reactjs#reactnativecourse#web development#web design#web developers
0 notes