#redirect url in php
Explore tagged Tumblr posts
Visit Tumblr Blog
Explore Tumblr blogs with no restrictions, modern design and the best experience.
Last Seen Tumblr Blogs


Fun Fact
Tumblr was the first site to host the blog for President Barack Obama in 2011.
Text
I might actually cry that my favorite digital exhibit from the Honolulu Museum of Art is gone, and I can't even view it on the wayback machine because it used dynamic php url redirects (?) to render.
RIP to Tongue in Cheek: Erotic Art in 19th Century Japan. feels like shit just want her back. i recognize this sounds like a punchline but perhaps if we experienced the full spectrum of the human experience in art, and not, like, sanitized fragments of it, it would not. but we can't even have that because Tongue in Cheek: Erotic Art in 19th Century Japan is down.
6 notes
·
View notes
Text
Notes de mise à jour
🌟 Nouveautés
Nous avons préparé un guide (en anglais) décrivant comment concevoir un script PHP pour accéder à Tumblr. Un exemple précise notamment comment lister vos mutus et classer vos abonnements par ordre de publication décroissant.
Sur Android, le design du processus d'activation de Blaze a été revu et corrigé, le rendant ainsi davantage détaillé et compréhensible.
Sur le Web, les anciens raccourcis claviers (ALT+C, ALT+R, ALT+Q) ne déclenchent à présent plus d'avertissement mettant en lumière l'existence des nouveaux raccourcis quand ils sont utilisés. Petit rappel : il suffit d'appuyer sur C pour créer un nouveau billet, tandis que les raccourcis permettant de rebloguer ou mettre en file d'attente instantanément un billet consulté sont respectivement SHIFT+R et SHIFT+Q.
Les URL de redirection de type "href.li" ne sont à présent plus prises en charge dans les liens des billets Tumblr.
🛠️ Correctifs
Les flux du tableau de bord étaient malencontreusement vides durant un bref laps de temps mardi 28 novembre avant qu'un correctif ne vienne résoudre le problème. Si vous rencontrez toujours l'anomalie, veuillez contacter notre support.
Correction sur le Web d'un problème qui faisait que la page Explorer ne se rechargeait pas correctement après s'être identifié.
Les horodatages affichés dans la messagerie instantanée sur le Web ont été remodelés : "Aujourd'hui" signifie bien… aujourd'hui, et pas une période pouvant prêter à confusion de "moins de 24 heures".
Correction sur le Web d'un bug dans la page File d'attente qui affichait systématiquement l'heure de programmation des billets au format UTC. Cette anomalie pouvait laisser penser qu'un billet allait être publié un jour avant/après la date prévue.
Correction d'un problème qui pouvait empêcher le générateur d'aperçu de liens de transformer les liens pointant vers Etsy en blocs Lien dans les billets.
Correction sur le Web d'une erreur fatale qui pouvait survenir lors de l'acquisition de badges à partir des paramètres du blog.
Mercredi 22 novembre, une anomalie a ralenti l'envoi de certains e-mails de réinitialisation de mot de passe. Le bug a été promptement résolu.
🚧 En cours
L'application iOS produit des erreurs fatales pour certains utilisateurs possédant d'anciens appareils. Ce problème est d'ores et déjà corrigé et une nouvelle version de l'appli est en cours d'examen chez Apple. Elle sera disponible dès que nous obtiendrons leur feu vert !
🌱 Prochainement
Il sera bientôt possible de mélanger aléatoirement et/ou de mettre en pause la publication de votre file d'attente directement depuis l'application iOS !
Vous rencontrez un problème ? Écrivez-nous (en anglais) et nous reviendrons vers vous aussi vite que possible !
Vous souhaitez nous faire part de vos commentaires ? Rendez-nous visite sur le blog Work in Progress et participez aux discussions de la Communauté !
Vous désirez soutenir financièrement Tumblr ? Consultez ce billet pour tout savoir, et jetez un œil à notre badge Mécène Tumblr directement sur TumblrMart !
16 notes
·
View notes
Text
Gophish Setup Guide: Launching Phishing Campaigns
Phishing Scenario : CASE 1 - Breaking news
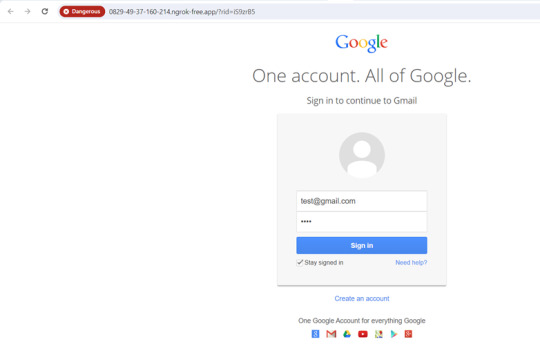
Objective: The objective of this phishing campaign is to lure employees into clicking a malicious link disguised as breaking news from the company. The landing page masqueraded as a Gmail sign-in page, prompting users to enter their login credentials. This page was designed to steal users' email account credentials.
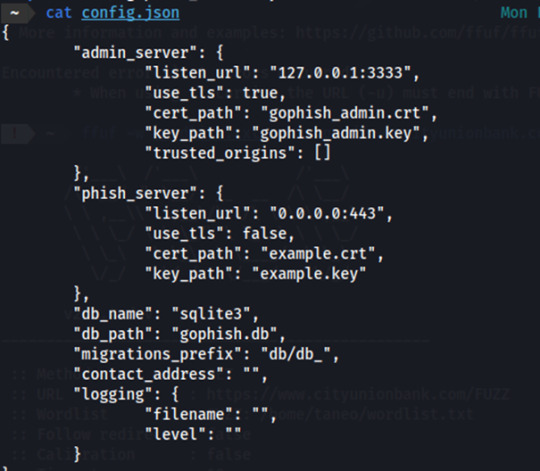
Install Gophish framework
Make the required changes in the config.json file
Launch Gophish and our first step would be to set up the sending profile by which we will send out phishing emails.
Let’s assume that the target company is using Gmail server
(When setting up the sending profile in Gophish using a Gmail account, you have to enable 2FA and give app access to Gophish)
Since our target company is using Gmail server, we will use Gmail email on our phishing campaign so we have set host as smtp.gmail.com:587. After creating the sending profile, we have to test if the sending profile works by sending a test email.
We're using the email address [email protected] as our designated Gmail account for sending phishing emails. Make sure to include the password that was generated when granting Gophish access to this Gmail account. After configuring the sending profile, we can test it by sending a test mail.

This is what the test mail will look like:

Email Template
The next step involves integrating an email template for the phishing campaign. We can opt for a pre-made template, for example, here we use a Breaking News email template, for initial testing. We can incorporate a tracking image within the emails to monitor various engagement metrics, including email opens, clicks, and receipt statuses. It also has an option where we can add a link which will redirect the victim to the landing page. On the landing page we can proceed to request for more valuable information from the user.

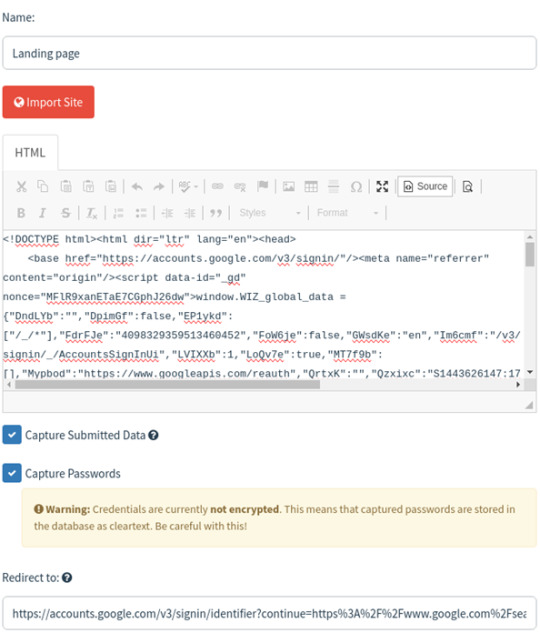
Landing Page
In the third step, set up a landing page where targets will be directed after clicking a link in the email. This landing page plays a crucial role in the phishing campaign, as it's where you can capture sensitive information like passwords. Gophish defaults to using http://0.0.0.0:80 for the landing page, but we can customize it to look like a legitimate login page or other enticing content to attract targets. We'll need to specify a redirect page where users will be sent after submitting their credentials.
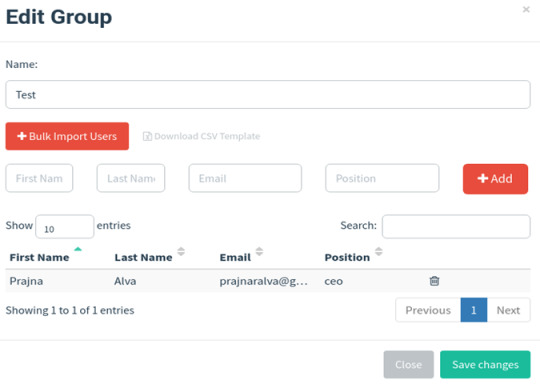
In the User & Groups section, you'll need to input the email addresses of your targets. Gophish framework requires you to provide the first name, last name, email address, and the rank of each target individual on the user groups page. You can also upload target details from a CSV file stored on your local system using import feature.
Install and set up Ngrok:
Install ngrok via Apt with the following command:
curl -s https://ngrok-agent.s3.amazonaws.com/ngrok.asc \
| sudo tee /etc/apt/trusted.gpg.d/ngrok.asc >/dev/null && echo "deb https://ngrok-agent.s3.amazonaws.com buster main" \
| sudo tee /etc/apt/sources.list.d/ngrok.list && sudo apt update && sudo apt install ngrok
Run the following command to add your authtoken to the default ngrok.yml configuration file.
ngrok config add-authtoken 2crm6P5lWlbTm4rwoGqn0QSHhPA_6nf7WmMJFKXVSD2SgBohF
Create an index.html page for the landing page and launch python http server in the port 8001
• python3 -m http.server 8001
Note: Verify in the browser if it's actually accessible.
We can also use other login page cloning techniques like built in gophish cloner, or Github projects (we used), Custom or by using third party clones (ex-goclone).
If it's a php file use the following command instead:
• php -S localhost:8001 -t .
Launch ngrok :
ngrok http http://localhost:8001/

Use the URL under forwarding and paste it on the Gophish URL section in the campaign page shown below:
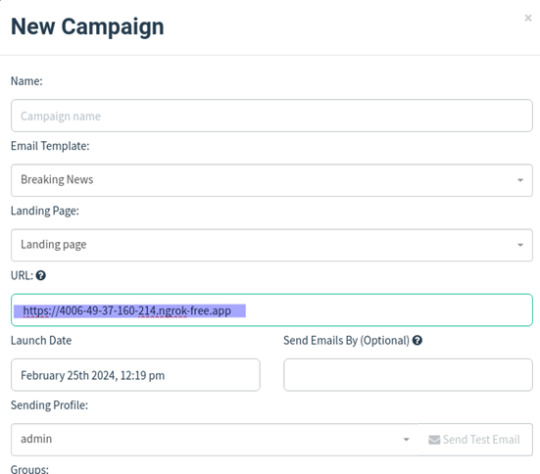
Creating Gophish Campaign:
Go to the Campaigns section.
Choose the right email and landing page templates.
Enter the landing page server URL.
Select the target group.
Start the campaign and monitor its progress.

Once we click on the link we are directed to the landing page, where we can enter our credentials.
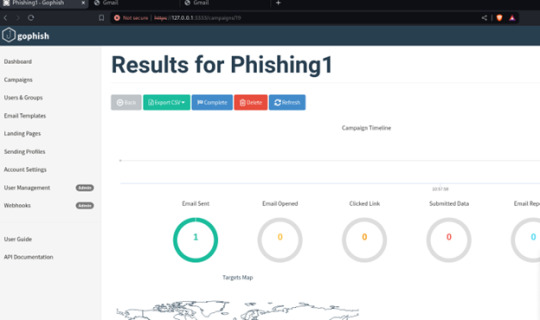
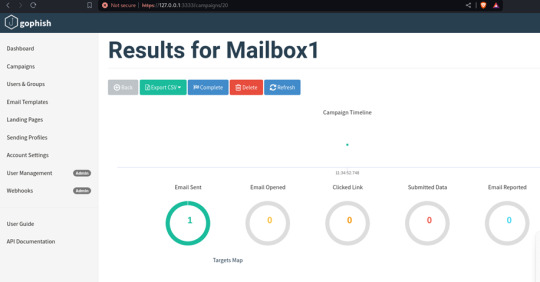
You can find all the phishing reports related to a specific campaign on the Dashboard in the Gophish framework. Here, you can see details such as sent emails, opened emails, clicked links, submitted data, and any emails reported as phishing by the targets. This page provides a comprehensive overview of the ongoing phishing campaign.
Phishing scenario: Case 2 - Password Reset Campaign
The aim of this phishing campaign is to trick users into divulging their login credentials by pretending to offer account protection in response to a fake mailbox compromise.

Users received an urgent email claiming their mailbox was compromised. They were directed to a phishing landing page disguised as a password reset portal.
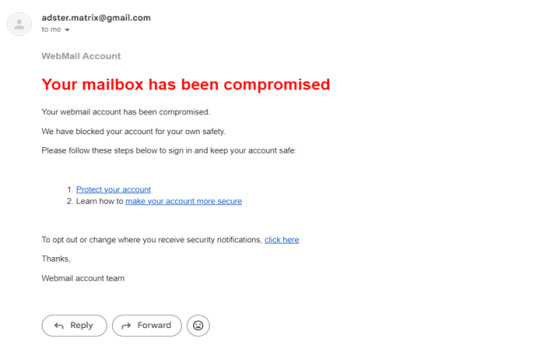
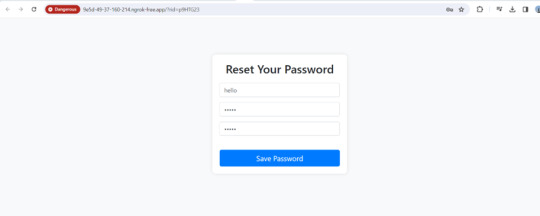
Upon clicking the link, Users were redirected to a fake password reset page resembling the email service provider's design, where they were prompted to enter their login credentials.
3 notes
·
View notes
Text
Fix Crawl Errors in Google Search Console Step‑by‑Step

If you’ve ever been frustrated by crawl errors in Google Search Console, you aren’t alone. These little issues can quietly wreck your SEO and drag down your rankings. I’ve had my fair share of nights checking for missing pages, 5xx errors, and DNS troubles. But today things are different. Let me take you through a simple, human‑friendly way to fix crawl errors, using the newest tools Google just rolled out after announcing big updates like Gemini 2.5, AI Mode in Google Search, and Agent Mode at Google I/O 2025.
Why crawl errors matter for SEO marketing
When Googlebot tries to read your site and hits a wall, it logs a crawl error. That might be a page not found, a server failing, or your DNS acting up. In SEO marketing every page counts, and if Google can’t crawl your pages, they can’t rank. Crawl errors are like hidden leaks in a ship—you don’t know they’re sinking you until it’s too late. Fixing them keeps your content visible and avoids sudden drops in traffic.
The new era after Google I/O 2025
You might be wondering, when is Google I/O 2025 happening? It took place on May 20 and 21, and Google used that stage to drop some big announcements. The star of the show for Search Console was AI Mode in Google Search, powered by Gemini 2.5 under the hood, and an enhanced Agent Mode to help us webmasters fix issues faster. These updates have transformed a manual, frustrating process into something more intelligent and efficient.
How to see crawl errors in Search Console
First thing’s first: open Google Search Console and click on Coverage followed by the Errors tab. Instead of a raw list of URLs, you’ll now see AI‑powered suggestions if you’ve enabled AI Mode. These suggestions might flag groups of 404 errors, server issues, or DNS blips. Even if the list is long, the AI groups related errors together, saving you time and giving you a clear view of what needs fixing.
Understanding each error type
Each category of crawl errors requires a different approach, so it helps to understand why they happen. DNS errors usually mean your domain couldn’t be resolved, often tied to hosting or DNS provider problems. Server errors, the dreaded 5xx family, point to issues on your web server—maybe it crashed or your scripts got overwhelmed. The classic 404 means the page is missing, often from deleted content or wrong internal links. Soft 404s are sneaky; they return a 200 status but have little or no real content, causing Google to treat them as “page missing.” Recognizing these differences helps you tackle them correctly.
Fixing DNS and server errors step by step
When you spot a DNS error, log into your DNS provider or hosting dashboard. See if your A, CNAME, or NS records are intact. If you recently switched providers or used Cloudflare, check for any misconfigurations. You might even temporarily pause Cloudflare’s proxy to make sure it’s not blocking Googlebot. Once the records fix, go back to Search Console and hit Validate Fix. It tells Google to recrawl those URLs.
Server errors can be trickier. Log into your server or hosting control panel and check for error logs around the time Googlebot hit your site. It might be overloaded PHP scripts or a misbehaving plugin. Maybe a sudden spike in traffic caused timeouts. With AI Mode and Agent Mode, Search Console sometimes gives hints like “slow response time” or “resource limit reached.” If you’re using managed hosting, reach out to support. Once you’ve fixed the backend, go back and ask Google to validate.
Repairing 404 and soft 404 pages
When Google bumps into a 404, think about why that page is missing. If the content is gone for good, send a hard 410 Gone status—it tells Google you meant to remove that page. If you’ve moved the content somewhere else, a 301 redirect to the new URL is the right move. Soft 404s are a little trickier. They happen when pages return 200 but have no substance—maybe a thin “this page doesn’t exist” message. Beef up those pages, add real content, or turn them into redirects. After updating, hit Validate Fix again in Search Console.
The lasting benefit to SEO marketing
Every crawl error you fix is a step toward better SEO marketing performance. Google sees a healthy, well‑structured site as easier to trust. Combine that with optimized content, mobile speed, and user‑friendly layouts, and you’ve built a strong foundation that gets rewarded in rankings. The enhancements from Google I/O 2025 — Gemini 2.5, AI Mode, and Agent Mode — just speed up the process. You’re not chasing errors, you’re preventing problems before they happen.
Putting it into practice
Let me walk you through a typical week. On Monday, I log into Search Console and check the Coverage Errors tab. The new interface shows AI Mode suggestions up front. If I see a few new 5xx or DNS errors, I log into my hosting dashboard, look at logs, make tweaks, and hit Validate Fix. Mid‑week, I review soft 404s or broken links, fix any thin pages or add 301s, and re‑validate. On Friday I glance at performance metrics—any dips? Did click impressions bounce back? If yes, job done. If not, I dig deeper. You can do the same, and now you’ve got Google’s own AI tools to help.
Using Google Translate for multilingual sites
If your site targets different languages, this step is crucial. After enabling AI Mode and Agent Mode, use Google Translate to scan your international content. Gemini 2.5 helps report crawl errors by language path, and you can fix errors in each version separately. No guessing. If your French pages are missing metadata or serve soft 404s, you’ll know exactly which URLs need attention.
Final thoughts
Crawl errors are like mosquitoes—tiny but irritating, and if you ignore too many, they can ruin your day. When Google I/O 2025 introduced AI Mode, Gemini 2.5, and Agent Mode, they gave us more powerful tools to wipe those bugs out fast. I’ve distilled everything here into a real, step‑by‑step approach you can follow now. Start with the Coverage tab, let AI group errors, dive into server, DNS, or content issues, fix them, validate, and repeat. Keep monitoring performance and stay on top of any new crawl issues.
#WebsiteRankingChecker#SEO2025#SearchEngineOptimization#SEOTool#DigitalMarketingTools#WebsitePerformance#RankTracking#KeywordTracking
0 notes
Text
SEO Uyumlu 301 Yönlendirme Nasıl Yapılır?

Web sitenizin yapısını değiştirdiğinizde doğru yönlendirmeler yapmak çok önemlidir. Site taşıma, içerik güncelleme veya URL yapısı değişikliklerinde 301 yönlendirmeler, SEO başarınızın anahtarıdır. SEO uyumlu 301 yönlendirmeleri nasıl yapacağınızı basit adımlarla anlatacağım. Doğru uygulanan 301 yönlendirmeler, sayfanızın otoritesini korur. Böylece kullanıcı deneyimini iyileştirir ve sıralamalarınızı güçlendirir.
301 Yönlendirme Nedir ve Neden Önemlidir?
301 yönlendirme, bir web sayfasının kalıcı olarak başka bir URL'ye taşındığını gösteren bir HTTP durum kodudur. Basitçe, ziyaretçileri ve arama motorlarını eski bir adresten yeni bir adrese yönlendirmenin resmi yoludur.
301 yönlendirmelerin SEO için önemi şunlardır:
Sayfa Değerini Koruma: Doğru yapılan bir 301 yönlendirme, eski sayfanızın link değerinin yaklaşık %90-99'unu yeni sayfaya aktarır.
Kullanıcı Memnuniyeti: Ziyaretçiler "404 - Sayfa Bulunamadı" hatasıyla karşılaşmaz ve aradıkları içeriğe sorunsuz ulaşır.
Verimli İndeksleme: Arama motorları sitenizi daha etkili bir şekilde tarar ve indeksler.
SEO Çalışmalarını Koruma: URL yapınızı değiştirseniz bile, mevcut SEO çalışmalarınız boşa gitmez.
SEO Uyumlu 301 Yönlendirme Nasıl Yapılır? 5 Kolay Yöntem
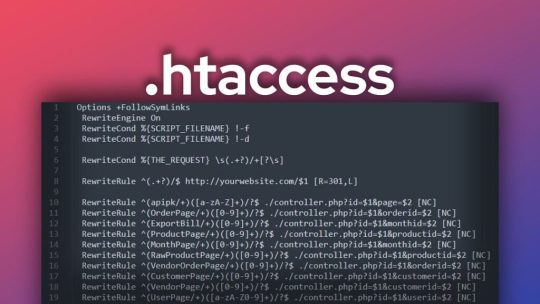
1. .htaccess Dosyası ile 301 Yönlendirme
Apache sunucularında .htaccess dosyası en sık kullanılan yöntemdir:
apache
# Tek sayfa yönlendirme Redirect 301 /eski-sayfa.html https:// www.siteadi .com/yeni-sayfa.html
(Link kısımlarını boşluksuz yazın. İçerikte linkler oluşturmamak adına boşluklu şekilde yazıyorum. Diğer vereceğim örneklerde de bu noktaya dikkat ediniz.)
# Tüm site için alan adı değişikliği RewriteEngine On RewriteCond %{HTTP_HOST} ^eskisite com [NC] RewriteRule ^(.*)$ https:// www.yenisite.com/$1 [L,R=301]
Bu yöntemi uygulamak için:
FTP veya kontrol panelinizden root dizinine erişin
.htaccess dosyasını düzenleyin (yoksa oluşturun)
Kodları ekleyin ve kaydedin
2. WordPress ile 301 Yönlendirme
Eğer site alt yapınız WordPress ise işinizi kolaylaştıracak birkaç eklenti vardır:
Kullanabileceğiniz Eklentiler:
Redirection
Yoast SEO
301 Redirects
All in One SEO Pack
Örneğin, Redirection eklentisi ile kolayca yönlendirme yapabilirsiniz:
WordPress yönetici paneline girin
Eklentiyi kurun ve etkinleştirin
"Araçlar > Redirection" bölümüne gidin
"Yönlendirme Ekle" düğmesine tıklayın
Eski URL ve yeni URL bilgilerini yazın
3. PHP ile 301 Yönlendirme
Sayfalarınızın başında PHP kodu kullanarak yönlendirme yapabilirsiniz:
php
<?php header("HTTP/1.1 301 Moved Permanently"); header("Location: https:// www yenisite.com/yeni-sayfa"); exit(); ?>
Bu yöntemi, .htaccess erişiminiz yoksa veya dinamik yönlendirmeler gerekiyorsa kullanabilirsiniz.
4. Nginx Sunucularında 301 Yönlendirme
Nginx sunucusu kullanıyorsanız, nginx.conf dosyasına şu kodları ekleyin:
nginx
server { listen 80; server_name eskisayfaadi com; return 301 https://www.yenisayfaadi.com$request_uri; }
5. cPanel Üzerinden 301 Yönlendirme
cPanel kontrol paneli kullanıyorsanız:
cPanel'e giriş yapın
"Domains" bölümünden "Redirects" seçeneğini bulun
Yönlendirme tipini "Permanent (301)" olarak seçin
Eski ve yeni URL'leri yazın
"Add" düğmesine tıklayın
301 Yönlendirme Yaparken Dikkat Edilmesi Gereken 7 Önemli Nokta
Yönlendirme Zinciri Oluşturmayın: A→B→C şeklinde birden fazla yönlendirme, sayfa değerinin kaybolmasına ve yavaş yüklemeye neden olur.
Sadece Gerekli Yönlendirmeleri Yapın: Tüm eski sayfaları ana sayfaya yönlendirmek yerine, benzer içeriğe sahip sayfalara yönlendirin.
Doğru Eşleştirme Yapın: Eski içerikle ilgili en uygun yeni sayfaya yönlendirme yapın. Kullanıcılar aradıklarını bulmalıdır.
SSL Geçişlerinde Dikkatli Olun: HTTP'den HTTPS'ye geçerken tüm bağlantılar için doğru yönlendirmeler oluşturun.
Yönlendirmeleri Test Edin: Yaptığınız yönlendirmeleri Redirect Checker gibi araçlarla kontrol edin.
Geçici (302) ve Kalıcı (301) Arasındaki Farkı Bilin: Kalıcı değişiklikler için 301, geçici değişiklikler için 302 kullanın.
Search Console'a Bildirin: Büyük değişikliklerden sonra Google Search Console'da "Change of Address" (Adres Değişikliği) aracını kullanın.
301 Yönlendirme Hakkında Sıkça Sorulan Sorular
301 Yönlendirmeden Sonra SEO Etkisi Ne Kadar Sürede Görülür?
301 yönlendirme yaptıktan sonra, arama motorlarının değişiklikleri tamamen işlemesi genellikle 2-8 hafta sürer. Google'ın tarama hızı, sitenizin popülerliğine ve güncellenme sıklığına bağlıdır.
301 Yönlendirme Her Zaman Gerekli midir?
Hayır, her URL değişikliği için gerekli değildir. Ancak şu durumlarda mutlaka yapmalısınız:
Alan adı değiştirdiğinizde
Site yapısını güncellediğinizde
İçerikleri birleştirdiğinizde veya taşıdığınızda
HTTP'den HTTPS'ye geçtiğinizde
301 ve 302 Yönlendirme Arasındaki Fark Nedir?
301 kodu kalıcı yönlendirme, 302 kodu geçici yönlendirme anlamına gelir. SEO açısından, kalıcı değişiklikler için her zaman 301 yönlendirme kullanın. Çünkü 301 yönlendirmeler link değerini aktarır.
Çok Sayıda URL İçin Toplu 301 Yönlendirme Nasıl Yapılır?
Çok sayıda URL için .htaccess dosyasında düzenli ifadeler (RegEx) kullanabilirsiniz:
apache
RewriteEngine On RewriteRule ^eski-kategori/(.*)$ https:// www siteadi.com/yeni-kategori/$1 [R=301,L]
Bu kod, "eski-kategori" altındaki tüm sayfaları "yeni-kategori" altındaki aynı alt sayfalara yönlendirir.
SEO uyumlu 301 yönlendirmeler, web sitenizin sağlığını ve arama motoru görünürlüğünü korumanın en önemli parçasıdır. Doğru yaptığınızda, site yapısını değiştirseniz bile SEO çalışmalarınızı korur.
Unutmayın: SEO'nun amacı hem kullanıcıları hem de arama motorlarını memnun etmektir. Doğru 301 yönlendirmeler, bu iki hedefi aynı anda gerçekleştirmenize yardımcı olur.
Kaynakça:
developers.google.com/search/docs/advanced/crawling/301-redirects
https://www.aliarior.com/seo
httpd.apache.org/docs/current/howto/htaccess.html
nginx.org/en/docs/http/ngx_http_rewrite_module.html
www.seroundtable.com/archives/021237.html
#301 Yönlendirme#SEO Teknikleri#URL Yönlendirmesi#Web Sitesi Taşıma#htaccess Yönlendirme#SEO Uyumlu 301 Yönlendirme Nasıl Yapılır
0 notes
Text
🌿💻 Tách video YouTube theo session (đã có link redirect)
🌿💻 Tách video YouTube theo session (đã có link redirect) bằng PHP có thể thực hiện thông qua việc giả lập request đến đường dẫn https://crawler.tachthongtin.com/youtube?... và trích xuất nội dung. Dưới đây là trang PHP mẫu giúp bạn thực hiện điều đó 👇 💖💖👉🍀🍀 Hỗ trợ chạy trực tiếp trên localhost hoặc hosting PHP 7.4+ 🧾 youtube-tach.php <?php // ⚠️ Nhớ thay đổi URL khi cần $videoURL =…
0 notes
Text
Prevent XSS Attacks in Symfony Applications
Cross-Site Scripting (XSS) remains one of the most exploited web vulnerabilities, especially in modern PHP frameworks like Symfony. In this post, we'll explore how XSS vulnerabilities can creep into Symfony apps, how attackers exploit them, and how to fix or prevent these issues with practical code examples.

You’ll also see how you can scan your site for free using the Website Vulnerability Scanner, which helps detect XSS vulnerabilities and other issues automatically.
🔍 What is Cross-Site Scripting (XSS)?
Cross-Site Scripting (XSS) is a type of vulnerability that allows attackers to inject malicious JavaScript into webpages viewed by other users. The goal? Stealing cookies, session tokens, or redirecting users to malicious sites.
There are three common types:
Stored XSS – Malicious script is permanently stored on the target server.
Reflected XSS – Script is reflected off a web server, often in search results or error messages.
DOM-based XSS – Happens entirely on the client side using JavaScript.
⚠️ XSS in Symfony: How it Happens
Even though Symfony is a robust framework, developers may still accidentally introduce XSS vulnerabilities if they don’t properly escape output or trust user input blindly.
✅ Vulnerable Example: Output Without Escaping
// src/Controller/SampleController.php public function unsafeOutput(Request $request): Response { $name = $request->query->get('name'); return new Response("<h1>Hello, $name!</h1>"); }
If a user visits:
http://example.com?name=<script>alert('XSS')</script>
This JavaScript will execute in the browser. That’s a textbook XSS vulnerability.
🛡️ Secure Coding: Escaping Output in Symfony
Symfony uses Twig by default, which automatically escapes variables. But developers can override this behavior.
✅ Safe Example with Twig
{# templates/welcome.html.twig #} <h1>Hello, {{ name }}</h1>
This is safe because Twig escapes {{ name }} by default. But if you do this:
<h1>Hello, {{ name|raw }}</h1>
You disable escaping, making it vulnerable again. Avoid using |raw unless you're 100% sure the content is safe.
✋ Validating and Sanitizing Input
Always sanitize and validate input using Symfony’s form and validator components.
✅ Example Using Symfony Validator
use Symfony\Component\Validator\Constraints as Assert; use Symfony\Component\Validator\Validation; $validator = Validation::createValidator(); $violations = $validator->validate($userInput, [ new Assert\NotBlank(), new Assert\Regex([ 'pattern' => '/^[a-zA-Z0-9\s]*$/', 'message' => 'Only alphanumeric characters allowed.' ]), ]); if (count($violations) > 0) { // Handle validation errors }
🧪 Detecting XSS Automatically with a Free Tool
Want to find XSS vulnerabilities without writing a line of code?
Use the free security scanner by Pentest Testing Corp for a Website Security test. It scans your website for XSS, SQLi, Clickjacking, and many other issues.
🖼️ Screenshot of the Website Security Checker homepage

Screenshot of the free tools webpage where you can access security assessment tools.
📄 Sample XSS Detection Report
After scanning, you’ll get a detailed vulnerability report to check Website Vulnerability. Here’s a sample:
🖼️ Screenshot of a vulnerability assessment report

An Example of a vulnerability assessment report generated with our free tool, providing insights into possible vulnerabilities.
This includes affected URLs, vulnerability types, severity levels, and remediation suggestions.
🔗 Learn More About Web Security
Visit our blog at Pentest Testing Corp. for more insights, tutorials, and vulnerability write-ups.
✅ Final Checklist for Preventing XSS in Symfony
✅ Use Twig’s auto-escaping.
✅ Never use |raw unless absolutely necessary.
✅ Validate user input with Symfony's Validator.
✅ Sanitize dynamic content before outputting.
✅ Scan your app regularly with tools like free.pentesttesting.com.
Cross-Site Scripting is dangerous, but with a few best practices and tools, you can keep your Symfony app safe. Try out our website vulnerability scanner and harden your web applications today!
1 note
·
View note
Text
技术SEO如何优化301/302重定向?TG@yuantou2048
在网站建设和维护过程中,正确使用301和302重定向对于提升用户体验和搜索引擎优化(SEO)至关重要。本文将详细介绍这两种重定向的区别以及如何进行有效的优化。
什么是301重定向?
301重定向是一种永久性重定向,表示旧URL已被永久性更改,并且搜索引擎应该将所有权重转移到新URL上。这对于处理域名变更、页面移动等情况非常有用。
什么是302重定向?
302重定向是临时性的,通常用于暂时性地将用户从一个URL重定向到另一个URL。它告诉搜索引擎这是一个临时的改变,因此不会传递权重。
如何设置301重定向?
1. 使用.htaccess文件:如果你使用的是Apache服务器,可以在`.htaccess`文件中设置301重定向。
```apache
Redirect 301 /old-page.html http://www.example.com/new-page.html
```
2. 使用PHP代码:
```php
header("HTTP/1.1 301 Moved Permanently");
header("Location: http://www.example.com/new-url");
exit;
```
如何设置302重定向?
1. 通过.htaccess文件:
```apache
Redirect 302 /old-page.html http://www.example.com/new-page.html
```
3. 使用PHP脚本:
```php
header('HTTP/1.1 302 Found');
header('Location: http://www.example.com/new-page.html');
exit();
```
何时使用301 vs 302重定向?
301重定向:适用于永久性更改,如域名迁移或页面永久移动。
302重定向:适用于临时性更改,例如页面暂时不可用或内容暂时迁移到其他位置。
注意事项:
- 确保重定向链不要过长,避免影响加载速度和SEO效果。
- 定期检查重定向,确保没有循环重定向或无效链接。
最佳实践:
- 使用301重定向来处理永久性更改。
- 避免过多的重定向链,以防止搜索引擎爬虫陷入无限循环。
- 监控重定向日志,确保没有错误或不必要的重定向。
通过合理配置重定向,可以有效提高网站性能和SEO表现。
加飞机@yuantou2048

six mining
advanced miners
0 notes
Text
Common Challenges in Magento to Shopify Migration and How to Overcome Them
Migrating from Magento to Shopify is a strategic move for many businesses looking for a more scalable, user-friendly, and cost-effective eCommerce platform. However, the process comes with its own set of challenges, from data transfer complications to SEO risks. In this guide, we’ll explore the most common migration challenges and how to tackle them effectively to ensure a seamless transition.
1. Data Migration Complexity
Challenge-
Magento stores tend to have big product catalogs, customer information, and order history, so data migration is a complex task. Manually transferring the data may result in data loss, incorrect formatting, or mapping.
Solution-
Utilize automated migration software to simplify the process.
Backup your Magento database prior to migration to avoid data loss.
Check data mapping to make sure products, categories, and customer information are correctly mapped in Shopify.
2. URL Structure & SEO Maintenance
Challenge-
Magento and Shopify use varying URL structures, and if not properly managed, they can affect SEO rankings. Lost indexed URLs lead to broken links, decreased traffic, and lowered search engine positions.
Solution-
Implement 301 redirects from existing Magento URLs to new Shopify URLs to maintain SEO equity.
Move meta titles, descriptions, and alt texts manually or with an SEO migration tool.
Submit a refreshed XML sitemap to Google Search Console to reindex pages promptly.
3. Custom Features & Extensions Compatibility
Challenge-
Magento supports heavy customization with third-party extensions and custom-coded features. Shopify, however, has a distinct app ecosystem that might not be directly substitutable for Magento’s features.
Solution-
Determine essential features of your Magento store and discover Shopify app substitutes (e.g., Yotpo for reviews, Bold Product Options for advanced product customization).
For customized functionalities, hire a Shopify developer to create custom scripts or integrations.
Take advantage of Shopify Flow and Shopify Scripts for automations and higher-level customization on Shopify Plus.
4. Design & Theme Modifications
Problem-
Magento websites tend to have very customized themes that cannot necessarily be duplicated perfectly in Shopify. Shopify employs another templating language (Liquid) than Magento’s PHP-based infrastructure.
Solution-
Select a Shopify theme that best resembles your Magento look. There are numerous editable themes available at the Shopify Theme Store.
Use Shopify’s Theme Editor and manual CSS changes to customize the look and feel.
If necessary, hire a Shopify developer to develop a custom theme that suits your brand.
5. Payment Gateway & Checkout Differences
Challenge-
Magento allows merchants to customize the checkout process, while Shopify has a fixed checkout flow (unless using Shopify Plus). Additionally, some payment gateways used in Magento may not be available on Shopify.
Solution-
Check Shopify’s supported payment gateways and switch to an alternative if necessary.
Shopify Plus users can leverage Shopify Scripts to customize checkout flows. Optimize checkout with express payment options (Shopify Payments, PayPal, Apple Pay) for a seamless user experience.
6. Customer Accounts & Passwords Migration
Challenge-
For security policy reasons, customer passwords in Magento cannot be directly migrated to Shopify, so customers must reset their credentials.
Solution-
Let customers know ahead of time about the migration and offer an easy password reset link after the migration.
Utilize Shopify’s Bulk Invite to send reset directions in a bulk-efficient manner.
Offer discount codes or loyalty rewards to motivate customers to login and change their accounts.
7. Performance & Speed Optimization
Challenge-
Following migration, a few Shopify stores can have slower loading times caused by unoptimized images, excessive third-party apps, or suboptimal theme performance.
Solution-
Utilize Shopify’s native CDN (Content Delivery Network) for quicker image and content loading.
Optimize images with Shopify’s image compression tools (e.g., TinyPNG or Crush.pics).
Restrict unnecessary third-party apps and eliminate unwanted scripts to enhance load speed.
8. Training Your Team on Shopify
Challenge-
Magento users who are comfortable with its backend might feel Shopify’s admin panel is different and need training to effectively handle orders, inventory, and settings.
Solution-
Give hands-on Shopify training to staff through Shopify’s Help Center and Academy.
Establish user roles and permissions so team members have the appropriate level of access.
Utilize Shopify analytics and reports to assist your team in adjusting to Shopify’s dashboard.
Migration from Magento to Shopify is not without challenges, but with the right approach, tools, and professional assistance, migration can be seamless and extremely rewarding. By keeping data integrity, SEO integrity, design portability, and customer satisfaction in mind, companies can best take advantage of Shopify’s ease of use, scalability, and performance to scale their online business.
Need expert help for Magento to Shopify migration? Contact Us for an effortless migration experience with no loss of data and optimal efficiency!
0 notes
Text
Supercharge Your WordPress Development with These 10 PHP Snippets WordPress powers over 40% of the web, making it one of the most popular platforms for developers and bloggers alike. Whether you're customizing themes, building plugins, or tweaking functionality, having a handy set of PHP code snippets can save you hours of work. Here are 10 practical PHP snippets every WordPress developer should keep in their toolkit. 1. Disable WordPress Admin Bar for Non-Admins The admin bar can clutter the frontend for non-admin users. Use this snippet to disable it for everyone except administrators: add_action('after_setup_theme', function() if (!current_user_can('administrator')) show_admin_bar(false); ); This ensures a clean frontend experience for subscribers and other roles. 2. Change Default Login Logo URL Customizing the WordPress login page is a common requirement. Use this snippet to change the logo URL on the login screen: add_filter('login_headerurl', function() return home_url(); // Redirect to your website's homepage ); Combine this with CSS to fully brand the login page for clients or personal projects. 3. Redirect Users After Login Based on Role Direct users to specific pages after login based on their roles: add_filter('login_redirect', function($redirect_to, $request, $user) if (isset($user->roles) && is_array($user->roles)) if (in_array('administrator', $user->roles)) return admin_url(); elseif (in_array('editor', $user->roles)) return home_url('/editor-dashboard'); else return home_url('/welcome'); return $redirect_to; , 10, 3); This snippet improves user navigation and role-specific workflows. 4. Custom Excerpt Length Control the excerpt length in posts to maintain a consistent look across your site: add_filter('excerpt_length', function($length) return 20; // Set the excerpt length to 20 words ); Pair this with a custom read more link for better UX: add_filter('excerpt_more', function() return '... Read More'; ); 5. Remove WordPress Version Number Hiding the WordPress version number improves security by making it harder for attackers to target vulnerabilities: remove_action('wp_head', 'wp_generator'); This simple snippet removes the version meta tag from the HTML source. 6. Add Custom Image Sizes Define and use custom image sizes for different parts of your theme: add_action('after_setup_theme', function() add_image_size('custom-thumb', 400, 300, true); // Cropped image size ); To use this image size in your theme: echo wp_get_attachment_image($attachment_id, 'custom-thumb'); 7. Disable WordPress Auto Updates Sometimes you want to disable automatic updates to maintain more control: add_filter('automatic_updater_disabled', '__return_true'); You can also disable specific updates, such as plugin updates: add_filter('auto_update_plugin', '__return_false'); 8. Custom Maintenance Mode Display a maintenance mode page while working on your site: add_action('template_redirect', function() if (!current_user_can('administrator') && !is_user_logged_in()) wp_die( 'Under MaintenanceWe’ll be back shortly!', 'Maintenance Mode', array('response' => 503) ); ); This ensures only admins can access the site during maintenance. 9. Limit Post Revisions Restrict the number of post revisions saved in the database to optimize performance: define('WP_POST_REVISIONS', 5); // Limit to 5 revisions per post Add this line to your wp-config.php file to apply globally. 10. Custom Dashboard Widget Add a custom widget to the WordPress admin dashboard for quick links or messages: add_action('wp_dashboard_setup', function() wp_add_dashboard_widget( 'custom_dashboard_widget', 'Welcome to Your Dashboard',
function() echo 'Need help? Visit our support center.'; ); ); This snippet is great for client sites where you can provide tailored guidance. Wrapping Up These 10 PHP snippets cover some of the most common tasks WordPress developers encounter. By incorporating these into your workflow, you’ll save time and enhance the functionality of your projects. Bookmark this cheat sheet and customize these snippets to suit your specific needs!
0 notes
Text
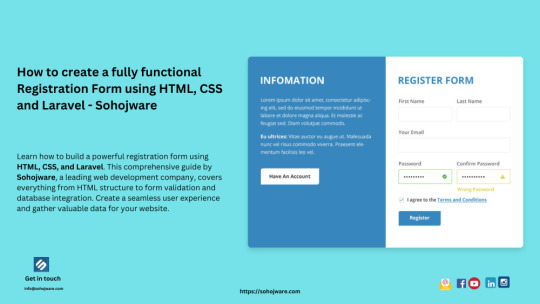
How To Create A Fully Functional Registration Form Using HTML, CSS And Laravel - Sohojware
In today’s digital age, having a functional and user-friendly registration form is crucial for any website or application. It allows users to create accounts, subscribe to services, or register for events. A well-designed registration form not only enhances the user experience but also helps you gather valuable data.
This comprehensive guide by Sohojware, a leading web development company in Bangladesh, will walk you through the process of creating a fully functional registration form using HTML, CSS, and Laravel. Laravel, a popular PHP framework, provides a robust foundation for building secure and scalable web applications.
What you’ll learn in this guide:
Understanding the components of a registration form
Building the HTML structure for the registration form
Styling the registration form with CSS
Integrating form functionality with Laravel
Components of a Registration Form:
Before diving into the code, let’s understand the common components of a well-designed registration form:
Input fields: These are where users enter their information, such as name, email address, username, and password. There are different types of input fields like text boxes, dropdown menus, and checkboxes, depending on the information you want to collect.
Labels: Labels identify each input field, making the registration form intuitive for users.
Validation: This ensures users enter data in the correct format. For example, email addresses must follow a specific format, and passwords must meet certain length and complexity requirements.
Submit button: This button triggers the form submission process.
Confirmation message: A clear message appears after successful registration, informing users their account has been created.
Building the HTML Structure:
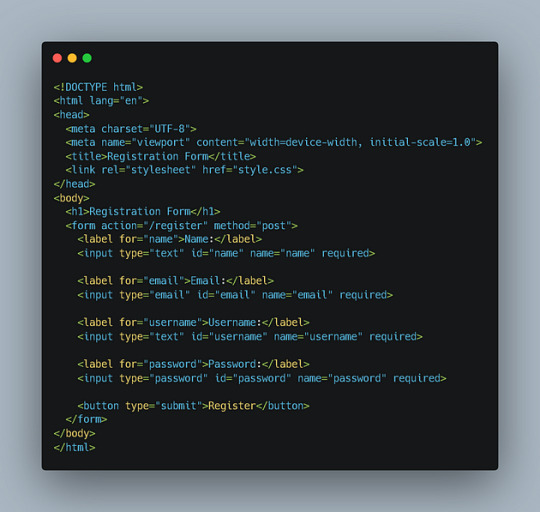
This code defines a basic registration form with input fields for name, email, username, and password. It also includes a submit button. Note that the action attribute in the <form> tag specifies the URL where the form data will be submitted, and the method attribute defines the HTTP method (POST in this case).
Styling the Registration Form with CSS:
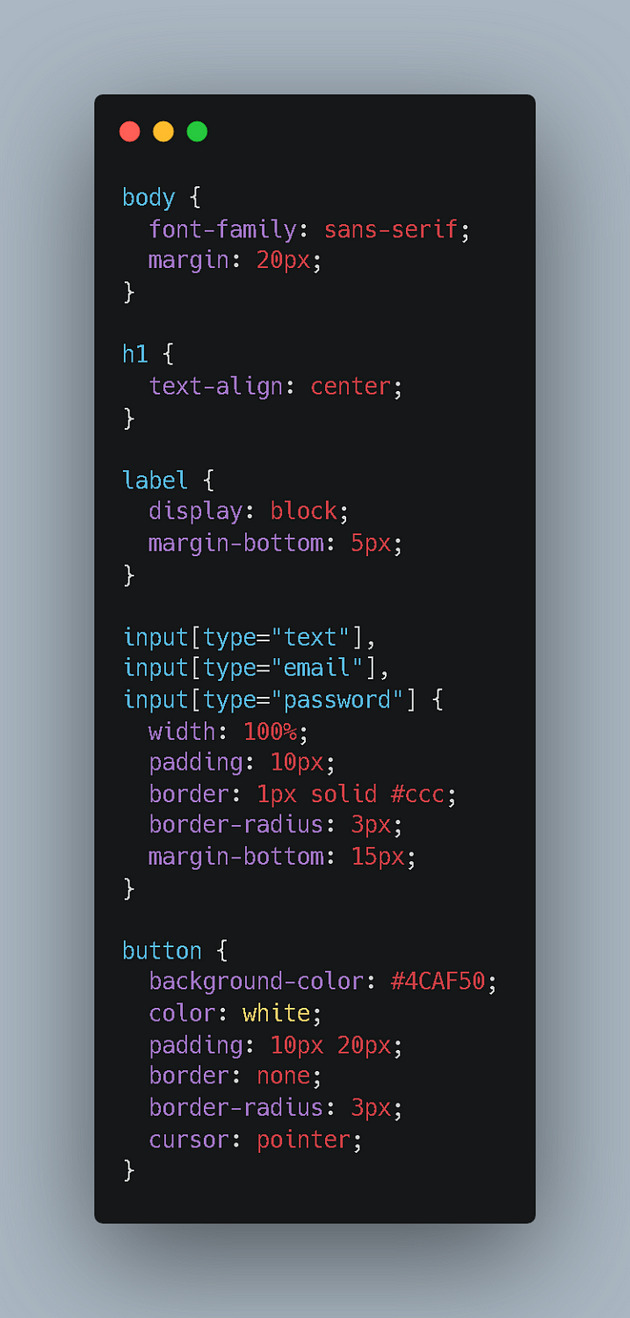
This code styles the form elements, making it visually appealing and user-friendly. You can further customize the styles to match your website’s design.
Integrating Form Functionality with Laravel
To make your registration form functional, you’ll need to integrate it with Laravel’s routing, validation, and database functionalities. Here’s how:
Create a Laravel Route: In your routes/web.php file, define a route to handle the form submission:
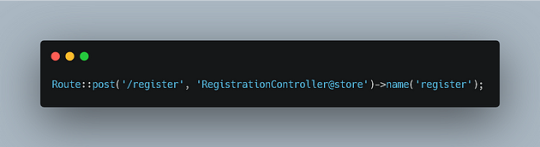
This route specifies that when a POST request is made to the /register URL, the store method in the RegistrationController class will be called.
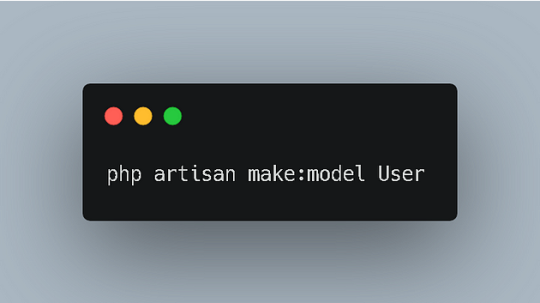
Create a Controller: Generate a new controller using the Artisan CLI command:

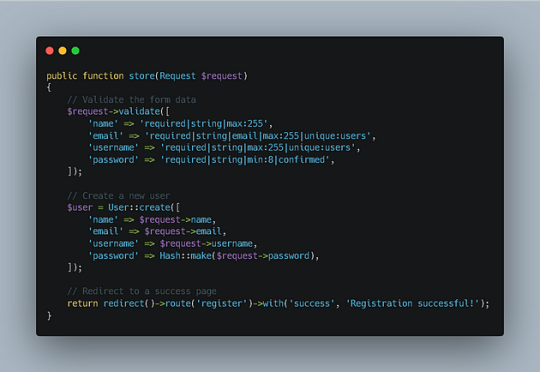
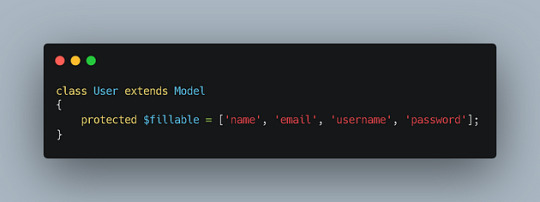
This code first validates the form data using Laravel’s validation rules. If the validation passes, it creates a new user record in your database using the User model. Finally, it redirects the user to a success page with a confirmation message.
Configure Database: Make sure your database connection is configured in your .env file.
Additional Considerations:
Security: Implement proper security measures to protect user data, such as hashing passwords and using secure encryption techniques.
Error Handling: Provide informative error messages to users if their form data is invalid.
Email Verification: Consider sending a verification email to users after registration to confirm their account.
Customization: Customize the registration form to match your website’s design and branding.
By following these steps, you can create a fully functional registration form using HTML, CSS, and Laravel, providing a seamless user experience for your website or application.
1 note
·
View note
Text

https://www.fiverr.com/emonbd/fix-deceptive-site-ahead-and-wordpress-malware-removal
When Google shows a Deceptive Site Ahead warning to your website visitors, it means they think your website might be harmful due to malware, phishing, malicious codes, and other security risks. This alarming message can scare away your visitors and make your site look untrustworthy.
If your site has been hacked, or infected with malware, phishing, or malicious codes I'm here to help you recover it.
Malware Cleaning:
Full Vulnerability Scan
Recover Hacked Website
Remove Redirect Malicious Code
Japanese Keyword Hack
Japanese SEO spam
Pharma Hack Removal
Clean Malware, Backdoor From Website or Hosting Server
Remove Blacklist & Red Warning from your site
Warning Removal:
Deceptive site ahead
Deceptive content
Suspicious site
Phishing pages
The site ahead contains malware
The site ahead contains harmful programs
Visiting this website may harm your compute
Blacklist Removal:
Google, McAfee, Yandex, Bing
Security Firewall:
Install and Configuration Security Plugin
Hide WP-Admin Login URL
Disable PHP/Shell Execution Uploads
Protect wp-config
Protect .htaccess
Disable Directory Browsing
Restrict All Access To wp-Includes
Restrict Direct Access To Plugins/Themes
0 notes
Text
How To Redirect Old Domain To New Domain

Redirecting an Old Domain to a New Domain
When you change domains, it's crucial to maintain the integrity of your old URLs. This ensures anyone clicking a link to your old website gets directed to the corresponding page on your new domain. This redirection is achieved using a 301 redirect, which tells search engines the move is permanent and helps preserve SEO value. Here are several methods to redirect your old domain to your new domain:
1. Using an .htaccess file: - .htaccess is a configuration file for Apache web servers. Even minor syntax errors can disrupt your content, so ensure you follow the instructions carefully. - Important: .htaccess is a hidden file. Make sure your FTP client is configured to show hidden files before proceeding. Here's a step-by-step guide: 1. Access your old domain's root directory through an FTP client. 2. Create a new text file using a text editor like Notepad and save it as `.htaccess` (ensure the filename starts with a dot). 3. Edit the contents of `.htaccess` with the following code, replacing `your-new-domain.com` with your actual new domain: ```apache RewriteEngine On RewriteBase / RewriteRule ^(.*)$ https://your-new-domain.com/$1 ``` - **Explanation:** - `RewriteEngine On` activates the rewrite engine. - `RewriteBase /` sets the base directory for the rewrite rules. - `RewriteRule ^(.*)$ https://your-new-domain.com/$1 ` defines the redirection rule: - `^(.*)$`: Matches any request URL. - `https://your-new-domain.com/$1`: The destination URL with the captured request path (`$1`) appended. - ``: Sets the redirect status code to 301 (permanent). - ``: Stops processing further rewrite rules after this one is applied. 4. Upload the `.htaccess` file back to your old domain's root directory.

2. Using PHP scripts: - You can leverage PHP scripts to redirect URLs using the header() function. This function sends an HTTP header instructing the client to redirect to a new location. Here's how to implement a PHP redirect script:- Create a new PHP file (e.g., redirect.php) using a text editor. - Add the following code to the PHP file, replacing https://your-new-domain.com/ with your new domain:```php ``` - **Explanation:** - `$newURL` stores the destination URL. - `header()` sends an HTTP header with the `Location` directive set to `$newURL` and a status code of 301 (permanent). - `exit()` terminates the script execution. - Upload the redirect.php file to your old domain's web server. - In your old website's code, link to redirect.php from the URLs you want to redirect.

3. Using DNS redirection: - Domain Name System (DNS) configurations can be used to point your domain to a new location. This method involves modifying your domain's DNS records at your domain registrar or DNS hosting provider. Here's a general process:- Log in to your domain registrar or DNS hosting provider's control panel. - Locate the DNS management section for your domain. - Create a new DNS record, typically labeled "URL Redirect" or "Forwarding." - Specify the destination URL (including http:// or https://) in the record. - Choose the redirect type (permanent or temporary). - Save the DNS record changes.Note: DNS propagation can take time (from a few minutes to several hours) for the changes to take effect globally.

4. Using cPanel (if your web hosting uses cPanel): Here's how to use cPanel's "Redirects" feature: - Access your cPanel account using your login credentials. - Navigate to the "Domains" section and locate the "Redirects" icon or option. - Within the "Redirects" section, you'll typically find options for different redirect types: - Permanent (301) Redirect: Use this for permanently moving visitors and search engines to a new URL. - Temporary (302) Redirect: Choose this for temporary redirects, like website maintenance or promotions. - Select the domain you want to redirect from the dropdown menu. - Enter the following details: - Redirects to: The full URL of the new destination page. - Source: The original URL or URL pattern you want to redirect from. - Choose whether to redirect with or without the "www" prefix (based on your preference). - (Optional) Enable wildcard redirection if you want all subdirectories within the old domain to redirect to the same path on the new domain. - Click "Add" or "Save" to apply the redirect configuration. - Test the redirect by entering the original URL in a web browser. It should automatically redirect to the specified new URL.

5. Using Cloudflare: - Cloudflare is a popular content delivery network (CDN) that also offers DNS management and redirection features. It provides free basic functionalities, including DDoS protection and SSL certificates. Here's a basic guide on using Cloudflare for redirection: Pre-requisite:- Sign up for a free Cloudflare account if you don't have one already.Steps: - Add your old domain to Cloudflare (it's a free process). - Update your domain's nameservers to point to Cloudflare's nameservers (provided during signup). This step propagates DNS changes, so allow some time for it to take effect globally. - Once your domain is active on Cloudflare, access the Cloudflare dashboard and navigate to the "Rules" section. - Create a new rule. - In the "For" field, enter your old domain name (e.g., your-old-domain.com). - Under "Settings," choose "Forwarding URL (301)" for a permanent redirect. - In the "To" field, enter your new domain name (e.g., https://your-new-domain.com/). - Click "Save" to activate the redirect rule.

Additional Considerations: - Testing: After implementing any redirection method, thoroughly test your redirects to ensure they work as expected. Use different browsers and devices to verify functionality. - SEO Impact: Using 301 redirects is generally SEO-friendly, as it signals to search engines that the content has permanently moved and helps transfer SEO value to the new domain. - Choosing the Right Method: The best method for you depends on your technical comfort level and hosting platform. If you're comfortable with editing configuration files, using .htaccess might be suitable. cPanel's "Redirects" feature offers a user-friendly interface for those using cPanel hosting. Cloudflare is a great option if you already use it for DNS management and want a convenient redirection solution. By following these methods and considerations, you can effectively redirect your old domain to your new domain, ensuring a smooth transition for your website visitors and preserving your SEO value. Read the full article
0 notes
Text
Hướng Dẫn Đọc Kèo Bóng Đá Tại Cwin
⛳️Cwin.fit giới thiệu cách đơn giản nhất để tính toán và đọc kèo bóng đá, giúp bạn tự tin hơn khi tham gia cá cược. 🌐Truy cập: https://cwin.fit/ Link Hướng Dẫn: https://cwin.fit/cach-doc-keo-bong-da/ THAM KHẢO THÊM CHI TIẾT SAU ĐÂY https://www.google.com.np/url?q=https://cwin.fit/ https://maps.google.com.np/url?q=https://cwin.fit/ https://google.lv/url?q=https://cwin.fit/ https://images.google.com.sa/url?q=https://cwin.fit/ https://images.google.com.bd/url?q=https://cwin.fit/ https://maps.google.com.sa/url?q=https://cwin.fit/ https://cse.google.com.np/url?q=https://cwin.fit/ https://www.google.com.sa/url?q=https://cwin.fit/ https://maps.google.com.pk/url?q=https://cwin.fit/ https://cse.google.com.pk/url?q=https://cwin.fit/ https://www.google.com.ec/url?q=https://cwin.fit/ https://google.com.ec/url?q=https://cwin.fit/ https://maps.google.com.ec/url?q=https://cwin.fit/ https://cse.google.by/url?q=https://cwin.fit/ https://images.google.com.ec/url?q=https://cwin.fit/ https://google.by/url?q=https://cwin.fit/ https://maps.google.by/url?q=https://cwin.fit/ https://cse.google.com.ec/url?q=https://cwin.fit/ https://images.google.by/url?q=https://cwin.fit/ https://www.google.by/url?q=https://cwin.fit/ https://carterdigital.com.au/?URL=https://cwin.fit http://www.meteogarda.it/website.php?url_to=https://cwin.fit https://maps.google.mv/url?sa=j&rct=j&url=https://cwin.fit https://www.adminer.org/redirect/?url=https://cwin.fit&lang=en http://webservices.icodes.co.uk/transfer2.php?location=https://cwin.fit https://cds.arbys.com/?URL=https://cwin.fit http://www.hagblomsfarghandel.se/?URL=https://cwin.fit https://en.asg.to/bridgePage.html?url=https://cwin.fit https://azaunited.org/?URL=https://cwin.fit https://stpso.com/?URL=https://cwin.fit https://bvcentre.ca/?URL=https://cwin.fit http://www.missionfrontiers.org/?URL=https://cwin.fit https://static.grantis.hu/aszf/?url=https://cwin.fit http://mail.mrg-sbyt.ru/bitrix/rk.php?goto=https://cwin.fit http://kinhtexaydung.net/redirect/?url=https://cwin.fit http://rd.am/www.crystalxp.net/redirect.php?url=https://cwin.fit http://xastir.org/api.php?action=https://cwin.fit https://image.google.dm/url?rct=t&sa=t&url=https://cwin.fit http://www.milmil.cc/sys/milmil.cgi?id=plan1010&mode=damy&moveurl=https://cwin.fit https://www.photoboothsolutions.com/?URL=https://cwin.fit

0 notes
Text
Creating a Simple REST API with PHP: A Beginner's Guide
In the digital era, REST APIs have become the backbone of web and mobile applications, facilitating seamless communication between different software systems. PHP, with its simplicity and wide adoption, is a powerful tool for building robust REST APIs. This guide aims to introduce beginners to the fundamentals of creating a simple REST API using PHP.
Understanding REST APIs
Before diving into the technicalities, it's essential to understand what REST APIs are. REST (Representational State Transfer) is an architectural style for designing networked applications. It relies on a stateless, client-server, cacheable communications protocol -- typically HTTP. In simpler terms, REST uses HTTP requests to GET, PUT, POST, and DELETE data.
Setting Up Your Environment
To start building your REST API with PHP, you'll need a local server environment like XAMPP, WAMP, or MAMP. These software packages provide the necessary tools (Apache, MySQL, and PHP) to develop and test your API locally. Once installed, start the Apache server to run your PHP scripts.
Planning Your API
Before coding, plan what resources your API will provide access to and the corresponding endpoints. For example, if you're building an API for a blog, resources might include articles, authors, and comments. An endpoint for retrieving articles could be structured as http://yourdomain.com/api/articles.
Creating the API
1. Setting Up a Project Structure
Create a new directory in your server's root folder (e.g., htdocs in XAMPP) named my_api. Inside this directory, create two files: .htaccess and index.php. The .htaccess file will be used for URL rewriting, making your API endpoints clean and user-friendly.
.htaccess
apacheCopy code
RewriteEngine On RewriteCond %{REQUEST_FILENAME} !-f RewriteRule ^([a-zA-Z0-9-]+)/?$ index.php?request=$1 [QSA,NC,L]
This configuration redirects all requests to index.php, passing the request path as a query parameter.
2. Implementing the API Logic
index.php
Start by initializing an array to mock a database of articles. Then, parse the request to determine which resource is being accessed.
phpCopy code
<?php // Mock database of articles $articles = [ ['id' => 1, 'title' => 'The First Article', 'content' => 'This is the first article.'], ['id' => 2, 'title' => 'The Second Article', 'content' => 'This is the second article.'] ]; // Get the request path $request = $_GET['request'] ?? ''; // Split the path into components $requestParts = explode('/', $request); // Determine the resource $resource = $requestParts[0] ?? ''; header('Content-Type: application/json'); switch ($resource) { case 'articles': echo json_encode($articles); break; default: http_response_code(404); echo json_encode(['error' => 'Resource not found']); break; }
This script checks the requested resource and returns a JSON-encoded list of articles if the articles resource is accessed. For any other resource, it returns a 404 error with a JSON error message.
3. Testing Your API
To test your API, you can use tools like Postman or simply your browser. For instance, navigating to http://localhost/my_api/articles should display the JSON-encoded articles.
Extending Your API
Once you've mastered the basics, you can extend your API by implementing additional HTTP methods (POST, PUT, DELETE) and adding authentication for secure access. This might involve more advanced PHP programming, including working with headers for content type and authentication tokens, and dealing with more complex routing and database interactions.
Best Practices
When developing your API, keep in mind best practices such as:
Security: Implement measures like authentication, input validation, and sanitization to protect your API.
Versioning: Version your API from the start (e.g., v1/articles) to avoid breaking changes for users as your API evolves.
Documentation: Provide clear, concise documentation for your API's endpoints, request parameters, and response objects.
Embracing PHP's Flexibility for Rapid Development
One of the unique aspects of creating a REST API with PHP is leveraging PHP's inherent flexibility and simplicity for rapid development. As a dynamically typed language, PHP allows developers to iterate quickly without the strict type constraints found in statically typed languages. This flexibility is particularly beneficial in the early stages of API development, where the data model and business logic might frequently change. Furthermore, PHP's extensive standard library and numerous frameworks can significantly speed up the development process. For instance, using a PHP framework like Laravel or Symfony can provide out-of-the-box solutions for routing, security, and ORM (Object-Relational Mapping), enabling developers to focus on the unique aspects of their application rather than boilerplate code. To streamline projects with experts, businesses look for top php development companies and avail their services to implement better development strategies.
The Power of PHP's Community and Resources
Another unique advantage of building REST APIs with PHP is the extensive community support and wealth of resources available. PHP is one of the most widely used programming languages for web development, with a vibrant community that contributes to a vast ecosystem of libraries, frameworks, and tools. This community support means developers can often find solutions to common problems and questions through forums, blogs, and tutorials. Additionally, the availability of comprehensive documentation and best practices makes it easier for businesses to avail PHP development services to delve deeper into advanced topics. The combination of PHP's ease of use and the support of its community makes it an excellent choice for developing REST APIs, providing both beginners and seasoned developers with the resources they need to succeed.
Conclusion
Building a REST API with PHP is a rewarding project that can enhance your web development skills. Following this guide, you've taken the first step towards creating your API, understanding its foundational concepts, and applying best practices. As want to incorporate more features, refine code, and explore the vast possibilities of RESTful services, the natural choice for them is to hire php developers by outsourcing.
Remember, the key to mastering API development is practice and continuous learning. Experiment with different scenarios, contribute to open-source projects, and stay updated with the latest trends in web development. Your journey as an API developer is just beginning, and the digital world eagerly awaits your contributions.
0 notes
Text
Hướng dẫn fix 🌿💥 Bạn đang gặp lỗi 301 Moved Permanently khi truy cập URL:
🌿💥 Bạn đang gặp lỗi 301 Moved Permanently khi truy cập URL: http://hamyshop.vn/feed/?orderby=rand&order=asc Và nó redirect sang: https://hamyshop.vn/feed/?orderby=rand&order=asc ✅ Giải thích nhanh: 301 Moved Permanently là chuyển hướng vĩnh viễn từ HTTP → HTTPS, hoàn toàn bình thường khi website đã bật SSL (HTTPS). Tuy nhiên, một số tool đọc RSS (như bot hoặc feedburner cũ, cron script PHP…) có…
0 notes