#bitlocker data recovery
Text
Without the Bitlocker key, is there a way to restore Windows?

If you have forgotten your bitlocker key, it could be very difficult to do window restoration. Without the bitlocker recovery key, you will not be able to access your files or recover data on your Windows. If you really want to recover your bitlocker, you can use a third-party data recovery tool.
Many companies provide data recovery services like BLR Data Recovery Tool, Recuva, R-Studio, Stellar, EaseUs, etc.
A free trial version of the tools allows users to scan and view all lost and deleted data.
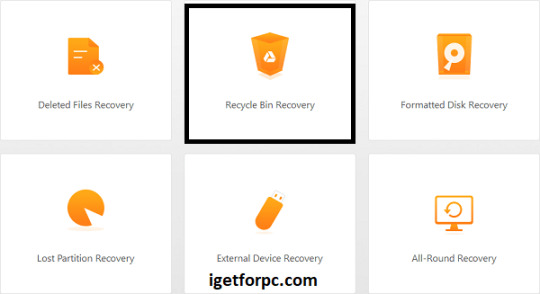
I strongly recommend using the trial version of BLR Data Recovery Tool because it is a powerful and user-friendly software that recovers lost or deleted files from a variety of storage media, including hard disks, SSDs, USB drives, NAS drive, memory cards, Bitlocker, and more. It supports both Windows and Mac operating systems, making it suitable for a wide range of users.
#bitlocker#bitlocker data recovery#bitlocker recovery key#bitlocker data recovery tool#blr data recovery tool#data recovery#data recovery tool#data recovery program#bitlocker data recovery tool free
2 notes
·
View notes
Text
Retrieve Bitlocker recovery key on Microsoft 365 portal

Retrieving your BitLocker recovery key via the Microsoft 365 portal is a straightforward process that can save you in critical situations where you've lost access to your encrypted drive. To start, log into your Microsoft 365 account and go to the Devices section. From there, select the device that’s encrypted with BitLocker. Under the device details, you’ll find the BitLocker recovery key, which you can use to unlock your drive and regain access to your data.
However, if you encounter issues accessing the Microsoft 365 portal or if the recovery key isn’t available, relying on a specialized BitLocker data recovery tool from BLR Tools can be invaluable. This tool is designed to help users recover data from BitLocker-encrypted drives when the recovery key is lost or inaccessible. With advanced algorithms, the BLR BitLocker Data Recovery Tool can bypass encryption barriers and restore your files safely and efficiently. This ensures that even in challenging scenarios, you have a reliable way to recover your important data without compromising security. Whether for personal use or in a business environment, this tool provides peace of mind when dealing with BitLocker encryption.
Visit:- https://medium.com/@business_35188/retrieve-bitlocker-recovery-key-on-microsoft-365-portal-full-guide-cf4ddd9c5561
0 notes
Text
Secure and Efficient Apple Data Recovery in Mumbai
In today's tech-driven world, data loss can happen unexpectedly and can be devastating. Whether you have lost important business documents, cherished memories, or critical personal files, our Apple Data Recovery in Mumbai services are designed to help you recover your valuable data quickly and securely. In addition to our Apple data recovery services, we also specialize in Bitlocker Data Recovery in Mumbai and Ransomware Data Recovery in Mumbai. Read on to find out how we can assist you in restoring your lost data and securing your digital life.

0 notes
Text
Bitlocker Recovery Service Malaysia
Data security is a crucial aspect for any organization or individual. BitLocker Recovery is a feature in Windows that provides data protection to your device by encrypting the entire disk drive.
However, there may be instances when you need to access your encrypted data and cannot do so. This is where BitLocker Recovery comes into play.
In this blog, we will explore the basics of BitLocker Recovery, including its importance and functions. We will also dive into different methods of retrieving your BitLocker Recovery Key, such as through your Microsoft account or using Command Prompt or PowerShell.
Additionally, we will discuss how to verify the correctness of your key and what steps you can take if you have lost it. Stay tuned to learn how to ensure the safety of your valuable data with BitLocker Recovery!
Data Recovery Malaysia
#data recovery malaysia#data recovery#datarecoverymalaysia#datarecoveryservices#data recovery center#hard disk repair malaysia#recovery#data#datarecovery#malaysia#bitlocker#bitlocker recovery
1 note
·
View note
Text
For those who are not aware: Bitlocker is encryption software, it encrypts your computer and makes it impossible to access the information on the computer unless you have the key.
It should be standard practice for IT companies to document the bitlocker keys as they are configuring bitlocker on a computer; generally you would do this by creating a record in your client management software for that specific device and putting the key in the record. Sometimes software can be used to extract that information in the event that it's necessary, but even if there's theoretically a way to extract the key, it should be documented somewhere *other* than on the encrypted computer.
This is something that a lot of IT people fuck up on kind of a lot (we've definitely had problems with missing bitlocker keys and I'm quite happy that the people who didn't document those keys aren't my coworkers anymore).
So what do you do if you want to use encryption software and you're NOT an IT company using a remote management tool that might be able to snag the keys?
When you are setting up encryption, put the encryption key in your password manager. Put it in your password manager. Document the important information that you cannot lose in your password manager. Your password manager is a good place to keep important things like your device encryption key, which you do not want lost or stolen. (If you run your password manager locally on an encrypted computer, export the data every once in a while, save it as an encrypted file, and put the file on your backup drive; you are going to have a bad time if your computer that hosts the only copies of your passwords shits the bed so *make a backup*)
This is my tip for home users for any kind of important recovery codes or software product keys: Print out the key and put it in your underwear drawer. Keep it there with your backup drive. That way you've got your important (small) computer shit in one place that is NOT your computer and is not likely to get shifted around and lost (the way that papers in desks often get shifted around and lost).
2K notes
·
View notes
Text
CrowdStrike'd and BitLocker'd
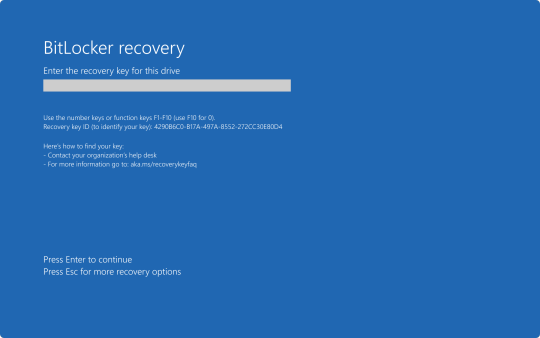
With yesterday's CrowdStrike outage. I'm sure a number of you are probably wondering "what does BitLocker have to do with any of this?" Well, it all has to do with an added layer of security many organizations use to keep data from being stolen if a computers ends up in the hands of an "unauthorized user."
To start, let me briefly explain what the CrowdStrike driver issue did and what the fix for it is.
After the update was automatically installed to computers running the CrowdStrike Falcon Sensor, a faulty driver file caused the Windows kernel on those computers to crash and display a Blue Screen of Death. How Windows typically handles a crash like this is to create a crash log file, then perform a reboot. Since this driver would launch shortly after Windows finished booting, it would cause the operating system to crash and reboot again. When two crashes have occurred in sequence, Windows will automatically boot into Recovery Mode. Hence why we say several pictures of the Recovery Mode screen across social media yesterday.

Unfortunately, this update was automatically pushed out to around 8.5 million computers across several organizations, causing widespread chaos within the matter of a few hours. And the fix for this issue had to be performed by physically accessing each computer, which required those of us working in I.T. to have to run around several facilities, locate each affected computer, and apply the fix one by one.
The short and simple of the fix is either one of two options. You can either use the Recovery Mode that Windows was already booted into to navigate to Start-Up Setting, and launch Safe Mode. Once Windows boots into Safe Mode, the technician can navigate to C:\Windows\System32\Drivers\CrowdStrike, and delete the file C00000291-*.sys. After that the computer can be rebooted as normal, and the crashing will stop.
Or the technician can open System Restore from Recovery Mode. And, assuming there is a recovery point, restore the computer back to a good known working state.
Now, this may all seem simple enough. So why were so many organizations having trouble running this fix? That all has to do with BitLocker. As an added security measure, many organizations use BitLocker on their computers to perform a full hard disk encryption. This is done so that if a computer ends up being lost or stolen, and ends up in the hands of an "unauthorized user" they will not be able to access any of the data stored on the computer without a password to log into the computer, or the computer's BitLocker recovery key.
This presented a problem when trying to restore all of these affected computers, because when either trying to launch Safe Mode or System Restore, the user would be prompted for the BitLocker recovery key.
In my organization's case, we found we could save time by providing our end user the steps to perform one of the two fixes on their own to save time. But the problem we still continue to run into is the need for these BitLocker recovery keys. In my case, I've been fielding several calls where I've had end users walking from one computer to another while I provide them with the key as they walk through reverting back to a previous restore point.
Again, a pretty long story, but hopefully that can provide some context as to what's been happening over the past 48 hours.
30 notes
·
View notes
Text
an unnecessarily long rant about windows 11, bitlocker, bulldozers, and one sad man's quest to format his 2tb nvme ssd
it's incredible how bad microsoft can make a product. windows 11 home pushes bitlocker on my drives without my knowledge or consent, encrypting them without a recovery key. fine. one of the encrypted drives (i have 2) gets corrupted! uh oh! the metadata of the single partition drive is now GONE! oh well! 'twas just my steam library and some stray GOG downloads. no worries! we'll just forma-the drive is now read only and every goddamn low level, registry edit, diskpart solution found anywhere online does squat. can't format the drive because it's read only and bitlocker encrpyted too somehow? okay. maybe the drive being encrypted has something to do with the permanant current read only state. let's go into settings and manage our bitlocker in control panel, yknow, like you've been able to for since it was released in 2013. FIne fine fine i'll go do that. microsoft does not include the ability to manage bitlocker via any other way than command prompt and powershell if you do not pay $100 for windows 11 professional and like WHATEVER right i've been using windows for 15 of my 20 years on this planet i can definitely handle some easy commands except oh wait the commands don't work? and the documentation for them is poor or nonexistant? oh and your now completely RAW drive actually doesn't have the relevant information to remove bitlocker at all???? i fail to see why formatting a drive cares what the fuck is on it anyway??? it's supposed to be like the bulldozer and also the vogons at the start of hitchhiker's guide to the galaxy, right? you just format the drive and all of the everything on it is supposed to get bulldozered and space lasered and filleted into new, clean, workable data! i can't clean the drive with diskpart because it's encrpyted, and i can't decrypt it because it has bad blocks where the metadata is!
#windows 11#ssd#fuck microsoft#bulldozer#diskpart#diskpart sucks#fuck diskpart#fuck bitlocker#bitlocker#for the price of windows 11 pro i can replace the ssd with a gen 4 nvme 2tb crucial drive that is about 2000mb/s faster than what i have#seems like overkill#yes i tried non microsoft tools#they didn't work either#aomei and macrium reflect both did nothing to help me except ask me to throw money at them#there is nothing of value of this drive i just want to format it and reinstall my steam games#fuck this shit#i'm so so so sorry if you read this expecting anything intresting about programming or tech or whatever or a big aha moment but it's just a#ouroborus snake of me getting fist fucked by the ghost of bill and melinda gates' marriage.
27 notes
·
View notes
Text
Last weekend I went and traveled to the other end of the country to see my good friend T. I was gonna put the finishing on the bike I built for him last year (fucked up belt length calculations so I had a new one in tow with the proper size) and also to pick up a leftover PSU of his which will go into the new PC i'll hopefully have together this month still.
T. is the very image of a Linux user, ever the tinkerer and was quite curious about my by this point very well worn MS Surface and the possibility of getting an open-source OS running on it. I was as apprehensive as ever about Linux, but hey just a quick test booting from a USB stick, what could possibly go wrong?
Turns out Windows didnt like these shenanigans and engaged the bitlocker file protection that was apparently enabled, effectively locking the drive. Recovery codes stored on my university account, which is defunct for by this point 4 or 5 years, thankfully none of the data was important. Also booting from USB didnt really work either.
The prospect of a touchscreen paperweight is not grand, not to mention the fact that I had planned on getting work done on next day's 8 hour train journey. So the only way was forward and blasting Arch Linux directly into the thing, with a somewhat guilty feeling T. working overtime to get the thing to working order so I could at least send emails.
2023, year of the Linux tablet, it works. It works really well, after ironing out the kinks with some helpful remote tech support. Arch for all it's reputation has proven itself a solid beginner distro by virtue of incredibly good documentation. Apart from one hiccup with java apps and high dpi displays prior functionality has been entirely restored and it feels zippier to boot.
Big nerd has taken me hostage and buddy I got stockholm's.
#its gotten to the point where I'm earnestly considering the unthinkable and setting up said new PC with linux out the gate#help
2 notes
·
View notes
Text
If you have Windows 11 on your computer, drop what you're doing, back up your data and see if your Microsoft account has your BitLocker recovery key. NOW.
I will leave the reason why I'm issuing this advice as an exercise for the reader, though suffice it to say I am enraged.
1 note
·
View note
Text
Azure Premium SSD v2(Pv2) Updates For Azure Disk Storage

Premium SSD v2 (Pv2)
Premium SSD v2 is typically less expensive than Premium SSDs and provides better performance. Premium SSD v2 (Pv2) discs provide unique performance adjustments (capacity, throughput, and IOPS) that you can make at any moment to match changing performance requirements while keeping workloads economical. A gaming application might require a lot of IOPS, but only during peak hours, or a transaction-intensive database might require a lot of IOPS at a modest size. Because of this, Premium SSD v2 can offer the best price-performance for the majority of general-purpose workloads.
Premium SSD v2(Pv2) is suitable for a wide range of workloads on virtual machines or stateful containers, including big data/analytics, gaming, SQL server, Oracle, MariaDB, SAP, Cassandra, and Mongo DB.
Although 512E sector size can also be used, Premium SSD v2(Pv2) supports 4k physical sector size by default. Certain applications require 512 byte sector sizes, even if the majority of them work with 4k sector sizes. For instance, release 12.2 or later of Oracle Database is needed to support 4k native discs.
Azure Premium SSD vs Premium SSD v2
The Premium SSD v2 lacks specific sizes, in contrast to Premium SSDs. A Premium SSD v2 allows you to customise the supported size to your liking and make fine-tuned performance tweaks without experiencing any downtime. Although Premium SSD v2(Pv2) doesn’t allow host caching, it greatly benefits from lower latency, which solves some of the same fundamental issues that host caching does. The flexibility to change IOPS, throughput, and size as necessary also spares you from the maintenance burden of stripping drives to fit your requirements.
Premium SSD v2 Limitations
The OS cannot be installed on a Premium SSD v2 disc.
Azure Compute Gallery is not compatible with premium SSD v2 discs.
Premium SSD v2 discs are now limited to certain areas of availability.
At this time, only zonal virtual machines (VMs) can be connected to Premium SSD v2 discs.
Customer-managed keys for Premium SSD v2 discs are not supported at this time by Azure Government or Azure China.
With certain restrictions and in certain areas, Premium SSD v2 discs offer encryption at the host. See Encryption at host for additional details.
Virtual machines (VMs) using Premium SSD v2 discs are not supported for Azure Disc Encryption (guest VM encryption via Bitlocker/DM-Crypt). We advise using platform-managed or customer-managed keys for encryption while at rest. Premium SSD v2 is compatible with this method.
At this time, VMs in Availability Sets cannot have Premium SSD v2 discs attached to them.
The Premium SSD v2 disc is not compatible with Azure Site Recovery on virtual machines.
A Premium SSD v2 cannot have its size increased without removing the disc or deallocating the virtual machine.
Host caching is not supported by Premium SSDv2.
Azure Premium SSD v2 availability
See the Premium SSD v2(Pv2) row on the Products available by Region page for a list of the regions that are currently supported.
Only a few availability zones presently offer Premium SSD v2 in the following regions:
Italy North (two zones of availability)
Central Spain (One Zone of Availability)
See What’s new for Azure Disc Storage or Azure Updates to find out when support for specific regions was implemented.
Premium SSD v2 performance
Providing sub-millisecond latencies and provided IOPS and throughput 99.9% of the time is the design goal of Pv2(premium SSD v2) discs. You may customise a disk’s capacity, throughput, and IOPS according to your workload requirements with Premium SSD v2 discs, giving you greater flexibility and lower prices. The price of your disc is determined by each of these factors. A Premium SSD v2 disk’s performance can be changed four times in a 24-hour period.
Premium SSD v2 capacity
The capacities of Pv2(Premium SSD v2) range in 1-GiB increments from 1 GiB to 64 TiBs. For specifics, refer to the pricing page. You are invoiced on a per GiB ratio.
By default, Pv2(Premium SSD v2) provides up to 100 TiB per area per subscription; however, it can accommodate larger capacities upon request. You can ask Azure Support for assistance, seek a quota increase, or request an increase in capacity.
Premium SSD v2 IOPS
There is a complimentary baseline IOPS of 3000 on all Pv2(Premium SSD v2) discs. A disk’s maximum IOPS can reach 80,000 IOPS after 6 GiB, increasing at a rate of 500 per GiB after that. Thus, the maximum IOPS for an 8 GiB disc is 4,000, and the maximum IOPS for a 10 GiB disc is 5,000. A disc needs to have at least 160 GiBs in order to support 80,000 IOPS. Your disc will cost more if you boost your IOPS over 3000.
Premium SSD v2 throughput
A free baseline throughput of 125 MB/s is available on all Premium SSD v2 discs. The maximum set throughput rises by 0.25 MB/s per set IOPS after 6 GiB. A disc with 3,000 IOPS can have a maximum throughput of 750 MB/s. This disc needs to have its IOPS raised in order to increase throughput beyond 750 MB/s. The maximum throughput that may be configured, for instance, is 1,000 if the IOPS is raised to 4,000. For discs with 5,000 IOPS or more, the maximum throughput supported is 1,200 MB/s. Your disc will cost more if you increase the throughput above 125.
Premium SSD v2 sizes
By default, the Premium SSD v2(Pv2) offers a physical sector size of 4k. Additionally supported is a 512E sector size. Certain applications require 512-byte sector sizes, even though the majority work with 4k sector sizes. For instance, release 12.2 or later of Oracle Database is needed to support 4k native discs.
Premium SSD v2 pricing
Azure Premium SSD v2 cost depends on region, disc size, and performance tier. The second-generation Premium SSD has better performance and scalability. The following things can affect pricing:
Bigger discs cost more. In gigabytes, disc sizes are measured.
Performance Tier: Azure offers several performance tiers with varied IOPs and throughput. Tiers with higher performance cost more.
Location: SSD prices vary by location.
Provisioned IOPS and Throughput: Some configurations charge by the amount you supply.
The Azure Pricing Calculator lets you enter your needs for an accurate price estimate.
These hypothetical numbers illustrate the pricing structure, however actual prices may vary:
Disk Size:
100 GB: $0.15 per GB/month
500 GB: $0.14 per GB/month
1 TB: $0.13 per GB/month
Performance Tier:
P1 (500 IOPS, 100 MBps): $1 per provisioned IOPS/month
P2 (2000 IOPS, 250 MBps): $0.75 per provisioned IOPS/month
P3 (7500 IOPS, 1000 MBps): $0.50 per provisioned IOPS/month
Region Example:
US East: Standard pricing
Europe West: 10% more than US East
Asia Pacific: 15% more than US East
For current Premium SSD v2 pricing, check Azure’s official resources or contact support.
Read more on govindhtech.com
#Azurepremium#ssdv2#pv2#azurediskstorage#gaming#workloads#virtualmacinnes#bigdata#analytics#Regionpage#Azuresupport#iops#ssdv2sizes#gigabytes#Azurepricing#technologe#technews#news#govindhtech
0 notes
Text
Exploring Windows Server: An Overview of Features and Capabilities
Windows Server is a powerful operating system designed by Microsoft to cater to the needs of businesses, organizations, and enterprises. This guide provides an overview of Windows Server, highlighting its features, capabilities, and benefits for managing network infrastructure, enhancing security, and facilitating efficient data management.
Introduction to Windows Server
Windows Server is a server operating system developed by Microsoft, offering a robust platform for hosting applications, managing network services, and supporting enterprise-scale operations. It provides a secure and reliable environment for businesses to deploy and manage critical services and applications.
Key Features and Capabilities
1. Server Roles and Services
Windows Server supports a variety of server roles and services essential for enterprise IT environments:
Active Directory: Centralizes network management, user authentication, and access control.
Domain Name System (DNS): Resolves domain names to IP addresses for network communication.
File and Storage Services: Provides file sharing, storage management, and data deduplication capabilities.
Web Services (IIS): Hosts websites, web applications, and services on Windows Server.
Remote Desktop Services (RDS): Enables remote access to desktops and applications for users.
Hyper-V: Virtualization platform for creating and managing virtual machines (VMs).
2. Security and Identity Management
Windows Server emphasizes security with features such as:
Windows Defender: Built-in antivirus and antimalware protection.
BitLocker: Encrypts data on disk drives to prevent unauthorized access.
Network Access Protection (NAP): Ensures compliance with network health policies for connected devices.
Active Directory Certificate Services (AD CS): Issues and manages digital certificates for secure communication.
3. Data Management and Backup
Storage Spaces: Virtualizes storage resources for flexibility and scalability.
Data Deduplication: Reduces storage capacity requirements by eliminating duplicate data.
Windows Server Backup: Provides built-in backup and recovery solutions for data protection.
DFS Replication: Replicates folders between servers for redundancy and disaster recovery.
4. Scalability and Performance
Windows Server supports scalability and high performance with features like:
Failover Clustering: Ensures high availability and reliability of applications and services.
Network Load Balancing (NLB): Distributes incoming network traffic across multiple servers to enhance performance.
Performance Monitoring Tools: Monitors server performance metrics and identifies bottlenecks for optimization.
Benefits of Windows Server
1. Enterprise-grade Reliability
Windows Server offers enterprise-grade reliability and stability, designed to handle mission-critical workloads and applications without compromising performance.
2. Enhanced Security and Compliance
With advanced security features and compliance tools, Windows Server helps organizations protect sensitive data, maintain regulatory compliance, and mitigate security risks.
3. Centralized Management and Administration
Active Directory and Group Policy simplify centralized management and administration of network resources, user accounts, and security policies across the organization.
4. Integration with Microsoft Ecosystem
Windows Server integrates seamlessly with other Microsoft products and services, such as Azure cloud services, Microsoft 365, and System Center, facilitating hybrid cloud environments and modern IT infrastructures.
Future of Windows Server
As organizations embrace digital transformation and cloud computing, Windows Server continues to evolve with innovations in hybrid cloud management, containerization with Kubernetes, and integration with AI-driven analytics for enhanced operational efficiency and agility.
Conclusion
Windows Server remains a cornerstone of enterprise IT infrastructure, offering a versatile platform for hosting applications, managing network services, and ensuring data security and compliance. Its comprehensive features, scalability, and integration capabilities empower organizations to streamline operations, enhance productivity, and adapt to evolving business needs.
0 notes
Video
youtube
BLR BitLocker Pen Drive Data Recovery Tool
1 note
·
View note
Text
Understanding the BitLocker Recovery Key: What It Is and How to Use It

Hey Tumblr friends! 🌟
If you've recently enabled BitLocker on your Windows device and suddenly find yourself staring at a prompt asking for a BitLocker recovery key, you might be wondering what this mysterious key is all about. Let’s dive into the essentials of the BitLocker recovery key, why you might need it, and how to find it when necessary.
What is a BitLocker Recovery Key?
A BitLocker recovery key is a 48-digit numerical password that acts as a backup method to unlock your encrypted drive. This key is generated when you first enable BitLocker on a drive and is crucial for situations where you can’t access your drive through the usual means.
Why Might You Need a BitLocker Recovery Key?
There are several reasons why you might be prompted to enter your BitLocker recovery key:
Forgotten Password: If you forget your BitLocker password, the recovery key is your only way to regain access.
Hardware Changes: Making significant changes to your computer’s hardware, like replacing the motherboard, can trigger the recovery key prompt.
Software Updates: Major updates to your operating system or BIOS might require you to enter the recovery key.
Security Concerns: If BitLocker detects potential security threats or unauthorized access attempts, it will ask for the recovery key.
Where to Find Your BitLocker Recovery Key
If you’re in a pinch and need to find your BitLocker recovery key, here are some common places to check:
Microsoft Account: If you linked BitLocker to your Microsoft account, you can find your key on the Microsoft BitLocker recovery key portal.
USB Drive: If you saved the recovery key to a USB drive, make sure to keep it somewhere safe and accessible.
Printout: Some folks print their recovery key and store it securely.
Azure Active Directory (AAD): If your device is connected to an organization’s AAD, your IT department might have a copy.
File: If you saved the recovery key as a file, it’s usually named something like BitLocker Recovery Key.txt.
What to Do if You Can’t Find Your Recovery Key
If you can’t locate your BitLocker recovery key, your options are unfortunately limited. Without the recovery key, accessing your encrypted data is not possible. This is a vital reminder to store your recovery key securely in multiple locations.
Best Practices for Managing Your BitLocker Recovery Key
Store Multiple Copies: Keep your recovery key in several places, such as your Microsoft account, a USB drive, a printout, and a secure digital file.
Secure Storage: Ensure your recovery key is stored in a safe location, like a safe or encrypted digital storage.
Keep Updated: Regularly update your recovery key and ensure it’s accessible, especially after significant system changes.
By following these best practices, you can avoid the potential frustration and data loss associated with being locked out of your BitLocker-encrypted drive.
For a more detailed guide on BitLocker and managing recovery keys, including step-by-step instructions and troubleshooting tips, check out this Comprehensive BitLocker Recovery Key Guide.
Hope this helps you stay secure and stress-free! If you have any more questions about BitLocker or need further assistance, feel free to drop a comment. 💬✨
Also read our related articals:
How Ad Blockers Might Trigger BSOD Blue Screen
Audio Troubleshooter: Resolve No Sound Issues On Dell Laptop
Laptop Not Connecting To WiFi? Fix Laptop WiFi Issues Today!
How To Fix ‘No Sound’ Issues On Your Laptop Or PC: A Comprehensive Guide
1 note
·
View note
Text
Download iMyFone AnyRecover 5.3.1.15 Full Free Activated
May 17, 2024
iMyFone AnyRecover Crack + License Key {Latest}
iMyFone AnyRecover data recovery software Full Version helps you to recover emails, videos, documents, images and a variety of other data with its clever and superficial features.it is a best and easy Software developed to help users to recover lost or deleted files from a variety of storage systems. It supports recovery from hard drives, memory cards, USB flash drives, and other digital storage mediums. AnyRecover can be particularly useful in situations where data has been lost due to accidental deletion, formatting, device corruption, or computer virus attacks.
Additionally, iMyFone AnyRecover Activation Key can recover your valuable data from Windows, Mac (M1, M2 supported), SSD, external drive, camera, drone, dashcam, camcorder, video, music player, hard drive, USB, SD cards, etc. Overall, iMyFone AnyRecover 4.5.0 cracked is aims to provide a reliable solution for data recovery needs across various operating systems, including Windows and macOS. the software supports recovery from different file systems such as FAT, exFAT, NTFS, and more.
You Can Also Download: Undelete 360
Key Features iMyFone AnyRecover:
iMyFone AnyRecover data recovery Free Download software recover delete or lost data from iOS device, iTunes, iCloud.
this software Recover any iOS data like photos, contacts, WhatsApp, call history, videos, app data, etc.
You can Save iOS data lost by accidental deletion, factory resetting etc.
Preview detailed iOS files (both deleted and existing files) before recovery.
It Support all iOS devices and iOS versions including iOS 17, iPhone 14 and iPhone 15.
Your best data recovery specialist for Windows, Mac, iOS and Android.
This software Restore deleted files from Recycle Bin, HDD, SSD, USB, SD card, etc.
Also, Recover deleted document, pictures, videos, emails and other files in 1 click.
In addition, It Can recover files from popular cloud storage services like Dropbox and Google Drive.
Allows pause, save, and resume of recovery sessions for flexible data restoration.
Recovers data from BitLocker-encrypted drives with decryption.
What’s New in Version iMyFone AnyRecover 8.5.5?
This release Comes with Optimizes the recovery quality, especially the data recovery of FAT/FAT32/NTFS
file systems, so more data can be recovered.
This new version Optimizes the scanning process and shortens the recovery time.
iMyFone AnyRecover Registration Code Supports to scan the partitioned disks.
Additionally, it now Support to recover data from BitLocker encrypted disks.
It now Support devices with APFS and HFS+ file systems.
This supports Window 12 and macOS 11.0.
iMyFone AnyRecover Supports the Following File Types:
Documents: PPT/PPTX, PDF, DOC/DOCX, XLS/XLSX, and more.
Graphics: JPG, PNG, GIF, TIFF, BMP, PSD, and various camera raw formats like CRW, CR2, NEF, ORF.
Videos: AVI, MOV, MP4, MKV, WMV, and other popular video formats.
Audio Files: MP3, WAV, WMA, AAC, M4A, and other common audio formats.
Emails: File types from various email clients, including PST, EMLX.
Archives: ZIP, RAR, ISO,
System Requirements:
For Windows:
Operating System: Windows 11,10, 8.1, 8, 7, XP
CPU/Processor: 1GHz (32 bit or 64 bit) or higher
RAM: 256 MB or more of RAM (1024MB Recommended)
Hard Disk Space: At least 200 MB of free space
For macOS:
Operating System: macOS 10.10 and later (up to the latest macOS)
CPU/Processor: 1GHz Intel or higher
RAM: 512 MB or more
Hard Disk Space: At least 200 MB of free space
How to Install iMyFone AnyRecover Crack Free Download?
Click the link below to begin the iMyFone AnyRecover Data recovery Crack Free Download. This is a complete offline installer standalone setup for the Windows Operating System. This would be compatible with both 32 and 64-bit Windows.
0 notes
Text
Windows 11 Set to Activate BitLocker Storage Encryption By Default

Reports suggest that in an upcoming update, a fresh installation of Windows 11 will automatically trigger BitLocker encryption on the hard drive by default, as observed in the Insider Preview build. This move, aimed at bolstering security, underscores the importance of securely storing the recovery key. The forthcoming Windows 11 update (24H2) streamlines the setup process by initiating BitLocker automatically, as per Deskmodder.de.
BitLocker, a native feature introduced with Windows Vista, encrypts entire volumes, rendering data inaccessible without the encryption key. While this default encryption enhances security against unauthorized access in case of theft or loss, concerns arise regarding potential data loss during Windows reinstallation for users who are unaware of this feature.
As per Deskmodder.de's report, this alteration applies to all editions of Windows, including "Home," "Pro," and higher tiers. Following the update, Device Encryption will be automatically enabled in the device security settings for all computers. However, the actual encryption of drives will not occur immediately.
Deskmodder.de advises caution for those who perform a fresh installation with the 24H2 update. It's crucial to verify the encryption status beforehand. Users should either deactivate encryption, reverse the encryption process, or securely store the BitLocker key. This warning is essential because Windows not only encrypts the system disk (C:) but also all connected hard drives. Users also have the option to circumvent encryption during installation by adjusting the registry key or creating custom bootable installation media using tools like Rufus or similar software.
Read the full article
0 notes
Text
How to enable and use 256-bit BitLocker in Windows 11
How to enable and use 256-bit BitLocker in Windows 11
How to enable 256-bit BitLocker in Windows 11
BitLocker is a built-in encryption tool in Windows 11 that helps protect your data by encrypting your whole operating system and files within it. In case you lose your computer, your data will be protected. However, the feature is exclusive to Pro and Enterprise editions of the Windows operating system.
We strongly recommend specifying the encryption method. By default, BitLocker uses XTS-AES-128. You can opt XTS-AES-256 for stronger security.
If you already have enabled BitLocker on your PC, you will need to unencrypt your drives, enable 256-bit encryption in Windows group policy, and then re-enable BitLocker. If you haven't enabled BitLocker on your PC yet, follow the steps below to enable 256-bit encryption:
Press Windows Key + R to open the Run dialog
Type gpedit.msc and press Enter
Go to Computer Configuration\Administrative Templates\Windows Components\BitLocker Drive Encryption. Look for the "Choose drive encryption method and cipher strength" option for the most recent operating version. For me it was Windows 10 (1511) and double click it.
Make sure you choose the correct options:
It is best to use XTS-AES-256 for operating system drives and fixed drives. Use AES-CBC 256-bit for removable drives so it is more compatible with other devices.
How to Use Bitlocker in Windows 11
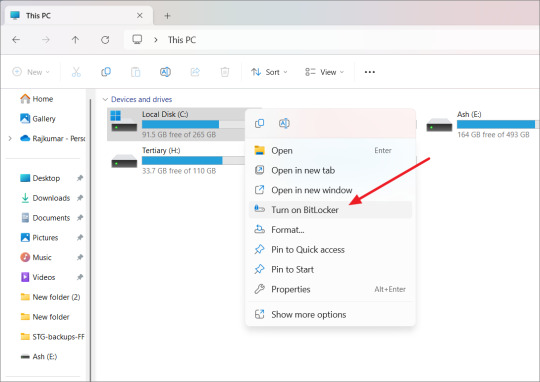
Windows 11 allows you to enable BitLocker for operating system drives, fixed drives, as well as removable drives. To turn on Bitlocker on a drive, follow these steps:
Open File Explorer and right-click on the drive you want to encrypt, then select 'Turn on BitLocker' from the context menu.

When you open the BitLocker Drive Encryption wizard, choose how you want to unlock your drive and click 'Next'. You can pick either a password or a smart card to unlock the drive:
Password: Create a password using a mix of capital and lowercase letters, numbers, spaces, and symbols.
Smart Card: You can use a Smart card along with a PIN to unlock the encrypted drive. The card needs to be inserted into your computer every time you want to access the drive.
Select how you want to save your recovery key, which you can use to unlock your drive if you forget your password or lose your smart card. There are a few ways:
Save to Microsoft Account: If you're signed in with a Microsoft account, you can save the recovery key there.
Save to a file: Save the recovery key as a document on your computer.
Print the recovery key: Print the recovery key on paper.
After backing up the recovery key, click 'Next' to continue.
Select how much of the selected drive you want to encrypt and click 'Next'.
Encrypt used disk space only: This is quicker and good for new computers or drives. Only the space with data will be encrypted.
Encrypt the entire drive: This is slower but better if you want to encrypt everything, even unused space. It's best for drives you've been using for a while.
BitLocker will keep encrypting new data as you add it.
Select an encryption mode:
New encryption mode: This is advanced and better for fixed drives on Windows 10 or 11.
Compatible mode: Use this for portable drives you might use on older Windows versions.
If you would like to run a system check before encrypting the drive, check the 'Run BitLocker system check' option and click 'Continue'. This system check ensures whether BitLocker can read the recovery and encryption keys properly.
Click 'Restart now' to continue. After the restart, the system will automatically encrypt the drive.
By the way , if you need Windows 11 Product key to activate your Windows 11 PC, you can get it from the Microsoft Partner Keyingo.com with discounts !
0 notes
Last Seen Blogs

cloudyjenn
Cloudy Jenn

victoriajwashingtonoreos
David. just David.

noahfosterlovebot
rosie :)

lwickedg
Untitled

fliesandfins
Flies and Fins