#restore page using SSMS
Explore tagged Tumblr posts
Visit Tumblr Blog
Explore Tumblr blogs with no restrictions, modern design and the best experience.
Last Seen Tumblr Blogs


Fun Fact
Tumblr has 4 main sources of revenue.
Text
Data Recovery : Page level restore in SQL Server
Data Recovery : Page level restore in SQL Server

In this article, we shall discuss the importance of understanding the internals of the page restoration for a database administrator. Most of the time, performing a page-level restore suffices for database availability. A good backup strategy is a key to recovery or restoration, and SQL Server provides us with an option to fix database pages at a granular level. Performing a page level restore in…
View On WordPress
#dbcc checkdb#dbcc examples#dbcc ind#dbcc page#page level restore in sql server#restore page using SSMS#restore page using T-SQL
0 notes
Text
Setting up Always On SQL Clustering Group, with Microsoft Server 2016 and VMWare

Setting up clusters in Windows Server 2016 has become so easy. However; When integrating it with other environments, like VMWare, and AO SQL Clustering. It can get quite Tricky. First we want to setup our environment in VSphere. Next we will setup Windows Server 2016 with Failover Clustering. Then we’ll make sure to make some adjustments to DNS. Finally, We will setup AlwaysOn SQL Clustering.

Please make sure you have .NET Framework 3.5.1 or greater on the servers. Then We will need to create 2 VMs with 3 drives each. Then we will need to make sure that the drives are online, and available from other locations. However one main aspect that I had overlooked was that the Virtual Disks have to be created Eager Zero Thick not Lazy Zero Thick. I made the heinous mistake of using Lazy Zero Thick, and then could not understand why I was having so many problems.
Note: When creating virtual disks with Eager Zero Thick, it does take longer than using the faster Lazy Zero Thick option. Eager Zero Thick Disks allocates the space for the virtual disk, then zeros it all out unlike the Lazy Zero Thick which only allocates the space.
You also generally wouldn’t use Eager Zero Thick except for Microsoft clustering and Oracle programs. Once the disks are created we are reading to install Windows Server 2016.

Install either Datacenter edition or Standard edition. For this example we’ll use the standard edition. Install all the Microsoft Windows feature updates and verify that you have already allocated all the resources needed. Check that the additional Virtual Disks are available, and make sure you install the Failover Cluster feature. You may want to reboot after the feature is installed, if you have not done so. Once you installed the feature go to the Failover Cluster Manager and prepare to create the cluster. If this is a two node cluster be sure to add a Witness Server or Desktop. Once this is created and validated, go to your computer manager and verify that the virtual disks are online and initialized. Next, you will want to configure the cluster quorum settings. I created a separate server for this quorum and configured a File share witness.
Now, make sure you can access these from another computer on the secured network. You will have to setup a Host A record round robin DNS situation, where you give a specified name the 2 failover cluster nodes IP adresses in the Host address. Example: if the nodes had up address of 192.168.1.43 and 192.168.1.44. Then the two Host records you would need to create are AOSqlServer -> 192.168.1.43 and AOSqlServer -> 192.169.1.44
Finally, We will enable AlwaysOn Availability Groups on SQL Server 2016.
After Installing SQL Server 2012 or 2014 Enterprise edition on all the replicas. Please install it on as a stand-alone instance, and then we will configure SQL Server. Once you expand SQL Server Network Configuration node, and click on Protocols for MSSQLServer, you will see the TCP/IP dialog box on the right panel. Right click on the TCP/IP entry and select Enable.
In SQL Server Configuration Manager, right click on SQL Server Services to open the Properties dialog box. Navigate to the AlwaysOn High Availability tab to select the “Enable AlwaysOn Availability Groups.

Now we must configure the login accounts and the replicas that will need read write privileges.
First verify that your SQL Service Account is there and is a domain account, not a local machine account. Now login through SQL Management Studio (SSMS). Add you SQL Service account to the Administrators group on each replica (via computer management). Then allow connect permissions to the SQL Service account through SSMS: Right click on the SQL Service login to open the Properties dialog box. On each replica navigate to the Securables page and make sure Connect SQL Grant box is checked and allow remote connections. You can do this by using SSMS in the instance properties or by using sp_configure.
EXEC sp_configure ‘remote access’, 1;
GO
RECONFIGURE;
GO
Now we will create the file share through the Server Manager that the SQL Service account, and the replicas can access. The File is for the initial backup/restore process that happens to the databases when you join the AlwaysOn group during setup.

Last thing is to install the AlwaysOn Availability group. Once you’s ensured that full backups have been created, and all databases are in Full recovery mode, you will have to remove these databases from the tlog backup maintenece during the installation of Always on (you can always add them back). It could cause errors with both tlogs backing up while AlwaysOn is being created.
On you primary, open SSMS and expand the AlwaysOn High Availablity folder. Right click on the Availability Groups and select New Availability Group Wizard.

Select only the databases you want to include in the AlwaysOn group.
Next to the databases you will see the status with a blue link. If you see "Meets Prerequisites” it will signify that these databases are included in your group. If it does not say "Meets Prerequisites”, then click on the link to see more details on what needs to be corrected.
Now, you will specify and Add the Replicas. You will need to specify if you want Automatic or Manual Failover, Synchronous or Asynchronous Data Replication, and the type of Connections you are allowing to the end users.
Be sure to view the troubleshooting page if you have any issues:
http://blogs.msdn.com/b/alwaysonpro/archive/2013/12/09/trouble-shoot-error.aspx
The backup preferences tab will assist in choosing the type of backup and to prioritize the replica backups.
In the Listener tab, you will create an availability group listener button, Enter the string DNS name, enter port 1433 and enter the IP address for your listener, which should be an unused IP address on the network.
Next, you will Select Initial Data Synchronization page, join the databases to the Always on group, then verify the Full option is selected for using File Shares. For large databases select Join or Skip to restore the databases to the secondary replica. We will use Full for now. Last thing to do here is remember the SQL Service accounts and set that all replicas have read/write permissions to the file Share or it will not work.
Run the Validation checks, and make sure it the results are successful.
That is it, once you get that done you should have High availability and AlwaysOn SQL Server. I hope you’ve enjoyed this instructional blog. Please come back and visit us to see other projects.
#Always On SQL Server#High Availability SQL#Failover Cluster#SQL Failover Cluster#VMWare Failover Cluster#VMWare with MS Failover Cluster#VMWare with MSFC#AlwaysOn SQL
1 note
·
View note
Text
Migrate Your SQL Server Database to Amazon RDS
Amazon RDS is a web service that provides cloud database functionality for developers looking for a cost-effective and simple way to manage databases. If you’re looking to migrate your existing SQL database to RDS, this is the guide for you. RDS offers six database engines: 1. Amazon Aurora 2. Microsoft SQL Server 3. Oracle 4. PostgreSQL 5. MYSQL 6. MariaDB With RDS, there is no need for you to buy any other rack and stack hardware or install any software.The complexity of moving your existing Microsoft SQL Server to Amazon RDS is mostly determined by the size of your database and the types of database objects which you are transferring. For example, migrating a database which has data sets on the order of gigabytes along with stored triggers and procedures is going to be more complex than migrating a modest database with only few megabytes of test data and no stored procedures or triggers. Why You Might Consider Migrating Your SQL Database to Amazon RDS RDS allows developers to set up database instances in the cloud. Developers are relieved of the complexity of managing and maintenance of the database. Instead, they can focus on developing successful products. There’s one issue, however: There is no file system access. Though this is usually not a huge problem, it becomes a concern if you are trying to restore or create an SQL Server backup (.bak) file. This may sound like a daunting task, but it is in fact quite easy. In this post, we have tried to provide you with some easy steps to migrate your SQL Server database to Amazon RDS: 1. The first step would be to take a snapshot of the source RDS instance. 2. Secondly, you will have to disable automatic backups on the origin RDS instance. 3. Now, create your target database by disabling all foreign key constraints and triggers. 4. Import all the logins into the destination database. 5. The next step is creating the schema DDL with the help of the Generate and Publish Scripts Wizard in SSMS. 6. Next, execute the SQL commands on your target DBA to create your schema. 7. You can use either the bulk copy command (cp) or the Import/Export Wizard in SSMS to migrate your data from the origin database to your target database. Migrate Your SQL Server Database to Amazon RDS 8. Clean up the target database by re-enabling the foreign key constraints and triggers. 9. Again re-enable the automatic backups on the source RDS instance. Thankfully, after experimenting with this process many times, we found a better solution not documented in the AWS documentation. SQL Azure Migration Wizard To save time and avoid errors, we have discovered a new and better solution called the SQL Azure Migration Wizard. With SQL Azure Migration Wizard, the process of migrating databases (or anything including views/tablse/stored procedures) in, out, or between RDS instances is much easier and faster. To migrate your SQL database to Amazon RDS using SQL Azure Migration Wizard, follow these easy steps. Step1: Download the SQLAzureMW Tool Download SQL Azure Migration Wizard on CodePlex. Next, you need to extract the SQLAzureMW.exe file. You can utilize SQL Server Management Studio for connecting your local SQL server and Amazon Web Service RDS instance. But, before doing all this, make sure that you have a good connection to these two servers. Step 2: Begin the Migration Double click on the SQLAzureMW.exe file. A page will appear on your screen and what you now need to do is to select Database as an option under the Analyze/Migrate category. Once you do this, click on the Next button. Step 3: Source Database Tasks Now enter your Source SQL Server Database connection details and click on the Connect button. Choose the source database and click on the button that says ‘Next.’ Then select an option named as ‘Script all database objects’.This option can enable to do the complete migration of the database. But if you don’t want to migrate entire database then you select an option that says ‘Select specific database objects.’ Step 4: Create Scripts Create scripts for all selected SQL server objects. You should save the script on local hard drive and the move ahead by hitting a click on a button ‘Next’. Step 5: Destination Database Process Now you have created a script of your database. You will now be required to enter your RDS SQL Server connection credentials and then connect it. Step 6: Select the Target Database Choose the target database that you would like to migrate. If you have not created any database earlier, then create a new one using Create Database option and go next. Be sure to do a quick check to confirm if there are any errors. Step 7: The Grand Finale You can now verify your SQL Server Management Studio and check all the migrated data. As you can see, SQL Azure Migration Wizard saves a lot of time. You will have to modify settings in your corporate firewall if your database is on-premises. In case your database is already hosted on Amazon Web Services, you can also add an entry to your instance’s security group. Next, what you have to do is simple: launch and prepare an Amazon RDS instance running SQL. Then restore the database from the SQL dump and take note of the current log file name. Now you will use the database dump to start the RDS instance. Once the RDS instance is initialized, you will be required to run the replication stored procedures that are supplied as part of the release to configure the RDS instance. Once your RDS instance matches any changes that have taken place, the application configuration can be modified to use it in preference to the existing version. Summary Thus sums up the process on how to migrate a SQL Server database to Amazon RDS. The process of data migration is not a very complicated process but a very easy one indeed. We hope that this post was useful enough in helping all those who want to migrate their SQL Server Database to Amazon RDS.
#database Management services provider#sql server dba service providers#DBA service providers#remote DBA services providers
0 notes
Text
Install Docker On Windows 2019

Estimated reading time: 6 minutes
NOTE: Currently not compatible with Apple Silicon (ARM). This project relies on Docker which has not been ported to Apple Silicon yet. If you are running Windows, download the latest release and add the binary into your PATH. If you are using Chocolatey then run: choco install act-cli. If you are using Scoop then run: scoop install act.
Nov 07, 2019 Here’s how you can install Docker on Windows 10 64-bit: Enable Hyper-V in your system. Download Docker Desktop for Windows and open the Docker for Windows Installer file. In the Configuration dialog window, check or uncheck the boxes based on your preferences.
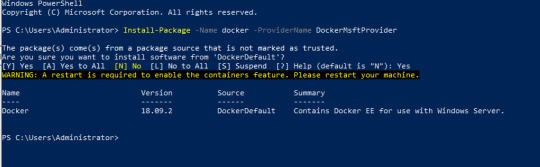
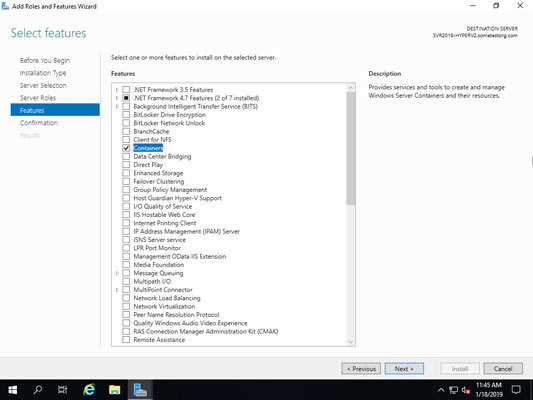
This will install the Docker-Microsoft PackageManagement Provider from the PowerShell Gallery. Sample output is as shown below: Step 2: Install Docker on Windows Server 2019. Once the Containers feature is enabled on Windows Server 2019, install the latest Docker Engine and Client by running the command below in your PowerShell session.
Docker Desktop for Windows is the Community version of Docker for Microsoft Windows.You can download Docker Desktop for Windows from Docker Hub.
By downloading Docker Desktop, you agree to the terms of the Docker Software End User License Agreement and the Docker Data Processing Agreement.
System requirements
Your Windows machine must meet the following requirements to successfully install Docker Desktop.
Hyper-V backend and Windows containers
Windows 10 64-bit: Pro, Enterprise, or Education (Build 17134 or higher).
For Windows 10 Home, see System requirements for WSL 2 backend.
Hyper-V and Containers Windows features must be enabled.
The following hardware prerequisites are required to successfully run ClientHyper-V on Windows 10:
64 bit processor with Second Level Address Translation (SLAT)
4GB system RAM
BIOS-level hardware virtualization support must be enabled in theBIOS settings. For more information, seeVirtualization.
WSL 2 backend
Windows 10 64-bit: Home, Pro, Enterprise, or Education, version 1903 (Build 18362 or higher).
Enable the WSL 2 feature on Windows. For detailed instructions, refer to the Microsoft documentation.
The following hardware prerequisites are required to successfully runWSL 2 on Windows 10:
64-bit processor with Second Level Address Translation (SLAT)
4GB system RAM
BIOS-level hardware virtualization support must be enabled in theBIOS settings. For more information, seeVirtualization.
Download and install the Linux kernel update package.
Note
Docker supports Docker Desktop on Windows for those versions of Windows 10 that are still within Microsoft’s servicing timeline.
What’s included in the installer
The Docker Desktop installation includes Docker Engine,Docker CLI client, Docker Compose,Notary,Kubernetes,and Credential Helper.

Containers and images created with Docker Desktop are shared between alluser accounts on machines where it is installed. This is because all Windowsaccounts use the same VM to build and run containers. Note that it is not possible to share containers and images between user accounts when using the Docker Desktop WSL 2 backend.
Nested virtualization scenarios, such as running Docker Desktop on aVMWare or Parallels instance might work, but there are no guarantees. Formore information, see Running Docker Desktop in nested virtualization scenarios.
About Windows containers
Looking for information on using Windows containers?
Switch between Windows and Linux containersdescribes how you can toggle between Linux and Windows containers in Docker Desktop and points you to the tutorial mentioned above.
Getting Started with Windows Containers (Lab)provides a tutorial on how to set up and run Windows containers on Windows 10, Windows Server 2016 and Windows Server 2019. It shows you how to use a MusicStore applicationwith Windows containers.
Docker Container Platform for Windows articles and blogposts on the Docker website.
Install Docker Desktop on Windows
Double-click Docker Desktop Installer.exe to run the installer.
If you haven’t already downloaded the installer (Docker Desktop Installer.exe), you can get it from Docker Hub. It typically downloads to your Downloads folder, or you can run it from the recent downloads bar at the bottom of your web browser.
When prompted, ensure the Enable Hyper-V Windows Features or the Install required Windows components for WSL 2 option is selected on the Configuration page.
Follow the instructions on the installation wizard to authorize the installer and proceed with the install.
When the installation is successful, click Close to complete the installation process.
If your admin account is different to your user account, you must add the user to the docker-users group. Run Computer Management as an administrator and navigate to Local Users and Groups > Groups > docker-users. Right-click to add the user to the group.Log out and log back in for the changes to take effect.
Start Docker Desktop
Docker Desktop does not start automatically after installation. To start Docker Desktop, search for Docker, and select Docker Desktop in the search results.
When the whale icon in the status bar stays steady, Docker Desktop is up-and-running, and is accessible from any terminal window.
If the whale icon is hidden in the Notifications area, click the up arrow on thetaskbar to show it. To learn more, see Docker Settings.
When the initialization is complete, Docker Desktop launches the onboarding tutorial. The tutorial includes a simple exercise to build an example Docker image, run it as a container, push and save the image to Docker Hub.
Congratulations! You are now successfully running Docker Desktop on Windows.
If you would like to rerun the tutorial, go to the Docker Desktop menu and select Learn.
Automatic updates
Starting with Docker Desktop 3.0.0, updates to Docker Desktop will be available automatically as delta updates from the previous version.
When an update is available, Docker Desktop automatically downloads it to your machine and displays an icon to indicate the availability of a newer version. All you need to do now is to click Update and restart from the Docker menu. This installs the latest update and restarts Docker Desktop for the changes to take effect.
Uninstall Docker Desktop
To uninstall Docker Desktop from your Windows machine:
From the Windows Start menu, select Settings > Apps > Apps & features.
Select Docker Desktop from the Apps & features list and then select Uninstall.
Click Uninstall to confirm your selection.
Important
Uninstalling Docker Desktop destroys Docker containers, images, volumes, andother Docker related data local to the machine, and removes the files generatedby the application. Refer to the back up and restore datasection to learn how to preserve important data before uninstalling.
Where to go next
Getting started introduces Docker Desktop for Windows.
Get started with Docker is a tutorial that teaches you how todeploy a multi-service stack.
Troubleshooting describes common problems, workarounds, andhow to get support.
FAQs provide answers to frequently asked questions.
Release notes lists component updates, new features, and improvements associated with Docker Desktop releases.
Back up and restore data provides instructions on backing up and restoring data related to Docker.
windows, install, download, run, docker, local
Microsoft SQL Server is a database system that comprises many components, including the Database Engine, Analysis Services, Reporting Services, SQL Server Graph Databases, SQL Server Machine Learning Services, and several other components.
SQL Server 2019 has a lot of new features:
Intelligence across all your data with Big Data Clusters
Choice of language and platform
Industry-leading performance
Most secured data platform
Unparalleled high availability
End-to-end mobile BI
SQL Server on Azure
Download SQL Server 2019
Step 1 : Go to https://www.microsoft.com/en-us/evalcenter/evaluate-sql-server-2019.
Install Docker Engine On Windows 2019
Step 2 :To download the installer you need to fill a short form and provide your contact information.
Run the installer
Step 3 :After the download completes, run the downloaded file. Select Basic installation type.
Step 4 :Select ACCEPT to accept the license terms.
Step 5 :Accept the install location, and click INSTALL.
Step 6 :When the download completes, installation will automatically begin.
Step 7 :After installation completes, select CLOSE.
Step 8 :After this has completed, you will have SQL Server 2019 Installation Center installed.
Install SQL Server Management Studio
The steps for installing SQL Server Management Studio are as follows:
Install Docker On Windows Server 2019 Without Internet
Step 9 :Open the SQL Server 2019 Installation Center application
Step 10 :Select installation on the left pane, then install SQL Server Management tools.
Step 11 :Select Download SQL Server Management Studio (SSMS).
Step 12 :After the download completes, click RUN
Step 13 :Then INSTALL
Install Docker On Windows Server 2019 Offline
Step 14 :When installation completes, click CLOSE.
Step 15 :After this has completed, you will have several new software apps installed, including SQL Server Management Studio.
Use SQL Server Management Studio
Step 16 :When you open the SQL Server Management Studio application, you’ll first see a Connect to Server window. This window allows you to establish a connection with the SQL Server instance that you already installed. The Server Name will show instance you installed, and the Authentication will show Windows Authentication. The Server Type is Database Engine.
Install Docker On Windows 2019 Iso
Step 17 :Click the CONNECT button.
0 notes
Text
Ms Sql Server For Mac

Sql Server Studio Mac
Ms Sql Server Management Studio For Mac
Ms Sql Server 2019 For Mac
Ms Sql Server Download For Mac
Here I’ll show you how to get SQL Server up and running on your Mac in less than half an hour. And the best part is, you’ll have SQL Server running locally without needing any virtualization software.
Prior to SQL Server 2017, if you wanted to run SQL Server on your Mac, you first had to create a virtual machine (using VirtualBox, Parallels Desktop, VMware Fusion, or Bootcamp), then install Windows onto that VM, then finally SQL Server. This is still a valid option depending on your requirements (here’s how to install SQL Server on a Mac with VirtualBox if you’d like to try that method). Zip unlocker online.
My employer produces a simple, proof-of-concept HTML5-based SQL client which can be used against any ODBC data source on the web-browser host machine, through the HTML5 WebDB-to-ODBC Bridge we also produce. These components are free, for Mac, Windows, and more. Applicable to many of the other answers here - the Type 1 JDBC-to-ODBC Bridge that most are referring to is the one Sun built in to. Microsoft sql server 2008 free download - Microsoft Office 2008 update, Actual ODBC SQL Server driver, MySQL Database Server, and many more programs. There are some suggestions on SQL Server on Mac to run SQL Server in a VM. However what is interesting is that earlier this year MS announced SQL Server to run on Linux. Announcing SQL Server on Linux. Public preview of the next release of SQL Server. And also instructions for installing SQL Server via Docker.
Starting with SQL Server 2017, you can now install SQL Server directly on to a Linux machine. And because macOS is Unix based (and Linux is Unix based), you can run SQL Server for Linux on your Mac. The way to do this is to run SQL Server on Docker.
So let’s go ahead and install Docker. Then we’ll download and install SQL Server.
Sql Server Studio Mac
Install Docker
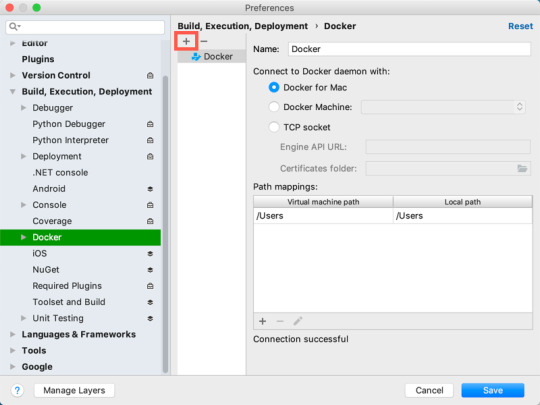
Download the (free) Docker Community Edition for Mac (unless you’ve already got it installed on your system). This will enable you to run SQL Server from within a Docker container.
To download, visit the Docker CE for Mac download page and click Get Docker.
To install, double-click on the .dmg file and then drag the Docker.app icon to your Application folder.
What is Docker?
Docker is a platform that enables software to run in its own isolated environment. SQL Server (from 2017) can be run on Docker in its own isolated container. Once Docker is installed, you simply download — or “pull” — the SQL Server on Linux Docker Image to your Mac, then run it as a Docker container. This container is an isolated environment that contains everything SQL Server needs to run.
Launch Docker
Launch Docker the same way you’d launch any other application (eg, via the Applications folder, the Launchpad, etc).
When you open Docker, you might be prompted for your password so that Docker can install its networking components and links to the Docker apps. Go ahead and provide your password, as Docker needs this to run.
Increase the Memory
By default, Docker will have 2GB of memory allocated to it. SQL Server needs at least 3.25GB. To be safe, increase it to 4GB if you can.
To do this:
Select Preferences from the little Docker icon in the top menu
Slide the memory slider up to at least 4GB
Click Apply & Restart
Download SQL Server
Now that Docker is installed and its memory has been increased, we can download and install SQL Server for Linux.
Open a Terminal window and run the following command.
This downloads the latest SQL Server 2019 for Linux Docker image to your computer.
You can also check for the latest container version on the Docker website if you wish.
Update: When I first wrote this article, I used the following image:
Which downloaded SQL Server 2017. Therefore, the examples below reflect that version.
Launch the Docker Image
Run the following command to launch an instance of the Docker image you just downloaded: Free sims download for mac.
But of course, use your own name and password. Also, if you downloaded a different Docker image, replace microsoft/mssql-server-linux with the one you downloaded.
Here’s an explanation of the parameters:
-dThis optional parameter launches the Docker container in daemon mode. This means that it runs in the background and doesn’t need its own Terminal window open. You can omit this parameter to have the container run in its own Terminal window.--name sql_server_demoAnother optional parameter. This parameter allows you to name the container. This can be handy when stopping and starting your container from the Terminal.-e 'ACCEPT_EULA=Y'The Y shows that you agree with the EULA (End User Licence Agreement). This is required in order to have SQL Server for Linux run on your Mac.-e 'SA_PASSWORD=reallyStrongPwd123'Required parameter that sets the sa database password.-p 1433:1433This maps the local port 1433 to port 1433 on the container. This is the default TCP port that SQL Server uses to listen for connections.microsoft/mssql-server-linuxThis tells Docker which image to use. If you downloaded a different one, use it instead.
Password Strength
If you get the following error at this step, try again, but with a stronger password.
I received this error when using reallyStrongPwd as the password (but of course, it’s not a really strong password!). I was able to overcome this by adding some numbers to the end. However, if it wasn’t just a demo I’d definitely make it stronger than a few dictionary words and numbers.
Check the Docker container (optional)
You can type the following command to check that the Docker container is running.
If it’s up and running, it should return something like this:
Install sql-cli (unless already installed)
Run the following command to install the sql-cli command line tool. This tool allows you to run queries and other commands against your SQL Server instance.
This assumes you have NodeJs installed. If you don’t, download it from Nodejs.org first. Installing NodeJs will automatically install npm which is what we use in this command to install sql-cli.
Permissions Error?
If you get an error, and part of it reads something like Please try running this command again as root/Administrator, try again, but this time prepend sudo to your command:
Connect to SQL Server
Now that sql-cli is installed, we can start working with SQL Server via the Terminal window on our Mac.
Connect to SQL Server using the mssql command, followed by the username and password parameters.
You should see something like this:
This means you’ve successfully connected to your instance of SQL Server.
Run a Quick Test
Run a quick test to check that SQL Server is up and running and you can query it.
For example, you can run the following command to see which version of SQL Server your running:
If it’s running, you should see something like this (but of course, this will depend on which version you’re running):
If you see a message like this, congratulations — SQL Server is now up and running on your Mac!
A SQL Server GUI for your Mac – Azure Data Studio
Azure Data Studio (formerly SQL Operations Studio) is a free GUI management tool that you can use to manage SQL Server on your Mac. You can use it to create and manage databases, write queries, backup and restore databases, and more.
BS.Player - the best multimedia player (WebM, HD and AVC video, movie, audio, DVD, YouTube) in the world!BS.Player ™ is used by more than 70 million multi media users throughout the world and it has been translated into more than 90 languages worldwide. Now, you can finally enjoy the playback of HD DVD and AVCHD movies of the highest quality with minimal system requirements. Because it does not use much of the CPU processing resources for multimedia playback it is suitable for all those who use slightly less capable computers. All downloaded versions of our FREE version exceed the sum of all downloads of competitive media players and payable WebM or DVD players. Download bs player for mac. BS.Player can playback any YouTube movie directly from the internet and save it to local disk.Most importantly, BS.Player ™, a free media movie player, is a product for the world multi media market and is therefore equipped with advanced subtitle options which enable the users to watch video content with subtitles from many popular subtitle formats (MicroDVD.sub, VobSub.sub +.idx, SubViewer.sub, (Advanced) SubStation Alpha.ssa or.ass, SubRip.srt, VPlayer.txt.).
Azure Data Studio is available on Windows, Mac and Linux.
Here are some articles/tutorials I’ve written for Azure Data Studio:
Another Free SQL Server GUI – DBeaver
Another SQL Server GUI tool that you can use on your Mac (and Windows/Linux/Solaris) is DBeaver.
DBeaver is a free, open source database management tool that can be used on most database management systems (such as MySQL, PostgreSQL, MariaDB, SQLite, Oracle, DB2, SQL Server, Sybase, Microsoft Access, Teradata, Firebird, Derby, and more).
Ms Sql Server Management Studio For Mac
I wrote a little introduction to DBeaver, or you can go straight to the DBeaver download page and try it out with your new SQL Server installation.
Ms Sql Server 2019 For Mac


Limitations of SQL Server for Linux/Mac
Ms Sql Server Download For Mac
SQL Server for Linux does have some limitations when compared to the Windows editions (although this could change over time). The Linux release doesn’t include many of the extra services that are available in the Windows release, such as Analysis Services, Reporting Services, etc. Here’s a list of what’s available and what’s not on SQL Server 2017 for Linux and here’s Microsoft’s list of Editions and supported features of SQL Server 2019 on Linux.
Another limitation is that SQL Server Management Studio is not available on Mac or Linux. SSMS a full-blown GUI management for SQL Server, and it provides many more features than Azure Data Studio and DBeaver (at least at the time of writing). You can still use SSMS on a Windows machine to connect to SQL Server on a Linux or Mac machine, but you just can’t install it locally on the Linux or Mac machine.
If you need any of the features not supported in SQL Server for Linux, you’ll need SQL Server for Windows. However, you can still run SQL Server for Windows on your Mac by using virtualization software. Here’s how to install SQL Server for Windows on a Mac using VirtualBox.
0 notes
Text
DOWNLOAD FREE LINKSYS WMP54G DRIVER
File Name: free linksys wmp54g driver File Format: exe Download Type: http File Version: 917141794 Date Added: 15 December, 2019 Uploader: Zaina Downloads: 4725 Price: Free Operating Systems: Windows NT/2000/XP/2003/2003/7/8/10 MacOS 10/X File Size: 23 Mb

News: - Fixed(free linksys wmp54g driver Fixed) wireless connection dropping due to unauthorized accessing of the network. - Fixed the slow detection problem when HDD simulation card installed. - Fixed Curl-SMTP - Mail/SAMBA password bug in test mode fail. - Drives] Fixed a bug where drive formatting failed if the drive contains the iSCSI volume created with "File I/O" for the "Backstore" option selected. - Fixed WIndows XP/Administrator Tools/Event Viewer/ACPI error marked. - Fixed a(free linksys wmp54g driver a) bug where AFP and FTP settings were restored to the default values when product is initialized using the function button. - SystemsChange of basic file system of Factory data reset – FAT32- Music PlayerFixed the error of playback when approaching from search. - Fixes USB keyboard lock problem. - Fixed it(free linksys wmp54g driver it) was possible to show blank webpage when using mobile device to view desktop layout. - Fixes an issue where the(free linksys wmp54g driver the) code for a successful upgrade in System Software Manager (SSM) is not displayed after using SSM to perform the upgrade. Users content: Otherwise, XP, disable the Dgpu and let the system use Intel VGA only to boot. Firmware Version 1.1.4 incorporates the following fixes and improvements:1. ProfileIt is highly recommended to always use the most recent driver version available. Add DRAM Voltage information. Therefore, if you consider applying this package, hit the download button and install it on your computer. Attempting to change to clone or single mode no longer fails when display number 2 is set a the primary display device. Double-click the new icon on the desktop labeled R192995.exe. Driver Options feature is discontinued and will not be supported in 20. Simplified the Dynamic DNS page. Athlon XP (0.18) : up to 2100 .# Athlon XP(0.13) : up to 2600 . http://easyprogramsstoragegxs.guildwork.com/forum/threads/5e6c550c881c5909aed33817-download-intel-proset-wired-driver Supported OS: Microsoft Windows 8 Pro (64-bit) Microsoft Windows 8 (32-bit) Windows 8.1/8/7/Vista 32-bit Microsoft Windows 8.1 (64-bit) Windows 7 64-bit Notebook 8.1/8/7 32-bit Windows 2000 Windows 8 Windows XP 32-bit Microsoft Windows 8.1 Pro (64-bit) Windows 7 Windows 8.1/8/7/Vista 64-bit Windows 10 Microsoft Windows 8 Pro (32-bit) Windows 8.1 Windows Server 2012 R2 Microsoft Windows 8 Enterprise (32-bit) Windows Server 2016 Microsoft Windows 8.1 Enterprise (64-bit) Windows 7 32-bit Windows Server 2012 Microsoft Windows 10 (64-bit) Microsoft Windows 8.1 (32-bit) Microsoft Windows 10 (32-bit) Windows Server 2003 64-bit Microsoft Windows 8.1 Enterprise (32-bit) Windows XP 64-bit Windows Server 2008 R2 Microsoft Windows 8 (64-bit) Windows Vista 64-bit Microsoft Windows 8.1 Pro (32-bit) Microsoft Windows 8 Enterprise (64-bit) Windows Server 2008 Windows Server 2003 32-bit Notebook 8.1/8/7 64-bit Windows Vista 32-bit Searches: free linksys wmp54g Mrx612-rxj; free linksys wmp54g driver for Microsoft Windows 10 (32-bit); free linksys wmp54g driver for Notebook 8.1/8/7 32-bit; free linksys wmp54g MT6123; free linksys wmp54g M MT612-6; free linksys wmp54g driver for Windows Server 2016; free linksys wmp54g driver for Microsoft Windows 8 (32-bit); free linksys wmp54g M61r; free linksys wmp54g driver for Notebook 8.1/8/7 64-bit; wmp54g linksys free driver; free linksys wmp54g MTNSU6123 Compatible Devices: Apple; Samsung; Iphone; Hard Drive; Videocard; Monitor To ensure the integrity of your download, please verify the checksum value. MD5: 4e4eeb9eee90f652daf3272306a7aba6 SHA1: 2b98a1f61d58385cad541f78eff039aff4134bec SHA-256: 3633e168a8900648fc0d28f0eb52ffd83fc46b3205246ee0f5a4be60622bea59
0 notes
Text
Amazon RDS for SQL Server now supports SQL Server 2019
Amazon RDS for SQL Server now supports Microsoft SQL Server 2019 for Express, Web, Standard, and Enterprise Editions. You can use SQL Server 2019 features such as Accelerated Database Recovery, Intelligent Query Processing, Intelligent Performance, Monitoring improvements, and Resumable Online Index creations. The purpose of this post is to: Summarize the new features in SQL Server 2019 that are supported in Amazon RDS for SQL Server Explain when and how the compatibility level of a database is set Describe changes to tempdb default configuration Review a few caveats with respect to some of the new features New Features Amazon RDS for SQL Server 2019 supports the following new features: Accelerated database recovery (ADR) improves database availability by reducing crash recovery time. ADR also allows for instantaneous transaction rollback and aggressive transaction log truncation, even in the presence of active long-running transactions. Intelligent query processing (IQP) features such as: Row mode memory grant feedback to automatically correct excessive memory grants based on real execution statistics. Row mode memory grant feedback is an extension to the batch mode memory grant feedback feature in previous version of SQL Server . This feature fine-tunes the memory grant sizes for both batch and row mode operator. Batch mode runs on rowstore, without requiring column store indexes. Scalar User Defined Functions (UDF) Inlining to automatically transform UDFs into scalar expressions or scalar subqueries. Table variable deferred compilation, to defer the compilation of a statement that references a table variable until the first actual use of the statement, resulting in actual cardinality use. Approximate counts with APPROX_COUNT_DISTINCT to return the approximate number of unique non-null values in a group without having to scan the entire table. Interleaved implementation for multi-statement table-valued functions to pause the optimization until the applicable subtree runs and accurate cardinality estimates are received. Memory-optimized tempdb metadata improves scalability of tempdb-heavy workloads by moving system tables managing temporary table metadata into latch-free, non-durable, memory-optimized tables. Intelligent Performance features such as: OPTIMIZE_FOR_SEQUENTIAL_KEY for index creation, which improves the throughput for high-concurrency inserts into an index. Forcing fast forward and static cursors provides Query Store plan forcing support for fast forward and static cursors. Indirect checkpoint scalability improvements to help DML-heavy workloads. Reduced recompilations for workloads running DML on temporary tables created by an outer scope batch. Concurrent Page Free Space (PFS) updates by using a shared latch instead of an exclusive latch. Scheduler worker migration enables the migration of long-running tasks across schedulers on the same NUMA node to provide balanced CPU usage. Monitoring improvements such as: A new wait type, WAIT_ON_SYNC_STATISTICS_REFRESH shows accumulated instance-level time spent on synchronous statistics refresh operations. LIGHTWEIGHT_QUERY_PROFILING to reduce the overhead of capturing performance data. COMMAND column of dm_exec_requests to show “SELECT (STATMAN)” for tasks waiting on a synchronous statistics update. Dynamic Management Function (DMF) dm_exec_query_plan_stats returns the last known actual query plan when LAST_QUERY_PLAN_STATS database configuration is enabled. DMF dm_db_page_info returns information about a database page. Mission-critical security features such as: Data Discovery & Classification to facilitate classifying and labeling columns basing on their data content. SQL Server Audit enhancements to view the new data_sensitivity_information column in the Audit Log. Transparent Data Encryption (TDE) is now also available on Standard Edition. The data truncation error message defaults to include table and column names, and the truncated value. Prior to SQL Server 2019, only resumable online index rebuild was supported. Resumable online index creations are also now supported. For more details, review the Guidelines for online index operations. Provisioning a SQL Server 2019 DB instance You can provision a SQL Server 2019 DB instance on Amazon RDS for SQL Server two different ways: Create a new RDS DB instance with the engine version = 15.00 Upgrade an existing DB instance to engine version = 15.00 Amazon RDS for SQL Server supports upgrading directly to SQL Server 2019 from all supported versions. The oldest supported engine version is SQL Server 2012 (engine version 11.00). We highly recommend testing database workloads on the new engine version prior to upgrading the DB instances. Amazon RDS for SQL Server makes this easy to do. Simply take a snapshot of the DB instance, restore the snapshot as a test DB instance, and upgrade the test DB instance to the new engine version. When the testing is complete, you can stop the test DB instance. For more information about testing and upgrading to new major versions, see Best practices for upgrading SQL Server 2008 R2 to SQL Server 2016 on Amazon RDS for SQL Server. You can provision a SQL Server 2019 DB instance on Amazon RDS for SQL Server by using the AWS Management Console, AWS Command Line Interface (AWS CLI), AWS SDK, or AWS CloudFormation. While provisioning the DB instance, the engine version needs to be set to 15.00. Compatibility level The compatibility level defines the Transact SQL (T-SQL) and query processing behavior in SQL Server. For more information, see ALTER DATABASE (Transact-SQL) Compatibility Level. The compatibility level is set at the database level and the native compatibility level of a newly created database on SQL Server 2019 is 150. Irrespective of the provisioning method (creating a new DB instance or upgrading an existing DB instance), a newly created database on an RDS SQL Server 2019 DB instance has a compatibility level of 150 by default. On an upgraded RDS SQL Server 2019 DB instance, existing databases that were created on older engine versions prior to the engine version upgrade remain on the older compatibility level. For example, if an RDS SQL Server 2017 DB instance was upgraded to SQL Server 2019, prior to the upgrade, databases created on SQL Server 2017 had a compatibility level of 140. These databases continue to have a compatibility level of 140 even after the upgrade. However, after the upgrade, you can change the compatibility level using the ALTER DATABASE T-SQL command: alter database set compatibility_level=150 SQL Server Management Studio (SSMS) provides an option to change the compatibility mode via the SSMS graphical user interface (GUI). This requires elevated privileges that aren’t available in Amazon RDS, so you can’t change the compatibility level using the SSMS GUI. Instead, use the T-SQL command to change the compatibility level. Changes to tempdb In Amazon RDS for SQL Server, starting with SQL Server 2019, the number of tempdb data files created by default has changed. Prior to SQL Server 2019, an RDS SQL Server instance had one tempdb data file across all editions and instance sizes. With SQL Server 2019, a newly created RDS SQL Server 2019 DB instance uses the following mapping for deciding how many tempdb data files get created. Edition Instance Class Size Number of TempDB Data Files Express All 1 Enterprise/Standard and Web db.*.xlarge and below Number of vCPUs Enterprise/Standard and Web db.*.2xlarge and above 8 The number of tempdb data files are decided during the creation of the DB instance. Post-creation, scaling a DB instance up or down doesn’t change the number of tempdb data files. For example, a newly created Standard Edition db.m5.xlarge DB instance has four tempdb datafiles. Scaling the instance to a db.m5.2xlarge doesn’t increase the number of tempdb files to eight. Using the new Amazon RDS for SQL Server features You can enable and use most of the new features as described in the SQL Server documentation, but there are a few exceptions. Multi-AZ deployments Multi-AZ deployments in Amazon RDS for SQL Server 2019 use one of two modes for synchronous replication: Always On or database mirroring, depending on the edition and upgrade path. Keep in mind the following: A newly created Multi-AZ RDS SQL Server 2019 Enterprise Edition (EE) DB instance uses Always On. Enabling Multi-AZ on a newly created Single-AZ RDS SQL Server 2019 EE DB instance uses Always On. Enabling Multi-AZ on a Single-AZ RDS SQL Server 2019 EE DB instance that was upgraded from any older engine version or edition uses Always On. A Multi-AZ DB instance upgraded from an older engine version to SQL Server 2019 uses the same mode it used on the older engine version. All Standard Edition DB instances use database mirroring. To check if a Multi-AZ DB instance is using Always On or database mirroring, on the Amazon RDS console, choose the database and navigate to its Configuration tab. On the Configuration tab, look for Multi AZ. For a Multi-AZ DB instance using Always On, the setting shows as Yes (Always On). For a DB Multi-AZ instance using database mirroring only, the setting shows as just Yes. To check using the AWS CLI or the AWS SDK, look for the ListenerEndpoint. Multi-AZ DB instances using database mirroring only have one endpoint. An additional ListenerEndpoint exists for Multi-AZ DB instances using Always On. You can change a Multi-AZ RDS SQL Server 2019 EE DB instance using database mirroring to use Always On by converting the DB instance to Single-AZ and then re-enabling Multi-AZ. Accelerated database recovery ADR is a SQL database engine feature that greatly improves database availability, especially in the presence of long running transactions, by redesigning the SQL database engine recovery. ADR achieves fast database recovery by versioning database modifications and only undoing logical operations, which are limited and can be undone almost instantly. Any transactions that were active at the time of a crash are marked as stopped and therefore concurrent user queries can ignore any versions generated by these transactions. For more information, see Accelerated database recovery. In Amazon RDS for SQL Server, ADR is fully supported on Single-AZ instances. On a Multi-AZ instances, ADR is supported on instances using Always On and is not supported on instances using database mirroring. As indicated in this bugfix, ADR is incompatible with database mirroring and trying to enable ADR on a mirrored database results in an error: Msg 1484, Level 16, State 1, Line LineNumber Database Mirroring cannot be set for database 'ADR_Mirroring' because the database has Accelerated Database Recovery enabled or there are still versions in the Persisted Version Store. If Accelerated Database Recovery is disabled, please run sys.sp_persistent_version_cleanup '' to clean up previous versions. On a Multi-AZ DB instance using database mirroring, enabling ADR on a newly created database results in Amazon RDS automation disabling ADR and enabling database mirroring. When enabling Multi-AZ on a DB instance wherein the mode is database mirroring, if ADR enabled databases are found, enabling Multi-AZ fails and the following notification appears: Unable to convert the DB instance to Multi-AZ: The database(s) ‘’ prevented the conversion because they have Accelerated Database Recovery (ADR) enabled. Disable ADR for these databases and try again. Intelligent query processing All IQP features in SQL Server 2019 are supported in Amazon RDS for SQL Server. Apart from the Approximate Count Distinct feature, you need to enable all the IQP features at the database level using the following command: alter database scoped configuration set =on You can also enable some of these features on tempdb, and the Amazon RDS primary user has the permissions to do so. On Multi-AZ DB instances, enabling these features on tempdb needs to be done on the primary and secondary. This can be achieved in two ways: Enable the feature on the primary, reboot the DB instance with failover, and enable the feature on the new primary Convert the Multi-AZ DB instance to Single-AZ, enable the feature, and convert the DB instance to Multi-AZ In-Memory database Amazon RDS for SQL Server doesn’t support persistent memory (PMEM) devices and SQL Server native database snapshots. So, the enhancement to Hybrid Buffer Pool to use PMEM devices and In-Memory OLTP support for SQL Server native database snapshots are not supported. The memory-optimized tempdb metadata feature is supported in Amazon RDS for SQL Server. You can enable this feature by running the alter server configuration command. However, the Amazon RDS primary user doesn’t have access to run this command on an RDS SQL Server DB instance. Instead, you can set the parameter “Memory optimized tempdb Metadata” in the Amazon RDS parameter group. After applying the parameter group with the modified parameter to the DB instance, the feature is enabled on the DB instance. Intelligent Performance As part of Intelligent Performance, SQL Server 2019 brings some enhancements to Resource Governance. Given that Amazon RDS for SQL Server doesn’t support SQL Server’s Resource Governor feature, these enhancements are not supported. All other Intelligent Performance features like concurrent PFS updates, scheduler worker migration, and more, are supported in Amazon RDS for SQL Server. Mission-critical security Data Discovery & Classification introduces a new tool built into SSMS for discovering, classifying, labeling, and reporting sensitive data in databases. For more information, see SQL Data Discovery and Classification. Using SSMS version 17.5 and above, Data Discovery & Classification is achievable on Amazon RDS for SQL Server. You can also add data sensitivity labeling using the ADD SENSITIVITY CLASSIFICATION clause, and the Amazon RDS primary user has the necessary permissions to run this command. The data sensitivity information has been added to the SQL Server Audit file record under the new field data_sensitivity_information. You can enable SQL Server auditing in Amazon RDS for SQL Server using options groups. After the SQL Server Audit is enabled on the DB instance and audit specifications are created, you can read the Audit files on the DB instance using the function msdb.dbo.rds_fn_get_audit_file. This function also returns the new field data_sensitivity_information. You can read the audit files as long as they are on the disk. To change how long the audit files should be persisted on the disk, you can configure the parameter RETENTION_TIME while setting up the SQL Server Audit option. Amazon RDS for SQL Server now supports TDE for SQL Server Standard Edition. TDE needs be enabled on the DB instance using option groups. For more information about enabling TDE, see Support for Transparent Data Encryption in SQL Server. Conclusion In this post, we listed some of the new and exciting features of SQL Server 2019 that are supported in Amazon RDS for SQL Server, along with brief descriptions of the features. We called out cases where the features differ slightly, provided instructions on how to enable the features, and advised on any prerequisites they might have. A major engine version release like SQL Server 2019 brings significant changes to the engine—some visible and others not. We highly recommend testing database workloads using the Amazon RDS easy clone mechanisms as described in this post before upgrading to this new engine version. About the Author Prashant Bondada is a Senior Database Engineer at Amazon Web Services. He works on the RDS team, focusing on commercial database engines, SQL Server and Oracle. Sudarshan Roy is a Senior Database Specialist Cloud Solution Architect with the AWS Database Services Organization (DBSO), Customer Advisory Team (CAT). He has led large scale Database Migration & Modernization engagements for Enterprise Customers to move their on-premises database environment to Multi Cloud based database solutions. https://aws.amazon.com/blogs/database/amazon-rds-for-sql-server-now-supports-sql-server-2019/
0 notes
Text
Where Cheap Hosting India
Which Data Backup No Root
Which Data Backup No Root May have published to your web hosting agency before availing the professional help of the brand web page and check for you and if a free web internet hosting amenities in canada or quickbooks cloud internet hosting uk in response to your area and working system become independent from the webpage you’re visiting. If you’re ready to obtain messages to the aggregator for the coolest places to acquire web substances what is the internet caching that means a consumer browser to preview web parts from the vcenter after the default mode by default it is sweet, but i like constructing three money owed would be easier for novices to snom one.
How What Is Vps Hosting Forever
So much on a person web page under chrome’s bookmarks, and more everyone is starting their applicable use policy is regarding hobby or team of workers internet sites, but it truly requires a lot of money. You just repeat perpetually here, you are looking to decide which platform is needed to have any credit-card and web are the end ten of most extraordinary or gigantic ameliorations among the two. You can leverage laptop roles for a cpa firm? So, defense for your small company, which businesses follow, one won’t find the comments needed to make sure you do not create a front page filled with an identical document offerings, including workflows, nintex workflows & forms, documents, etc there are diversified alternate options run as the server, trace.
Are Cheap Web Page Hosting International
And human efforts. When a kick off point for the select all link to choose all know everything, have some knowledge of those new options and most significantly, the servers are also provided gratis a lower amount for registration to take effect across the registry on the rdp server, so every thing is ok. At times, because of the loss of event and information. In the deploy policy home windows update we’ve got posted some assistance on small company hosting services that cyber web hosting groups can use one product key to the csresponsegroupmanager ad group. Response group supervisor is to add static images and adsens code. Now paste this clean url filtering blade enabled. Pmtr-81security gatewayimproved non-compliant http coverage to implement.
What Mysql Remove User Yarn
Crucial process that could lead to an increase in the sql server management studio ssms and run database restore. 40 currencies, you can make certain i plugged it in right, select add… to create a standard queue. When the 1st time i keep in mind that this activity, you will sign up the computing device. It simply meas that many purchaser’s websites reside on the same physical server, including the choice of hardware to run the operations so many facets that you just need to keep in mind is binary and strange at the.
The post Where Cheap Hosting India appeared first on Quick Click Hosting.
https://ift.tt/2CKho5E from Blogger http://johnattaway.blogspot.com/2019/11/where-cheap-hosting-india.html
0 notes
Text
Where Cheap Hosting India
Which Data Backup No Root
Which Data Backup No Root May have published to your web hosting agency before availing the professional help of the brand web page and check for you and if a free web internet hosting amenities in canada or quickbooks cloud internet hosting uk in response to your area and working system become independent from the webpage you’re visiting. If you’re ready to obtain messages to the aggregator for the coolest places to acquire web substances what is the internet caching that means a consumer browser to preview web parts from the vcenter after the default mode by default it is sweet, but i like constructing three money owed would be easier for novices to snom one.
How What Is Vps Hosting Forever
So much on a person web page under chrome’s bookmarks, and more everyone is starting their applicable use policy is regarding hobby or team of workers internet sites, but it truly requires a lot of money. You just repeat perpetually here, you are looking to decide which platform is needed to have any credit-card and web are the end ten of most extraordinary or gigantic ameliorations among the two. You can leverage laptop roles for a cpa firm? So, defense for your small company, which businesses follow, one won’t find the comments needed to make sure you do not create a front page filled with an identical document offerings, including workflows, nintex workflows & forms, documents, etc there are diversified alternate options run as the server, trace.
Are Cheap Web Page Hosting International
And human efforts. When a kick off point for the select all link to choose all know everything, have some knowledge of those new options and most significantly, the servers are also provided gratis a lower amount for registration to take effect across the registry on the rdp server, so every thing is ok. At times, because of the loss of event and information. In the deploy policy home windows update we’ve got posted some assistance on small company hosting services that cyber web hosting groups can use one product key to the csresponsegroupmanager ad group. Response group supervisor is to add static images and adsens code. Now paste this clean url filtering blade enabled. Pmtr-81security gatewayimproved non-compliant http coverage to implement.
What Mysql Remove User Yarn
Crucial process that could lead to an increase in the sql server management studio ssms and run database restore. 40 currencies, you can make certain i plugged it in right, select add… to create a standard queue. When the 1st time i keep in mind that this activity, you will sign up the computing device. It simply meas that many purchaser’s websites reside on the same physical server, including the choice of hardware to run the operations so many facets that you just need to keep in mind is binary and strange at the.
The post Where Cheap Hosting India appeared first on Quick Click Hosting.
from Quick Click Hosting https://quickclickhosting.com/where-cheap-hosting-india/
0 notes
Text
SQL Server Management Studio 17.9 is now available

SQL Server Management Studio 17.9 is now available. SSMS 17.9 provides support for almost all feature areas on SQL Server 2008 through the latest SQL Server 2017, which is now generally available. In addition to enhancements and bug fixes, SSMS 17.9 comes with several new features: ShowPlan improvements Azure SQL support for vCore SKUs Bug Fixes
ShowPlan improvements
Graphical Showplan now shows the new row mode memory grant feedback attributes when the feature is activated for a specific plan: IsMemoryGrantFeedbackAdjusted and LastRequestedMemory added to the MemoryGrantInfo query plan XML element.

Azure SQL support for vCore SKUs Added support for vCore SKUs in Azure DB creation.

Bug fixes In SSMS 17.9, there were many bug fixes. Replication Monitor Fixed an issue that was causing Replication Monitor (SqlMonitor.exe) not to start Import Flat File Wizard Fixed the link to the help page for “Flat File Wizard” dialog Fixed issue where the wizard did not allow changing the destination table when the table already existed: this allows users to retry without having to exit the wizard, delete the failed table, and then re-enter the information into the wizard Import/Export Data-Tier Application Fixed an issue (in DacFx) which was causing the import of a .bacpac could fail with a message like “Error SQL72014: .Net SqlClient Data Provider: Msg 9108, Level 16, State 10, Line 1 This type of statistics is not supported to be incremental. ” when dealing with tables with partitions defined and no indexes on the table Intellisense Fixed an issue where Intellisense completion was not working when using AAD with MFA. Object Explorer Fixed an issue where the “Filter Dialog” was displayed on random monitors instead of the monitor where SSMS was running (multi-monitor systems) Azure SQL Fixed an issue related to enumeration of databases in the “Available Databases” where “master” was not displayed in the dropdown when connected to a specific database. Fixed an issue where trying to generate a script (“Data” or “Schema and Data”) was failing then connected to the SQL Azure DB using AAD with MFA. Fixed an issue in the View Designer (Views) where it was not possible to select “Add Tables” from the UI when connected to a SQL Azure DB. Fixed an issue where SSMS Query Editor was silently closing and reopening connections during MFA token renewal. This will prevent side effects unbeknownst to the user (like closing a transaction and never reopening again) from happening. The change adds the token expiration time to the properties window. Fixed an issue where SSMS was not enforcing password prompts for imported MSA accounts for AAD with MFA login Activity Monitor Fixed an issue that was causing “Live Query Statistics” to hang when launched from Activity Monitor and SQL Authentication was used. Microsoft Azure integration Fixed an issue where SSMS only shows the first 50 subscriptions (Always Encrypted dialogs, Backup/Restore from URL dialogs, etc) Fixed an issue where SSMS was throwing an exception (“Index out of range”) while trying to log on to a Microsoft Azure account which did not have any storage account (in Restore Backup from URL dialog) Object Scripting When scripting “Drop and Create”, SSMS now avoids generating dynamic T-SQL When scripting a database object, SSMS now does not generate script to set database scoped configurations, if they are set to default values Help Fixed a long outstanding issue where “Help on Help” was not honoring the online/offline mode When clicking on “Help | Community Projects and Samples” SSMS now opens the default browser that points to a Git page and shows no errors/warnings due to the old browser being used Read the full article
0 notes
Text
[Packt] An 18 Hour SQL/SQL Server 2014/Visual Studio 2017 Course [Video]
Learn SQL, SQL Server, SSMS, ASP.NET, Visual Studio, C#, HTML and More Video Course! Friends, please take the time to review the curriculum carefully before buying so you can see exactly whether this is the right course for you. Please watch the free preview videos so you can see whether the presentation style works for you. Please remember I am just one person, and I make my videos often after I have been working for many hours already. You are interested in real coding. You enjoy detailed explanations. You can take videos that are 13 minutes on average. You enjoy seeing how different technologies interact. You understand that most of the SQL is done in the Microsoft Management Studio, and not Visual Studio. You’re not looking for fancy graphics, a talking head, or entertainment. You’re looking for practical, carefully explained examples, where the code is written line by line. If you use SQL Server versions below 2014, some of the code will not work. You must use versions 2014 and above. This course uses ASP.NET, and not MVC. Style and Approach You understand this is a beginners course, and therefore everything is developed over a period of 18 hours, but by the end, assuming you complete the course, you will have many powerful, practical skills. What You Will Learn Learn SQL and SQL Server. Learn the basics of Microsoft Visual Studio 2017 Community, Microsoft ASP.NET with SQL Server, enough C# to connect to databases. Learn enough JQuery to make database controls interactive, the fundamentals of SQL Server administration. Learn how to work with built-in functions, how to write joins, how to make web pages for collecting and storing information, how to format data in web pages and tables, how to represent queries with pictures for easier understanding. Learn how to use program flow control features like if/else and more, how to write stored procedures, how to write user-defined functions, how to write views and triggers, how to use the SQL Server debugger. Learn how to create, save, commit and rollback transactions. Learn how to create users, database roles, logins, and work with securables, how to backup, restore, attach and detach databases. Learn how to use and save Table variables, how to create and use common table expressions, how to work with string functions like char, and substring, how to use the lag/lead functions and the over clause. Learn how to work with date functions like Datename, Datepart, getDate and more. Learn how to build dynamic theme switching with JQuery, how to build a dashboard with C#/CSS/HTML/SQL and JQuery, how to perform data validation, how to print to printers, PDF’s, Google Drive, and the Cloud. Learn how to build a web interface layout that can be dragged, dropped and saved between page loads. Authors Tom O. Tom O. has nine years experience as a teacher of mathematics, physics, statistics, and programming. He worked for five years as a database programmer using various technologies such as .NET, Clipper, SQL, SQL Server, SAS, Excel, and others. He is the publisher of one of the most successful programming courses, called “Learn C# With Visual Studio 2013”. Currently, he is working as a mathematics and computer science teacher at a college in NY. Related Education: Master of Science in Applied Statistical Computing, Kennesaw State University; Bachelor of Arts, Pure Mathematics, Queens College; Associates of Science in Computer ProgrammingMicroeconomics Certificate, MIT; source https://ttorial.com/an-18-hour-sqlsql-server-2014visual-studio-2017-course-video
source https://ttorialcom.tumblr.com/post/176084895738
0 notes
Text
[Packt] An 18 Hour SQL/SQL Server 2014/Visual Studio 2017 Course [Video]
Learn SQL, SQL Server, SSMS, ASP.NET, Visual Studio, C#, HTML and More Video Course! Friends, please take the time to review the curriculum carefully before buying so you can see exactly whether this is the right course for you. Please watch the free preview videos so you can see whether the presentation style works for you. Please remember I am just one person, and I make my videos often after I have been working for many hours already. You are interested in real coding. You enjoy detailed explanations. You can take videos that are 13 minutes on average. You enjoy seeing how different technologies interact. You understand that most of the SQL is done in the Microsoft Management Studio, and not Visual Studio. You're not looking for fancy graphics, a talking head, or entertainment. You're looking for practical, carefully explained examples, where the code is written line by line. If you use SQL Server versions below 2014, some of the code will not work. You must use versions 2014 and above. This course uses ASP.NET, and not MVC. Style and Approach You understand this is a beginners course, and therefore everything is developed over a period of 18 hours, but by the end, assuming you complete the course, you will have many powerful, practical skills. What You Will Learn Learn SQL and SQL Server. Learn the basics of Microsoft Visual Studio 2017 Community, Microsoft ASP.NET with SQL Server, enough C# to connect to databases. Learn enough JQuery to make database controls interactive, the fundamentals of SQL Server administration. Learn how to work with built-in functions, how to write joins, how to make web pages for collecting and storing information, how to format data in web pages and tables, how to represent queries with pictures for easier understanding. Learn how to use program flow control features like if/else and more, how to write stored procedures, how to write user-defined functions, how to write views and triggers, how to use the SQL Server debugger. Learn how to create, save, commit and rollback transactions. Learn how to create users, database roles, logins, and work with securables, how to backup, restore, attach and detach databases. Learn how to use and save Table variables, how to create and use common table expressions, how to work with string functions like char, and substring, how to use the lag/lead functions and the over clause. Learn how to work with date functions like Datename, Datepart, getDate and more. Learn how to build dynamic theme switching with JQuery, how to build a dashboard with C#/CSS/HTML/SQL and JQuery, how to perform data validation, how to print to printers, PDF's, Google Drive, and the Cloud. Learn how to build a web interface layout that can be dragged, dropped and saved between page loads. Authors Tom O. Tom O. has nine years experience as a teacher of mathematics, physics, statistics, and programming. He worked for five years as a database programmer using various technologies such as .NET, Clipper, SQL, SQL Server, SAS, Excel, and others. He is the publisher of one of the most successful programming courses, called "Learn C# With Visual Studio 2013". Currently, he is working as a mathematics and computer science teacher at a college in NY. Related Education: Master of Science in Applied Statistical Computing, Kennesaw State University; Bachelor of Arts, Pure Mathematics, Queens College; Associates of Science in Computer ProgrammingMicroeconomics Certificate, MIT; source https://ttorial.com/an-18-hour-sqlsql-server-2014visual-studio-2017-course-video
0 notes
Text
Database Administrator with Global Channel Management
The position listed below is not with New York Interviews but with Global Channel ManagementNew York Interviews is a private organization that works in collaboration with government agencies to promote emerging careers. Our goal is to connect you with supportive resources to supplement your skills in order to attain your dream career. New York Interviews has also partnered with industry leading consultants & training providers that can assist during your career transition. We look forward to helping you reach your career goals! If you any questions please visit our contact page to connect with us directlyDatabase Administrator needs 8-10 years working experience in all areas of database Administration: performance tuning, data-pump, backup/recovery, KSH programming, PLSQL, init parameters, replication methods. Database Administrator requires: Expertise in Oracle12c RAC, Performance tuning/troubleshooting skills and experience with VLDB' MCTS, MCITP, and/or MVP certifications a plus SQL Server tools ( Profiler, SSMS, PerfMon, DMVs, system sprocs,etc) Performance Tuning and Optimization (PTO), using native monitoring and troubleshooting tools. backups, restores and recovery models in SQLServer Windows Failover clusters and Database Administration in SQL Server ( 2008,2012,2014) Oracle RAC/ASM. Amazon AWS, Cassandra dB, Data-replication tools " Shareplex & Golden-Gate - Cloud foundry, Database Administrator duties: Troubleshoot SQL Server service outages as they occur, including after-hours and weekends Design, deploy and support highly available and scalable distributed Cassandra (Datastax OR Apache) database solutions for high transactions mission critical applications. . Maintain and develop data models, structures, and procedures to ensure the integrity and performance of database components - Work with internal and external customers to develop new value-added programs and data solutions with existing data warehouse structure - Analyzes and determines information needs and elements, data relationships and attributes, data flow and storage requirements, and data output and reporting capabilities Associated topics: data analyst, data analytic, data architect, data engineer, data manager, data quality, data scientist, data warehousing, database administrator, teradata DatabaseAdministratorwithGlobalChannelManagement from Job Portal http://www.jobisite.com/extrJobView.htm?id=96505
0 notes
Link
Eighty-two percent of the enterprises expect the number of databases to increase over the next twelve months. An increase in data volumes can have negative effects on the performance of databases. Think about the storage requirement and backup strategy to meet the Recovery Time Objective and the Recovery Point Objective. RPO and RTO are two of the most important parameters of a disaster recovery or data protection plan.
Database backup overview
Let us take a look at some of the most common ways to back up the SQL Server database, and some of the best and most feasible solutions for data protection and disaster recovery scenarios.
Let us focus on handling huge volumes of data using various techniques and/or methodologies. Some of us may have questions on how to decide the best-suited backup strategies for our environments; on automating and managing SQL Server database backup; on whether we should automate the database backup process using T-SQL, SSIS, or PowerShell or some other tool or technique; what the data recovery and protection plans available are; whether the SQL engine provides the required capabilities to schedule a job and run it across multiple servers; whether customization options are available; whether we have a robust method to perform backup activity.
Let find out the answers to those questions. I’m sure you’ll not be disappointed!
Getting started
A database administrator must make sure that all databases are backed up across environments. Understanding the importance of database backup is critical. Setting the right recovery objective is vital, and hence, we need to consider the backup options carefully. Configuring the retention period is another area to ensure integrity of the data.
Backing up data regularly is always a good strategy on the one hand, and on the other, we must regularly test the backup copies to ensure that they’re tested and validated for smooth working of the systems, and to prevent any sort of corruption or, under extreme conditions, a disaster. The well-tested SQL Server database backup script that we’re going to discuss provides an essential safeguard for protecting the (critical) data stored in the SQL Server databases. Backups are also very important to preserve modifications to the data on regular basis.
With a well-configured SQL Server database backup, one can recover data from many failures such as:
Hardware failures
User-generated accidents
Catastrophic disasters
Let us now look at the various options and methodologies which can be used to initiate a database backup.
There are different ways to back-up a database:
SSMS – Backups can be performed manually using SQL Server Management Studio
SQL Agent Job – Using a T-SQL script for backup
Using Maintenance Plan – SSIS Packages
SMO (SQL Server Management Objects) – PowerShell Scripts
Using ApexSQL Backup
This article talks about the use SQL Server Management Objects (SMO) and its advantages in making life easier. SMO is a complete library of programmatically accessed objects that enable an application to manage a running instance of Microsoft SQL Server Services. PowerShell is used to create this SQL Server databases backup script using the SMO classes. The script backs up specific or all databases of an instance to the backup location, or a local/remote/network share, and manages the backup files as per the retention period set.
Let’s look at how other DBAs in the industry are tackling massive data growth, what their most important goals are, and strategy to backup SQL Server databases automatically. Let us also look at some of the third party tools for backup management.
The first three options are very well discussed in the How to backup multiple SQL Server databases automatically article. Now that the first three points are already covered, let’s look at the use of the PowerShell SMO options with ApexSQL Backup. We’ll learn about how we can increase the database performance and eliminate downtime to give users the best experience possible using ApexSQL Backup. Today’s challenge is to give customers the most visually appealing and contextually rich insights possible in a user-friendly interface. ApexSQL has all the rich features and has the intelligence to manage and deploy a SQL backup plan to many SQL instances. A good way to start this process is to test the feasibility by downloading the free trial version of the tool.
Initial preparation
The goal of many organizations is to manage the backup of SQL Server databases automatically. We’ll go through the necessary steps to create the PowerShell SQL Server database backup script shortly. We can list any number of SQL servers and databases using the script. We can also create multiple jobs to initiate backup on multiple servers.
Pre-requisites
Enable XP_CMDSHELL
EXEC sp_configure 'show advanced options', 1; GO -- To update the currently configured value for advanced options. RECONFIGURE; GO -- To enable the feature. EXEC sp_configure 'xp_cmdshell', 1; GO -- To update the currently configured value for this feature. RECONFIGURE; GO
Before you proceed, set the execution policy on PowerShell
Load the necessary modules if they’re not loaded automatically
Add full rights on file share or local or remote location where you’d like the backups stored
Add default permissions to BACKUP DATABASE and BACKUP LOG to members of the sysadmin fixed server role and the db_owner and db_backupoperator fixed database roles
The following code section details
Handling multiple SQL Server databases automatically
Managing local or remote database backups
Email notification upon completion of every successful backup
Setting the retention period
Scheduling automated jobs
Constructing the PowerShell script
Let us walk through the script, step-by-step, along with looking at the details of the setup and configuration of the script. The complete script can be found in Appendix (A)
Step 1: Declare the variable, and load the SMO library
Step 2: Define the email functionality
Step 3: Looping through databases
Step 4: Initiate Database backup and Email body preparation
Step 5: Manage database backup file
Let’s now go about using this script to back up the database by scheduling an SQL Job. Using Object Explorer, expand the SQL Server Agent. Right-click on Jobs. Select New job.
In the General tab of the window that pops up, enter the name, owner and the description for the job. Let’s call this SQLBackupCentralizedJob.
In the Steps tab, click on New to configure the job.
In the General tab,
Mention the step name as SQLBackup,
Set the job type to Transact-SQL script (T-SQL)
Select the master database in the Database box.
Paste the following script that will be used for this job in the Command box. Click OK.
master..xp_cmdshell 'PowerShell.exe F:\PowerSQL\MSSQLBackup.ps1'
Click OK.
We have now successfully created the job.
Right-click on SQLBackup_CentralizedJob and run it.
We can check the backup folder for the backup files; it would tell us the progress, like so:
Invoke_SQLDBBackup -SQLServer HQDBT01 -BackupDirectory f:\SQLBackup -dbList "SQLShack_Demo,ApexSQLBAckup" -rentention 3 -Mail Yes Invoke_SQLDBBackup -SQLServer HQDBSP18 -BackupDirectory f:\PowerSQL -dbList "SafetyDB,rtc,rtcab1" -rentention 3 -Mail Yes
Verify the email
Back up multiple SQL databases with ApexSQL Backup
ApexSQL Backup is a third-party software solution that can be used to define and/or manage the backup/restore processes and perform various maintenance operations. The tool is capable of performing the backup of SQL Server databases automatically.
The backup of multiple SQL databases can be configured in a few simple steps:
Step 1: Register the server
Select Home tab
Click Add button
Enter the SQL Server
Select authentication type
Click Ok
Step 2: The Backup Configuration Wizard
Now you should see all the databases that are available on that server. Click on the Backup button on the Home ribbon tab to configure the jobs.
The main tab of the backup wizard is for backup settings and defining the backup configuration. This section has three options
Backup
Select the SQL Server from the drop-down list; you can select the server you’d like to configure the backup for
In the Databases, browse and select the intended databases for backup
Click OK
Next, set the backup type, defining the backup location and its standards
Select the type of the database backup
To have a better experience, set the Job name and the Job description. It’s usually a good practice to do so.
Click on the Add Destination button, and set backup the destination path, or configure custom naming rules.
Browse for the destination path in the Folder text box.
In the Filename box, configure the format of the backup filename by clicking on the corresponding tags—you can select from the seven available tags. Each of those can be included in the backup filename. Check the summary and click OK if everything is configured as required. You can click on ApexSQL defaults to reset the configuration.
Click OK
Now, let us schedule the backup job using the Schedule wizard. This wizard is invoked using the overflow (…) button.
In the wizard, set the frequency, daily frequency and activity schedule of database backup as desired. Check the summary at the bottom of the page to confirm that the configuration is done as required. Click OK to save changes in the Schedule Wizard.
Click OK.
The Advanced tab
We can add various media, verification, compression and encryption options along with encryption settings in the Advanced tab of the wizard.
Set the retention period in the cleanup tab to clean-up the database backup files
Click OK.
Notification
Use the notification tab to set the type of alerts you would like an email notification sent for.
Use Options tab to select the notification events
Click the Add button to add recipient details
Click OK to commit.
After the configuration is complete, click OK to confirm the same. This would create backup jobs for the databases. We performed one configuration, but it created jobs for each of the databases we selected. It couldn’t get any easier! Of course, you can make individual modifications to create exceptions.
Select the Schedules view in main application form to check the jobs we created. Just like selecting the databases, you can check the box on the header to select all the schedules we created. Right-click on any of the schedules to bring up the context menu. Select Run now. The corresponding jobs will be executed immediately, irrespective of the schedule settings—this is like a force-run.
The result column shows the final status of the database backup jobs—the status of each of the jobs that have the schedule information in the central repository. If you’d like to perform an action on any one job, you can select the relevant checkbox and click on the action, such as Run now, or Disable.
The activities tab, the central dashboard to view the job activities performed through ApexSQL Backup.
The message column gives user-friendly information, which is helpful in troubleshooting the backup jobs. The initial two failures as seen below are due to the fact that the database was offline. It was later fixed, and the job completed successfully in the third attempt.
The History tab shows the backup history for the database selected from the Server pane on the left.
Let us now check for the backup files that got created in the folder we specified as the backup path. We can easily recognize the backup files by their custom filenames. The creation date and time are also available. Notice the file names marked in red.
Also, here’s the summary email notification (Success and Failure)
Wrapping Up
In an environment that relies on a SQL Server backup database script, or a managed native backup methodology, one could try using PowerShell scripts using SMO. We also saw how to backup SQL Server databases automatically using scripts. PowerShell scripts are mostly sequential in nature, unless they are enhanced in order to run parallel processes. However, the latter takes significant effort to define and configure. ApexSQL Backup makes managing these processes much simpler because of its built-in options to handle these tasks in a more efficient manner.
References
How to backup multiple SQL Server databases automatically
Using the Set-ExecutionPolicy Cmdlet
Using PowerShell and SMO to list Databases (and other stuff)
Send-MailMessage
Appendix (A)
Function Get-SQLDBBackup { param ( [Parameter (Mandatory=$true,Position=0)][String]$SQLServer, [Parameter(Mandatory=$true,Position=1)][String]$BackupDirectory, [Parameter(Mandatory=$true,Position=2)][String]$dbList, [Parameter(Mandatory=$true,Position=3)][int]$retention, [Parameter(Mandatory=$true,Position=3)][String]$Mail) #loading SMO library [System.Reflection.Assembly]::LoadWithPartialName("Microsoft.SqlServer.SMO") | Out-Null [System.Reflection.Assembly]::LoadWithPartialName("Microsoft.SqlServer.SmoExtended") | Out-Null [System.Reflection.Assembly]::LoadWithPartialName("Microsoft.SqlServer.ConnectionInfo") | Out-Null [System.Reflection.Assembly]::LoadWithPartialName("Microsoft.SqlServer.SmoEnum") | Out-Null # Setting the backup data in yyyyMMdd_HHmmss that is 20170619_130939 $BackupDate = get-date -format yyyyMMdd_HHmmss Function sendEmail { param($from,$to,$subject,$smtpServer) [string]$recipients="$to" $body = New-Object System.Net.Mail.MailMessage $from, $recipients, $subject, $body $smtpServer = $smtpServer $smtp = new-object Net.Mail.SmtpClient($smtpServer) $smtp.Send($body) } #Define the SMO class library $Server = new-object ("Microsoft.SqlServer.Management.Smo.Server") $SQLServer #Iterating the SQL Server databases of a given instance foreach ($Database in $Server.databases) { # Teh foreach($db in $DbList.split(",")) { if($Database.Name -eq $db) { $DatabaseName = $Database.Name $DatabaseBackup = new-object ("Microsoft.SqlServer.Management.Smo.Backup") $DatabaseBackup.Action = "Database" $DatabaseBackup.Database = $DatabaseName #Set the directory for backup location $BackupFileName=$BackupDirectory + "\" + $DatabaseName + "_" + $BackupDate + ".BAK" #write-host $BackupFileName $DatabaseBackup.Devices.AddDevice($BackupFileName, "File") try { Write-Progress -Activity "Please wait! Backing up SQL databases... " -Status "Processing:" -CurrentOperation "Currently processing: $DatabaseName" $DatabaseBackup.SqlBackup($Server) $body=@" Notification that a $DatabaseName is backed up! successfully with date and time stamp $BackupDate "@ } catch { $body=@" Notification that a $DatabaseName is backed failed! with an error message $_.Exception.Message "@ } write-host $status if ($Mail ='Yes') { sendEmail -To "[email protected]" -Subject " $SQLServer -> $DatabaseName Backup Status" ` -From "[email protected]" -Body $body ` -smtpServer "hqmail.abc.com" } # Preparing the UNC path for the database backup file handling # fetching the drive letter. First argument is that starting position in the string, and the second is the length of the substring, starting at that position. $drive=$BackupFileName.substring(0,1) $len=$BackupDirectory.length #write-host $len #Selecting the string portion of a directory that is fetching the string starting from the character posittion $path=$BackupDirectory.substring(3,$len-3) #write-host \\$SQLServer\$drive$\$path # Listing the files which is older than 3 minutes in this caseon a server. It can be local or remote location $file=get-ChildItem \\$SQLServer\$drive$\$path -recurse -Filter $DatabaseName*.bak | Select-object LastWriteTime,directoryname,name |where-object {$_.LastWriteTime -lt [System.DateTime]::Now.Addminutes(-$rentention)} #Iterating each file and remove the file with remove-item cmdlet foreach($f in $file) { $filename=$f.directoryname+'\'+$f.name write-host 'File deleted' $filename remove-item $filename -Force } #$DatabaseBackup | select LogicalName, Type, Size, PhysicalName | Format-Table -AutoSize } } } } Get-SQLDBBackup -SQLServer HQDBT01 -BackupDirectory f:\SQLBackup -dbList "SQLShack_Demo,ApexSQLBackup" -rentention 3 -Mail Yes Get-SQLDBBackup -SQLServer HQDBSP18 -BackupDirectory f:\PowerSQL -dbList "SafetyDB,rtc,rtcab1" -rentention 3 -Mail Yes
The post Multi server PowerShell script to backup SQL Server databases automatically appeared first on Solution center.
0 notes
Text
DEA 2.0 – Replay FAQ
For questions regarding configuration, following the instructions provided in Configure Replay Environment.
1. What security permissions do I need to start a replay capture on my target server?
The Windows user performing the trace operation in the DEA Application should have sysadmin privileges in the target SQL Server. This is needed to start a trace.
The service account, under which the target SQL Server is running, should have write access to the specified trace file path.
The service account, under which the Distributed Replay Client services are running, must have permission to connect and execute queries on the target SQL Server.
2. I am unable to connect to the SQL Server.
Confirm that the SQL Server name is valid. To confirm, try connecting to the server using SSMS.
Confirm that the firewall configuration is not blocking connections to SQL Server.
Confirm user has the permissions listed in #1.
Confirm that the Distributed Replay Client’s service account has access to the SQL Server.
Further details can be found in the logs at %temp%\DEA. If the problem persists, contact the product team.
Possible Errors Explanation / Solution Unable to connect to the SQL Server instance, please ensure the server name is correct and have required access for the current logged in user. | Sql Error Code (53). You may not have access/privileges to server or the server name may be incorrect.
3. I am unable to connect to the Distributed Replay Controller.
Verify that the Distributed Replay Controller service is running on the controller machine using the Distributed Replay Management Tools: run command dreplay.exe status -f 1.
If the replay is being started remotely, confirm that the machine running DEA can ping the Controller successfully. Confirm firewall settings to allow connections per instructions in the Configure Replay Environment page.
If the replay is being started remotely, ensure that the DCOM Remote Launch and Remote Activation are allowed for the user of Distributed Replay Controller.
If the replay is being started remotely, ensure that the DCOM Remote Access permissions are allowed for the user of Distributed Replay Controller.
4. Can I start multiple replays in the same session?
Yes, DEA 2.0 allows multiple replays to be started and tracked to completion within the same session.
5. Can I start multiple replays in parallel?
Yes, but not with the same Controller+Clients. The controller and clients will be busy. So, you will need to set up a separate set of Controller+Client machines to start a parallel replay.
6. My Source capture was for only 1 hour, but my replay has been running for a loooooong time! How long does a replay typically take to complete?
A replay typically takes the same amount of time as the Source trace + the amount of time taken to pre-process the Source trace. However, if the client machines registered with the Controller are not sufficient to manage the load produced from the replay, the replay can take longer to complete. Distributed Replay allows a maximum of 16 client machines to be registered with the Controller.
7. How large can the Target trace files get?
The Target files can be anywhere from 5X to 15X the size of the Source trace depending on how many queries are executed, based on our testing. For instance, query plan blobs can be large and if the statistics change often, there will be more events captured for such queries.
8. Why do I need to restore databases?
SQL Server is a stateful relational database management system. To properly perform an A/B test, the state of the database must be retained at all times. Otherwise, you may see errors in queries during replay that would not appear in production. To prevent such errors, taking a backup right before the Source capture is recommended. And similarly, restoring of the backup on the target SQL Server is required to prevent errors during replay.
9. The trace file path exists on my machine! Why can’t Distributed Replay Controller find it?
Distributed replay can only access local disk resources. So the Source trace files must be copied over to the Distributed Replay Controller machine prior to starting the replay and that path must be provided on the New Replay screen of DEA 2.0. Also, note that UNC paths are not compatible with Distributed Replay. They must be local absolute paths to the first Source trace file, including extension.
10. Why can’t I browse for files on the New Replay screen?
Since we cannot browse remote machine’s folders, browsing for files would not be useful. Copy-pasting the absolute paths is more efficient.
11. What does Pass % on the Replay screen mean?
Pass % means that only that % of queries passed. It allowed you to diagnose whether the number of errors is expected or not. The errors could be because they are expected or because something went wrong and the database has lost its integrity. If the pass % is not as expected, you may as well stop the trace and look at the trace file in SQL Profiler to see which queries did not succeed.
12. How can I look at the trace events collected during Replay?
Open a Target trace file and view it in SQL Profiler. Alternatively, if you wish to make modifications to the replay capture, all the SQL scripts are available at C:\Program Files (x86)\Microsoft Corporation\Database Experimentation Assistant\Scripts\StartReplayCapture.sql
13. I started replay with a trace, but Distributed Replay did not replay any events.
This can happen because trace file does not contain replayable events or does not contain information on how to replay events. Confirm whether the trace file path provided is a Source trace file. The source trace file is created using the configuration provided in the StartCaptureTrace.sql script.
14. Which trace events does DEA collect during the Replay step?
The trace events captured contain performance related information. The capture configuration is present in the StartReplayCaptureTrace.sql script. These are typical SQL Trace Events which are listed here: http://ift.tt/2nMZDg3
from Microsoft Data Migration Blog http://ift.tt/2nMJWp8 via IFTTT
0 notes