#rpg maker mv shipping bin tutorial
Explore tagged Tumblr posts
Visit Tumblr Blog
Explore Tumblr blogs with no restrictions, modern design and the best experience.
Last Seen Tumblr Blogs


Fun Fact
In 2020, Tumblr had 29.4 million users in the US.
Text
Shipping Bin Tutorial For RPG Maker MV (RMMV)!
The tutorial is under the cut due to it being long! Everything you need to create a shipping bin like Stardew Valley, Rune Factory, Harvest Moon, etc. Is right here!
So this took a lot of trial and error, but! It appears to be working just fine, and it can definitely probably be edited and changed if you’re more skilled with javascript, but given that I’m an amateur, it’s not going to be spectacular. This is meant as the barebones really and to explain the basics to others who either are new to javascript or have spent countless hours trying to make a shipping bin for people!
Required: 3 Variables, 1 common event/event
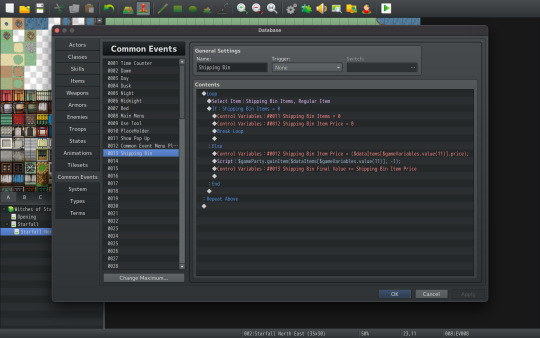
This image is what I will be referencing to for the entire post! So what you want to do is either have a common event page or event page open (I prefer common event as it’s easy to add to multiple events if I wish).
We will first begin with the loop command under our flow control.

This is what will allow us to use the select item command under the message section over and over without having to enter and exit repeatedly. It’s more or less for an aesthetic reason, and it keeps us from frustrating our players! After the loop, we will create the select item option. This is where our first variable comes in!
For all intents, we will be using the variable numbers I used, but feel free to use any variable you want! This first variable (#11), I named Shipping Bin Item. This is where the item ID will be stored every time the player adds something to the bin. You can choose whether your shipping bin will be able to hold Regular Items, Hidden Items, or Key Items, but for this tutorial, mine will be set to regular items! This is so you can set things like Tool Items or one of a kind items to key/hidden, so the player cannot sell them!
So far you should have:
Loop
Select Item: Shipping Bin Item, Regular Items
Now we add the If else statement! For our player to either hit escape or to have zero items in their inventory, we want it so they cannot get anything from it. So we should have
If: Shipping Bin Items = 0
This is where the other two variables will occur. They may seem confusing right now, but it’ll be explained shortly!
Control Variables: 11 Shipping Bin Items = 0 Control Variables: 12 Shipping Bin Items Price = 0
This will set values to 0 and make sure something silly doesn’t happen that gives your player extra gold when they shouldn’t have it.
After we do this, we will break the loop so that the player can exit!
So in total, our event should look like this
Loop Select Item: Shipping Bin Item, Regular Items If: Shipping Bin Items = 0 Control Variables: 11 Shipping Bin Items = 0 Control Variables: 12 Shipping Bin Items Price = 0 Break Loop
Else:
Now this is where the javascript comes in! For anyone using other versions of rpg maker, these script codes may vary if using older or newer versions of rpg maker. However, it should be easily to find these script codes either in forums or google!
To start, we will set our variable to some script!

When you click on Control variables under the game progression tab on page one, you will have the option to set it to constants, variables, etc. What we want is the button option of script. This will allow us to write our own script that we cannot always normally do with the predefined options rpg maker gives us!
But Screeny! What do we type there? Well, I’ll tell you!
We need to set our second variable (12 for this example) to Shipping Bin Item Price first. After which, we need to write some script that will tell us what the item price is. With select item set up, the game is already storing the item ID to variable 11, and it will change every time our player selects an item to put in the shipping bin.
If you have not set up items, don’t worry! If you add items later, it should still work with this! All you need to do is set a price base in the database for it! Then the game will later read the price with our line of code we’re adding.
Anything involving data for items can usually be found with ($dataItems[x]) with x being the id number. However, since we need to check all items, it would be a cluster of chaotic else ifs to check every single item ID, so we can instead set x to a variable! For this we will type ($dataItems[$gameVariables.value(11)]). What this is doing is saying that the item is equal to the value of Variable 11. You can use this for a lot of things such as item ids and item price! Which what we need next is exactly that! Typically, to find an item price, we would say $dataItems[x].price, but since we’re using a variable, we will need to use the variable in the x again! This gives us:
($dataItems[$gameVariables.value(11)].price);
So this is what we write in the script field on the variable! Now is the actual script.

For our script line, we will need the script command that can be found on page three under the “Advanced” tab. This is going to be long again, but this is how we control what items the player loses. Again, this is simplified, but we will set it up so that the entire party will lose 1 of each item they click. You can most likely change this with variables and allow the player to choose the quantity they want, but again, this is the simple version!
So we’re going to use $gameParty.gainItem which seems weird, but sometimes the lose item function will not remove an item and actually stop at 1 of the item. We will then use the information from above, without the price of the item, so: ($dataItems[$gameVariables.value(11)]. After which, we will use , -1 to signify the player is gaining a negative of an item, which actually subtracts from player inventory! All together, you’ll have:
$gameParty.gainItem($dataItems[$gameVariables.value(11)], -1);
And the last step is the easiest! The third variable (13 for this example) we need is Shipping Bin Final Value. This will add up all of the items price values that are set in the database for a grand total value of all items added! Create a control variable for Shipping Bin Final Value and set it to Add. Then click the variable and select Shipping Bin Item Price. This adds all the values to it, and now we are finished! Our completed script should look like this:
Loop Select Item: Shipping Bin Item, Regular Items If: Shipping Bin Items = 0 Control Variables: 11 Shipping Bin Items = 0 Control Variables: 12 Shipping Bin Items Price = 0 Break Loop
Else:
Control Variables: 12 Shipping Bin items Price = ($dataItems[$gameVariables.value(11)].price); Script: $gameParty.gainItem($dataItems[$gameVariables.value(11)], -1) Control variables: 13 Shipping Bin Final Value += Shipping Bin Item Price
Now you can add this to your shipping bin event and it’s ready to use! You can also set up events like a bed where when the player sleeps, their gold amount will change += to Shipping Bin Final Value every night. Then you can reset all three variables to make sure that the player doesn’t have gold left in variable 13 that they add to from the day before!
#RPG Maker#RPG Maker MV#rpg maker mv tutorial#rpg maker tutorial#long post#rpg maker javascript#rpg maker mv javascript#shipping bin tutorial#rpg maker mv shipping bin#rpg maker mv shipping bin tutorial
12 notes
·
View notes