#rpi4
Text
So I made a private media server for myself and family, and I love it, I can watch all my movies or listen to all my music whenever I want!
I hate the amount of work I have to do for it though... I'm barely a quarter of the way through all of my tv shows, animes, movies, or music, not including all of the stuff my family has...
So much work, and I'm still the only one that actually uses the server, no one else seems interested... I'm proud of it, but... sometimes it's so tedious
3 notes
·
View notes
Text

📢 Calling all #RaspberryPi enthusiasts! Explore a wide range of #RPi series models with unbeatable prices at #Elecrow. Visit now and bring your projects to life.🚀 #PicoW #RPI5
📌 https://www.elecrow.com/mcu/raspberry-pi.html?cat=123_raspberry-pi-main-board?utm_source=tumblr&utm_term=idd=2
1 note
·
View note
Text
Installed FFMPEG, removed 264ify and replaced with enhanced-264ify (it's actually actively maintained lol) and disabled open264 in FF and we are so back boys. 720p works on YT so that means it's doing hardware decoding properly with codecs that aren't Debian bullshit assware.
Frankly I do not understand why on a limited platform like the RPi4, the FF in the repo is set to default to garbage libraries and extensions when FFMPEG works astonishingly better. Just more reason to hate Debianites I guess.
#nicoisms#if you use an rpi4 a lot take note#either ditch rasp os or do this#I was too lazy to set up arch bc idk if the arm FF in repo is optimised properly so I stuck with the debian trash
0 notes
Photo
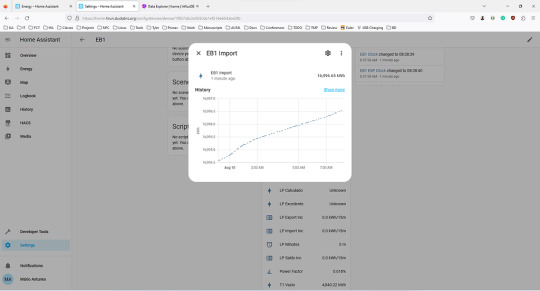
Energy dashboard missing some bars
Recently I acquired a sensor for the electricity meter. The sensor page is in PT, but is a tasmota that was adjusted to the meters used in Portugal. It is connected through MQTT and I have the values in Home Assistant and the database: However, the energy dashboard has a strange behaviour: There are mentions of similar issues, but all appear to fix themselves after one update or by changing the browser. HomeAssistant is being deployed in an RPI4 with the following docker-compose: version: '3' services: homeassistant: container_name: homeassistant image: "ghcr.io/home-assistant/home-assistant:stable" restart: unless-stopped environment: - TZ=Europe/Lisbon volumes: - ./config/:/config - /etc/localtime:/etc/localtime:ro privileged: true network_mode: host depends_on: - mosquitto - mariadb - influxdb mosquitto: image: eclipse-mosquitto container_name: mosquitto volumes: - ./mosquitto:/mosquitto restart: unless-stopped network_mode: host mariadb: container_name: mariadb image: mariadb restart: unless-stopped ports: - "13306:3306/tcp" # So we can access the WebUI environment: - TZ=Europe/Lisbon - MYSQL_ROOT_PASSWORD=${MYSQL_ROOT_PASSWORD} - MYSQL_DATABASE=${MYSQL_HA_DATABASE} - MYSQL_USER=${MYSQL_HA_USER} - MYSQL_PASSWORD=${MYSQL_HA_PASSWORD} volumes: - ./mariadb/data:/var/lib/mysql - ./mariadb/config/:/etc/mysql/conf.d influxdb: container_name: influxdb image: influxdb restart: unless-stopped ports: - "8086:8086/tcp" # So we can access the WebUI environment: - TZ=Europe/Lisbon - DOCKER_INFLUXDB_INIT_MODE=setup - DOCKER_INFLUXDB_INIT_USERNAME=${INFLUXDB_USER} - DOCKER_INFLUXDB_INIT_PASSWORD=${INFLUXDB_PASSWORD} - DOCKER_INFLUXDB_INIT_ORG=${INFLUXDB_ORG} - DOCKER_INFLUXDB_INIT_BUCKET=${INFLUXDB_BUCKET} volumes: - ./influxdb/data:/var/lib/influxdb2 - ./influxdb/config/:/etc/influxdb2 ulimits: nofile: soft: 32768 hard: 32768 And the configuration file for home assistant is the following: # Loads default set of integrations. Do not remove. default_config: # Text to speech tts: - platform: google_translate automation: !include automations.yaml script: !include scripts.yaml scene: !include scenes.yaml http: use_x_forwarded_for: true trusted_proxies: - 127.0.0.1 - ::1 - 192.168.1.0/24 recorder: db_url: !secret mariadb purge_keep_days: 10 # default history: influxdb: api_version: 2 ssl: false host: 127.0.0.1 port: 8086 token: !secret influxdb_token organization: !secret influx_org bucket: homeassistant tags: source: HomeAssistant tags_attributes: - friendly_name default_measurement: units ignore_attributes: - icon exclude: # Customise to fit your needs entities: - zone.home domains: - persistent_notification - person Since the sensor values are in the database, I don’t think the issue is in the deployment. I also have no errors in the logs, nor issues in the statistics dev menu. Any idea? 2 posts - 2 participants Read full topic
https://community.home-assistant.io/t/energy-dashboard-missing-some-bars/601366
0 notes
Text
Argon One with NVME base
I've been having some fun lately with my Raspberry Pi 4s. They're back in stock more frequently at adafruit.com. Give my filter at rpilocator.com a look to catch one in stock. I just picked up 2 8GB rpi4b's. They can be found.
Anyway, I was looking for an RPI4 to add to my desktop setup and wanted a nicer, more functional case for it. I also have a few nvme drives floating about, and wanted to put one to work in this desktop pi.
Don't get me wrong, I've got a gaming rig, slightly aged, but sporting a RTX4070ti, next to my Macbook Pro... the one I bought right before the Apple Silicon MBPs were released. That's just the way of the road with these things.
Lots of digressing... so... the rpi case I settled on was the Argon One with the add-on Argon M.2 NVME Expansion Board. Note: There is also a sata version.
The Argon One is an aluminum case with a fan, a daughter board that converts the mini-hdmi ports to regular HDMI ports, and an IR receiver, that I'll never use. What I did do, obviously was add the nvme base. I put a drive on it, got it all installed with 64 bit RaspberrypiOS (formerly Raspbian?) and fired it up.
Well there was no sign of the nvme drive. I was heartbroken. I through the drive in an external ssd case I had and realized I just needed to format the drive. I put it all back together, and now have a desktop pi to play with.
Fun stuff.
0 notes
Text
Micro CRT on RPI4. Funny part> screen was mirrored, and I swap wires for horizontal coil and now is "normal" This is analog magic :D https://t.co/ugz2eoDBMn
— bobricius (@bobricius) Nov 1, 2022
from http://twitter.com/bobricius
via IFTTT
0 notes
Text
Python send keystrokes

#PYTHON SEND KEYSTROKES ANDROID#
I've seen somewhere there is a way to power the PiZero from the computer usb port and configure it as a hid device at the same time so I guess that'll be a good start on the PC end of this setup. Before typing, Keys activates the application window that contains. I was thinking of using PiZero for this project in order to keep it compact. The Keys action sends keyboard input to the object, that is, types the specified text in it. If you only want to press the key with send(), you can simply use nd('ctrl', doreleaseFalse) to not release the key. ndkeys ('some text') One can simulate pressing the arrow keys by using the Keys class: ndkeys (' and some', Keys.ARROWDOWN) Also note, it is possible to call sendkeys on any element, which makes it possible to test keyboard shortcuts such as those used on Gmail. Right now I've got 2 RPi4 and both Win & Linux computers. Another alternative is the send() function itself it has two parameters, dopress and dorelease which both default to True. Note, by setting the flag parameter to 1 the keys parameter is sent RAW.
I'd like it to be in python if possible but that's not mandatory Most laptop computer keyboards have a special Fn key.
Normal keys may be queued up and and sent in batches. Notes This utility may be slow with multiple special keys as they are sent through adb and processed one at. It communicates via adb and is written in python.
#PYTHON SEND KEYSTROKES ANDROID#
I'd like avoid any installation or configuration on the PC in order to keep it simple to use: just plug and play if possible. Description SendKeys is a utility for sending keyboard input from a terminal to a USB attached Android device.You can simulate keys/mouse by sending WMKEYDOWN, WMKEYUP, WMCHAR, WMLBUTTONDOWN, messages to the window. So, basically, I'd like to setup the Pi as a " translator": +-+ +-+ +-+ Sending keystrokes to another application python. What I'd like to do is to use the Pi to translate keyboard input (either keycode or characters) to something else (utf8 char / sound why not?!) while transfering it to PC. I found this thread and a few others but they don't seem to consider that a keyboard is attached to the pi and that the primary data is sent from it - rather, the pi just emulates.
0 notes
Text
Raspbian causing screenflick er

#RASPBIAN CAUSING SCREENFLICK ER 1080P#
#RASPBIAN CAUSING SCREENFLICK ER DRIVERS#
#RASPBIAN CAUSING SCREENFLICK ER TV#
You are receiving this because you modified the open/close state. In the end, it is very inconsistent and I can't figure out anyĬombination of settings that will allow me to display more than 2 streams Streams where when I set it to 512 it would flash back and forth between Mawarebytes is a well known anti malware to detect root cause of malwares and prevent.
#RASPBIAN CAUSING SCREENFLICK ER 1080P#
Something did change when I set it to 1024, in that it would allow 2 1080p Performance improvements, and are untested.* Entering /opt/vc/bin/tvservice -m CEA into the command line will list all possible modes. Generally, not all possible modes are supported by a monitor. Usually, the best mode is selected automatically, but in this case, I had to overwrite it manually. *Values of gpu_mem over 512 are not recommended, will provide no The mode defines attributes such as fps, screenresolution or interlaced/progressive. Poor support for 4k displays in the RPi4, an issue with my 4K TV, or what. Only get 7 or 9 to display when trying a 3x3. I then tried a lower res substream of 704x480. However an attempt to display 4 of them would only display the original 2. Setting gpu_mem=1024 and I was able to get 2 1080p feeds to display, It would switch back and forth (like a flicker, but only displaying oneįeed at a time) between both feeds until ultimately one would go blank and Just trying to use 2 1920x1080Ĭamera feeds I could only get one to display when I had gpu_mem set to 512.
#RASPBIAN CAUSING SCREENFLICK ER DRIVERS#
You have to update the drivers for fixing this problem. Sometimes flickering occurs for not having an updated drive. Das Raspberry Pi soll 3D-Funktionalität erhalten. desktop recorder Screenflick, system utility OnyX, time manager Timelime, and memory optimizer SixtyFou 20:46 Uhr, MacNN,. The Refresh rate of the screen is a very important cause behind flickering. Von seinen Quellen bei Partnern von Microsoft will er erfahren haben.
#RASPBIAN CAUSING SCREENFLICK ER TV#
I am trying to configure a RPi4 with 4GB and a 4K TV that I recently First, you have to check the screen if it is damaged or not. In the end, it is very inconsistent and I can't figure out any combination of settings that will allow me to display more than 2 streams at 1080p or more than 7 at D1 (704x480). Something did change when I set it to 1024, in that it would allow 2 1080p streams where when I set it to 512 it would flash back and forth between the 2. Values of gpu_mem over 512 are not recommended, will provide no performance improvements, and are untested. I'm not sure if this is just poor support for 4k displays in the RPi4, an issue with my 4K TV, or what. With this resolution I can only get 7 of 9 to display when trying a 3x3 layout. As ahjcheng mentioned above I then tried setting gpu_mem=1024 and I was able to get 2 1080p feeds to display, however an attempt to display 4 of them would only display the original 2. It would switch back and forth (like a flicker, but only displaying one feed at a time) between both feeds until ultimately one would go blank and then the 2nd would display fine. Just trying to use 2 1920x1080 camera feeds I could only get one to display when I had gpu_mem set to 512. I am trying to configure a RPi4 with 4GB and a 4K TV that I recently purchased.
0 notes
Text
Operating System development tutorials in Rust on the Raspberry Pi. You need Linux but macOS will work too.
4 notes
·
View notes
Link
From ending battles over the only PC in the house to supporting 3D printing and ventilator projects, the tiny single-board computer is suddenly in great demand.
Sales of Raspberry Pi's single-board computers hit 640,000 in March, the second-biggest month for sales since they started selling, as consumers flocked to inexpensive ways to work and learn from home.
While some sales can be attributed to tinkering Pi-hobbyists with a lot more time to fill all of sudden, Eben Upton, the Raspberry Pi's co-creator, told TechRepublic demand is also coming from households that have found themselves in daily battles over use of the family computer.
"It used to be sustainable to have a shared family computer, but now every family member needs to have one to work or learn," said Upton. "Now, everyone is at home competing for the use of one computer."
While sales of Raspberry Pi picked up steadily over the course of March, the latter end of the month is where things really gathered steam, with Upton describing the increase in demand as "turning the dial up from three to 10", with industrial sales staying very stable and Raspberry Pi 4 volumes ramping up very quickly.
"I think what this is telling us is that we're seeing genuine consumer use of the product. It's not like your desktop PC – you're not going to be able play Crysis on it – but if you want a machine you can use to edit documents, use the web, use Gmail and Office 365 and all the baseline use cases of a general purpose computer, the Raspberry Pi 4 is a product we've made to get over that bar."
Other uses of Raspberry Pi computers have been related to the COVID-19 outbreak more directly. In Columbia, for example, efforts are underway to get ventilators running on Pi computers, which – if successful – could help address the shortage of traditional ventilator equipment in the country.
Read more: https://www.techrepublic.com/article/raspberry-pi-why-sales-have-rocketed-in-the-middle-of-the-coronavirus-outbreak/
6 notes
·
View notes
Photo

Having fun with my #RaspberryPi collections. I have #RPi4, #RPi400, #RPi0, #RPi0W & #RPi0WH. Affordable #SBC for home electronics hobby projects. https://www.instagram.com/p/CIXlwE6p44x/?igshid=k1dgsix0t769
0 notes
Text
youtube
God I fucking love sorting algorithms man
#a little bedtime wind down#couldn't do the refactor today so tomorrow is going to be code or death#I'll fiddle with the RPi4 on Monday#Youtube
0 notes
Text
Graylog syslog server on Raspberry Pi 4 (8gb)
This is how I installed graylog on my Pi.
What is needed:
1.- Raspberry Pi 4 - 8 GB Ram with firmware patch to boot from USB.
2.- Geekworm Raspberry Pi 4 mSATA SSD Adapter X857.
3.- MSata drive (using a 250 gb drive).
4.- Raspbian/Debian, Ubuntu aarch64.
5.- Network connection (Ethernet, WiFi and BT disabled).
6.- Rpi4 heatsinks (optional/recommended).
Procedure:
Install OS (Raspbian Aarch64) on the MSata drive, boot the raspberry pi and then do
# sudo apt update && apt full-upgrade -y
# sudo apt install apt-transport-https openjdk-11-jre-headless uuid-runtime pwgen dirmngr gnupg wget zip curl
Install MongoDB
# curl -s https://www.mongodb.org/static/pgp/server-4.2.asc | sudo apt-key add -
# echo "deb [ arch=arm64 ] https://repo.mongodb.org/apt/ubuntu bionic/mongodb-org/4.2 multiverse" | sudo tee /etc/apt/sources.list.d/mongodb-org-4.2.list
# sudo apt update && sudo apt install mongodb-org -y
# sudo systemctl enable mongod
# sudo systemctl start mongod
# sudo systemctl status mongod
Install Elasticsearch
# wget -qO - https://artifacts.elastic.co/GPG-KEY-elasticsearch | sudo apt-key add -
# echo "deb [ arch=arm64 ] https://artifacts.elastic.co/packages/oss-7.x/apt stable main" | sudo tee -a /etc/apt/sources.list.d/elastic-7.x.list
# sudo apt update && sudo apt install elasticsearch-oss -y
# sudo tee -a /etc/elasticsearch/elasticsearch.yml > /dev/null <<EOT
cluster.name: graylog
network.host: 127.0.0.1
http.port: 9200
action.auto_create_index: false
EOT
# sudo systemctl daemon-reload
# sudo systemctl enable elasticsearch.service
# sudo systemctl restart elasticsearch.service
Install Graylog
Download the latest graylog-x.x.x.tgz from https://www.graylog.org/downloads-2 and scp it to your PI or
# cd opt
# wget https://downloads.graylog.org/releases/graylog/graylog-x.x.x.tgz
# sudo tar -xf graylog-x.x.x.tgz
# sudo mv /opt/graylog-x.x.x /opt/graylog
# sudo rm graylog-x.x.x.tgz
# vi /etc/graylog/server/server.conf and configure to your needs
To start the server do:
# cd /opt/graylog/bin
# ./graylogctl start
After the server started go to http://server-ip:9000 and use the user admin with the password previously configured, create an input and that should be all.
To configure password and settings on server.conf please refer to graylog documentation.
2 notes
·
View notes
Last Seen Blogs

superman-muscle
Superboy

captainditrag
Captain Ditrag's Movie Reviews & Singing Videos


summerxcampxisland
✰✭✧✮

falloutdndmod
Fallout & Freaks