#rubber backed fender washers
Text
D.I.Y.
"I've nothing much to offer
There's nothing much to take
I'm an absolute beginner
And I'm absolutely sane"
#TGS #D11
Saved my self a few bob, I did. A couple o’ quid left in me pocket.
Got an appraisal a week or so back. 500 plus they wanted.
And, being them a body shop — it was a fair price. But…
500 bens for a bent-up truck’s fender?
It’s just the bloody holes of the rubber fender bit had stretched out passed where the bolts could hold to the frame o’ the beast.
So…
A few bucks for a small packet of washers,…

View On WordPress
0 notes
Text
LIUGONG WHEEL LOADER SPARE PARTS 122

35B0661 INSTRUMENT
37B2979 SENSOR
56A5811 BLOCK
48C6276 HOUSING
08D2354 FLANGE
24C3626 LINKAGE
24C3624 BOOM
24C3625 BUCKET LEVER
18C0440 HOSE AS
SP187354 COVER
SP187355 PLUG
SP187356 RING NUT
SP187357 LOCKING PLATE
SP187358 SHAFT RETAINER
SP187359 DIFFERENTIAL CARRIER
SP187360 COVER
SP187361 SHIM KIT
SP187362 BEVEL GEAR SET
SP187363 WHEEL STUD
SP187364 HALF SHAFT
SP187365 CENTERING RING
SP187366 PLANET GEAR CARRIER
SP187367 WHEEL HUB
SP187368 RING GEAR
SP187370 AXLE CASE
SP187371 PINION
SP187372 PISTON
SP187373 ADJUSTING BOLT
SP187375 BACK - UP RING
SP187376 RING
SP187377 O - RING
SP187378 O - RING
SP187379 DISC
SP187381 FRICTION WASHER
SP187382 BEARING
SP187383 STUD
SP187384 PLUG
SP187385 VENT
SP187387 DIFFERENTIAL SHAFT
SP187388 COVER PLATE
SP187389 NUT
SP187390 SPACER
SP187393 BLEEDING BOLT
SP187394 PLUG
SP187395 PLUG
SP187396 MAGNETIC PLUG
00A8909 CONNECTOR
71A2340 ELEMENT BASE
38Y0626X0 BUCKET AS
12C7813 CHECK VALVE
67C3905 HOSE AS
70C3455 CAB HARNESS
70C3473 HARNESS
16D3045 PUSH ROD
75A1762 TORSION SPRING
75A1763 TORSION SPRING
16D3046 PUSH ROD
18D9776 BRACKET
70C3448 HARNESS
70C3441 HARNESS
34C8821 BUSHING
34C8825 BUSHING
18D9775 BRACKET
60C2489X0 RADIATOR MOUNTING
34C8827 BUSHING
34C8826 BUSHING
34C8822 BUSHING
34C8823 BUSHING
34C8824 BUSHING
34C8828 BUSHING
86A3329D0 PROTECTIVE COVER
41D1887D0 STEP
42D2297D0 SHIELD-LH
32A4845 HOSE
18D9664 BRACKET
92A7595 PLATE
18D9757 COMPRESSOR BRACKET
48D1815 BRACKET
33D1545 LOWER HINGE PLATE
33D1544 UPPER HINGE PLATE
SP195470 PREFILTER
SP195487 FUEL DRAIN TUBE
SP195488 PLAIN WASHER
SP195490 OIL COOLER CORE GASKET
SP195491 OIL FILLER CONNECTION
SP195492 ADAPTER CONNECTOR
SP195493 OVERHAUL KONG GAI
43C3412X8 FORK
SP186483 SEAL KIT
SP186487 CYLINDER HEAD
SP186488 PISTON
SP186489 PISTON ROD
SP186490 CYLINDER
48C5902X0 TOP COVER
48C5861X0 ENGINE HOOD
04C1552 HOSE AS
02C3216 TUBE AS
04C1553 HOSE AS
30D4051X0 FRONT FRAME
30D4051X9 FRONT FRAME
24C3544 LINKAGE
24C3542 BOOM
24C3543 LEVER
34D0397X0 BEAM FRAME
24C3530 BOOM AS
08D2427 TUBE AS
08D2428 TUBE AS
08D2433 TUBE AS
40D1646X0 REAR FENDER-RH
40D1645X0 REAR FENDER-LH
97A1469 PLATE
07A7927 SUPPORT
25D0847 FORK BODY
43C8327 BRACKET AS
08D2436 TUBE AS
67C3840 HOSE AS
49C8150 HOSE
18C0321 HOSE AS
67C3843 HOSE AS
67C3842 HOSE AS
08D2351 TUBE AS
08D2336 TUBE AS
67C3886 HOSE AS
08D2437 TUBE AS
79A4989 DECAL
08D1968 TUBE AS
58A6235 PLATE
67C2837 HOSE AS
67C2840 HOSE AS
20C3496 WATER RADIATOR
20C3497 OIL COOLER
20C3498 TRANSMISSION OIL COOLER
20C3495 RADIATOR GP
18D9465 PLATE
49C8064 HOSE
49C8068 HOSE
49C8069 HOSE GP
49C8070 HOSE GP
48C6275 HOUSING
70C3392 CAB HARNESS
21D1477T2 BOOM
30D4280 REAR FRAME
SP194504 SECONDARY FUEL FILTER ELEMENT
30D3990 REAR FRAME
67C2980 FUEL HOSE
18C0030 HOSE AS
42C2082 GEARBOX &TORQUE CONVERTER AS
18C0052 HOSE AS
18C0335 HOSE AS
07C3951 HOSE AS
07C3977 HOSE AS
18C0003 HOSE AS
18C0002 HOSE AS
08D2353 TUBE AS
41C3241 MIDDLE DRIVE SHAFT
51C0853 DRIVE SHAFT
38Y0658X0 BUCKET AS
39Y0189X0 GRAPPLE
42D3341 MAST
11D2067 PIN
70C3422 HARNESS
77A2721 BOLT
30B1422 LIQUID LEVEL SWITCH
18D7320 BRAKE CYLINDER BRACKET
70A1444 BRAKE HOUSING
70C2618 CAB HARNESS
30C3653 FITTING
70C2439 CAB HARNESS
70C3389 HARNESS
98A5710 PLATE
24C2738X0 BOOM
82A4507 RUBBER PLATE
67C2633 HOSE AS
23D5744 MOUNTING PLATE
85A7029 DOME DECORATION AS
11C2965 STEERING PUMP
18A8599 BLADE GP
18A8598 CUTTING EDGE
SP184229 THERMOSTAT GASKET
SP188568 SEAL KIT
SP188569 SAFETY VALVE
SP188570 FLANGE
SP188571 FLANGE YOKE
SP188572 FLANGE YOKE
47C4362 HOUSING
86A4118 HOUSING
86A4120 HOUSING
76A1262 SNAP RING
98A6571 BRACKET
98A6572 BRACKET
27C1362X0 TOOL KIT
86A4117 HOUSING
84A5215 RUBBER SLEEVE
86A4119 HOUSING
SP189879 TEMP SENSOR ASSY
18D8105 BRACKET
18D8104 BRACKET
79A3218 DECAL
SP111999 IDLER
49C8138 EVAPORATOR
70C3317 HARNESS
SP193222 MANIFOLD EXHAUST
SP193223 AFTERCOOLER
SP193224 MAGNETIC SWITCH
SP193225 TUBE AIR INTAKE
SP193226 BRACKET MAGNETIC SWITCH
49C8073 HOSE
12C7853 DIRECTIONAL VALVE
46D3748 MOUNTING PLATE
34B1993 SWITCH
34B1992 SWITCH
70C3374 CAB HARNESS
05C9803 HOSE AS
48A9551 PLATE
05C9804 HOSE AS
11D2042 PIN
SP187720 THREADED PLUG
SP187722 THREADED PLUG
SP187724 HEXAGON FLANGE HEAD CAP SCREW
SP187727 HEXAGON FLANGE HEAD CAP SCREW
SP187728 HEXAGON FLANGE HEAD CAP SCREW
SP187729 HEXAGON FLANGE HEAD CAP SCREW
SP187730 HEXAGON FLANGE HEAD CAP SCREW
SP187731 THREADED PLUG
SP187733 BANJO CONNECTOR SCREW
SP187734 WIRE TIE CLAMP
SP187735 O-RING SEAL
67C2830 HOSE AS
SP187570 SEAL KIT
SP187571 SAFETY VALVE
SP187576 TURBOCHARGER
SP187577 COVER PLATE
SP187578 O-RING SEAL
SP187584 WATER OUTLET CONNECTION
SP187585 THERMOSTAT HOUSING
SP187586 EXPANSION PLUG
08D1598 TUBE AS
08D1600 TUBE AS
07C9756 HOSE AS
24C3455 BOOM AS
08D1599 TUBE AS
86A2715D0 PROTECTIVE COVER
67C1994 HOSE AS
07C2457 HOSE AS
38Y0058X0 BUCKET
49C8477X0 FUSE AS
07A8468 PLATE
SP187588 O-RING SEAL
SP187589 TURBOCHARGER GASKET
SP187591 IDLER SHAFT
SP187592 IDLER SHAFT
SP187593 WIRING HARNESS
SP187594 SPRING HOSE CLAMP
SP187596 CAMSHAFT THRUST SUPPORT
SP187598 DIAMOND RING SEAL
SP187600 WATER BYPASS TUBE
SP187601 O-RING SEAL
SP187602 O-RING SEAL
SP187603 O-RING SEAL
SP187604 VALVE INSERT
SP187605 INTAKE VALVE
SP187606 HEAT SHIELD
SP187608 ALTERNATOR SUPPORT
SP187609 FAN HUB
SP187611 FUEL DRAIN TUBE
SP187685 ENGINE LIFTING BRACKET
SP187686 SIX POINT CAP SCREW
SP187689 LUBRICATING OIL TRANSFER TUBE
SP187690 CAMSHAFT COVER SEAL
SP187691 CAMSHAFT COVER
SP187692 ENGINE LIFTING BRACKET
SP187695 LUBRICATING OIL PUMP GASKET
SP187698 GEAR RETAINER
SP187702 CONNECTION GASKET
SP187703 CONNECTING ROD CAP SCREW
SP187707 SEAL OIL
SP187713 ELECTRONIC CONTROL MODULE WIRING HARNESS
SP187715 WIRE TIE CLAMP
SP187717 MALE UNION
SP193989 PREVAILING TORQUE TYPE HEXAGON NUT WITH
95A3533 LUG
30D4033 FRONT FRAME
22D2047 BUCKET
97A1207 CUTTING EDGE
96A6619 EDGE-LH
96A6620 EDGE-RH
37B3162 CONTROLLER
07A8215 MOUNTING PLATE
79A5307 DECAL
38Y0603X0 HAY FORK
SP187719 LUBRICATING OIL FILTER HEAD
SP187618 CAMSHAFT
SP187620 FEMALE CONNECTOR
SP187621 FEMALE CONNECTOR
SP187624 ADAPTER CONNECTION
SP187626 THREADED PLUG
SP187628 THREADED SPACER
SP187629 PISTON COOLING NOZZLE
SP187630 EXPANSION PLUG
SP187631 VALVE INSERT
SP187633 O-RING SEAL
SP187635 WIRE TIE CLAMP
SP187636 HEXAGON FLANGE HEAD CAP SCREW
SP187639 ELECTRICAL CONNECTION
SP187640 THERMOSTAT
SP187642 LUBRICATING OIL COOLER COVER GASKET
SP187643 MOUNTING SPACER
SP187644 CRANKSHAFT PULLEY
SP187645 HEXAGON FLANGE HEAD CAP SCREW
SP187646 CRANKSHAFT ADAPTER
SP187648 IDLER GEAR
SP187651 PRESSURE SENSING TUBE
SP187653 BELT TENSIONER SUPPORT
27C1391X0 COUNTERWEIGHT
SP190627 CYLINDER HEAD
SP190628 FLYWHEEL SHELL
SP190633 SUCTION TUBE
18D8907 BRACKET
18C0426 HOSE AS
08D2489 TUBE AS
67C3994 HOSE AS
48D1742 COVER
55A9777 BUSHING
24C3623 LINKAGE
24C3622 LEVER
67C3971 HOSE AS
70C3427 HARNESS
69A0890 PLATE
49C8075 HOSE GP
67C3595 HOSE AS
12C8143 RELIEF VALVE
70C2588 CAB HARNESS
01Y0354X8 FRONT AXLE AS
01Y0457X8 REAR AXLE AS
SP189501 FUEL FILTER ELEMENT
SP189502 FLYWHEEL
39Y0184X0 WORK IMPLEMENT LINES AS
30D4310 FRONT FRAME
67C3782 HOSE AS
SP192208 STOP SLEEVE
SP192210 DRIVE SHAFT
SP192214 SPRING
SP192215 SEAL KIT
38Y0185X0 BUCKET
24C3505 LEVER
24C3504 LEVER
11D2062 PIN
11D2059 PIN
95A3811 PLATE
96A6933 PLATE
96A6941 PLATE
55A9700 BUSHING
18C0395 HOSE AS
67C3900 HOSE AS
59A1776 PLATE
55A9704 BUSHING
55A9648 BUSHING
55A9671 BUSHING
38Y0642X0 BUCKET AS
70C3458 HARNESS
70C3486 HARNESS
01Y0654 REAR AXLE
Read the full article
0 notes
Text
Chat +62 822-9999-5979, Manufacturer Arch Rubber Fender Canada Niri Rubber
Chat WA +62 822-9999-5979, Rubber Fender Manufacturer In China, Marine Rubber Fender Supplier In Singapore, Rubber Fender Suppliers In India, Rubber Fender Manufacturer In India, D Rubber Fender Manufacturer In Mumbai
Indonesian Marine Supplier
Ready for Cylindrical Fender, V Fender (SVF), A-Fender (SAF), M-Fender (SMF), Super Cone Fender (SSCF), Super Cell Fender (SCF), Lambda Fender (LMD), D-Fender
Komplek Jaladha Pura ( AURI )
Jln. Cendrawasih III No. 34
Kel. Margahayu
Bekasi Timur
Bekasi 17113
Klik here => https://wa.me/+6282299995979
Klik here => https://wa.me/+6282299995979
Klik here => https://wa.me/+6282299995979

#rubber fender barrier#rubber fender boat#rubber fender blocks#rubber fender body#rubber fender bib#rubber backed fender washers#rubber b fender#b section rubber fender#rubber fender covers#rubber fender catalogue#rubber fender compression test#rubber fender customs tariff code#rubber fender cones#rubber cylindrical fender#rubber coated fender washers#rubber cylinder fender#rubber fender d type#rubber fender design#rubber fender d section#rubber dock fender
0 notes
Text
Get Great Car Fix Suggestions On this page Just before The Next Vehicle Concern!
Failing to make the proper choices about automobile fixes can make you in a realm of damage. The next occasion you experience judgements with regards to your vehicle, you should be certain you know what you're doing. Please read on to stay well-informed regarding your car restoration choices once they take place.
Read your owner's handbook thoroughly in order to save cash on auto repair. In this particular handbook, you can find a lot of suggestions that could get your car back into gear and help save you a visit to the mechanic. Mending https://www.lndauto.com/ on your own may help you within both a practical and economic sensation.
You don't usually must take your automobile for the retail outlet when there is a challenge. Quite a few automotive problems can be done yourself. You could use the web and try to analyze the situation and inform yourself for the alternatives. If the maintenance isn't too hard, you could possibly cut costs by performing it on your own.
When you are worried about a car system store puffing up the level of work which needs to be completed, go and obtain totally free diagnostics from in other places. Since there is no promise you will definately get job carried out by them, they may have no reason to assert there is a lot more required than needed.
Talk with your tech to ascertain if they have worked tirelessly on your car just before. In case they have prior to, then they are probably going so as to also fix your car or truck easily ample.
Will not make the oversight of having someone correct your automobile simply because the total amount it will cost cost less than all the others. Often the low prices compensate for the shortage in high quality work. Performing analysis on the repair center under consideration will assist you to assess if that is the situation in this article.
Don't be scared to question as many concerns as you need. It is your car or truck, and you must know why it is important to correct a certain object straight away. When you are experiencing intimated, or maybe you are not receiving straight replies, obtain a secondly viewpoint before you sign away on the function.
Keep a basic fix package within your auto trunk always. An easy package made up of wrenches, jumper cabling, screws, as well as a jack might be a life saver should your vehicle reduces on the highway. This will enable you to make small maintenance immediately, saving you the fee for a pricey tow truck.
A damage or scuff within a plastic-type material fender is very an easy task to resolve. Begin by cutting the portions that adhere outside the damage until the sides are clean. You may then work with a filler to make the dent disappear altogether. Beach sand within the region and paint to conceal the restoration.
Trust your gut experiencing when confronted with a auto technician. In the event the person you are speaking to is not going to actually solution to your questions or is apparently vague on objective, you need to always keep searching. A great technician need to put you relaxed and give you a lot of information on the task which needs to be done.
If you have been getting minimal car troubles, you have to have them looked at. In many cases, dismissing modest troubles guide right to more severe ones.
Probably the most important component of your automobile is the braking system. With out them, you are not going to have the capacity to generate. If they are destroyed, this can be really harmful to suit your needs. Consequently, when you practical experience braking system troubles, immediately see a auto technician to get them replaced. To get this done on your own, you should use rubber footwear to get rid of the mounting bolts and loosen the brake padding. Then, set up new braking system. Nonetheless, if you are not comfortable achieving this, it is best to visit a mechanic. You do not desire to get odds in relation to brakes.
Be sure your car or truck is ready for wintertime. The cool can be extremely difficult on the vehicle's method therefore you need to properly preserve it. A lot of things you should do are look into the tires, look at the antifreeze, change older wipers, and check out windshield washer substance. Driving is hard adequate in the winter, so make issues less difficult if you make sure your car or truck can handle the harsher varying weather conditions.
Best mechanics advise that you search for a technician who displays a sincere attitude. They are saying that, in addition to excellent Better business bureau ratings and suitable licensing and recognition, a good technician is just "up-front". Aspects who steer clear of eye contact, don't give directly answers and overlook your worries ought to be averted.
If you don't have standard knowledge about the automobile, you can't identify if one thing is going improper. If you believe your knowledge is incredibly constrained, vehicle fix classes can be a beneficial endeavor. Being familiar with the performing of your own motor vehicle and how to conduct diverse fixes will help you help save a great deal down the road, whilst the school is surely an initial expense. That way, you will discover issues before they get too awful, and that will help with the lifespan of your respective automobile.
Severe and potentially hazardous concerns with a brand new automobile should be taken to the attention of your company There can be a remember issued for the motor vehicle or maybe the company will look at issuing a remember should you be not really the only person that complains. Your company may even deal with the repairs.
When evaluating a reputable car fix facility, only look at accredited fix retailers. Qualifications, for example the seal off for Auto Services Brilliance, are an indication that the shop has exhibited a fundamental level of proficiency in the area of car repair. While such accreditations are never ever a total promise of excellent assistance, chances are better if the place is licensed.
Should you get in an crash, you need to get the speak to and insurance plan information in the others concerned. This may cause obtaining your car set much easier. Supply this information to the repair shop if they must communicate with the insurance of the liable celebration.
Make sure that you keep all of your service data. When you ought to get anything in your automobile set, you ought to deliver a record of all of the function you may have had done in your car. This data may be helpful to the professional that is allotted to fix your car.
How do you sense reading this post about dealing with your vehicle maintenance? Imagine encouraging this new self-confidence and continuous to grow it with new knowledge. Will no longer should you really truly feel inferior in relation to producing decisions regarding your car improvements. Take the bull through the horns!
1 note
·
View note
Text
C2 Corvette Gets a Complete Cooling System Overhaul
The cooling system in a C2 Corvette has plenty of faults, even in the original configuration, and when you start modifying the engine the problems only get worse. The constant struggle to stay cool has created anxiety in thousands of Corvette owners, as one eye is always glued on the temperature gauge. The subject in this cooling system overhaul is a small-block car backed by a manual transmission and 4.11 gears. The healthy small-block and low rearend gears made for big fun, but anything over 55 mph for more than a few minutes resulted in overheating issues. A five-speed transmission helped matters tremendously by bringing the cruising rpm down, but it didn’t completely reduce the temperature anxiety. A generic aluminum radiator and electric fan also seemed to help, but it didn’t fit the car well enough to be considered a permanent solution.
The car’s previous cooling system eliminated the original expansion tank system. While the universal aluminum radiator was simple and effective, it was a little too tall for the car, making the hood clearance too close for comfort. The radiator hose placement also wasn’t ideal and it just didn’t have the right look. In an effort to cool this low-geared hot rod Corvette, we decided to start from scratch with a new radiator from DeWitts, a new fiberglass fan shroud from J&D Corvette and a box full of cooling system goodies from Zip Corvette.
Going from cobbled together universal parts to a selection of direct-fit parts made for an easy install. It was more work to undo the universal components than it was to install the new pieces. Everything fit as advertised and the assembly process was simply a matter of bolting factory-type pieces together, a task that we handled over the course of a few evenings in the shop. The improved stock-look aluminum radiator and flex fan is certainly capable of cooling this modified small-block, as we have been pleased to see the temperature gauge staying at 180 degrees. In addition to the improved cooling capabilities, the new components cleaned up the engine bay nicely. Take a look at our cooling system overhaul and use the tips and tricks to keep your C2 cool, whether it’s on the highway, sitting in traffic or blasting down your favorite backroad. Vette
1. When our 1964 Corvette coupe rolled into the garage it had a functional cooling system, but the generic aluminum radiator didn’t offer proper fitment. It was physically too tall for the car and the hose outlets were not quite right.
2. The original fan shroud was in pretty bad shape before the universal-fit radiator was installed, but you can see where modifications were necessary to accommodate the radiator hose outlets.
3. After draining the fluids and undoing the less-than-desirable cooling system repairs, we were ready to remove the generic radiator, electric fan and hacked-up shroud.
4. Since our new DeWitts radiator is a direct-fit piece, we whipped out the Zip Corvette catalog for some standard replacement parts. First up was a pair of new radiator cushions (PN WS-333) that fit into the original lower radiator mounts.
5. The radiator is DeWitts’ HP Series (PN 1249063M), which features all-aluminum construction and two rows of 1.25-inch tubes and offers 25 percent more cooling capacity than stock replacement radiators. We ordered ours in the “Black Ice” coating for an original look. The original-style dowels fit nicely into the new rubber cushions.
6. We grabbed a new radiator and shroud center bracket (PN M-259) from Zip, along with a new upper cushion (PN WS-436). We slid the cushion over the original-style tab on the radiator and then loosely installed the two bolts to hold the radiator upright.
7. It would seem natural to install the fan shroud next, but we found that installing the lower radiator hose is much easier without the shroud in the way. The radiator hoses came from RockAuto.com, but you can get them at many Corvette parts suppliers.
8. Now we can lower the J&D Corvette fiberglass fan shroud into place. Before installation, we sanded it and applied two coats of semi-gloss black paint to match the rest of the engine bay.
9. After getting it dropped into place, we installed bolts and nuts in the factory positions. Make note that the original steel shroud had built-in nuts, while our J&D Corvette replacement does not, meaning that it requires pass-through bolts and attaches with nuts and washers.
10. We tightened the side mounting bolts and then tightened the radiator and shroud center bracket bolts. That allowed us to accurately drill the hole for the only remaining fastener. After it is drilled, we install the bolt, nut and washers.
11. Final adjustments can be made to align the center bracket and then the bolts can be tightened.
12. Our six-blade flex fan can be re-installed using the existing hardware. We removed the electric fan, as the new cooling system is more than adequate for this modified Corvette.
13. Any time the cooling system is taken apart it’s a good time to replace the thermostat. It’s cheap and easy to install since you’ve already drained the coolant. We went with a 180-degree thermostat.
14. Our upper radiator hose was a little long so we trimmed it with tin snips until the fitment was perfect.
15. With the upper radiator hose installed—and the dust and our fingerprints wiped off—the new DeWitts radiator and J&D Corvette fan shroud look like factory fresh pieces.
16. Now it’s time to move onto the expansion tank. Since our previous radiator did not use an expansion tank we had removed the mounting straps and bracket. We got a new bracket (PN M-235A) from Zip Corvette and attached it to the inner fender using new bolts.
17. Next are the expansion tank straps (PN M-235). The straps are not pre-bent so we did some trial and error fitment to get an idea of the correct shape. After getting them dialed in, we attached the lower portion of the straps to the bracket.
18. The new DeWitts expansion tank (PN 421) is an exact reproduction of the original Harrison tank. We still had to do some final tweaking on the straps, and then installed the new strap bolts from Zip.
19. Another cheap and easy step for a cooling system overhaul is installing new heater hoses. You can buy the hose in bulk at the local parts store or you can buy the correct stamped hoses from any Corvette parts supplier. We opted for the parts store hoses and installed them with new clamps.
20. Another piece from the Zip Corvette catalog is this heater hose T-fitting (PN M-207). It connects the upper heater core hose to the expansion tank and allows free coolant flow from the water pump.
21. One last trip to the parts store yielded us some new heater hose fittings for the water pump and the intake manifold. We coated the threads with pipe sealant before threading them into place.
22. Although it is rather bulky, this 90-degree fitting is a much better piece than some of the chrome-plated aftermarket versions. We removed the valve cover to give us a little more room to tighten the fitting.
23. We spun the fitting until it was facing the front of the car and then trimmed the heater hose for a nice fit. Next, we trimmed and installed the lower heater hose.
24. Finally, we installed 3/8-inch hose from the expansion tank to the radiator, as well as a 3/8-inch overflow hose.
25. With a combination of parts from DeWitts, J&D Corvette and Zip Corvette, we completely overhauled this Corvette’s cooling system and gave it a super clean look. The final step was pouring a fresh mixture of coolant and water into the expansion tank and taking it for a spin … and 180 degrees never looked so good!
Sources
DeWitts
(517) 548-0600
www.dewitts.com
J&D Corvette
(800) 838-8353
www.jdcorvette.com
Zip Corvette
(800) 962-9632
www.zip-corvette.com
The post C2 Corvette Gets a Complete Cooling System Overhaul appeared first on Hot Rod Network.
from Hot Rod Network https://www.hotrod.com/articles/c2-corvette-gets-complete-cooling-system-overhaul/
via IFTTT
2 notes
·
View notes
Link
Best Bumper Installation Service and Cost in Austin TX |Mobile Auto Truck Repair Austin
more information is at : https://mobileautotruckrepairaustintx.com/bumper-installation-near-me/
Bumper Installation Service near Austin TX: Are you looking for the Best Bumper Installation Service near Austin TX ? Mobile Auto Truck Repair Austin, A vehicle’s bumper is a protective part of the automobile that is mounted to both the front and rear ends of the car. Cost? Free estimates! Send us a message or call us today. Best Bumper Installation Service around Austin TX. We serve Austin TX and other areas. Get a Free Quote Now!
BEST BUMPER INSTALLATION SERVICE IN AUSTIN TX
AUSTIN BUMPER INSTALLATION
How to install your bumper system
Bumper Installation Service near Austin TX: If you've recently become the new owner of a rear bumper system, you may not know how all of the different pieces fit together to mount to your chassis. Whether it's KG, they all typically have similar pieces. OTK is essentially the same process, but will differ slightly with their parts.
● You'll begin by installing the two mounting posts to your chassis . The key to securing the two mounting posts to your chassis starts with installation outside of the chassis. In your hands, drop your smaller washer into what will become the outside of the mounting post, drop the larger washer into what will become the inside. Now drop your 10mm bolt through the two washers and mounting post beforehand tightening the rubber (with threading on the inside) to your bolt. You should have one sold piece now that you''ll mount to your chassis.
● To finish installing your mounting posts to your chassis, grab a 17mm wrench or socket on an impact and tighten the piece to your chassis tube .Nice and tight will do, you don't have to set any world records for strength. You'll do this for both sides, left and right, before we head into the next segment.
● The next piece to install is what you'll eventually mount your rear bumper to, it's the rear bumper support . Supplied typically with a short 8mm bolt, washer, and nut, you'll fasten your support to your post solidly. After successfully mounting both your right and left supports solidly to your posts, we'll move on to the next segment, mounting the bumper.
● You'll notice on the bumper a pair of elongated mounting holes. Line those holes up with your support holes and press the bumper to your supports. Now it's time to grab your hardware, which should typically be an 8mm bolt with washer and nut, and tighten your bumper to your supports . Again, you don't need to show off your strength, but make sure it's nice and solid; you don't want the bumper to move side to side. Your entire system should be nice and tight at this point. However, it is common to see the support loose on the post. You can loosen the support by taking a couple of turns out, but still keeping the bolt within the nylon of the nut so that it doesn't vibrate out while on track. This will free up the rear end and allow it to flex more in certain conditions.
What is a Bumper?
Bumper Installation Service near Austin TX: A vehicle’s bumper is a protective part of the automobile that is mounted to both the front and rear ends of the car. Typically crafted from aluminum, plastic, rubber, or steel, the bumper acts as a shock absorber during low-speed collisions. It also aids in reducing more significant damages made to your vehicle. While some types of bumpers are made from foam that acts as a kind of cushion, others have energy absorbers or brackets that serve the same purpose.
Do Bumper Guards Really Work?
● Collisions happen even if you’re a careful driver. If your car is rear-ended or damaged in a parking lot, the other person can drive away without much risk. To prevent damages that may not be covered by car insurance, many people use bumper guards to protect their vehicles.
● Bumper guards are vertical bars or foam pads that can be placed on either the back or front of your car. They’re usually easy to install and remove, but are they worth it? Let’s look at the pros and cons of utilizing a bumper guard.
They protect your vehicle
Bumper Installation Service near Austin TX: If you have to park in a crowded street or in a cramped garage, there’s always the possibility that someone may hit the back of your car. You could also end up damaging your vehicle yourself if you don’t have enough room to back out of a parking space. A foam guard will give you a little cushion to absorb damage. It can also protect the front end of your vehicle by minor damage caused by fender benders.
3 Benefits of Installing a Heavy-Duty Bumper on Your Vehicle
If you need to select a bumper for your commercial truck or pickup, you may want to consider the benefits of a heavy-duty model. Heavy-duty bumpers outperform lightweight models in several categories including collision protection, longevity, and durability. To learn more about the benefits of a weightier model, look over this convenient guide.
Why Choose a Bumper?
1. Collision Protection
You will find large, robust bumpers on vehicles like ambulances, fire trucks, and commercial vehicles for a reason. A bumper’s most important duty lies in collision protection. Thus, bigger, more resilient ones will always offer greater performance in this arena. Heavy-duty bumpers absorb impact better than thinner models, thereby keeping the truck and individuals inside safe from harm.
2. Longevity
heavy-duty bumper Heavy-duty bumpers are often constructed from high-quality steel, which is built to endure for decades. While less robust models may suffer wear and tear over the years and eventually need replacement, a heavy-duty bumper will continue to serve your needs. Off-roaders who demand rugged features that will hold up in the face of mud, rocks, and debris will also greatly benefit from a sturdier bumper. If you want a lasting investment, opt for the durability heavy-duty models offer.
3. Economic Savings
While heavy-duty bumpers may cost more initially, they offer significant economic savings over lightweight models in the long run. Since heavy-duty bumpers very rarely need replacement, you won’t have to worry about additional expenditures as the years pass. Furthermore, these bumpers protect against serious and costly vehicular damage.
TIPS
Bumper Installation Service near Austin TX: This is one of the less complex mechanical jobs that you can perform on your car, and it can be attempted by even those with the most basic of technical knowledge. All you need to complete this task is a spanner set, a socket and ratchet set, some wire clippers, a Phillips and a flat-head screwdriver and two wheel ramps to help you elevate your vehicle and you’re ready to go.
● Locate and Unscrew the Bumper Cover
There are two parts to the front bumper. The first is the painted cover that matches your car’s color scheme. This is sometimes referred to as the bumper, but is actually concealing the real bumper underneath. To replace the bumper you will need to remove this first. Open the car bonnet and remove the screws that hold the cover in place. These can be found above the grill.
● Unclip the Bumper Cover
It’s now time to unclip the bumper cover from its position. Look underneath the front side of the part and locate the plastic clips that hold it in place. Carefully use the flat head screwdriver to pry these out of position. This should leave a clip exposed. This clip attaches the bumper to the body work, and needs to be cut with your clippers. Finally pull the bumper cover away from the car and place it on a blanket or towel to prevent it from getting scratched or damaged.
● Bumper Removal
After driving the car up the wheel ramps so that the front of the car is elevated, use a body board to go under the front of the car and find the bolts along the upper edge of the bumper. Use your spanner set to remove the bolts, and use the socket and ratchet set to remove the tensioning rods that sit on either side of the bumper. Make sure you store all the bolts in a safe place for reattachment, and then take the old bumper away from the car.
● Replace the Bumper
Place the bumper on the frame of the car and thread the bolts through the holes in the part to hold it in place against the frame. Then simply reattach the nuts to the bolts and tighten so the bumper is flush against the bodywork before finally reattaching the tensioning rods. You’re now ready to drive the car down the ramp and get to work on replacing the bumper cover.
● Reattach the Bumper Cover
Retrieve the bumper cover from its safe storage space. You will need to replace the clips that you destroyed in step 2 with new clips or the bumper cover will flap in the wind. Simply put the cover in place and lock it in position before reattaching all the necessary clips. When this is completed and the part is firmly held against the bumper simply reattach the screws under the grille and your car is good to go.
COST
How much does it cost to install a bumper?
Bumper Installation Service near Austin TX: In the worst scenario, because of high damage, a replacement will be made. A replacement of a bumper will cost you around $300 – $700. If sensors, lights, cameras or any other component are damaged, then you can expect an increase in overall cost. Even a low-speed collision of a new car could cost up to $1,000.
If you find yourself in a fender bender and need to have your bumper replaced, you may be wondering about bumper repair costs. Usually, a bumper will cost between $880 and $1,390 to replace, depending on the type of vehicle you own and the amount of labor time the repair takes. Front bumper repair costs tend to be different than rear bumper repair costs. Additionally, different auto manufacturers will charge different amounts for bumper parts.
Why is Bumper Replacement and Bumper Repair Costs So Pricey?
Many folks get caught off-guard when they find out how much bumper repairs cost. This is because bumpers are an integral part of your vehicle for both aesthetic and practical purposes. They are vital components of a vehicle and this is why the price to repair or replace them are so high.
Labor Costs for Bumper installation Costs
Repairing or replacing a bumper isn’t just a simple matter of unscrewing a couple of bolts. Since modern front and end bumpers are integrated parts of the vehicle, auto technicians will need to disconnect and reconnect all of the parts. Some of these parts include:
● Air Intakes: Although this is not a common occurrence, some cars are made this way and have their cold-air intakes mounted to the front bumper.
● Airbag Sensors: These parts can sometimes be connected to the bumper. In order to remove the bumper, you will need to remove the airbag sensors first.
● Lights: A lot of your vehicle’s lights, including the headlights and turn signals, may be wired to the front bumper. They all need to be disconnected before you replace or repair the bumper.
● Trim: There can be numerous trim parts that are connected to the bumper. To replace or repair the bumper, they will need to be removed.
● Warning Signals: Car warning sensors such as weather sensors, parking sensors, backup sensors, vehicle lane changing warning sensors, collision warning sensors, as well as car cameras will probably be interconnected to your bumper.
Removing all of these parts one by one will take two hours or more to complete. If the car accident is severe, some of these parts will have to be replaced. These additional charges can quickly add up and significantly increase the costs of the overall replacement or repair process.
FREQUENTLY ASKED QUESTIONS
What is a Bumper?
A vehicle’s bumper is a protective part of the automobile that is mounted to both the front and rear ends of the car. Typically crafted from aluminum, plastic, rubber, or steel, the bumper acts as a shock absorber during low-speed collisions. It also aids in reducing more significant damages made to your vehicle. While some types of bumpers are made from foam that acts as a kind of cushion, others have energy absorbers or brackets that serve the same purpose.
How do I install my Bumper Guard products?
Please reference our section on Installation Instructions
How long does it take to install the Bumper Guard products?
Installation takes only a few minutes. Please make sure to follow the installation instructions when applying our bumper guards.
Will the Bumper Guards chip, fade, or discolor?
Since the color of our bumper guards run through the product you will not experience any cracks, chips or fading like you would get from a painted bumper guard.
Can the Bumper Guards be installed on a repainted bumper?
We do not recommend installing bumper guards on a repainted bumper. Oftentimes when a bumper is repainted at a body shop the quality of the paint job is second rate. It is possible that the 3M adhesive can damage a repainted bumper if removed improperly.
If I trim or cut the edges of my bumper guard will the color be different on the cut edges?
No, since the color runs through the bumper guard; the color of the actual bumper guard will be the color on the exposed cut edge,
Can you paint the bumper guards to match a color that you do not carry?
You probably could get them professional painted at a bumper shop but we DO NOT recommend it. The paint will more than likely crack, chip or peel off with time/from the elements/or if damaged.
How do I know what size to order?
If you are unsure what size to order please measure your vehicle's bumper. The sizes we have available are standard sizes. We can customize a particular size if you require. Please contact us with any requests.
I can't tell what color to order?
Oftentimes we carry many shades of a particular color. If you are unsure which color to choose, we recommend ordering a color sample. Color samples are the simplest way to ensure a close color match. All color samples are shipped USPS and are labeled accordingly.
Is it possible to trim/cut color bumper guards, rear bumper guards, and/or front bumper guards?
Yes, however we recommend purchasing our professional grade clippers. They work really well in cutting/trimming your bumper guard. Please note our bumper guard edge comes straight cut. If you want to trim the ends of your bumper guards on an angle we recommend ordering the clippers. Also please note that standard scissors/players do not work so well when attempting to cut or trim the guards.
CALL FOR US:
● Bumper Installation Service Near Austin TX
● Bumper Installation
● Front Bumper Installation
● Bumper Installation Cost
● Car Bumper Installation
● Bumper Installation Labor Cost
● Car Bumper Clip Lock
● Bumper Guard Installation Near Austin TX
● How To Install Bumper Clips
● Bumper Repair Cost
● Front Bumper Repair Cost
● Front Bumper Replacement Cost Estimate
● Small Crack In Bumper Repair Cost
● Loose Bumper Repair Cost
● How Much To Replace A Rear Bumper
● Car Bumper Repair
● How Much Does It Cost To Replace A Plastic Bumper Near Austin TX
BEST BUMPER INSTALLATION SERVICE IN AUSTIN TX
MOBILE AUTO TRUCK REPAIR AUSTIN
REQUEST MORE INFORMATION. CONTACT US NOW!
Contact Details
Mobile Auto Truck Repair Austin
Best Mobile Mechanic & Mobile Auto Truck Repair in Austin Texas
Call US: (512) 649-5322
Location: Texas, Austin
Monday-Sunday 24 Hours
www.mobileautotruckrepairaustintx.com
Zip Codes in Austin, Texas:
76527 (Florence) 76530 (Granger) 76537 (Jarrell) 76573 (Schwertner) 76574 (Taylor) 76578 (Thrall)
78602 (Bastrop) 78610 (Buda) 78612 (Cedar Creek) 78613 (Cedar Park) 78615 (Coupland) 78616 (Dale)
78617 (Del Valle) 78619 (Driftwood) 78620 (Dripping Springs) 78621 (Elgin) 78622 (Fentress) 78626
(Georgetown) 78628 (Georgetown) 78633 (Georgetown) 78634 (Hutto) 78640 (Kyle) 78641 (Leander)
78642 (Liberty Hill) 78644 (Lockhart) 78645 (Lago Vista) 78648 (Luling) 78650 (Mc Dade) 78652
(Manchaca) 78653 (Manor) 78655 (Martindale) 78656 (Maxwell) 78659 (Paige) 78660 (Pflugerville)
78661 (Prairie Lea) 78662 (Red Rock) 78664 (Round Rock) 78665 (Round Rock) 78666 (San Marcos)
78669 (Spicewood) 78676 (Wimberley) 78681 (Round Rock) 78701 | 78702 | 78703 | 78704 | 78705 |
78712 | 78717 | 78719 | 78721 | 78722 | 78723 | 78724 | 78725 (Hornsby Bend) 78726 | 78727 |
78728 (Wells Branch) 78729 (Jollyville) 78730 | 78731 | 78732 | 78733 | 78734 (Lakeway) 78735 |
78736 | 78737 | 78738 (Bee Cave) 78739 | 78741 | 78742 | 78744 | 78745 | 78746 | 78747 | 78748 |
78749 | 78750 | 78751 | 78752 | 78753 | 78754 | 78756 | 78757 | 78758 | 78759 | 78953 (Rosanky)
78957 (Smithville)
#Roadsideassistance. #Emergencyroadsideassistance #CommercialTowing
#Carlockouts #HeavyTransportation #Flatbedtowservice
0 notes
Link
Best Bumper Installation Service and Cost in Albuquerque NM |Mobile Mechanics of Albuquerque
More information is at:
http://mobilemechanicalbuquerque.org/bumper-installation-near-me/
Are you looking for the BestBumper Installation Service near Albuquerque NM ? Mobile Mechanics of Albuquerque,A vehicle’s bumper is a protective part of the automobile that is mounted to both the front and rear ends of the car. Cost? Free estimates! Send us a message or call us today. Best Bumper Installation Service around Albuquerque NM. We serve Albuquerque NMand other areas. Get a Free Quote Now!
BEST BUMPER INSTALLATION SERVICE IN ALBUQUERQUE NM
ALBUQUERQUEBUMPER INSTALLATION
How to install your bumper system
Bumper Installation Service near Albuquerque NM: If you've recently become the new owner of a rear bumper system, you may not know how all of the different pieces fit together to mount to your chassis. Whether it's KG, they all typically have similar pieces. OTK is essentially the same process, but will differ slightly with their parts.
● You'll begin by installing the two mounting posts to your chassis . The key to securing the two mounting posts to your chassis starts with installation outside of the chassis. In your hands, drop your smaller washer into what will become the outside of the mounting post, drop the larger washer into what will become the inside. Now drop your 10mm bolt through the two washers and mounting post beforehand tightening the rubber (with threading on the inside) to your bolt. You should have one sold piece now that you''ll mount to your chassis.
● To finish installing your mounting posts to your chassis, grab a 17mm wrench or socket on an impact and tighten the piece to your chassis tube .Nice and tight will do, you don't have to set any world records for strength. You'll do this for both sides, left and right, before we head into the next segment.
● The next piece to install is what you'll eventually mount your rear bumper to, it's the rear bumper support . Supplied typically with a short 8mm bolt, washer, and nut, you'll fasten your support to your post solidly. After successfully mounting both your right and left supports solidly to your posts, we'll move on to the next segment, mounting the bumper.
● You'll notice on the bumper a pair of elongated mounting holes. Line those holes up with your support holes and press the bumper to your supports. Now it's time to grab your hardware, which should typically be an 8mm bolt with washer and nut, and tighten your bumper to your supports . Again, you don't need to show off your strength, but make sure it's nice and solid; you don't want the bumper to move side to side. Your entire system should be nice and tight at this point. However, it is common to see the support loose on the post. You can loosen the support by taking a couple of turns out, but still keeping the bolt within the nylon of the nut so that it doesn't vibrate out while on track. This will free up the rear end and allow it to flex more in certain conditions.
What is a Bumper?
Bumper Installation Service near Albuquerque NM: A vehicle’s bumper is a protective part of the automobile that is mounted to both the front and rear ends of the car. Typically crafted from aluminum, plastic, rubber, or steel, the bumper acts as a shock absorber during low-speed collisions. It also aids in reducing more significant damages made to your vehicle. While some types of bumpers are made from foam that acts as a kind of cushion, others have energy absorbers or brackets that serve the same purpose.
Do Bumper Guards Really Work?
● Collisions happen even if you’re a careful driver. If your car is rear-ended or damaged in a parking lot, the other person can drive away without much risk. To prevent damages that may not be covered by car insurance, many people use bumper guards to protect their vehicles.
● Bumper guards are vertical bars or foam pads that can be placed on either the back or front of your car. They’re usually easy to install and remove, but are they worth it? Let’s look at the pros and cons of utilizing a bumper guard.
They protect your vehicle
Bumper Installation Service near Albuquerque NM: If you have to park in a crowded street or in a cramped garage, there’s always the possibility that someone may hit the back of your car. You could also end up damaging your vehicle yourself if you don’t have enough room to back out of a parking space. A foam guard will give you a little cushion to absorb damage. It can also protect the front end of your vehicle by minor damage caused by fender benders.
3 Benefits of Installing a Heavy-Duty Bumper on Your Vehicle
If you need to select a bumper for your commercial truck or pickup, you may want to consider the benefits of a heavy-duty model. Heavy-duty bumpers outperform lightweight models in several categories including collision protection, longevity, and durability. To learn more about the benefits of a weightier model, look over this convenient guide.
Why Choose a Bumper?
1. Collision Protection
You will find large, robust bumpers on vehicles like ambulances, fire trucks, and commercial vehicles for a reason. A bumper’s most important duty lies in collision protection. Thus, bigger, more resilient ones will always offer greater performance in this arena. Heavy-duty bumpers absorb impact better than thinner models, thereby keeping the truck and individuals inside safe from harm.
2. Longevity
heavy-duty bumperHeavy-duty bumpers are often constructed from high-quality steel, which is built to endure for decades. While less robust models may suffer wear and tear over the years and eventually need replacement, a heavy-duty bumper will continue to serve your needs. Off-roaders who demand rugged features that will hold up in the face of mud, rocks, and debris will also greatly benefit from a sturdier bumper. If you want a lasting investment, opt for the durability heavy-duty models offer.
3. Economic Savings
While heavy-duty bumpers may cost more initially, they offer significant economic savings over lightweight models in the long run. Since heavy-duty bumpers very rarely need replacement, you won’t have to worry about additional expenditures as the years pass. Furthermore, these bumpers protect against serious and costly vehicular damage.
TIPS
Bumper Installation Service near Albuquerque NM: This is one of the less complex mechanical jobs that you can perform on your car, and it can be attempted by even those with the most basic of technical knowledge. All you need to complete this task is a spanner set, a socket and ratchet set, some wire clippers, a Phillips and a flat-head screwdriver and two wheel ramps to help you elevate your vehicle and you’re ready to go.
● Locate and Unscrew the Bumper Cover
There are two parts to the front bumper. The first is the painted cover that matches your car’s color scheme. This is sometimes referred to as the bumper, but is actually concealing the real bumper underneath. To replace the bumper you will need to remove this first. Open the car bonnet and remove the screws that hold the cover in place. These can be found above the grill.
● Unclip the Bumper Cover
It’s now time to unclip the bumper cover from its position. Look underneath the front side of the part and locate the plastic clips that hold it in place. Carefully use the flat head screwdriver to pry these out of position. This should leave a clip exposed. This clip attaches the bumper to the body work, and needs to be cut with your clippers. Finally pull the bumper cover away from the car and place it on a blanket or towel to prevent it from getting scratched or damaged.
● Bumper Removal
After driving the car up the wheel ramps so that the front of the car is elevated, use a body board to go under the front of the car and find the bolts along the upper edge of the bumper. Use your spanner set to remove the bolts, and use the socket and ratchet set to remove the tensioning rods that sit on either side of the bumper. Make sure you store all the bolts in a safe place for reattachment, and then take the old bumper away from the car.
● Replace the Bumper
Place the bumper on the frame of the car and thread the bolts through the holes in the part to hold it in place against the frame. Then simply reattach the nuts to the bolts and tighten so the bumper is flush against the bodywork before finally reattaching the tensioning rods. You’re now ready to drive the car down the ramp and get to work on replacing the bumper cover.
● Reattach the Bumper Cover
Retrieve the bumper cover from its safe storage space. You will need to replace the clips that you destroyed in step 2 with new clips or the bumper cover will flap in the wind. Simply put the cover in place and lock it in position before reattaching all the necessary clips. When this is completed and the part is firmly held against the bumper simply reattach the screws under the grille and your car is good to go.
COST
How much does it cost to install a bumper?
Bumper Installation Service near Albuquerque NM: In the worst scenario, because of high damage, a replacement will be made. A replacement of a bumper will cost you around $300 – $700. If sensors, lights, cameras or any other component are damaged, then you can expect an increase in overall cost. Even a low-speed collision of a new car could cost up to $1,000.
If you find yourself in a fender bender and need to have your bumper replaced, you may be wondering about bumper repair costs. Usually, a bumper will cost between $880 and $1,390 to replace, depending on the type of vehicle you own and the amount of labor time the repair takes. Front bumper repair costs tend to be different than rear bumper repair costs. Additionally, different auto manufacturers will charge different amounts for bumper parts.
Why is Bumper Replacement and Bumper Repair Costs So Pricey?
Many folks get caught off-guard when they find out how much bumper repairs cost. This is because bumpers are an integral part of your vehicle for both aesthetic and practical purposes. They are vital components of a vehicle and this is why the price to repair or replace them are so high.
Labor Costs for Bumper installation Costs
Repairing or replacing a bumper isn’t just a simple matter of unscrewing a couple of bolts. Since modern front and end bumpers are integrated parts of the vehicle, auto technicians will need to disconnect and reconnect all of the parts. Some of these parts include:
● Air Intakes: Although this is not a common occurrence, some cars are made this way and have their cold-air intakes mounted to the front bumper.
● Airbag Sensors: These parts can sometimes be connected to the bumper. In order to remove the bumper, you will need to remove the airbag sensors first.
● Lights: A lot of your vehicle’s lights, including the headlights and turn signals, may be wired to the front bumper. They all need to be disconnected before you replace or repair the bumper.
● Trim: There can be numerous trim parts that are connected to the bumper. To replace or repair the bumper, they will need to be removed.
● Warning Signals: Car warning sensors such as weather sensors, parking sensors, backup sensors, vehicle lane changing warning sensors, collision warning sensors, as well as car cameras will probably be interconnected to your bumper.
Removing all of these parts one by one will take two hours or more to complete. If the car accident is severe, some of these parts will have to be replaced. These additional charges can quickly add up and significantly increase the costs of the overall replacement or repair process.
FREQUENTLY ASKED QUESTIONS
What is a Bumper?
A vehicle’s bumper is a protective part of the automobile that is mounted to both the front and rear ends of the car. Typically crafted from aluminum, plastic, rubber, or steel, the bumper acts as a shock absorber during low-speed collisions. It also aids in reducing more significant damages made to your vehicle. While some types of bumpers are made from foam that acts as a kind of cushion, others have energy absorbers or brackets that serve the same purpose.
How do I install my Bumper Guard products?
Please reference our section on Installation Instructions
How long does it take to install the Bumper Guard products?
Installation takes only a few minutes. Please make sure to follow the installation instructions when applying our bumper guards.
Will the Bumper Guards chip, fade, or discolor?
Since the color of our bumper guards run through the product you will not experience any cracks, chips or fading like you would get from a painted bumper guard.
Can the Bumper Guards be installed on a repainted bumper?
We do not recommend installing bumper guards on a repainted bumper. Oftentimes when a bumper is repainted at a body shop the quality of the paint job is second rate. It is possible that the 3M adhesive can damage a repainted bumper if removed improperly.
If I trim or cut the edges of my bumper guard will the color be different on the cut edges?
No, since the color runs through the bumper guard; the color of the actual bumper guard will be the color on the exposed cut edge,
Can you paint the bumper guards to match a color that you do not carry?
You probably could get them professional painted at a bumper shop but we DO NOT recommend it. The paint will more than likely crack, chip or peel off with time/from the elements/or if damaged.
How do I know what size to order?
If you are unsure what size to order please measure your vehicle's bumper. The sizes we have available are standard sizes. We can customize a particular size if you require. Please contact us with any requests.
I can't tell what color to order?
Oftentimes we carry many shades of a particular color. If you are unsure which color to choose, we recommend ordering a color sample. Color samples are the simplest way to ensure a close color match. All color samples are shipped USPS and are labeled accordingly.
Is it possible to trim/cut color bumper guards, rear bumper guards, and/or front bumper guards?
Yes, however we recommend purchasing our professional grade clippers. They work really well in cutting/trimming your bumper guard. Please note our bumper guard edge comes straight cut. If you want to trim the ends of your bumper guards on an angle we recommend ordering the clippers. Also please note that standard scissors/players do not work so well when attempting to cut or trim the guards.
CALL FOR US:
● Bumper Installation Service Near Albuquerque NM
● Bumper Installation
● Front Bumper Installation
● Bumper Installation Cost
● Car Bumper Installation
● Bumper Installation Labor Cost
● Car Bumper Clip Lock
● Bumper Guard Installation Near Albuquerque NM
● How To Install Bumper Clips
● Bumper Repair Cost
● Front Bumper Repair Cost
● Front Bumper Replacement Cost Estimate
● Small Crack In Bumper Repair Cost
● Loose Bumper Repair Cost
● How Much To Replace A Rear Bumper
● Car Bumper Repair
● How Much Does It Cost To Replace A Plastic Bumper Near Albuquerque NM
BEST BUMPER INSTALLATION SERVICE IN ALBUQUERQUE NM
MOBILE MECHANICS OF ALBUQUERQUE
REQUEST MORE INFORMATION. CONTACT US NOW!
0 notes
Text
LIUGONG WHEEL LOADER SPARE PARTS 169

SP216808 SHUT-OFF SPOOL
SP216813 ASSY-REV MODULATOR HOSE - SEE FRONT PAGE
SP216820 DAM-OIL
SP216829 ADAPTOR-STEER PUMP
SP216834 CLIP
66C1292 FUEL HOSE
66C3814 HOSE AS
66C6517 HOSE AS
66C8669 HOSE AS
66C9333 HOSE AS
67A0344 PIPE
67A1203 PIPE
67A2924 EXHAUST PIPE
67C0192 HOSE AS
67C0901 HOSE AS
67C3591 HOSE AS
67C3901 HOSE AS
67C4925 HOSE AS
67C5000 HOSE AS
67C6867 HOSE AS
67C7819 HOSE AS
69A7416 PLATE
08D0351 TUBE AS
08D2431 TUBE AS
08D2571 TUBE AS
70C0184 HARNESS
70C0522 HARNESS
70C0629 HARNESS
70C1458 HARNESS
70C2624 HARNESS
70C3390 HARNESS
70C3445 CABLE
70C4497 HARNESS
70C5527 CAB HARNESS
70C5558 CAB HARNESS
70C8114 CAB HARNESS
72A3059 TOOTH
74A2883 DECAL
70C3561 CAB HARNESS
70C3062 STEERING HARNESS
67C7554 HOSE AS
04C2239 HOSE AS
30D5827 REAR FRAME
09C0663 CLAMP
09C1536 CLAMP
09C1826 CLAMP
09C2776 CLAMP
09D2738 TUBE AS
09D3166 TUBE AS
09D3314 TUBE AS
02A1874 TEE
42C2566 PISTON GP
09D5345 TUBE AS
09D7133 OIL FILLER
09D7508 TUBE AS
09D8962 TUBE AS
09D8971 TUBE AS
10A6546 ELASTIC PLATE
11A5167 MOUNTING PLATE
11C2580 STEERING PUMP
11C2581 WORKING PUMP
79A7394 DECORATION
81A0374 LINER
82A0540 CUSHION
82A0565 GASKET
82A2199 SPONGE
82A2205 SPONGE
83A2046 RUBBER SHEET
83A2577 O-RING
83A2698 DUST RING
83A3003 PROTECTIVE SHIELD
84A3616 O-RING
84A3877 BAFFLE
84A3886 BAFFLE
84A3944 BAFFLE
84A5458 RUBBER PLATE
86A2590 DECORATION
87A1169 GLASS
90A3374 SHIM
97A1840 CUTTING EDGE
11D2061 PIN
11D2063 PIN
11D2510 PIN
12B1752 O-RING
99A0813 PLATE-LH
SP134364 HOSE
12B2960 O-RING
12C3843 CONTROL UNIT
15D1686 FLANGED JOINT
16A3356 NUT BLOCK
16C0036 STRAINER
18C0385 HOSE AS
18C0387 HOSE AS
18C0390 HOSE AS
18C1046 HOSE AS
SP160709 DRIVE SHAFT
SP160716 WASHER
SP160724 DUST SEAL RIN
SP160729 O-RING
SP160737 END COVER
SP161809 PRIMARY TOOTH
SP167890 SEAL KIT
SP169320 COPPER SLEEVE
SP169714 SPHERICAL BEARING
SP169719 SINGLE SEAL ASSY
SP169750 O RING Φ113.67×5.33
SP169774 BIAS SPRING
SP169780 SPHERICAL WASHER
SP169785 BEARING RETAINER ORIFFICE
SP171145 HEXAGON SOCKET SCREW
SP171150 SETTING RING
SP171152 DISK CARRIER
SP171168 LOCKING PIN
SP171189 O-RING
SP171196 HEXAGON SCREW
SP171201 HEXAGON SCREW
SP171207 HEXAGON SOCKET SCREW
SP171214 DISK
SP171215 BUSHING
SP171228 PLANETARY CARRIER
SP171235 SUN GEAR
SP171262 LOCKING PIN
SP171270 ADJUSTING NUT
SP171276 BRACKET
SP171281 DISK
SP171288 NEEDLE BEARING
SP173162 SPOOL DS
SP173169 LOAD SIGNAL DRAINAGE VALVE
SP173176 M6 PLUG KIT
SP177895 CLIP-CLOSED
SP177904 PIPE-OIL FILLER
SP177910 DUST COVER
SP177915 LOCKWASHER
38Y1286X0 BUCKET AS
38Y0438X0 BUCKET GP
30K0011 CONNECTOR
30C0840 CONNECTOR
30C1500 CONNECTOR
21C0921X0 HYDRAULIC OIL TANK
32C0716 TEE
13C1495X0 AIR RESERVOIR
12C6090 CHECK VALVE AS
34C6036 SIDE HOOD
42D3912X0 SIDE HOOD
67C8820 HOSE AS
41C3668 RIM AS
48C8340 DOOR
72A3850 COUNTERWEIGHT
19C2681 HOSE AS
32A4894 WATER HOSE
90A8092 TAG
03G3650 PLATE
30A2549 WATER PIPE
04C1394 HOSE AS
04C1396 HOSE AS
18C0380 HOSE AS
19D0803 BRACKET
18C0683 HOSE AS
04C1686 HOSE AS
60C2924X0 RADIATOR MOUNTING
18C0684 HOSE AS
98A9913 PLATE
40D1946 REAR FENDER-RH
01Y0716X0 REAR AXLE AS
01C1849 TUBE AS
48C7470 MAST AS
19D5885 BOTTOM PLATE
24C3934 LINKAGE
46C4497 STEERING COLUMN AS
39Y0284X0 GRAPPLE
96A8101 CUTTING EDGE-RH
06C4557 HOSE AS
SP149869 FUEL-INLET PIPE ASSEMBLY
SP182459 INJECTION PIPE
SP210775 HARD TUBE A
48C8576 TOP COVER
92A0918 PLATE
SP110007 CYLINDER HEAD BOLT
SP141430 THE PISTON RING ASSEMBLY
SP149800 BACK-UP BLOCK
SP182469 WASTE GAS CONTROL VALVE
SP184074 HEXAGON FLANGE BOLT
32A4993 INTAKE HOSE
SP182413 INDICATOR
SP227613 O-RING
SP227612 SWASH PLATE
SP227578 COMBINATION WASHER
10D2812 PIPE AS
98A2692 PLATE
18C2671 HOSE AS
25D1002R UPPER FORK
SP107625 ADJUSTING SHIM
08C2014 HARNESS
38Y0955X0 BUCKET GP
SP227611 RADIATOR CAP
SP227579 PIN
30B0967P02 PRESSURE SWITCH
70C8307 HARNESS
SP107629 ADJUSTING SHIM
21C1613X9 HYDRAULIC OIL TANK
49D2463 BRACKET
SP227575 CARRIER
34A8707 SOCKET
48C8586 SIDE HOOD
SP231628 SEAL KIT
08G1032 EDGE-LH
SP227570 SHIM
38Y0755X0 BUCKET AS
67C9817 HOSE AS
47C0090
SP116314
10D2813 PIPE AS
06C0089TS HOSE AS
01B1640 BOLT
SP227582 AXLE HOUSING AS
16B0026P01 RADIAL TYRE
22D2313X0 BUCKET
SP212557 VALVE COVER
06C2661TS HOSE AS
SP212556 FAN SUPPORT
SP100140 SHIM A =1.6
67C9778 HOSE AS
47C3414X2 STEERING COLUMN AS
45D3323 SHROUD
84A6384 RUBBER PLATE
85A7288 SIDE HOOD
SP227580 PISTON
46C0310 A/C PANEL
57A3238 GASKET
30B0831P01 TEMP SENSOR
05G1868 PLATE
67C8613 HOSE AS
SP123966 OIL
84A6422 SEAL
46C2949 CONTROL BOX
08D6851 TUBE AS
84A6425 SEAL
37C0392 FILTER ELEMENT
40D2275X0 REAR FENDER-RH
SP227581 DUST RING
SP227576 BOLT
SP227577 PIN
41B0135Y18L OIL
30B0135P02 PRESSURE SWITCH
SP227571 SHIM
70C8310 WORK LIGHT HARNESS
46D4811 TOP COVER
21C1985X9 HYDRAULIC OIL TANK
34C0095P04 TYRE AS
SP227573 BOLT
SP227574 MAIN REDUCER
SP212559 PLUG THREADED
41D2060 HANDRAIL GP-RH
00G5516 PLATE
70C8304 CAB HARNESS
67C9564 HOSE AS
SP100135 WASHER S=0.3
30B0831P02 TEMP SENSOR
56A0028P02 DRIVENPLATE
40D2274X0 REAR FENDER-LH
08C1158 HARNESS
21C1875X9 HYDRAULIC OIL TANK
30B0967P01 PRESSURE SWITCH
SP227572 ROLLING NEEDLE
84A6424 SEAL
01C2202 TUBE AS
47C0036 SEAT
18C3024 HOSE AS
41B0016Y4L MOBIL GREASE
SP107633 ADJUSTING SHIM
25D1002L UPPER FORK
48C8585 SIDE HOOD
40D2251X0 REAR FENDER-RH
01C2203 TUBE AS
08D7066 TUBE AS
21C2088X9 HYDRAULIC OIL TANK
45D3846 PROTECTION SHIELD
21C1471X9 HYDRAULIC OIL TANK
47C5745 DOME DECORATION AS
70C8306 HARNESS
SP100137 WASHER S=0.1
00G5515 PLATE
SP107655 ADJUSTING SHIM
08G1033 EDGE-RH
41D2453 PROTECTIVE BARRIER
Read the full article
0 notes
Text
Driveway Tech: A Quick, Easy, And Cheap Junkyard Windshield Washer Pump Fix
We always like cheap, easy fixes to things that annoy us. Driving around 50 year old cars means that having a working windshield washer pump at all is a luxury. But, keeping that stupid thing working is a real pain.
Most GM’s from the ’60’s to mid ’80’s had the plunger style washer pumps that had a plastic plunger in a plastic tube that used rubber flap style valves to pull washer fluid in, then shoot out the fluid, when they function. There are kits to replace all the O-rings and rubber valves. But, they seldom work very well, or for very long.

Tonight’s victim is Project Hay Hauler, the ’67 GMC pickup. This era of GM pickups has the wiper motor/washer pump under the dash, behind the radio. A giant pain in the backside to work on. I would rather keep a squeegee and a bottle of Windex in my truck forever than try to work on a wiper motor way up in the back of my dash.

When looking up behind the dash, I saw that there was an old electric pump that a previous owner of the truck tried using instead of pulling the washer motor to fix the washer pump. I guess I am not alone in hating this work. It also explained the old momentary switch that was under the dash when I bought the truck.
So what is a better option? A friend once mentioned to me that late ’80’s to late ’90’s GM trucks used an electric washer pump that was attached right to the washer tank under the hood. I finally remembered this on a recent junkyard jaunt my local yard, Andersen’s Self Service Auto Parts..
After looking at a bunch of fullsize trucks, I noticed that S10’s had the same set up. But, the S10’s used a smaller washer tank. This seemed like a better idea to make it easier to find a place to locate it under the hood of the GMC. I actually grabbed two of these for a mere $20 bucks.

The first thing to do is to find a place where you can mount the new tank. The most obvious place would be where the original tank was located. If you ever see this 50 year old tanks in cars, they are usually brittle and broken. Mine is amazingly still unbroken and holding fluid. I didn’t throw it away. It went into the giant box with other GMC parts on the shelf.

The new tank seemed to fit better right on the inside of the driver’s side fender.

With a couple self tapping screws, the new washer tank was mounted.

The next step is to find a place for a momentary switch and wire it up. The 67-68 dash panels have the wiper switch on the left side, while the later had the switch it on the right side. The 67-68’s had a choke knob there. If you want to get crafty with your wiring, you can skip the separate switch and connect the power to the washer pump straight to the wiper switch. I didn’t feel like doing that. I had a super cheap button switch in my electrical parts stash. I mounted it where the knob for the original choke cable went.


I ran the power wire to the washer pump along the original under hood wiring.

With new hoses ran to the washer pump, I tucked the wiring away under the inner fender to get a cleaner look.

The final test was to turn it on. It took a couple seconds for the pump to move fluid through all the hose, but the spray was strong enough to shoot straight over the windshield spraying the ceiling of my garage. A little adjustment to the spray nozzles and everything was finished. Ready for my road trip. RMRW 2018.
Scott Liggett

The post Driveway Tech: A Quick, Easy, And Cheap Junkyard Windshield Washer Pump Fix appeared first on BangShift.com.
Driveway Tech: A Quick, Easy, And Cheap Junkyard Windshield Washer Pump Fix syndicated from https://cashcarsremovalwrecker.wordpress.com
0 notes
Text
Installing a ProCharger Supercharger on a Late-Model 6.4L Hemi
After a short period of ownership of your new Challenger, Charger, Ram, or an SRT version of the Durango, Grand Cherokee, or Wrangler, a decision was made that the horsepower the 5.7L or 6.4L Hemi was putting to the ground was no longer enough to satisfy the never-ending quest for more power. To increase the output of the Hemi, all options were considered, such as upgrading the heads and camshaft, adding nitrous, installing a turbocharger, or even mounting a supercharger. After carefully studying the benefits and drawbacks of each power adder, it was determined a centrifugal supercharger would provide greater performance than a head/cam swap, be available all the time unlike the constant bottle filling required for nitrous, would fit into the engine bay and look like a factory installation rather than an aftermarket add-on like a turbocharger, and the centrifugal supercharger would provide more effective output than a turbocharger when run on pump gasoline. A call was placed to ATI ProCharger for one of their High Output (HO) Intercooled System, which included an air-to-air intercooler. This supercharger kit was designed to work with stock compression pistons (which our 2018 Challenger has) and a fuel octane rating of 91 or higher.
Why did we select ProCharger? ProCharger was the only choice when it came to a 100 percent complete, bolt-on supercharger installation. They have been the leading aftermarket supercharger manufacturer for 25 years, and their products are some of the best engineered, reliable, and powerful on the market. The ProCharger line is USA engineered and built to provide excellent power/pound of boost for a multitude of applications, including not only late-model V-8s, but trucks, SUVs, compacts, motorcycles, and various marine applications. The ProCharger supercharger comes with an air-to-air intercooler that helps keep the charge air temperatures at a minimum for maximum power. Lastly, there’s a warranty with each supercharger system.
Before the installation of the ProCharger began, our stock 2018 Challenger with a 6.4L Hemi was strapped to a Mustang dyno to evaluate the rear-wheel horsepower and torque. With the engine and drivetrain up to operating temperature, a run from 3,100 to 6,200 rpm was performed. The numbers were impressive for a stock, off-the-showroom floor vehicle. We made several more baseline runs, and all the runs were very similar in performance output and consistency; the best run resulted in a peak of 426 rear-wheel horsepower at 6,200 rpm, and the torque peaked at 404 lb-ft at 4,300 rpm. Pleased with the results, we moved the Challenger to a four-post drive on vehicle lift, so the stock component removal could begin.
Prior to starting the removal process, we familiarized ourselves with the kit. With dozens of parts in the kit and a thick installation guide, it looked like a daunting undertaking, but with good planning and patience, the installation progressed smoothly. Following the steps of the installation guide, we ensured that no fuel pressure was in the fuel rails before they were removed by pulling the 20-amp fuse No. 6 or relay 46 (depending upon model year — both located in the trunk) to disable the voltage to the fuel pump, and the engine was turned over for 15 seconds to bleed off the fuel pressure. After the pressure was relieved, the negative battery cable was disconnected. We removed the engine covers, unclipped the wiring harnesses from each fuel injector, and pulled the injectors and rails from the intake manifold. Each injector was removed from its fuel rail and new injectors supplied with the kit were installed. The new injectors with the fuel rails were reinstalled into the intake manifold.
The manifold absolute pressure sensor (MAP) was removed from the intake manifold. A MAP adapter was threaded into the intake manifold, and a new supplied MAP sensor was installed on the MAP adapter. A fresh set of plugs (16) that were one step colder were gapped to .035 inch and torqued into each cylinder (two plugs per cylinder). The intake air temperature sensor (IAT) was removed from the engine. The positive crankcase valve (PCV) hose was freed from the airbox assembly, and with the unthreading of a bolt and the band clamp on the airbox housing, the airbox was pulled from the engine bay. While in the engine bay area, the radiator cavity covers (black airflow dams) were detached from the radiator support. If the vehicle had been equipped with a shaker hood, several additional steps would’ve been required to remove the airbox from the car.
The Challenger was raised so we could gain access to the under-chassis body cladding. There were three lower front fenderwell panel fasteners that were removed per side. The back cladding required unthreading of four fasteners to free it from the chassis. Following the removal of the back cladding, the removal of 11 additional fasteners released the front cladding from the Challenger. With everything that attached to the exterior of the fascia removed from the top and bottom sides, we had to dive deeper into the fenderwells and into the area around the air conditioning condenser to remove more clips, rivets, and fasteners to remove the fascia. While we were removing the various fasteners, we disconnected the wiring harness to the fascia, thus eliminating the need to unplug each turn signal and fog lamp separately. When we were sure we had every fastener removed, we taped the front edge of the fenders of the Challenger with several layers of 2-inch masking tape to protect the paint. Each side of the fascia was unsnapped, and the fascia was gently pulled straight forward off the Challenger. With the fascia placed on a pair of fender covers on the floor, we proceeded to remove plastic radiator shrouding and ducting from around the condenser and radiator. The serpentine belt and tensioner were removed, and lastly the horns were disconnected from the harness and removed. The horn brackets were set aside and wouldn’t be reused for the supercharger installation.
At this point, we moved to the cooling system of the Challenger. We removed the coolant reservoir cap, drained the coolant from the radiator, removed the coolant lines from the reservoir, and removed the reservoir from the engine bay. The reservoir wouldn’t be reused for the installation of the supercharger. Once the reservoir was removed, we removed the radiator bracket located on the driver side of the radiator. We still had more components to loosen or remove to get to the harmonic balancer. There was a radiator cradle, radiator trim, electric fan connectors, and several fasteners that had to be removed. The fan shroud was pushed up from below slightly, tilted to the rear of the Challenger, and then lowered out from the bottom of the engine bay. As the cradle and fasteners were removed, a jackstand was required to hold the radiator in its approximate location.
With just enough clearance between the harmonic balancer and the radiator, we backed off the factory harmonic balancer bolt and prepared the balancer for a dowel pin. We secured the supplied drill jig with a bolt and washer into the balancer bolt threads in the crankshaft, and we used a 90-degree drill with a drill bit in the jig to locate a small hole in the crankshaft and the balancer. A stainless steel dowel pin slipped into the drilled hole to engage the outer diameter of the crankshaft to the inner diameter of the balancer. The harmonic balancer bolt was reinstalled and torqued to specifications. Pinning the balancer was necessary because the factory doesn’t include a keyway and key, and the load on the belt and harmonic balancer pulley would be greatly increased by the supercharger, which could cause the pulley to slip on the crankshaft.
After the dowel pin was installed, the radiator fans were reinstalled and the support cradle was reattached along with all the mounting fasteners. A pair of aluminum intercooler brackets was installed onto the radiator support. Once the brackets were installed, the intercooler was guided behind the steel bumper of the chassis and in front of the condenser, where it was secured with several bolts to the intercooler brackets. Both horns were mounted on their new relocation support and attached to the passenger-side intercooler bracket. The harness was rerouted and connected to the horns.
In the engine bay, the four throttle body bolts were removed from the intake manifold as were the two idler bracket bolts and the two timing cover bolts just under the idler bracket. A standoff bracket was installed in the location, where the idler bracket had been. The factory tensioner with an idler pulley added to the assembly was installed in its normal position on the engine with the tensioner pointing downward. A sub bracket was installed, and the ribbed idler was reinstalled onto the sub bracket. The factory belt was routed as laid out in the instructions. After orienting all the brackets, spacers, and bolts, the main bracket was installed onto the engine. The ProCharger head unit (supercharger) was filled with the supplied bottles of supercharger oil via the fill plug/dipstick port, and the head unit was installed onto the main bracket. Two 8-rib idler pulleys were installed on to the main bracket, the supercharger belt was installed, and the belt was tensioned via a screw-jack belt tensioner attached to the main bracket and the tensioner assembly.
The task of routing all the ducting for the supercharger proceeded well. First, the throttle body was reinstalled onto the intake manifold. A 4-inch coupler was run from the intercooler to the air plenum and then from the plenum to the throttle body via a 45 degree 3.5-inch rubber elbow, which was all held together by clamps. The IAT was installed into the threaded bung in the air plenum. A series of silicone rubber elbows and tubes were plumbed from the bottom of the intercooler to the ProCharger supercharger. The Proflow surge system was installed between the intercooler and the supercharger. Just like the other tubes on the intercooler, the tubes and elbows were held together with clamps provided in the kit. To guarantee clean air entered the supercharger, a formed plastic ductwork was affixed to the supercharger, and at the other end, a conical-shaped air filter was installed. The PCV hose that was removed during disassembly was cut to length and slipped onto a barbed fitting, extending from the plastic ductwork.
The new coolant reservoir was installed on the opposite side of the Hemi from the stock location. One factory coolant fitting elbow was reversed (pointed toward the passenger side) in its factory hose, and the hoses were rerouted to the new location of the reservoir. The petcock in the radiator was returned to the closed position, and we filled the system and the reservoir to the full cold level designated on the new reservoir.
We were on the home stretch with our installation. Before the fascia went back on the Challenger, we had to attach the ambient air temp sensor to the intercooler bracket near the horns with zip ties, and two fascia deflectors had to be removed to allow the intercooler and the fascia to fit together properly. The fascia was carefully remounted, and the fasteners and clips were reinstalled. The electrical connection to the fascia was reattached, and both underside cladding panels were secured to the chassis. Lastly, the radiator cavity corners were snapped back into place.
We did a once-over of the installation to verify a component, fastener, trim panel, or anything else was not left loose or was out of place. Once we determined everything looked good, the negative cable was reattached to the battery, and the fuel pump fuse or relay was reinstalled (if it had not been previously). We started the 6.4L and listened for any abnormal noises or noticeable shaking from the engine. After a warm-up cycle, the engine was shut off, and after cooling, the fluid levels were all checked.
Regardless of which kit was purchased, the engine will require a new tune to be uploaded to the PCM before the engine can be run. We had a custom tune uploaded to the PCM (ProCharger will provide the custom tune on your PCM), and with that, we were ready for some additional dyno runs. With more than a quarter tank of 93-octane fuel in the tank, and a fuel pressure gauge connected to the fuel rail to verify the fuel pressure remained between 55 and 60 psi, we ran the Hemi from 3,100 to 6,400 rpm several times. Just like the baseline runs, the runs were consistent and repeatable, but unlike the baseline runs, the 7 psi of boost pushed the numbers up greatly. The engine torque increased to 502 lb-ft at 6,000 rpm, and the engine horsepower jumped to 601 hp at 6400 rpm. The engine horsepower was still increasing when the rev limiter was engaged at 6,400 rpm. The torque increased 98 lb-ft over stock, and even better, the torque with the ProCharger supercharger was higher at all points of the run than the peak torque of the baseline. The horsepower increase was an incredible 175 hp on pump gas at the rear wheels.
If you’re looking for triple-digit increases in torque and horsepower for your late-model Hemi, it’s time to step up to a ProCharger supercharger. The performance numbers provided are excellent, while maintaining decent fuel mileage and civilized street manners on 91 or greater octane fuel. If your engine is already modified or the horsepower gain of the HO Intercooled System doesn’t meet your needs, ProCharger offers an intercooled Stage II supercharger system that’ll elevate the performance numbers of your Hemi into rarefied air. For a boost in your Hemi’s output, give the reps a call about which ProCharger supercharger system will best fit your needs.
Are you looking for more power for your 2018 6.4L Hemi? Is 600-plus horsepower not enough satisfy you? ProCharger has increased the power levels with the Stage II Dedicated Drive System and tuner kit for the 6.4L (392) Hemi. The installation of the ProCharger Stage II supercharger can push the horsepower to 800, 900, 1,000, or even over 1,200. The ProCharger Stage II includes an eight-rib dedicated drive system to provide maximum belt wrap to control belt slippage and a race intercooler upgrade. The HO bracket system fits ProCharger head units up to the F-1A-94 without the need to modify your car. Just like the HO system, the Stage II system if a fully turn key complete system that includes a fuel system and the benefits of a handheld tuner. If your Challenger has a Shaker hood, don’t worry, ProCharger has a system for your needs; your Shaker hood will remain in place and will bring in the much-desired cool air. Contact ProCharger for more information about the 2018 Stage II offerings.
The 2018 6.4L Hemi Challenger was baselined from 3,100 to 6,200 rpm in its factory stock tune on a Mustang chassis dyno. The results of the series of runs on the 6.4L Hemi provided a peak of 426 rear-wheel horsepower at 6,200 rpm, and the torque peaked at 404 lb-ft at 4,300 rpm.
The stock 6.4L was a perfect candidate for the ProCharger High Output (HO) Intercooled System, which works well with the Challenger’s stock compression ratio and operates on 91 or greater octane gasoline.
The PCV fresh air tube was disconnected from the factory airbox. The intake air temperature sensor (IAT) wiring harness was detached, and after the removal of a fastener and a clamp, the airbox was pulled from the engine bay. The airbox wouldn’t be reused after the installation of the supercharger.
The fuel pressure was relieved, and the rails and fuel injectors were removed from the intake manifold. The factory fuel injectors were removed, and higher flow injectors supplied in the kit were installed into the fuel rails. The new injectors and rails were reinstalled onto the intake manifold.
The factory manifold absolute pressure sensor (MAP) was removed and discarded. A MAP adapter was threaded into the factory location on the intake manifold. A new MAP sensor was bolted to the adapter. This new MAP is able to read engine vacuum and engine boost.
A new set of spark plugs that were one heat range colder than stock were installed. Each plug was gapped to .035 inch as requested in the installation guide.
After removing several fasteners in the engine bay, the radiator support area, and two cladding panels from the underside of the chassis, the front fascia was removed. The use of 2-inch tape on the edge of the front fenders protected the paint as the fascia was carefully removed.
The plastic radiator shrouding and various ducting was removed from around the condenser and radiator. This gave us greater access to additional components that needed to be removed and provided access to the opening behind the steel chassis bumper to install the intercooler.
With the fascia and cladding out of the way, the radiator petcock was easily accessed. The coolant was drained. The factory reservoir would have to be removed, so draining the coolant was a requirement.
Removing the radiator cradle, additional radiator trim, the electric fan connectors, and several fasteners freed the fan shroud from the radiator. The fan shroud was pushed up from below slightly, tilted to the rear of the Challenger, and then lowered out from the bottom of the engine bay.
With just enough room to remove the harmonic balancer bolt, we secured the supplied drill jig with a bolt and washer into the balancer bolt threads in the crankshaft. A 90-degree drill with a drill bit in the jig drilled a small hole in the crankshaft and the balancer.
The stainless steel dowel pin was required to lock the crankshaft and harmonic balancer together. The pin was slipped into the drilled hole to engage the outer diameter of the crankshaft to the inner diameter of the balancer. Pinning the balancer was necessary because the factory keyless installation of the balancer will likely slip from the increased load placed upon the belt and the balancer pulley.
The new intercooler brackets were installed to factory boltholes on the radiator support. The intercooler was slipped between the steel bumper and the air conditioning condenser. There’s some adjustability built into the ProCharger brackets, which allows fine-tuning of the installation.
The factory idler was removed from the cylinder head. Once the idler was removed, two bolts (just below the idler) on the water pump were removed. A stand-off bracket was installed in the location where the idler bracket and the water pump bolts had been.
After orienting all the brackets, spacers, and bolts, the main bracket was installed onto the engine. The layout of the main bracket holes and spacers provided a perfectly flush fit to the engine. The chrome finish on the main bracket provides a little flash with its function.
If the reservoir hadn’t been previously removed, it needed to be removed at this time. The reservoir would not be reused. The reservoir hose, as well as, a heater hose would have to be rerouted to reach the new location of the reservoir.
The ProCharger head unit was oiled with the supplied oil and then installed onto the main bracket. A series of Allen bolts secured the supercharger to the main bracket.
The supercharger belt was routed through the various pulleys and then the tensioner bolt was tightened to achieve the proper tension of the belt. Occasional checking of the belt tension will ensure proper supercharger performance and maintain suitable belt life.
With the throttle body reinstalled, the new ducting was routed from the intercooler to the throttle body. All the ductwork was designed to fit properly through and around the radiator support. The IAT was mounted into the new ductwork at the inlet to the throttle body.
The Proflow compressor surge valve was installed between the supercharger and the intercooler. Compressor surge is a problem with all superchargers. It develops when the supercharger is creating boost, but the throttle shaft is closed. The air must be released into the atmosphere (blowoff valve) or recirculated back through the supercharger compressor (bypass valve).
The new coolant reservoir was installed on the opposite side of the Hemi from the stock location due to the supercharger installation position. One factory coolant fitting elbow was reversed in its factory hose to point to the passenger side, and the hoses to the reservoir were rerouted to the new location.
The fascia was reinstalled after the horns (with new bracket) and the ambient air temperature sensor were relocated to clear the intercooler. A few pieces of radiator ducting had to be left out of the installation to allow the fascia to fit properly. All the factory cladding, panels, and fasteners were used to reattach the fascia.
To keep the air clean entering the supercharger, a conical filter and plastic ductwork was attached to the supercharger. The factory PCV hose was shortened to length and slipped onto a barbed fitting attached to the plastic ductwork.
With little of the intercooler able to be seen, the Challenger looks stock, but it’s packing over 600 hp at the rear wheels. To take advantage of the ProCharger supercharger, the factory PCM was re-flashed. The Challenger exhibits outstanding street manners on 91+ octane fuel, and the supercharged 6.4L maintains decent fuel economy.
The Hemi was run from 3,100 to 6,400 rpm several times, and the runs were consistent and repeatable. With 7 psi of boost, the engine torque increased to a peak of 502 lb-ft at 6,000 rpm, and the engine horsepower jumped to a peak 601 hp at 6,400 rpm. The engine horsepower was still increasing at 6,400 rpm. The torque peak increased 98 lb-ft over stock, and even better, the torque with the ProCharger supercharger was higher at all points of the run than the peak torque of the baseline. The peak horsepower increase was an incredible 175 hp on pump gas at the rear wheels.
The post Installing a ProCharger Supercharger on a Late-Model 6.4L Hemi appeared first on Hot Rod Network.
from Hot Rod Network https://www.hotrod.com/articles/installing-a-procharger-supercharger-on-a-late-model-6-4l-hemi/
via IFTTT
0 notes
Text
A Proper Thrashing: 2003 Ranger Rover
DORNOCH, Scotland — Scotland may be cold in January, but at least it’s a wet cold. You can’t do proper off-roading without that extra bit of pouring rain turning the rivers to raging beasts and the forest ruts to bottomless hobbit holes. Scotland must be seven-tenths water. It fills the firths to overflowing, comes cascading out of craggy outcroppings in torrents, runs straight down every road surface on this northernmost tip of the United Kingdom, and has you whipping your windshield wipers into a frenzy.
Just bloody beautiful. Pass the Glenmorangie—eighteen-year, preferably. It goes well with the haggis from Dingwall.
The national coat of Scotland is the waxed Barbour. The vehicle of choice is the 2003 Range Rover. At least, that’s what it is today, because Scotland is where we are, and we are guests of Land Rover. In these gruesome conditions, we’d have it no other way. Gruesome is really the wrong word, based on our fierce love of gritty, off-road adventure. We like to plunge into raging rivers, pushing a bow wave as high as the car’s hood onto the far shore. We live for the terror of sliding straight down muddy embankments and into pools of water of unknown depth in the dark. We thrill to the challenge of climbing—wheel by articulated wheel—through ditches and fissures and crevasses and ravines.
We especially like to do so in Range Rovers, because there is very little chance that we’ll actually get any of those elements on us. Range Rovers always have been unstoppable beasts of upper-crust burden since the first was introduced by Land Rover in 1970. (This would be not counting the failure of the first-generation air suspension, that is.) Since then, there’s been only one redesign, and it was in the spirit of the first—a fresh turn on the original theme of fusty country elegance. The queen in a babushka. When Bob Dover left Aston Martin to run Land Rover, his extremely chic wife, Tracey, was overheard muttering into her champagne: “Goodbye, Manolos; hello, wellies.”
As it turns out, the skyscraper Italian stilettos got to stay, and the green rubber boots remained in the closet. This third Range Rover throws off its babushka, thanks to the brief interlude Land Rover spent under the BMW umbrella, where a key champion was Wolfgang Reitzle, then BMW’s head of product development. Reitzle finished the job when he left BMW and joined Ford in 1999 and led Ford’s purchase of Land Rover the following year.
There’s no mistaking it for anything but a Range Rover, with that clamshell hood, split tailgate, and upright, grille-heavy front end. But the overall shape is sleeker (not to mention wider, longer, and taller), and the xenon headlamp clusters are positively New Age, as are the functional front-fender vents. Land Rover chief designer Geoff Upex led the British team, beating out two BMW studios to win the redesign job.
Happy as a pig in the mud: Range Rovers are virtually unstoppable off-road. We proved it on the vast, privately owned Novar Estate, where it had snowed ten days before, engorging the rives and turning the hillsides to a beautiful slop. One hilltop on the estate revealed the dark majesty of the Scottish Highlands beyond.
Looking around the smart, new, extra-roomy cabin (2.6 inches wider inside), it’s hard to recall what made the last Range Rover luxurious, other than its price. Now, this—this is something else again. First comes the dash, a bold door-to-door sweep swaddled in thick parchment-colored leather, bisected by two striking pillars of cherry wood with a finish reminiscent of paste wax. The wood uprights frame the controls and display for the GPS navigation system above a pair of air vents, and pushbuttons, an analog clock (which magically synchronizes with the digital clock as it is set), and rotary climate-control dials are neatly clustered below. Wood veneer adorns lower door-mounted bins, and a huge cube of it surrounds side air vents on the outer dash edges.
“We wanted the look of a small Bentley,” explains chairman Dover. Land Rover never had an interior design signature. Now we’ve made it cool and chic and Norwegian. Or you can make it Teutonic by replacing the wood with metal.” The most prominent souvenirs of its Munich masters are the beautiful gauges and finely articulated switches logically grouped around (and on) the telescoping, tilting steering wheel.
A soft wash of light from two slots in the ceiling continuously bathes the aluminum-accented shifter and its two attendant paddles (one engages Hill Descent Control, the other engages low range) for easy location during night driving. A pale glow illuminates the door handles and storage bins. Two days of Highlands driving–one spent entirely on boggy forest roads and rocky hillsides, the other in a 200-mile pavement dash from east to west–made us want to pack up the Range Rover’s plush navy leather armchairs piped in parchment leather and ship them home for the family Suburban. Or maybe the family living room.
Hall of fame: The 2003 Range Rover’s passenger compartment couldn’t differ more radically from that of its predecessor, with fine leather, exquisite wood trim, and BMW-esque gauges and controls.
It was like being in a fabulous Riva boat. Or maybe I was just thinking Riva boat because, at the moment I was thinking Riva, the road plunged down an embankment and gave way to a fairly rapid river, and I had to gun the Range Rover’s 4.4-liter BMW-sourced V-8 to carry some speed as I hit the water. We had been in Scotland about two hours, the first spent in a technical briefing held in a lovely, halogen-lit room with a beautiful wood floor, smack in the middle of a Royal Air Force aeronautical search-and-rescue base northeast of Inverness. Actually, the room turned out to have been built by Land Rover smack in the middle of an airplane hangar on the base. The sleek room’s far wall slid open, and there was our test fleet parked in the dark, damp other half of the hangar. It was the first of many reminders of Land Rover’s new battle cry: tough luxury.
Back to tough. Covering a goodly part of the sodden, private, 25,000-acre Novar Estate in a day was not a problem for a number of reasons. There was, as mentioned, the mighty strong 282-horsepower engine (borrowed from BMW’s own X5), subdued slightly by the extra weight of this much stouter vehicle but still more than tough enough for our low-speed needs. (Despite an aluminum hood, front fenders, and doors, the new Range Rover weighs 414 pounds more than the outgoing model and 550 pounds more than an X5 4.4i.) The ZF five-speed ControlShift manu-matic transmission has a dual-range transfer case that now can be shifted with the flick of a finger while on the fly, provided you’re not flying too high. The added security of Hill Descent Control is another welcome finger flick of a paddle away. At times, we were creeping down steep grades so slowly in super-low that I added gas.
Bigger news is Range Rover’s switch to a monococque structure—a huge break from the body-on-frame construction of yore. Bending stiffness is radically improved, as are body-panel fits. Three subframes cradle the transfer case and front and rear suspension systems, now both independent. The air-spring system also has been redesigned to pillow off-road jolts and jounces more effectively. It still has “kneel” feature that lowers the vehicle rolls to a complete stop.
This new Range Rover is 1.8 inches taller and 9.3 inches longer than the old one, with a 5.3 inches more wheelbase. Maximum ground clearance is greater than before (11.0 inches), it will tow more (7700 pounds), and it can snatch-recover a 12,000-pound load.
By late afternoon, the wind was howling badly enough across the barren hillsides that we switched heaters for seats and steering wheel and began the downhill battle. At the shore of Loch Glass, Land Rover had neatly parked a toilet trailer (with art on the walls and running water in the sinks) a large temporary glass house with wooden floor, cushy furniture, halogen lights, classical music, and an attendant who served tea and cookies.
“It wouldn’t be nearly as useful without the hidden bank of generators,” quipped Dover as he sipped his tea. Out of the woods at the property’s edge, we were hailed by three guys with Land Rover Defenders and power washers who hosed down our Range Rover, checked its tires for gashes, and sent us on our way to town. Tough luxury, indeed.
And then tough was all finished. We arrived at our quarters, imposing Skibo Castle, built at the turn of the twentieth century by the world’s richest man, Andrew Carnegie. Many stories surround this fabulous 7500-acre estate (down from 250,000 acres). But let me just say that you need to know a member (Dover) to stay there; a butler named James met us in the circular drive with a tray of single malts; a bagpiper played us awake each morning; black pudding (made of blood) was on my breakfast plate; there was a Burberry store in the dungeon, and they take American Express; and I got Madonna’s bridal suite. There were no lost diamond studs under the bed; I checked.
The last thrashing we would give the Range Rover was the most obvious one, the test that has tripped it up for the past thirty years. We would drive it fast and hard, mostly on a single-track paved path through the wild Beinn Eighe national nature preserve along the 12.5-mile shore of Loch Maree, to quaint Gairloch and Poolewe on the western shore.
We set the navigation system (nice, but not as nice as the systems from Acura and Lexus) so photographer Tim Andrew wouldn’t have to guide me. I was really looking forward to this day and not just for the six hours of mouth-gaping scenery.
Dover’s boys had broken his golden rule: “Be modest. Under-promise and over-deliver.” Not only did they claim the obvious high-dollar SUVs from BMW, Mercedes-Benz, and Lexus for competition, but they got carried away and insisted that a Range Rover would kick Mercedes S-class booty as well. A beautiful, controlled ride at highway speeds on pavement has never been the Range Rover’s forte, so this would be some feat.
A feat that was not to be, actually. Let’s just chalk that S-class talk up to a bit of overenthusiasm for the incredible level of refinement this off-road wonder has achieved. The steering is still a bit numb, although it is certainly better. You can crash the slick new air springs on bumps with the sort of rapid steering inputs you’d use in an emergency avoidance maneuver at 40 or 50 mph. During ordinary cornering sweeps, however, body roll is nicely controlled. Emergency Brake Assistance and Electronic Brakeforce Distribution lend great composure under heavy braking.
You could call it home: After a drive to the rugged west coast of Scotland and back to Dornoch in the east, Skibo Castle was a welcome beacon in the night.
The heavens emptied, and I drove hard, finding the Range Rover faster overall but still a bit sluggish. The dual-range throttle is mapped for on- and off-road use. On the low road, pedal travel is long, mushy, and somewhat vague; on the high road, you have to push through a lethargic initial pedal to get to the engine growl. And that growl is tamer than the X5’s. Says Dover, “There was no conscious decision to detune the engine sound. We spent a lot of time on engine and gearbox mounting, on the door seals (there are two), and on sound deadening. People think quiet cars are quality cars. This is the quietest 4×4 we can find.” Will Ford be replacing that BMW engine with one of its own any time soon? “Don’t hold your breath,” says Dover. “It costs so much, with crash testing and so on, to do an engine. And we’re very happy with the BMW engine.”
As were we. We were happy with all of it, actually, S-class whipper or not. We came here looking not for a luxury sedan but for an extreme off-roader with better on-road manners than its predecessor. We found all of that, wrapped in exquisite raiment. It’s modern, it’s roomier, it’s quiet, it’s beautiful, and it works like crazy. The Range Rover will cost like it, too, but you were expecting that, weren’t you? This should not be a problem, says Land Rover’s marketing director, Matthew Taylor: “One thing all Range Rover buyers have in common is money. They have money.”
They will need it. The Range Rover will hit our shores in June with a base price close to $70,000, topping out at about $80,000. (The first ones all will have the extra-cost bi-xenon headlamps, and a third of them will have the optional “contour” front seats.) Land Rover hopes Americans will want 11,000 of them by 2003. We’d call it a leadpipe cinch.
2003 Land Rover Range Rover Specifications
PRICE $70,000/$80,000 (base/as-tested)(est.) ENGINE 4.4L DOHC 32-valve V-8/282 hp @ 5,400 rpm, 324 lb-ft @ 3,600 TRANSMISSION 5-speed automatic LAYOUT 4-door, 5-passenger, front-engine, 4WD SUV EPA MILEAGE 12/17 mpg (city/hwy) (est.) L x W x H 194.9 x 77.0 x 73.3 in WHEELBASE 113.4 in WEIGHT 5,374 lb 0-60 MPH 9.0 sec TOP SPEED 130 mph
Originally published online April 1, 2002 from the April 2002 issue of Automobile.
The post A Proper Thrashing: 2003 Ranger Rover appeared first on Automobile Magazine.
from Performance Junk WP Feed 4 https://ift.tt/2I0YgB2
via IFTTT
0 notes
Text
AUTOMOBiLE Flashback: A Proper Thrashing: 2003 Ranger Rover
DORNOCH, Scotland — Scotland may be cold in January, but at least it’s a wet cold. You can’t do proper off-roading without that extra bit of pouring rain turning the rivers to raging beasts and the forest ruts to bottomless hobbit holes. Scotland must be seven-tenths water. It fills the firths to overflowing, comes cascading out of craggy outcroppings in torrents, runs straight down every road surface on this northernmost tip of the United Kingdom, and has you whipping your windshield wipers into a frenzy.
Just bloody beautiful. Pass the Glenmorangie—eighteen-year, preferably. It goes well with the haggis from Dingwall.
The national coat of Scotland is the waxed Barbour. The vehicle of choice is the 2003 Range Rover. At least, that’s what it is today, because Scotland is where we are, and we are guests of Land Rover. In these gruesome conditions, we’d have it no other way. Gruesome is really the wrong word, based on our fierce love of gritty, off-road adventure. We like to plunge into raging rivers, pushing a bow wave as high as the car’s hood onto the far shore. We live for the terror of sliding straight down muddy embankments and into pools of water of unknown depth in the dark. We thrill to the challenge of climbing—wheel by articulated wheel—through ditches and fissures and crevasses and ravines.
We especially like to do so in Range Rovers, because there is very little chance that we’ll actually get any of those elements on us. Range Rovers always have been unstoppable beasts of upper-crust burden since the first was introduced by Land Rover in 1970. (This would be not counting the failure of the first-generation air suspension, that is.) Since then, there’s been only one redesign, and it was in the spirit of the first—a fresh turn on the original theme of fusty country elegance. The queen in a babushka. When Bob Dover left Aston Martin to run Land Rover, his extremely chic wife, Tracey, was overheard muttering into her champagne: “Goodbye, Manolos; hello, wellies.”
As it turns out, the skyscraper Italian stilettos got to stay, and the green rubber boots remained in the closet. This third Range Rover throws off its babushka, thanks to the brief interlude Land Rover spent under the BMW umbrella, where a key champion was Wolfgang Reitzle, then BMW’s head of product development. Reitzle finished the job when he left BMW and joined Ford in 1999 and led Ford’s purchase of Land Rover the following year.
There’s no mistaking it for anything but a Range Rover, with that clamshell hood, split tailgate, and upright, grille-heavy front end. But the overall shape is sleeker (not to mention wider, longer, and taller), and the xenon headlamp clusters are positively New Age, as are the functional front-fender vents. Land Rover chief designer Geoff Upex led the British team, beating out two BMW studios to win the redesign job.
Happy as a pig in the mud: Range Rovers are virtually unstoppable off-road. We proved it on the vast, privately owned Novar Estate, where it had snowed ten days before, engorging the rives and turning the hillsides to a beautiful slop. One hilltop on the estate revealed the dark majesty of the Scottish Highlands beyond.
Looking around the smart, new, extra-roomy cabin (2.6 inches wider inside), it’s hard to recall what made the last Range Rover luxurious, other than its price. Now, this—this is something else again. First comes the dash, a bold door-to-door sweep swaddled in thick parchment-colored leather, bisected by two striking pillars of cherry wood with a finish reminiscent of paste wax. The wood uprights frame the controls and display for the GPS navigation system above a pair of air vents, and pushbuttons, an analog clock (which magically synchronizes with the digital clock as it is set), and rotary climate-control dials are neatly clustered below. Wood veneer adorns lower door-mounted bins, and a huge cube of it surrounds side air vents on the outer dash edges.
“We wanted the look of a small Bentley,” explains chairman Dover. Land Rover never had an interior design signature. Now we’ve made it cool and chic and Norwegian. Or you can make it Teutonic by replacing the wood with metal.” The most prominent souvenirs of its Munich masters are the beautiful gauges and finely articulated switches logically grouped around (and on) the telescoping, tilting steering wheel.
A soft wash of light from two slots in the ceiling continuously bathes the aluminum-accented shifter and its two attendant paddles (one engages Hill Descent Control, the other engages low range) for easy location during night driving. A pale glow illuminates the door handles and storage bins. Two days of Highlands driving–one spent entirely on boggy forest roads and rocky hillsides, the other in a 200-mile pavement dash from east to west–made us want to pack up the Range Rover’s plush navy leather armchairs piped in parchment leather and ship them home for the family Suburban. Or maybe the family living room.
Hall of fame: The 2003 Range Rover’s passenger compartment couldn’t differ more radically from that of its predecessor, with fine leather, exquisite wood trim, and BMW-esque gauges and controls.
It was like being in a fabulous Riva boat. Or maybe I was just thinking Riva boat because, at the moment I was thinking Riva, the road plunged down an embankment and gave way to a fairly rapid river, and I had to gun the Range Rover’s 4.4-liter BMW-sourced V-8 to carry some speed as I hit the water. We had been in Scotland about two hours, the first spent in a technical briefing held in a lovely, halogen-lit room with a beautiful wood floor, smack in the middle of a Royal Air Force aeronautical search-and-rescue base northeast of Inverness. Actually, the room turned out to have been built by Land Rover smack in the middle of an airplane hangar on the base. The sleek room’s far wall slid open, and there was our test fleet parked in the dark, damp other half of the hangar. It was the first of many reminders of Land Rover’s new battle cry: tough luxury.
Back to tough. Covering a goodly part of the sodden, private, 25,000-acre Novar Estate in a day was not a problem for a number of reasons. There was, as mentioned, the mighty strong 282-horsepower engine (borrowed from BMW’s own X5), subdued slightly by the extra weight of this much stouter vehicle but still more than tough enough for our low-speed needs. (Despite an aluminum hood, front fenders, and doors, the new Range Rover weighs 414 pounds more than the outgoing model and 550 pounds more than an X5 4.4i.) The ZF five-speed ControlShift manu-matic transmission has a dual-range transfer case that now can be shifted with the flick of a finger while on the fly, provided you’re not flying too high. The added security of Hill Descent Control is another welcome finger flick of a paddle away. At times, we were creeping down steep grades so slowly in super-low that I added gas.
Bigger news is Range Rover’s switch to a monococque structure—a huge break from the body-on-frame construction of yore. Bending stiffness is radically improved, as are body-panel fits. Three subframes cradle the transfer case and front and rear suspension systems, now both independent. The air-spring system also has been redesigned to pillow off-road jolts and jounces more effectively. It still has “kneel” feature that lowers the vehicle rolls to a complete stop.
This new Range Rover is 1.8 inches taller and 9.3 inches longer than the old one, with a 5.3 inches more wheelbase. Maximum ground clearance is greater than before (11.0 inches), it will tow more (7700 pounds), and it can snatch-recover a 12,000-pound load.
By late afternoon, the wind was howling badly enough across the barren hillsides that we switched heaters for seats and steering wheel and began the downhill battle. At the shore of Loch Glass, Land Rover had neatly parked a toilet trailer (with art on the walls and running water in the sinks) a large temporary glass house with wooden floor, cushy furniture, halogen lights, classical music, and an attendant who served tea and cookies.
“It wouldn’t be nearly as useful without the hidden bank of generators,” quipped Dover as he sipped his tea. Out of the woods at the property’s edge, we were hailed by three guys with Land Rover Defenders and power washers who hosed down our Range Rover, checked its tires for gashes, and sent us on our way to town. Tough luxury, indeed.
And then tough was all finished. We arrived at our quarters, imposing Skibo Castle, built at the turn of the twentieth century by the world’s richest man, Andrew Carnegie. Many stories surround this fabulous 7500-acre estate (down from 250,000 acres). But let me just say that you need to know a member (Dover) to stay there; a butler named James met us in the circular drive with a tray of single malts; a bagpiper played us awake each morning; black pudding (made of blood) was on my breakfast plate; there was a Burberry store in the dungeon, and they take American Express; and I got Madonna’s bridal suite. There were no lost diamond studs under the bed; I checked.
The last thrashing we would give the Range Rover was the most obvious one, the test that has tripped it up for the past thirty years. We would drive it fast and hard, mostly on a single-track paved path through the wild Beinn Eighe national nature preserve along the 12.5-mile shore of Loch Maree, to quaint Gairloch and Poolewe on the western shore.
We set the navigation system (nice, but not as nice as the systems from Acura and Lexus) so photographer Tim Andrew wouldn’t have to guide me. I was really looking forward to this day and not just for the six hours of mouth-gaping scenery.
Dover’s boys had broken his golden rule: “Be modest. Under-promise and over-deliver.” Not only did they claim the obvious high-dollar SUVs from BMW, Mercedes-Benz, and Lexus for competition, but they got carried away and insisted that a Range Rover would kick Mercedes S-class booty as well. A beautiful, controlled ride at highway speeds on pavement has never been the Range Rover’s forte, so this would be some feat.
A feat that was not to be, actually. Let’s just chalk that S-class talk up to a bit of overenthusiasm for the incredible level of refinement this off-road wonder has achieved. The steering is still a bit numb, although it is certainly better. You can crash the slick new air springs on bumps with the sort of rapid steering inputs you’d use in an emergency avoidance maneuver at 40 or 50 mph. During ordinary cornering sweeps, however, body roll is nicely controlled. Emergency Brake Assistance and Electronic Brakeforce Distribution lend great composure under heavy braking.
You could call it home: After a drive to the rugged west coast of Scotland and back to Dornoch in the east, Skibo Castle was a welcome beacon in the night.
The heavens emptied, and I drove hard, finding the Range Rover faster overall but still a bit sluggish. The dual-range throttle is mapped for on- and off-road use. On the low road, pedal travel is long, mushy, and somewhat vague; on the high road, you have to push through a lethargic initial pedal to get to the engine growl. And that growl is tamer than the X5’s. Says Dover, “There was no conscious decision to detune the engine sound. We spent a lot of time on engine and gearbox mounting, on the door seals (there are two), and on sound deadening. People think quiet cars are quality cars. This is the quietest 4×4 we can find.” Will Ford be replacing that BMW engine with one of its own any time soon? “Don’t hold your breath,” says Dover. “It costs so much, with crash testing and so on, to do an engine. And we’re very happy with the BMW engine.”
As were we. We were happy with all of it, actually, S-class whipper or not. We came here looking not for a luxury sedan but for an extreme off-roader with better on-road manners than its predecessor. We found all of that, wrapped in exquisite raiment. It’s modern, it’s roomier, it’s quiet, it’s beautiful, and it works like crazy. The Range Rover will cost like it, too, but you were expecting that, weren’t you? This should not be a problem, says Land Rover’s marketing director, Matthew Taylor: “One thing all Range Rover buyers have in common is money. They have money.”
They will need it. The Range Rover will hit our shores in June with a base price close to $70,000, topping out at about $80,000. (The first ones all will have the extra-cost bi-xenon headlamps, and a third of them will have the optional “contour” front seats.) Land Rover hopes Americans will want 11,000 of them by 2003. We’d call it a leadpipe cinch.
2003 Land Rover Range Rover Specifications
PRICE $70,000/$80,000 (base/as-tested)(est.) ENGINE 4.4L DOHC 32-valve V-8/282 hp @ 5,400 rpm, 324 lb-ft @ 3,600 TRANSMISSION 5-speed automatic LAYOUT 4-door, 5-passenger, front-engine, 4WD SUV EPA MILEAGE 12/17 mpg (city/hwy) (est.) L x W x H 194.9 x 77.0 x 73.3 in WHEELBASE 113.4 in WEIGHT 5,374 lb 0-60 MPH 9.0 sec TOP SPEED 130 mph
Originally published online April 1, 2002 from the April 2002 issue of Automobile.
The post AUTOMOBiLE Flashback: A Proper Thrashing: 2003 Ranger Rover appeared first on Automobile Magazine.
from Performance Junk Blogger 6 https://ift.tt/2I0YgB2
via IFTTT
0 notes
Link
Best Bumper Installation Service and Cost in Omaha NE |Mobile Mechanics of Omaha
More information is at: http://24hourautotruckrepairomaha.org/bumper-installation-near-me/
Bumper Installation Service near Omaha NE: Are you looking for the Best Bumper Installation Service near Omaha NE ? Mobile Mechanics of Omaha, A vehicle’s bumper is a protective part of the automobile that is mounted to both the front and rear ends of the car. Cost? Free estimates! Send us a message or call us today. Best Bumper Installation Service around Omaha NE. We serve Omaha NE and other areas. Get a Free Quote Now!
BEST BUMPER INSTALLATION SERVICE IN OMAHA NE
OMAHA BUMPER INSTALLATION
How to install your bumper system
Bumper Installation Service near Omaha NE: If you've recently become the new owner of a rear bumper system, you may not know how all of the different pieces fit together to mount to your chassis. Whether it's KG, they all typically have similar pieces. OTK is essentially the same process, but will differ slightly with their parts.
● You'll begin by installing the two mounting posts to your chassis . The key to securing the two mounting posts to your chassis starts with installation outside of the chassis. In your hands, drop your smaller washer into what will become the outside of the mounting post, drop the larger washer into what will become the inside. Now drop your 10mm bolt through the two washers and mounting post beforehand tightening the rubber (with threading on the inside) to your bolt. You should have one sold piece now that you''ll mount to your chassis.
● To finish installing your mounting posts to your chassis, grab a 17mm wrench or socket on an impact and tighten the piece to your chassis tube .Nice and tight will do, you don't have to set any world records for strength. You'll do this for both sides, left and right, before we head into the next segment.
● The next piece to install is what you'll eventually mount your rear bumper to, it's the rear bumper support . Supplied typically with a short 8mm bolt, washer, and nut, you'll fasten your support to your post solidly. After successfully mounting both your right and left supports solidly to your posts, we'll move on to the next segment, mounting the bumper.
● You'll notice on the bumper a pair of elongated mounting holes. Line those holes up with your support holes and press the bumper to your supports. Now it's time to grab your hardware, which should typically be an 8mm bolt with washer and nut, and tighten your bumper to your supports . Again, you don't need to show off your strength, but make sure it's nice and solid; you don't want the bumper to move side to side. Your entire system should be nice and tight at this point. However, it is common to see the support loose on the post. You can loosen the support by taking a couple of turns out, but still keeping the bolt within the nylon of the nut so that it doesn't vibrate out while on track. This will free up the rear end and allow it to flex more in certain conditions.
What is a Bumper?
Bumper Installation Service near Omaha NE: A vehicle’s bumper is a protective part of the automobile that is mounted to both the front and rear ends of the car. Typically crafted from aluminum, plastic, rubber, or steel, the bumper acts as a shock absorber during low-speed collisions. It also aids in reducing more significant damages made to your vehicle. While some types of bumpers are made from foam that acts as a kind of cushion, others have energy absorbers or brackets that serve the same purpose.
Do Bumper Guards Really Work?
● Collisions happen even if you’re a careful driver. If your car is rear-ended or damaged in a parking lot, the other person can drive away without much risk. To prevent damages that may not be covered by car insurance, many people use bumper guards to protect their vehicles.
● Bumper guards are vertical bars or foam pads that can be placed on either the back or front of your car. They’re usually easy to install and remove, but are they worth it? Let’s look at the pros and cons of utilizing a bumper guard.
They protect your vehicle
Bumper Installation Service near Omaha NE: If you have to park in a crowded street or in a cramped garage, there’s always the possibility that someone may hit the back of your car. You could also end up damaging your vehicle yourself if you don’t have enough room to back out of a parking space. A foam guard will give you a little cushion to absorb damage. It can also protect the front end of your vehicle by minor damage caused by fender benders.
3 Benefits of Installing a Heavy-Duty Bumper on Your Vehicle
If you need to select a bumper for your commercial truck or pickup, you may want to consider the benefits of a heavy-duty model. Heavy-duty bumpers outperform lightweight models in several categories including collision protection, longevity, and durability. To learn more about the benefits of a weightier model, look over this convenient guide.
Why Choose a Bumper?
1. Collision Protection
You will find large, robust bumpers on vehicles like ambulances, fire trucks, and commercial vehicles for a reason. A bumper’s most important duty lies in collision protection. Thus, bigger, more resilient ones will always offer greater performance in this arena. Heavy-duty bumpers absorb impact better than thinner models, thereby keeping the truck and individuals inside safe from harm.
2. Longevity
heavy-duty bumper Heavy-duty bumpers are often constructed from high-quality steel, which is built to endure for decades. While less robust models may suffer wear and tear over the years and eventually need replacement, a heavy-duty bumper will continue to serve your needs. Off-roaders who demand rugged features that will hold up in the face of mud, rocks, and debris will also greatly benefit from a sturdier bumper. If you want a lasting investment, opt for the durability heavy-duty models offer.
3. Economic Savings
While heavy-duty bumpers may cost more initially, they offer significant economic savings over lightweight models in the long run. Since heavy-duty bumpers very rarely need replacement, you won’t have to worry about additional expenditures as the years pass. Furthermore, these bumpers protect against serious and costly vehicular damage.
TIPS
Bumper Installation Service near Omaha NE: This is one of the less complex mechanical jobs that you can perform on your car, and it can be attempted by even those with the most basic of technical knowledge. All you need to complete this task is a spanner set, a socket and ratchet set, some wire clippers, a Phillips and a flat-head screwdriver and two wheel ramps to help you elevate your vehicle and you’re ready to go.
● Locate and Unscrew the Bumper Cover
There are two parts to the front bumper. The first is the painted cover that matches your car’s color scheme. This is sometimes referred to as the bumper, but is actually concealing the real bumper underneath. To replace the bumper you will need to remove this first. Open the car bonnet and remove the screws that hold the cover in place. These can be found above the grill.
● Unclip the Bumper Cover
It’s now time to unclip the bumper cover from its position. Look underneath the front side of the part and locate the plastic clips that hold it in place. Carefully use the flat head screwdriver to pry these out of position. This should leave a clip exposed. This clip attaches the bumper to the body work, and needs to be cut with your clippers. Finally pull the bumper cover away from the car and place it on a blanket or towel to prevent it from getting scratched or damaged.
● Bumper Removal
After driving the car up the wheel ramps so that the front of the car is elevated, use a body board to go under the front of the car and find the bolts along the upper edge of the bumper. Use your spanner set to remove the bolts, and use the socket and ratchet set to remove the tensioning rods that sit on either side of the bumper. Make sure you store all the bolts in a safe place for reattachment, and then take the old bumper away from the car.
● Replace the Bumper
Place the bumper on the frame of the car and thread the bolts through the holes in the part to hold it in place against the frame. Then simply reattach the nuts to the bolts and tighten so the bumper is flush against the bodywork before finally reattaching the tensioning rods. You’re now ready to drive the car down the ramp and get to work on replacing the bumper cover.
● Reattach the Bumper Cover
Retrieve the bumper cover from its safe storage space. You will need to replace the clips that you destroyed in step 2 with new clips or the bumper cover will flap in the wind. Simply put the cover in place and lock it in position before reattaching all the necessary clips. When this is completed and the part is firmly held against the bumper simply reattach the screws under the grille and your car is good to go.
COST
How much does it cost to install a bumper?
Bumper Installation Service near Omaha NE: In the worst scenario, because of high damage, a replacement will be made. A replacement of a bumper will cost you around $300 – $700. If sensors, lights, cameras or any other component are damaged, then you can expect an increase in overall cost. Even a low-speed collision of a new car could cost up to $1,000.
If you find yourself in a fender bender and need to have your bumper replaced, you may be wondering about bumper repair costs. Usually, a bumper will cost between $880 and $1,390 to replace, depending on the type of vehicle you own and the amount of labor time the repair takes. Front bumper repair costs tend to be different than rear bumper repair costs. Additionally, different auto manufacturers will charge different amounts for bumper parts.
Why is Bumper Replacement and Bumper Repair Costs So Pricey?
Many folks get caught off-guard when they find out how much bumper repairs cost. This is because bumpers are an integral part of your vehicle for both aesthetic and practical purposes. They are vital components of a vehicle and this is why the price to repair or replace them are so high.
Labor Costs for Bumper installation Costs
Repairing or replacing a bumper isn’t just a simple matter of unscrewing a couple of bolts. Since modern front and end bumpers are integrated parts of the vehicle, auto technicians will need to disconnect and reconnect all of the parts. Some of these parts include:
● Air Intakes: Although this is not a common occurrence, some cars are made this way and have their cold-air intakes mounted to the front bumper.
● Airbag Sensors: These parts can sometimes be connected to the bumper. In order to remove the bumper, you will need to remove the airbag sensors first.
● Lights: A lot of your vehicle’s lights, including the headlights and turn signals, may be wired to the front bumper. They all need to be disconnected before you replace or repair the bumper.
● Trim: There can be numerous trim parts that are connected to the bumper. To replace or repair the bumper, they will need to be removed.
● Warning Signals: Car warning sensors such as weather sensors, parking sensors, backup sensors, vehicle lane changing warning sensors, collision warning sensors, as well as car cameras will probably be interconnected to your bumper.
Removing all of these parts one by one will take two hours or more to complete. If the car accident is severe, some of these parts will have to be replaced. These additional charges can quickly add up and significantly increase the costs of the overall replacement or repair process.
FREQUENTLY ASKED QUESTIONS
What is a Bumper?
A vehicle’s bumper is a protective part of the automobile that is mounted to both the front and rear ends of the car. Typically crafted from aluminum, plastic, rubber, or steel, the bumper acts as a shock absorber during low-speed collisions. It also aids in reducing more significant damages made to your vehicle. While some types of bumpers are made from foam that acts as a kind of cushion, others have energy absorbers or brackets that serve the same purpose.
How do I install my Bumper Guard products?
Please reference our section on Installation Instructions
How long does it take to install the Bumper Guard products?
Installation takes only a few minutes. Please make sure to follow the installation instructions when applying our bumper guards.
Will the Bumper Guards chip, fade, or discolor?
Since the color of our bumper guards run through the product you will not experience any cracks, chips or fading like you would get from a painted bumper guard.
Can the Bumper Guards be installed on a repainted bumper?
We do not recommend installing bumper guards on a repainted bumper. Oftentimes when a bumper is repainted at a body shop the quality of the paint job is second rate. It is possible that the 3M adhesive can damage a repainted bumper if removed improperly.
If I trim or cut the edges of my bumper guard will the color be different on the cut edges?
No, since the color runs through the bumper guard; the color of the actual bumper guard will be the color on the exposed cut edge,
Can you paint the bumper guards to match a color that you do not carry?
You probably could get them professional painted at a bumper shop but we DO NOT recommend it. The paint will more than likely crack, chip or peel off with time/from the elements/or if damaged.
How do I know what size to order?
If you are unsure what size to order please measure your vehicle's bumper. The sizes we have available are standard sizes. We can customize a particular size if you require. Please contact us with any requests.
I can't tell what color to order?
Oftentimes we carry many shades of a particular color. If you are unsure which color to choose, we recommend ordering a color sample. Color samples are the simplest way to ensure a close color match. All color samples are shipped USPS and are labeled accordingly.
Is it possible to trim/cut color bumper guards, rear bumper guards, and/or front bumper guards?
Yes, however we recommend purchasing our professional grade clippers. They work really well in cutting/trimming your bumper guard. Please note our bumper guard edge comes straight cut. If you want to trim the ends of your bumper guards on an angle we recommend ordering the clippers. Also please note that standard scissors/players do not work so well when attempting to cut or trim the guards.
CALL FOR US:
● Bumper Installation Service Near Omaha NE
● Bumper Installation
● Front Bumper Installation
● Bumper Installation Cost
● Car Bumper Installation
● Bumper Installation Labor Cost
● Car Bumper Clip Lock
● Bumper Guard Installation Near Omaha NE
● How To Install Bumper Clips
● Bumper Repair Cost
● Front Bumper Repair Cost
● Front Bumper Replacement Cost Estimate
● Small Crack In Bumper Repair Cost
● Loose Bumper Repair Cost
● How Much To Replace A Rear Bumper
● Car Bumper Repair
● How Much Does It Cost To Replace A Plastic Bumper Near Omaha NE
BEST BUMPER INSTALLATION SERVICE IN OMAHA NE
MOBILE MECHANICS OF OMAHA
REQUEST MORE INFORMATION. CONTACT US NOW!
CONTACT US:
Mobile Mechanics of Omaha
24-hour mobile mechanic roadside assistance services in Omaha NE!
CALL (531) 233-6154 MOBILE MECHANIC
CALL (402) 401 7564 TOWING SERVICE OMAHA
CALL (402) 590 8094 ROADSIDE ASSISTANCE
WEBISTE:
www.24hourautotruckrepairomaha.org
http://www.mobileautorepairomaha.com/
http://www.mobilemechanicomaha.com/
SERVICE AREA:
Communities we serve: Omaha, Carter Lake, Council Bluffs, Crescent, Bellevue, Boys Town, La Vista, Papillion, Honey Creek, Offutt A F B, Bennington, Fort Calhoun, Washington, Elkhorn, St Columbans, Underwood, Kennard, Mc Clelland, Mineola, Waterloo, Springfield, Missouri Valley, Treynor, Cedar Creek, Gretna, Blair, Valley, Neola, Pacific Junction, Plattsmouth, Silver City, Glenwood, Louisville, Yutan, Arlington, Minden, Modale, South Bend, Logan, Murray, Ashland, Mead, Persia, Memphis, Manley, Magnolia, Macedonia, Malvern, Fremont, Carson, Oakland, Herman, Murdock, Nickerson, Shelby, Weeping Water, Hastings, Mondamin, Henderson, Ithaca, Hancock, Nehawka, Tabor, Union, Greenwood, Thurman, Portsmouth, Woodbine, Colon, Wahoo, Avoca, Emerson, Winslow, Avoca, Elmwood, Little Sioux, Cedar Bluffs, Pisgah, Tekamah, Alvo, Randolph, Ames, Hooper, Panama, Craig, Waverly, Ceresco, Percival, Otoe, Imogene, Malmo, Sidney, Uehling, Walnut, Harlan, Westphalia, Eagle, Lincoln, Dunlap, Moorhead, Red Oak, Morse Bluff, Weston, Griswold, Blencoe, Earling, Davey, Dunbar, Nebraska City, North Bend, Unadilla, Elliott, Lewis, Prague, Syracuse, Marne, Scribner, Oakland, Palmyra, Pilot Grove, Walton, Riverton, Farragut, Shenandoah, Valparaiso, Lorton, Essex, Soldier, Hamburg, Defiance, Kirkman, Raymond, Dow City, Stanton, Atlantic, Decatur, Bennet, Elk Horn, Snyder, Lyons, Kimballton, Irwin, Arion, Malcolm, West Point, Panama, Roca, Dodge, Manilla, Yorktown, Northboro, Coin, Hickman, Denton, Bancroft, Aspinwall, Sprague, Clarinda, Martell, Blanchard, Manning, Beemer, College Springs, Shambaugh, Braddyville, 50022, 51432, 51446, 51447, 51454, 51455, 51501, 51502, 51503, 51510, 51520, 51521, 51523, 51525, 51526, 51527, 51528, 51529, 51530, 51531, 51532, 51533, 51534, 51535, 51536, 51537, 51540, 51541, 51542, 51543, 51544, 51545, 51546, 51548, 51549, 51550, 51551, 51552, 51553, 51554, 51555, 51556, 51557, 51558, 51559, 51560, 51561, 51562, 51563, 51564, 51565, 51566, 51570, 51571, 51572, 51573, 51575, 51576, 51577, 51578, 51579, 51591, 51593, 51601, 51602, 51603, 51630, 51631, 51632, 51636, 51637, 51638, 51639, 51640, 51645, 51647, 51648, 51649, 51650, 51651, 51652, 51653, 51654, 51656, 52648, 68002, 68003, 68004, 68005, 68007, 68008, 68009, 68010, 68015, 68016, 68017, 68018, 68019, 68020, 68022, 68023, 68025, 68026, 68028, 68029, 68031, 68033, 68034, 68037, 68038, 68040, 68041, 68042, 68044, 68045, 68046, 68048, 68050, 68056, 68057, 68058, 68059, 68061, 68063, 68064, 68065, 68066, 68068, 68069, 68070, 68072, 68073, 68101, 68102, 68103, 68104, 68105, 68106, 68107, 68108, 68109, 68110, 68111, 68112, 68113, 68114, 68116, 68117, 68118, 68119, 68120, 68122, 68123, 68124, 68127, 68128, 68130, 68131, 68132, 68133, 68134, 68135, 68136, 68137, 68138, 68139, 68142, 68144, 68145, 68147, 68152, 68154, 68155, 68157, 68164, 68172, 68175, 68176, 68178, 68179, 68180, 68181, 68182, 68183, 68197, 68198, 68304, 68307, 68317, 68336, 68339, 68346, 68347, 68349, 68366, 68372, 68382, 68402, 68403, 68404, 68407, 68409, 68410, 68413, 68417, 68418, 68419, 68428, 68430, 68438, 68446, 68454, 68455, 68461, 68462, 68463, 68501, 68502, 68503, 68504, 68505, 68506, 68507, 68508, 68509, 68510, 68512, 68514, 68516, 68517, 68520, 68521, 68522, 68523, 68524, 68526, 68527, 68528, 68529, 68531, 68532, 68542, 68583, 68588, 68621, 68633, 68648, 68649, 68664, 68716, 68788
#MobileMechanic
#RoadsideAssistance
#towingService
#omaha
#NE
#autotruckrepair
#RVRepair
0 notes
Text
Going Topless: Volkswagen Beetle, Mustang GT and Fiat 124 Spider
Text and Photos by Michael Hozjan
With summer having finally arrived a few months late, almost coinciding with leaf peeping season, I got lucky and was treated to three of the coolest convertibles on the market. If you’re looking to get out of the minivan or suv and put fun back into driving, you needn’t look much further, one of these is sure to please your soul.

Volkswagen Beetle
Several decades ago I was the proud owner of what at the time might have been the oldest convertible Beetle in Quebec, a 1961. The car was a blast to drive and even without any decent heat, I’d often drop the top in the middle of winter and cruise down St. Catherine St. in Montreal.
Those days convertibles reigned supreme, with nearly every model line, from Acadians to Zephyrs, having a convertible version. But ridiculous legislation from the U.S. nearly sent the convertible the way of the dodo. The choice of convertibles has grown in recent years but it’s still relatively slim. The choice of affordable German convertibles is even slimmer. Thank God for the folks at Volkswagen for keeping the drop tops alive throughout the years and model changes from Beetle to Rabbit to Golf and again back to the Beetle. In a sea of jellybean look alike sedans, the Beetle stands supreme in being distinguishable and recognizable.

Yes you’ll find quicker convertibles such as the Mustang and Fiat, but you’ll be hard pressed to find the Teutonic engineering and ride quality that the Beetle offers elsewhere without emptying your bank account. It’s not just that they’re solid, Volkswagens are well thought out, and one of the best examples is the back up camera mounted underneath the big VW crest. While others, like Mazda and Mercedes, to name a few, have Flavor Flave belt buckle sized crests mounted fore and aft and then expose their cameras to the elements, VW’s is protected from mud, dirt and slush so every time you back up, the camera is clean.

The VW’s rear view camera is always clean (above)compared to other manufacturers’ cameras (below)

The Beetle continues with the same charm that it had in the height of its popularity in the sixties. The cutesy we tried too hard “new” Beetle is gone and replaced by dare I say a more masculine rendition? This one works and everyone agrees it looks great, whether they’re talking about the sedan or the convertible.
Except for minor changes to the bumpers, the 2017 Beetle is unchanged from last year’s model. Like throughout the fifties, sixties and seventies, Volkswagen still believes that if it’s not broken why change it. They do however seem to be adding to the trim lines to satisfy every budget, from the base Trendline ($25,390) up the five trim levels topping off with the Dune edition at $32,890. Canada does not get the high horsepower, sporty Beetle R. Bummer!
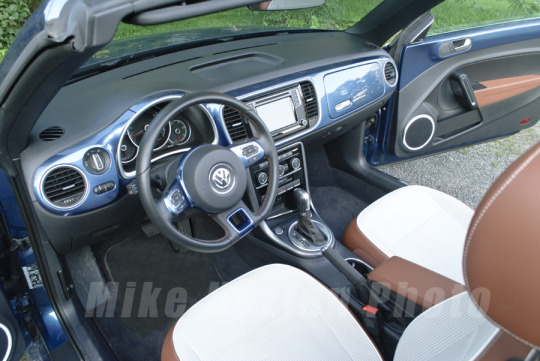
Therefore, no matter which model you choose, the engine driving the front wheels is the same, a 1.8L turbocharged unit that doles out 170 hp and 184 lb.ft. of torque. Sadly VW has discontinued their manual tranny and opted to go only with the 6-speed automatic. A smooth shifting and capable tranny but there’s nothing sweeter than going through the gears yourself on a hot summer night on a curvy road.
My driver for the week was the Classic, pegged one level up from the base model and wearing vintage hub caps on steel wheels with chrome rings in lieu of mag wheels. It just adds more charm to the car. For the additional two grand over the base model, the Classic owner gets smartphone integration, 6.3 inch touchscreen, and 8 Fender speakers for the CD player and sat radio in addition to the Trendline’s base equipment such as heated front seats and washer nozzle and electronic stability control.
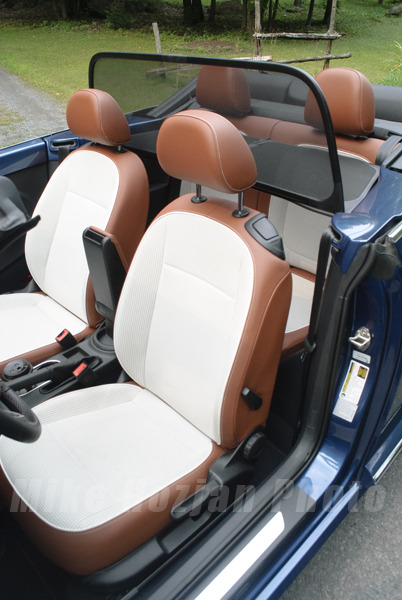
My silk blue metallic cabriolet came with a brown top and Sioux brown two-tone cloth and leatherette interior.
Getting away from all the techno and mechanical jargon, if you’ve never driven a Beetle you’re in for a treat. The Beetle is solid, tight and comfortable. The seats are firm yet great for long drives. Controls are easy to reach and manipulate. There’s an air of quality that becomes immediately apparent as soon as you get behind the wheel that few cars in its price range can match. The ride is supple enough to weed out the roughest potholes but firm enough, with undue body roll, to take on spirited driving on the way to the chalet or to your favorite apple picking spot. Drop the power top and your blood pressure will drop automatically as the Beetle feel good appeal takes charge.
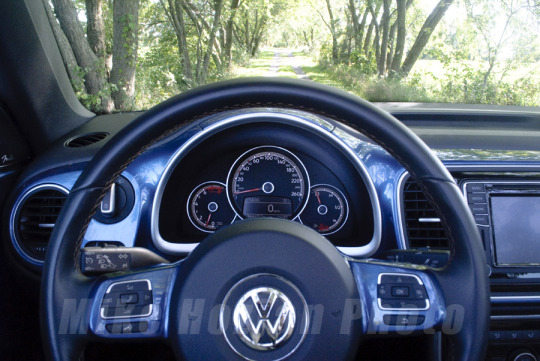
While there are detractors that say the Beetle is on the noisy side I say bull. I found the Beetle quieter with the top down than some sedans are with the windows open. You can easily carry a conversation at highway speeds. The wind deflector mounted behind the front seats reduces wind buffeting and puts the kibosh on any back seat passengers.

Oh and don’t think that convertibles are only for summer and are too cold to drive in the winter. Just like my ’61, this Beetle has a thick insulated top the keeps you as cozy in winter as any sedan. It may be the second most recognized car in the world after the Jeep, but it sure doesn’t have the single layer of vinyl roof of the Jeep.
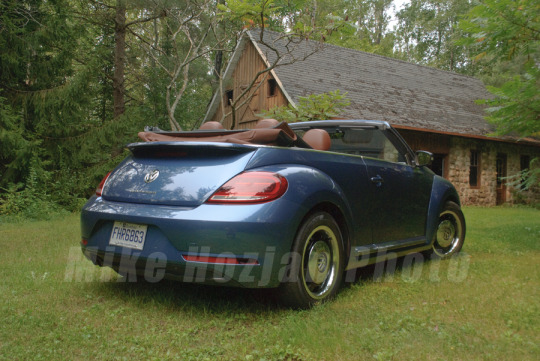
Throughout the ‘70s the Beetle was an anti-establishment icon. These days it’s as much a fashion statement with just enough retro cues to have baby boomers and millennials appreciate the car.
Price as tested: $27,930
Ford Mustang GT Premium
It happened again. It happens every time I get behind the wheel of a Mustang. I turn into a giddy teenager that just wants to drive and drive and drive and yes smoke the rubber and throw the tail out on occasion.

The siren that beckoned me to the open road this year was the 5.0L iteration of America’s favorite pony car, the Mustang GT. The last time I was behind the Mustang’s reins, it was powered by a 2.3L EcoBoost four cylinder (the convertible starts at $33,888). Ya there’s a difference, 435 horses and 400 lb.ft. worth of torque. And there’s a difference in the sonorous tone of the V-8 as you pull out into traffic, you can’t help but grin. It’s a melody that transforms you into Frank Bullitt even though the look out the windshield is more reminiscent of a 1971 Mustang than Bullitt’s ’68.
Like the Beetle, the Mustang has the retro flare going on and if memory serves me right is the longest running American built convertible. Which translates to what I said about the Beetle, refinement through the ages.
Those refinements include cowl shake, the Achilles heel of convertibles. Having driven nearly every generation of Mustang throughout the years, this latest edition is easily the stiffest structured Mustang as clearly evidenced with the lack of cowl shake.
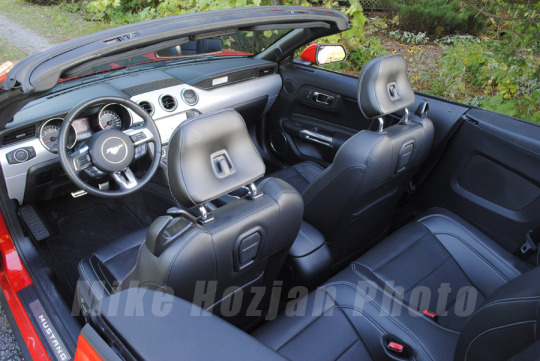
Maybe someone at Ford listened to my constant harping about their pain in the butt infotainement system because this time around everything was childishly simple to use. Or maybe it was just in keeping with the retro motif. In either case, thank you Ford. Matter of fact the whole interior works just fine. Leg, head and shoulder room are plentiful…as long as you’re in the front buckets. Egress and ingress is also excellent, again as long as you’re getting in the front. Despite their initial appearance, the back seats work. This past summer we took my buddy’s girlfriend’s Mustang to the Syracuse Nationals and I’m glad to report the three of us were comfortable throughout the six-hour round trip. So yes it will hold four adults.

The top has also received more insulation making it quieter, but there’s still ample road noise coming into the cabin. I had to check more than once, when the top was up, if the back windows were down.

My tester came with the 6-speed automatic with steering wheel mounted paddle shifters and a console-mounted switch for normal, sport, track and snow shift point settings. Thankfully the 6-speed manual remains available. The 5.0L will get you to the century mark on the speedometer in a hair over 5 seconds, yet the stallion can be calmed to be as smooth as a minivan easing you through bumper to bumper traffic. City driving takes a toll on the ‘Stang’s gas mileage - entering suv territory. Even with a soft throttle foot city driving can bring you in the 14L/100kms area. But cruising down the pike will net a miserly 9L/100kms. My average for the week, despite a healthy dose of spirited throttle action cost me 10.8L/100kms. One sore point that I wish Ford would address is the small gas tank, it roughly holds a paltry 60 litres.

Just how old are Ford’s designers?
The Mustang is obviously the largest convertible tested here (the pony has grown to a full sized horse, but don’t call it a Clydesdale, it’s nimble and carving out the twisties is a greater joy than ever thanks to the independent rear suspension that replaced the solid rear axle two years ago. The electric steering is precise and the standard 18-inch tires perform admirably. As a matter of fact I hit a piece of rebar poking out of an expansion joint just as I moved into the left lane to pass a crawling ten-wheeler on the 13. I was sure it spelled the end of the wheel and tire, yet to my amazement both held up remarkably well.
The Premium GT in base form will set you back $49, 948 with another $1500 for the automatic. My tester had the upgrade radio package, adaptive speed control, back up camera, plastic end caps for the roof cavity when open (a $600 option), nav system and a few other treats. Add the dealer prep and transportation charges and the final tab came in at just under sixty grand, not exactly cheap but there’s a lot of fun factor.
Price as tested: $59, 198
Fiat 124 Spider Abarth
I often get asked what’s the best car on the market, and which would I recommend. My response is always the same, Miata. Which is usually followed by, “ No, seriously, what’s the best car” Again my response is. “Miata.”
“But it’s rear wheel drive and so low to the ground, you can’t drive it in winter.”
Sadly I get this mostly from Baby Boomers, which should know better and so I counter with, “Did you forget that before the front wheel drive we both grew up with rear wheel drive cars … and survived. Listen the Miata is a blast to drive, fits like a glove and the engine is bulletproof.”

Needless to say when Fiat Chrysler Automobiles finally confirmed they were reintroducing the 124 Spider to these shores I was eager to get my hands on it. My buddy, Dino, had one in the seventies and there were many late summer nights spent in it with the top down cruising downtown Montreal or carving up some country road. Often another friend would fit himself sideways into the rear bench seat.
Unlike the other two convertibles here, the 124 bares no retro cues and the only thing it shares with the old Pinifarina designed car is the twin raised hood panels and six-sided grille. In the original you sat mid-ship with the trunk and hood sharing almost equal space. Not so in the new car, and there’s reason for it, it’s based on Mazda’s MX-5 Miata. Yes, the two are built side by side in Japan.
If you thought the Toyota/Subaru partnership with the 86 and BRZ was weird, than this one tops the cake. But you know something, IT WORKS!

Think about it, you take a world-class chassis structure, like the Miata, mix in Italian suspension, throw in Fiat’s MultiAir 1.4-liter turbocharged four-cylinder (remember - Fiat owns Ferrari and the original 124s had twincam engines penned by legendary Ferrari racing engine designer Aurelio Lampredi) and marry it to the Miata’s wonderful, quick throw, 6-speed manual and send the ponies to the rear wheels through a limited slip differential from Fiat’s performance arm, Abarth, well it’s a recipe for success.

The Abarth version gets 164 horsepower, four more than the standard 124 (thanks to a sport-tuned exhaust), and an impressive 184 lb.ft. of torque with torque peaking at 3,200 rpm. Making it a fun car for the street and good enough to get you to 100 kph in about 6.5 seconds. But the 124 isn’t about 0 to 100 times or quarter mile times, it’s about handling, and that is where the Fiat shines. While I couldn’t get my hands on the latest Miata to do a back-to-back comparison, I’d hazard to say that the Fiat outshines the MX-5.
Power delivery is smooth with just a hint of turbo lag. Brakes are excellent and there’s just enough “give” in the traction control to kick the rear out before it takes over. There’s also sport mode for the suspension. If the Miata is a fun vehicle to drive the 124 takes it up a notch without sacrificing the ride.
The Miata fits me like a glove, and the Fiat fits like a great pair of Italian loafers. Ingress and egress is easier and there’s just enough added room to keep your from feeling claustrophobic. Except for a few questionable shortfalls the Fiat’s interior is as comfortable as it is attractive.

Except for the ugly infotainment system screen sticking up like a sore thumb (what ever happened to Italian design?), there’s more of a finished look to the Fiat that the MX-5 misses out on. Heated leather buckets coddle you and offer a generous amount support.
Ok I’m not nit picking but placing the cup holders behind my elbow doesn’t work in a sports car when I’m shifting. Yes there’s an alternate slot for a cup holder next to the passenger’s knee just waiting for hot coffee to spill. At first glance the Fiat’s trunk is huge compared to the Mazda’s, but upon closer examination you realize that there’s no spare. I’m sorry folks I HATE run flats and any other form of marketing hype including air compressors and canned air, that the automakers are trying to sell us just to avoid throwing in a spare. If you’ve ever had a flat and NOT a slow leak, you’ll know that a compressor will not work, or for that matter if you’ve ever wrecked your rim and blown the air out on our wonderful roads. We need spares not air. The auto club isn’t always there when you need it.

Oh and lastly the Abarth also gets a red faced tachometer. What’s wrong with this picture? Think about it…obviously the guys at Fiat didn’t.
The base 124 will set you back a paltry $32, 890 and the base Abarth starts at $37,995. There are two option packages, the Safety and Comfort Package at $1,300 and the Luxury Collection Package at $5500 that came with my tester. The Luxury Collection includes 9 Bose speakers and subwoofer, GPS, LED lights and upgraded leather seats, sat radio. The hand painted matt black on the hood and trunk lid added another $2,995 to the tag! At over 48 grand, for my money I’ll take the base car thank you and if I want black panels I’ll go with a wrap at a fraction of the price.
Ok the Fiat has a few minor gripes, but all in all it’s a wonderful ride, one that I’d love to have in my driveway. Will it replace the Miata as my most recommended car? While it’s great to see another fantastic sports car on the market and the two cars despite their similarities are just different enough to matter. The Miata has withstood the test of time, it will be very interesting how the Fiat holds up in reliability.
Price as tested: $48,385
0 notes
Text
Homemade Fascia Blaster Alternative DIY
Fascia blasting is a super powerful and effective tool for sculpturing your body. It will help you on every step along your journey to a good-looking body. Regardless of either you’re trying to reduce your postpartum overhang belly, beat cellulite or to blast off last stubborn fat cells on your “almost” perfect six-pack, you will see results from blasting.
About fascia blaster
Photo source: fasciablaster.com On the photo: Ashley Black
The creator of Fasciablasting is Ashley Black “Guru”. You can find everything on the topic on her website fasciablaster.com including fascia blaster reviews, as well as order the original fascia blaster and related products.
If you want to know my opinion about “does the fascia blaster really work”? Yes it does. But you can also check numerous videos on YouTube, including astonishing before and after photos. And don’t trust reviews from Amazon, as none of them from verified purchase and it all seems like a competitor’s paid campaign to discredit the product. As well as other fascia blaster scam claims and complaints that after some deeper research showed to be based on nothing.
N.B. I have no affiliation with Ashley Black or her products, just sharing my research on the topic of fascia rollers and their effectiveness before deciding if I want to try one.
But if you landed on this page on purpose, you know that fascia blaster is expensive (around 100$ with shipping and tax). If you can’t pay that price, but really want to be able to fascia blast. You have two cheaper alternatives:
To use fascia blasting technique with stick roller or/and octopus hand massagers, that are readily available for purchase, like this one or this one, or…
To make your own fat and connective tissue roller that will perform similarly to original and will cost at list 3 times less.
The second option seemed more attractive to me. So I started to search for ideas on how I can make my own fascia roller for cellulite. And I can tell you, I was very pleased with the end result. Hopefully, you will be too.
How to make your own fascia roller
Supplies:
Wooden rod – I used handle from toilet plunger. I bought mine at Walmart for 3-4$. The closest thing I found on Amazon is this one. But to be sure that everything will fit perfectly, here’s measurements of my rod: Length – 18’’ (45.5cm), Diameter – 7/8’’ (2.2cm), Circumference – 2 3/4’’ (7cm)
I read that some people have used broom sticks for that purpose also successfully. But you will need to cut it to desired length. I find length anywhere between 18 and 20’’ to be optimal.
Three octopus hand massagers – I used these. You won’t know the color of massagers until you receive them and the shipping is long, but it’s the cheapest option. Check other offers on these massager too as they change constantly.
Bicycle handles (for kids bikes) – These handles fit my rod like they were created for it. Plus they come in many colors so you can choose your favorite or the one matching massagers you will get.
Fender washers 6 pcs. – for these octopus massagers 3/16’’x 1 ¼’’ fender washers are the perfect fit. You can buy them at any hardware store or online here, or you, probably, have them already.
Flat screws 1 ½’’ and nuts – You need 3 flat screws and 3 nuts. I used screws that left from previous project, but I would say #6 screws like these should be a good fit for the purpose.
Equipment:
Power drill
Pencil
Ruler
Screwdriver
Wrench or pliers
How to assemble your fascia massager:
Remove rubber head from a plunger stick
Slip bike handles on the stick.
Unscrew heads from octopus massagers
Measure center of the stick and mark it with the pencil.
Position your massagers evenly on the stick with central one over your mark.
Mark the center points for two other octopuses. With 18’’ rod you will have your massagers overlap and positioned roughly 1-1 ½’’ from the end of rubber handles.
Drill holes in the plunger stick. The hole should be slightly larger than your screw size.
Insert screw into the fender washer, then into “belly” of the octopus, then another fender washer and insert this “sandwich” into the drilled hole. You can use a hammer (be gentle) to help the crew getting in to the hole.
Secure screw with a nut using your fingers. Tighten the nut by holding it with a wrench or pliers and using screw driver on the other side.
Voila, your personal fascia wonder stick is ready!
Now nothing holds you back from working your fascia, breaking your cellulite deposits and blasting fat cells.
And, please, share your success or fails on making your personal fascia massager in comments below, as it can help others.
See More Here: Homemade Fascia Blaster Alternative DIY
Homemade Fascia Blaster Alternative DIY published first on https://wellnessgeeky.wordpress.com
0 notes
Text
Homemade Fascia Blaster Alternative DIY
Fascia blasting is a super powerful and effective tool for sculpturing your body. It will help you on every step along your journey to a good-looking body. Regardless of either you’re trying to reduce your postpartum overhang belly, beat cellulite or to blast off last stubborn fat cells on your “almost” perfect six-pack, you will see results from blasting.
About fascia blaster
[caption id=“attachment_1608” align=“aligncenter” width=“1000”] Photo source: fasciablaster.com On the photo: Ashley Black[/caption]
The creator of Fasciablasting is Ashley Black “Guru”. You can find everything on the topic on her website fasciablaster.com including fascia blaster reviews, as well as order the original fascia blaster and related products.
If you want to know my opinion about “does the fascia blaster really work”? Yes it does. But you can also check numerous videos on YouTube, including astonishing before and after photos. And don’t trust reviews from Amazon, as none of them from verified purchase and it all seems like a competitor’s paid campaign to discredit the product. As well as other fascia blaster scam claims and complaints that after some deeper research showed to be based on nothing.
N.B. I have no affiliation with Ashley Black or her products, just sharing my research on the topic of fascia rollers and their effectiveness before deciding if I want to try one.
But if you landed on this page on purpose, you know that fascia blaster is expensive (around 100$ with shipping and tax). If you can’t pay that price, but really want to be able to fascia blast. You have two cheaper alternatives:
To use fascia blasting technique with stick roller or/and octopus hand massagers, that are readily available for purchase, like this one or this one, or…
To make your own fat and connective tissue roller that will perform similarly to original and will cost at list 3 times less.
The second option seemed more attractive to me. So I started to search for ideas on how I can make my own fascia roller for cellulite. And I can tell you, I was very pleased with the end result. Hopefully, you will be too.
How to make your own fascia roller
Supplies:
Wooden rod – I used handle from toilet plunger. I bought mine at Walmart for 3-4$. The closest thing I found on Amazon is this one. But to be sure that everything will fit perfectly, here’s measurements of my rod: Length – 18’’ (45.5cm), Diameter – 7/8’’ (2.2cm), Circumference – 2 3/4’’ (7cm)
I read that some people have used broom sticks for that purpose also successfully. But you will need to cut it to desired length. I find length anywhere between 18 and 20’’ to be optimal.
Three octopus hand massagers – I used these. You won’t know the color of massagers until you receive them and the shipping is long, but it’s the cheapest option. Check other offers on these massager too as they change constantly.
Bicycle handles (for kids bikes) – These handles fit my rod like they were created for it. Plus they come in many colors so you can choose your favorite or the one matching massagers you will get.
Fender washers 6 pcs. – for these octopus massagers 3/16’’x 1 ¼’’ fender washers are the perfect fit. You can buy them at any hardware store or online here, or you, probably, have them already.
Flat screws 1 ½’’ and nuts – You need 3 flat screws and 3 nuts. I used screws that left from previous project, but I would say #6 screws like these should be a good fit for the purpose.
Equipment:
Power drill
Pencil
Ruler
Screwdriver
Wrench or pliers
How to assemble your fascia massager:
Remove rubber head from a plunger stick
Slip bike handles on the stick.
Unscrew heads from octopus massagers
Measure center of the stick and mark it with the pencil.
Position your massagers evenly on the stick with central one over your mark.
Mark the center points for two other octopuses. With 18’’ rod you will have your massagers overlap and positioned roughly 1-1 ½’’ from the end of rubber handles.
Drill holes in the plunger stick. The hole should be slightly larger than your screw size.
Insert screw into the fender washer, then into “belly” of the octopus, then another fender washer and insert this “sandwich” into the drilled hole. You can use a hammer (be gentle) to help the crew getting in to the hole.
Secure screw with a nut using your fingers. Tighten the nut by holding it with a wrench or pliers and using screw driver on the other side.
Voila, your personal fascia wonder stick is ready!
Now nothing holds you back from working your fascia, breaking your cellulite deposits and blasting fat cells.
And, please, share your success or fails on making your personal fascia massager in comments below, as it can help others.
Source Here: Homemade Fascia Blaster Alternative DIY
Homemade Fascia Blaster Alternative DIY published first on https://wellnessgeeky.tumblr.com
0 notes
Last Seen Blogs

pickmeenterprises
Untitled

shoppingosaka
日本代購在大阪

piercethealexwolf073105-blog
Ptvalexwolf

sandrodeandrade
sandro de andrade

futuristicarbiterkid-blog
Untitled