#sdkmanager
Explore tagged Tumblr posts
Visit Tumblr Blog
Explore Tumblr blogs with no restrictions, modern design and the best experience.
Last Seen Tumblr Blogs


Fun Fact
Tumblr was attacked by a cross-site scripting worm deployed by the Internet troll group GNAA on Dec 3, 2012.
Text
Installasi dan Setting Android SDK Tanpa Android Studio
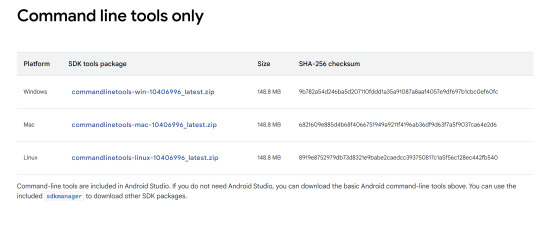
langkah setelah kamu menginstall flutter maka selanjutnya melakukan installasi dan setting android SDKnya. berikukt langkah-langkahnya : Buka link https://developer.android.com/studio dan scroll ke bawah hingga menemukan command line tools only tanpa perlu android studio Langkah selanjutnya silahkan download sesuai sistem operasi, jadi saya akan pilih windows untuk commandlinetoolsnya. setelah…
View On WordPress
#environment variables#instalasi android sdk#install flutter#sdkmanager#sdk_android_root#setting android sdk#vscode tanpa android studio
0 notes
Text
Fluttering into Action: A Step-By-Step Guide to Installing and Configuring Flutter SDK on macOS

Flutter has attained immense popularity in the software industry. Big tech corporations are investing large sums of money to hire a Flutter developers team. As a result, the developer community has become obsessed with mastering the skills necessary to harness the full potential of the platform. However, software developers face a steep learning curve when they select Flutter app development. This comprehensive guide will teach you how to install and configure Flutter on macOS and efficiently migrate your project onto the platform. Let’s go ahead and understand the installation process of Flutter on macOS.
Step-By-Step Guide For Flutter Installation On MacOS
Before you initiate the installation process, you must make sure that your current hardware and system fulfill the minimum requirement of Flutter.
SYSTEM REQUIREMENTS
Operating Systems: macOS (64-bit), version 10.14 (Mojave) or higher.
Disk Space: 2.8 GB (excluding space for IDE/tools).
Tools: Git for macOS or Xcode.
DOWNLOAD FLUTTER SDK
Now that you have verified that your hardware and system meet the basic requirements for the installation, you can proceed to the first step of the process.
Start by downloading the installation bundle from here — Flutter SDK for macOS.
The newest version of Flutter 3.16.3 for macOS was released on the stable channel on 12/06/2023.
If you are using the Apple Silicon processor, download the latest version from here — flutter_macos_arm64_3.13.7-stable.zip
Extract The Zip File
Extract the downloaded Zip file to a folder of your choice.
cd ~/development
$ unzip ~/Downloads/flutter_macos_3.13.7-stable.zip
Append Flutter Tool to your assigned path
export PATH="$PATH:`pwd`/flutter/bin"
To verify if the PATH is already set correctly, you must run the program once.

Using this command is vital because the installer appends the Flutter repository as the default PATH. This prevents Flutter from working in another terminal directory. Once you are done with this step, you can deploy Flutter commands successfully.
Run Flutter Doctor
If any dependencies are missing, Flutter won’t work. Most firms hire Flutter developers team after getting stuck on this step. However, you can use the following command to check for the missing dependencies-

This useful command runs a full diagnostic on the system environment and generates a full report on its findings. The report is supplied at the terminal window, and it tells the developer if he needs to download or update an existing dependency. You cannot skip over this step even if you downloaded Flutter through the Dart SDK. There might be some other software missing or additional tasks you need to perform to get the platform up and running.
For example, you may face the ��Android license status unknown” message in case the sdkmanager shell script crashes in the $android_sdk/tools/bin directory.
Review PATH Environment Variable
A skilled Flutter developer from Flutter Agency will always validate that your system’s PATH environment variable incorporates the path to Android SDK’s bin directory. Look for this output –
export PATH=$PATH:/path/to/android-sdk/tools/bin
Install Flutter Plugin
IntelliJ, Android Studio, and VS Code each have their unique editor plugin. For our guide, we shall use the VS Code or Visual Studio Code.
Run VS Code.
Press Command+Shift+B buttons to activate View>Command Palette.
Type ‘install’ on the command palette, and when the ‘Extensions: Install Extension’ comes up on the screen, click on it.
Type ‘flutter’ on the search field and then click on the ‘Flutter’ option in the list.
Click on the Install button.
Reload VS Studio by clicking on the ‘Reload’ button.
Android Studio
Flutter Doctor often reports on two common issues associated with Android Studio. If you see ‘Flutter plugin not installed’ or ‘Dart plugin not installed’ flashing on the Flutter Doctor console, follow these steps to rectify the error –
Launch Android Studio
Click on ‘Preferences’, and from the drop-down, select ‘Plugins’.
Click on ‘Browse Repositories’, and then select the Flutter plugin and click ‘Install’.
Click on the ‘Yes’ button when prompted to start the Dart plugin installation process.
After the installation, a dialogue box will appear with the restart option. Click on the “Restart’ option.
Verify Your Setup
You must run Flutter Doctor again to validate your setup thus far. Most software development companies need to hire flutter developers team because they skip over this step and face issues in the later stages of the app development.
iOS Setup
To start this process, you must first download and configure Xcode. These are the steps involved –
Install Xcode
Download Xcode from the 9.0 version onwards from the Mac App Store to create Flutter applications for iOS.
Configure Xcode using sudo xcode-select –switch /Applications/Xcode.app/Contents/Developer command.
Use the command line to sign the Xcode license agreement by clicking on the ‘Agree’ button.
Configure The iOS Simulator
You need to test out your Flutter app on your iOS simulator first. Follow these steps — Use the open -a Simulator command to launch the simulator on your Mac.
Click on the Hardware option and then Device to check if your simulator is using a 64-bit device.
Select the Scale Menu on the Window option to set the app’s dimensions.
Launch A New Project In VS Code
Utilize the Flutter starter app template to initiate a new project.
Press Cmd+Shift+P.
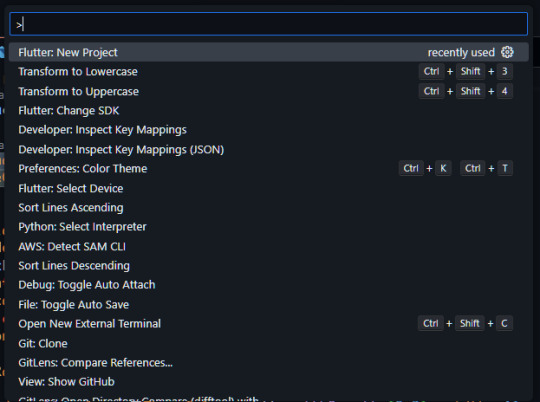
Click on Flutter: New Project and then select ‘Enter’.
Set a Project name and location.
Execution and Debugging
When you run a Flutter project on VS Code for the first time, the status bar will show Flutter-specific entries. You might also see the ‘No Devices’ error message. We will share a secret tip to overcome this error that only a skilled Flutter developer from the Flutter agency knows.
Click on ‘No Devices’.
On the command palette, click on iOS Simulator.
Press F5 or click on the Debug menu on the IDE window to start debugging.
CONCLUSION
Now, you are ready to take advantage of Flutter, which has been instrumental in the success of other companies. Alternatively, you can also hire a Flutter developers team to take care of this massive undertaking.
Content Source: Complete Tutorial For Flutter Installation Guide on macOS
#hire a Flutter developers team#Flutter SDK for macOS#Android license status unknown#Flutter Doctor#Best Flutter App Development Company#Flutter App Development Company#Flutter Company#Flutter Development Company#Hire Flutter Agency#Top Flutter App Development Companies#Dedicated Flutter App Developers#Flutter App Developer#Flutter Mobile App Developer#Hire Flutter App Developers#Hire Flutter Application Developers#Hire Flutter Developer
0 notes
Text
Dive into React Native for Android Development

If you’re new to mobile development, Expo CLI is the best place to start. Expo is a suite of tools centered on React Native, and while it has many capabilities, the most important one for us right now is that it can start developing React Native App Development Services in minutes. All you’ll need is a current version of Node.js and a phone or emulator. Snack may be used to test React Native straight in your web browser before installing any tools.
If you’re already experienced with mobile programming, React Native CLI can be a good choice. Hire Dedicated React Native Developers to get started, with Xcode or Android Studio. If you already have one of these tools installed, you should be up and running in a matter of minutes. You should anticipate spending around an hour installing and configuring them if they are not already installed.
Let’s take a look at the things we should keep in mind:
Animations
Performance
React Native styling
Use CSS-in-JS wrapper library
Use Expo-Kit only when needed
Choose the right navigation library
Convert any web project into mobile easily
The purpose of developing React Native Apps
Scaling your software to work on a variety of devices and screen sizes
Years passed, and React Native talents were in high demand. Since it had been a long time since I had learned something new, I figured why not give it a shot?

Install the necessary tools to get started with React Native
Setup Visual Studio Code (or your code editor of choice)
Download and install Android Studio for Windows. By default, Android Studio installs the most recent Android SDK. React Native requires the Android SDK 6.0 (Marshmallow) or later. We recommend that you use the most recent SDK.
Make the following environment variables for the Java SDK and Android SDK:
Enter “Edit the system environment variables” in the Windows search bar to launch the System Properties window.
Select Environment Variables…, then New… under User Variables.
Fill in the Variable name and value (path). The following are the default directories for the Java and Android SDKs. If you’ve decided to install the Java and Android SDKs in a specified place, be sure to edit the variable paths properly.
JAVA_HOME: C:\Program Files\Android\Android Studio\jre\jre
ANDROID_HOME: C:\Users\username\AppData\Local\Android\Sdk
Download and install NodeJS for Windows. If you will be dealing with various projects and versions of NodeJS, you should consider utilizing Node Version Manager (nvm) for Windows. For new projects, we recommend installing the most recent LTS version.
Make a new React Native project.
To build a new React Native project, use npx, the package runner tool included with npm. from Windows Command Prompt, PowerShell, Windows Terminal, or VS Code’s integrated terminal (View > Integrated Terminal).
PowerShellCopy
npx react-native init MyReactNativeApp
Open your new “MyReactNativeApp” directory:
PowerShellCopy
cd MyReactNativeApp
Connect a USB cord to your computer if you want to run your project on a physical Android device.
If you wish to run your project on an Android emulator, you shouldn’t have to do anything because Android Studio comes with a built-in emulator. If you wish to execute your software on a certain device’s emulator. In the toolbar, choose the AVD Manager button.
Enter the following command to start your project. This will launch Node Metro Bundler in a new console window.
PowerShellCopy
npx react-native run-android
PowerShellCopy
C:\Users\[User Name]\AppData\Local\Android\Sdk\tools\bin\sdkmanager –licenses
To make changes to the app, enter the My React Native App project directory in your preferred IDE. We prefer Visual Studio Code or Android Studio.
The react-native init project template includes a primary page called App.js. This page is pre-populated with a plethora of relevant links to React Native development resources. Fill the first Text element with text, such as the “HELLO WORLD!” string seen below.
JavaScriptCopy
<Text style={styles.sectionDescription}>
Edit <Text style={styles.highlight}>App.js</Text> to change this screen, and then return to check your changes.
“HELLO WORLD!”
</Text>
To see the changes you made, reload the app. There are various approaches to this.
Enter “r” in the Metro Bundler console window.
Double-tap “r” on your keyboard in the Android device emulator.
Shake the device to bring up the React Native debug menu and select ‘Reload’ on a hardware Android device.
Here are the Benefits of React Native for Android app development :
Easy to learn
Constantly improving
Huge number of libraries
Actively growing community
Native components for both platforms
Expo eliminates the need to possess a Mac in order to build for iOS.
There will be no longer limitless construction times with live and hot reloading.
A code-base shared between Android and iOS apps, with just small changes necessary to match platform experiences.
Reduction in labor resources while some Android/iOS native development may still be required, it will be rare.
Final Thoughts:
One of the main reasons why React Native is one of the greatest cross-platform frameworks for mobile applications is its superb UI rendering. Hire React Native Developers to provide React Native mobile app development services for both Android and iOS devices.
#hire react native app developers#hire dedicated react native developers#hire react native developer
1 note
·
View note
Text
Run Android on Docker on Mac OS
How to build and run Android Emulator on a Docker container, run locally on MacBook. Assumption Docker is installed. I learned about Docker from this GitHub tutorial. In this tutorial, we will create and run an Android Emulator inside a Docker container.
1.Pull the Android Docker images.
a. Open Docker application on MacBook.
b. Open a new terminal and enter below commands:
//Pulls android-sdk image docker pull thyrlian/android-sdk
//Pulls android-sdk-vnc image docker pull thyrlian/android-sdk-vnc
//Runs android sdk on container docker run -it — rm -v $(pwd)/sdk:/sdk thyrlian/android-sdk bash -c 'cp -a $ANDROID_HOME/. /sdk'
2.Modified below command to use your file ssh key path “../../ssh/id_rsa.pub”
docker run -d -p 5901:5901 -p 2222:22 -p 5037:5037 -v $(pwd)/sdk:/opt/android-sdk -v /Users/asandoval/.ssh/id_rsa.pub:/root/.ssh/authorized_keys thyrlian/android-sdk-vnc
3.Open new terminal and SSH into container. Use below command to install Android emulator components
ssh [email protected] -p 2222 //enter your SSH id_rsa key password
Enter below commands to download Android emulator components:
sdkmanager "platform-tools" "platforms;android-24" "emulator"
sdkmanager "system-images;android-24;default;armeabi-v7a"
Enter below commands to create new Android Emulator:
avdmanager create avd -n emuTest -k "system-images;android-24;default;armeabi-v7a"
emulator -avd emuTest -noaudio -no-boot-anim -gpu off
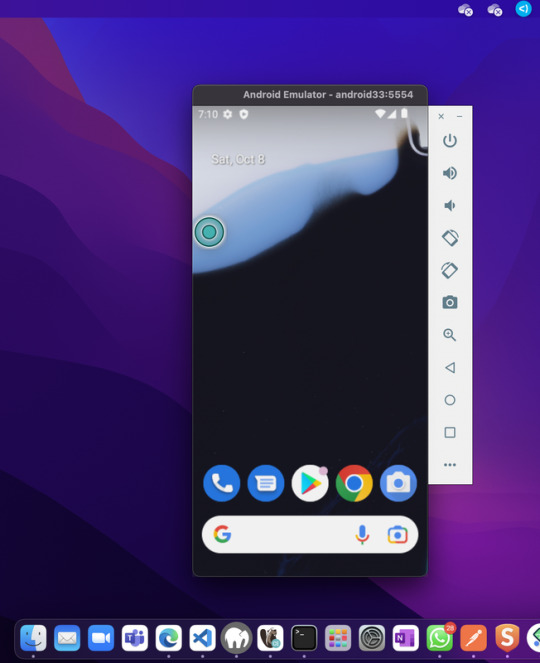
4.The Android emulator is starting inside Docker container
Now VNC to the container. With VNC you are able to see the emulator. You will have an android emulator running on your virtual machine “container”
a. On MacBook open application “Screen Sharing”.
b. Enter below:
vnc://0.0.0.0:5901
(password: android)
5. Open new terminal and enter below ADB commands.
$adb kill-server
$adb connect 0.0.0.0:5037
$adb logcat
$adb assembleReleaseGloogeBuild
$adb install -r /PATH-to-your-APK/./.
Since the sdk container is persisted on host machine (`-v $(pwd)/sdk:/sdk`), we don’t need to install the emulator packages after the first run,We just need to open terminal and enter below command.
//Runs android sdk on container docker run -it — rm -v $(pwd)/sdk:/sdk thyrlian/android-sdk bash -c ‘cp -a $ANDROID_HOME/. /sdk’
The Docker container running the Android emulator keeps running until you stop/kill docker container. Below Docker commands shows how to stop docker container:
docker ps -a
docker rm -f {container ID}
1 note
·
View note
Text
Install AVD di MacOS tanpa perlu install Android Studio
Beberapa tech-geeks yang pernah menjalankan handphone Android di komputer pasti pernah menginstall berbagai jenis emulator untuk memenuhi berbagai kebutuhannya. Misal hanya sekadar untuk bermain game, menjalankan aplikasi yang tidak bisa dijalankan di OS smartphone lain semisal iOS, untuk keperluan "hacking" sesaat, atau memang kerjaannya mendevelop aplikasi Android untuk keperluan debugging dan testing.
Adanya Android Virtual Device bisa menjadi salah satu pilihan teman-teman untuk menjalankan hape virtual ber-OS Android di komputer kalian, disamping adanya emulator seperti NOX, Genymotion, dll. AVD ini seringnya dipahami mayoritas orang awam ataupun developer android sebagai satu kesatuan/bundling dengan instalasi Android Studio. Padahal kenyataannya nggak sama sekali lho... Kita bisa instal AVD tanpa harus install Android Studio yang memakan storage sampai bergiga-giga itu (terakhir yang saya tau sih 8GB-an hmm...).
Kali ini saya mau sharing bagaimana caranya install AVD atau emulator di komputer (PC atau laptop), khususnya di komputer berbasis MacOS (Macbook Pro M1 2020). Saya menyadur dan menekankan beberapa poin penting dari link berikut sebagai acuan dasar saya (Sumber: klik disini!). Untuk versi Windows dan Linux sebenarnya menurut saya jauh lebih mudah karena processor-nya support semua hehehe. Tapi untuk yang saya share kali ini, para pengguna OS tersebut mohon menyesuaikan saja ya...
INSTALASI:
Download command-tools dari link berikut (Command-Line Tools only): https://developer.android.com/studio
Copy dan extract ke /Library/Android/sdk
Install openjdk-8 atau versi latest (perlu Java)
Run .sdkmanager --list untuk lihat versi packages terbaru yang nanti diperlukan
Run ./sdkmanager platform-tools emulator untuk download emulator dan platform-tools
Tambahkan PATH dari direktori emulator, platform-tools, dan bin dengan cara run export PATH=$PATH:/Library/Android/sdk/cmdline-tools/tools/bin:/Library/Android/sdk/emulator:/Library/Android/sdk/platform-tools
Buat Android Virtual Device (avd) dengan run avdmanager create avd —name android33 —package “system-images;android-33;google_apis_playstore;arm64-v8a”
Run emulator dengan emulator -avd (nama_avd) atau emulator @(nama_avd)
Selesai! Silakan mainkan AVD-nya!
TROUBLESHOOT:
(exec. ada di folder emulator)
Semua file executable ada di folder bin, run terminal dari pathname (lokasi) tersebut
Pengaturan instance per AVD ada di folder /(User)/Library/.android/avd/(nama_avd).ini atau di /(User)/Library/.android/avd/(nama_avd)/config.ini
Jika tidak bisa menggunakan control button AVD, pastikan sudah mengedit hw.keyboard = yes di config.ini
Restart setiap ada perubahan di config.ini dengan cara run ./emulator -avd restart
Reset/wipe seluruh data ke factory default dengan cara run `./emulator -avd (nama_avd) -wipe-data
Jika parameter command tidak ditemukan, coba pakai double-dash (--)
USING APK:
(exec. ada di folder platform-tools)
copy .apk: run ./adb push (lokasi_.apk) /sdcard/(nama_.apk)
install .apk: run ./adb install (lokasi_.apk)
Gimana? Mudah kan ya setelah tau caranya? Doakan saya jika bermanfaat ya hehehe. Jangan lupa like dan share-nya, supaya yang lain juga ikut terbantu. Mari saling sharing knowledge. Jangan pelit mentok di kalian aja, sebarkan!
0 notes
Text
Flutter for mac m1

FLUTTER FOR MAC M1 INSTALL
FLUTTER FOR MAC M1 UPDATE
FLUTTER FOR MAC M1 ANDROID
FLUTTER FOR MAC M1 PRO
FLUTTER FOR MAC M1 DOWNLOAD
Flutter (Channel stable, 3.0.5, on macOS 12.5 21G72 darwin-arm, locale en-GB)
FLUTTER FOR MAC M1 ANDROID
For android development my Mac with Apple silicon is almost ready to go!ĭoctor summary (to see all details, run flutter doctor -v):
Now you can run flutter doctor.Right now I just need an android target so I can ignore the CocoaPodsissue.
These are the SDK Tools selected in Android Studio 'Chipmunk' for a working installation on a Mac computer with Apple silicon.
FLUTTER FOR MAC M1 DOWNLOAD
Once you've downloaded it (taking care to make sure you download the version for Apple silicon)You can find the SDK manager graphical user interface on the three dots menu item on the main project screen SDK manager menu in Android Studio 'Chipmunk' 2021.2.1.You can do this from the terminal but by far the easiest way is to use the sdkmanager in Android Studio 'Chipmunk' to get the Android SDK Build tools 33.0.0 which finally has everything required for Flutter app development on an Apple Silicon based Mac computer without Rosetta 2 translation. The latest tools include support for Apple Silicon. You should now download the latest Android command.zshrc and adding the flutter folder to your path $ export PATH="$PATH:/flutter/bin" Add the location you chose to your path by editing your.I've started using /Users/yourusername/Development so as to keep things for my user and away from macOS folders which might not behave the way you might expect these days what with system integrity protection (SIP) and the filesystem (AFPS). Get the Flutter SDK by downloading the latest stable release, extracting it to your desired location.
FLUTTER FOR MAC M1 INSTALL
Optionally Install Homebrew, the free and open-source Package Manager for macOS from.
FLUTTER FOR MAC M1 UPDATE
Install Xcode from the App Store, and install the Command Line tools too, you may have to run Xcode once then go back to Software Update to get the Command Line tools to show up as an update or you can use terminal commands to get them.
This means that for the first time I have been able to export and build my FlutterFlow based app on My Apple Studio, without Rosetta! It is super fast to build, run, hot reload and test! Installing Flutter on a Mac with Apple Silicon without Rosetta FlutterFlow now supports the 3.0.5 stable release of Flutter. In this screenshot you can see the Flutter DevTools debugger and profiler running against my Flutter based app built with FlutterFlow which is running on an Android device directly connected with a cable to a Mac Studio 2022. A FlutterFlow based Flutter app DevTools debugger and profiler running from a Mac Studio, against a directly connected Android device with no Rosetta 2 translation tools installed.įlutter DevTools debugger and profiler on Pixel 4a 5G This was a personal goal for me and an indicator of the mainstream platform viability of Apple Silicon for developers and other devops workloads like continuous integration.
FLUTTER FOR MAC M1 PRO
However for me the process of replacing my Intel based Mac Pro means that all of the toolchain must work on Apple Silicon without installing the Rosetta technology. I have nothing against Rosetta 2 which is a perfectly capable just in time and ahead of time translation technology which enables Intel applications to be translated into Arm chip instructions. It is the best computer I have ever had, and is due to replace my obsolete Mac Pro (2013) which has been on 24 hours a day for almost ten years.įlutter's documentation suggests installing Rosetta 2 first on Apple Silicon based Mac computers. My Mac Studio is 64GB, M1 ultra, and 1TB SSD. If you can stretch to it the Mac Studio (2020) is an amazing, powerful and almost silent desktop computer which is perfect for developers too. You'll need your own keyboard, mouse, and monitor. They make almost perfect development machines. See my other articles on this site about that. You can pick them up for around £900 at Computer Exchange. MacOS is a great choice for a development environment provided you do things the Apple way and don't think you are running Linux. However for real on device testing and complex app debugging for example for banner adverts or in-app purchases you really need local debugging tools on real devices. FlutterFlow allows you to avoid much of the complexity of these tools by delivering much of the development environment in a browser. This is often called a toolchain and thats the term I prefer since it indicates that they are dependent on one another and is generic enough to convey that the tools come from multiple vendors. Flutter based app development with FlutterFlow on a Mac computer with Apple Silicon without Rosetta 2 translation technologyįlutter development requires a set of applications and operating systems components to work in concert with one another.
0 notes
Text
Ionic e Android no Mac Apple M1
Introdução
Nesse tutorial vou ensinar a configurar o ambiente para utilizar o Ionic e Android Studio. Por enquanto somente para rodar o projeto diretamente do dispositivo, ainda não fiz testes utilizando o emulador.
Mais sobre Android Studio e Mac Apple M1 em: https://doesitarm.com/tv/android-studio-on-apple-silicon-m1-i-qs4ydzc8yoq/
Java para m1
Instalar Java 8 a partir do pacote mantido pela Zulu:
https://www.azul.com/downloads/zulu-community/?os=macos&architecture=arm-64-bit&package=jdk
Android Studio
Baixar e instalar normalmente em https://developer.android.com/studio
Instalando gradle
Instalando via brew
brew install --build-from-source gradle
Configurando variaveis de ambiente
Adicionar ao zsh, bash ou ao shell de preferencia:
# Create a JAVA_HOME variable, determined dynamically export JAVA_HOME=$(/usr/libexec/java_home) # Add that to the global PATH variable export PATH=${JAVA_HOME}/bin:$PATH # Set Android_HOME export ANDROID_HOME=$HOME/Library/Android/sdk/ # Add the Android SDK to the ANDROID_HOME variable export PATH=$ANDROID_HOME/platform-tools:$PATH export PATH=$ANDROID_HOME/tools:$PATH export PATH=$ANDROID_HOME/tools/bin:$PATH #Set GRADLE_HOME export GRADLE_HOME=/opt/homebrew/Cellar/gradle/6.8.3 export PATH=$PATH:$GRADLE_HOME/bin
Obs.: Algumas das variaveis acima estão com a versão especificada, como gradle. Verifique a versão informada antes de continuar.
Verificando instalação
Para verificar se todos os itens acima foram instalados com sucesso:
Verificando java:
$ java -version openjdk version "1.8.0_282" OpenJDK Runtime Environment (Zulu 8.52.0.23-CA-macos-aarch64) (build 1.8.0_282-b08) OpenJDK 64-Bit Server VM (Zulu 8.52.0.23-CA-macos-aarch64) (build 25.282-b08, mixed mode)
Verificando gradle:
$ gradle --version ------------------------------------------------------------ Gradle 6.8.3 ------------------------------------------------------------ Build time: 2021-02-22 16:13:28 UTC Revision: 9e26b4a9ebb910eaa1b8da8ff8575e514bc61c78 Kotlin: 1.4.20 Groovy: 2.5.12 Ant: Apache Ant(TM) version 1.10.9 compiled on September 27 2020 JVM: 1.8.0_282 (Azul Systems, Inc. 25.282-b08) OS: Mac OS X 11.2.1 aarch64
Verificando Android Studio:
$ sdkmanager --version 26.1.1
Conclusão
Depois de tudo instalado e verificado basta executar os comandos do ionic para gerar builds para android seguindo o tutorial oficial em:
https://ionicframework.com/docs/cli/commands/cordova-build
0 notes
Photo

Download Platform SDK tools package If you do not need Android Studio, you can download the basic Android command line tools below. You can use the included sdkmanager to download other SDK packages. Cara : 1. klik robot -> Verify -> here to continue, 2. Tunggu 10 detik lalu klik Get Link. Direct Download Link : Windows sdk-tools -windows-4333796. zip (148 MB) https://www.lwt.pw/SdkToolsWindows Mac sdk-tools- darwin-4333796. zip (98 MB) https://www.lwt.pw/SdkToolsDarwinMac Linux sdk-tools-linux-4333796.zip (147 MB) https://www.lwt.pw/SdkToolsLinuxTerbaru https://www.instagram.com/p/Bwua09eB1Tj/?utm_source=ig_tumblr_share&igshid=1okjkeouojz8d
0 notes
Text
LuneOS Doppio
はい。3年半ぶり。
3年の間にUSB-micro-Bでデータ通信結線してるケーブルが失われたのでローソン100で調達。※ダメもとで見に行ったらあったので逆に驚いた。100均でデータ通信できるケーブル売ってる時代か。。。
https://pivotce.com/2018/11/28/luneos-november-stable-release-doppio/
を、見ながらサクっとインストール。bootloaderのアンロックは3年前に済ませているし、カスタムリカバリもその時に入れたものが残っているので、母艦(PC)側にSDK入れるのだけやり直した。
# 端末側は古いLuneOSが入ったまま
3年前とはSDKの用意の仕方が違っていて、まず↓から「コマンドライン ツールのみ」 というのを落としてきて解凍。
https://developer.android.com/studio/?hl=ja
コマンドプロンプトからsdkmanagerコマンドでインストール > sdk-tools-windows-4333796\tools\bin\sdkmanager "platform-tools"
これでplatform-tools と adb用の色々がsdk-tools-windows-4333796\platform-tools の下にあらわれる。adb.exe とか fastboot.exe とか。
そしたらbootloaderのUIからリカバリモードで起動してInstall zip>install zip from sideload で待ち状態にしておき、PC側から > adb sideload webos-ports-dev-package-mako.zip でしばらく待って端末側で" Flashing kernel ... "とでてリブートせぇ的なメッセージが出たらOK。
でリブートすると・・・ ※ガラス面が汚い・生活感あふれる映り込みで恐縮です。

Japaneseが選べる!!!
※Korean(Japan)ってなんだ?


そしてなんと、ようやくWiFiつかめるっぽい。
データ通信用のMVNOなSIM解約しちゃってたので助かる。 これで遊べる。。。

repo選択か何かか。よくわからないのでデフォままで。

日本語選択したはずだが・・・

焦らすね。。。


キタワァ
ちなみにインストール手順のところに赤文字で、CM 12.1を初期化する必要がある的なことが書いてあるが何もしなくてもいけた。よくわからないが、元がAndroidの場合は必要なのかも(自分のはもともと古いLuneOSからの新Ver.インストール)。だいたいCM12.1がなんだかわからないので動いてくれて助かった。
過去の↓
http://shinwiki.tumblr.com/post/97968609143/ http://shinwiki.tumblr.com/post/97980637743/
http://shinwiki.tumblr.com/post/126793081683/
0 notes
Text
You have not accepted the license agreements of the following SDK components
You have not accepted the license agreements of the following SDK components
cd "%ANDROID_HOME%"/tools/bin
Run the sdkmanager as follows:
sdkmanager --licenses
And accept the licenses you did not accept yet (but need to).
View On WordPress
0 notes
Text
React Native Setup
I spent too long this weekend getting a “hello world” react native application up and running just the way I wanted it. I just wanted to detail my experience and my gotchas.
Goal: Get a “hello world” react native v0.49 app running on android on Kitkat API 19 using the Genymotion 2.11.0′s android emulator on OSX 10.12.
What I did: The installation of react native is pretty straightforward- you need ruby 2.4, nodejs, watchman and in my case, I wanted to use yarn over npm.
I didn’t want to use android studio so I opted to install things via the android sdkmanager (which you get from the sdk tools package you can download here). What isn’t detailed in the articles I found is what android studio is actually downloading for you when you install an sdk. For use with Genymotion (personal version downloadable here) I found I needed the sdk platform, build-tools, platform-tools and optionally the sources. The installation of these via the sdkmanager looks like:
sdkmanager “build-tools;19.1.0“ “platform-tools“ “ platforms;android-19“ “sources;android-19“
You can either let the sdkmanager use its default location to install to, your you can specify your own. I’m pretty sure it’s a better pattern to pick the installation location so that you can run multiple versions of android SDKs, but for to get it up and running, I just went with the defaults.
With the sdk + tools installed, next it was Genymotion. I installed it and then configured it- under settings > ADB, select “use custom android SDK tools” and selected the top level folder that contains all of the packages I installed. The tools Genymotion needs are aapt and adb, so the folder you choose needs to contain these files in its subdirectories. If Genymotion can’t find everything it needs it’ll tell you, otherwise you’re good to go.
After selecting an appropriate VM in Genymotion and having it start successfully I was trying to do
yarn start
and launch my android connection but was getting an error like:
"could not install *smartsocket* listener: Address already in use"
After bouncing around between articles and reading about adb there are apparently a bunch of reasons this can happen. From the article linked above:
When you start an adb client, the client first checks whether there is an adb server process already running. If there isn't, it starts the server process.
and from starting adb in nodaemon mode I found that `yarn start` was starting adb server, but Genymotion was also starting an adb server itself- but to do this it terminates the running server that yarn started somehow. For whatever reason when you try to rerun the android connection from the react native application to bind to the android VM’s adbd process, it tries to start the adb server but throws the above error because the default port for the adb is used by Genymotion. Why don’t they coordinate? Why is this happening?
What I found is that it seems to have something with where the adb executable in invoked from and how. Because installing the sdk from sdkmanager doesnt manipulate your PATH, I noticed the processes had varying paths to the adb executable in ps. I figured I’d try making a symlink to adb in /usr/local/bin and gave it try- that fixed it! There must be something in the executable or a PID file or something somewhere that facilitates this restarting coordination and it took the symlink to bring everything in line.
After that everything worked great!
0 notes
Text
Macbookでadbを使う
Macbookが生き返ったので色々設定していたら、adb環境の構築に詰まった。
理由はひとつ、sdkmanagerのguiが廃止になっていたからだ。
そこでユーザーガイドを参考にコマンドラインからplatform-toolsをダウンロードしようとsdk toolsをダウンロード、解凍し/tools/binでターミナルを起動し
$ sdkmanager "platform-tools”
とすると
Warning: File ~/.android/repositories.cfg could not be loaded.
というエラーで上手くいか��い。調べた結果、こちらを参考に~/.android/repositories.cfgにファイルを生成してやると上手くいった。
ダウンロードが終わったら~/.bash_profileに
export ANDROID_HOME=/Users/xxxxx/AndroidSDK/ export PATH=$PATH:${ANDROID_HOME}/platform-tools:${ANDROID_HOME}/tools
という感じで追記、パスを通す。bashを再起動してadb versionなんかでadbが使えることを確認。
以上。
0 notes
Text
TACO and Android Support on Windows 10
I’m using Visual Studio Code also known as VS code or @code these days. Following this MSDN article I couldn’t get TACO installed based on the instructions in the article. The article instructs you to use this command >taco install-reqs android. I kept on getting the classic –e exit code 1 error.
I’m on Windows Surface Pro 4.
Doing some digging this error was caused by the Android SDK not being installed properly. Do to the update to Android SDK around sdkmanager the above command was not working. So this is how I got Android SDK installed on my machine without installing Android Studio to work within @code.
Downloaded the SDK Tools only.
Extract contents to “C:\Android\android-sdk”.
From the command prompt run the following two commands in order:
sdkmanager “platforms;android-25“.
sdkmanager –update.
Open your project in @code and run the script again. >taco install-reqs android
This is what I ended up with (I didn’t have a iOS device connected or configured at the time so the iOS reqs weren’t installed which is fine):
#sobotown
from TACO and Android Support on Windows 10
0 notes