#serial Jpeg camera module
Explore tagged Tumblr posts
Visit Tumblr Blog
Explore Tumblr blogs with no restrictions, modern design and the best experience.
Last Seen Tumblr Blogs


Fun Fact
In 2020, 44% of users from Denmark used Tumblr daily.
Text
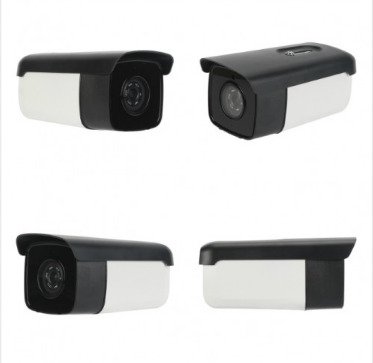
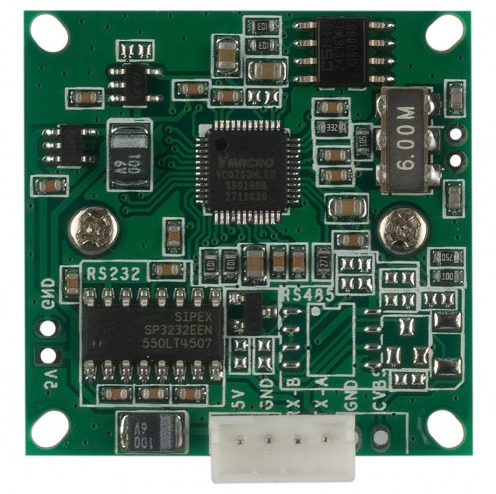
Serial JPEG Color Camera Module
A serial JPEG color camera module is a compact imaging device designed to capture and transmit JPEG-encoded images or video frames over a serial interface. These modules offer an integrated solution for capturing high-quality images and transferring them to a host system, typically using a serial communication protocol.
0 notes
Link
If you like to buy USB camera module, then contact us to find best options. Give us a call to clear all your doubts today. Or, check our site for information on range of cameras including USB 2.0, 3.0, 4.0 version cameras, accessories, and network camera for surveillance issues.
0 notes
Text
Dxo viewpoint serial

#Dxo viewpoint serial serial key#
#Dxo viewpoint serial upgrade#
#Dxo viewpoint serial upgrade#
This most recent variant gives a refreshed and further developed UI that is more instinctive, a cutting edge RAW converter, further developed commotion evacuation innovation that can be applied straightforwardly to RAW pictures, a residue expulsion apparatus, and – obviously – similarity with more camera models.ĭxO Optics Pro Standard offers an entire scope of elements to naturally right and upgrade your pictures including end of contortion, vignetting, and focal point delicate quality through explicitly evolved camera/focal point modules, the expulsion of camera clamor and purple bordering dust evacuation, improvement of openness and dynamic reach, shading advancement, viewpoint revision with Auto-Crop, and a progressive RAW transformation and feature recuperation framework. Regardless of whether you need to improve many pictures in a solitary snap without trying setting up sliders, or you need to physically set up your rectification boundaries, DXO Optics Pro will address your issue. The expansion is fit for applying optical rectifications, White Balance adjustment, DxO Smart Lighting, PRIME denoising, and DxO ClearView fog expulsion, in a new UI that is basic, perfect, and natural.ĭxO Optics Pro 11.4.3 Crack Standard will naturally further develop picture quality in light of a broad investigation of cameras and focal points. With DxO OpticsPro going about as an outsider augmentation. DxO picture handling for upheld cameras can now be gotten to straightforwardly from inside the altering method of OS X Photos, Whether you need to allow the product naturally to further develop many pictures or like to physically characterize the settings for every one of them, DxO Optics Pro has the adaptability to furnish you with unparalleled picture quality and efficiency.ĭxO OpticsPro for Photos is intended to give a consistent picture handling work process for Photographers who are on a Mac and use OS X Photos as their essential photograph application.
#Dxo viewpoint serial serial key#
Direct Download Download Now DxO Optics Pro 11.4.3 Crack With Serial Key LatestĭxO Optics Pro 11.4.3 Crack is a genuine computerized photograph lab for consequently working on the nature of RAW or JPEG pictures: optical and mathematical redresses, streamlined openness, shading control, RAW change, commotion evacuation, detail upgrade, etc.
0 notes
Text
Alien skin exposure x crack

#Alien skin exposure x crack serial key#
#Alien skin exposure x crack full crack#
#Alien skin exposure x crack skin#
#Alien skin exposure x crack upgrade#
#Alien skin exposure x crack software#
Furthermore over It is well compatible with all glasses and operating systems. Similarly, It can also be completed as a plug-in for Photoshop in conjunction with Sun Zone. Then This app could be a prose sale as the main manager posts a notarized photo.
#Alien skin exposure x crack upgrade#
Also, you can upgrade these sieves and the ground for some missing copy tools. And This cool app allows you to enhance many of the real word topography in your photos. Moreover, Delete them original or modify them too fast for your separate taste buds.
#Alien skin exposure x crack skin#
Alien Skin Exposure X5 Bundle 7.0.0.96+ With Crack : For example, the app has a wide range of vintage and classic movie-like visual effects that you can apply to your photos and display them as old photos. So if you are also looking for a professional photo editing and processing tool, we recommend that you do not miss out on using this software. And This program contains a set of unique and professional features that can be seen in some graphical tools. Then This application contains an extensive library of creative and amazing visual effects that you can apply to your photos and give them special effects.
#Alien skin exposure x crack software#
It is a powerful and professional software package for creative photographers that allows you to change your artistic photos in the most beautiful way possible.
#Alien skin exposure x crack serial key#
Similarly, The Exposure X5 package’s serial key and efficient advertising workflow keep you within the creative industry. A special creative team not noticeable in other photo editors helps your photos stand out. Its huge library of great designs provides inspiring starting points that you can customize. Exposure X5 Bundle7.0.0.96+ With Crack:Įxposure X5 Bundle Crack freeload is a great photo editor for innovative photographers who want to create creative photos. Two additional apps expand creative possibilities: Blow Up 3 enlarges your photos into large prints using the sharpest resizing technology, and Snap Art 4 turns your photos into beautiful hand-made paintings. The focus of the pack is Exposure X, an editing application that simplifies your workflow and provides a rich set of creative tools.
#Alien skin exposure x crack full crack#
Exposure X5 Bundle Full Crack 7.0.0.96+freeload :Įxposure X5 Bundle Alien Skin Exposure X5 Bundle 2020 MAC is a photo editor and organizer that integrates all of Alien Skin’s award-winning photo editing apps into one product. Apple Mac users need OS X Yosemite (10.Download Exposure X5 Bundl. Advanced image resizing tools in the Exposure Bundle let you enlarge your images while keeping them crystal clear. You can customize the user interface, and view images in a full-screen preview or on a second monitor. Improve your efficiency by creating presets for many common tasks like color filters, brushes, file settings, and file naming. Cloud storage support lets you sync files between computers and collaborate with others.Įxposureâ™s filtering, selection, and search tools help you stay organized. Large RAW files and extensive editing actions wonâ™t slow Exposure down. Exposureâ™s speed helps you cruise through your tasks. It supports a variety of file types (RAW, DNG, JPEG, TIFF, PSD), DSLR and mirrorless cameras, and lenses. Exposure has all the creative tools you need, so you donâ™t have to cobble together multiple applications to create beautiful images.Įxposure is flexible enough to handle any photography workflow. You can preview multiple looks simultaneously, then quickly choose your favorite and apply it with a single click. The intuitive user interface puts all the tools you need on screen. Thereâ™s no switching back and forth between separate user modules ‒ simply navigate to your images and begin working. Your entire workflow becomes easier and faster. Itâ™s streamlined and intuitive, so you avoid burdensome steps like catalogs or imports. Browse them for inspiration, then apply the one that best evokes your chosen mood.Įxposure keeps you in the creative editing zone. Use these presets to bring warmth and character to your images. Its library of carefully-curated styles spans the history of film and beyond. Use it as your complete solution or as a creative editing plug-in with Adobe Lightroom or Photoshop.Įxposure offers the creative tools you need to create your masterpiece. Itâ™s flexible enough to adapt to different workflows, too. Instead, Exposure streamlines your workflow, making it easy for you to organize your photos and transform them into beautiful works of art. You wonâ™t find unnecessary complications like catalogs, imports, or separate user modules. Use it to quickly organize your images, nondestructively edit your photos, and apply gorgeous looks and special effects. Alien Skin Exposure X2 2.0.0.364 Revision 34847Įxposure X2 is an advanced RAW photo editor and organizer that improves every step in your editing workflow.
0 notes
Text
Adobe photoshop cs3 download requirements

#Adobe photoshop cs3 download requirements how to#
#Adobe photoshop cs3 download requirements serial key#
#Adobe photoshop cs3 download requirements full version#
#Adobe photoshop cs3 download requirements license key#
After the Extract, the zip file Installs the Program As Normal.
After the Download Extract the zip file using WinRAR or WinZip.
#Adobe photoshop cs3 download requirements how to#
How To Crack Adobe Photoshop CS3 Download.
How To Install & Register Adobe Photoshop CS3 Crack freeload
Processor: Intel Multi-core processor or later.
Hard Disk Space required: 1GB of free hard disk space required.
Memory (RAM) required: 1GB of RAM required.
Supported Operating System: Windows 7/8/8.1/10/11.
Compositing is assisted with Photoshop’s new Quick Selection and Refine Edge tools and improved image stitching technology.
Other features include the nondestructive Smart Filters, optimizing graphics for mobile devices, Fill Light and.
The Clone Source palette is introduced, adding more options to the clone stamp tool.
There is more control over print options and better management with Adobe Bridge.
The Black and White adjustment option improves control over manual grayscale conversions with a dialog box similar to that of Channel Mixer.
Enhancements were made to the Black and White Conversion, Brightness and Contrast Adjustment, and Vanishing Point Module tools.
#Adobe photoshop cs3 download requirements serial key#
Adobe Photoshop CS3 Serial Key supports over 150 RAW formats as well as JPEG, TIFF, and PDF.There is also improved support for Camera RAW files which allow users to process images with higher speed and conversion quality.One of the most significant is the streamlined interface which allows increased performance, speed, and efficiency.
#Adobe photoshop cs3 download requirements license key#
Adobe Photoshop CS3 License Key improves on features from previous versions of Photoshop and introduces new tools.
#Adobe photoshop cs3 download requirements full version#
Adobe Photoshop CS3 Crack Full Version Key Features Compositing is helped with Adobe Photoshop cs3 crack keygen freeload new Quick Selection and Refine Edge instruments and improved picture sewing innovation. Different highlights incorporate the nondestructive Smart Filters, advancing illustrations for versatile devices, Fill Light, and Dust Busting instruments. Photoshop cs3 freeload full version crack the Clone Source palette is presented, adding more choices to the clone stamp apparatus. There is more power over print choices and better administration with Adobe Bridge. Photoshop cs3 freeload full version with crackĪdobe Photoshop CS3 Full Crack the Black and White change alternative improves authority over manual grayscale transformations with an exchange box like that of Channel Mixer. Want to try this software? Download Photoshop CS3 Crack. This program is suitable for pc or laptop computers that have intermediate specifications and below. Even internet cafes in those days also installed this program by default. Where was when the Photoshop CS3 Extended application started to be legendary. In this version, there was a significant system change. Download Photoshop CS3 for pc full version is also able to accommodate your design inspiration easily. So it’s not just for editing photos and much more as you need. But along with developments, this application starts to switch professionally as a graphic design media. Make it easy for anyone to start learning photo editing professionally. This program basically has a very perceptive look. 5.2.1 How To Crack Adobe Photoshop CS3 Download Adobe photoshop cs3 download with crack Download photoshop cs3 full crackīut for those of you who still need Adobe Photoshop CS3 Full Version, you can download it below Direct Download links free.
0 notes
Text
Serial JPEG Color Camera Module
Are you Discovering to serial JPEG color camera Module on Spinel Electronics. Shop a huge range of quality Serial JPEG Color Camera Module, Get the best-quality 5MP USB camera module and 300K pixels at an affordable price. For more details call us at: +1 (800) 837-5859.

0 notes
Link
If you are looking to buy infrared USB camera module, then check our website to see the range of options. You may consider buying our products online and we will help you find the right version of USB camera (v. 2.0, 3.0 or 4.0 or network camera) according to your budget & surveillance needs.
0 notes
Link
The company is one of kind known for manufacturing, designing and development of Network (IP) cameras, Serial JPEG cameras, USB cameras and other range of specialty cameras. Since years the company is into this business and is known for providing camera modules and finished cameras as well.
0 notes
Text
An object, measured in pixels, is the level of detail that the camera can capture. This camera can capture details as it has more pixels. Large images can be captured without any difficulty or disturbance. The pixel count of serial JPEG color camera module is more than 12 million.
1 note
·
View note
Text
DxO Optics Pro 11.4.3 Crack
The final version of DxO Optics Pro 11.4.2 Crack is a powerful image processing software designed to improve the quality of JPEG and RAW, not only taking into account the same parameters such as exposure time, aperture or focal length, but also camera and lens models. The app allows manually correcting personal photos or automatically improving the entire session at the same time. The adjustment of optics and geometry is one of the most important options provided by this tool. All modules are designed according to a specific camera + lens, providing good results. Other advantages of the tool include exposure and contrast optimization, advanced noise removal, and color control.
The entire photographic process is limited to a few steps. The program’s interface makes it easy to get the necessary experience for new users and allows you to optimize workflow for advanced users. Manufacturers provide versions of Windows and Mac OS x. This program allows the image to be processed in its original format. The DxO Optical 11 Crack provides Mac with darkroom parameters for your camera model and photo shooting conditions. To ensure that the best processing converter used in the DxO software is based on the detailed calibration characteristics of each camera model. Due to advanced noise removal, excellent color performance and commitment to detail photos at DxO are excellent quality.
With a large number of module libraries, users can quickly and accurately remove defects in images. The filter is based on the DxO laboratory and provides a detailed analysis of the camera and lens combination. The correct parameters allow you to reduce the use of curvature and stretched image generation, for example, wide-angle lenses, illustrations, sharpening fixes, and eliminating chromatic aberrations (color edges). The same parameters can of course be used for many photographs.
The DxO technology developed by DxO Optical Professional Review is a software development company. It gives rich original file conversion capabilities and has a stunning set of editing tools for possible image quality. DxO Optical Professional 11.4.3 The key is so many people who are easy to use. The installation process is very quick and easy without any problems. You can easily set up the application and start it. It provides automatic correction, allowing professional photographers to maintain accurate ambient color values, glow control, chromatic aberration, various distortions, and smooth tone conversion, in addition to the unparalleled quality of sharp images. Dxo Software 11.4.3 keygen’s interface You say it’s outdated Don’t worry, I solved all your problems, It provided you with satisfaction or 100% results You are simple from every angle.
DxO Optical Pro 11 brings advanced raw noise reduction, increased contrast and sharpness, and offers richer detail and natural colors for better image quality. DxO Optical Professional offers a rich set of original file conversion capabilities and a versatile editing tool for optimal image quality. Optical Pro is dedicated to minimizing the effects of fog and fog, reducing unnecessary light diffusion, improving sharpness and contrast, regardless of the shooting conditions. It provides automatic corrections that enable professional photographers to maintain accurate ambient color values, chromatic aberration, glow control, smooth tone conversion, and various distortions, and even the clarity of the image is unmatched.
DxO Optical Pro is an image quality enhancement software and mosaic system to better process raw data. Discover the outstanding performance of Dxo Optics Pro Download. Whether in automatic or manual mode, many smart tools can help you perfect your image. Due to the ultra-accurate analysis of each lens combination, DxO Optical Professional automatically corrects optical defects in the image with unparalleled quality. White Balance, Vitality, Tone Curve, Multi-Point Balance, Color Saturation Protection: Utilize all these tools to make all your photos of brilliant colors, or apply your own color interpretation.
The final version of the DXO Optical Pro 11 Activation Code is a powerful image processing software designed to improve the quality of JPEG and RAW, taking into account not only the exposure time, the same parameters of aperture or focal length, but also the camera model and lens. This program has a raw converter. DXO Optical Pro 10 has many advanced technologies that can adjust brightness, contrast, and color balance. The principle of Dxo Software Free Download is project-based. You load a set of photos from a hard drive, a flash memory card or any other medium, and the material sistematiziruete describes the necessary adjustments. In addition, DxO Optical Pro can be connected as a plug-in graphics editor Adobe Photoshop. DXO Optical Professional 11 crack design makes it easier for you to improve your photos and make high-quality photos. With the help of DXO optics, you can set white balance and color temperature to make your photos more balanced and elegant. For more details, you can download it and try to find any DxO Optical Professional Elite Edition.
DxO Optical Professional 10.5.3 Elite Full Cracking is an image quality improvement software with an excellent system to better handle raw data. Determine the superior performance of Dxo Optics Pro Free Full Version. Whether in automatic or manual mode, several smart tools can help you perfect your image. Due to the ultra-accurate analysis of each lens combination, the DxO optics professional mechanically corrects optical defects in the image with unmatched quality levels. White Balance, Vitality, Tone Curve, Multi-Point Balance, Color Saturation Protection: Take advantage of all these tools to make your photos of all vivid colors, or apply your own color clarification.
Dxo Optics Pro Mac is one of the most recognized basic picture and image editors. But it is not designed for complex editing or manipulation or creative image creation. Instead, it was created to correct basic flaws and flaws in your camera, flaws in your camera or lens. DXO Optical Professional 12 cracks do two major methods of this work. First, it applies some lens correction methods to the lens you use. These methods were developed by the company in high-tech laboratories in a highly technical manner.
The full version of Dxo Optics Mac 12 gets this information from the data in the image. It corrects many shortcomings such as hands-free, corner shadows, edge softness and distortion. When you open the image folder in it, it automatically applies all of these methods. The second method is to apply the conversion process and lighting tools to shadow tones, highlight recovery and advanced noise reduction for ultra-smooth high ISO lenses. Users can use DXO optical JPEG files from the camera, but if you must experience its full power, you must try the original file. It’s easy to get DXO Optical Pro 12 Cracks on this page.
The software is easy to install and use. These were divided according to consumer type or professional model cameras. But after version 10 includes the collection of cameras and lenses. In addition, the elite version includes more advanced tools, high-quality noise reduction, clear view contrast enhancement, and support for color management workflows. You can easily download DXO Optical Pro 12 from the link below. Installation instructions are very simple.
DxO Optics Pro 11.4.3 Full + Crack is the best image editing software and you will get your hands. With simple methods and a simple interface, one-click noise reduction, contrast management and color editing options are given. Dxo Optics Pro 11 offers the best file conversion processing for Windows and Mac users, with a range of editing tools for optimal image quality. DxO Optical Pro 11 is fully patched to minimize the effects of fog and fog, increase/decrease sharpness, color and contrast, and does not care about shooting conditions. DxO Optical Pro 11 Terrorizer helps in professional color correction, providing professional photographers with the best environment colors, light defractions, precise control, smooth tone conversion, and elimination of distortion, also besten the sharpness of the image can not match the quality.
DxO Optical Pro 11 Serial Keys have an interface dark and grey colors that provide a clean, elegant appearance. Its interface has two modes: Organize and customize. In “Custom”, you can perform all edits and adjustments.Dxo Optics Pro Software provides a slide view of the image you are working with and works with the appropriate icons, indicating whether the photo has been processed, whether the camera and lens module images are installed, and the star rating.
The full version of DxO Optics Professional 11.4.3 is unique, unlike almost any photo editing software, it starts with your own automatic best guess correction for your photos, lens-based, camera and exposure/contrast settings. DxO Optical Pro 11 is free to download in reality, instead of shooting thousands of shots in different lighting conditions to create the best lens and camera profile for each camera to accommodate these corrections. Automatic correction is best than most photo editing software. DxO Optical Pro 11 Mac OSX offers bar discounts, in addition to the standard DxO AutoCorrect, and offers multiple colors, black and white, contrast and exposure and landscape options.
Key Features:
Simple interface.
Simple to use application.
The installation speed is very fast.
Remote Desktop Manager Crack.
Automatically detect or correct red eyes.
Just one click to perform the recovery process.
Advanced control of each image parameter
Advanced noise reduction of raw files
Automatically correct all optical defects
Deep shadows and highlights of overexposure
Easy to use, but unparalleled processing speed
Full dynamic range and recovery details
Intelligent tone maps on the entire image
Powerful and accurate camera calibration
Remove smoke from the city landscape
Improve contrast, lighting and more.
Completely redesigned and more intuitive interface
Personalize the interface to increase productivity
Ability to use Photoshop, Lightroom and Flickr
Color rendering makes your image sparkle.
DxO preset handles your image in one click.
DxO smart lighting master lamp.
Interaction with Lightroom DxO image quality for all your photos.
Preview your modified display in real time.
Tailor-made optical corrections push the limits of the lens, and so on.
What’s new:
New automatic detection and correct red eyes
New faster and more powerful noise reduction
New Intelligent Lighting and Face Detection
Other bug fixes and improvements
With this update, the Nikon D5500, the Canon Canon SX60 HS, and the Olympus Pen E-PL7 benefit from several of DxO Optical’s Pro 10’s tailored corrections.
With the help of the DxO Optical Block Library, 422 new camera/lens combinations have been added, thus providing support to lens manufacturers such as Canon, Nikon, and Sony. It also provides support for other third-party branded lenses such as Tamron, Tokina, and Sigma, Canon, Panasonic, Pentax, Nikon, Olympus, Samsung, and Sony cameras.
DxO Optics Professional 11.4.3 The elite full crack tool has been optimized to simplify the photographer’s workflow and improve efficiency. A new search engine has been added to the source browser to help users easily find and load any folder available on the operating system by typing in their name.
Correcting tools have returned and now add DxO OpticsPro’s greater skill and ease of use. The Horizon slider now makes quieter rotations perform more quietly, and the dust tool is also easier to use.
Minimum requirements:
Windows 7/8/8.1/10/ (64-bit)
2 GHz multi-core processor
4 GB RAM
2 GB disk space
DirectX 9.0c
512 MB VRAM
.NET Framework Version 4. 6
how to install?
Disconnect from the internet (most important)
Unzip and Install the Program (Run Setup)
Do not run, exit the program, if run
Copy the crack file from the crack to installdir #
# “C:Program Files DxO Labs DxO OpticsPro 11”
Never update, block the program on your firewall!
The post DxO Optics Pro 11.4.3 Crack appeared first on Take Crack.
from Take Crack https://ift.tt/2I6ApkJ via IFTTT
0 notes
Text
Spinel Electronics – Enabling Best Electronic Solutions in Manufacturing Cameras
With the emerging technology and development in the world, there are lots of electronic devices that we use for fulfilling our day to day domestic and business requirements. Most of the electronic devices are integrated using multiple other components for their overall functioning. An integral component these days for many of the electronic devices (like a mobile phone) is a camera. Else than every smart phone, all the laptops are also equipped with a digital camera. However, the primary requirement of any company manufacturing smart phones and laptops must use the VGA USB camera module of the best quality to maintain the standard of their device. In case you also hold such a business and are seeking for a good camera manufacturing company, you can approach us at Spinel Electronics.
We offer the best customized electronic solutions for various types of cameras. We offer a big range of the camera varieties and solutions. Some of those include panoramic, image sensors, WDR, dual lenses, thermal, different angles of view, infrared solutions, low-light capturing, weatherproofing, low temperature rated serial camera, and much more. We accept any smaller to bigger project related to customized electronics solutions for the cameras. Our experts are experienced in designing and developing the prototypes of the requirement before implementing those.

We make sure that the requirements of our clients are clearly collected prior to start a project. Post the consent of the clients only we start developing the solution as per their specifications. We strive to attain the best quality to delight our customers. We ensure a close coordination with our customers to attain customer satisfaction at every stage of the development. Being one of the best camera module manufacturing companies in Orange County, we are expert in designing and developing serial JPEG cameras, 2MP USB camera, network (IP) cameras, and other special cameras. Once we develop our solution, we take it through the series of testing processes to ensure that our clients are delivered the best quality cameras.
0 notes
Link
Shop for customizable TTL serial jpeg camera which is compact and ideal for security system from our exclusive online store. Hurry up give us a call to discuss your specific needs and get a customized camera at the best price.
0 notes
Link
USB cameras are imaging devices which use USB 2.0 and USB 3.0 to transfer the image. These USB cameras are designed to easily hamper the dedicated computer system, which is most common in all the computers. Giving a speed of about 480mb/s USB 2.0 cameras is famous.
0 notes
Photo


การติดตั้งและทดสอบ Raspberry Pi Camera Board
Raspberry Pi Camera Board เป็นโมดูลกล้องที่ออกแบบมาใช้งานร่วมกับบอร์ด Raspberry Pi โดยสามารถเชื่อมต่อกับซ๊อกเก็ต CAMERA บนบอร์ด ที่มีการเชื่อมต่อแบบ CSI bus โดยให้ทำการดึงซ๊อกเก็ต CAMERA แล้วเสียบสายเเพ เข้าไปดังรูป จากนั้นให้กดซ๊อกเก็ตของกล้องลงเพื่อทำการล๊อคสายสัญญาณ และที่สำคัญอย่าลืมดึงสติกเกอร์กันรอยออกด้วย ซึ่งการทดสอบ Raspberry pi camera board เบื้องต้น
เราจะทำการเชื่อมจ่ายไฟเข้าตัวบอร์ดเเละเชื่อมต่อ Internet เพื่อที่จะทำการอัพเดทข้อมูลโดยยใช้ sudo apt-get update และ sudo apt-get upgrade แล้วจึงทำการสั่ง sudo raspi-config เพื่อ enable ค่าของกล้อง ตลอดจนท้ายที่สุดทำการ Reboot ตัวบอร์ดใหม่อีกครั้ง และเข้าไปที่ TLX เพื่อทดสอบตัวกล้องด้วยคำสั่ง raspistill -o cam.jpg ก็จะได้ภาพที่ถ่ายจากกล้องขึ้นมาครับ และหากต้องการจะถ่ายภาพวิดิโอ raspivid -o video.h264 ทั้งนี้กล้องต้องการสำรองพลังงานอยู่ที่ power supply sufficient, The Camera Module adds about 200-250mA to the power requirements of your Raspberry Pi.
***ข้อควรระวัง**** เวลาเราอัพเกรดตัวกล้องหากพบ Error อาจจะเป็นเพราะเราเสียบกล้องไม่สนิท วิธีแก้ให้ปิดเครื่องและทำการเสียบสายให้แน่นเเล้วจึง ทำการอัพเดทอีกครั้ง
Switch Alternative Switch Description
-c --config โหลดไฟล์คอนฟิกเกอเรชั่น
-q --quiet ซ่อนข้อความยกเว้นข้อความที่แสดงความผิดพลาด Errors
-v --verbose แสดงข้อความเพิ่มเติมในขณะจับภาพ
--version แสดงเวอร์ชั่นและออกจากคำสั่ง
-l --loop รันแบบวนรอบ
-b --background รันอยู่เบื้องหลัง
-o --output สร้าง log file บันทึกการจับภาพ
-d --device เลือกแหล่งกล้องที่เชื่อมต่อ
-i --input <number/name> เลือก input สำหรับใช้งาน
-t --tuner เลือก tuner สำหรับใช้งาน
-f --frequency เลือความถี่ frequency สำหรับใช้งาน
-r --resolution ตั้งความละเอียดภาพ
--fps ตั้ง frame rate สำหรับการจับภาพ
-F --frames กำหนดจำนวนเฟรมเพื่อจับภาพ
-S --skip กำหนดจำนวนเฟรมเพื่อข้ามการจับภาพ
�� กำหนดจำนวนเฟรมเพื่อข้ามการจับภาพ
--dumpframe สร้างไฟล์ดิบ (raw frame)
-s --set = กำหนดค่าควบคุม
--revert เรียกคืนภาพต้นฉบับ
--flip พลิกกลับภาพใน���นวนอนแนวตั้ง (h, v)
--crop [,] ตัดบางส่วนของภาพ
--scale ปรับสเกลรูปภาพ
--rotate หมุนรูปภาพตามมุม 90 องศาที่กำหนด
--deinterlace ลดข้อบกพร่องหรือการรบกวนบนภาพ
--invert สลับสีตรงกันข้าม
--greyscale ปรับภาพเป็นโทนสีเทา ระงับสีทั้งหมด
--swapchannels สลับช่อง c1 และ c2.
--no-banner ซ่อนแถบ Banner แสดงข้อมูล
--top-banner ซ่อนแถบ Banner ด้านบนของภาพ
--bottom-banner ซ่อนแถบ Banner ด้านล่างของภาพ (Default)
--banner-colour กำหนดสี banner (#AARRGGBB)
--line-colour กำหนดสีเส้นขอบของ banner
--text-colour กำหนดสีของตัวอักษร
--font <[name][:size]> กำหนดฟอนท์และขนาด
--no-shadow ระงับโหมดแสดงเงาของตัวอักษร
--shadow เปิดโหมดแสดงเงาของตัวอักษร
--title กำหนดชื่อหัวเรื่อง (มุมบนด้านซ้าย)
--no-title ยกเลิกการกำหนดชื่อหัวเรื่อง
--subtitle กำหนดชื่อเรื่องย่อย (มุมล่างซ้าย)
--no-subtitle ยกเลิกการกำหนดชื่อเรื่องย่อย
--timestamp กำหนดรูปแบบวันเวลา (มุมบนขวา)
--no-timestamp ยกเลิกการกำหนดรูปแบบวันเวลา
--gmt ใช้เวลา GMT แทนเวลาท้องถิ่น local timezone.
--info กำหนดข้อมูลตัวอักษร (มุมล่างขวา)
--no-info ยกเลิกการกำหนดข้อมูลตัวอักษร
--underlay กำหนดรูปภาพอิมเมจที่นำมาวางซ้อนด้านล่าง
--no-underlay ยกเลิกการกำหนดรูปภาพอิมเมจที่นำมาวางซ้อนด้านล่าง
--overlay กำหนดรูปภาพอิมเมจที่นำมาวางซ้อนด้านบน
--no-overlay ยกเลิกการกำหนดรูปภาพอิมเมจที่นำมาวางซ้อนด้านบน
--jpeg เลือกฟอร์แมต JPEG (-1, 0 - 95)
--png เลือกฟอร์แมต PNG (-1, 0 - 10)
--save บันทึกการจับภาพลงไฟล์
--exec รันคำสั่งและรอจนกว่าคำสั่งจะทำงานเสร็จ
SETTING UP
See Camera Setup.
TROUBLESHOOTING
If the Camera Module isn't working correctly, there are number of things to try:
Is your power supply sufficient? The Camera Module adds about 200-250mA to the power requirements of your Raspberry Pi.
Is the ribbon cable attached to the Camera Serial Interface (CSI), not the Display Serial Interface (DSI)? The ribbon connector will fit into either port. The Camera port is located near the HDMI connector.
Are the ribbon connectors all firmly seated, and are they the right way round? They must be straight in their sockets.
Is the Camera Module connector, between the smaller black Camera Module itself and the PCB, firmly attached? Sometimes this connection can come loose during transit or when putting the Camera Module in a case. Using a fingernail, flip up the connector on the PCB, then reconnect it with gentle pressure. It engages with a very slight click. Don't force it; if it doesn't engage, it's probably slightly misaligned.
Have sudo apt-get update and sudo apt-get upgrade been run?
Has raspi-config been run and the Camera Module enabled?
If things are still not working, try the following:
If even a firmware update doesn't fix the problem, your Camera Module may be defective, and may need to be replaced.
Error : raspistill/raspivid command not found. This probably means your update/upgrade failed in some way. Try it again.
Error : ENOMEM. The Camera Module is not starting up. Check all connections again.
Error : ENOSPC. The Camera Module is probably running out of GPU memory. Check config.txt in the /boot/ folder. The gpu_mem option should be at least 128. Alternatively, use the Memory Split option in the Advanced section of raspi-config to set this.
If you've checked all the above issues and the Camera Module is still not working, you may need to upgrade the firmware on the Raspberry Pi. Use the following command to get the very latest (but experimental) firmware:
sudo rpi-update
COMMON COMMAND LINE OPTIONS
PREVIEW WINDOW
--preview, -p Preview window settings <'x,y,w,h'>
Allows the user to define the size of the preview window and its location on the screen. Note this will be superimposed over the top of any other windows/graphics.
--fullscreen, -f Fullscreen preview mode
Forces the preview window to use the whole screen. Note that the aspect ratio of the incoming image will be retained, so there may be bars on some edges.
--nopreview, -n Do not display a preview window
Disables the preview window completely. Note that even though the preview is disabled, the camera will still be producing frames, so will be using power.
--opacity, -op Set preview window opacity
Sets the opacity of the preview windows. 0 = invisible, 255 = fully opaque.
CAMERA CONTROL OPTIONS
--sharpness, -sh Set image sharpness (-100 - 100)
Sets the sharpness of the image. 0 is the default.
--contrast, -co Set image contrast (-100 - 100)
Sets the contrast of the image. 0 is the default.
--brightness, -br Set image brightness (0 - 100)
Sets the brightness of the image. 50 is the default. 0 is black, 100 is white.
--saturation, -sa Set image saturation (-100 - 100)
Sets the colour saturation of the image. 0 is the default.
--ISO, -ISO Set capture ISO (100 - 800)
Sets the ISO to be used for captures.
--vstab, -vs Turn on video stabilisation
In video mode only, turns on video stabilisation.
--ev, -ev Set EV compensation (-10 - 10)
Sets the EV compensation of the image. Default is 0.
--exposure, -ex Set exposure mode
Possible options are:
auto: use automatic exposure mode
night: select setting for night shooting
nightpreview:
backlight: select setting for backlit subject
spotlight:
sports: select setting for sports (fast shutter etc.)
snow: select setting optimised for snowy scenery
beach: select setting optimised for beach
verylong: select setting for long exposures
fixedfps: constrain fps to a fixed value
antishake: antishake mode
fireworks: select setting optimised for fireworks
Note that not all of these settings may be implemented, depending on camera tuning.
--awb, -awb Set Automatic White Balance (AWB) mode
Modes for which colour temperature ranges (K) are available have these settings in brackets.
off: turn off white balance calculation
auto: automatic mode (default)
sun: sunny mode (between 5000K and 6500K)
cloud: cloudy mode (between 6500K and 12000K)
shade: shade mode
tungsten: tungsten lighting mode (between 2500K and 3500K)
fluorescent: fluorescent lighting mode (between 2500K and 4500K)
incandescent: incandescent lighting mode
flash: flash mode
horizon: horizon mode
Note that not all of these settings may be implemented, depending on camera type.
--imxfx, -ifx Set image effect
Set an effect to be applied to the image:
none: no effect (default)
negative: invert the image colours
solarise: solarise the image
posterise: posterise the image
whiteboard: whiteboard effect
blackboard: blackboard effect
sketch: sketch effect
denoise: denoise the image
emboss: emboss the image
oilpaint: oil paint effect
hatch: hatch sketch effect
gpen: graphite sketch effect
pastel: pastel effect
watercolour: watercolour effect
film: film grain effect
blur: blur the image
saturation: colour saturate the image
colourswap: not fully implemented
washedout: not fully implemented
colourpoint: not fully implemented
colourbalance: not fully implemented
cartoon: not fully implemented
Note that not all of these settings may be available in all circumstances.
--colfx, -cfx Set colour effect <U:V>
The supplied U and V parameters (range 0 - 255) are applied to the U and Y channels of the image. For example, --colfx 128:128 should result in a monochrome image.
--metering, -mm Set metering mode
Specify the metering mode used for the preview and capture:
average: average the whole frame for metering
spot: spot metering
backlit: assume a backlit image
matrix: matrix metering
--rotation, -rot Set image rotation (0 - 359)
Sets the rotation of the image in the viewfinder and resulting image. This can take any value from 0 upwards, but due to hardware constraints only 0, 90, 180, and 270 degree rotations are supported.
--hflip, -hf Set horizontal flip
Flips the preview and saved image horizontally.
--vflip, -vf Set vertical flip
Flips the preview and saved image vertically.
--roi, -roi Set sensor region of interest
Allows the specification of the area of the sensor to be used as the source for the preview and capture. This is defined as x,y for the top-left corner, and a width and height, with all values in normalised coordinates (0.0 - 1.0). So, to set a ROI at halfway across and down the sensor, and a width and height of a quarter of the sensor, use:
-roi 0.5,0.5,0.25,0.25
--shutter, -ss Set shutter speed
Sets the shutter speed to the specified value (in microseconds). There's currently an upper limit of approximately 6000000us (6000ms, 6s), past which operation is undefined.
--drc, -drc Enable/disable dynamic range compression
DRC changes the images by increasing the range of dark areas, and decreasing the brighter areas. This can improve the image in low light areas.
off
low
med
high
By default, DRC is off.
--stats, -st Display image statistics
Displays the exposure, analogue and digital gains, and AWB settings used.
--awbgains, -awbg
Sets blue and red gains (as floating point numbers) to be applied when -awb -off is set e.g. -awbg 1.5,1.2
--mode, -md
Sets a specified sensor mode, disabling the automatic selection. Possible values depend on the version of the Camera Module being used:
Version 1.x (OV5647)
ModeSizeAspect RatioFrame ratesFOVBinning
0automatic selection
11920x108016:91-30fpsPartialNone
22592x19444:31-15fpsFullNone
32592x19444:30.1666-1fpsFullNone
41296x9724:31-42fpsFull2x2
51296x73016:91-49fpsFull2x2
6640x4804:342.1-60fpsFull2x2 plus skip
7640x4804:360.1-90fpsFull2x2 plus skip
Version 2.x (IMX219)
ModeSizeAspect RatioFrame ratesFOVBinning
0automatic selection
11920x108016:90.1-30fpsPartialNone
23280x24644:30.1-15fpsFullNone
33280x24644:30.1-15fpsFullNone
41640x12324:30.1-40fpsFull2x2
51640x92216:90.1-40fpsFull2x2
61280x72016:940-90fpsPartial2x2
7640x4804:340-90fpsPartial2x2
--camselect, -cs
Selects which camera to use on a multi-camera system. Use 0 or 1.
--annotate, -a Enable/set annotate flags or text
Adds some text and/or metadata to the picture.
Metadata is indicated using a bitmask notation, so add them together to show multiple parameters. For example, 12 will show time(4) and date(8), since 4+8=12.
Text may include date/time placeholders by using the '%' character, as used by strftime.
ValueMeaningExample Output
-a 4Time20:09:33
-a 8Date10/28/15
-a 124+8=12 Show the date(4) and time(8)20:09:33 10/28/15
-a 16Shutter Settings
-a 32CAF Settings
-a 64Gain Settings
-a 128Lens Settings
-a 256Motion Settings
-a 512Frame Number
-a 1024Black Background
-a "ABC %Y-%m-%d %X"Show some textABC %Y-%m-%d %X
-a 4 -a "ABC %Y-%m-%d %X"Show custom
formatted
date/timeABC 2015-10-28 20:09:33
-a 8 -a "ABC %Y-%m-%d %X"Show custom
formatted
date/timeABC 2015-10-28 20:09:33
--annotateex, -ae Set extra annotation parameters
Specifies annotation size, text colour, and background colour. Colours are in hex YUV format.
Size ranges from 6 - 160; default is 32. Asking for an invalid size should give you the default.
ExampleExplanation
-ae 32,0xff,0x808000 -a "Annotation text"gives size 32 white text on black background
-ae 10,0x00,0x8080FF -a "Annotation text"gives size 10 black text on white background
APPLICATION-SPECIFIC SETTINGS
RASPISTILL
--width, -w Set image width <size> --height, -h Set image height <size> --quality, -q Set JPEG quality <0 to 100>
Quality 100 is almost completely uncompressed. 75 is a good all-round value.
--raw, -r Add raw Bayer data to JPEG metadata
This option inserts the raw Bayer data from the camera into the JPEG metadata.
--output, -o Output filename <filename>
Specifies the output filename. If not specified, no file is saved. If the filename is '-', then all output is sent to stdout.
--latest, -l Link latest frame to filename <filename>
Makes a file system link under this name to the latest frame.
--verbose, -v Output verbose information during run
Outputs debugging/information messages during the program run.
--timeout, -t Time before the camera takes picture and shuts down
The program will run for this length of time, then take the capture (if output is specified). If not specified, this is set to 5 seconds.
--timelapse, -tl time-lapse mode
The specific value is the time between shots in milliseconds. Note that you should specify %04d at the point in the filename where you want a frame count number to appear. So, for example, the code below will produce a capture every 2 seconds, over a total period of 30s, named image0001.jpg, image0002.jpg and so on, through to image0015.jpg.
-t 30000 -tl 2000 -o image%04d.jpg
Note that the %04d indicates a 4-digit number, with leading zeroes added to make the required number of digits. So, for example, %08d would result in an 8-digit number.
If a time-lapse value of 0 is entered, the application will take pictures as fast as possible. Note that there's an minimum enforced pause of 30ms between captures to ensure that exposure calculations can be made.
--thumb, -th Set thumbnail parameters (x:y:quality)
Allows specification of the thumbnail image inserted into the JPEG file. If not specified, defaults are a size of 64x48 at quality 35.
if --thumb none is specified, no thumbnail information will be placed in the file. This reduces the file size slightly.
--demo, -d Run a demo mode <milliseconds>
This options cycles through the range of camera options. No capture is taken, and the demo will end at the end of the timeout period, irrespective of whether all the options have been cycled. The time between cycles should be specified as a millisecond value.
--encoding, -e Encoding to use for output file
Valid options are jpg, bmp, gif, and png. Note that unaccelerated image types (GIF, PNG, BMP) will take much longer to save than jpg, which is hardware accelerated. Also note that the filename suffix is completely ignored when deciding the encoding of a file.
--exif, -x EXIF tag to apply to captures (format as 'key=value')
Allows the insertion of specific EXIF tags into the JPEG image. You can have up to 32 EXIF tag entries. This is useful for tasks like adding GPS metadata. For example, to set the longitude:
--exif GPS.GPSLongitude=5/1,10/1,15/1
would set the longitude to 5 degs, 10 minutes, 15 seconds. See EXIF documentation for more details on the range of tags available; the supported tags are as follows:
IFD0.< or IFD1.< ImageWidth, ImageLength, BitsPerSample, Compression, PhotometricInterpretation, ImageDescription, Make, Model, StripOffsets, Orientation, SamplesPerPixel, RowsPerString, StripByteCounts, XResolution, YResolution, PlanarConfiguration, ResolutionUnit, TransferFunction, Software, DateTime, Artist, WhitePoint, PrimaryChromaticities, JPEGInterchangeFormat, JPEGInterchangeFormatLength, YCbCrCoefficients, YCbCrSubSampling, YCbCrPositioning, ReferenceBlackWhite, Copyright> EXIF.< ExposureTime, FNumber, ExposureProgram, SpectralSensitivity, ISOSpeedRatings, OECF, ExifVersion, DateTimeOriginal, DateTimeDigitized, ComponentsConfiguration, CompressedBitsPerPixel, ShutterSpeedValue, ApertureValue, BrightnessValue, ExposureBiasValue, MaxApertureValue, SubjectDistance, MeteringMode, LightSource, Flash, FocalLength, SubjectArea, MakerNote, UserComment, SubSecTime, SubSecTimeOriginal, SubSecTimeDigitized, FlashpixVersion, ColorSpace, PixelXDimension, PixelYDimension, RelatedSoundFile, FlashEnergy, SpatialFrequencyResponse, FocalPlaneXResolution, FocalPlaneYResolution, FocalPlaneResolutionUnit, SubjectLocation, ExposureIndex, SensingMethod, FileSource, SceneType, CFAPattern, CustomRendered, ExposureMode, WhiteBalance, DigitalZoomRatio, FocalLengthIn35mmFilm, SceneCaptureType, GainControl, Contrast, Saturation, Sharpness, DeviceSettingDescription, SubjectDistanceRange, ImageUniqueID> GPS.< GPSVersionID, GPSLatitudeRef, GPSLatitude, GPSLongitudeRef, GPSLongitude, GPSAltitudeRef, GPSAltitude, GPSTimeStamp, GPSSatellites, GPSStatus, GPSMeasureMode, GPSDOP, GPSSpeedRef, GPSSpeed, GPSTrackRef, GPSTrack, GPSImgDirectionRef, GPSImgDirection, GPSMapDatum, GPSDestLatitudeRef, GPSDestLatitude, GPSDestLongitudeRef, GPSDestLongitude, GPSDestBearingRef, GPSDestBearing, GPSDestDistanceRef, GPSDestDistance, GPSProcessingMethod, GPSAreaInformation, GPSDateStamp, GPSDifferential> EINT.< InteroperabilityIndex, InteroperabilityVersion, RelatedImageFileFormat, RelatedImageWidth, RelatedImageLength>
Note that a small subset of these tags will be set automatically by the camera system, but will be overridden by any EXIF options on the command line.
Setting --exif none will prevent any EXIF information being stored in the file. This reduces the file size slightly.
--fullpreview, -fp Full preview mode
This runs the preview window using the full resolution capture mode. Maximum frames per second in this mode is 15fps, and the preview will have the same field of view as the capture. Captures should happen more quickly, as no mode change should be required. This feature is currently under development.
--keypress, -k Keypress mode
The camera is run for the requested time (-t), and a capture can be initiated throughout that time by pressing the Enter key. Pressing X then Enter will exit the application before the timeout is reached. If the timeout is set to 0, the camera will run indefinitely until the user presses X then Enter. Using the verbose option (-v) will display a prompt asking for user input, otherwise no prompt is displayed.
--signal, -s Signal mode
The camera is run for the requested time (-t), and a capture can be initiated throughout that time by sending a USR1 signal to the camera process. This can be done using the kill command. You can find the camera process ID using the pgrep raspistill command.
kill -USR1 <process id of raspistill>
RASPISTILLYUV
Many of the options for raspistillyuv are the same as those for raspistill. This section shows the differences.
Unsupported options:
--exif, --encoding, --thumb, --raw, --quality
Extra options :
--rgb, -rgb Save uncompressed data as RGB888
This option forces the image to be saved as RGB data with 8 bits per channel, rather than YUV420.
Note that the image buffers saved in raspistillyuv are padded to a horizontal size divisible by 32, so there may be unused bytes at the end of each line. Buffers are also padded vertically to be divisible by 16, and in the YUV mode, each plane of Y,U,V is padded in this way.
RASPIVID
--width, -w Set image width <size>
Width of resulting video. This should be between 64 and 1920.
--height, -h Set image height <size>
Height of resulting video. This should be between 64 and 1080.
--bitrate, -b Set bitrate
Use bits per second, so 10Mbits/s would be -b 10000000. For H264, 1080p30 a high quality bitrate would be 15Mbits/s or more. Maximum bitrate is 25Mbits/s (-b 25000000), but much over 17Mbits/s won't show noticeable improvement at 1080p30.
--output, -o Output filename <filename>
Specify the output filename. If not specified, no file is saved. If the filename is '-', then all output is sent to stdout.
--verbose, -v Output verbose information during run
Outputs debugging/information messages during the program run.
--timeout, -t Time before the camera takes picture and shuts down
The program will run for this length of time, then take the capture (if output is specified). If not specified, this is set to 5 seconds. Setting 0 will mean the application will run continuously until stopped with Ctrl-C.
--demo, -d Run a demo mode <milliseconds>
This options cycles through the range of camera options. No capture is done, and the demo will end at the end of the timeout period, irrespective of whether all the options have been cycled. The time between cycles should be specified as a millisecond value.
--framerate, -fps Specify the frames per second to record
At present, the minimum frame rate allowed is 2fps, and the maximum is 30fps. This is likely to change in the future.
--penc, -e Display preview image after encoding
Switch on an option to display the preview after compression. This will show any compression artefacts in the preview window. In normal operation, the preview will show the camera output prior to being compressed. This option is not guaranteed to work in future releases.
--intra, -g Specify the intra refresh period (key frame rate/GoP)
Sets the intra refresh period (GoP) rate for the recorded video. H264 video uses a complete frame (I-frame) every intra refresh period, from which subsequent frames are based. This option specifies the number of frames between each I-frame. Larger numbers here will reduce the size of the resulting video, and smaller numbers make the stream less error-prone.
--qp, -qp Set quantisation parameter
Sets the initial quantisation parameter for the stream. Varies from approximately 10 to 40, and will greatly affect the quality of the recording. Higher values reduce quality and decrease file size. Combine this setting with a bitrate of 0 to set a completely variable bitrate.
--profile, -pf Specify H264 profile to use for encoding
Sets the H264 profile to be used for the encoding. Options are:
baseline
main
high
--inline, -ih Insert PPS, SPS headers
Forces the stream to include PPS and SPS headers on every I-frame. Needed for certain streaming cases e.g. Apple HLS. These headers are small, so don't greatly increase the file size.
--timed, -td Do timed switches between capture and pause
This options allows the video capture to be paused and restarted at particular time intervals. Two values are required: the on time and the off time. On time is the amount of time the video is captured, and off time is the amount it is paused. The total time of the recording is defined by the timeout option. Note that the recording may take slightly over the timeout setting depending on the on and off times.
For example:
raspivid -o test.h264 -t 25000 -timed 2500,5000
will record for a period of 25 seconds. The recording will be over a timeframe consisting of 2500ms (2.5s) segments with 5000ms (5s) gaps, repeating over the 20s. So the entire recording will actually be only 10s long, since 4 segments of 2.5s = 10s separated by 5s gaps. So:
2.5 record – 5 pause - 2.5 record – 5 pause - 2.5 record – 5 pause – 2.5 record
gives a total recording period of 25s, but only 10s of actual recorded footage.
--keypress, -k Toggle between record and pause on Enter keypress
On each press of the Enter key, the recording will be paused or restarted. Pressing X then Enter will stop recording and close the application. Note that the timeout value will be used to signal the end of recording, but is only checked after each Enter keypress; so if the system is waiting for a keypress, even if the timeout has expired, it will still wait for the keypress before exiting.
--signal, -s Toggle between record and pause according to SIGUSR1
Sending a USR1 signal to the raspivid process will toggle between recording and paused. This can be done using the kill command, as below. You can find the raspivid process ID using pgrep raspivid.
kill -USR1 <process id of raspivid>
Note that the timeout value will be used to indicate the end of recording, but is only checked after each receipt of the SIGUSR1 signal; so if the system is waiting for a signal, even if the timeout has expired, it will still wait for the signal before exiting.
--initial, -i Define initial state on startup
Define whether the camera will start paused or will immediately start recording. Options are record or pause. Note that if you are using a simple timeout, and initial is set to pause, no output will be recorded.
--segment, -sg Segment the stream into multiple files
Rather than creating a single file, the file is split into segments of approximately the numer of milliseconds specified. In order to provide different filenames, you should add %04d or similar at the point in the filename where you want a segment count number to appear e.g:
--segment 3000 -o video%04d.h264
will produce video clips of approximately 3000ms (3s) long, named video0001.h264, video0002.h264 etc. The clips should be seamless (no frame drops between clips), but the accuracy of each clip length will depend on the intraframe period, as the segments will always start on an I-frame. They will therefore always be equal or longer to the specified period.
--wrap, -wr Set the maximum value for segment number
When outputting segments, this is the maximum the segment number can reach before it's reset to 1, giving the ability to keep recording segments, but overwriting the oldest one. So if set to 4, in the segment example above, the files produced will be video0001.h264, video0002.h264, video0003.h264, and video0004.h264. Once video0004.h264 is recorded, the count will reset to 1, and video0001.h264 will be overwritten.
--start, -sn Set the initial segment number
When outputting segments, this is the initial segment number, giving the ability to resume a previous recording from a given segment. The default value is 1.
EXAMPLES
STILL CAPTURES
By default, captures are done at the highest resolution supported by the sensor. This can be changed using the -w and -h command line options.
Take a default capture after 2s (times are specified in milliseconds) on the viewfinder, saving in image.jpg:
raspistill -t 2000 -o image.jpg
Take a capture at a different resolution:
raspistill -t 2000 -o image.jpg -w 640 -h 480
Reduce the quality considerably to reduce file size:
raspistill -t 2000 -o image.jpg -q 5
Force the preview to appear at coordinate 100,100, with width 300 pixels and height 200 pixels:
raspistill -t 2000 -o image.jpg -p 100,100,300,200
Disable preview entirely:
raspistill -t 2000 -o image.jpg -n
Save the image as a PNG file (lossless compression, but slower than JPEG). Note that the filename suffix is ignored when choosing the image encoding:
raspistill -t 2000 -o image.png –e png
Add some EXIF information to the JPEG. This sets the Artist tag name to Boris, and the GPS altitude to 123.5m. Note that if setting GPS tags you should set as a minimum GPSLatitude, GPSLatitudeRef, GPSLongitude, GPSLongitudeRef, GPSAltitude, and GPSAltitudeRef:
raspistill -t 2000 -o image.jpg -x IFD0.Artist=Boris -x GPS.GPSAltitude=1235/10
Set an emboss image effect:
raspistill -t 2000 -o image.jpg -ifx emboss
Set the U and V channels of the YUV image to specific values (128:128 produces a greyscale image):
raspistill -t 2000 -o image.jpg -cfx 128:128
Run preview for 2s, with no saved image:
raspistill -t 2000
Take a time-lapse picture, every 10 seconds for 10 minutes (10 minutes = 600000ms), naming the files image_num_001_today.jpg, image_num_002_today.jpg and so on, with the latest picture also available under the name latest.jpg:
raspistill -t 600000 -tl 10000 -o image_num_%03d_today.jpg -l latest.jpg
Take a picture and send the image data to stdout:
raspistill -t 2000 -o -
Take a picture and send the image data to a file:
raspistill -t 2000 -o - > my_file.jpg
Run the camera forever, taking a picture when Enter is pressed:
raspistill -t 0 -k -o my_pics%02d.jpg
VIDEO CAPTURES
Image size and preview settings are the same as for stills capture. Default size for video recording is 1080p (1920x1080).
Record a 5s clip with default settings (1080p30):
raspivid -t 5000 -o video.h264
Record a 5s clip at a specified bitrate (3.5Mbits/s):
raspivid -t 5000 -o video.h264 -b 3500000
Record a 5s clip at a specified framerate (5fps):
raspivid -t 5000 -o video.h264 -f 5
Encode a 5s camera stream and send the image data to stdout:
raspivid -t 5000 -o -
Encode a 5s camera stream and send the image data to a file:
raspivid -t 5000 -o - > my_file.h264
SHELL ERROR CODES
The applications described here will return a standard error code to the shell on completion. Possible error codes are:
C DefineCodeDescription
EX_OK0Application ran successfully
EX_USAGE64Bad command line parameter
EX_SOFTWARE70Software or camera error
130Application terminated by Ctrl-C
0 notes
Text
The crime rate was shown to have decreased by 16% in studies of weatherproof serial cameras. Although serial JPEG color camera modules are quite good at deterring crime, they also have other uses.
0 notes
Link
For any plans of buying, it is recommendable to go for the renowned brand rather than trusting local suppliers for the same if wanted the best on your investment.
0 notes