#usb camera module
Explore tagged Tumblr posts
Visit Tumblr Blog
Explore Tumblr blogs with no restrictions, modern design and the best experience.
Last Seen Tumblr Blogs


Fun Fact
The Tumblr office adopted Tommy, an 11-year-old Pomeranian.
Video
youtube
SincereFirst 8MP IMX179 USB3.0 Separate Camera Module
This camera module is a detached high-resolution USB camera module. The camera module has a resolution of 8 million pixels and uses the Sony IMX179 CMOS image sensor. The interface type is USB3.0 and the resolution is 3264×2488. It is widely used. Used in home monitoring, office security, scanning equipment, etc.
#youtube#This camera module is a detached high-resolution USB camera module. The camera module has a resolution of 8 million pixels and uses the Sony#SincereFirst#camera module#Sony IMX179 CMOS image sensor#Sony IMX179#CMOS image sensor#USB camera module#sincerefirst USB camera module#sincerefirst camera module
2 notes
·
View notes
Video
youtube
SincereFirst CMOS IMX179 Imaging Sensor 8MP Camera Module
2 notes
·
View notes
Text
Professional Camera Module Supplier
CBRITECH is a Professional Camera Module Supplier, offering cutting-edge imaging solutions for medical, industrial, and consumer applications. Explore our wide range of high-quality camera modules designed for precision and performance. Trust us for innovative designs and reliable products. Visit CBRITECH today for advanced camera module solutions.
0 notes
Text
Small USB Camera Module
A small USB camera module is a compact and versatile imaging device that connects to a computer or other compatible devices via a USB interface. These camera modules are designed to capture high-quality images or videos in various applications where space, portability, and ease of use are paramount.

0 notes
Text
Dual Lens USB Camera Module – A Smart Device for Smart Users
Dual lens USB camera module is made to best improve product quality and performance to best meet the growing and diverse needs of customers. The multifunctional dynamic physical cameras support facial recognition, live detection, iris recognition, finger vein recognition, etc. Also this camera module is suitable for the complex indoor and outdoor backlighting environments.
0 notes
Text
Our 13 MP camera module ensure high performance. The 4k USB camera module with S-Mount lens holder ensures better performance even in less light. This small form factor 4K camera module is based on 1/3.2” AR1335 CMOS image sensor.
0 notes
Text
A Compact Pi Compute Module Backpack 🍓🥧📸🎒
We used to stock a PiCam Module
that would plug into a Pi CM4 or CM5 - recently we went to restock it, but the vendor hasn't replied to our emails for many months. So, it could be a good time for us to design something that works similarly but with more capabilities. So we tasked Timon
with designing something for us - we just said, "Make the best thing ya can," and he delivered! Check this board out that plugs onto the compute module and provides many great accessories: USB connection for bootloading/USB gadget, USB 3.0 host type A for CM5, micro HDMI, micro SD card for data storage on 'Lite modules, camera connection, and mount, two DSI connectors, fan connect, Stemma QT / Qwiic connection, and RTC battery. There's one shutdown button for CM5 and two GPIO buttons plus one LED. Timon's gonna try to add an EYESPI connector for our next rendering so we can get some I2C/SPI/PWM outputs easily. What do you think? We wanted to keep it compact and not too pricey (aiming for <$30 cost. We'll see if we can get it there) but were able to craft fairly complex projects in a small space.
#raspberrypi#computeModule#electronics#maker#hardware#embedded#engineering#diy#tech#innovation#pcbdesign#usb3#microsd#hdmi#camera#stemmaqt#qwiic#gpio#fan#rtc#devboard#prototyping#opensource#electronicsdesign#robotics#automation#coding#hobbyelectronics#hackerspace#geekstuff
17 notes
·
View notes
Text


When fiction becomes science.
"The JEM Internal Ball Camera is a free floating, remote-control panoramic camera that helps crews monitor operations aboard the Japanese Experiment Module (JEM) of the International Space Station. Similar to current consumer-grade ball cameras, the JEM Internal Ball Camera is charged with a standard USB cable and provides real-time video and image downloads to remote operators. Because the camera operates untethered to power supplies or other devices, it provides a view of the JEM outside the visual field of the other cameras currently installed on the JEM and frees astronauts to use their hands for other tasks."
9 notes
·
View notes
Video
youtube
# Introducing the Fast Charging Power Bank Portable Module Board
So, you're in the market for a new power bank, huh? Well, you've come to the right place! Let me tell you all about the Fast Charging Power Bank Portable Module Board. This bad boy is made of metal, which not only makes it super durable but also gives it a sleek and modern look. Plus, with a cell type of 10000mAh 1260110*1, you can rest assured that you'll have plenty of power to keep your devices juiced up on the go.
# Key Features of the Fast Charging Power Bank Portable Module Board
Let's dive a little deeper into what sets this power bank apart from the rest. First off, it supports DisPlay, which is a handy feature that lets you see how much juice you have left at a glance. And while it doesn't have an LED light, it makes up for it with its impressive 22.5W input/output power.
The Fast Charging Power Bank Portable Module Board is equipped with both Micro-USB and Type-C/Double-USB ports, giving you plenty of options for connecting your devices. Plus, with a charging power of PD20W, you can count on fast and efficient charging every time. And with its compatibility with a wide range of devices, including mobile phones, tablets, PCs, and cameras, you'll never have to worry about running out of battery again.
# Why You'll Love the Fast Charging Power Bank Portable Module Board
Now, let's talk about why this power bank is a must-have accessory for anyone on the go. With a powerful polymer battery cell, you can charge your devices securely and efficiently, knowing that they're in good hands. The integrated two-way PD20W fast charging technology ensures that your devices will be charged up in no time, so you can get back to what you were doing without missing a beat.
And let's not forget about the color options! Whether you prefer a sleek black, a vibrant green, or a bold red, there's a color to suit every style. So, if you're tired of constantly running out of battery when you need it most, it's time to upgrade to the Fast Charging Power Bank Portable Module Board.
So, what are you waiting for? Say goodbye to low battery anxiety and hello to endless power with the Fast Charging Power Bank Portable Module Board. Trust me, you won't regret it!
#youtube#Power bank vivo#Power bank spy camera#Power bank PD#Power bank meaning#Power bank mah meaning#Power bank light#Power bank in hand luggage#Power bank for iPhone 11#Power bank for iPad#Power bank for steam deck#Power bank best#Power bank app#ower bank 3000mah#Power bank best buy#Power bank xiaomi 30000mah#Power bank with flashlight#Power bank tarkov#Power bank target
2 notes
·
View notes
Video
youtube
720P ES101 USB Endoscope Cameras Module
#youtube#The ES101 USB endoscope camera module is designed for medical and industrial applications providing high-definition imaging and flexibility.
0 notes
Text
Putting a headphone jack in a Fairphone 4
TLDR with this procedure you sacrifice the lower loudspeaker, but the upper one will still behave as normal. Calls and other audio seem to work just fine. There is some interference from internals that gets picked up by amplified speakers, I'm sure there's a way to filter it, this is mainly a proof of concept. This is not really a guide and I do not guarantee anything at all.
I really liked my Fairphone 4 except that it didn't have a 3.5mm jack like normal phones used to have. And my car has never heard of Bluetooth. So I started joking about drilling a hole in it.
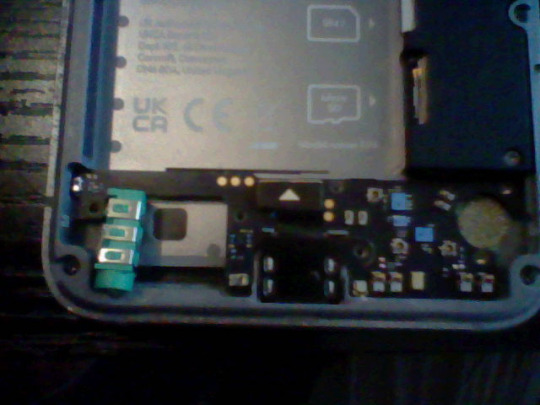
I found this green TRS jack on a USB DAC and found it would fit inside. I took this photo with a DSi camera. Originally I thought I might be able to fit both the jack and the speaker, and I had this elaborate plan to make a cut in the mainboard and move the vibrating motor elsewhere,

but decided against it because I had no idea what losing that one contact would do. I did a test and found no major issues with removing the bottom loudspeaker. If I needed the phone to be loud, I'd hook something else up anyway. I bought a second loudspeaker and horrendously dissected it.

I used a knife. If you do this you should absolutely use a dremel tool and not a knife. Unless you don't have a dremel tool
The plan is, remove the speaker part. You do not have to completely de-laminate the two layers of plastic. Just this section of the bottom layer. The top layer has pretty colors and conductive tape and contacts for mysterious purposes. Maybe antenna.

Next, you must drill the hole. We're not quite sure what the case is made of, but it probably involves aluminum. I had a drill press and clamps, but I went to my friend's house. He doesn't have clamps or many drill bits, but he knows metal. The jack barrel was like 5.1mm in outer diameter, and after lamenting that all our bits were in imperial, we settled on a 7/32". We removed all components from the chassis including mainboard and screen before drilling.
Here, we went for a hole that was centered on the middle hole of the speaker grill. However, if you do this, you will need to also remove some more metal, because the jack will need to be kind of submerged in the floor. We also had to sand down one side of the jack paper thin to make it sit flat against the back of the screen module. In hindsight, I should have marked where the jack wanted to sit before drilling. This would have us drill at the edge of the case, but it would be closed off by the phone's back cover anyway so it wouldn't matter. Just plan out your hole instead of eyeballing it.
Unfortunately, we did not get any pictures of the fit after we were done. Probably for the best, so no one has to see the metal carnage.
Once it was in place, it was time to wire it. The speaker module presses a flat flex cable up against these two contacts on the board.
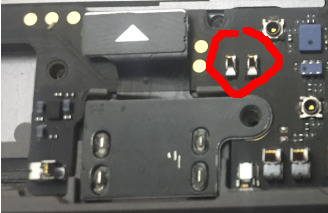
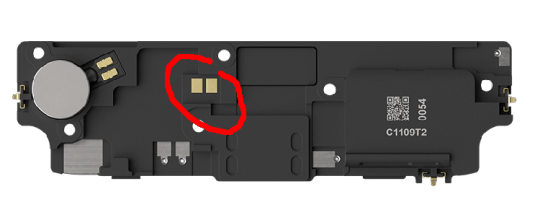
I originally managed to solder to the flat cable, but then made a mistake and tore the pads, so I ended up soldering directly to those spring pins on the mainboard. I used magnet wire for everything. I just connected both the L and R pins of the jack to this one speaker output because I didn't feel like probing out the top speaker connector and running wire up there just yet. Ideally I would have a switched jack that interrupts the top speaker, but that's for later. I might salvage something from an Apple device, their jacks tend to be compact.
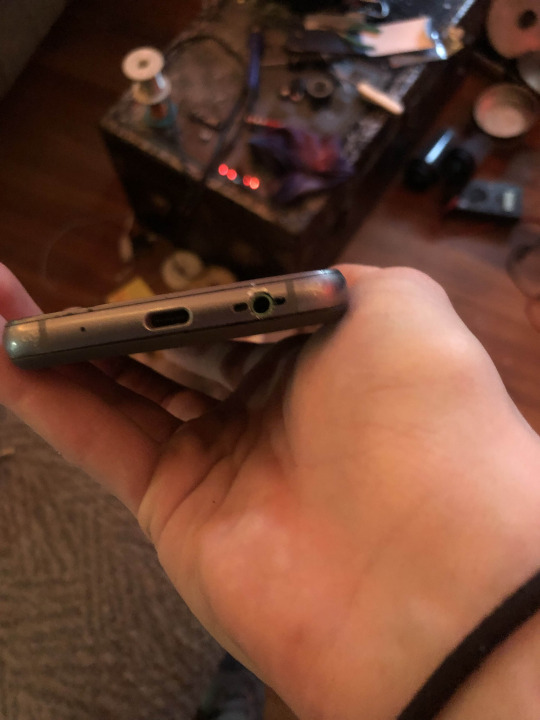
Hot glued the thing in place, and this is the end result. It works just great with passive headphones. I'll upload a demo video when I get the chance, I've already used my 1 video. I wish I had taken better pictures, but it wasn't very convenient.
The caveats in the beginning apply. It's also way too loud because it's meant to drive a speaker, and it's balanced for that too. I might be able to put a resistor divider on there to reduce the output volume and let a louder signal drown out the interference a bit better?
I have no idea if this is a thing people do, putting audio jacks in their phones. But I would think that replacing the speaker like this would work on a lot of different phones. Maybe worth trying?
6 notes
·
View notes
Text
Professional Camera Module Supplier
CBRITECH is a Professional Camera Module Supplier, offering cutting-edge imaging solutions for medical, industrial, and consumer applications. Explore our wide range of high-quality camera modules designed for precision and performance. Trust us for innovative designs and reliable products. Visit CBRITECH today for advanced camera module solutions.
0 notes
Text
1080P USB Camera Module
At spinelelectronics.com, you can get a wide selection of high-quality 1080P USB Camera Module, VGA USB Camera Module, and 2MP USB Camera Module at low rates. For more information visit our online store or call us (800) 837-5859.

0 notes
Text
Dual Lens USB Camera Module – A Smart Device for Smart Users
Dual Lens USB Camera Module is designed for environmental versatility and featuring long-range capabilities and high-resolution depth perception.
0 notes
Text
Our 13 MP camera module ensure high performance. The 4k USB camera module with S-Mount lens holder ensures better performance even in less light. This small form factor 4K camera module is based on 1/3.2” AR1335 CMOS image sensor.
0 notes
Text
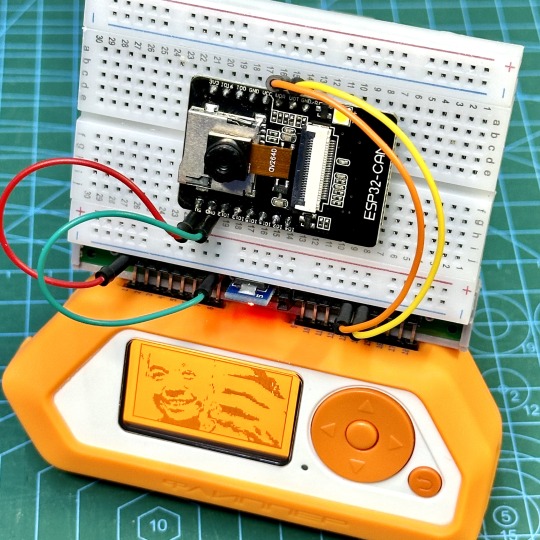
DIY: ESP32-CAM Module for Flipper Zero
Here's a simple add-on module that you can build easily for just a few dollars. Essentially, you just need to connect 4 wires between the ESP32-CAM module and Flipper Zero, then flash the firmware.
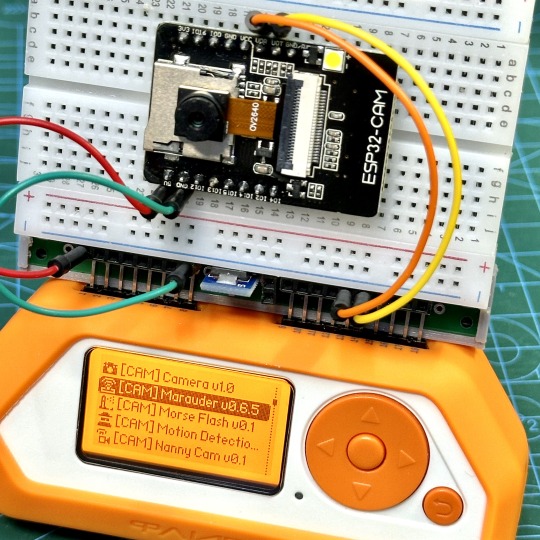
This module allows you to use it with apps like Marauder, Camera, Morse Flasher, etc. The nice thing about using ESP32-CAM is that the module already has micro SD card slot built in, in addition to the camera and LED. This setup is also referred to as Mayhem board.
You can find the ESP32-CAM module on various e-commerce sites like Amazon, Aliexpress, etc. for just a few dollars. Note that you only need the ESP32-CAM module itself, the top module in the photo below. You don't need the Micro USB to Serial Port module (bottom module). Many sellers sell both items together as a bundle.

I used a breadboard below for demonstration purposes, but you can make this permanent and smaller by soldering it on a prototype board.
First, here are the connections you need to make. You can even use jumper wires to directly connect the ESP32-CAM module to Flipper Zero.
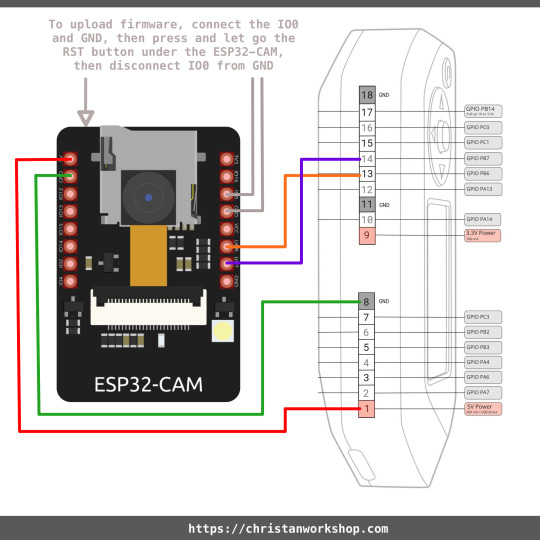
After plugging your module into Flipper Zero, we need to flash the firmware on the ESP32-CAM module. To do that, connect your Flipper Zero to your computer using a data cable (use the cable that came with your Flipper Zero if unsure). Then, on your Flipper Zero, open GPIO > USB-UART Bridge. It should show Pin 13 for TX, Pin 14 for RX. If it doesn't, press the Left arrow button to go into Config and change UART Pins to 13,14. Next, you need to connect pin IO0 and GND (put something metal like the tip of a screwdriver to connect these 2 pins) on the ESP32-CAM, then press and let go the RST button under the ESP32-CAM module, then disconnect pin IO0 from GND. If you do this correctly, the next step will work. If it doesn't, try again.

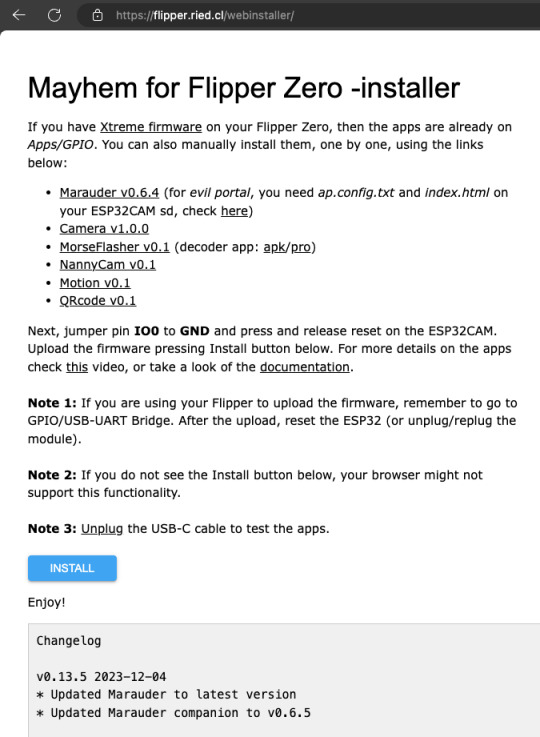
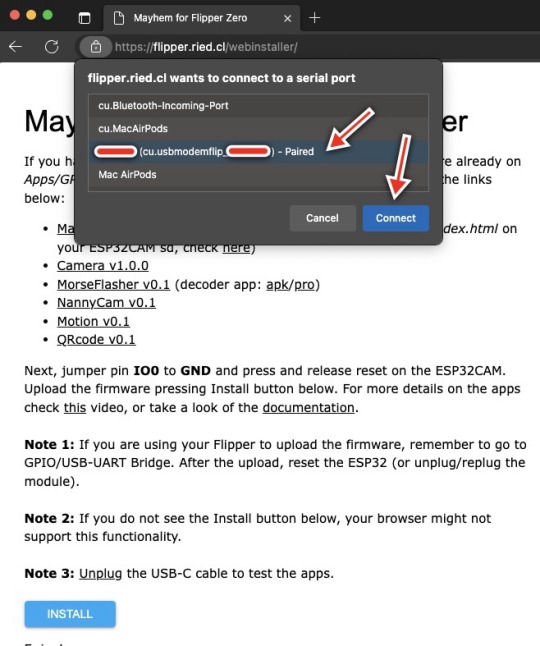
Now, point your Chrome/Microsoft Edge browser to this site and click INSTALL. In the popup, select your Flipper Zero and click Connect.
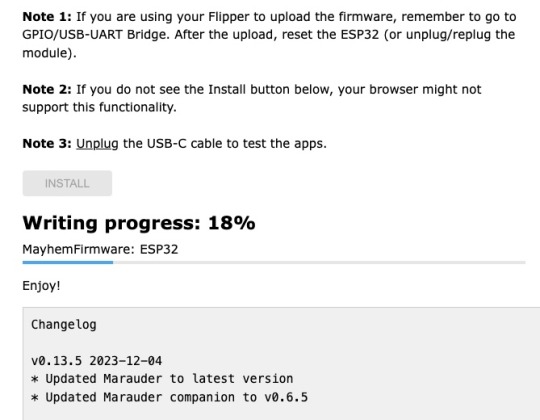
Now, you should see the firmware being flashed. When done, you can disconnect your Flipper Zero from your computer and exit USB-UART Bridge on your Flipper Zero.

If you have already installed third party firmware like Xtreme or RogueMaster, the apps you need to use this module is already installed under GPIO and you can use it right away. Otherwise, you will need to install the apps yourself using the links provided in the above firmware install website. Do connect your Flipper Zero to your computer to install those apps.
That's it! Just a few bucks and a bit of effort.
Here are some videos from other makers for reference:
youtube
youtube
4 notes
·
View notes