#setup docker on centos 8
Explore tagged Tumblr posts
Visit Tumblr Blog
Explore Tumblr blogs with no restrictions, modern design and the best experience.
Last Seen Tumblr Blogs


Fun Fact
Tumblr has 411 employees.
Text
How To Setup Elasticsearch 6.4 On RHEL/CentOS 6/7?

What is Elasticsearch? Elasticsearch is a search engine based on Lucene. It is useful in a distributed environment and helps in a multitenant-capable full-text search engine. While you query something from Elasticsearch it will provide you with an HTTP web interface and schema-free JSON documents. it provides the ability for full-text search. Elasticsearch is developed in Java and is released as open-source under the terms of the Apache 2 license. Scenario: 1. Server IP: 192.168.56.101 2. Elasticsearch: Version 6.4 3. OS: CentOS 7.5 4. RAM: 4 GB Note: If you are a SUDO user then prefix every command with sudo, like #sudo ifconfig With the help of this guide, you will be able to set up Elasticsearch single-node clusters on CentOS, Red Hat, and Fedora systems. Step 1: Install and Verify Java Java is the primary requirement for installing Elasticsearch. So, make sure you have Java installed on your system. # java -version openjdk version "1.8.0_181" OpenJDK Runtime Environment (build 1.8.0_181-b13) OpenJDK 64-Bit Server VM (build 25.181-b13, mixed mode) If you don’t have Java installed on your system, then run the below command # yum install java-1.8.0-openjdk Step 2: Setup Elasticsearch For this guide, I am downloading the latest Elasticsearch tar from its official website so follow the below step # wget https://artifacts.elastic.co/downloads/elasticsearch/elasticsearch-6.4.2.tar.gz # tar -xzf elasticsearch-6.4.2.tar.gz # tar -xzf elasticsearch-6.4.2.tar.gz # mv elasticsearch-6.4.2 /usr/local/elasticsearch Step 5: Permission and User We need a user for running elasticsearch (root is not recommended). # useradd elasticsearch # chown -R elasticsearch.elasticsearch /usr/local/elasticsearch/ Step 6: Setup Ulimits Now to get a Running system we need to make some changes of ulimits else we will get an error like “max number of threads for user is too low, increase to at least ” so to overcome this issue make below changes you should run. # ulimit -n 65536 # ulimit -u 2048 Or you may edit the file to make changes permanent # vim /etc/security/limits.conf elasticsearch - nofile 65536 elasticsearch soft nofile 64000 elasticsearch hard nofile 64000 elasticsearch hard nproc 4096 elasticsearch soft nproc 4096 Save files using :wq Step 7: Configure Elasticsearch Now make some configuration changes like cluster name or node name to make our single node cluster live. # cd /usr/local/elasticsearch/ Now, look for the below keywords in the file and change according to you need # vim conf/elasticsearch.yml cluster.name: kapendra-cluster-1 node.name: kapendra-node-1 http.port: 9200 to set this value to your IP or make it 0.0.0.0 ID needs to be accessible from anywhere from the network. Else put your IP of localhost network.host: 0.0.0.0 There is one more thing if you have any dedicated mount pint for data then change the value for #path.data: /path/to/data to your mount point.
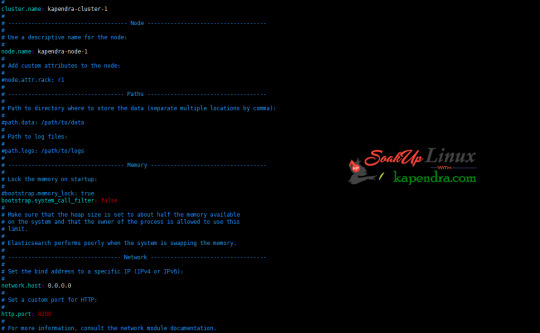
Your configuration should look like the above. Step 8: Starting Elasticsearch Cluster As the Elasticsearch setup is completed. Let the start Elasticsearch cluster with elastic search user so first switch to elastic search user and then run the cluster # su - elasticsearch $ /usr/local/elasticsearch/bin/elasticsearch 22278 Step 9: Verify Setup You have all done it, just need to verify the setup. Elasticsearch works on port default port 9200, open your browser to point your server on port 9200, You will find something like the below output http://localhost:9200 or http://192.168.56.101:9200 at the end of this article, you have successfully set up Elasticsearch single node cluster. In the next few articles, we will try to cover a few commands and their setup in the docker container for development environments on local machines. Read the full article
2 notes
·
View notes
Text
Empowering Digital Growth with Virtual Private Server Hosting at CloudMinister Technologies
In today’s fast-paced digital landscape, businesses need powerful, scalable, and secure hosting solutions to maintain a strong online presence. At CloudMinister Technologies, we provide industry-leading Virtual Private Server (VPS) hosting that bridges the gap between the affordability of shared hosting and the performance of dedicated servers.
Our Virtual Private Server hosting gives you complete control, consistent performance, and enterprise-grade security, making it the ideal solution for growing startups, developers, e-commerce businesses, and enterprises alike.
What is a Virtual Private Server?
A Virtual Private Server is a virtual machine that runs its own operating system and has allocated server resources, including CPU, RAM, and storage. Unlike shared hosting, where resources are divided among multiple users, a Virtual Private Server ensures that your server environment is isolated, secure, and customizable.
At CloudMinister Technologies, we use advanced KVM virtualization, which allows users to run fully isolated Linux or Windows environments with root access and complete freedom to configure the system as required.
Why Choose Virtual Private Server Hosting from CloudMinister?
We understand that every business has unique needs. Our Virtual Private Server hosting is built on a foundation of performance, flexibility, reliability, and personalized support.
1. Dedicated Server Resources
Each Virtual Private Server comes with a guaranteed allocation of CPU, RAM, and storage. This ensures stable performance even during peak traffic times.
2. High-Speed NVMe SSD Storage
Our infrastructure uses NVMe SSDs, providing faster read/write speeds, significantly improving website load times, application responsiveness, and database queries.
3. Full Root Access and Administrative Control
Users have complete control over their server environment. You can install custom software, configure security policies, or run any application that fits your business needs.
4. Rapid Provisioning and Deployment
With our automated provisioning system, your Virtual Private Server is ready within minutes. No waiting, no downtime—just instant access to your hosting environment.
5. Customizable Operating System Options
Choose from a variety of Linux distributions (Ubuntu, CentOS, AlmaLinux, Debian, Fedora) or Windows Server editions. We also support custom ISO uploads for specialized setups.
6. Data Center Location Options
Deploy your server in a location that matches your target audience. Our global data centers help reduce latency, improve SEO, and ensure compliance with local regulations.
7. Unmetered Bandwidth
Our Virtual Private Server plans include unmetered bandwidth, ensuring your website or application runs smoothly, even during high traffic surges.
8. Security-First Hosting
Each server is protected by advanced firewalls, real-time monitoring, DDoS protection, and regular OS patching. Custom firewall rules and VPN setups are also supported.
9. Regular Backups and Snapshots
Safeguard your data with daily or weekly backups, and use snapshot features to roll back your server to a previous state in seconds if needed.
10. Managed or Unmanaged Options
Whether you want to manage the server yourself or have our expert team take care of it, we offer flexible plans for both managed and unmanaged Virtual Private Servers.
Additional Key Benefits of CloudMinister Virtual Private Servers
Developer Tools & API Access Supports Git, Docker, CI/CD pipelines, scripting tools, and automation frameworks.
Control Panel Integration Available with cPanel, Plesk, DirectAdmin, or no panel for full customization.
IPv4 and IPv6 Ready Dedicated IP addresses and IPv6 support are included in every plan.
Resource Monitoring Dashboard Track usage in real-time with our powerful monitoring tools.
Easy Application Hosting Host WordPress, Magento, Laravel, Django, React, and other modern frameworks.
No Hidden Fees Transparent billing with simple monthly or annual payment options.
Disaster Recovery Support Fast recovery tools and technical support ensure minimal downtime during incidents.
ISO Certification Compliance Hosting environments are built to meet ISO 27001 standards for information security.
White-Label Options for Resellers Sell hosting under your brand using our white-label Virtual Private Server plans.
Scalable Resource Upgrades Increase CPU, RAM, or storage on demand without migration or downtime.
Ideal Use Cases for Virtual Private Server Hosting
E-commerce Websites Handle secure transactions, high traffic volumes, and personalized customer experiences.
Agencies and Web Developers Host and manage multiple client websites with custom environments.
SaaS and Tech Startups Launch scalable cloud-based platforms, APIs, and applications with flexibility and control.
Educational Institutions Deploy Learning Management Systems, research platforms, or student portals.
Enterprises Support internal tools, data analytics, and intranet systems on isolated, secure servers.
IT Consultants and ResellersOffer fully-branded hosting solutions to clients with our white-label infrastructure.
CloudMinister's Commitment to Your Success
When you choose CloudMinister Technologies as your hosting provider, you gain more than just a Virtual Private Server—you gain a reliable, long-term partner committed to supporting your digital journey.
We stand by our promise of:
99.95% uptime guarantee backed by SLA
24/7/365 technical support from certified system engineers
Free server migration assistance
Custom deployment options tailored to your project
Ongoing performance and security optimization
Our mission is to provide a hosting experience that combines powerful infrastructure, expert support, and flexible plans—so you can focus on what matters most: growing your business.
Get Started Today with CloudMinister Technologies
Your business deserves hosting that works as hard as you do. With our Virtual Private Server hosting, you get performance, security, and control—without the complexity or high costs of traditional dedicated servers.
Explore our flexible Virtual Private Server plans, talk to our solution architects for a custom setup, or let us help you migrate from your current provider—completely free of charge.
CloudMinister Technologies: Hosting That Grows With You
For More Visit:- www.cloudminister.com
0 notes
Text
How to Install Docker on Amazon Linux 2 AWS EC2.
How to Install Docker on Amazon Linux 2 AWS EC2.
Hi hope you are doing well, lets learn about “How to Setup and Install Docker on amazon linux 2 AWS EC2”, the Docker is the fastest growing technology in the IT market. Many industries are moving towards docker from the normal EC2 instances. Docker is the container technology. It is PAAS (Platform as a Service), which uses a OS virtualisation to deliver software in packages called…

View On WordPress
#docker hub#install docker ce on centos 8#Install Docker CE on Rocky Linux#install docker centos 8 dnf#Install docker in rocky linux 8#install docker on amazon linux 2#install docker on aws ec2#install docker on aws ec2 ubuntu#install docker on centos 8#install docker on centos 8 step by step#install docker on centos 8.4#Install docker on rocky linux 8#setting up docker on centos 8#setup docker on centos 8
0 notes
Text
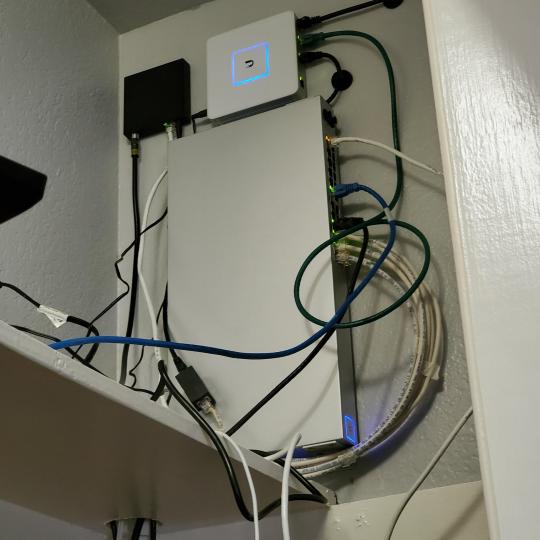
My Homelab/Office 2020 - DFW Quarantine Edition
Moved into our first home almost a year ago (October 2019), I picked out a room that had 2 closets for my media/game/office area. Since the room isn't massive, I decided to build a desk into closet #1 to save on space. Here 1 of 2 shelves was ripped off, the back area was repainted gray. A piece of card board was hung to represent my 49 inch monitor and this setup also gave an idea how high I needed the desk.
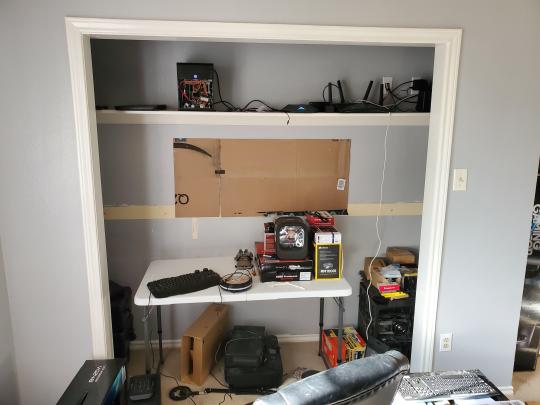
On my top shelf this was the initial drop for all my Cat6 cabling in the house, I did 5 more runs after this (WAN is dropped here as well).

I measured the closet and then went to Home Depot to grab a countertop. Based on the dimensions, it needed to be cut into an object shape you would see on Tetris.

Getting to work, cutting the countertop.

My father-in-law helped me cut it to size in the driveway and then we framed the closet, added in kitchen cabinets to the bottom (used for storage and to hide a UPS). We ran electrical sockets inside the closet. I bought and painted 2 kitchen cabinets which I use for storage under my desk as well.

The holes allowed me to run cables under my desk much easier, I learned many of these techniques on Battlestations subreddit and Setup Wars on Youtube. My daughter was a good helper when it came to finding studs.
Some of my cousins are networking engineers, they advised me to go with Unifi devices. Here I mounted my Unifi 16 port switch, my Unifi Security Gateway (I'll try out pfSense sometime down the line), and my HD Homerun (big antenna is in the attic). I have Cat6 drops in each room in the house, so everything runs here. On my USG, I have both a LAN #2 and a LAN #1 line running to the 2nd closet in this room (server room). This shot is before the cable management.

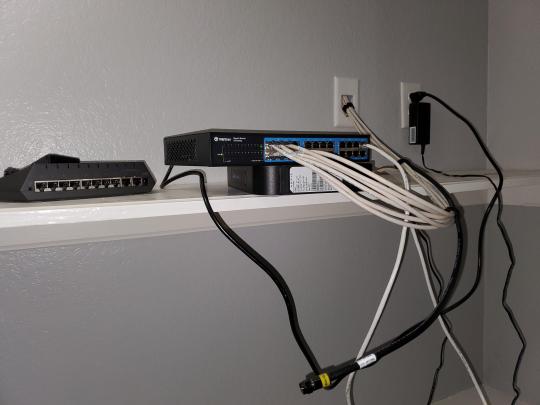
Cable management completed in closet #1. Added an access point and connected 3 old Raspberry Pi devices I had laying around (1 for PiHole - Adblocker, 1 for Unbound - Recursive DNS server, and 1 for Privoxy - Non Caching web proxy).

Rats nest of wires under my desk. I mounted an amplifier, optical DVD ROM drive, a USB hub that takes input from up to 4 computers (allows me to switch between servers in closet #2 with my USB mic, camera, keyboard, headset always functioning), and a small pull out drawer.

Cable management complete, night shot with with Nanoleaf wall lights. Unifi controller is mounted under the bookshelf, allows me to keep tabs on the network. I have a tablet on each side of the door frame (apps run on there that monitor my self hosted web services). I drilled a 3 inch hole on my desk to fit a grommet wireless phone charger. All my smart lights are either running on a schedule or turn on/off via an Alexa command. All of our smart devices across the house and outside, run on its on VLAN for segmentation purposes.

Quick shot with desk light off. I'm thinking in the future of doing a build that will mount to the wall (where "game over" is shown).

Wooting One keyboard with custom keycaps and Swiftpoint Z mouse, plus Stream Deck (I'm going to make a gaming comeback one day!).

Good wallpapers are hard to find with this resolution so pieced together my own.

Speakers and books at inside corner of desk.

Speakers and books at inside corner of desk.

Closet #2, first look (this is in the same room but off to the other side). Ran a few CAT6 cables from closet #1, into the attic and dropped here (one on LAN #1, the other on LAN #2 for USG). Had to add electrical sockets as well.

I have owned a ton of Thinkpads since my IBM days, I figured I could test hooking them all up and having them all specialize in different functions (yes, I have a Proxmox box but it's a decommissioned HP Microserver on the top shelf which is getting repurposed with TrueNAS_core). If you're wondering what OSes run on these laptops: Windows 10, Ubuntu, CentOS, AntiX. All of these units are hardwired into my managed Netgear 10gigabit switch (only my servers on the floor have 10 gigabit NICs useful to pass data between the two). Power strip is also mounted on the right side, next to another tablet used for monitoring. These laptop screens are usually turned off.
Computing inventory in image:
Lenovo Yoga Y500, Lenovo Thinkpad T420, Lenovo Thinkpad T430s, Lenovo Thinkpad Yoga 12, Lenovo Thinkpad Yoga 14, Lenovo Thinkpad W541 (used to self host my webservices), Lenovo S10-3T, and HP Microserver N54L

Left side of closet #2

**moved these Pis and unmanaged switch to outside part of closet**
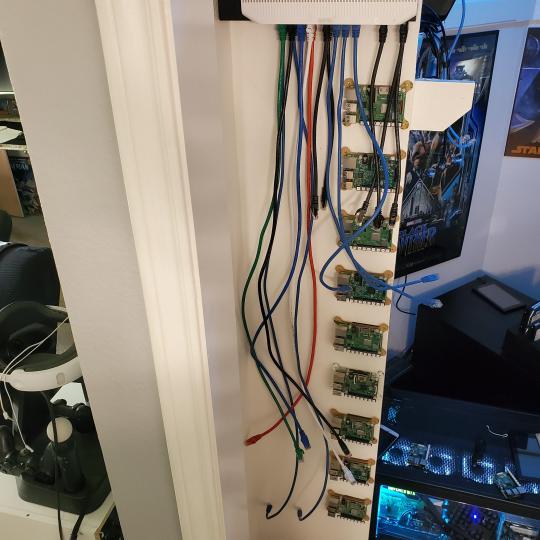
Since I have a bunch of Raspberry Pi 3s, I decided recently to get started with Kubernetes clusters (my time is limited but hoping to have everything going by the holidays 2020) via Rancher, headless. The next image will show the rest of the Pis but in total:
9x Raspberry Pi 3 and 2x Raspberry Pi 4
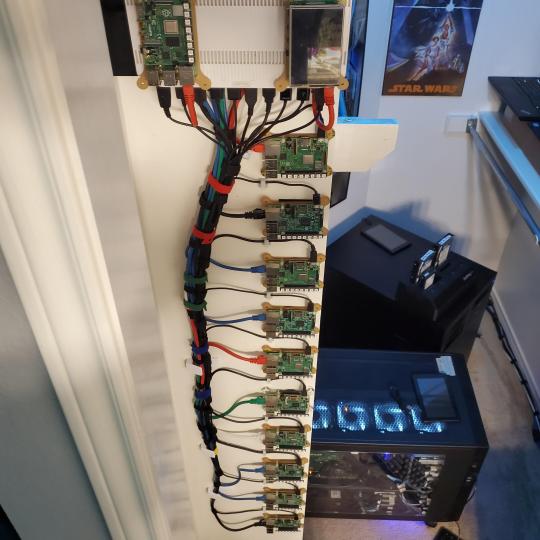
2nd shot with cable management. The idea is to get K3s going, there's Blinkt installed on each Pi, lights will indicate how many pods per node. The Pis are hardwired into a switch which is on LAN #2 (USG). I might also try out Docker Swarm simultaneously on my x86/x64 laptops. Here's my compose generic template (have to re-do the configs at a later data) but gives you an idea of the type of web services I am looking to run: https://gist.github.com/antoinesylvia/3af241cbfa1179ed7806d2cc1c67bd31
20 percent of my web services today run on Docker, the other 80 percent are native installs on Linux and or Windows. Looking to get that up to 90 percent by the summer of 2021.
Basic flow to call web services:
User <--> my.domain (Cloudflare 1st level) <--> (NGINX on-prem, using Auth_Request module with 2FA to unlock backend services) <--> App <--> DB.
If you ever need ideas for what apps to self-host: https://github.com/awesome-selfhosted/awesome-selfhosted

Homelabs get hot, so I had the HVAC folks to come out and install an exhaust in the ceiling and dampers in the attic.

I built my servers in the garage this past winter/spring, a little each night when my daughter allowed me to. The SLI build is actually for Parsec (think of it as a self hosted Stadia but authentication servers are still controlled by a 3rd party), I had the GPUs for years and never really used them until now.

Completed image of my 2 recent builds and old build from 2011.
Retroplex (left machine) - Intel 6850 i7 (6 core, 12 thread), GTX 1080, and 96GB DDR4 RAM. Powers the gaming experience.
Metroplex (middle machine) - AMD Threadripper 1950x (16 core, 32 thread), p2000 GPU, 128GB DDR4 RAM.
HQ 2011 (right machine) - AMD Bulldozer 8150 (8 cores), generic GPU (just so it can boot), 32GB DDR3 RAM.

I've been working and labbing so much, I haven't even connected my projector or installed a TV since moving in here 11 months ago. I'm also looking to get some VR going, headset and sensors are connected to my gaming server in closet #2. Anyhow, you see all my PS4 and retro consoles I had growing up such as Atari 2600, NES, Sega Genesis/32X, PS1, Dreamcast, PS2, PS3 and Game Gear. The joysticks are for emulation projects, I use a Front End called AttractMode and script out my own themes (building out a digital history gaming museum).

My longest CAT6 drop, from closet #1 to the opposite side of the room. Had to get in a very tight space in my attic to make this happen, I'm 6'8" for context. This allows me to connect this cord to my Unifi Flex Mini, so I can hardware my consoles (PS4, PS5 soon)

Homelab area includes a space for my daughter. She loves pressing power buttons on my servers on the floor, so I had to install decoy buttons and move the real buttons to the backside.

Next project, a bartop with a Raspberry Pi (Retropie project) which will be housed in an iCade shell, swapping out all the buttons. Always have tech projects going on. Small steps each day with limited time.
6 notes
·
View notes
Text
GitLab is a web-based platform used to host Git repositories. This tool supports software development using the Continuous Delivery(CD) and Continuous Integration(CI) processes. The GitLab Enterprise Edition builds on top of Git with extra features such as LDAP group sync, multiple roles, and audit logs. It also includes authorization integration with deeper authentication. The amazing features associated with GitLab are: Easy integration with Jenkins, Docker, Slack, Kubernetes, JIRA, LDAP e.t.c Code Quality (Code Climate) On-premise or cloud-based installations Development Analytics Performance monitoring Rich API Integration with IDEs like Eclipse, Visual Studio, Koding, and IntelliJ Issue management, bug tracking, and boards Repository mirroring and high availability (HA) Hosting static websites (GitLab Pages) ChatOp tool (Mattermost) Code Review functionality and Review Apps tool Service Desk (ticketing system) The GitLab system is made up of several distinct components and dependencies. When installing GitLab directly on your system, these components are installed as well. They include Redis, Gitaly, PostgreSQL, and the GitLab application itself. To avoid these components from being populated into your environment, using Docker containers is the preferred installation method. This ensures that all the components live within a single container away from the filesystem of the host. In this guide, we will walk through how to run GitLab in Docker Containers using Docker Compose. Setup Pre-requisites For this guide you need the following: 1GB or more of available RAM on the host Docker and Docker-compose A fully Qualified Domain name(For SSL certificates) But before you begin, update your system and install the required tools: ## On Debian/Ubuntu sudo apt update && sudo apt upgrade sudo apt install curl vim git ## On RHEL/CentOS/RockyLinux 8 sudo yum -y update sudo yum -y install curl vim git ## On Fedora sudo dnf update sudo dnf -y install curl vim git #1. Install Docker and Docker Compose on Linux Begin by installing the Docker engine on your system. Below is a dedicated guide to help you install docker on your system How To Install Docker CE on Linux Systems Once docker has been installed, start and enable the service. sudo systemctl start docker && sudo systemctl enable docker Add your system user to the docker group. sudo usermod -aG docker $USER newgrp docker Now proceed and install Docker compose with aid of the below guide. How To Install Docker Compose on Linux Another easy way of installing Docker Dev release is with the docker.sh script below: sudo apt update && sudo apt install curl uidmap -y curl -fsSL get.docker.com -o get-docker.sh sudo sh get-docker.sh dockerd-rootless-setuptool.sh install #2. Provisioning the GitLab Container We will begin by pulling the docker-compose.yml file for the deployment. wget https://raw.githubusercontent.com/sameersbn/docker-gitlab/master/docker-compose.yml You need to generate 3 random strings at least 64 characters long to be used for: GITLAB_SECRETS_OTP_KEY_BASE: this is used to encrypt 2FA secrets in the database GITLAB_SECRETS_DB_KEY_BASE: used for CI secret variables encryption and importing variables into the database. GITLAB_SECRETS_SECRET_KEY_BASE: it is used for password reset links as well as other ‘standard’ auth features. These strings can be generated using pwgen installed as with the commands: ##On Debian/Ubuntu sudo apt install -y pwgen ##On RHEL/CentOS/RockyLinux 8 sudo yum install epel-release -y sudo yum install pwgen -y ## On Fedora sudo dnf install -y pwgen Generate random strings with the command: pwgen -Bsv1 64 Edit the file and add the strings appropriately, the deployment file has 3 containers i.e Redis, PostgreSQL, and GitLab. Open the file for editing. vim docker-compose.yml Make the below changes as desired. PostgreSQL container
Configure your database as preferred. You need to set the database password. ...... postgresql: restart: always volumes: - postgresql-data:/var/lib/postgresql:Z environment: - DB_USER=gitlab - DB_PASS=StrongDBPassword - DB_NAME=gitlab_production - DB_EXTENSION=pg_trgm,btree_gist ...... GitLab Container Proceed and provide database details, and set the health check appropriately in the GitLab container. gitlab: restart: always image: sameersbn/gitlab:14.10.2 depends_on: - redis - postgresql ports: - "10080:80" - "10022:22" volumes: - gitlab-data:/home/git/data:Z healthcheck: test: curl http://localhost/-/health || exit 1 interval: 1m timeout: 10s retries: 3 start_period: 1m environment: - DEBUG=false - DB_ADAPTER=postgresql - DB_HOST=postgresql - DB_PORT=5432 - DB_USER=gitlab - DB_PASS=StrongDBPassword - DB_NAME=gitlab_production ...... Also update Timezone variables - TZ=Africa/Nairobi - GITLAB_TIMEZONE=Nairobi Under the GitLab container, you can add HTTPS support by making the below settings. If you do not have an FQDN, enable self-signed certificates as well. - GITLAB_HTTPS=true .... If you are using self-signed certificates, you need to enable this as well. - SSL_SELF_SIGNED=true Proceed and provide the random strings. Remember to set the GITLAB_HOST and remove the GITLAB_PORT. This is done because we will configure reverse proxy later. - GITLAB_HOST=gitlab.computingpost.com - GITLAB_PORT= - GITLAB_SSH_PORT=10022 - GITLAB_RELATIVE_URL_ROOT= - GITLAB_SECRETS_DB_KEY_BASE=long-and-random-alphanumeric-string - GITLAB_SECRETS_SECRET_KEY_BASE=long-and-random-alphanumeric-string - GITLAB_SECRETS_OTP_KEY_BASE=long-and-random-alphanumeric-string Set the GitLab user email and password. - GITLAB_ROOT_PASSWORD=StrongPassw0rd - [email protected] You can also enable SMTP support by making the desired settings. - SMTP_ENABLED=true - SMTP_DOMAIN=www.example.com - SMTP_HOST=smtp.gmail.com - SMTP_PORT=587 - [email protected] - SMTP_PASS=password - SMTP_STARTTLS=true - SMTP_AUTHENTICATION=login There are many other configurations you can make to this container. These settings include the Timezone, OAUTH, IMAP e.t.c #3. Configure Persistent Volumes For data persistent, we have to map the volumes appropriately. The docker-compose.yml file has 3 volumes. Here, we will use a secondary disk mounted on our system for data persistence. Identify the disk. $ lsblk NAME MAJ:MIN RM SIZE RO TYPE MOUNTPOINT sda 8:0 0 40G 0 disk ├─sda1 8:1 0 1G 0 part /boot └─sda2 8:2 0 39G 0 part ├─rl-root 253:0 0 35G 0 lvm / └─rl-swap 253:1 0 4G 0 lvm [SWAP] sdb 8:16 0 10G 0 disk └─sdb1 8:17 0 10G 0 part Ensure the disk is formatted before you proceed to mount it as shown. sudo mkdir /mnt/data sudo mount /dev/sdb1 /mnt/data Confirm if the disk has been mounted on the desired path. $ sudo mount | grep /dev/sdb1 /dev/sdb1 on /mnt/data type xfs (rw,relatime,seclabel,attr2,inode64,logbufs=8,logbsize=32k,noquota) Create the 3 volumes in the disk. sudo mkdir -p /mnt/data/redis sudo mkdir -p /mnt/data/postgresql sudo mkdir -p /mnt/data/gitlab Set the appropriate file permissions. sudo chmod 775 -R /mnt/data sudo chown -R $USER:docker /mnt/data On Rhel-based systems, you need to configure SELinux as below for the paths to be accessible. sudo setenforce 0 sudo sed -i 's/^SELINUX=.*/SELINUX=permissive/g' /etc/selinux/config Now create the docker volumes for the containers. Redis docker volume create --driver local \ --opt type=none \ --opt device=/mnt/data/redis \ --opt o=bind redis-data PostgreSQL
docker volume create --driver local \ --opt type=none \ --opt device=/mnt/data/postgresql \ --opt o=bind postgresql-data GitLab docker volume create --driver local \ --opt type=none \ --opt device=/mnt/data/gitlab \ --opt o=bind gitlab-data Once created, list the volumes with the command: $ docker volume list DRIVER VOLUME NAME local gitlab-data local postgresql-data local redis-data Now in the YAML file, add these lines at the bottom. $ vim docker-compose.yml ....... volumes: redis-data: external: true postgresql-data: external: true gitlab-data: external: true #4. Bringing up GitLab. After the desired configurations have been made, bring up the containers with the command: docker-compose up -d Sample execution output: [+] Running 23/28 ⠇ gitlab Pulling 33.9s ⠿ d5fd17ec1767 Pull complete 8.0s ⠿ 2cbc1a21dc95 Pull complete 9.3s ⠿ e3cf021c7259 Pull complete 25.0s ⠿ c55daad7c782 Pull complete 25.2s ..... ⠿ redis Pulled 24.4s ⠿ 1fe172e4850f Pull complete 17.6s ⠿ 6fbcd347bf99 Pull complete 18.1s ⠿ 993114c67627 Pull complete 18.9s ⠿ 2a560260ca39 Pull complete 20.5s ⠿ b7179886a292 Pull complete 20.8s .... ⠿ postgresql Pulled 21.4s ⠿ 23884877105a Pull complete 2.6s ⠿ bc38caa0f5b9 Pull complete 2.8s ⠿ 2910811b6c42 Pull complete 3.1s ⠿ 36505266dcc6 Pull complete 3.5s ........ Verify if the containers are running: $ docker ps CONTAINER ID IMAGE COMMAND CREATED STATUS PORTS NAMES f5e238c85afb sameersbn/gitlab:14.10.2 "/sbin/entrypoint.sh…" 2 minutes ago Up 2 minutes (healthy) 443/tcp, 0.0.0.0:10022->22/tcp, :::10022->22/tcp, 0.0.0.0:10080->80/tcp, :::10080->80/tcp ubuntu-gitlab-1 c4113ccccc8a sameersbn/postgresql:12-20200524 "/sbin/entrypoint.sh" 2 minutes ago Up 2 minutes 5432/tcp ubuntu-postgresql-1 a352f63cdea5 redis:6.2.6 "docker-entrypoint.s…" 2 minutes ago Up 2 minutes 6379/tcp ubuntu-redis-1 #5. Secure GitLab with SSL Certificates. We need to secure the site with SSL so as to prevent unauthorized access to your data. With the GITLAB_HTTPS option enabled, you can generate certificates for your domain name. Normally, the container looks for the certificates in the volume that belongs to the GitLab container. However, in this guide, we will configure the Nginx reverse proxy for HTTPS. First, install Nginx on your system. ##On RHEL/CentOS/Rocky Linux 8 sudo yum install nginx ##On Debian/Ubuntu sudo apt install nginx Create a virtual host file as shown. sudo vim /etc/nginx/conf.d/gitlab.conf
Add the below lines to the file. server listen 80; server_name gitlab.computinforgeeks.com; client_max_body_size 0; chunked_transfer_encoding on; location / proxy_pass http://localhost:10080/; proxy_set_header Host $http_host; proxy_set_header X-Real-IP $remote_addr; proxy_set_header X-Forwarded-For $proxy_add_x_forwarded_for; proxy_set_header X-Forwarded-Proto $scheme; proxy_set_header X-Forwarded-Ssl on; proxy_buffering off; proxy_request_buffering off; Save the file, restart and enable Nginx. sudo systemctl restart nginx sudo systemctl enable nginx Option1 – Using Self Signed Certificate The certificate pair is generated using openSSL. Begin by generating the private key. openssl genrsa -out gitlab.key 2048 Create a certificate signing request(CSR). openssl req -new -key gitlab.key -out gitlab.csr Sign the certificate using the CSR and private key. openssl x509 -req -days 3650 -in gitlab.csr -signkey gitlab.key -out gitlab.crt After this, you will have a self-signed certificate generated. For more security, you need to create more robust DHE parameters. openssl dhparam -out dhparam.pem 2048 Now you will have 3 files, gitlab.key, gitlab.crt and dhparam.pem. Copy these files to the certificates directory. sudo cp gitlab.crt /etc/ssl/certs/gitlab.crt sudo mkdir -p /etc/ssl/private/ sudo cp gitlab.key /etc/ssl/private/gitlab.key sudo cp dhparam.pem /etc/ssl/certs/dhparam.pem Now edit your Nginx config to accommodate the certificates. server server_name gitlab.computingpost.com; client_max_body_size 0; chunked_transfer_encoding on; location / proxy_pass http://localhost:10080/; proxy_set_header Host $http_host; proxy_set_header X-Real-IP $remote_addr; proxy_set_header X-Forwarded-For $proxy_add_x_forwarded_for; proxy_set_header X-Forwarded-Proto $scheme; proxy_set_header X-Forwarded-Ssl on; proxy_buffering off; proxy_request_buffering off; listen 443 ssl; ssl_certificate /etc/ssl/certs/gitlab.crt; ssl_certificate_key /etc/ssl/private/gitlab.key; ssl_dhparam /etc/ssl/certs/dhparam.pem; server if ($host = gitlab.computingpost.com) return 301 https://$host$request_uri; listen 80; server_name gitlab.computingpost.com; return 404; To establish trust with the server, the client needs to copy the gitlab.crt to the list of trusted certificates. Normally at /usr/local/share/ca-certificates/ for Ubuntu and /etc/pki/ca-trust/source/anchors/ for CentOS. Once done, update the certificates: ##On Ubuntu/Debian sudo update-ca-certificates ##On CentOS/Rocky Linux sudo update-ca-trust extract This is done to avoid the error below during git clone on the client. $ git clone https://gitlab.computingpost.com/gitlab-instance-dbda973a/my-android-project.git Cloning into 'my-android-project'... fatal: unable to access 'https://gitlab.computingpost.com/gitlab-instance-dbda973a/my-android-project.git/': SSL certificate problem: self signed certificate Option 2 – Using Let’s Encrypt This requires one to have a Fully Qualified Domain Name(FQDN). Here, we will use a reverse proxy(Nginx) Begin by installing the required packages. ##On RHEL 8/CentOS/Rocky Linux 8/Fedora sudo dnf install https://dl.fedoraproject.org/pub/epel/epel-release-latest-8.noarch.rpm sudo dnf install certbot python3-certbot-nginx ##On Debian/Ubuntu sudo apt install certbot python3-certbot-nginx Generate SSL certificates for your domain name using the command: sudo certbot --nginx Proceed and issue certificates for the domain name. ........ Which names would you like to activate HTTPS for? - - - - - - - - - - - - - - - - - - - - - - - - - - - - - - - - - - - - - - - - 1: gitlab.computingpost.com - - - - - - - - - - - - - - - - - - - - - - - - - - - - - - - - - - - - - - - -
Select the appropriate numbers separated by commas and/or spaces, or leave input blank to select all options shown (Enter 'c' to cancel): 1 Requesting a certificate for gitlab.computingpost.com Performing the following challenges: http-01 challenge for bitwarden.example.com Waiting for verification... Cleaning up challenges .... Restart Nginx. sudo systemctl restart nginx #6. Access GitLab Web UI. Now proceed and access GitLab via HTTPS. If you have a firewall enabled, allow the port/service through it. ##For UFW sudo ufw allow 443/tcp ##For Firewalld sudo firewall-cmd --add-service=http --permanent sudo firewall-cmd --add-service=https --permanent sudo firewall-cmd --reload Now proceed and access the page using the URL https://domain_name Login using the created credentials. On successful login, you will see this dashboard. Set if you want the account to be used by everyone or for personal use by setting who to register for an account. Once configured, proceed and create a new project by clicking on “New Project“. Here, I will deploy a project from a template as shown. Once created, the project will appear as shown. You can proceed and add SSH keys for easier management. To confirm if everything is set up accordingly, we will try and git clone the repository. Click on clone to obtain the desired URL. Since I do not have SSH keys, I will proceed to use HTTPS as shown. Voila! That verifies that the GitLab installation is working as preferred. #7. Cleanup To remove the GitLab installation and all the persistent data, use the command: $ docker-compose down -v [+] Running 4/4 ⠿ Container admin-gitlab-1 Removed 13.5s ⠿ Container admin-redis-1 Removed 0.7s ⠿ Container admin-postgresql-1 Removed 0.5s ⠿ Network admin_default Removed 0.4s Closing Thoughts. We have triumphantly walked through how to run GitLab in Docker Containers using Docker Compose. Now you have a GitLab installation from which you can host Git repositories. I hope this was significant.
0 notes
Text
Mattermost system requirements

MATTERMOST SYSTEM REQUIREMENTS INSTALL
MATTERMOST SYSTEM REQUIREMENTS FULL
MATTERMOST SYSTEM REQUIREMENTS ANDROID
MATTERMOST SYSTEM REQUIREMENTS SOFTWARE
Other S3-compatible systems may work, but are not officially supported. Mattermost is compatible with object storage systems which implement the S3 API. Elasticsearch 5.0 and later is supported. Elasticsearch to support highly efficient database searches in a cluster environment.Grafana to visualize the system health metrics collected by Prometheus with the performance monitoring feature.Prometheus to track system health of your Mattermost deployment, through performance monitoring feature available in Enterprise Edition E20.System Requirementsįor Enterprise Edition deployments with a multi-server setup, we highly recommend the following systems to support your Mattermost deployment: Mattermost’s performance monitoring tools can be used for detailed performance measurements and to inspect the running system to ensure sizing and installation is correct. You can use the Mattermost open source load testing framework to simulate usage of your system.
MATTERMOST SYSTEM REQUIREMENTS FULL
It is highly recommended that pilots are run before enterprise-wide deployments in order to estimate full scale usage based on your specific organizational needs. Hardware Requirements for Enterprise Deployments (Multi-Server) Scale Requirementsįor Enterprise Edition deployments with a multi-server setup, see our scaling guide.
1 - 1,000 users - 1 vCPU/cores, 2 GB RAM.
Most small to medium Mattermost team deployments can be supported on a single server with the following specifications based on registered users: Hardware Requirements for Team Deployments Changing this number may change memory requirements.įor deployments larger than 2,000 users, it is recommended to use the Mattermost open source load testing framework to simulate usage of your system at full scale. Recommendation is based on default 50 MB maximum file size, which can be adjusted from the System Console. Moreover, memory requirements can be driven by peak file sharing activity. These hardware recommendations are based on traditional deployments and may grow or shrink depending on how active your users are. Usage of CPU, RAM, and storage space can vary significantly based on user behavior. If you are using MySQL 8.0.4+, you will need to enable mysql_native_password by adding the following entry in your MySQL configuration file:`` ĭefault-authentication-plugin=mysql_native_password In MySQL 8.0.4, the default authentication plugin was changed from mysql_native_password to caching_sha2_password ( ).
Hashtags or recent mentions of usernames containing a dot do not return search results.
MATTERMOST SYSTEM REQUIREMENTS INSTALL
If any of the above is an issue, you can either enable the Elasticsearch (E20) feature or install MySQL instead.
Terms containing a dash return incorrect results as dashes are ignored in the search query.
Hashtags or recent mentions of usernames containing a dash do not return search results.
For searching two characters, you will also need to set ft_min_word_len and innodb_ft_min_token_size to 2 and restart MySQL.
MySQL 5.6, 5.7, 8 (see note below on MySQL 8 support)ĭeployments requiring searching in Chinese, Japanese, and Korean languages require MySQL 5.7.6+ and the configuration of ngram Full-Text parser.
While community support exists for Fedora, FreeBSD, and Arch Linux, Mattermost does not currently include production support for these platforms.
Using the Mattermost Docker image on a Docker-compatible operating system (Linux-based OS) is still recommended.
Ubuntu 18.04, Debian Buster, CentOS 6+, CentOS 7+, RedHat Enterprise Linux 7+, Oracle Linux 6+, Oracle Linux 7+.
MATTERMOST SYSTEM REQUIREMENTS SOFTWARE
Server Software Mattermost Server Operating System Mobile clients: iOS Mail App (iOS 7+), Gmail Mobile App (Android, iOS).Web based clients: Office 365, Outlook, Gmail, Yahoo, AOL.Desktop clients: Outlook 2010+, Apple Mail version 7+, Thunderbird 38.2+.iOS: iOS 11+ with Safari 12+ or Chrome 77+.
MATTERMOST SYSTEM REQUIREMENTS ANDROID
Android: Android devices with Android 7+.
iOS: iPhone 5s devices and later with iOS 11+.
Though not officially supported, the Linux desktop app also runs on RHEL/CentOS 7+.
Linux: Ubuntu LTS releases 18.04 or later.
Requirements Software Client Software Desktop Apps
0 notes
Text
Macos Recovery Install Latest Os

Start up from macOS Recovery
Apple Recovery Install Latest Os
Determine whether you're using a Mac with Apple silicon, then follow the appropriate steps:
Apple silicon: Turn on your Mac and continue to press and hold the power button until you see the startup options window, which includes a gear icon labeled Options. Select Options, then click Continue.
Intel processor: Make sure that your Mac has a connection to the internet. Then turn on your Mac and immediately press and hold Command (⌘)-R until you see an Apple logo or other image.
This step is important. An Internet connection is needed in order to reinstall the macOS operating system. If you are using a laptop, make sure it is connected to a power source. How to install a new copy of macOS Big Sur in Recovery Mode. Recovery Mode is the special salvation of the Mac that first launched with OS X 10.7 Lion. MacOS Recovery installs the latest macOS version that was previously installed on your Mac, with some exceptions that Apple highlights in a support document: If you just had your Mac logic board replaced during a repair, macOS Recovery might offer only the latest macOS compatible with your Mac.
If you're asked to select a user you know the password for, select the user, click Next, then enter their administrator password.
The official build of CentOS. How to install and use Docker on RHEL 7 or CentOS 7 (method 1) The procedure to install Docker is as follows: Open the terminal application or login to the remote box using ssh command: ssh user@remote-server-name; Type the following command to install Docker via yum provided by Red Hat: sudo yum install docker. Docker is a tool that allows you to easily build, test and deploy applications smoothly and quickly using containers. Containers allow a developer to package an application with its dependencies and ship it out as a single package. Install Docker on CentOS # Although the Docker package is available in the official CentOS 7 repository, it may not always be the latest version. The recommended approach is to install Docker from the Docker’s repositories. To install Docker on your CentOS 7 server follow the steps below. Install Docker CE on CentOS 8 RHEL 8. So far we have covered docker introduction and terminologies. We should be ready to install Docker CE on RHEL 8 / CentOS 8. We will start with the installation of Docker then Docker Compose. There are two editions of Docker available. Docker install centos 6.
Reinstall macOS
Select Reinstall macOS from the utilities window in macOS Recovery, then click Continue and follow the installer's instructions.
Follow these guidelines during installation:
Allow installation to complete without putting your Mac to sleep or closing its lid. Your Mac might restart and show a progress bar several times, and the screen might be empty for minutes at a time.
If the installer asks to unlock your disk, enter the password you use to log in to your Mac.
If the installer doesn't see your disk, or it says that it can't install on your computer or volume, you might need to erase your disk first.
If the installer is for a different version of macOS than you expected, learn about other installation options, below.
If the installer offers you the choice between installing on Macintosh HD or Macintosh HD - Data, choose Macintosh HD.
After installation is complete, your Mac might restart to a setup assistant. If you're selling, trading in, or giving away your Mac, press Command-Q to quit the assistant without completing setup. Then click Shut Down. When the new owner starts up the Mac, they can use their own information to complete setup.
Other macOS installation options
By default, macOS Recovery installs the latest macOS that was previously installed on your Mac.* You can get other macOS versions using one of these methods:
On an Intel-based Mac, you can use Option-Command-R at startup to upgrade to the latest macOS that is compatible with your Mac. Exceptions:
If macOS Sierra 10.12.4 or later was never previously installed, you will receive the macOS that came with your Mac, or the closest version still available.
If your Mac has the Apple T2 Security Chip and you never installed a macOS update, you will receive the latest macOS that was installed on your Mac.
On an Intel-based Mac that previously used macOS Sierra 10.12.4 or later, you can use Shift-Option-Command-R at startup to install the macOS that came with your Mac, or the closest version still available.
Reinstall macOS from the App Store instead of using macOS Recovery. If you can't install the latest macOS, you might be able to install an earlier macOS.
Create a bootable installer, then use it to install macOS on your Mac or another Mac.
* If you just had your Mac logic board replaced during a repair, macOS Recovery might offer only the latest macOS compatible with your Mac. If you erased your entire disk instead of just the startup volume on that disk, macOS Recovery might offer only the macOS that came with your Mac, or the closest version still available.
macOS Big Sur elevates the most advanced desktop operating system in the world to a new level of power and beauty. Experience Mac to the fullest with a refined new design. Enjoy the biggest Safari update ever. Discover new features for Maps and Messages. And get even more transparency around your privacy.
Check compatibility
macOS Big Sur is compatible with these computers:
MacBook introduced in 2015 or later MacBook Air introduced in 2013 or later MacBook Pro introduced in late 2013 or later Mac mini introduced in 2014 or later iMac introduced in 2014 or later iMac Pro Mac Pro introduced in 2013 or later View the complete list of compatible computers.
If upgrading from macOS Sierra or later, macOS Big Sur requires 35.5GB of available storage to upgrade. If upgrading from an earlier release, macOS Big Sur requires up to 44.5GB of available storage. To upgrade from OS X Mountain Lion, first upgrade to OS X El Capitan, then upgrade to macOS Big Sur.
Make a backup
Before installing any upgrade, it’s a good idea to back up your Mac. Time Machine makes it simple, and other backup methods are also available. Learn how to back up your Mac. Download docker for windows 10 pro 64 bit 64.
Get connected
It takes time to download and install macOS, so make sure that you have a reliable Internet connection. If you're using a Mac notebook computer, plug it into AC power.
Download macOS Big Sur
If you're using macOS Mojave or later, get macOS Big Sur via Software Update: Choose Apple menu > System Preferences, then click Software Update.
Or use this link to open the macOS Big Sur page on the App Store: Get macOS Big Sur. Then click the Get button or iCloud download icon.
Begin installation
After downloading, the installer opens automatically.
Click Continue and follow the onscreen instructions. You might find it easiest to begin installation in the evening so that it can complete overnight, if needed.
If the installer asks for permission to install a helper tool, enter the administrator name and password that you use to log in to your Mac, then click Add Helper.
Allow installation to complete
Please allow installation to complete without putting your Mac to sleep or closing its lid. Your Mac might restart, show a progress bar, or show a blank screen several times as it installs both macOS and related updates to your Mac firmware.
Stay up to date
After installing macOS Big Sur, you will be notified when updates to macOS Big Sur are available. You can also use Software Update to check for updates: Choose Apple menu > System Preferences, then click Software Update.
Download Adobe Premiere Pro CC 2019 for Mac Free. Latest Version setup of Adobe Premiere Pro CC 2019 Premium Pro DMG for Apple Macbook OS X. Brief Overview of Adobe Premiere Pro CC 2019 for Mac OS X. Adobe Premiere Pro CC 2019 is a very handy and impressive application which can be used for real time video editing. Adobe 2019 mac download.
Or get macOS Big Sur automatically
If you're using OS X El Capitan v10.11.5 or later and your App Store preferences or Software Update preferences are set to download new updates when available, macOS Big Sur will download conveniently in the background, making it even easier to upgrade. A notification will inform you when macOS Big Sur is ready to be installed. Click Install to get started, or dismiss the notification to install later. When you're ready to install, just open the file named Install macOS Big Sur from your Applications folder.

Learn more
Apple Recovery Install Latest Os
If the installer shows a list of apps that are not optimized for your Mac, learn about 32-bit app compatibility, then choose whether to proceed with the installation.
For the strongest security and latest features, upgrade to macOS Big Sur. If you have hardware or software that isn't compatible with Big Sur, you might be able to install an earlier macOS.
You can also use macOS Recovery to reinstall the macOS you're using now, upgrade to the latest compatible macOS, or install the macOS that came with your Mac.
0 notes
Text
The Way to Set up Docker CE on CentOS 8

If you need Docker CE on CentOS, the measures for setup have changed to the iteration of this platform. the Way to set up Docker CE on CentOS 8 should you need Docker CE on CentOS, the measures for setup have shifted for the iteration of this platform. If your company's cloud is [...]
Read full article here 📄 👉 http://bit.ly/3199Nr0
https://www.seowebdev.co/the-way-to-set-up-docker-ce-on-centos-8/
0 notes
Text
LINUX OS ULTRA SECURE ENCRYPTED VPN SERVICE PROGRAMMING ON DEMAND
https://sites.google.com/view/linux-vpn-server

ULTRASECURE ENCRYPTION VPN SERVER ,SERVER VPN,SERVER VPN WINDOWS 10,SERVER VPN GRATUIT,SERVER VPN FREE,SERVER VPN RASPBERRY PI,SERVER VPN ROMANIA,SERVER VPN WINDOWS,SERVER VPN JAPAN,SERVER VPN 2019,SERVER VPN WIN 10,SERVER VPN ACASA,SERVER VPN ANDROID FREE,SERVER VPN ADDRESS,SERVER VPN ASUS,SERVER VPN ARGENTINA,SERVER VPN ARDUINO,SERVER VPN APP,VPN SERVER ADDRESS FREE,VPN SERVER ADDRESS USA,A VPN SERVER ADDRESS,A VPN SERVER,CREATE A SERVER VPN,ACCESS A SERVER VPN,CREATING A VPN SERVER,BUILD A VPN SERVER,CREATE A VPN SERVER AT HOME,SETUP A VPN SERVER AT HOME,CREATE A VPN SERVER UBUNTU,HOST A VPN SERVER,SERVER VPN BRAZIL,SERVER VPN BOT MOBILE LEGEND,SERVER VPN BUAT MOBILE LEGEND,VPN BRAZIL SERVER,VPNBOOK SERVER,SERVER VPN BITDEFENDER,SERVER VPN BANGLADESH,VPN SERVER BEHIND NAT,VPN SERVER BEHIND ROUTER,VPN SERVER BEHIND NAT ROUTER,RASPBERRY PI B+ VPN SERVER,SERVER VPN CISCO,SERVER VPN CHINA,SERVER VPN CENTOS,SERVER VPN CONFIGURATION,SERVER VPN CLIENT,SERVER VPN CLOUD,SERVER VPN.COM,SERVER VPN CHINA FREE,SERVER VPN CENTOS 7,SERVER VPN CHROME,C VPN SERVER,CELL C VPN SERVER,SERVER VPN DOWNLOAD,SERVER VPN DEBIAN,SERVER VPN DD-WRT,VPN SERVER DID NOT RESPOND,VPN SERVER DOCKER,VPN SERVER DIGITALOCEAN,VPN SERVER DID NOT RESPOND IPHONE,VPN SERVER DEBIAN 9,VPN SERVER DOWNLOAD FREE,VPN SERVER DID NOT RESPOND MAC,D'LINK VPN SERVER,D'LINK VPN SERVER ROUTER,D'LINK 850L VPN SERVER,SERVER VPN EINRICHTEN,EXPRESSVPN SERVER,VPN SERVER EUROPE,VPN SERVER EDGEROUTER,VPN SERVER EDGEROUTER X,VPN SERVER EN WINDOWS 10,VPN SERVER EASY,VPN SERVER ESSENTIALS 2016,VPN SERVER EDGEOS,WINDOWS SERVER ESSENTIALS VPN,SERVER VPN FOR WINDOWS,SERVER VPN FREEBOX,SERVER VPN FREE IPHONE,SERVER VPN FOR IPHONE,SERVER VPN FOR ANDROID,SERVER VPN FRANCE,SERVER VPN FREE USA,F-SECURE VPN SERVER 5.20,F-SECURE VPN SERVER,F-SECURE VPN SERVER LOCATIONS,F-SECURE FREEDOME VPN SERVER,SERVER VPN GATE,SERVER VPN GRATIS INDONESIA,SERVER VPN GRATIS TERCEPAT,SERVER VPN GRATIS UNTUK ANDROID,SERVER VPN GRATIS 2018,SERVER VPN GRATIS TERCEPAT PC,SERVER VPN GRATIS TERBAIK,SERVER VPN GRATIS INTERNET,SERVER VPN GRATIS TERCEPAT 2018,SERVER VPN HIDE.ME,SERVER VPN HOSTNAME,SERVER VPN HTTP INJECTOR,VPN SERVER HARDWARE,VPN SERVER HOME,VPN SERVER HOSTING,VPN SERVER HAS REACHED CAPACITY,VPN SERVER HOST,VPN SERVER HONG KONG,VPN SERVER HAWAII,OS X SERVER VPN PORTS,APPLE OS X SERVER VPN,APPLE OS X SERVER VPN PORTS,MAC OS X SERVER VPN ROUTES,MAC OS X SERVER VPN PORTS,SERVER VPN IPHONE,SERVER VPN INDONESIA,SERVER VPN INDIA,VPN ITALY SERVER,SERVER VPN IPSEC,SERVER VPN IOS,SERVER VPN IP,SERVER VPN IPSEC UBUNTU,SERVER VPN IN ROUTER,VPN SERVER IN CHINA,SERVER VPN JEPANG,VPN SERVER JAPAN FREE,VPN SERVER ADDRESS JAPAN,VPN JUMP SERVER,FREE PPTP VPN SERVER JAPAN,VPN SERVER JEPANG APK,VPN SERVER JEPANG GRATIS,VPN SERVER JEPANG ANDROID,VPN SERVER JAVA,SERVER VPN KOREA,SERVER VPN KERIO,SERVER VPN KURULUMU,SERVER VPN KENCANG,VPN SERVER KALI LINUX,VPN SERVER KOREA FREE,VPN SERVER KUBERNETES,VPN SERVER KALI,VPN SERVER KOSTENLOS,VPN SERVER KAUFEN,K-SECURE VPN SERVER,SERVER VPN LINUX,SERVER VPN L2TP,SERVER VPN LIST,SERVER VPN LINUX UBUNTU,SERVER VPN L2TP UBUNTU,SERVER VPN L2TP WINDOWS 7,SERVER VPN LOGS,SERVER VPN LA GI,SERVER VPN LOGIN,VPN SERVER LIST FREE,SERVER VPN MIKROTIK,SERVER VPN MAC,SERVER VPN MAC OS X,SERVER VPN MICROSOFT,SERVER VPN MOBILE,SERVER VPN MOBILE LEGENDS,SERVER VPN MOBILE LEGEND,SERVER VPN MIEN PHI,SERVER VPN ML,SERVER VPN MOBILE LEGEND BOT,SERVER VPN NAS QNAP,SERVER VPN NOOB MOBILE LEGEND,SERVER VPN NO WINDOWS,SERVER VPN NOTEBOOK,VPN SERVER NAME,VPN SERVER NAME OR ADDRESS,VPN SERVER NETFLIX,VPN SERVER NAS SYNOLOGY,VPN SERVER NAS,VPN SERVER NAME OR ADDRESS WINDOWS 10,SERVER VPN OPENVPN,SERVER VPN OPEN SOURCE,SERVER VPN ONLINE,SERVER VPN OPENWRT,VPN SERVER OS X,VPN SERVER ON WINDOWS 10,VPN SERVER ON RASPBERRY PI,VPN SERVER ON UBUNTU,VPN SERVER ON ANDROID,SERVER OF VPN,SERVER VPN PPTP,SERVER VPN PORT,SERVER VPN PC,SERVER VPN PROXY,SERVER VPN PRO,SERVER VPN PURE,SERVER VPN PORTS,SERVER VPN PHILIPPINES,SERVER VPN P2P,PRIVATE SERVER VPN,PRIVATE VPN SERVER LIST,PRIVATE VPN SERVER SETUP,PRIVATE VPN SERVER FREE,PRIVATE VPN SERVER SOFTWARE,PRIVATE VPN SERVER LOCATIONS,PRIVATE VPN SERVER WINDOWS,PRIVATE VPN SERVER CLOUD,PRIVATE VPN SERVER STATUS,PRIVATE VPN SERVER SERVICE,SERVER VPN QNAP,VPN SERVER QNAP NAS,VPN SERVER QATAR,SETUP VPN SERVER QNAP,OPENVPN SERVER QNAP,VPN SERVER QUE ES,VPN SERVER QNAP EINRICHTEN,FREE VPN SERVER QATAR,SYNOLOGY VPN SERVER QUICKCONNECT,FREE VPN SERVER QUORA,SERVER VPN RASPBERRY,SERVER VPN RDS,SERVER VPN RPI,VPN SERVER RUSSIA,VPN SERVER REQUIREMENTS,VPN SERVER REACHED CAPACITY,VPN SERVER RASPBIAN,SERVER VPN SETUP,SERVER VPN SINGAPORE,SERVER VPN SOFTWARE,SERVER VPN SYNOLOGY,SERVER VPN SSH,SERVER VPN SOFTETHER,SERVER VPN SSL,SERVER VPN SOFTWARE FREE,VPN SERVER SOFTWARE FOR WINDOWS,VPN SERVER SOFTWARE WINDOWS 10,SERVER VPN TP-LINK,SERVER VPN TO ANDROID,SERVER VPN TERCEPAT,SERVER VPN TELKOMSEL,SERVER VPN TERBAIK UNTUK MOBILE LEGEND,SERVER VPN TERCEPAT DI DUNIA,SERVER VPN TERMUDAH MOBILE LEGEND,VPN SERVER TEST,VPN SERVER THAILAND FREE,AT&T VPN SERVER ADDRESS,T MOBILE VPN SERVER ADDRESS,AT&T VPN SERVER,T-MOBILE VPN SERVER,AT&T VPN SERVER NAME,SERVER VPN UNTUK PUBG LITE,SERVER VPN UBUNTU,SERVER VPN USA,SERVER VPN US,SERVER VPN UK,SERVER VPN UNTUK MOBILE LEGEND,SERVER VPN UNTUK ML,SERVER VPN UDP 53,VPN SERVER UBUNTU 18.04,VPN SERVER USERNAME AND PASSWORD,CREARE UN SERVER VPN,CREARE UN SERVER VPN WINDOWS 10,CONFIGURARE UN SERVER VPN,CREARE UN SERVER VPN UBUNTU,CREER UN SERVEUR VPN,CREARE UN SERVER VPN A CASA,CREARE UN SERVER VPN PER NAVIGARE,INSTALLARE UN SERVER VPN,CREARE UN SERVER VPN SU WINDOWS 10,CREARE UN SERVER VPN SU WINDOWS 7,SERVER VPN VIETNAM,VPN SERVER VS CLIENT,VPN SERVER VPS,VPN SERVER OR CLIENT,VPN SERVER OR ROUTER,PROXY SERVER VS VPN,VPN SERVER VPN,VPN SERVER VENEZUELA,VPN SERVER VS ROUTER,VPN SERVER VIRTUAL,V SERVER VPN,VPN SERVER ON HYPER V,PROXY SERVER OR VPN,STRATO V-SERVER VPN,SERVER VPN WINDOWS 2008,SERVER VPN WINDOWS 2016,SERVER VPN WINDOWS 8.1,SERVER VPN WINDOWS XP,SERVER VPN WINDOWS 8,SERVER VPN WIN 7,VPN SERVER WIKI,PI ZERO W VPN SERVER,SERVER VPN W DOMU,SERVER VPN XP,VPN SERVER XIAOMI ROUTER,VPN SERVER WINDOWS XP PROFESSIONAL,VPN SERVER WINDOWS XP SETUP,VPN-X SERVER,VPN SERVER XS4ALL,X VPN SERVER,EDGEROUTER X VPN SERVER,ER-X VPN SERVER,X VPN SERVER ADDRESS,X-VPN SERVER LOCATIONS,X-VPN SERVER LIST,X VPN SERVER NAME,SERVER VPN YANG BAGUS BUAT MOBILE LEGEND,SERVER VPN YANG BAGUS,SERVER VPN YANG CEPAT,SERVER VPN YANG PALING CEPAT,SERVER VPN YG BAGUS,SERVER VPN YANG AKTIF,SERVER VPN YOUR FREEDOM,VPN SERVER YEASTAR,VPN SERVER NEW YORK,VPN SERVER HAS REFUSED YOUR LICENSE FILE,VPN SERVER ZYXEL NAS,VPN SERVER ZIGGO,VPN SERVER ZUHAUSE,VPN SERVER ZYXEL,VPN SERVER ZYXEL KEENETIC,VPN SERVER ZIGGO MODEM,VPN SERVER ZIMBABWE,VPN SERVER ZIGGO GO,VPN SERVER ZERTIFIKAT KONNTE NICHT ÜBERPRÜFT WERDEN,SERVER VPN 1 MONTH,SERVER VPN UBUNTU 16.04,VPN SERVER WINDOWS 10 L2TP,VPN SERVER WINDOWS 10 SOFTWARE,VPN SERVER WINDOWS 10 PPTP,VPN SERVER UBUNTU 17.10,VPN-1 SERVER COULD NOT FIND ANY CERTIFICATE TO USE FOR IKE,RASPBERRY PI 1 VPN SERVER,1&1 SERVER VPN,1 MONTH VPN SERVER,SERVER #1 EURO217.VPNBOOK.COM,UK SERVER 1 VPN SETTINGS,VPN-1 SERVER COULD NOT FIND CERTIFICATE TO USE FOR IKE,VPN-1 SERVER CAN'T FIND ANY CERTIFICATE TO USE FOR IKE,1UND1 VPN SERVER,1&1 CLOUD SERVER VPN,SERVER VPN 2016,SERVER VPN 2012,SERVER VPN 2018,VPN SERVER 2008,SERVER 2016 VPN SETUP,SERVER 2012 VPN SETUP,VPN SERVER 2012 R2,VPN SERVER 2008 R2,VPN SERVER 2012 R2 STEP BY STEP,RASPBERRY PI 2 VPN SERVER,DOTA 2 VPN SERVER,ENIGMA 2 VPN SERVER,SUPERHUB 2 VPN SERVER,RASPBERRY PI 2 VPN SERVER PERFORMANCE,RASPBERRY PI 2 VPN SERVER SPEED,2 VPN SERVER HINTEREINANDER,KEENETIC LITE 2 VPN SERVER,SPEEDPORT SMART 2 VPN SERVER,KEENETIC EXTRA 2 VPN SERVER,SERVER VPN 360,SERVER VPN RASPBERRY PI 3,VPN SERVER 30 DAYS,VPN SERVER 3G ROUTER,ALAMAT SERVER VPN 3,ALAMAT SERVER VPN KARTU 3,RASPBERRY PI 3 SERVER VPN,RASPBERRY PI 3 VPN SERVER PERFORMANCE,RASPBERRY PI 3 VPN SERVER SETUP,3 IKE SERVER VPN,RASPI 3 VPN SERVER,RASPBERRY PI 3 VPN SERVER EINRICHTEN,MI ROUTER 3 VPN SERVER,RASPBERRY PI 3 VPN SERVER KURULUMU,RASPBERRY PI 3 VPN SERVER SPEED,RASPBERRY PI 3 VPN SERVER IPSEC,SERVER VPN IPHONE 4,VPN SERVER 4PDA,VPN SERVER 4G,VPN SERVER 443,PACKETIX VPN SERVER 4.0,VPN SERVER PORT 443,PACKETIX VPN SERVER 4.0 HOME EDITION,SOFTETHER VPN SERVER 443 ERROR,FREE VPN SERVER 4,VPN SERVER OVER 4G,EDGEROUTER 4 VPN SERVER,LIVEBOX 4 VPN SERVER,USG PRO 4 VPN SERVER,XIAOMI ROUTER 4 VPN SERVER,SERVER 5.4 VPN,SERVER 5.7.1 VPN,SERVER VPN TCP 53,VPN SERVER UNREACHABLE (-5),MACOS SERVER 5.7.1 VPN,VPN SERVER CENTOS 5,CENTOS 5 VPN SERVER,ZYWALL 5 VPN SERVER,VPN SERVER FRITZBOX 6490,VPN SERVER IPHONE 6,VPN SERVER DEBIAN 6,VPN SERVER ERROR 619,CENTOS 6 VPN SERVER,DSM 6 VPN SERVER,CENTOS 6 VPN SERVER PPTP,SYNOLOGY DSM 6 VPN SERVER,IPHONE 6 VPN SERVER ANTWORTET NICHT,VPN SERVER WINDOWS 7 FREE DOWNLOAD,VPN SERVER WINDOWS 7 MULTIPLE CONNECTIONS,VPN SERVER WINDOWS 7 FREE,VPN SERVER WINDOWS 7 L2TP,VPN SERVER WINDOWS 7 SOFTWARE,VPN SERVER WINDOWS 7 SETUP,WINDOWS 7 SERVER VPN,WIN 7 SERVER VPN,WINDOWS 7 SERVER VPN SETUP,CENTOS 7 VPN SERVER,WINDOWS 7 VPN SERVER L2TP,CENTOS 7 VPN SERVER L2TP,WINDOWS 7 VPN SERVER SOFTWARE,CENTOS 7 VPN SERVER PPTP,WINDOWS 7 VPN SERVER PORT,CENTOS 7 VPN SERVER SETUP,SERVER VPN ERROR 800,VPN SERVER SETUP WINDOWS 8.1,VPN SERVER DEBIAN 8,VPN SERVER PORT 80,VPN SERVER WINDOWS 8.1 PRO,VPN SERVER ERROR 807,WINDOWS SERVER VPN ERROR 800,SERVER 2012 VPN ERROR 800,WINDOWS 8 SERVER VPN,WINDOWS 8 VPN SERVER SETUP,CREATE WINDOWS 8 VPN SERVER,DEBIAN 8 SERVER VPN,WINDOWS 8 VPN SERVER PORT,WINDOWS 8 VPN SERVER EINRICHTEN,WINDOWS 8 VPN SERVER KURULUMU,DEBIAN 9 VPN SERVER VPN,SERVER VPN WINDOWS 10,SERVER VPN GRATUIT,SERVER VPN FREE,SERVER VPN RASPBERRY PI,SERVER VPN ROMANIA,SERVER VPN WINDOWS,SERVER VPN JAPAN,SERVER VPN 2019,SERVER VPN WIN 10,SERVER VPN ACASA,SERVER VPN ANDROID FREE,SERVER VPN ADDRESS,SERVER VPN ASUS,SERVER VPN ARGENTINA,SERVER VPN ARDUINO,SERVER VPN APP,VPN SERVER ADDRESS FREE,VPN SERVER ADDRESS USA,A VPN SERVER ADDRESS,A VPN SERVER,CREATE A SERVER VPN,ACCESS A SERVER VPN,CREATING A VPN SERVER,BUILD A VPN SERVER,CREATE A VPN SERVER AT HOME,SETUP A VPN SERVER AT HOME,CREATE A VPN SERVER UBUNTU,HOST A VPN SERVER,SERVER VPN BRAZIL,SERVER VPN BOT MOBILE LEGEND,SERVER VPN BUAT MOBILE LEGEND,VPN BRAZIL SERVER,VPNBOOK SERVER,SERVER VPN BITDEFENDER,SERVER VPN BANGLADESH,VPN SERVER BEHIND NAT,VPN SERVER BEHIND ROUTER,VPN SERVER BEHIND NAT ROUTER,RASPBERRY PI B+ VPN SERVER,SERVER VPN CISCO,SERVER VPN CHINA,SERVER VPN CENTOS,SERVER VPN CONFIGURATION,SERVER VPN CLIENT,SERVER VPN CLOUD,SERVER VPN.COM,SERVER VPN CHINA FREE,SERVER VPN CENTOS 7,SERVER VPN CHROME,C VPN SERVER,CELL C VPN SERVER,SERVER VPN DOWNLOAD,SERVER VPN DEBIAN,SERVER VPN DD-WRT,VPN SERVER DID NOT RESPOND,VPN SERVER DOCKER,VPN SERVER DIGITALOCEAN,VPN SERVER DID NOT RESPOND IPHONE,VPN SERVER DEBIAN 9,VPN SERVER DOWNLOAD FREE,VPN SERVER DID NOT RESPOND MAC,D'LINK VPN SERVER,D'LINK VPN SERVER ROUTER,D'LINK 850L VPN SERVER,SERVER VPN EINRICHTEN,EXPRESSVPN SERVER,VPN SERVER EUROPE,VPN SERVER EDGEROUTER,VPN SERVER EDGEROUTER X,VPN SERVER EN WINDOWS 10,VPN SERVER EASY,VPN SERVER ESSENTIALS 2016,VPN SERVER EDGEOS,WINDOWS SERVER ESSENTIALS VPN,SERVER VPN FOR WINDOWS,SERVER VPN LINUX VPN SERVER,LINUX VPN CLIENT,LINUX VPN FREE,LINUX VPN SOLUTIONS,LINUX VPN DISTRO,LINUX VPN CONNECT,LINUX VPN REDDIT,LINUX VPN CLIENT CHECKPOINT,LINUX VPN SERVER DEBIAN,LINUX VPN APK,LINUX VPN APK DOWNLOAD,LINUX VPN APP,LINUX VPN APPLIANCE,LINUX VPN AUTO RECONNECT,LINUX VPN ANDROID,LINUX VPN AUTO CONNECT,LINUX VPN ANYCONNECT,LINUX VPN APPLICATION,LINUX AND VPN,CREATE A LINUX VPN SERVER,SETUP A LINUX VPN SERVER,BUILD A LINUX VPN SERVER,CREATE A VPN LINUX,SETUP A VPN LINUX,MAKE A VPN LINUX,CONNECT TO A VPN LINUX,HOW TO MAKE A LINUX VPN SERVER,LINUX VPN BOX,VPNBOOK LINUX,LINUX VPN BRIDGE,LINUX VPN BONDING,LINUX VPN BAIXAR,LINUX VPN BEHIND NAT,LINUX VPN BYPASS,LINUX VPN BEST PRACTICES,LINUX VPN CLIENTS,LINUX VPN COMMAND LINE,LINUX VPN CLIENT COMMAND LINE,LINUX VPN CLIENT IPSEC,LINUX VPN CISCO,VPN C LINUX,LINUX VPN DOWNLOAD,LINUX VPN DISTRIBUTION,LINUX VPN DEBIAN,LINUX VPN DOWNLOAD FREE,LINUX VPN DESCARGAR,LINUX VPN DNS,LINUX VPN DNS RESOLUTION,LINUX VPN DNS LEAK,LINUX VPN DEFAULT GATEWAY,LINUX VPN EINRICHTEN,LINUX VPN ENDPOINT,LINUX VPN EASY,LINUX VPN ETH,LINUX EXPRESS VPN,LINUX EASY VPN SERVER,KALI LINUX EXPRESS VPN,LINUX MINT EXPRESS VPN,VPN EN LINUX MINT,VPN EN LINUX UBUNTU,LINUX VPN FIREWALL,LINUX VPN FOR ANDROID,LINUX VPN FREE DOWNLOAD,LINUX VPN FORTICLIENT,LINUX VPN FOR WINDOWS,LINUX VPN FORTINET,LINUX VPN FREE SERVER,LINUX VPN FOR NETFLIX,LINUX VPN FRITZBOX,F SECURE VPN LINUX,LINUX VPN GATEWAY,LINUX VPN GUI,LINUX VPN GATE,LINUX VPN GITHUB,GLOBALPROTECT VPN FOR LINUX,LINUX VPN GRATUIT,LINUX VPN GRATIS,LINUX VPN GUI CLIENT,LINUX VPN GATEWAY DISTRO,LINUX VPN HOWTO,LINUX VPN HOST,LINUX VPN HOME SERVER,LINUX VPN HOTSPOT,LINUX VPN HIDE IP,LINUX HTTPS VPN,LINUX VPN TUNNEL HOWTO,LINUX VPN SERVER HOW TO,LINUX MINT VPN HOW TO,LINUX VPN PPTP CLIENT HOW TO,LINUX VPN IKEV2,LINUX VPN INSTALL,LINUX VPN IPSEC CLIENT,LINUX VPN IPSEC SERVER,LINUX VPN INDIR,LINUX VPN IMPORT FROM FILE,LINUX VPN INTERFACE,LINUX VPN IPHONE,LINUX INSTALL VPN SERVER,LINUX VPN JUNIPER,LINUX JUNIPER VPN CLIENT,LINUX JOURNAL VPN,ARCH LINUX JUNIPER VPN,LINUX MINT JUNIPER VPN,LINUX CONNECT TO JUNIPER VPN,JYU LINUX VPN,JHU LINUX VPN,LINUX VPN KILL SWITCH,LINUX VPN KERNEL,LINUX VPN KEEP ALIVE,LINUX VPN KEEPS DISCONNECTING,LINUX VPN KURULUMU,LINUX VPN KOSTENLOS,LINUX VPN KERNEL MODULE,LINUX VPN KAPATMA,LINUX VPN KILL SWITCH IPTABLES,LINUX VPN KILL,LINUX VPN LOGS,LINUX VPN L2TP,LINUX VPN LIST,LINUX VPN L2TP CLIENT,LINUX VPN L2TP SERVER,LINUX VPN L2TP IPSEC,LINUX VPN LANCOM,LINUX VPN L2TP UBUNTU,LINUX VPN COMMAND LINE CLIENT,LINUX VPN MANAGER,LINUX VPN MESH,LINUX VPN MTU,LINUX VPN MONITOR,LINUX VPN MESH NETWORK,LINUX VPN MIT FRITZBOX,LINUX VPN METRIC,LINUX VPN MTN,VPN LINUX MINT,LINUX VPN NOT CONNECTING,LINUX VPN NETFLIX,LINUX VPN NO INTERNET,LINUX VPN NETWORK MANAGER,LINUX VPN NAT,LINUX VPN NEW,LINUX VPN NETWORK,NORDVPN LINUX,ARCH LINUX VPN NETWORK MANAGER,LINUX VPN OPEN SOURCE,LINUX VPN OVER SSH,LINUX VPN OS,OPENVPN LINUX,OPENVPN SERVER LINUX,OPENVPN GUI LINUX,OPENVPN LINUX MINT,ARCH LINUX OPENVPN,LINUX VPN PROXY,LINUX VPN PORT FORWARDING,LINUX VPN PROTOCOLS,LINUX VPN PROXY SERVER,LINUX VPN PRE-SHARED KEY,LINUX VPN PPTP CLIENT,LINUX VPN PPTP SERVER,LINUX VPN PLUGIN,LINUX VPN PALO ALTO,LINUX QUICK VPN,LINUX VPN ROUTE ADD,LINUX VPN ROUTER,LINUX VPN ROUTING,LINUX VPN REMOTE ACCESS SERVER,LINUX VPN ROUTER DISTRO,LINUX VPN RASPBERRY PI,LINUX VPN REMOTE DESKTOP,LINUX VPN ROUTING TABLE,LINUX VPN REVIEW,LINUX VPN SERVER UBUNTU,LINUX VPN SERVER CENTOS,LINUX VPN SERVER SETUP,LINUX VPN TUTORIAL,LINUX VPN TERMINAL,LINUX VPN TO WINDOWS,LINUX VPN TO AZURE,LINUX VPN TIMEOUT,LINUX VPN TWO FACTOR AUTHENTICATION,LINUX VPN TO WINDOWS SERVER,LINUX VPN TOR,AT&T VPN LINUX,LINUX VPN UBUNTU,LINUX VPN UNLIMITED,LINUX VPN UK,LINUX VPN USA,LINUX USE VPN,LINUX UBUNTU VPN SERVER,VPN LINUX UBUNTU FREE,LINUX UBUNTU VPN SETUP,LINUX SET UP VPN,LINUX SET UP VPN SERVER,LINUX VPN VERBINDUNG,LINUX VPN VIVO,FRITZBOX VPN LINUX VPNC,VPN VOOR LINUX,LINUX VPN VERBINDUNG HERSTELLEN,LINUX VPN WIREGUARD,LINUX VPN WITH GUI,LINUX VPN WINDOWS,LINUX VPN WINDOWS SERVER,LINUX VPN WATCHGUARD,LINUX VPN WITHOUT ROOT,LINUX VPN WINDOWS CLIENT,LINUX VPN WEB GUI,LINUX VPN WEB INTERFACE,LINUX VPN WITHOUT TUN,VPN W LINUX,LINUX VPN XAUTH,LINUX VPN IPSEC XAUTH PSK,LINUX MINT XFCE VPN,VPN X LINUX,VPN LINUX XFCE,X VPN LINUX,VPN YF LINUX,YOCTO LINUX VPN,LINUX VPN YÜKLEME,KALI LINUX VPN YÜKLEME,VPN YHTEYS LINUX,VPN LINUX Y WINDOWS,ZYXEL LINUX VPN CLIENT,ZYXEL LINUX VPN,ZYWALL LINUX VPN CLIENT,LINUX VPN ZU FRITZBOX,LINUX Z VPN,VPN ZWISCHEN LINUX UND WINDOWS,LINUX MINT 19.1 VPN,VPN LINUX 16.04,VPN LINUX MINT 18,VPN LINUX MINT 19,LINUX MINT 18.3 VPN,LINUX MINT 19 VPN CLIENT,LINUX VPN 2018,LINUX VPN 2FA,KALI LINUX VPN 2018,KALI LINUX VPN 2017,KALI LINUX 2.0 VPN,LINUX 2 VPN CONNECTIONS,BEST LINUX VPN 2018,KALI LINUX VPN 2019,LINUX LAYER 2 VPN,LAYER 2 VPN LINUX,OPERA VPN LINUX 32,VPN 360 LINUX,3CX LINUX VPN,OPERA VPN LINUX 32 BIT,LINUX VPN SERVER CENTOS 6,JUNIPER VPN LINUX 64 BIT,VPN LINUX CENTOS 6,JUNIPER VPN LINUX 64,FORTICLIENT SSL VPN LINUX 64 BIT DOWNLOAD,FORTICLIENT 6 LINUX VPN,LINUX VPN CENTOS 7,ORACLE LINUX 7 VPN,VPN LINUX WINDOWS 7,SCIENTIFIC LINUX 7 VPN,LINUX PPTP VPN CENTOS 7,ORACLE LINUX 7 VPNC,LINUX VPN 9.4.6,LINUX-VPN 9.4.6.APK MOBILE VPN WITH SSL CLIENT,MOBILE VPN WITH SSL,MOBILE VPN FOR UAE,MOBILE VPN WITH SSL WATCHGUARD DOWNLOAD,MOBILE VPN THAT WORKS WITH NETFLIX,MOBILE VPN FOR NETFLIX,MOBILE VPN FREE,MOBILE VPN WITH SSL CLIENT DOWNLOAD,MOBILE VPN DOWNLOAD,MOBILE VPN APPS,MOBILE VPN ANDROID FREE,MOBILE VPN APP FREE,MOBILE VPN ANDROID FREE DOWNLOAD,MOBILE VPN APK,MOBILE VPN ACCESS,MOBILE AS VPN SERVER,WATCHGUARD MOBILE VPN ANDROID,DOES A MOBILE VPN USE DATA,WHAT IS A MOBILE VPN,WHY USE A MOBILE VPN,MOBILE VPN BEST,MOBILE VPN BENEFITS,MOBILE VPN BATTERY,MOBILE VPN BLOCKER,MOBILE VPN BOX,VPN MOBILE BANKING,OPERA MOBILE VPN BROWSER,PUBG MOBILE BEST VPN,MOBILE LEGENDS BEST VPN,B-MOBILE APN,B-MOBILE VPN接続,MOBILE VPN CLIENT,MOBILE VPN CHROME,MOBILE VPN CHINA,MOBILE VPN CHANGER,MOBILE VPN CONNECTION,MOBILE VPN CISCO,MOBILE VPN CRACK,MOBILE VPN CONFIGURATION,MOBILE VPN CHINA FREE,MOBILE VPN CHECKPOINT,MOBILE VPN DOWNLOAD WATCHGUARD,MOBILE VPN DEFINITION,MOBILE VPN DEVICE,MOBILE VPN DUBAI,MOBILE VPN DOESN'T WORK,MOBILE VPN DELIVERING ADVANCED SERVICES IN NEXT GENERATION WIRELESS SYSTEMS PDF,MOBILE VPN DATA COMPRESSION,VPN MOBILE DATA,VPN MOBILE DATA FREE,POINT D'ACCÈS MOBILE VPN,MOBILE EXPRESS VPN,FORTNITE MOBILE VPN ERROR,MOBILE CHROME VPN EXTENSION,MOBIL VPN EKŞI,MOBIL VPN EKLEME,MOBIL VPN EN IYI,MOBILEXPRESSION VPN,FORTNITE MOBILE VPN ERROR FIX,MOBILE VPN FREE INTERNET,MOBILE VPN FOR ANDROID,MOBILE VPN FREE ANDROID,MOBILE VPN FOR CHROME,MOBILE VPN FORTIGATE,F-VPN MOBILE,F-SECURE MOBILE VPN,F-SECURE FREEDOME VPN MOBILE,VPN MOBILE GRATUIT,MOBILE GAMING VPN,WATCHGUARD MOBILE VPN,GOOD MOBILE VPN,VPN GATE MOBILE,GOOGLE MOBILE VPN,GHIBLI MOBILE VPN,MOBILE LEGEND GB VPN,VPN MOBILE GROUP,VPN MOBILE GRATIS,MOBILE VPN HOW IT WORKS,MOBILE VPN HOW TO USE,MOBILE VPN HARDWARE,MOBILE VPN HACK,MOBILE VPN HONG KONG,MOBILE VPN HANDLER,MOBILE HOTSPOT VPN NOT WORKING,MOBILE HOTSPOT VPN WINDOWS 10,MOBILE LEGENDS VPN HACK,MOBILE VPN INDIA,MOBILE VPN IOS,MOBILE VPN IPSEC WATCHGUARD,MOBILE VPN IPHONE,MOBILE VPN IPSEC,MOBILE VPN IPSEC WATCHGUARD DOWNLOAD,MOBILE VPN IPHONE FREE,MOBILE VPN IP,VPN MOBILE INTERNET FREE,BEST MOBILE VPN IOS FREE,MOBILE VPN JAPAN,MOBILE JUMP VPN,VPN MOBILE JAVA,NOKIA MOBILE VPN JAR,VPN MOBILE LEGEND JEPANG,JALANTIKUS VPN MOBILE LEGEND,VPN MOBILE LEGEND JALANTIKUS,VPN JAPAN MOBILE LEGEND,VPN MOBILE LEGENDS,VPN MOBILE KILL SWITCH,WATCHGUARD MOBILE VPN KEEPS DISCONNECTING,MOBILE ME VPN KAISE SET KARE,FORTNITE MOBILE VPN KICK,WATCHGUARD MOBILE VPN KEEP ALIVE,MOBIL VERIDE VPN KULLANMAK,MOBIL VERI VPN KULLANMAK,MOBILE VPN LINE,MOBILE VPN L2TP WATCHGUARD,MOBILE VPN LAPTOP,MOBILE LEGENDS VPN CHEAT,MOBILE LEGENDS VPN TRICK,VPN MOBILE LEGENDS MEANING,VPN MOBILE LEGEND,VPN MOBILE LEGEND APK,VPN MOBILE LEGENDS APK,MOBILE VPN MEANS,MOBILE VPN MARKET,WATCHGUARD MOBILE VPN MAC,MOBILE LEGENDS VPN MEANING,CHECKPOINT MOBILE VPN CLIENT MAC,WATCHGUARD MOBILE VPN MAC DOWNLOAD,MOBILE LEGEND VPN MASTER,MOBILE LEGEND MENGGUNAKAN VPN,VPN MOBILE LEGEND MIKROTIK,VPN MOBILE LEGEND MOD,BUSINESS MOBILE M VPN,MOBILE VPN NETFLIX,MOBILE VPN NOT WORKING,MOBILE VPN NOT CONNECTING,MOBILE VPN NETWORK,MOBILE VPN NUMBER,NETMOTION MOBILITY VPN,MOBILE VPN NET,MOBILE NORD VPN,MOBILE VPN OPERA,MOBILE VPN ONLINE,MOBILE VPN ON ANDROID,MOBILE VPN OPERA BROWSER,MOBILE VPN ON IPHONE,WATCHGUARD MOBILE VPN ON MAC,PUBG MOBILE ON VPN,MOBILE HOTSPOT OVER VPN,VPN ON MOBILE,VPN ON MOBILE DATA,USE OF MOBILE VPN,OPERA ON MOBILE VPN,USES OF MOBILE VPN,MOBILE VPN PASSWORD,MOBILE VPN PHILIPPINES,MOBILE VPN PROVIDERS,MOBILE VPN PFSENSE,MOBILE VPN PROXY,MOBILE VPN PROTOCOL,MOBILE VPN PROFILE,MOBILE VPN PDF,MOBILE VPN PALO ALTO,MOBILE VPN PPTP,BEST MOBILE VPN QUORA,Q MOBILE APN SETTING,VPN MOBILE O QUE SIGNIFICA,MOBILE VPN REDDIT,MOBILE VPN REVIEW,MOBILE VPN ROUTER,MOBILE VPN REDDIT IOS,MOBILE VPN REQUIRED,MOBILE WIFI ROUTER VPN,BEST MOBILE VPN REDDIT,FREE MOBILE VPN REDDIT,MOBILE VPN UPDATE REQUIRED,AVAST MOBILE VPN REVIEW,MOBILE VPN SETTING,MOBILE VPN SSL,MOBILE VPN SSL CLIENT,MOBILE VPN SOLUTIONS,MOBILE VPN SERVICE,MOBILE VPN SOFTWARE,MOBILE VPN SERVER,MOBILE VPN SECURITY,MOBILE VPN SSL WATCHGUARD,BUSINESS MOBILE S VPN,T MOBILE BUSINESS MOBILE S VPN,MOBILE VPN TELEKOM,MOBILE VPN TELKOMSEL,MOBILE VPN THAT WORKS IN CHINA,MOBILE VPN TUNNEL,MOBILE VPN TO PC,MOBILE VPN TECHNOLOGY,MOBILE VPN TUTORIAL,MOBILE VPN TYPE,T MOBILE APN,T MOBILE APN IPHONE,T MOBILE APN CONFIGURATION,T MOBILE APN SETUP,T MOBILE VPN SERVICE,T MOBILE VPN ISSUES,T MOBILE VPN SERVER ADDRESS,T MOBILE VPN,MOBILE VPN UK,MOBILE VPN USES,MOBILE VPN USE,MOBILE VPN UAE,MOBILE VPN UNIBAS,MOBILE VPN USA,MOBILE VPN UNSUCCESSFUL,MOBILE VPN US,U MOBILE VPN,U MOBILE VPN UNLIMITED,U MOBILE UNLIMITED VPN APK,APN U MOBILE 4G,U MOBILE IPHONE VPN,U MOBILE FREE VPN,U MOBILE UNLIMITED INTERNET VPN,VPN U MOBILE MALAYSIA,VECTONE MOBILE VPN,MOBILE VPN FREE VPN SERVER,MOBILE VPN FREE VPN,VPN MOBILE VIKINGS,VPN MOBILE VODAFONE,MOBIL VERI VPN,MOBIL VERI VPN DEĞIŞTIRME,MOBIL VERI VPN BAĞLANMIYOR,VPN V MOBILE,MOBILE VPN WITH SSL CLIENT ANDROID,MOBILE VPN WIKI,MOBILE VPN WATCHGUARD ANDROID,MOBILE VPN WITH SSL CLIENT FREE DOWNLOAD,MOBILE VPN WITH SSL CLIENT SOFTWARE DOWNLOAD,WINDOWS MOBILE VPN,WINDOWS MOBILE VPN FREE,WINDOWS 10 MOBILE VPN,WINDOWS MOBILE 6.5 VPN,WINDOWS MOBILE 6.5 VPN CLIENT,WINDOWS 10 MOBILE VPN CLIENT,WINDOWS MOBILE 6.5 VPN SETUP,WINDOWS 10 MOBILE VPN FREE,WINDOWS MOBILE VPN CLIENT,WINDOWS MOBILE VPN APP,MOBILE X VPN,XFINITY MOBILE VPN,XFINITY MOBILE APN SETTINGS,WATCHGUARD MOBILE VPN WINDOWS XP,BUSINESS MOBILE XL VPN,X VPN MOBILE,VPN MOBILE LEGEND YANG TIDAK LAG,VPN MOBILE LEGEND YANG BAGUS,FREE MOBILE YOUTUBE VPN ANDROID,Y MOBILE VPN,VPN YEMEN MOBILE,VPN YOUTUBE MOBILE,YEMEN MOBILE APN SETTING,YAHOO MOBILE VPN,VPN MOBILE LEGEND YG BAGUS,Y MOBILE VPN設定,MOBILE ZONE VPN,MOBILE IP VPN ZUSATZVERTRÄGE,T MOBILE VPN ZA SVE M,T MOBILE VPN ZA SVE L,Z MOBILE VPN,ZSCALER MOBILE VPN,ZYXEL MOBILE VPN,ZENMATE MOBILE VPN,WINDOWS MOBILE 10 VPN,MOBILE HOTSPOT WINDOWS 10 VPN,WATCHGUARD MOBILE VPN 10.22,WATCHGUARD MOBILE VPN 12,WATCHGUARD MOBILE VPN 12 DOWNLOAD,WATCHGUARD MOBILE VPN 11.12.4,WATCHGUARD MOBILE VPN 10.22 BUILD 15 DOWNLOAD,WATCHGUARD MOBILE VPN 12.2,MOBILE VPN WITH SSL 12.0 FOR WINDOWS,VPN 1 MOBILE,MOBILE LEGENDS VPN 2018,MOBILE VPN 2018,MOBILE LEGEND VPN 2018,BEST MOBILE VPN 2018,BEST MOBILE VPN 2019,WATCHGUARD MOBILE VPN 2FA,MOBILE LEGEND VPN 2019,BEST FREE MOBILE VPN 2018,VPN MOBILE LEGEND 2018 APK,PUBG MOBILE LITE VPN 2019,3 MOBILE APN,THREE MOBILE VPN,VPN MOBILE 4G,WATCHGUARD MOBILE VPN 5.31,TOP 5 MOBILE VPN,WINDOWS MOBILE 6.1 VPN,WINDOWS MOBILE 6 VPN CLIENT,WINDOWS MOBILE 6.1 VPN CLIENT,MOBILE VPN WATCHGUARD WINDOWS 7,WINDOWS 10 MOBILE VPN 789,CHECKPOINT MOBILE VPN WINDOWS 7,CHECKPOINT MOBILE VPN CLIENT 80.80,WINDOWS 10 MOBILE VPN 809,9 MOBILE VPN,MOBILE9 FREE VPN
0 notes
Text
Docker Update Ubuntu


Docker Ubuntu Change Timezone
Docker-compose Update Ubuntu
Update: 2018-09-10 The reason for choosing ufw-user-forward, not ufw-user-input using ufw-user-input. Pro: Easy to use and understand, supports older versions of Ubuntu. For example, to allow the public to visit a published port whose container port is 8080, use the command. Docker containers are designed to be ephemeral. To update an existing container, you remove the old one and start a new one. Thus the process that you are following is the correct one. You can simplify the commands to the following ones: docker-compose up -force-recreate -build -d docker image prune -f.
-->
You can configure automatic log upload for continuous reports in Cloud App Security using a Docker on an on-premises Ubuntu, Red Hat Enterprise Linux (RHEL), or CentOS server.
Prerequisites
OS:
Ubuntu 14.04, 16.04, and 18.04
RHEL 7.2 or higher
CentOS 7.2 or higher
Disk space: 250 GB
CPU: 2
RAM: 4 GB
Set your firewall as described in Network requirements
Note
If you have an existing log collector and want to remove it before deploying it again, or if you simply want to remove it, run the following commands:
Log collector performance
The Log collector can successfully handle log capacity of up to 50 GB per hour. The main bottlenecks in the log collection process are:
Network bandwidth - Your network bandwidth determines the log upload speed.
I/O performance of the virtual machine - Determines the speed at which logs are written to the log collector's disk. The log collector has a built-in safety mechanism that monitors the rate at which logs arrive and compares it to the upload rate. In cases of congestion, the log collector starts to drop log files. If your setup typically exceeds 50 GB per hour, it's recommended that you split the traffic between multiple log collectors.
Set up and configuration
Step 1 – Web portal configuration: Define data sources and link them to a log collector
Go to the Automatic log upload settings page.
In the Cloud App Security portal, click the settings icon followed by Log collectors.
For each firewall or proxy from which you want to upload logs, create a matching data source.
Click Add data source.
Name your proxy or firewall.
Select the appliance from the Source list. If you select Custom log format to work with a network appliance that isn't listed, see Working with the custom log parser for configuration instructions.
Compare your log with the sample of the expected log format. If your log file format doesn't match this sample, you should add your data source as Other.
Set the Receiver type to either FTP, FTPS, Syslog – UDP, or Syslog – TCP, or Syslog – TLS.
Note
Integrating with secure transfer protocols (FTPS and Syslog – TLS) often requires additional settings or your firewall/proxy.
f. Repeat this process for each firewall and proxy whose logs can be used to detect traffic on your network. It's recommended to set up a dedicated data source per network device to enable you to:
Monitor the status of each device separately, for investigation purposes.
Explore Shadow IT Discovery per device, if each device is used by a different user segment.
Go to the Log collectors tab at the top.
Click Add log collector.
Give the log collector a name.
Enter the Host IP address of the machine you'll use to deploy the Docker. The host IP address can be replaced with the machine name, if there is a DNS server (or equivalent) that will resolve the host name.
Select all Data sources that you want to connect to the collector, and click Update to save the configuration.
Further deployment information will appear. Copy the run command from the dialog. You can use the copy to clipboard icon.
Export the expected data source configuration. This configuration describes how you should set the log export in your appliances.
Note
A single Log collector can handle multiple data sources.
Copy the contents of the screen because you will need the information when you configure the Log Collector to communicate with Cloud App Security. If you selected Syslog, this information will include information about which port the Syslog listener is listening on.
For users sending log data via FTP for the first time, we recommend changing the password for the FTP user. For more information, see Changing the FTP password.
Step 2 – On-premises deployment of your machine
The following steps describe the deployment in Ubuntu.
Note
The deployment steps for other supported platforms may be slightly different.
Open a terminal on your Ubuntu machine.
Change to root privileges using the command: sudo -i
To bypass a proxy in your network, run the following two commands:
If you accept the software license terms, uninstall old versions and install Docker CE by running the commands appropriate for your environment:
Remove old versions of Docker: yum erase docker docker-engine docker.io
Install Docker engine prerequisites: yum install -y yum-utils
Add Docker repository:
Install Docker engine: yum -y install docker-ce
Start Docker
Test Docker installation: docker run hello-world
Remove old versions of Docker: yum erase docker docker-engine docker.io
Install Docker engine prerequisites:
Add Docker repository:
Install dependencies:
Install Docker engine: sudo yum install docker-ce
Start Docker
Test Docker installation: docker run hello-world
Remove the container-tools module: yum module remove container-tools
Add the Docker CE repository: yum-config-manager --add-repo https://download.docker.com/linux/centos/docker-ce.repo
Modify the yum repo file to use CentOS 8/RHEL 8 packages: sed -i s/7/8/g /etc/yum.repos.d/docker-ce.repo
Install Docker CE: yum install docker-ce
Start Docker
Test Docker installation: docker run hello-world
Remove old versions of Docker: apt-get remove docker docker-engine docker.io
If you are installing on Ubuntu 14.04, install the linux-image-extra package.
Install Docker engine prerequisites:
Verify that the apt-key fingerprint UID is [email protected]: apt-key fingerprint | grep uid
Install Docker engine:
Test Docker installation: docker run hello-world
Deploy the collector image on the hosting machine by importing the collector configuration. Import the configuration by copying the run command generated in the portal. If you need to configure a proxy, add the proxy IP address and port number. For example, if your proxy details are 192.168.10.1:8080, your updated run command is:
Verify that the collector is running properly with the following command: docker logs <collector_name>
You should see the message: Finished successfully!
Step 3 - On-premises configuration of your network appliances
Configure your network firewalls and proxies to periodically export logs to the dedicated Syslog port or the FTP directory according to the directions in the dialog. For example:
Step 4 - Verify the successful deployment in the Cloud App Security portal


Check the collector status in the Log collector table and make sure the status is Connected. If it's Created, it's possible the log collector connection and parsing haven't completed.
You can also go to the Governance log and verify that logs are being periodically uploaded to the portal.
Alternatively, you can check the log collector status from within the docker container using the following commands:
Log in to the container by using this command: docker exec -it <Container Name> bash
Verify the log collector status using this command: collector_status -p
If you have problems during deployment, see Troubleshooting Cloud Discovery.
Optional - Create custom continuous reports
Verify that the logs are being uploaded to Cloud App Security and that reports are generated. After verification, create custom reports. You can create custom discovery reports based on Azure Active Directory user groups. For example, if you want to see the cloud use of your marketing department, import the marketing group using the import user group feature. Then create a custom report for this group. You can also customize a report based on IP address tag or IP address ranges.
Docker Ubuntu Change Timezone
In the Cloud App Security portal, under the Settings cog, select Cloud Discovery settings, and then select Continuous reports.
Click the Create report button and fill in the fields.
Under the Filters you can filter the data by data source, by imported user group, or by IP address tags and ranges.
Next steps
Docker-compose Update Ubuntu
If you run into any problems, we're here to help. To get assistance or support for your product issue, please open a support ticket.
0 notes
Text
The Elastic stack (ELK) is made up of 3 open source components that work together to realize logs collection, analysis, and visualization. The 3 main components are: Elasticsearch – which is the core of the Elastic software. This is a search and analytics engine. Its task in the Elastic stack is to store incoming logs from Logstash and offer the ability to search the logs in real-time Logstash – It is used to collect data, transform logs incoming from multiple sources simultaneously, and sends them to storage. Kibana – This is a graphical tool that offers data visualization. In the Elastic stack, it is used to generate charts and graphs to make sense of the raw data in your database. The Elastic stack can as well be used with Beats. These are lightweight data shippers that allow multiple data sources/indices, and send them to Elasticsearch or Logstash. There are several Beats, each with a distinct role. Filebeat – Its purpose is to forward files and centralize logs usually in either .log or .json format. Metricbeat – It collects metrics from systems and services including CPU, memory usage, and load, as well as other data statistics from network data and process data, before being shipped to either Logstash or Elasticsearch directly. Packetbeat – It supports a collection of network protocols from the application and lower-level protocols, databases, and key-value stores, including HTTP, DNS, Flows, DHCPv4, MySQL, and TLS. It helps identify suspicious network activities. Auditbeat – It is used to collect Linux audit framework data and monitor file integrity, before being shipped to either Logstash or Elasticsearch directly. Heartbeat – It is used for active probing to determine whether services are available. This guide offers a deep illustration of how to run the Elastic stack (ELK) on Docker Containers using Docker Compose. Setup Requirements. For this guide, you need the following. Memory – 1.5 GB and above Docker Engine – version 18.06.0 or newer Docker Compose – version 1.26.0 or newer Install the required packages below: ## On Debian/Ubuntu sudo apt update && sudo apt upgrade sudo apt install curl vim git ## On RHEL/CentOS/RockyLinux 8 sudo yum -y update sudo yum -y install curl vim git ## On Fedora sudo dnf update sudo dnf -y install curl vim git Step 1 – Install Docker and Docker Compose Use the dedicated guide below to install the Docker Engine on your system. How To Install Docker CE on Linux Systems Add your system user to the docker group. sudo usermod -aG docker $USER newgrp docker Start and enable the Docker service. sudo systemctl start docker && sudo systemctl enable docker Now proceed and install Docker Compose with the aid of the below guide: How To Install Docker Compose on Linux Step 2 – Provision the Elastic stack (ELK) Containers. We will begin by cloning the file from Github as below git clone https://github.com/deviantony/docker-elk.git cd docker-elk Open the deployment file for editing: vim docker-compose.yml The Elastic stack deployment file consists of 3 main parts. Elasticsearch – with ports: 9200: Elasticsearch HTTP 9300: Elasticsearch TCP transport Logstash – with ports: 5044: Logstash Beats input 5000: Logstash TCP input 9600: Logstash monitoring API Kibana – with port 5601 In the opened file, you can make the below adjustments: Configure Elasticsearch The configuration file for Elasticsearch is stored in the elasticsearch/config/elasticsearch.yml file. So you can configure the environment by setting the cluster name, network host, and licensing as below elasticsearch: environment: cluster.name: my-cluster xpack.license.self_generated.type: basic To disable paid features, you need to change the xpack.license.self_generated.type setting from trial(the self-generated license gives access only to all the features of an x-pack for 30 days) to basic.
Configure Kibana The configuration file is stored in the kibana/config/kibana.yml file. Here you can specify the environment variables as below. kibana: environment: SERVER_NAME: kibana.example.com JVM tuning Normally, both Elasticsearch and Logstash start with 1/4 of the total host memory allocated to the JVM Heap Size. You can adjust the memory by setting the below options. For Logstash(An example with increased memory to 1GB) logstash: environment: LS_JAVA_OPTS: -Xm1g -Xms1g For Elasticsearch(An example with increased memory to 1GB) elasticsearch: environment: ES_JAVA_OPTS: -Xm1g -Xms1g Configure the Usernames and Passwords. To configure the usernames, passwords, and version, edit the .env file. vim .env Make desired changes for the version, usernames, and passwords. ELASTIC_VERSION= ## Passwords for stack users # # User 'elastic' (built-in) # # Superuser role, full access to cluster management and data indices. # https://www.elastic.co/guide/en/elasticsearch/reference/current/built-in-users.html ELASTIC_PASSWORD='StrongPassw0rd1' # User 'logstash_internal' (custom) # # The user Logstash uses to connect and send data to Elasticsearch. # https://www.elastic.co/guide/en/logstash/current/ls-security.html LOGSTASH_INTERNAL_PASSWORD='StrongPassw0rd1' # User 'kibana_system' (built-in) # # The user Kibana uses to connect and communicate with Elasticsearch. # https://www.elastic.co/guide/en/elasticsearch/reference/current/built-in-users.html KIBANA_SYSTEM_PASSWORD='StrongPassw0rd1' Source environment: source .env Step 3 – Configure Persistent Volumes. For the Elastic stack to persist data, we need to map the volumes correctly. In the YAML file, we have several volumes to be mapped. In this guide, I will configure a secondary disk attached to my device. Identify the disk. $ lsblk NAME MAJ:MIN RM SIZE RO TYPE MOUNTPOINT sda 8:0 0 40G 0 disk ├─sda1 8:1 0 1G 0 part /boot └─sda2 8:2 0 39G 0 part ├─rl-root 253:0 0 35G 0 lvm / └─rl-swap 253:1 0 4G 0 lvm [SWAP] sdb 8:16 0 10G 0 disk └─sdb1 8:17 0 10G 0 part Format the disk and create an XFS file system to it. sudo parted --script /dev/sdb "mklabel gpt" sudo parted --script /dev/sdb "mkpart primary 0% 100%" sudo mkfs.xfs /dev/sdb1 Mount the disk to your desired path. sudo mkdir /mnt/datastore sudo mount /dev/sdb1 /mnt/datastore Verify if the disk has been mounted. $ sudo mount | grep /dev/sdb1 /dev/sdb1 on /mnt/datastore type xfs (rw,relatime,seclabel,attr2,inode64,logbufs=8,logbsize=32k,noquota) Create the persistent volumes in the disk. sudo mkdir /mnt/datastore/setup sudo mkdir /mnt/datastore/elasticsearch Set the right permissions. sudo chmod 775 -R /mnt/datastore sudo chown -R $USER:docker /mnt/datastore On Rhel-based systems, configure SELinux as below. sudo setenforce 0 sudo sed -i 's/^SELINUX=.*/SELINUX=permissive/g' /etc/selinux/config Create the external volumes: For Elasticsearch docker volume create --driver local \ --opt type=none \ --opt device=/mnt/datastore/elasticsearch \ --opt o=bind elasticsearch For setup docker volume create --driver local \ --opt type=none \ --opt device=/mnt/datastore/setup \ --opt o=bind setup Verify if the volumes have been created. $ docker volume list DRIVER VOLUME NAME local elasticsearch local setup View more details about the volume. $ docker volume inspect setup [ "CreatedAt": "2022-05-06T13:19:33Z", "Driver": "local", "Labels": , "Mountpoint": "/var/lib/docker/volumes/setup/_data", "Name": "setup", "Options": "device": "/mnt/datastore/setup", "o": "bind", "type": "none" , "Scope": "local" ] Go back to the YAML file and add these lines at the end of the file.
$ vim docker-compose.yml ....... volumes: setup: external: true elasticsearch: external: true Now you should have the YAML file with changes made in the below areas: Step 4 – Bringing up the Elastic stack After the desired changes have been made, bring up the Elastic stack with the command: docker-compose up -d Execution output: [+] Building 6.4s (12/17) => [docker-elk_setup internal] load build definition from Dockerfile 0.3s => => transferring dockerfile: 389B 0.0s => [docker-elk_setup internal] load .dockerignore 0.5s => => transferring context: 250B 0.0s => [docker-elk_logstash internal] load build definition from Dockerfile 0.6s => => transferring dockerfile: 312B 0.0s => [docker-elk_elasticsearch internal] load build definition from Dockerfile 0.6s => => transferring dockerfile: 324B 0.0s => [docker-elk_logstash internal] load .dockerignore 0.7s => => transferring context: 188B ........ Once complete, check if the containers are running: $ docker ps CONTAINER ID IMAGE COMMAND CREATED STATUS PORTS NAMES 096ddc76c6b9 docker-elk_logstash "/usr/local/bin/dock…" 9 seconds ago Up 5 seconds 0.0.0.0:5000->5000/tcp, :::5000->5000/tcp, 0.0.0.0:5044->5044/tcp, :::5044->5044/tcp, 0.0.0.0:9600->9600/tcp, 0.0.0.0:5000->5000/udp, :::9600->9600/tcp, :::5000->5000/udp docker-elk-logstash-1 ec3aab33a213 docker-elk_kibana "/bin/tini -- /usr/l…" 9 seconds ago Up 5 seconds 0.0.0.0:5601->5601/tcp, :::5601->5601/tcp docker-elk-kibana-1 b365f809d9f8 docker-elk_setup "/entrypoint.sh" 10 seconds ago Up 7 seconds 9200/tcp, 9300/tcp docker-elk-setup-1 45f6ba48a89f docker-elk_elasticsearch "/bin/tini -- /usr/l…" 10 seconds ago Up 7 seconds 0.0.0.0:9200->9200/tcp, :::9200->9200/tcp, 0.0.0.0:9300->9300/tcp, :::9300->9300/tcp docker-elk-elasticsearch-1 Verify if Elastic search is running: $ curl http://localhost:9200 -u elastic:StrongPassw0rd1 "name" : "45f6ba48a89f", "cluster_name" : "my-cluster", "cluster_uuid" : "hGyChEAVQD682yVAx--iEQ", "version" : "number" : "8.1.3", "build_flavor" : "default", "build_type" : "docker", "build_hash" : "39afaa3c0fe7db4869a161985e240bd7182d7a07", "build_date" : "2022-04-19T08:13:25.444693396Z", "build_snapshot" : false, "lucene_version" : "9.0.0", "minimum_wire_compatibility_version" : "7.17.0", "minimum_index_compatibility_version" : "7.0.0" , "tagline" : "You Know, for Search"
Step 5 – Access the Kibana Dashboard. At this point, you can proceed and access the Kibana dashboard running on port 5601. But first, allow the required ports through the firewall. ##For Firewalld sudo firewall-cmd --add-port=5601/tcp --permanent sudo firewall-cmd --add-port=5044/tcp --permanent sudo firewall-cmd --reload ##For UFW sudo ufw allow 5601/tcp sudo ufw allow 5044/tcp Now proceed and access the Kibana dashboard with the URL http://IP_Address:5601 or http://Domain_name:5601. Login using the credentials set for the Elasticsearch user: Username: elastic Password: StrongPassw0rd1 On successful authentication, you should see the dashboard. Now to prove that the ELK stack is running as desired. We will inject some data/log entries. Logstash here allows us to send content via TCP as below. # Using BSD netcat (Debian, Ubuntu, MacOS system, ...) cat /path/to/logfile.log | nc -q0 localhost 5000 For example: cat /var/log/syslog | nc -q0 localhost 5000 Once the logs have been loaded, proceed and view them under the Observability tab. That is it! You have your Elastic stack (ELK) running perfectly. Step 6 – Cleanup In case you completely want to remove the Elastic stack (ELK) and all the persistent data, use the command: $ docker-compose down -v [+] Running 5/4 ⠿ Container docker-elk-kibana-1 Removed 10.5s ⠿ Container docker-elk-setup-1 Removed 0.1s ⠿ Container docker-elk-logstash-1 Removed 9.9s ⠿ Container docker-elk-elasticsearch-1 Removed 3.0s ⠿ Network docker-elk_elk Removed 0.1s Closing Thoughts. We have successfully walked through how to run Elastic stack (ELK) on Docker Containers using Docker Compose. Futhermore, we have learned how to create an external persistent volume for Docker containers. I hope this was significant.
0 notes
Text
An SSO(Single Sign-On) is a system that allows access to multiple independent, software systems using the same credentials. This simply means that with a single authentication, you can log into several services without providing a password. SSO systems are popular nowadays with Google, Facebook e.t.c using it. Today, there are many SSO servers, they include OneLogin, okta e.t.c Keycloak is an open-source SSO provider that supports multiple protocols such as OpenID Connect and SAML 2.0. This Identity and Access Management System allows one to easily add authentication to an application and secure it. You can easily enable social login or use an existing Active Directory/LDAP. Keycloak is a very extensible and highly configurable tool that offers the following features: User Federation – It allows one to sync users from Active Directory and LDAP servers. Kerberos bridge – It can be used to automatically authenticate the users logged in to the Kerberos server. Theme support – Customize its interface to integrate with your applications as desired. Two-factor Authentication Support – It offers support for HOTP/TOTP via Google Authenticator or FreeOTP. Social Login – You can enable login with GitHub, Google, Facebook, Twitter and other social networks. It offers Single-Sign-On and Single-Sign-Out for browser applications. Identity Brokering – it allows one to authenticate with external SAML or Open ID identity providers. Session management – the admins can view and manage the user sessions. Client adapters for JavaScript applications, JBoss EAP, WildFly, Fuse, Jetty, Tomcat, Spring, etc. Below is an illustration of the Keycloak Architecture. This guide offers the required knowledge on how to run Keycloak Server in Docker Containers with Let’s Encrypt SSL. Getting Started. We will begin by installing the required packages for this setup. ## On Debian/Ubuntu sudo apt update && sudo apt upgrade sudo apt install curl vim git ## On RHEL/CentOS/RockyLinux 8 sudo yum -y update sudo yum -y install curl vim git ## On Fedora sudo dnf update sudo dnf -y install curl vim git Step 1 – Install Docker and Docker-Compose on Linux This guide requires one to have docker and docker-compose installed. Below is a dedicated guide to help you install Docker on Linux. How To Install Docker CE on Linux Systems Verify the installation as below: $ docker -v Docker version 20.10.14, build a224086 Add your system user to the docker group. sudo usermod -aG docker $USER newgrp docker Start and enable the docker service on your system. sudo systemctl start docker && sudo systemctl enable docker Step 2 – Create the Database Container. It is important to have a database when deploying the Keycloak Server Container. In this guide, we will run the PostgreSQL database container. Create a network for Keycloak. docker network create keycloak-network Run PostgreSQL in the pod. docker run --name db \ --net keycloak-network \ -e POSTGRES_USER=admin \ -e POSTGRES_PASSWORD=Passw0rd \ -e POSTGRES_DB=keycloakdb \ -d docker.io/library/postgres:latest View the container. $ docker ps CONTAINER ID IMAGE COMMAND CREATED STATUS PORTS NAMES 479b1599d5a0 postgres:latest "docker-entrypoint.s…" 12 seconds ago Up 10 seconds 5432/tcp db Step 3 – Provisioning the Keycloak Server Container. This guide provides two methods on how you can provision the Keycloak Server Container. These are: Building your optimized Keycloak docker image Using ready Keycloak docker image 1. Building your optimized Keycloak docker image You can build your own Keycloak image with token exchange feature, health and metrics endpoints enabled, and uses the PostgreSQL database from the below Dockerfile. vim Dockerfile Add the below lines to the file FROM quay.io/keycloak/keycloak:latest as builder ENV KC_HEALTH_ENABLED=true ENV KC_METRICS_ENABLED=true
ENV KC_FEATURES=token-exchange ENV KC_DB=postgres # Install custom providers RUN curl -sL https://github.com/aerogear/keycloak-metrics-spi/releases/download/2.5.3/keycloak-metrics-spi-2.5.3.jar -o /opt/keycloak/providers/keycloak-metrics-spi-2.5.3.jar RUN /opt/keycloak/bin/kc.sh build FROM quay.io/keycloak/keycloak:latest COPY --from=builder /opt/keycloak/ /opt/keycloak/ WORKDIR /opt/keycloak # For demonstration purposes only, please make sure to use proper certificates in production instead RUN keytool -genkeypair -storepass password -storetype PKCS12 -keyalg RSA -keysize 2048 -dname "CN=server" -alias server -ext "SAN:c=DNS:localhost,IP:127.0.0.1" -keystore conf/server.keystore # Change these values to point to a running postgres instance ENV KC_DB_URL=jdbc:postgresql://db/keycloakdb ENV KC_DB_USERNAME=admin ENV KC_DB_PASSWORD=Passw0rd ENV KC_HOSTNAME=localhost ENTRYPOINT ["/opt/keycloak/bin/kc.sh", "start"] Remember to replace the database credentials and the IP address in the DB_URL appropriately before we proceed to build the image. docker build . -t keycloak_image Once the image has been built, view it: $ docker images REPOSITORY TAG IMAGE ID CREATED SIZE keycloak_image latest c7e3a15f28de 5 seconds ago 754MB faf55943f0f2 13 seconds ago 734MB quay.io/keycloak/keycloak latest a669b057e631 36 hours ago 562MB postgres latest 74b0c105737a 44 hours ago 376MB Now run Keycloak in the created pod using the optimized image. In production mode (with secure defaults) docker run --name keycloak --net keycloak-network -p 8443:8443 -e KEYCLOAK_ADMIN=myadmin -e KEYCLOAK_ADMIN_PASSWORD=StrongPassw0rd -d keycloak_image The container will be created as below: $ docker ps CONTAINER ID IMAGE COMMAND CREATED STATUS PORTS NAMES 78eb8a3e6ecc keycloak_image "/opt/keycloak/bin/k…" 4 seconds ago Up 3 seconds 8080/tcp, 0.0.0.0:8443->8443/tcp, :::8443->8443/tcp keycloak f6f538e7c097 postgres:latest "docker-entrypoint.s…" 2 minutes ago Up 2 minutes 0.0.0.0:5432->5432/tcp, :::5432->5432/tcp db Once complete, the container should be accessible on port 8443 can be accessed using the URL https://IP_address:8443 The health checkpoints are: https://localhost:8443/health https://localhost:8443/health/ready https://localhost:8443/health/live Metrics are available at: https://localhost:8443/metrics 2. Using ready Keycloak docker image You can also use the ready Keycloak docker image. The command below shows how you can run a standard Keycloak image. docker run -d \ --net keycloak-network \ --name keycloak \ -e KEYCLOAK_USER=myadmin \ -e KEYCLOAK_PASSWORD=StrongPassw0rd \ -p 8080:8080 \ -p 8443:8443 \ -e KEYCLOAK_DB=postgres \ -e KEYCLOAK_FEATURES=token-exchange \ -e KEYCLOAK_DB_URL=jdbc:postgresql://db/keycloakdb \ -e KEYCLOAK_DB_USERNAME=admin \ -e KEYCLOAK_DB_PASSWORD=Passw0rd \ jboss/keycloak Remember to replace the database and Keycloak admin user credentials. Check the status of the container. $ docker ps CONTAINER ID IMAGE COMMAND CREATED STATUS PORTS NAMES a910a9eaa5e1 jboss/keycloak "/opt/jboss/tools/do…" 5 seconds ago Up 4 seconds 0.0.0.0:8080->8080/tcp, :::8080->8080/tcp, 0.0.0.0:8443->8443/tcp, :::8443->8443/tcp keycloak 8f5e593eb517 postgres:latest "docker-entrypoint.s…" About an hour ago Up About an hour 5432/tcp db Step 4 – Access and Use Keycloak Server Access Keycloak using the URL https://IP_address:8443 Proceed to the admin console and log in using the created user.
With the correct user credentials provided, you will be authenticated to the dashboard below. We already have a Realm created, we will proceed and add a new client in the Clients tab. Provide the details for the client. Provide the URL path of your application under “Valid redirect URL“. You can also create a new user in the user tab. Proceed to the Credentials tab and set the password for the user. Assign roles to the created user in the roles tab That was a brief demonstration on how to get started with Keycloak. Step 5 – Secure Keycloak with Let’s Encrypt SSL It is necessary to secure your Keycloak server with SSL certificates to prevent the credentials from traveling along the unprotected wire. In this guide, we will use Let’s Encrypt to issue free trusted SSL certificates for our domain name. First, install and configure a reverse proxy with Nginx. ##On RHEL 8/CentOS/Rocky Linux 8/Fedora sudo dnf install https://dl.fedoraproject.org/pub/epel/epel-release-latest-8.noarch.rpm sudo yum install nginx certbot python3-certbot-nginx ##On Debian/Ubuntu sudo apt install nginx certbot python3-certbot-nginx Proceed and create a Virtual Host file. sudo vim /etc/nginx/conf.d/keycloak.conf The file will contain the below lines. server listen 80; server_name keycloak.example.com; client_max_body_size 25m; location / proxy_pass https://localhost:8443/; proxy_set_header Host $http_host; proxy_set_header X-Real-IP $remote_addr; proxy_set_header X-Forwarded-Proto $scheme; error_page 404 /404.html; location = /40x.html error_page 500 502 503 504 /50x.html; location = /50x.html Save the file restart and enable Nginx sudo systemctl restart nginx sudo systemctl enable nginx Proceed and generate SSL certificates for the domain name with the command: sudo certbot --nginx Proceed as below. Saving debug log to /var/log/letsencrypt/letsencrypt.log Enter email address (used for urgent renewal and security notices) (Enter 'c' to cancel): Enter a valid Email address here - - - - - - - - - - - - - - - - - - - - - - - - - - - - - - - - - - - - - - - - Please read the Terms of Service at https://letsencrypt.org/documents/LE-SA-v1.2-November-15-2017.pdf. You must agree in order to register with the ACME server. Do you agree? - - - - - - - - - - - - - - - - - - - - - - - - - - - - - - - - - - - - - - - - (Y)es/(N)o: y - - - - - - - - - - - - - - - - - - - - - - - - - - - - - - - - - - - - - - - - Would you be willing, once your first certificate is successfully issued, to share your email address with the Electronic Frontier Foundation, a founding partner of the Let's Encrypt project and the non-profit organization that develops Certbot? We'd like to send you email about our work encrypting the web, EFF news, campaigns, and ways to support digital freedom. - - - - - - - - - - - - - - - - - - - - - - - - - - - - - - - - - - - - - - - - (Y)es/(N)o: y Account registered. Which names would you like to activate HTTPS for? - - - - - - - - - - - - - - - - - - - - - - - - - - - - - - - - - - - - - - - - 1: keycloak.example.com - - - - - - - - - - - - - - - - - - - - - - - - - - - - - - - - - - - - - - - - Select the appropriate numbers separated by commas and/or spaces, or leave input blank to select all options shown (Enter 'c' to cancel): 1 Requesting a certificate for keycloak.example.com Performing the following challenges: http-01 challenge for keycloak.example.com Waiting for verification... Cleaning up challenges Deploying Certificate to VirtualHost /etc/nginx/conf.d/keycloak.conf Please choose whether or not to redirect HTTP traffic to HTTPS, removing HTTP access. - - - - - - - - - - - - - - - - - - - - - - - - - - - - - - - - - - - - - - - - 1: No redirect - Make no further changes to the webserver configuration. 2: Redirect - Make all requests redirect to secure HTTPS access. Choose this for
new sites, or if you're confident your site works on HTTPS. You can undo this change by editing your web server's configuration. - - - - - - - - - - - - - - - - - - - - - - - - - - - - - - - - - - - - - - - - Select the appropriate number [1-2] then [enter] (press 'c' to cancel): 2 Redirecting all traffic on port 80 to ssl in /etc/nginx/conf.d/keycloak.conf - - - - - - - - - - - - - - - - - - - - - - - - - - - - - - - - - - - - - - - - Congratulations! You have successfully enabled https://keycloak.example.com ... Now proceed and access your Keycloak server with HTTPS using the URL https://domain_name Closing Thoughts. This guide not only provides the required knowledge on how to run the Keycloak Server in Docker Containers with Let’s Encrypt SSL but also knowledge on how to get started with the Keycloak SSO system.
0 notes
Text
All applications generate information when running, this information is stored as logs. As a system administrator, you need to monitor these logs to ensure the proper functioning of the system and therefore prevent risks and errors. These logs are normally scattered over servers and management becomes harder as the data volume increases. Graylog is a free and open-source log management tool that can be used to capture, centralize and view real-time logs from several devices across a network. It can be used to analyze both structured and unstructured logs. The Graylog setup consists of MongoDB, Elasticsearch, and the Graylog server. The server receives data from the clients installed on several servers and displays it on the web interface. Below is a diagram illustrating the Graylog architecture Graylog offers the following features: Log Collection – Graylog’s modern log-focused architecture can accept nearly any type of structured data, including log messages and network traffic from; syslog (TCP, UDP, AMQP, Kafka), AWS (AWS Logs, FlowLogs, CloudTrail), JSON Path from HTTP API, Beats/Logstash, Plain/Raw Text (TCP, UDP, AMQP, Kafka) e.t.c Log analysis – Graylog really shines when exploring data to understand what is happening in your environment. It uses; enhanced search, search workflow and dashboards. Extracting data – whenever log management system is in operations, there will be summary data that needs to be passed to somewhere else in your Operations Center. Graylog offers several options that include; scheduled reports, correlation engine, REST API and data fowarder. Enhanced security and performance – Graylog often contains sensitive, regulated data so it is critical that the system itself is secure, accessible, and speedy. This is achieved using role-based access control, archiving, fault tolerance e.t.c Extendable – with the phenomenal Open Source Community, extensions are built and made available in the market to improve the funmctionality of Graylog This guide will walk you through how to run the Graylog Server in Docker Containers. This method is preferred since you can run and configure Graylog with all the dependencies, Elasticsearch and MongoDB already bundled. Setup Prerequisites. Before we begin, you need to update the system and install the required packages. ## On Debian/Ubuntu sudo apt update && sudo apt upgrade sudo apt install curl vim git ## On RHEL/CentOS/RockyLinux 8 sudo yum -y update sudo yum -y install curl vim git ## On Fedora sudo dnf update sudo dnf -y install curl vim git 1. Install Docker and Docker-Compose on Linux Of course, you need the docker engine to run the docker containers. To install the docker engine, use the dedicated guide below: How To Install Docker CE on Linux Systems Once installed, check the installed version. $ docker -v Docker version 20.10.13, build a224086 You also need to add your system user to the docker group. This will allow you to run docker commands without using sudo sudo usermod -aG docker $USER newgrp docker With docker installed, proceed and install docker-compose using the guide below: How To Install Docker Compose on Linux Verify the installation. $ docker-compose version Docker Compose version v2.3.3 Now start and enable docker to run automatically on system boot. sudo systemctl start docker && sudo systemctl enable docker 2. Provision the Graylog Container The Graylog container will consist of the Graylog server, Elasticsearch, and MongoDB. To be able to achieve this, we will capture the information and settings in a YAML file. Create the YAML file as below: vim docker-compose.yml In the file, add the below lines: version: '2' services: # MongoDB: https://hub.docker.com/_/mongo/ mongodb: image: mongo:4.2 networks: - graylog #DB in share for persistence volumes: - /mongo_data:/data/db # Elasticsearch: https://www.elastic.co/guide/en/elasticsearch/reference/7.10/docker.html
elasticsearch: image: docker.elastic.co/elasticsearch/elasticsearch-oss:7.10.2 #data folder in share for persistence volumes: - /es_data:/usr/share/elasticsearch/data environment: - http.host=0.0.0.0 - transport.host=localhost - network.host=0.0.0.0 - "ES_JAVA_OPTS=-Xms512m -Xmx512m" ulimits: memlock: soft: -1 hard: -1 mem_limit: 1g networks: - graylog # Graylog: https://hub.docker.com/r/graylog/graylog/ graylog: image: graylog/graylog:4.2 #journal and config directories in local NFS share for persistence volumes: - /graylog_journal:/usr/share/graylog/data/journal environment: # CHANGE ME (must be at least 16 characters)! - GRAYLOG_PASSWORD_SECRET=somepasswordpepper # Password: admin - GRAYLOG_ROOT_PASSWORD_SHA2=e1b24204830484d635d744e849441b793a6f7e1032ea1eef40747d95d30da592 - GRAYLOG_HTTP_EXTERNAL_URI=http://192.168.205.4:9000/ entrypoint: /usr/bin/tini -- wait-for-it elasticsearch:9200 -- /docker-entrypoint.sh networks: - graylog links: - mongodb:mongo - elasticsearch restart: always depends_on: - mongodb - elasticsearch ports: # Graylog web interface and REST API - 9000:9000 # Syslog TCP - 1514:1514 # Syslog UDP - 1514:1514/udp # GELF TCP - 12201:12201 # GELF UDP - 12201:12201/udp # Volumes for persisting data, see https://docs.docker.com/engine/admin/volumes/volumes/ volumes: mongo_data: driver: local es_data: driver: local graylog_journal: driver: local networks: graylog: driver: bridge In the file, replace: GRAYLOG_PASSWORD_SECRET with your own password which must be at least 16 characters GRAYLOG_ROOT_PASSWORD_SHA2 with a SHA2 password obtained using the command: echo -n "Enter Password: " && head -1 1514/tcp, :::1514->1514/tcp, 0.0.0.0:9000->9000/tcp, 0.0.0.0:1514->1514/udp, :::9000->9000/tcp, :::1514->1514/udp, 0.0.0.0:12201->12201/tcp, 0.0.0.0:12201->12201/udp, :::12201->12201/tcp, :::12201->12201/udp thor-graylog-1 1a21d2de4439 docker.elastic.co/elasticsearch/elasticsearch-oss:7.10.2 "/tini -- /usr/local…" 31 seconds ago Up 28 seconds 9200/tcp, 9300/tcp thor-elasticsearch-1 1b187f47d77e mongo:4.2 "docker-entrypoint.s…" 31 seconds ago Up 28 seconds 27017/tcp thor-mongodb-1 If you have a firewall enabled, allow the Graylog service port through it. ##For Firewalld sudo firewall-cmd --zone=public --add-port=9000/tcp --permanent sudo firewall-cmd --reload ##For UFW sudo ufw allow 9000/tcp 5. Access the Graylog Web UI Now open the Graylog web interface using the URL http://IP_address:9000. Log in using the username admin and SHA2 password(StrongPassw0rd) set in the YAML. On the dashboard, let’s create the first input to get logs by navigating to the systems tab and selecting input. Now search for Raw/Plaintext TCP and click launch new input Once launched, a pop-up window will appear as below. You only need to change the name for the input, port(1514), and select the node, or “Global” for the location for the input. Leave the other details as they are. Save the file and try sending a plain text message to the Graylog Raw/Plaintext TCP input on port 1514. echo 'First log message' | nc localhost 1514 ##OR from another server##
echo 'First log message' | nc 192.168.205.4 1514 On the running Raw/Plaintext Input, show received messages The received message should be displayed as below. You can as well export this to a dashboard as below. Create the dashboard by providing the required information. You will have the dashboard appear under the dashboards tab. Conclusion That is it! We have triumphantly walked through how to run the Graylog Server in Docker Containers. Now you can monitor and access logs on several servers with ease. I hope this was significant to you.
0 notes
Text
A media server is a computer system for storing digital media such as videos, images, and audio files. These files can be accessed and shared via the internet. There are several media servers such as; Subsonic, Emby, Madsonic, Gerbera, Universal Media Server, LibreELEC, Red5 OSMC, Kodi, Tvmobili, OpenFlixr, Jellyfin e.t.c. Plex media server is a powerful full-featured server that allows one to stream media over the internet via compatible devices. Plex can be installed on Linux, macOS, Windows e.t.c. Plex has a simple interface and it organizes the data in beautiful libraries that make it easy for one to access them. The features and benefits associated with Plex are: Allows you to easily pick and choose what to share. Supports cloud sync. Offers the parental control functionality. Supports encrypted connections with multiple user accounts. Supports flinging of video from one device to another. Has a media optimizer for Plex Media Player. Supports audio fingerprinting and automatic photo-tagging. Supports mobile sync which offers offline access to your media files. This guide describes how to run Plex Media Server in Docker Containers. Setup Pre-requisites Update your system and install the required packages using the commands: ## On RHEL/CentOS/RockyLinux 8 sudo yum update sudo yum install curl vim ## On Debian/Ubuntu sudo apt update && sudo apt upgrade sudo apt install curl vim ## On Fedora sudo dnf update sudo dnf -y install curl vim Step 1 – Install Docker and Docker Compose Before you proceed with this guide, you need Docker installed on your system. It can be installed using the dedicated guide below: How To Install Docker CE on Linux Systems Once installed, ensure that the Docker Engine is started. sudo systemctl start docker && sudo systemctl enable docker Also, add your user account to the Docker group. sudo usermod -aG docker $USER newgrp docker You can also install Docker Compose if you wish to run Plex from the Docker-Compose YAML file. Installing Docker Compose can be accomplished with the aid of the guide below: How To Install Docker Compose on Linux Step 2 – Create a Persistent Volume for Plex For the Plex data to persist, you need to create/mount the volumes on your system. There are several volumes required. Create the volumes as below. sudo mkdir /plex sudo mkdir /plex/database,transcode,media On Rhel-based systems, you need to set SELinux in permissive mode for these paths to be accessible. sudo setenforce 0 sudo sed -i 's/^SELINUX=.*/SELINUX=permissive/g' /etc/selinux/config Step 3 – Run Plex Media Server in Docker Containers This guide provides two ways how to run the Plex Media Server in Docker Containers i.e directly with docker and using Docker-compose. With these methods, you can use 3 networking types: Bridge – This is the default networking, it creates an entirely new network within the host and runs containers within it. Host – This networking uses the IP address of the host running docker such that a container’s networking appears to be the host rather than separate. macvlan – networking creates a new virtual computer on the network which is the container. Setting up Plex using host and macvlan networking is easier and requires fewer workarounds. The docker files will be as below. For Macvlan Networking If using Macvlan Networking run the commands below: docker run \ -d \ --name plex \ --network=physical \ --ip= \ -e TZ="" \ -e PLEX_CLAIM="" \ -h \ -v /plex/database:/config \ -v /plex/transcode:/transcode \ -v /plex/media:/data \ plexinc/pms-docker For Host Networking docker run \ -d \ --name plex \ --network=host \ -e TZ="" \ -e PLEX_CLAIM="" \ -v /plex/database:/config \ -v /plex/transcode:/transcode \ -v /plex/media:/data \ plexinc/pms-docker For this guide, I will demonstrate how to run Plex using the bridge(default) networking. Here several ports are exposed.
docker run \ -d \ --name plex \ -p 32400:32400/tcp \ -p 3005:3005/tcp \ -p 8324:8324/tcp \ -p 32469:32469/tcp \ -p 1900:1900/udp \ -p 32410:32410/udp \ -p 32412:32412/udp \ -p 32413:32413/udp \ -p 32414:32414/udp \ -e TZ="Africa/Nairobi" \ -e PLEX_CLAIM="claim-ey6ekAqeQjosd1P" \ -e ADVERTISE_IP="http://192.168.205.4:32400/" \ -h plexserver.example.com \ -v /plex/database:/config \ -v /plex/transcode:/transcode \ -v /plex/media:/data \ plexinc/pms-docker In the above command, obtain the PLEX_CLAIM using the URL https://www.plex.tv/claim. If this token is not provided, you cannot automatically log in to Plex. Alternatively, you can use Docker Compose to run the Plex container with bridged networking as below. Create a docker-compose.yml file vim docker-compose.yml In the file, add the below lines, replacing appropriately version: '2' services: plex: container_name: plex image: plexinc/pms-docker restart: unless-stopped ports: - 32400:32400/tcp - 3005:3005/tcp - 8324:8324/tcp - 32469:32469/tcp - 1900:1900/udp - 32410:32410/udp - 32412:32412/udp - 32413:32413/udp - 32414:32414/udp environment: - TZ=Africa/Nairobi - PLEX_CLAIM=claim-ey6ekAqeQjosd1P - ADVERTISE_IP=http://192.168.205.4:32400/ hostname: plexserver.example.com volumes: - /plex/database:/config - /plex/transcode:/transcode - /plex/media:/data You can run the container with docker-compose using the command: docker-compose up -d Once the container has started, view the status as below. $ docker ps CONTAINER ID IMAGE COMMAND CREATED STATUS PORTS NAMES baf1e1a3b806 plexinc/pms-docker "/init" 5 seconds ago Up 2 seconds (health: starting) 0.0.0.0:3005->3005/tcp, :::3005->3005/tcp, 0.0.0.0:8324->8324/tcp, :::8324->8324/tcp, 0.0.0.0:1900->1900/udp, :::1900->1900/udp, 0.0.0.0:32410->32410/udp, :::32410->32410/udp, 0.0.0.0:32400->32400/tcp, :::32400->32400/tcp, 0.0.0.0:32412-32414->32412-32414/udp, :::32412-32414->32412-32414/udp, 0.0.0.0:32469->32469/tcp, :::32469->32469/tcp plex Step 4 – Access the Plex Web UI AT this point, Plex is running with the Web accessible via the set URL http://IP_address:32400 The Plex UI will load with the Plex Claim automatically loaded for the account set, proceed, and sign in to the dashboard. On this dashboard, you can watch live TV, movies, shows, podcasts, listen to music, and add your media. Live Tv can be watched y selecting the desired channel. Watch online movies and shows: You can as well add media to Plex Media can be added to the server as below. To make settings to Plex, navigate to the settings tab and make the desired settings. Step 5 – Manage the Plex container. The Plex container can be managed as below. ##To stop docker stop plex ##To start docker start plex The container can also be managed as a system service by creating a service file for it as below: sudo vim /etc/systemd/system/plex-container.service In the created file, add the lines below. [Unit] Description=Plex container [Service] Restart=always ExecStart=/usr/bin/docker start -a plex ExecStop=/usr/bin/docker stop -t 2 plex [Install] WantedBy=local.target Save the file and reload the system daemon. sudo systemctl daemon-reload Now start and enable Plex to run automatically on boot. sudo systemctl start plex-container.service sudo systemctl enable plex-container.service Check the status of the service.
$ systemctl status plex-container.service ● plex-container.service - Plex container Loaded: loaded (/etc/systemd/system/plex-container.service; enabled; vendor preset: disabled) Active: active (running) since Wed 2022-03-09 10:42:24 EST; 10s ago Main PID: 59416 (docker) Tasks: 8 (limit: 36438) Memory: 17.3M CGroup: /system.slice/plex-container.service └─59416 /usr/bin/docker start -a plex Mar 09 10:42:24 localhost.localdomain systemd[1]: Started Plex container. That is it! This is the end of this guide on how to run Plex Media Server in Docker Containers. I hope this was significant to you.
0 notes
Text
The Vagrant Podman Provisioner can be used to automatically install Podman which is a daemon-less container engine used to develop, manage and run OCI containers. Podman built and officially supported by RedHat, acts as a drop-in replacement for Docker. Just like Docker, Podman has the ability to pull container images and configure containers to run automatically on boot. Podman is highly preferred when running containers since it allows one to run containers from Kubernetes as long as the images are OCI-compliant. Podman can also be used along with other provisioners such as the puppet provisioner e.t.c. In this setup, we will use Vagrant to set up the best working environment for the Podman provisioner. This guide takes a deep dive into how to manage Podman Containers With Vagrant. Getting Started. For this guide, you need to have Vagrant installed on your system. Below are dedicated guides to help you install Vagrant on your system. On Debian/Ubuntu/Kali Linux Install Vagrant on Ubuntu / Debian / Kali Linux On RHEL 8/CentOS 8 /Rocky Linux 8/Alma Linux How To Install Vagrant on CentOS 8 / RHEL 8 On Fedora Install Vagrant and VirtualBox on Fedora On Ubuntu, you will have to install the below package. sudo apt-get install libarchive-tools For this guide, I will use VirtualBox as my hypervisor. You can install it on your system using the guides below On Debian Install VirtualBox on Debian On Ubuntu/Kali Linux/Linux mint How To Install VirtualBox on Kali Linux / Linux Mint On RHEL/CentOS/Rocky Linux How To Install VirtualBox on CentOS 8 / RHEL 8 With Vagrant and Virtualbox successfully installed using the aid of the above guides, now you are set to proceed as below. Step 1 – Create a Vagrant Box For this guide, we will create a CentOS 7 vagrant box using VirtualBox as the provider. $ vagrant box add centos/7 --provider=virtualbox You can as well use other Hypervisors as below. ##For KVM vagrant box add centos/7 --provider=libvirt ##For VMware vagrant box add generic/centos7 --provider=vmware_desktop ##For Docker vagrant box add generic/centos7 --provider=docker ##For Parallels vagrant box add generic/centos7 --provider=parallels Create a Vagrant file for CentOS 7 as below mkdir ~/vagrant-vms cd ~/vagrant-vms touch ~/vagrant-vms/Vagrantfile Now we are set to edit the vagrant file depending on our preferences as below. Step 2 – Manage Podman Containers With Vagrant Now manage your Podman containers with Vagrant as below. Stop the running instance: $ vagrant halt ==> default: Attempting graceful shutdown of VM... 1. Build Podman Images with Vagrant The Vagrant Podman provisioner can be used to automatically build images. Container images can be built before running them or prior to any configured containers as below. $ vim ~/vagrant-vms/Vagrantfile Vagrant.configure("2") do |config| config.vm.box = "centos/7" config.vm.provision "podman" do |d| d.build_image "~/vagrant-vms/app" end end Above is a sample code on how to build an image from a Docker file and remember the path ~/vagrant/app must exist on your guest machine. vagrant ssh mkdir ~/vagrant-vms/app chmod 755 ~/vagrant-vms/app Stop the running instance as below vagrant halt Start Vagrant as below. vagrant up --provision 2. Pull Podman Images with Vagrant Images can also be pulled from Docker registries. There are two methods you can use to specify the Docker image to be pulled. The first method is by using the argument images: For example, to pull an Ubuntu image use: $ vim ~/vagrant-vms/Vagrantfile Vagrant.configure("2") do |config| config.vm.box = "centos/7" config.vm.provision "podman", images: ["ubuntu"] end The second option is by using the pull_images function as below. Vagrant.configure("2") do |config| config.vm.box = "centos/7" config.vm.provision "podman" do |d| d.pull_images "ubuntu"
d.pull_images "alpine" end end Sample output: $ vagrant up --provision ......... ==> default: Rsyncing folder: /home/thor/vagrant-vms/ => /vagrant ==> default: Running provisioner: podman... default: Podman installing ==> default: Pulling Docker images... ==> default: -- Image: ubuntu ==> default: Trying to pull registry.access.redhat.com/ubuntu... ==> default: name unknown: Repo not found ==> default: Trying to pull registry.redhat.io/ubuntu... ==> default: unable to retrieve auth token: invalid username/password: unauthorized: Please login to the Red Hat Registry using your Customer Portal credentials. Further instructions can be found here: https://access.redhat.com/RegistryAuthentication ==> default: Trying to pull docker.io/library/ubuntu... ==> default: Getting image source signatures ==> default: Copying blob sha256:7b1a6ab2e44dbac178598dabe7cff59bd67233dba0b27e4fbd1f9d4b3c877a54 ==> default: Copying config sha256:ba6acccedd2923aee4c2acc6a23780b14ed4b8a5fa4e14e252a23b846df9b6c1 ==> default: Writing manifest to image destination ==> default: Storing signatures ==> default: ba6acccedd2923aee4c2acc6a23780b14ed4b8a5fa4e14e252a23b846df9b6c1 3. Run Podman Containers with Vagrant In addition to building and pulling Podman images, Vagrant can as well be used to run Podman containers. Running containers can be done using the Ruby block syntax normally with do…end blocks. For example to run a Rabbitmq Podman container, use the below syntax. $ vim ~/vagrant-vms/Vagrantfile Vagrant.configure("2") do |config| config.vm.box = "centos/7" config.vm.provision "podman" do |d| d.run "rabbitmq" end end Start the instance $ vagrant up --provision ........ ==> default: Rsyncing folder: /home/thor/vagrant-vms/ => /vagrant ==> default: Running provisioner: podman... ==> default: Starting Docker containers... ==> default: -- Container: rabbitmq Verify that the container has been started. $ vagrant ssh $ podman ps CONTAINER ID IMAGE COMMAND CREATED STATUS PORTS NAMES 245e7d8cf138 docker.io/library/rabbitmq:latest rabbitmq-server About a minute ago Up About a minute ago rabbitmq You can as well run multiple containers using the same image. Here, you have to specify the name of each container. For example, running multiple MySQL instances, you can use the code as below. $ vim ~/vagrant-vms/Vagrantfile Vagrant.configure("2") do |config| config.vm.box = "centos/7" config.vm.provision "podman" do |d| d.run "db-1", image: "mariadb" d.run "db-2", image: "mariadb" end end $ vagrant up --provision ==> default: Rsyncing folder: /home/thor/vagrant-vms/ => /vagrant ==> default: Running provisioner: podman... default: Podman installing ==> default: Starting Docker containers... ==> default: -- Container: db-1 ==> default: -- Container: db-2 Furthermore, a container can be configured to run with a shared directory mounted in it. For example, running an Ubuntu container with a shared directory /var/www use the below code; $ vim ~/vagrant-vms/Vagrantfile Vagrant.configure("2") do |config| config.vm.box = "centos/7" config.vm.provision "podman" do |d| d.run "ubuntu", cmd: "bash -l", args: "-v '/vagrant:/var/www'" end end Sample output: $ vagrant up --provision ==> default: Rsyncing folder: /home/thor/vagrant-vms/ => /vagrant ==> default: Running provisioner: podman... default: Podman installing ==> default: Starting Docker containers... ==> default: -- Container: ubuntu You can verify your created Podman containers as below: $ vagrant ssh $ podman ps -a CONTAINER ID IMAGE COMMAND CREATED STATUS PORTS NAMES ec976aa0ae53 docker.io/library/ubuntu:latest bash -l 2 minutes ago Exited (0) Less than a second ago ubuntu You can pause/hibernate the vagrant instance as below.
vagrant suspend Delete the Vagrant instance: vagrant destroy Conclusion. That marks the end of this guide! We have successfully gone through how to manage Podman Containers With Vagrant. I hope you found this guide important.
0 notes
Text
Welcome to this guide on how to run Netbox IPAM Tool in Docker Containers. But before we dive into the nub of this matter, let’s first get to know what the Netbox IPAM tool is all about. Netbox is a free and open-source tool used to manage and document computer networks via the web. Netbox IPAM is written in Django. It helps ease the task of creating virtual implementations of devices in a data center which initially were being done on paper. The amazing features of Netbox IPAM include the following: Vlan Management VRF Management IPAM – IP Address Management DCIM – Data Center Infrastructure Management Circuit Provider Management Multi-Site (tenancy) Single Converged Database Rack Elevation Report Alert Connection Management – Interfaces/Console/Power Customization Header For Logo’s etc Running Netbox using Docker Containers is simple because, all the tedious task of installing dependencies such as Python, Django e.t.c is avoided. Getting Started. Before we begin on this guide, ensure that your system is up-to-date and the required packages installed. ## On Debian/Ubuntu sudo apt update && sudo apt upgrade sudo apt install curl vim git ## On RHEL/CentOS/RockyLinux 8 sudo yum -y update sudo yum -y install curl vim git ## On Fedora sudo dnf update sudo dnf -y install curl vim git 1. Install Docker and Docker-Compose on Linux This setup relies on Docker and docker-compose meeting the below requirements: Docker version 19.03 and above docker-compose version 1.28.0 and above Install the latest version of Docker CE on Linux with the aid of the guide below. How To Install Docker CE on Linux Systems Verify the installed version of Docker. $ docker -v Docker version 20.10.10, build b485636 Then add your system user to the docker group in order to execute docker commands without using the sudo command. sudo usermod -aG docker $USER newgrp docker Now proceed and install Docker-compose on Linux. Download the latest version of docker-compose as below. curl -s https://api.github.com/repos/docker/compose/releases/latest | grep browser_download_url | grep docker-compose-linux-x86_64 | cut -d '"' -f 4 | wget -qi - Make the file executable. chmod +x docker-compose-linux-x86_64 Move the file to your PATH. sudo mv docker-compose-linux-x86_64 /usr/local/bin/docker-compose Verify your installation by checking the docker-compose version. $ docker-compose version Docker Compose version v2.1.1 Now start and enable docker. sudo systemctl start docker && sudo systemctl enable docker 2. Provision the Netbox IPAM server All the components needed to build Netbox as a docker container are provided in the Github repository. Here, images are built and released to Docker Hub and Quay.io once a day. Now git clone the Netbox docker file as below. git clone -b release https://github.com/netbox-community/netbox-docker.git Navigate into the Netbox directory. cd netbox-docker Modify the docker-compose.yml from the docker-compose.override.yml.example file as below. tee docker-compose.override.yml 8080/tcp, :::8000->8080/tcp netbox-docker-netbox-1 d652988275e6 netboxcommunity/netbox:v3.0-1.4.1 "/sbin/tini -- /opt/…" 2 minutes ago Up 2 minutes netbox-docker-netbox-housekeeping-1 6ee0e21ecde0 netboxcommunity/netbox:v3.0-1.4.1 "/sbin/tini -- /opt/…" 2 minutes ago Up 2 minutes netbox-docker-netbox-worker-1 3ff7e0c6b174 redis:6-alpine "docker-entrypoint.s…" 2 minutes ago Up 2 minutes 6379/tcp netbox-docker-redis-cache-1 92e49f207764 redis:6-alpine "docker-entrypoint.s…" 2 minutes ago Up 2 minutes 6379/tcp netbox-docker-redis-1 77908ccce0ca postgres:13-alpine "docker-entrypoint.s…" 2 minutes ago Up 2 minutes 5432/tcp netbox-docker-postgres-1
If you have a firewall enabled, allow port 8000 as below. ##For Firewalld sudo firewall-cmd --zone=public --add-port=8000/tcp --permanent sudo firewall-cmd --reload ##For UFW sudo ufw allow 8000/tcp 3. Access the Netbox IPAM tool Web UI Everything is set, we can now proceed and access the Netbox IPAM web UI with the URL http://Hostname:8000 or http://IP_Address:8000. Log in to the page with the default credentials as Username: admin, Password: admin, and API Token: 0123456789abcdef0123456789abcdef01234567 On successful login, you will see this page. Now here, you can navigate using the panel on your left as shown. While on this panel, you can add the devices, connections, circuits, IPAM, clusters, power supply, and many other items to be managed. This gives an implementation that with Netbox IPAM tool, it is so easy to manage a data center by adding the required devices. To add a device let’s say a router, you will add the information below. In case you want to stop all the running containers, run the below command: $ docker-compose stop You can remove the containers as below. $ docker-compose stop && docker-compose rm Sample Output: +] Running 6/0 ⠿ Container netbox-docker-netbox-housekeeping-1 Stopped 0.0s ⠿ Container netbox-docker-netbox-1 Stopped 0.0s ⠿ Container netbox-docker-netbox-worker-1 Stopped 0.0s ⠿ Container netbox-docker-redis-cache-1 Stopped 0.0s ⠿ Container netbox-docker-redis-1 Stopped 0.0s ⠿ Container netbox-docker-postgres-1 Stopped 0.0s ? Going to remove netbox-docker-netbox-1, netbox-docker-netbox-housekeeping-1, netbox-docker-netbox-worker-1, netbox-docker-redis-cache-1, netbox-docker-redis-1, netbox-docker-postgres-1 (y/N) y Conclusion That is it! At this point, we can all agree that running Netbox IPAM Tool in Docker Containers is easier. I hope you succeeded to set up the Netbox IPAM tool Docker container.
0 notes