#sigusr1
Explore tagged Tumblr posts
Visit Tumblr Blog
Explore Tumblr blogs with no restrictions, modern design and the best experience.
Last Seen Tumblr Blogs


Fun Fact
28.6 is the average number of monthly visits per US mobile user.
Text
what do you guys think SIGUSR1 is for?
Just spam it in a loop :)
Don't really know how I stand on this.
Only thing I'm sure of is fuck you if your program only runs in a 252738 color terminal with unicode emojis. Looking at you entire nodejs ecosystem
I get that loading bars are against UNIX principles but ermmm does it not make you feel sexy and cool to have live feedback in the terminal? Like fym “no news is good news”? Eat shit
8 notes
·
View notes
Text
Linuxのプロセス強制終了について
実行コマンドについて
// 強制終了(シグナルID 9)を指定する $ kill -9 $PID // シグナルIDの一覧 $ kill -l 1) SIGHUP 2) SIGINT 3) SIGQUIT 4) SIGILL 5) SIGTRAP 6) SIGABRT 7) SIGBUS 8) SIGFPE 9) SIGKILL 10) SIGUSR1 11) SIGSEGV 12) SIGUSR2 13) SIGPIPE 14) SIGALRM 15) SIGTERM 16) SIGSTKFLT 17) SIGCHLD 18) SIGCONT 19) SIGSTOP 20) SIGTSTP 21) SIGTTIN 22) SIGTTOU 23) SIGURG 24) SIGXCPU 25) SIGXFSZ 26) SIGVTALRM 27) SIGPROF 28) SIGWINCH 29) SIGIO 30) SIGPWR 31) SIGSYS 34) SIGRTMIN 35) SIGRTMIN+1 36) SIGRTMIN+2 37) SIGRTMIN+3 38) SIGRTMIN+4 39) SIGRTMIN+5 40) SIGRTMIN+6 41) SIGRTMIN+7 42) SIGRTMIN+8 43) SIGRTMIN+9 44) SIGRTMIN+10 45) SIGRTMIN+11 46) SIGRTMIN+12 47) SIGRTMIN+13 48) SIGRTMIN+14 49) SIGRTMIN+15 50) SIGRTMAX-14 51) SIGRTMAX-13 52) SIGRTMAX-12 53) SIGRTMAX-11 54) SIGRTMAX-10 55) SIGRTMAX-9 56) SIGRTMAX-8 57) SIGRTMAX-7 58) SIGRTMAX-6 59) SIGRTMAX-5 60) SIGRTMAX-4 61) SIGRTMAX-3 62) SIGRTMAX-2 63) SIGRTMAX-1 64) SIGRTMAX
ref
linux killできないプロセスを強制終了する
0 notes
Photo

My CS professor told us to print something when our program receives the SIGUSR1 signal. He didn’t tell us what to print. ;)
43 notes
·
View notes
Text
Lab 8: Signals Solution
Lab 8: Signals Solution
You are given a basic signal handling program. Extend it to: * Reset the counter to 0 every 15 seconds using SIGALRM. Make sure this works every 15 seconds, not just once. * Add 5 to the counter when the user presses Ctrl+\ (SIGQUIT) * Add 10 to the counter when SIGUSR1 is received * Exit gracefully (print the final count and “Goodbye!”) when SIGINT is received (already provided) Sending…

View On WordPress
0 notes
Text
Comando kill no Linux (envia sinais) [Guia Básico]

O Comando kill no Linux envia sinais para os processos. Ele é usado geralmente para terminar a execução de processos identificados pelo seu PID. Se nenhum sinal específico for passado como parâmetro, o kill irá enviar o sinal SIGTERM (15) para terminar o processo de forma elegante. Neste exemplo o kill Força o servidor de web identificado pelo PID 1953 a ler novamente o seu arquivo de configuração: $ ps aux | grep httpdwwwrun 1952 0.0 1.7 93232 2248 ? S 16:15 0:00 /usr/sbin/httpd -f /etc/httpd/httpd.confwwwrun 1953 0.0 1.7 93232 2248 ? S 16:15 0:00 /usr/sbin/httpd -f /etc/httpd/httpd.confwwwrun 1954 0.0 1.7 93232 2248 ? S 16:15 0:00 /usr/sbin/httpd -f /etc/httpd/httpd.conf # kill –HUP 1953 Termina abruptamente os processos de serviço de web com os PIDs 1953 e 1954: # kill –9 1953 1954 A opção -l do kill oferece uma lista de sinais e seus respectivos códigos: $ kill -l 1) SIGHUP 2) SIGINT 3) SIGQUIT 4) SIGILL 5) SIGTRAP 6) SIGABRT 7) SIGBUS 8) SIGFPE 9) SIGKILL 10) SIGUSR1 11) SIGSEGV 12) SIGUSR2 13) SIGPIPE 14) SIGALRM 15) SIGTERM ( ... ) Um comando que facilita enviar sinais para processos que tem vários processos filhos é o killall. https://youtu.be/xwcD5xrR5nE Aprenda muito mais sobre Linux em nosso curso online. Você pode efetuar a matrícula aqui. Se você já tem uma conta, ou quer criar uma, basta entrar ou criar seu usuário aqui. Gostou? Compartilhe Read the full article
0 notes
Photo

Project 6 Solution turnin code: cs_p6 Write a program that loops doing: sleep(1); It should print this message each time it receives SIGUSR1:
0 notes
Text
Linux process communication - Signals
Para conseguir ler e entender esse post, é necessário que vc saiba o mínimo de Linux e da linguagem de programação C.
Primeiramente, o que é signals? signals(em português, sinais) é o método de comunicação entre processos Linux. Ou seja, através desses signals, eles podem pedir, ou avisar, algo para outros processos em execução.
Um bom exemplo para entender signals, é o comando kill, quando executamos o comando kill para um determinado processo, estamos enviando um sinal chamado SIGTERM para a ele. Esse sinal é um PEDIDO de finalização ao processo, isso quer dizer que, se você enviar esse signal para o processo do Chrome, por exemplo, ele estará pedindo ao chrome para que ele finalize a sua execução, esse pedido pode, ou não, ser ignorado. Agora, caso você utilize o argumento "-9" no comando kill, você estará enviando um signal chamado SIGKILL para o processo. Diferente do SIGTERM, o SIGKILL não pode ser ignorado, não importa o que o processo esteja fazendo, se ele receber esse sinal, ele imediatamente é finalizado.
Existem diversos outro signals no Linux, não irei explicar todos, então deixarei uma tabela aqui em baixo de alguns desses signals.
A = abort T = terminate I = ignore S = stop
Signal
Default Action
Description
SIGABRT
A
Process abort signal.
SIGALRM
T
Alarm clock.
SIGBUS
A
Access to an undefined portion of a memory object.
SIGCHLD
I
Child process terminated, stopped,
[XSI]

or continued.

SIGCONT
C
Continue executing, if stopped.
SIGFPE
A
Erroneous arithmetic operation.
SIGHUP
T
Hangup.
SIGILL
A
Illegal instruction.
SIGINT
T
Terminal interrupt signal.
SIGKILL
T
Kill (cannot be caught or ignored).
SIGPIPE
T
Write on a pipe with no one to read it.
SIGQUIT
A
Terminal quit signal.
SIGSEGV
A
Invalid memory reference.
SIGSTOP
S
Stop executing (cannot be caught or ignored).
SIGTERM
T
Termination signal.
SIGTSTP
S
Terminal stop signal.
SIGTTIN
S
Background process attempting read.
SIGTTOU
S
Background process attempting write.
SIGUSR1
T
User-defined signal 1.
SIGUSR2
T
User-defined signal 2.
[XSI]
SIGPOLL
T
Pollable event.
SIGPROF
T
Profiling timer expired.
SIGSYS
A
Bad system call.
SIGTRAP
A
Trace/breakpoint trap.
SIGURG
I
High bandwidth data is available at a socket.
SIGVTALRM
T
Virtual timer expired.
SIGXCPU
A
CPU time limit exceeded.
SIGXFSZ
A
File size limit exceeded.
Tirando o SIGKILL e o SIGSTOP, todos os outros processos podem ser ignorados, ou interpretado de outras formas. Olhando na tabela, você verá um sinal chamado SIGUSR1, sua ação padrão é finalizar um processo, porém, programas podem interpretar esse sinal do modo que bem quiser. Podemos usar como exemplo, o comando dd, que serve para copiar arquivos, geralmente usado para gravar arquivos do tipo ISO em pendrives. Se vc enviar o sinal SIGUSR1 ao dd, enquanto ele estiver em execução, ele irá receber o sinal e retornar informações sobre o progresso atual. Exemplo abaixo.

Ou seja, ao invés de finalizar o processo, como ele faz por padrão, ele interpreta o sinal SIGUSR1 como um pedido de informações sobre o progresso.
AGORA, PROGRAMANDO...
Se você quiser entender melhor, siga-me, vamos voar como cavalinhos com asas no mundo das condicionais binárias. Traduzindo, bora lá codar em C.
Para tratar sinais em C, precisamos incluir a biblioteca signal.h e a biblioteca de syscall, a unistd.h.
Primeiramente, vamos começar com um programa bem simples, ele vai ignorar quando o usuário tentar parar o script com ctrl+c. Para isso, é importante saber que, quando vc lança essa combinação de teclas, vc está enviando um signal SIGINT ao processo. Vamos usar uma função bem chamada sigignore.
#include <stdio.h> #include <unistd.h> #include <signal.h> #include <stdlib.h> int sigignore(int sig); int main () { sigignore(SIGINT); for(int x=0; x<5; x++){ sleep(1); printf("olan"); fflush(stdout); } printf("finalizein"); return 0; }
Agora, todas as tentativas de finalizar o processo com ctrl+c irão ser falhas.

Ai neste gif que passei meia hora pra fazer, vimos o ctrl+c não fez efeito nenhum, ele continuou executando até finalizar o processo. OK, isso ficou um pouco sem graça, vamos fazer algo mais legal. Vamos fazer que, quando a usuário mande SIGINT, o programa execute uma função e imprima ou faça algo. Para isso, vamos usar a função signal(), passando o sinal que queremos tratar e a o ponteiro para a função que será acionada. signal(SIG, &FUNC). A função deve ter o parametro para a entrada do signal.
#include <stdio.h> #include <unistd.h> #include <signal.h> #include <stdlib.h> void exitsafe(int signal); FILE *fd; int main(void) { signal(SIGINT, &exitsafe); int cnt = 0; fd = fopen("output.txt", "w"); while(1) { cnt += 1; fprintf(fd, "%s%dn", "Ola", cnt); puts("Data Writed"); sleep(2); } } void exitsafe(int signal) { puts("nSIGINT DETECETADO: Fechando arquivo com segurança"); fclose(fd); exit(0); }
Ok, agora vamos ver como ficou. (lembrando que ^c significa ctrl+c)
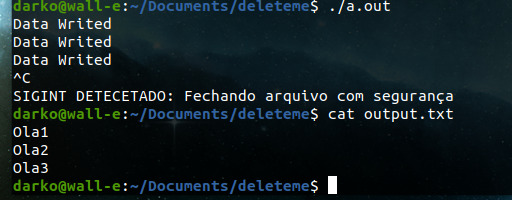
O código apenas abre um arquivo e começa escrever nele em um looping fechado com um delay de 2 segundos para não flodar. Em um caso sem a nossa função de exitsafe, o programa iria apenas parar sem fechar o arquivo aberto, porém, com a nossa função quando ele recebe o sinal para parar ele aciona a função exitsafe() para finalizar o programa corretamente.
Neste caso parece ser algo besta e simples, mas softwares mais complexos se parado instântaneamente pode ocorrer de lixos no sistema ou algum problema mais sério.
Por hoje é isso, essa foi apenas uma preview sobre as funções do signals no sistema linux, creio que valha a pena dá uma estudada mais profundamente neste assunto futuramente.
0 notes
Photo

Project 6 Solution turnin code: cs_p6 Write a program that loops doing: sleep(1); It should print this message each time it receives SIGUSR1:
0 notes
Text
Comando kill no Linux (envia sinais) [Guia Básico]

O Comando kill no Linux envia sinais para os processos. Ele é usado geralmente para terminar a execução de processos identificados pelo seu PID. Se nenhum sinal específico for passado como parâmetro, o kill irá enviar o sinal SIGTERM (15) para terminar o processo de forma elegante. Neste exemplo o kill Força o servidor de web identificado pelo PID 1953 a ler novamente o seu arquivo de configuração: $ ps aux | grep httpdwwwrun 1952 0.0 1.7 93232 2248 ? S 16:15 0:00 /usr/sbin/httpd -f /etc/httpd/httpd.confwwwrun 1953 0.0 1.7 93232 2248 ? S 16:15 0:00 /usr/sbin/httpd -f /etc/httpd/httpd.confwwwrun 1954 0.0 1.7 93232 2248 ? S 16:15 0:00 /usr/sbin/httpd -f /etc/httpd/httpd.conf # kill –HUP 1953 Termina abruptamente os processos de serviço de web com os PIDs 1953 e 1954: # kill –9 1953 1954 A opção -l do kill oferece uma lista de sinais e seus respectivos códigos: $ kill -l 1) SIGHUP 2) SIGINT 3) SIGQUIT 4) SIGILL 5) SIGTRAP 6) SIGABRT 7) SIGBUS 8) SIGFPE 9) SIGKILL 10) SIGUSR1 11) SIGSEGV 12) SIGUSR2 13) SIGPIPE 14) SIGALRM 15) SIGTERM ( ... ) Um comando que facilita enviar sinais para processos que tem vários processos filhos é o killall. https://youtu.be/xwcD5xrR5nE Você que é profissional de TI, de suporte ou desenvolvedor, já pensou em aprender Linux de verdade? E ainda de quebra tirar uma certificação LPI Linux Essentials de quebra? E melhor ainda, com o melhor curso Online para Linux? Faça como essas pessoas e crie sua conta agora. Aqui você tem tudo para você ter sucesso nas provas de LPI e CompTIA - Aulas Práticas no Shell - Flashcards para memorização - Jogos de Palavras cruzadas - 06 servidores virtuais na Amazon só pra você - Mapas Mentais - Vídeo Glossário - Simulado preparatório para as provas - Agenda de aula personalizada - Exercícios guiados – Laboratórios reais - Recursos de Aula (anotações e outros) Quer saber se uma certificação vale a pena ? Saiba porque os salários são bons, e porque as empresas estão procurandoprofissionais de Linux. Você vai ententer que os benefícios superam de longe o sacrifício. E se você já se decidiu, veja nosso Guia de Certificação. E se quer saber onde fazer as provas, consulte a lista de cidade. Se quiser saber o idioma das provas, veja esse post. Aprenda muito mais sobre Linux em nosso curso online. Você pode fazer a matrícula aqui. Se você já tem uma conta, pode acessar aqui. Gostou? Compartilhe Read the full article
0 notes
Quote
How do I rotate catalina.out? CATALINA_BASE/logs/catalina.out does not rotate. But it should not be an issue because nothing should be printing to standard output since you are using a logging package, right? If you really must rotate catalina.out, here are some techniques you can use: If you are using jsvc 1.0.4 or later (from Apache Commons Daemon project) to launch Tomcat, you can send SIGUSR1 signal to jsvc to get it to re-open its log files (Jira Ticket). You can couple this with 'logrotate' or your favorite log-rotation utility (including good-old 'mv') to re-name catalina.out at intervals and then get jsvc to re-open the original (catalina.out) file and continue writing to it. Use 'logrotate' with the 'copytruncate' option. This allows you to externally rotate catalina.out without changing anything within Tomcat. Modify bin/catalina.sh (or bin/catalina.bat) to pipe output from the JVM into a piped-logger such as cronolog or Apache httpd's rotatelogs (note that the previous reference is for Apache httpd documentation and *is not applicable to Tomcat* -- it merely illustrates the concept). See also the patch in Bug 53930, "Allow capture of catalina stdout/stderr to a command instead of just a file".
FAQ/Logging - Tomcat Wiki
0 notes
Text
Mastering the Node.js Core Modules - The Process Module
In this article, we'll take a look at the Node.js Process module, and what hidden gems it has to offer. After you’ve read this post, you’ll be able to write production-ready applications with much more confidence. You’ll know what process states your Node.js apps will have, you’ll be able to do graceful shutdown, and you’ll handle errors much more efficiently.
In the new Mastering the Node.js Core Modules series you can learn what hidden/barely known features the core modules have, and how you can use them. By going through the basic elements of these Node.js modules, you’ll have a better understanding of they work and how can you eliminate any errors.
In this chapter, we’ll take a look at the Node.js process module. The process object (which is an instance of the EventEmitter) is a global variable that provides information on the currently running Node.js process.
Events to watch out for in the Node.js process module
As the process module is an EventEmitter, you can subscribe to its events just like you do it with any other instances of the EventEmitter using the .on call:
process.on('eventName', () => { //do something })
uncaughtException
This event is emitted when an uncaught JavaScript exception bubbles back to the event loop.
By default, if no event listeners are added to the uncaughtException handler, the process will print the stack trace to stderr and exit. If you add an event listener, you change this behavior to the one you implement in your listener:
process.on('uncaughtException', (err) => { // here the 1 is a file descriptor for STDERR fs.writeSync(1, `Caught exception: ${err}\n`) })
During the past years, we have seen this event used in many wrong ways. The most important advice when using the uncaughtException event in the process module are the following:
if uncaughtException happens, your application is in an undefined state,
recovering from uncaughtException is strongly discouraged, it is not safe to continue normal operation after it,
the handler should only be used for synchronous cleanup of allocated resources,
exceptions thrown in this handler are not caught, and the application will exit immediately,
you should always monitor your process with an external tool, and restart it when needed (for example, when it crashes).
unhandledRejection
Imagine you have the following code snippet:
const fs = require('fs-extra') fs.copy('/tmp/myfile', '/tmp/mynewfile') .then(() => console.log('success!'))
What would happen if the source file didn’t exist? Well, the answer depends on the Node.js version you are running. In some of them (mostly version 4 and below), the process would silently fail, and you would just sit there wondering what happened.
In more recent Node.js versions, you would get the following error message:
(node:28391) UnhandledPromiseRejectionWarning: Unhandled promise rejection (rejection id: 1): undefined (node:28391) [DEP0018] DeprecationWarning: Unhandled promise rejections are deprecated. In the future, promise rejections that are not handled will terminate the Node.js process with a non-zero exit code.
This means that we missed the error handling in the Promise we used for copying a file. The example should have been written this way:
fs.copy('/tmp/myfile', '/tmp/mynewfile') .then(() => console.log('success!')) .catch(err => console.error(err))
The problem with not handling Promise rejections is the same as in the case of uncaughtExceptions - your Node.js process will be in an unknown state. What is even worse, is that it might cause file descriptor failure and memory leaks. Your best course of action in this scenario is to restart the Node.js process.
To do so, you have to attach an event listener to the unhandledRejection event, and exit the process with process.exit(1).
Our recommendation here is to go with Matteo Collina's make-promises-safe package, which solves it for you out of the box.
Node.js Signal Events
Signal events will also be emitted when Node.js receives POSIX signal events. Let's take a look at the two most important ones, SIGTERM and SIGUSR1.
You can find the full list of supported signals here.
SIGTERM
The SIGTERM signal is sent to a Node.js process to request its termination. Unlike the SIGKILL signal, it can be listened on or ignored by the process.
This allows the process to be shut down in a nice manner, by releasing the resources it allocated, like file handlers or database connections. This way of shutting down applications is called graceful shutdown.
Essentially, the following steps need to happen before performing a graceful shutdown:
The applications get notified to stop (received SIGTERM).
The applications notify the load balancers that they aren’t ready for newer requests.
The applications finish all the ongoing requests.
Then, it releases all of the resources (like a database connection) correctly.
The application exits with a "success" status code (process.exit()).
Read this article for more on graceful shutdown in Node.js.
SIGUSR1
By the POSIX standard, SIGUSR1 and SIGUSR2 can be used for user-defined conditions. Node.js chose to use this event to start the built-in debugger.
You can send the SIGUSR1 signal to the process by running the following command:
kill -USR1 PID_OF_THE_NODE_JS_PROCESS
Once you did that, the Node.js process in question will let you know that the debugger is running:
Starting debugger agent. Debugger listening on [::]:5858
Methods and values exposed by the Node.js process module
process.cwd()
This method returns the current working directory for the running Node.js process.
$ node -e 'console.log(`Current directory: ${process.cwd()}`)' Current directory: /Users/gergelyke/Development/risingstack/risingsite_v2
In case you have to change it, you can do so by calling process.chdir(path).
process.env
This property returns an object containing the user environment, just like environ.
If you are building applications that conform the 12-factor application principles, you will heavily depend on it; as the third principle of a twelve-factor application requires that all configurations should be stored in the user environment.
Environment variables are preferred, as it is easy to change them between deploys without changing any code. Unlike config files, there is little chance of them being accidentally checked into the code repository.
It is worth mentioning, that you can change the values of the process.env object, however, it won't be reflected in the user environment.
process.exit([code])
This method tells the Node.js process to terminate the process synchronously with an exit status code. Important consequences of this call::
it will force the process to exit as quickly as possible
even if some async operations are in progress,
as writing to STDOUT and STDERR is async, some logs can be lost
in most cases, it is not recommended to use process.exit() - instead, you can let it shut down by depleting the event loop.
process.kill(pid, [signal])
With this method, you can send any POSIX signals to any processes. You don’t only kill processes as the name suggest - this command acts as a signal sender too (like the kill system call.)
Exit codes used by Node.js
If all goes well, Node.js will exit with the exit code 0. However, if the process exits because of an error, you’ll get one of the following error codes::
1 : Uncaught fatal exception, which was not handled by an uncaughtException handler,
5 : Fatal error in V8 (like memory allocation failures),
9 : Invalid argument, when an unknown option was specified, or an option which requires a value was set without the value.
These are just the most common exit codes, for all the exit codes, please refer to http://ift.tt/2fA8o8c.
Learn more Node.js
These are the most important aspects of using the Node.js process module. We hope that by following the above listed advices, you’ll be able to get the most out of Node.js. In case you have any questions, don’t hesitate to reach out to us in the comments section below.
By studying the core modules, you can quickly get the hang of Node.js! Although, in case you feel that you could use some extra information about the foundations, or you have doubts about how you can implement Node successfully in your organization - we can help!
The team of RisingStack is going to travel around Europe this to hold trainings for those who are interested in working with Node.js. Check out the Beginner Node.js Training Agenda here.
Mastering the Node.js Core Modules - The Process Module published first on http://ift.tt/2fA8nUr
0 notes
Text
Mastering the Node.js Core Modules - The Process Module
In this article, we'll take a look at the Node.js Process module, and what hidden gems it has to offer. After you’ve read this post, you’ll be able to write production-ready applications with much more confidence. You’ll know what process states your Node.js apps will have, you’ll be able to do graceful shutdown, and you’ll handle errors much more efficiently.
In the new Mastering the Node.js Core Modules series you can learn what hidden/barely known features the core modules have, and how you can use them. By going through the basic elements of these Node.js modules, you’ll have a better understanding of they work and how can you eliminate any errors.
In this chapter, we’ll take a look at the Node.js process module. The process object (which is an instance of the EventEmitter) is a global variable that provides information on the currently running Node.js process.
Events to watch out for in the Node.js process module
As the process module is an EventEmitter, you can subscribe to its events just like you do it with any other instances of the EventEmitter using the .on call:
process.on('eventName', () => { //do something })
uncaughtException
This event is emitted when an uncaught JavaScript exception bubbles back to the event loop.
By default, if no event listeners are added to the uncaughtException handler, the process will print the stack trace to stderr and exit. If you add an event listener, you change this behavior to the one you implement in your listener:
process.on('uncaughtException', (err) => { // here the 1 is a file descriptor for STDERR fs.writeSync(1, `Caught exception: ${err}\n`) })
During the past years, we have seen this event used in many wrong ways. The most important advice when using the uncaughtException event in the process module are the following:
if uncaughtException happens, your application is in an undefined state,
recovering from uncaughtException is strongly discouraged, it is not safe to continue normal operation after it,
the handler should only be used for synchronous cleanup of allocated resources,
exceptions thrown in this handler are not caught, and the application will exit immediately,
you should always monitor your process with an external tool, and restart it when needed (for example, when it crashes).
unhandledRejection
Imagine you have the following code snippet:
const fs = require('fs-extra') fs.copy('/tmp/myfile', '/tmp/mynewfile') .then(() => console.log('success!'))
What would happen if the source file didn’t exist? Well, the answer depends on the Node.js version you are running. In some of them (mostly version 4 and below), the process would silently fail, and you would just sit there wondering what happened.
In more recent Node.js versions, you would get the following error message:
(node:28391) UnhandledPromiseRejectionWarning: Unhandled promise rejection (rejection id: 1): undefined (node:28391) [DEP0018] DeprecationWarning: Unhandled promise rejections are deprecated. In the future, promise rejections that are not handled will terminate the Node.js process with a non-zero exit code.
This means that we missed the error handling in the Promise we used for copying a file. The example should have been written this way:
fs.copy('/tmp/myfile', '/tmp/mynewfile') .then(() => console.log('success!')) .catch(err => console.error(err))
The problem with not handling Promise rejections is the same as in the case of uncaughtExceptions - your Node.js process will be in an unknown state. What is even worse, is that it might cause file descriptor failure and memory leaks. Your best course of action in this scenario is to restart the Node.js process.
To do so, you have to attach an event listener to the unhandledRejection event, and exit the process with process.exit(1).
Our recommendation here is to go with Matteo Collina's make-promises-safe package, which solves it for you out of the box.
Node.js Signal Events
Signal events will also be emitted when Node.js receives POSIX signal events. Let's take a look at the two most important ones, SIGTERM and SIGUSR1.
You can find the full list of supported signals here.
SIGTERM
The SIGTERM signal is sent to a Node.js process to request its termination. Unlike the SIGKILL signal, it can be listened on or ignored by the process.
This allows the process to be shut down in a nice manner, by releasing the resources it allocated, like file handlers or database connections. This way of shutting down applications is called graceful shutdown.
Essentially, the following steps need to happen before performing a graceful shutdown:
The applications get notified to stop (received SIGTERM).
The applications notify the load balancers that they aren’t ready for newer requests.
The applications finish all the ongoing requests.
Then, it releases all of the resources (like a database connection) correctly.
The application exits with a "success" status code (process.exit()).
Read this article for more on graceful shutdown in Node.js.
SIGUSR1
By the POSIX standard, SIGUSR1 and SIGUSR2 can be used for user-defined conditions. Node.js chose to use this event to start the built-in debugger.
You can send the SIGUSR1 signal to the process by running the following command:
kill -USR1 PID_OF_THE_NODE_JS_PROCESS
Once you did that, the Node.js process in question will let you know that the debugger is running:
Starting debugger agent. Debugger listening on [::]:5858
Methods and values exposed by the Node.js process module
process.cwd()
This method returns the current working directory for the running Node.js process.
$ node -e 'console.log(`Current directory: ${process.cwd()}`)' Current directory: /Users/gergelyke/Development/risingstack/risingsite_v2
In case you have to change it, you can do so by calling process.chdir(path).
process.env
This property returns an object containing the user environment, just like environ.
If you are building applications that conform the 12-factor application principles, you will heavily depend on it; as the third principle of a twelve-factor application requires that all configurations should be stored in the user environment.
Environment variables are preferred, as it is easy to change them between deploys without changing any code. Unlike config files, there is little chance of them being accidentally checked into the code repository.
It is worth mentioning, that you can change the values of the process.env object, however, it won't be reflected in the user environment.
process.exit([code])
This method tells the Node.js process to terminate the process synchronously with an exit status code. Important consequences of this call::
it will force the process to exit as quickly as possible
even if some async operations are in progress,
as writing to STDOUT and STDERR is async, some logs can be lost
in most cases, it is not recommended to use process.exit() - instead, you can let it shut down by depleting the event loop.
process.kill(pid, [signal])
With this method, you can send any POSIX signals to any processes. You don’t only kill processes as the name suggest - this command acts as a signal sender too (like the kill system call.)
Exit codes used by Node.js
If all goes well, Node.js will exit with the exit code 0. However, if the process exits because of an error, you’ll get one of the following error codes::
1 : Uncaught fatal exception, which was not handled by an uncaughtException handler,
5 : Fatal error in V8 (like memory allocation failures),
9 : Invalid argument, when an unknown option was specified, or an option which requires a value was set without the value.
These are just the most common exit codes, for all the exit codes, please refer to http://ift.tt/2fA8o8c.
Learn more Node.js
These are the most important aspects of using the Node.js process module. We hope that by following the above listed advices, you’ll be able to get the most out of Node.js. In case you have any questions, don’t hesitate to reach out to us in the comments section below.
By studying the core modules, you can quickly get the hang of Node.js! Although, in case you feel that you could use some extra information about the foundations, or you have doubts about how you can implement Node successfully in your organization - we can help!
The team of RisingStack is going to travel around Europe this to hold trainings for those who are interested in working with Node.js. Check out the Beginner Node.js Training Agenda here.
Mastering the Node.js Core Modules - The Process Module published first on http://ift.tt/2w7iA1y
0 notes
Text
Sigusr1
#include <signal.h>
#include <stdio.h>
#include <unistd.h>
#include <sys/types.h>
#include <string.h>
int c,i;
void sig_handler () {
i = 0;
printf("entro nella signal\n");
printf("%d\n", c);
}
int main() {
pid_t pid, pidp;
pid = fork();
if (pid==0) {
sleep(5);
printf("sono il figlio\n");
pidp = getppid();
i=0;
kill(pidp, SIGUSR1);
printf("ho mandato la kill\n");
} else {
i = 1;
printf("sono il padre\n");
while (i!=0) {
c++;
printf("ciclo\n");
sleep(1);
signal(SIGUSR1, sig_handler);
}
}
}
0 notes
Text
Comando kill no Linux (envia sinais) [Guia Básico]

O Comando kill no Linux envia sinais para os processos. Ele é usado geralmente para terminar a execução de processos identificados pelo seu PID. Se nenhum sinal específico for passado como parâmetro, o kill irá enviar o sinal SIGTERM (15) para terminar o processo de forma elegante. Neste exemplo o kill Força o servidor de web identificado pelo PID 1953 a ler novamente o seu arquivo de configuração: $ ps aux | grep httpdwwwrun 1952 0.0 1.7 93232 2248 ? S 16:15 0:00 /usr/sbin/httpd -f /etc/httpd/httpd.confwwwrun 1953 0.0 1.7 93232 2248 ? S 16:15 0:00 /usr/sbin/httpd -f /etc/httpd/httpd.confwwwrun 1954 0.0 1.7 93232 2248 ? S 16:15 0:00 /usr/sbin/httpd -f /etc/httpd/httpd.conf # kill –HUP 1953 Termina abruptamente os processos de serviço de web com os PIDs 1953 e 1954: # kill –9 1953 1954 A opção -l do kill oferece uma lista de sinais e seus respectivos códigos: $ kill -l 1) SIGHUP 2) SIGINT 3) SIGQUIT 4) SIGILL 5) SIGTRAP 6) SIGABRT 7) SIGBUS 8) SIGFPE 9) SIGKILL 10) SIGUSR1 11) SIGSEGV 12) SIGUSR2 13) SIGPIPE 14) SIGALRM 15) SIGTERM ( ... ) Um comando que facilita enviar sinais para processos que tem vários processos filhos é o killall. https://youtu.be/xwcD5xrR5nE Aprenda muito mais sobre Linux em nosso curso online. Você pode efetuar a matrícula aqui. Se você já tem uma conta, ou quer criar uma, basta entrar ou criar seu usuário aqui. Gostou? Compartilhe Read the full article
0 notes
Text
Mastering the Node.js Core Modules - The Process Module
In this article, we'll take a look at the Node.js Process module, and what hidden gems it has to offer. After you’ve read this post, you’ll be able to write production-ready applications with much more confidence. You’ll know what process states your Node.js apps will have, you’ll be able to do graceful shutdown, and you’ll handle errors much more efficiently.
In the new Mastering the Node.js Core Modules series you can learn what hidden/barely known features the core modules have, and how you can use them. By going through the basic elements of these Node.js modules, you’ll have a better understanding of they work and how can you eliminate any errors.
In this chapter, we’ll take a look at the Node.js process module. The process object (which is an instance of the EventEmitter) is a global variable that provides information on the currently running Node.js process.
Events to watch out for in the Node.js process module
As the process module is an EventEmitter, you can subscribe to its events just like you do it with any other instances of the EventEmitter using the .on call:
process.on('eventName', () => { //do something })
uncaughtException
This event is emitted when an uncaught JavaScript exception bubbles back to the event loop.
By default, if no event listeners are added to the uncaughtException handler, the process will print the stack trace to stderr and exit. If you add an event listener, you change this behavior to the one you implement in your listener:
process.on('uncaughtException', (err) => { // here the 1 is a file descriptor for STDERR fs.writeSync(1, `Caught exception: ${err}\n`) })
During the past years, we have seen this event used in many wrong ways. The most important advice when using the uncaughtException event in the process module are the following:
if uncaughtException happens, your application is in an undefined state,
recovering from uncaughtException is strongly discouraged, it is not safe to continue normal operation after it,
the handler should only be used for synchronous cleanup of allocated resources,
exceptions thrown in this handler are not caught, and the application will exit immediately,
you should always monitor your process with an external tool, and restart it when needed (for example, when it crashes).
unhandledRejection
Imagine you have the following code snippet:
const fs = require('fs-extra') fs.copy('/tmp/myfile', '/tmp/mynewfile') .then(() => console.log('success!'))
What would happen if the source file didn’t exist? Well, the answer depends on the Node.js version you are running. In some of them (mostly version 4 and below), the process would silently fail, and you would just sit there wondering what happened.
In more recent Node.js versions, you would get the following error message:
(node:28391) UnhandledPromiseRejectionWarning: Unhandled promise rejection (rejection id: 1): undefined (node:28391) [DEP0018] DeprecationWarning: Unhandled promise rejections are deprecated. In the future, promise rejections that are not handled will terminate the Node.js process with a non-zero exit code.
This means that we missed the error handling in the Promise we used for copying a file. The example should have been written this way:
fs.copy('/tmp/myfile', '/tmp/mynewfile') .then(() => console.log('success!')) .catch(err => console.error(err))
The problem with not handling Promise rejections is the same as in the case of uncaughtExceptions - your Node.js process will be in an unknown state. What is even worse, is that it might cause file descriptor failure and memory leaks. Your best course of action in this scenario is to restart the Node.js process.
To do so, you have to attach an event listener to the unhandledRejection event, and exit the process with process.exit(1).
Our recommendation here is to go with Matteo Collina's make-promises-safe package, which solves it for you out of the box.
Node.js Signal Events
Signal events will also be emitted when Node.js receives POSIX signal events. Let's take a look at the two most important ones, SIGTERM and SIGUSR1.
You can find the full list of supported signals here.
SIGTERM
The SIGTERM signal is sent to a Node.js process to request its termination. Unlike the SIGKILL signal, it can be listened on or ignored by the process.
This allows the process to be shut down in a nice manner, by releasing the resources it allocated, like file handlers or database connections. This way of shutting down applications is called graceful shutdown.
Essentially, the following steps need to happen before performing a graceful shutdown:
The applications get notified to stop (received SIGTERM).
The applications notify the load balancers that they aren’t ready for newer requests.
The applications finish all the ongoing requests.
Then, it releases all of the resources (like a database connection) correctly.
The application exits with a "success" status code (process.exit()).
Read this article for more on graceful shutdown in Node.js.
SIGUSR1
By the POSIX standard, SIGUSR1 and SIGUSR2 can be used for user-defined conditions. Node.js chose to use this event to start the built-in debugger.
You can send the SIGUSR1 signal to the process by running the following command:
kill -USR1 PID_OF_THE_NODE_JS_PROCESS
Once you did that, the Node.js process in question will let you know that the debugger is running:
Starting debugger agent. Debugger listening on [::]:5858
Methods and values exposed by the Node.js process module
process.cwd()
This method returns the current working directory for the running Node.js process.
$ node -e 'console.log(`Current directory: ${process.cwd()}`)' Current directory: /Users/gergelyke/Development/risingstack/risingsite_v2
In case you have to change it, you can do so by calling process.chdir(path).
process.env
This property returns an object containing the user environment, just like environ.
If you are building applications that conform the 12-factor application principles, you will heavily depend on it; as the third principle of a twelve-factor application requires that all configurations should be stored in the user environment.
Environment variables are preferred, as it is easy to change them between deploys without changing any code. Unlike config files, there is little chance of them being accidentally checked into the code repository.
It is worth mentioning, that you can change the values of the process.env object, however, it won't be reflected in the user environment.
process.exit([code])
This method tells the Node.js process to terminate the process synchronously with an exit status code. Important consequences of this call::
it will force the process to exit as quickly as possible
even if some async operations are in progress,
as writing to STDOUT and STDERR is async, some logs can be lost
in most cases, it is not recommended to use process.exit() - instead, you can let it shut down by depleting the event loop.
process.kill(pid, [signal])
With this method, you can send any POSIX signals to any processes. You don’t only kill processes as the name suggest - this command acts as a signal sender too (like the kill system call.)
Exit codes used by Node.js
If all goes well, Node.js will exit with the exit code 0. However, if the process exits because of an error, you’ll get one of the following error codes::
1 : Uncaught fatal exception, which was not handled by an uncaughtException handler,
5 : Fatal error in V8 (like memory allocation failures),
9 : Invalid argument, when an unknown option was specified, or an option which requires a value was set without the value.
These are just the most common exit codes, for all the exit codes, please refer to http://ift.tt/2fA8o8c.
Learn more Node.js
These are the most important aspects of using the Node.js process module. We hope that by following the above listed advices, you’ll be able to get the most out of Node.js. In case you have any questions, don’t hesitate to reach out to us in the comments section below.
By studying the core modules, you can quickly get the hang of Node.js! Although, in case you feel that you could use some extra information about the foundations, or you have doubts about how you can implement Node successfully in your organization - we can help!
The team of RisingStack is going to travel around Europe this to hold trainings for those who are interested in working with Node.js. Check out the Beginner Node.js Training Agenda here.
Mastering the Node.js Core Modules - The Process Module published first on http://ift.tt/2fA8nUr
0 notes