#stafftutorial
Explore tagged Tumblr posts
Visit Tumblr Blog
Explore Tumblr blogs with no restrictions, modern design and the best experience.
Last Seen Tumblr Blogs


Fun Fact
Tumblr was acquired by Yahoo for $1.1B in 2013.
Text
Jack Frost Staff Tutorial - Part 1
This is my how-to for making a Jack Frost Staff from Dreamwork’s Rise of the Guardians. When finished, the staff should stand about 6-8″ taller than yourself.
This tutorial uses measurements for myself (I am about 5’2”). So you may have to adjust the staff height itself accordingly. Say for example, you are 6ft or taller, you may have to buy one 10ft pole and shorten it so that the total staff height is 6-8 inches taller than yourself.
I will explain this more when I talk about attaching the crook and the pole together. For adjustments to the crook measurements, add the same number to each measurements to make sure that it will keep its proper shape after the adjustment. This tutorial is done in two parts, the first part is the construction of the staff itself. The second is painting it to look like the version from the movie. My friend and I have two versions of the finished staff, the first is done by stringing the colors onto the staff after painting it a base brown color. The second is entirely paint. Both give it a neat look at the end so it is entirely your preference for which you prefer to do.
Good Luck and let me know if you have any questions or need help ^_^
Part 1 - Construction of the Staff
What you will need
2 pieces of PVC pipe (1 in diameter, 5 ft in length)
3 PVC pipe caps
3 PVC pipe joints (45˚ angle)
1 PVC pipe joint (90˚ angle)
Heavy-Duty Cutting tool

Step One
Take one of the two PVC pipes, this will become the crook of the staff. This is where the cutting tools come in handy. I used a Dremel, but a hand saw or circle saw work just as good. Use a marker to measure out two 6 inch pieces, one 4 inch piece, and one 3 inch piece. Mark them like I did so you can keep track of which piece is which.

Step Two
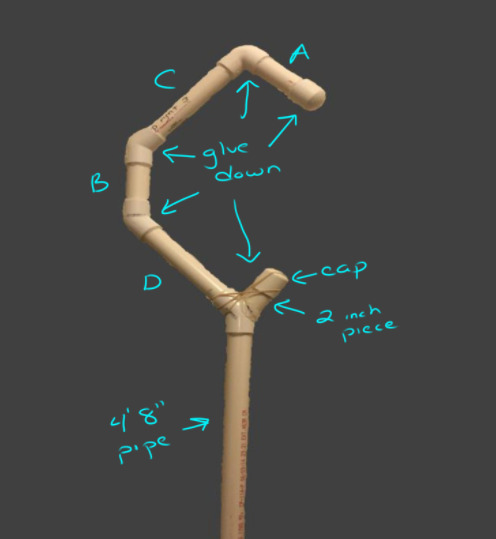
Follow closely, we are going to take the pieces and make them look like the image on the right. You will need the pieces you just cut, one of the caps, and the joint pieces.
Take piece A and place a cap on one of the ends like shown. On the other end of piece A you are going to place a 90˚ angle joint piece.
Take piece C and attach it to that 90˚ angle piece you just placed. Now place a 45˚ angle piece on the other end of C.
Take piece B and attach it to the 45˚ angle piece you just attached. Place another 45˚ angle piece on the other end.
Take piece D and attach it to the 45˚ angle piece you just attached. Place the final 45˚ angle piece on the other end of piece D.

At this point your crook should look like the image on the right. Flatten the crook against the ground so that it lays flat. Make sure all the pieces are attached tightly to one another and the joints are secured on there.
Step Three
Here is where you may have to adjust the height measurements of the staff depending on your own height. Take the second PVC pipe and attach it to the crook you just made. Place one of the two remaining caps on the bottom of the pole. The crook itself should measure about a foot in height. Since I am 5’2’’, I cut off 4 inches from the second PVC pipe pole so that the total height of the staff is about 5’8 (which is 6 inches above my own height). If you are 6 ft tall normally, cut the 10 ft pole to 5 feet, 6 inches, that way when you attach the crook (which is 1 ft) your total staff height is 6 feet 6 inches.
**If you have questions about this part, or unsure, feel free to send me a note in my inbox and I will help you out with the measurements. **

Step Four
For this part, you can do one of two things. You can simply attach the cap to the 45˚ joint connecting the staff and the crook, or you can cut a small 2 inch piece of pipe and place the cap on that to attach.
Start by gluing all of the joints down to each piece. Make sure the pieces are secure before gluing. This gives the staff some sturdiness.
Next, align the piece onto the joint so that its sits at a slight angle. You may want a second person to help you with this part. Have someone hold the piece in place which you place glue around the piece attaching it to the joint.
Don’t be stingy with the glue, give it a nice thick coat making sure it is firmly attached - you can always sand the extra away after it dries.
For added security, attach rubber-bands to hold the piece in place while the glue dries.

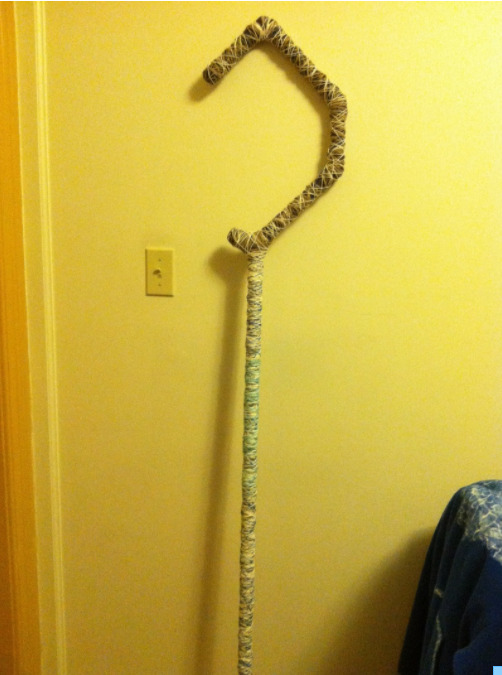
Congratulations!!
Now you have the base for your Jack Frost Staff. See Part 2 – Painting the Staff
#cosplaytutorial#cosplaytutorials#jackfrost#riseoftheguardians#dreamworks#cosplayer#cosplaying#cosplay#stafftutorial#propmaking#propmaker#jackfroststaff#jackfroststafftutorial#riseoftheguardianstutorial#guardian
19 notes
·
View notes
Text
Jack Frost Staff Tutorial - Part 2 : Painting the Staff
I have two main versions of this staff that the tutorial is based around: Painting & Stringing. Both versions do require a painted base prior to the detailing aspect - the tutorial will split after the initial process.
Which option you choose will depend on your own personal preferences, time, and how much you have to spend.
What you will need for Option 1 - Painting
Painter's Tape (or masking tape)
Gesso (or spray paint)
Paint brushes (a few different sizes)
Different shades of brown paint (I prefer acrylics for this)
Different shades of blue paint (I prefer acrylics myself)
White or silver paints (Glitter ones optional)
What you will need for Option 2 - Stringing
Painter's Tape (or masking tape)
Gesso (or spray paint)
Paint Brush (a few different sizes)
Hemp cording (2 shades of brown minimum)
Hemp cording (3 or more shades of blue)
Hemp cording (white and or silver)
Step 1 Prep Work - Hiding the PVC joints
There are a few different ways to cover/hide the joints where the multiple PVC pipes connect. I will cover two of my preferred types here - Painters Tape & Primer/Wood Filler
Option 1 - Painter’s Tape
Cover each of the joints with either masking tape or painters tape. This acts as two fold: the first part is to help give the staff some added sturdiness, the second part helps smooth out the roughness of each joint. This means that after it is painted it looks like one whole piece rather than a disjointed staff.
I would do at least 2 layers of tape, more if you see it as necessary. Definitely do a healthy amount around the joint at the bottom of the crook. This will also help to reinforce the glue and rubber bands holding it on.
Make sure you also do this at the bottom of the staff as well on the foot joint.
Personally I use painter's tape because I have more of it, but as long as it is thick enough it really doesn't matter what kind of tape you use.

Option 2 - Primer/Wood Filler/Modeling Clay
There a few different mediums you can use here, though wood filler and modeling clay are two of my favorites. The idea is to use a material that can be added in around the joints to fill in the void where it connects and smooth them out to make a seamless connection.
**Unfortunately I do not have a photo to share of this aspect as we did the painter’s tape for the original tutorial**
Step 2
After adding the tape around the joint you want to prime the staff for painting. Because of the smoothness of the staff and the type of plastic, normal paint doesn't stick to it as nicely, thus the primer. You can do this one of two ways and it is whichever you prefer. You can use a spray paint and do 1-2 coats on each side. If you choose the spray paint I would suggest doing white or a light brown. Your other option and the one I used was Gesso. This stuff works great. I did about 2-3 coats of Gesso on each side. Make sure you lay newspaper or something else down before painting.
NOTE: I forgot to put the tape on before taking this image (which meant I had to do it afterwards - please don't make my mistake)
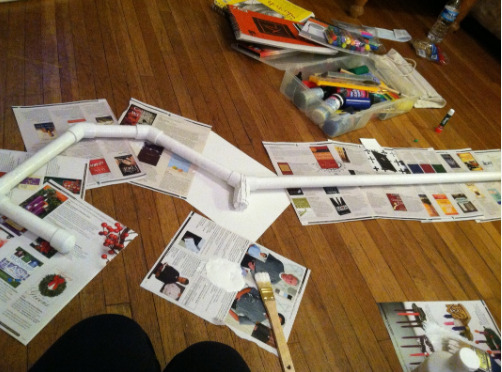
HINT: Do small layers of Gesso at a time to prevent globing or uneven drying. It takes longer but it worth it.
Step 3
After you Gesso (or spray paint) and it is fully dry, then you can do your initial painting.
I would suggest starting with a medium brown, and then do coats of darker and lighter trying to get it to look like wood. Keep your paint strokes going in the same direction (Up & Down) to help get this particular look.
This photo isn't a very good example so I apologize.
You can always look up wood references to get an idea of how you want it to look. This is entirely personal. Don't worry too much if you can't get it right. The blues, whites, and silvers will help cover up any mistakes you have.

This is the point where the two options split.
Step 4 - Option 2
Take your your first shade of tan (or brown) hemp cording and wrap it loosely like so. I would suggest getting a friend to help hold the staff while you wrap the hemp cording. (You can see my friend in the bottom corner - though the staff is hers, it was more so me helping her make it)
Continue adding hemp cording around the staff. Alternate the thread colors with the different shades of brown and tan. After you have a decent amount you can change over to the blues. Again keep alternating the colors as you go to give the staff dimension with the colors.
After you feel you have enough, switch to the white or silvers to give it the highlights. The goal is to make it look frosted. Where your hand sits should be the most frosted part gradually changing back to brown around it.
This does take awhile but it looks unique and awesome when its done.


#cosplaytutorial#cosplaytutorials#jackfroststaff#jackfroststafftutorial#riseoftheguardians#riseoftheguardianstutorial#dreamworks#jackfrost#cosplayer#cosplaying#cosplayers#stafftutorial#propmaking#propmakingtutorial#propmaker#staff#cosplayprop
8 notes
·
View notes