#static vs non static typescript
Explore tagged Tumblr posts
Visit Tumblr Blog
Explore Tumblr blogs with no restrictions, modern design and the best experience.
Last Seen Tumblr Blogs


Fun Fact
The Tumblr office adopted Tommy, an 11-year-old Pomeranian.
Text
Static vs Non-Static in TypeScript: Understanding the Differences
When working with Type Script, understanding the difference between static and non-static members is crucial for writing clean and efficient code. These concepts are foundational in object-oriented programming (OOP) and can significantly impact how you structure and interact with your classes. In this micro blog, we’ll explore the topic of static vs non-static Type Script, explaining what each term means, how to use them, and when to choose one over the other.
Static Members in TypeScript
Static members belong to the class itself rather than any specific instance of the class. This means you can access static members without creating an object of the class. Static members are useful for defining properties and methods that are shared among all instances of a class.
Key Characteristics:
Scope: Static members are scoped to the class itself.
Access: They can be accessed using the class name.
Memory Efficiency: Static members are shared among all instances, reducing memory overhead.
Non-Static Members in TypeScript
Non-static, or instance, members are tied to a specific object instance. You need to instantiate the class to use these members. Non-static members are useful for defining properties and methods that vary between different instances of a class.
Key Characteristics:
Scope: Non-static members are scoped to the instance of the class.
Access: They can be accessed using the instance of the class.
Encapsulation: They help maintain object-specific state and behavior.
Best Practices
Guidelines for Choosing Between Static and Non-Static Members
Use Static Members for Class-Level Operations:
When a property or method is related to the class itself and not to any specific instance, make it static.
Example: Utility functions, configuration constants, and methods that perform operations unrelated to instance-specific data.
Use Non-Static Members for Instance-Level Operations:
When a property or method is specific to an instance of a class, make it non-static.
Example: Properties that describe an object’s state and methods that operate on those properties.
Common Pitfalls to Avoid
Overusing Static Members:
Avoid making everything static just because it’s convenient. Overuse can lead to a design that is hard to maintain and less flexible.
Static members should be used sparingly and only when necessary.
Ignoring Encapsulation:
Encapsulation is a key principle of object-oriented programming. Ensure that non-static members are used to maintain object-specific state and behavior.
Avoid accessing static members directly from instance methods when it’s not needed, as it can break encapsulation.
Mixing Responsibilities:
Keep a clear distinction between static and non-static responsibilities. Static members should not rely on instance-specific data.
Ensure that your class design respects the single responsibility principle.
Conclusion
Understanding the difference between static and non-static members in Type Script is crucial for organizing your code properly and making it more readable and maintainable. By following the guidelines and best practices outlined above, you can effectively use static and non-static members to write efficient and maintainable Type Script code.
0 notes
Text
Node JS Vs Angular: Overview & Fundamental Differences

Both Angular and Node JS are popular web development platforms with distinct applications and advantages. Businesses can choose amongst them for development initiatives with greater knowledge if they are aware of their basic distinctions. Let's explore the main distinctions between Angular and Node JS.
This comprehensive comparative analysis will help businesses hire Angular.js developers or Node JS developers.
Overview of Node JS
A runtime environment called Node JS allows developers to run JavaScript code on the server side. It uses the V8 Javascript engine from Google, and hence, it improves the speed of code execution. This event-driven, non-blocking architectural paradigm has earned Node JS the reputation of being an extremely scalable and reliable choice for developing real-time web apps and APIs.
- Key Points about Node JS:
1. JavaScript runtime environment server-side.
2. An event-driven architecture that is non-blocking.
3. Perfect for developing real-time, robust applications and APIs.
4. Makes use of JavaScript on the server and client sides.
Overview of Angular
Google, on the contrary, created and maintains the front-end framework Angular. It is a client-side programming framework that is particularly intended for developing interactive single-page web applications. Angular, having the Model-View-Controller (MVC) architecture, therefore acquires several potent features, which are dependency injection, two-way data binding, and modular development. If you hire dedicated Angular developers, these features can easily be integrated into projects.
- Key Points about Angular:
1. Front-end framework for building SPAs.
2. Follows the Model-View-Controller (MVC) architecture.
3. Offers two-way data binding and dependency injection.
4. Ideal for building interactive and dynamic web applications.
Angular Vs Node JS: Fundamental Differences
1. Purpose and Focus:
- Server-side programming, including backend logic, APIs, and database operations, is the main focus of Node JS.
- Angular is designed with client-side programming, data binding, user interface management, and browser interactions in consideration.
2. Syntax and Language:
- JavaScript is the main language stack that is used equally on both sides of a client and server, respectively, in Node JS.
- TypeScript, a JavaScript superset, is used by Angular to provide additional features like static typing for developing reliable applications.
3. Building Design:
- Node JS has a non-blocking, event-driven paradigm that enables the management of multiple connections simultaneously.
- Like various other frameworks, Angular adheres to the MVC design pattern, which divides code into controllers (logic), views (user interface), and models (data). This approach encourages modularity and maintainability.
4. Development Scope:
- Backend services, APIs, real-time applications (such as messaging applications and streaming services), and server-side scripting can all be developed using Node.js.
- SPAs, business apps, dynamic dashboards, and intricate user interfaces with a wealth of features can all be developed using Angular.
5. Ecosystem and Tooling:
- A large community of npm packages, modules, and tools for server-side development, testing, and deployment exists for Node.js.
- To improve efficiency and code organization, Angular offers a full CLI (Command Line Interface) for front-end development, in addition to frameworks, components, and modules.
Conclusion
To sum up, Node JS and Angular have different uses in web development; Node JS is more concerned with server-side logic, whilst Angular is more interested in client-side interaction. While companies seeking Node.js development services should focus on backend features and scalability, those trying to hire Angular developers should think about the frontend components of their projects. Businesses can successfully utilize the capabilities of Node JS and Angular in their development operations by comprehending these basic contrasts.
0 notes
Text
Getting started with C# and Blazor
In this new post, I want to summarize what I understood for getting started with C# and Blazor, the new technology from Microsoft. I briefly spoke about Blazor in some other posts but here I want to introduce it properly.
We live in exciting times, as .NET developer’s life has never been better. We can create apps for any operating system be it Windows, Linux, iOS, Android or macOS. Of course, we can also build amazing web-based applications with ASP.NET. MVC, Razor Pages, and WebAPI have allowed us to create robust scalable and reliable systems for years, but there has long been a missing piece to the puzzle.
One thing all of ASP.NETs web solutions have in common is that they are server based. We’ve never been able to leverage the power of C# and .NET to write client-side applications, this has always been the domain of JavaScript.
So, I’m going to introduce you to a revolutionary client-side framework: Blazor. Built on web standards, Blazor allows us to write rich, engaging user interfaces using C# and .NET. We’ll explore how Blazor can make your development process more efficient and raise your productivity levels, especially if you’re using .NET on the server as well. We’ll cover hosting models, an important concept to understand when starting out with Blazor. We’ll look at both production supported models and the benefits and tradeoffs of each. Next, we’ll introduction components and the benefits of using them to build UIs. Finally, we’ll discuss the reasons why you should consider Blazor for your next project.
Table of contents
Why choose Blazor for new applications?
Pros
Components, a better way to build UI.
What is a component?
The benefits of a component-based UI
Components
Anatomy of a Blazor component
Understanding the code
Blazor, a platform for building modern UI with C#
No installation required
Mobile applications
Understanding hosting models
Blazor Electron
Code example
Mobile Blazor Bindings
Blazor WebAssembly
Process begin
DOM manipulation
blazor.boot.json
dotnet.wasm
Calculating UI Updates
Process explained
Benefits
Tradeoffs
Blazor WebAssembly summarize
Blazor Server
Process begins
Process static files
Calculating UI updates
Process explained
SignalR
DOM
Performance
The test
Testing
Benefits
Tradeoffs
Blazor Server summarize
Why choose Blazor for new applications?
Arguably, the hardest part of starting a new project in recent times has been choosing the tech stack, there is just so much choice available. This is especially true in the front-end world. Pick a framework (Angular, React, Vue), pick a language (TypeScript, CoffeeScript, Dart), pick a build tool (Webpack, Parcel, Browserify). If a team is new to this eco-system, it can seem an almost impossible task to try and work out which combination of technologies will help make the project a success; it’s even hard for teams with experience!
So, first in this getting started with C# and Blazor, let’s cover some of the top reasons for choosing Blazor for your next project and how it can help avoid some of the issues I’ve just mentioned.
Pros
C#, a modern and feature rich language – It’s powerful, easy to learn, and versatile
Great tooling – The .NET community has been fortunate to have some amazing tooling. Visual Studio is an extremely powerful, feature rich and extensible IDE. It’s also 100% free for individuals or non-enterprise teams of 5 or less. If you prefer something more lightweight, then there is Visual Studio Code – one of the most popular code editors today. Both Visual Studio and VS Code are both cross platform:
Visual Studio for Windows and Mac
Visual Studio Code for Windows, Mac and Linux.
.NET Ecosystem – While many new frameworks need to wait for an ecosystem to build up around them, Blazor can tap into the existing .NET ecosystem. Blazor applications target .NET Standard 2.1 and can in theory use any .NET Standard NuGet package.
Unopinionated – There are no preferred patterns or practices for Blazor development, you can write applications using the ones you’re familiar and comfortable with.
Shallow learning curve – If you’re an existing .NET developer then the learning curve for Blazor is quite shallow. Razor, C#, dependency injection, project structure will all look familiar to you. This means you can focus on writing features quicker, rather than learning the framework.
Code sharing – If you’re using C# on the server then Blazor makes an excellent paring. One of the most frustrating problems with different client and server languages is the inability to reuse code. With Blazor, everything is C#. Any shared code can be placed in a common .NET Standard class library and shared easily between server and client.
Open source – As with many projects at Microsoft, Blazor is fully open source and the code is freely available on GitHub for you to browse, download, or fork your own copy.
Components, a better way to build UI.
Blazor, as with many modern front-end frameworks, uses the concept of components to build the UI. Everything is a component, pages, parts of a page, layouts, they’re all components. There are various types of component in Blazor as well as multiple ways to write them all of which will be explored in future chapters. But learning to think in terms of components is essential for writing Blazor applications.
What is a component?
You can think of a component as a building block. You put these building blocks together to form your application. These building blocks can be as big or as small as you decide, however, building an entire UI as a single component wouldn’t be a good idea. Components really show their benefit when you think of them as a way to divide up logical areas of a UI. Let’s look at an example of a user interface structured as components.

Example of a layout divided into components
Each area of the interface is a component and each one has a certain responsibility. You may also notice that there is a hierarchy forming. The layout component sits at the top of the tree, the menu, header, home page and footer are all child components of the layout component. These child components could, and probably would have child components of their own. For example, the header component could contain a logo component and a search component.

Example of nesting components to form a component tree
The benefits of a component-based UI
Many UIs have repeating elements in them, a great advantage to using components is that you can define an element in a component and then reuse the component wherever the element repeats. This can drastically cut down on the amount of repeated code in an application. It also makes the maintainability of the application much better as if the design of that element changes you only need to update it in a single place.
To cater for more advanced scenarios, components can define their own APIs allowing data and events to be passed in and out. Imagine a line of business application, it’s probably safe to assume that within that app there would be lots of places data would be displayed in table format. One approach would be to create each table as its own component, however, this would mean we would end up with a lot of components which displayed data in a table.
A better approach would be to define a single component which took in a dataset as a parameter and then displayed it in a table. Now we have a single component for displaying data in a table that we can reuse all over the application. We could also add features to this component, things such as sorting or paging. As we do, this functionality is automatically available to all the tables in the application as they are all reusing the same component.
Components
Components help speed up the development process. Due to the reusable nature of components, using them often leads to shorter development times. They can be composed together.
While usually self-contained, it’s also possible to have components work together to create more complex UI. For example, let’s take the data table scenario we just talked about, that could be a single component but that could potentially be quite large.
Another approach would be to divide it up into several smaller components, each performing a certain job. We could have a table header component, a table body component even a table cell component. Each of these components are performing a specific job but they are still part of the overall table component.
Anatomy of a Blazor component
Now, in this post getting started with C# and Blazor, we have a better idea of what components are in a general sense, let’s look at an example of a component in Blazor. For this we’re going to grab a component from the Blazor project template.
In figure 1.3 we can see an example of a component from Blazors standard project template, Counter.razor.

The sections of a component in Blazor
This particular component is known as a routable component, as it has a page directive declared at the top. Routable components are essentially a page in the application. When the user navigates to the /counter route in the application, this component will be loaded by Blazor router. It displays a simple counter with a button and when the user clicks on the button the count is incremented by one and the new value displayed to the user.
Understanding the code
While understanding the code isn’t important at this point, we can understand the structure of the component. Figure 1.3 is divided up into three sections each has a certain responsibility.
Section 1 is used to define directives, add using statements, inject dependencies, or other general configuration which applies to the whole component.
Section 2 defines the markup of the component; this is written using the Razor language, a mix of C# and HTML. Here we define the visual elements which make up the component.
Section 3 is the code block. This is used to define the logic of the component. It is possible to write any valid C# code into this section. You can define fields, properties, even entire classes if you wish.
Blazor, a platform for building modern UI with C#
Blazor is a fully featured framework for building modern client-side applications using the power of C# and .NET. Allowing developers to build engaging applications which work across nearly any platform – including web, mobile and desktop.
Blazor is an alternative to JavaScript frameworks and libraries such as Angular, Vue and React. If you’ve had experience working with any of these then you’ll probably start spotting familiar concepts. The most notable influence is the idea of building UIs with components, a concept all these technologies share and something we’ll explore in more detail later in this chapter.
No installation required
Because Blazor is built on top of web standards; it doesn’t require the end user to have .NET installed on their machines or any kind of browser plugin or extension. In fact, with Blazor WebAssembly applications we don’t even need .NET running on the server, this flavor of Blazor can be hosted as simple static files.
Being built on .NET means we have access to the vibrant ecosystem of packages available on NuGet. We also have best in class tooling with Visual Studio and Visual Studio Code, and of course, with .NET being cross platform, we can develop our Blazor applications on whatever our preferred platform is, be that Windows, Mac or Linux.
Mobile applications
Therefore, I want to highlight that Blazors programming model can also be used to build cross-platform native mobile applications via an experimental project called Mobile Blazor Bindings. This is a collaboration between the ASP.NET Core team and the Xamarin team to investigate the potential and demand for using Blazor to build non-web UIs. Microsoft has also announced the future evolution of Xamarin Forms, the Multi-platform App UI framework known as .NET MAUI. This framework will allow developers to build native apps which run on Windows, macOS, iOS and Android. According to the roadmap, Blazors programming model will be offered as an option for building these new .NET MAUI apps. This really makes Blazor a compelling technology to learn as once understood, could allow developers to build UIs for almost any platform or device.
Hopefully, you can already see Blazor is an exciting technology with a lot of potential. But there is a key concept which is important to understand before we go any further, that of hosting models. Let’s tackle that next.
Understanding hosting models
When first getting started with Blazor you will immediately come across the concept of hosting models. Essentially, hosting models are where a Blazor application is run. Currently, Blazor has two production supported hosting models called Blazor WebAssembly and Blazor Server. Regardless of which of these models you choose for your application, the component model is the same meaning components are written the same way and can be interchanged between either hosting model.

Blazor has a separation between hosting models and its app/component model. Meaning components written for one hosting model can be used with another.
The above image shows an abstract representation of Blazors architecture, with the separation between the app and component model and the various hosting models. One of the interesting aspects of Blazor is the potential of other hosting models being made available over time to allow Blazor to run in more places and be used to create more types of UI.
Outside of the two production hosting models we will cover below, there are also two other experimental models Microsoft have been testing, Blazor Electron and Mobile Blazor Bindings.
Blazor Electron
Blazor Electron is the oldest of the two experiments and allows Blazor components to be hosted in an Electron application (https://www.electronjs.org/). Developers write components for this model using HTML and C# in the exact same way as they would for Blazor WebAssembly or Blazor Server.
Code example
An example of a component which can be used by all three of hosting models is shown in the following code.
<div> <p>Current count: @currentCount</p> <button @onclick="IncrementCount">Click me</button> </div> @code { private int currentCount = 0; private void IncrementCount() { currentCount++; } }
Mobile Blazor Bindings
The newer experiment is Mobile Blazor Bindings. This model allows developers to write native mobile applications using Blazors programming model. However, this hosting model can’t use components written using web technologies, components for this hosting model must be written using native controls. The following code contains the same component as the code abode but rewritten for the Mobile Blazor Bindings hosting model.
<StackLayout> <Label> Current count: @currentCount </Label> <Button OnClick="@IncrementCount">Click me</Button> </StackLayout> @code { private int currentCount = 0; private void IncrementCount() { currentCount++; } }
As you can see the programming model is the same between the two code samples. The logic in the code block is unchanged, it’s just C# after all. The only difference is in the markup where web technologies have been swapped for native mobile controls. This does mean that we can’t swap component around between web-based hosting models and native hosting models. However, once we’ve mastered Blazors programming model we can easily use that knowledge to create other types of UI.
Now we’ve talked a little about hosting models in general we’re going to focus in on the two production supported options available in Blazor today, Blazor WebAssembly and Blazor Server.
Blazor WebAssembly
Blazor WebAssembly is the principal hosting model for Blazor applications. Choosing this option will mean your application will run entirely inside the client’s browser making it a direct alternative to JavaScript SPA (Single Page Application) frameworks. To understand how this hosting model works we’re going to walk through the process of initializing a Blazor WebAssembly application shown in following image.
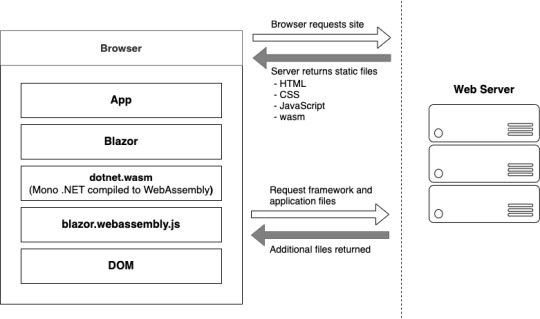
Bootup of a Blazor WebAssembly application showing the interactions between the client’s browser and the web server
Process begin
The process begins when a browser makes a request to the webserver. The web server will return a set of files needed to load the application, these include the host page for the application, usually called index.html, any static assets required by the application such as images, CSS and JavaScript. As well as a special JavaScript file called blazor.webassembly.js.
At this point, you may be wondering why we have a JavaScript file, one of the big selling points of Blazor is the ability to write UI logic using C# instead of JavaScript, right? Yes, that’s true.
But as of right now WebAssembly has a fairly large limitation, it can’t alter the DOM or call Web APIs directly.
DOM manipulation
In order to manage this current limitation, part of the Blazor framework resides in JavaScript called blazor.webassembly.js file. This part of the framework does three main things:
Loads and initializes the Blazor application in the browser.
Provides direct DOM manipulation so Blazor can perform UI updates.
Provides APIs for JavaScript interop scenarios, which we’ll discuss in detail in later chapters.
It’s possible that in the future this file will no longer be required, this will depend on how fast features are added to WebAssembly and adopted by browsers. But for now, it’s an essential part of the framework.
Now, we’ve cleared that up let’s get back to our booting Blazor app. I want to point out that the server returns all static files. They haven’t required any server-side compilation or manipulation. This means that they can be hosted on any service which offers static hosting, there is no requirement for a .NET runtime to be present on the server. For the first time this opens up free hosting options such as GitHub pages to .NET developers (applies to standalone Blazor WebAssembly applications only).
blazor.boot.json
Once the browser has received all the initial files from the web server it can process them and construct the Document Object Model (DOM). Next, blazor.webassembly.js is executed. This performs many actions but in the context of starting a Blazor WebAssembly app it downloads the blazor.boot.json file. This file essentially contains an inventory of all of the framework and application files which are required to run the app.
Most of these files are normal .NET assemblies, there is nothing special about them and they could be run on any compatible .NET runtime. But there’s also another type of file which is downloaded called dotnet.wasm.
dotnet.wasm
The dotnet.wasm file is in fact a complete .NET runtime, the mono .NET runtime to be exact, which has been compiled to WebAssembly.
At this point in time, only the .NET runtime is compiled to WebAssembly, the framework and application are standard .NET assemblies. In the future a feature called AOT (Ahead Of Time) compiling will be introduced which will allow developers to compile parts of their applications into WebAssembly.
The benefit of this will be performance, any code compiled to WebAssembly will be many times more performant than the interpreted approach used today. However, there’s a tradeoff, and that’s size. AOT compiled code will be bigger than the standard assemblies meaning a larger overall download size for the application.
Once the blazor.boot.json file has been downloaded and the files listed in it have been downloaded, it’s time for the application to be run. The WebAssembly .NET runtime is initialized which in turn loads the Blazor framework and finally the application itself. At this point we have a running Blazor application which exists entirely inside the client’s browser. Aside from requesting additional data (if applicable), there’s no further reliance on the server.
Calculating UI Updates
We now understand how a Blazor WebAssembly application boots up. But how do UI updates get calculated? Just as we did for the initialization process, we’re going to follow a scenario to understand how this happens and what Blazor does.
The process of client-side navigation in Blazor WebAssembly from clicking a link to the application of UI updates
For our scenario we have a Blazor WebAssembly application with two pages, home and counter. Neither of these pages have anything on them except a heading saying either “Home” or “Counter”, respectively. The user is on the home page of the application and is going to click on a link to the go to the counter page. We’ll follow the process Blazor goes through to update the UI from that of the home page to the counter page.
Process explained
When the user clicks on the counter link, the navigation event is intercepted by Blazor on the JavaScript side. This event is then passed over to Blazor on the WebAssembly side and is processed by Blazors router component.
The router checks its routing table for any routable components which match the link the user has attempted to navigate to. In our case, it will find a match with the Counter component and a new instance of that component will be created and the relevant lifecycle methods will be executed.
Once complete Blazor will work out the minimum amount of changes that are required to update the DOM to match that of the Counter component. When this is complete, those changes will be passed back down to the Blazor JavaScript runtime and that will in-turn, apply those changes to the physical DOM. At this point the UI will update the user will be on the Counter page.
All of this has happened client-side in the user browser. There was no need for a server during any point in this process. It’s fair to say that in a real world application, you would probably make a call out to a server to some point in this process. This usually happens during the execution of the lifecycle methods of the component being navigated to in order to load some initial data for the component. But this would depend on the individual application.
Benefits
Now we know a bit more about how the Blazor WebAssembly hosting model works, let talk about the benefits and tradeoffs of choosing this model. Let’s start with the benefits.
Applications run on the client. This means that there is much less load on the server, you can offload much of the work to the client. This could lead to significant cost saving on server infrastructure and improve the scalability of an application.
Can work in offline scenarios. As the app runs entirely inside the browser there’s no need for a persistent connection to the server, making applications more tolerant to unstable network connections. It’s also trivial is enable Progressive Web Application (PWA) functionality. In fact, Blazor WebAssembly has this as an option you can select when creating your application.
Deployed as static files. As Blazor WebAssembly apps are just static files, they can be deployed anywhere static hosting is available. This opens up some options which have never been available to .NET developers historically. Services such as GitHub pages, Netlify, Azure Blob Storage, AWS S3 Buckets, Azure Static Web Sites, are all options for hosting standalone Blazor WebAssembly applications.
Code Sharing. Potentially one of the greatest benefits with Blazor WebAssembly is if you’re using C# on the server. You can now use the same C# objects on your client as you use on the server. The days of keeping TypeScript models in sync with their C# equivalent and vice versa, are over.
Tradeoffs
Of course, nothing is a silver bullet so let’s understand some tradeoffs of this model.
Payload. The initial download size for a Blazor WebAssembly app can be considered quite large. The project template weighs in at around 1.8mb when published. This is largely down to the fact Blazor needs to ship an entire .NET runtime to the client which comes in at around 600kb. However, this is a one-time cost as the runtime and many of the framework assemblies are cached on the first load. Meaning subsequent loads can be a small as a few kb.
Load time. A knock-on effect of the payload size can be load time. If the user’s on a poor internet connection the amount of time required to download the initial files will be higher, which will delay the start of the application, leaving the user with a loading message of some kind. This can be offset slightly by using server-side prerendering, however, while this will give the user something more interesting to look at initially, the app still won’t be interactive until all files have been downloaded and initialized. Server-side prerendering for Blazor WebAssembly apps also requires a ASP.NET Core element on the server, which negates any free hosting options.
Restricted runtime. This is arguably not a tradeoff as such, but for existing .NET developers who are used to having a relatively free rein over the machine their apps run on, it’s something to be aware of. WebAssembly applications run in the same browser sandbox as JavaScript applications. This means, for example, that you will not be allowed to reach out to the users’ machine and do things such access the local file system.
Blazor WebAssembly summarize
To summarize, Blazor WebAssembly is the hosting model to choose if you’re looking for a direct replacement for a JavaScript SPA framework such as Angular, React or Vue. While there are a few tradeoffs to consider, there are some substantial benefits to choosing this model.
Blazor Server
Now we’ve seen how Blazor WebAssembly works, let’s turn our attention to the Server hosting model and see how it differs. Blazor Server was the first production supported hosting model for Blazor, being released around 8 months before the WebAssembly version. As we did with the previous model, we’ll walk through initializing a Blazor Server application to help us understand how things work.
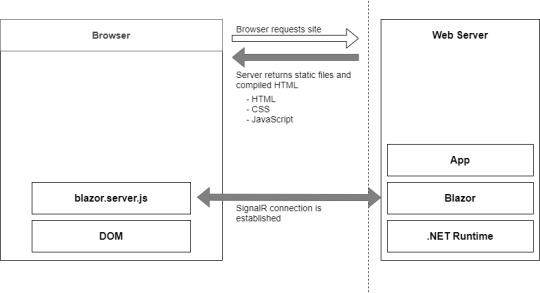
Bootup process of a Blazor Server application
Process begins
The process begins with a request to load the site from the browser. When this request hits the webserver two things could happen, the app is started up, or if the app is already running, a new session is established. Why would the app already be running? Blazor WebAssembly follows the traditional SPA model and runs entirely in the browser, essentially making it like a desktop application. Each user has their own instance of the app which runs locally on their machine. Blazor Server is different, only one instance of the application runs on the server, but it can support many clients. Therefore, the app could already be running, and the new request would just establish a new session.
Process static files
The request is then processed by the application and the initial payload is sent back to the browser. This includes static assets such as CSS and JavaScript files, and images. There is also the initial HTML, but this is compiled rather than static HTML we saw in Blazor WebAssembly. The reason for this is that the hosting page for a Blazor Server application is a Razor Page rather than a static HTML page in the WebAssembly model. The advantage of this is it allows Blazor Server applications to use server-side prerendering out of the box. In fact, this feature is enabled by default when you create this type of Blazor application.
Once the initial payload is returned to the browser the files are processed and the DOM is created – then a file called blazor.server.js is executed. The job of this runtime is to establish a SignalR connection back to the Blazor application running on the server. At this point the application is ready for user interaction.
Calculating UI updates
What happens when a user interacts with the application? We saw earlier that in Blazor WebAssembly the events are processed right there in the browser along with calculating any UI updates and applying them to the DOM. But that can’t happen here as the application is running on the server.
We’ll follow the same scenario as we did with Blazor WebAssembly, we have a Blazor Server application with two pages, home and counter. Neither of these pages have anything on them except a heading saying either “Home” or “Counter”, respectively. The user is on the home page of the application and is going to click on a link to the go to the counter page. We’ll follow the process Blazor goes through to update the UI from that of the home page to the counter page.

Process of updating the UI in Blazor Server
Process explained
The user clicks on the link in the menu and the click event is intercepted by Blazor’s runtime on the client. The runtime then processes the event to understand what has happened. In this case there are two things, a mouse click event and a navigation event, due to it being a hyperlink that was clicked. These two events are then bundled up and sent back to the server over the SignalR connection that was established when the application started.
So, the client sent a the message to the server and the server unpacks and process the message. The Blazor framework then calls any application code necessary. In this case it would instantiate an instance of the counter page component and execute the relevant lifecycle methods.
SignalR
Once complete, Blazor will work out what the minimum amount of changes needed to make the current page transform to the counter page and then send these back to the client via the SignalR connection. Just to be clear, Blazor will not send back an entirely new page to the client. It will only send back the minimum number of instructions needed to update the current DOM to match the Counter page. In our case, the only difference is the heading. Blazor will send back a single instruction to change the text in the heading from “Home” to “Counter”.
DOM
Once back on the client, the client unpacks the changes, and the required changes are applied to the physical DOM. From the user’s perspective, they appear to have navigated to a new page in the application, the counter page. But they are still on the same physical page, it just has a different header.
You may have spotted this already, but the overall process isn’t any different to how Blazor WebAssembly worked, it’s just been stretched out a bit over that SignalR connection. Blazor Server is just as much a SPA as Angular, Vue or Blazor WebAssembly. It just happens to run its logic and calculate UI updates on the server instead of the client. In fact, I would go as far as saying if you were presented with two identical applications, one written in Blazor Server and one in Blazor WebAssembly, you wouldn’t be able to tell the difference between them, as a user.
Performance
Before we talk about benefits and tradeoffs for this model, I want quickly mention performance. With all the network chatter which goes on in this hosting model I’m sure it may have crossed your mind that this might not scale particularly well.
The test
In 2019, the ASP.NET Core team did some testing to establish the performance levels of Blazor Server apps. They setup an application in Azure and tested it on different powered virtual machines, checking the number of active users the application could support. Here are the results.
Standard D1 v2 Instance (1vCPU & 3.5GB Memory). Over 5000 concurrent users
Standard D3 v2 Instance (4vCPU & 14GB Memory). Over 20,000 concurrent users
As you can see, Blazor Server is no slouch when it comes to performance. The main factor they found which effects the number of clients that can be supported is memory. This makes sense as the server needs to keep track of all the clients which are connected to it, the more there are the more information needs to be stored in memory.
Testing
The other major finding from testing was how network latency effected the application. As all interaction are sent back to the server for processing, latency can have a large impact on usability.
If the server is located 250ms away from the client, then each interaction is going to take at least 500ms to be processed as it has to travel to the server (250ms), then be processed, then travel back again (250ms).
Testing found that when the latency went above 200ms then the UI began to feel sluggish and less responsive. As a rough rule you would always want your users to be on the same continent as the server. If you want to have a globally available Blazor Server application, then you need to have your app evenly distributed across the world aiming to keep all clients within 200ms of a server.
Benefits
As we did before, let’s look at the benefits and tradeoffs of choosing a Blazor Server application.
Small payload. As the application is running on the server as opposed to the client, the initial download is significantly smaller. Depending on static assets such as CSS and images a Blazor Server application can be as small as a 100-200kb.
Fast load time. With a much smaller payload the application loads much faster. The server-side prerendering also helps as the user never sees a loading message.
Access to the full runtime. The application code is executing on the server on top of the full .NET runtime. This means that you can do things such as access the servers file system if you require without hitting any security restrictions.
Code security. If you have code which is proprietary, and you don’t want people being able to download and interrogate it then Blazor Server is a good choice. The application code is all executed on the server and only the UI updates are sent to the client. This means your code is never exposed to the client in anyway.
Tradeoffs
Heavy server load. Where Blazor WebAssembly allows us to utilize the power of the client Blazor Server does the complete opposite. Almost all of the work is now being performed by the server. Meaning you might need a larger investment in your infrastructure to support Blazor Server apps.
Doesn’t work offline. Where Blazor WebAssembly takes offline working in its stride Blazor Server does not. The SignalR connection is the lifeline of the application and without it the client can’t function at all. By default, this results in an overlay with a message saying the client is attempting to reestablish the connection. If this fails, the user has to refresh the browser to restart the application.
Latency. Due to its design Blazor Server apps are sensitive to latency issues. Every interaction the user has with the application must be sent back to the server for processing and await any updates that need to be applied. If there is a high latency in the connection between client and server a noticeable lag manifests in the UI and actions quickly feel sluggish. In real numbers a latency above 200ms is going to start causing these issues.
Requires a stable connection. Following on from the need for low latency and tying in with the inability to work offline. Blazor Server apps need to have a stable internet connection. If the connection is intermittent in any way, the user will continually see the reconnecting overlay in their application which quickly becomes very disruptive. An obvious scenario where this could occur is when a user is on a mobile device which has intermittent connection.
Blazor Server summarize
In summary, if you’re looking for a fast loading application and you have users with a fast and stable network connection, then Blazor Server is a great choice.
The post Getting started with C# and Blazor appeared first on PureSourceCode.
from WordPress https://www.puresourcecode.com/dotnet/net-core/getting-started-with-c-and-blazor/
0 notes
Photo

React with TypeScript: Best Practices
React and TypeScript are two awesome technologies used by a lot of developers these days. Knowing how to do things can get tricky, and sometimes it’s hard to find the right answer. Not to worry. We’ve put together the best practices along with examples to clarify any doubts you may have.
Let’s dive in!
How React and TypeScript Work Together
Before we begin, let’s revisit how React and TypeScript work together. React is a “JavaScript library for building user interfaces”, while TypeScript is a “typed superset of JavaScript that compiles to plain JavaScript.” By using them together, we essentially build our UIs using a typed version of JavaScript.
The reason you might use them together would be to get the benefits of a statically typed language (TypeScript) for your UI. This means more safety and fewer bugs shipping to the front end.
Does TypeScript Compile My React Code?
A common question that’s always good to review is whether TypeScript compiles your React code. The way TypeScript works is similar to this interaction:
TS: “Hey, is this all your UI code?” React: “Yup!” TS: “Cool! I’m going to compile it and make sure you didn’t miss anything.” React: “Sounds good to me!”
So the answer is yes, it does! But later, when we cover the tsconfig.json settings, most of the time you’ll want to use "noEmit": true. What this means is TypeScript will not emit JavaScript out after compilation. This is because typically, we’re just utilizing TypeScript to do our type-checking.
The output is handled, in a CRA setting, by react-scripts. We run yarn build and react-scripts bundles the output for production.
To recap, TypeScript compiles your React code to type-check your code. It doesn’t emit any JavaScript output (in most scenarios). The output is still similar to a non-TypeScript React project.
Can TypeScript Work with React and webpack?
Yes, TypeScript can work with React and webpack. Lucky for you, the webpack documentation has a guide on that.
Hopefully, that gives you a gentle refresher on how the two work together. Now, on to best practices!
Best Practices
We’ve researched the most common questions and put together this handy list of the most common use cases for React with TypeScript. This way, you can use this article as a reference in your own projects.
Configuration
One of the least fun, yet most important parts of development is configuration. How can we set things up in the shortest amount of time that will provide maximum efficiency and productivity? We’ll discuss project setup including:
tsconfig.json
ESLint
Prettier
VS Code extensions and settings.
Project Setup
The quickest way to start a React/TypeScript app is by using create-react-app with the TypeScript template. You can do this by running:
npx create-react-app my-app --template typescript
This will get you the bare minimum to start writing React with TypeScript. A few noticeable differences are:
the .tsx file extension
the tsconfig.json
the react-app-env.d.ts
The tsx is for “TypeScript JSX”. The tsconfig.json is the TypeScript configuration file, which has some defaults set. The react-app-env.d.ts references the types of react-scripts, and helps with things like allowing for SVG imports.
tsconfig.json
Lucky for us, the latest React/TypeScript template generates tsconfig.json for us. However, they add the bare minimum to get started. We suggest you modify yours to match the one below. We’ve added comments to explain the purpose of each option as well:
{ "compilerOptions": { "target": "es5", // Specify ECMAScript target version "lib": [ "dom", "dom.iterable", "esnext" ], // List of library files to be included in the compilation "allowJs": true, // Allow JavaScript files to be compiled "skipLibCheck": true, // Skip type checking of all declaration files "esModuleInterop": true, // Disables namespace imports (import * as fs from "fs") and enables CJS/AMD/UMD style imports (import fs from "fs") "allowSyntheticDefaultImports": true, // Allow default imports from modules with no default export "strict": true, // Enable all strict type checking options "forceConsistentCasingInFileNames": true, // Disallow inconsistently-cased references to the same file. "module": "esnext", // Specify module code generation "moduleResolution": "node", // Resolve modules using Node.js style "isolatedModules": true, // Unconditionally emit imports for unresolved files "resolveJsonModule": true, // Include modules imported with .json extension "noEmit": true, // Do not emit output (meaning do not compile code, only perform type checking) "jsx": "react" // Support JSX in .tsx files "sourceMap": true, // Generate corrresponding .map file "declaration": true, // Generate corresponding .d.ts file "noUnusedLocals": true, // Report errors on unused locals "noUnusedParameters": true, // Report errors on unused parameters "incremental": true, // Enable incremental compilation by reading/writing information from prior compilations to a file on disk "noFallthroughCasesInSwitch": true // Report errors for fallthrough cases in switch statement }, "include": [ "src/**/*" // *** The files TypeScript should type check *** ], "exclude": ["node_modules", "build"] // *** The files to not type check *** }
The additional recommendations come from the react-typescript-cheatsheet community and the explanations come from the Compiler Options docs in the Official TypeScript Handbook. This is a wonderful resource if you want to learn about other options and what they do.
ESLint/Prettier
In order to ensure that your code follows the rules of the project or your team, and the style is consistent, it’s recommended you set up ESLint and Prettier. To get them to play nicely, follow these steps to set it up.
Install the required dev dependencies:
yarn add eslint @typescript-eslint/parser @typescript-eslint/eslint-plugin eslint-plugin-react --dev
Create a .eslintrc.js file at the root and add the following:
module.exports = { parser: '@typescript-eslint/parser', // Specifies the ESLint parser extends: [ 'plugin:react/recommended', // Uses the recommended rules from @eslint-plugin-react 'plugin:@typescript-eslint/recommended', // Uses the recommended rules from @typescript-eslint/eslint-plugin ], parserOptions: { ecmaVersion: 2018, // Allows for the parsing of modern ECMAScript features sourceType: 'module', // Allows for the use of imports ecmaFeatures: { jsx: true, // Allows for the parsing of JSX }, }, rules: { // Place to specify ESLint rules. Can be used to overwrite rules specified from the extended configs // e.g. "@typescript-eslint/explicit-function-return-type": "off", }, settings: { react: { version: 'detect', // Tells eslint-plugin-react to automatically detect the version of React to use }, }, };
Add Prettier dependencies:
yarn add prettier eslint-config-prettier eslint-plugin-prettier --dev
Create a .prettierrc.js file at the root and add the following:
module.exports = { semi: true, trailingComma: 'all', singleQuote: true, printWidth: 120, tabWidth: 4, };
Update the .eslintrc.js file:
module.exports = { parser: '@typescript-eslint/parser', // Specifies the ESLint parser extends: [ 'plugin:react/recommended', // Uses the recommended rules from @eslint-plugin-react 'plugin:@typescript-eslint/recommended', // Uses the recommended rules from the @typescript-eslint/eslint-plugin + 'prettier/@typescript-eslint', // Uses eslint-config-prettier to disable ESLint rules from @typescript-eslint/eslint-plugin that would conflict with prettier + 'plugin:prettier/recommended', // Enables eslint-plugin-prettier and displays prettier errors as ESLint errors. Make sure this is always the last configuration in the extends array. ], parserOptions: { ecmaVersion: 2018, // Allows for the parsing of modern ECMAScript features sourceType: 'module', // Allows for the use of imports ecmaFeatures: { jsx: true, // Allows for the parsing of JSX }, }, rules: { // Place to specify ESLint rules. Can be used to overwrite rules specified from the extended configs // e.g. "@typescript-eslint/explicit-function-return-type": "off", }, settings: { react: { version: 'detect', // Tells eslint-plugin-react to automatically detect the version of React to use }, }, };
These recommendations come from a community resource written called “Using ESLint and Prettier in a TypeScript Project”, by Robert Cooper. If you visit this resource, you can read more about the “why” behind these rules and configurations.
VSCode Extensions and Settings
We’ve added ESLint and Prettier and the next step to improve our DX is to automatically fix/prettify our code on save.
First, install the ESLint extension and the Prettier extension for VSCode. This will allow ESLint to integrate with your editor seamlessly.
Next, update your Workspace settings by adding the following to your .vscode/settings.json:
{ "editor.formatOnSave": true }
This will allow VS Code to work its magic and fix your code when you save. It’s beautiful!
These suggestions also come from the previously linked article “Using ESLint and Prettier in a TypeScript Project”, by Robert Cooper.
Note: to read more about React.FC, look here, and read here for React.ReactNode.
Continue reading React with TypeScript: Best Practices on SitePoint.
by Joe Previte via SitePoint https://ift.tt/3miQ04t
0 notes
Text
The Next.js Handbook
I wrote this tutorial to help you quickly learn Next.js and get familiar with how it works.
It's ideal for you if you have zero to little knowledge of Next.js, you have used React in the past, and you are looking forward diving more into the React ecosystem, in particular server-side rendering.
I find Next.js an awesome tool to create Web Applications, and at the end of this post I hope you'll be as excited about it as I am. And I hope it will help you learn Next.js!
Note: you can download a PDF / ePub / Mobi version of this tutorial so you can read it offline!
Index
Introduction
The main features provided by Next.js
Next.js vs Gatsby vs create-react-app
How to install Next.js
View source to confirm SSR is working
The app bundles
What's that icon in the bottom right?
Install the React DevTools
Other debugging techniques you can use
Adding a second page to the site
Linking the two pages
Dynamic content with the router
Prefetching
Using the router to detect the active link
Using next/router
Feed data to the components using getInitialProps()
CSS
Populating the head tag with custom tags
Adding a wrapper component
API routes
Run code on the server side, or on the client side
Deploying the production version
Deploying on Now
Analyzing the app bundles
Lazy loading modules
Where to go from here
Introduction
Working on a modern JavaScript application powered by React is awesome until you realize that there are a couple problems related to rendering all the content on the client-side.
First, the page takes longer to become visible to the user, because before the content loads, all the JavaScript must load, and your application needs to run to determine what to show on the page.
Second, if you are building a publicly available website, you have a content SEO issue. Search engines are getting better at running and indexing JavaScript apps, but it's much better if we can send them content instead of letting them figure it out.
The solution to both of those problems is server rendering, also called static pre-rendering.
Next.js is one React framework to do all of this in a very simple way, but it's not limited to this. It's advertised by its creators as a zero-configuration, single-command toolchain for React apps.
It provides a common structure that allows you to easily build a frontend React application, and transparently handles server-side rendering for you.
The main features provided by Next.js
Here is a non-exhaustive list of the main Next.js features:
Hot Code Reloading
Next.js reloads the page when it detects any change saved to disk.
Automatic Routing
Any URL is mapped to the filesystem, to files put in the pages folder, and you don't need any configuration (you have customization options of course).
Single File Components
Using styled-jsx, completely integrated as built by the same team, it's trivial to add styles scoped to the component.
Server Rendering
You can render React components on the server side, before sending the HTML to the client.
Ecosystem Compatibility
Next.js plays well with the rest of the JavaScript, Node, and React ecosystem.
Automatic Code Splitting
Pages are rendered with just the libraries and JavaScript that they need, no more. Instead of generating one single JavaScript file containing all the app code, the app is broken up automatically by Next.js in several different resources.
Loading a page only loads the JavaScript necessary for that particular page.
Next.js does that by analyzing the resources imported.
If only one of your pages imports the Axios library, for example, that specific page will include the library in its bundle.
This ensures your first page load is as fast as it can be, and only future page loads (if they will ever be triggered) will send the JavaScript needed to the client.
There is one notable exception. Frequently used imports are moved into the main JavaScript bundle if they are used in at least half of the site pages.
Prefetching
The Link component, used to link together different pages, supports a prefetch prop which automatically prefetches page resources (including code missing due to code splitting) in the background.
Dynamic Components
You can import JavaScript modules and React Components dynamically.
Static Exports
Using the next export command, Next.js allows you to export a fully static site from your app.
TypeScript Support
Next.js is written in TypeScript and as such comes with an excellent TypeScript support.
Next.js vs Gatsby vs create-react-app
Next.js, Gatsby, and create-react-app are amazing tools we can use to power our applications.
Let's first say what they have in common. They all have React under the hood, powering the entire development experience. They also abstract webpack and all those low level things that we used to configure manually in the good old days.
create-react-app does not help you generate a server-side-rendered app easily. Anything that comes with it (SEO, speed...) is only provided by tools like Next.js and Gatsby.
When is Next.js better than Gatsby?
They can both help with server-side rendering, but in 2 different ways.
The end result using Gatsby is a static site generator, without a server. You build the site, and then you deploy the result of the build process statically on Netlify or another static hosting site.
Next.js provides a backend that can server side render a response to request, allowing you to create a dynamic website, which means you will deploy it on a platform that can run Node.js.
Next.js can generate a static site too, but I would not say it's its main use case.
If my goal was to build a static site, I'd have a hard time choosing and perhaps Gatsby has a better ecosystem of plugins, including many for blogging in particular.
Gatsby is also heavily based on GraphQL, something you might really like or dislike depending on your opinions and needs.
How to install Next.js?
To install Next.js, you need to have Node.js installed.
Make sure that you have the latest version of Node. Check with running node -v in your terminal, and compare it to the latest LTS version listed on https://nodejs.org/.
After you install Node.js, you will have the npm command available into your command line.
If you have any trouble at this stage, I recommend the following tutorials I wrote for you:
Now that you have Node, updated to the latest version, and npm, we're set!
We can choose 2 routes now: using create-next-app or the classic approach which involves installing and setting up a Next app manually.
Using create-next-app
If you're familiar with create-react-app, create-next-app is the same thing - except it creates a Next app instead of a React app, as the name implies.
I assume you have already installed Node.js, which, from version 5.2 (2+ years ago at the time of writing), comes with the npx command bundled. This handy tool lets us download and execute a JavaScript command, and we'll use it like this:
npx create-next-app
The command asks the application name (and creates a new folder for you with that name), then downloads all the packages it needs (react, react-dom, next), sets the package.json to:
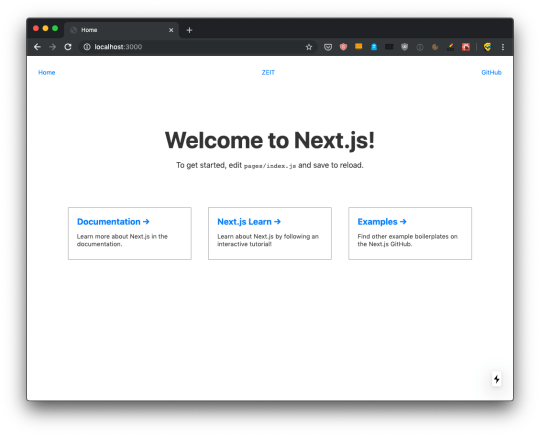
and you can immediately run the sample app by running npm run dev:
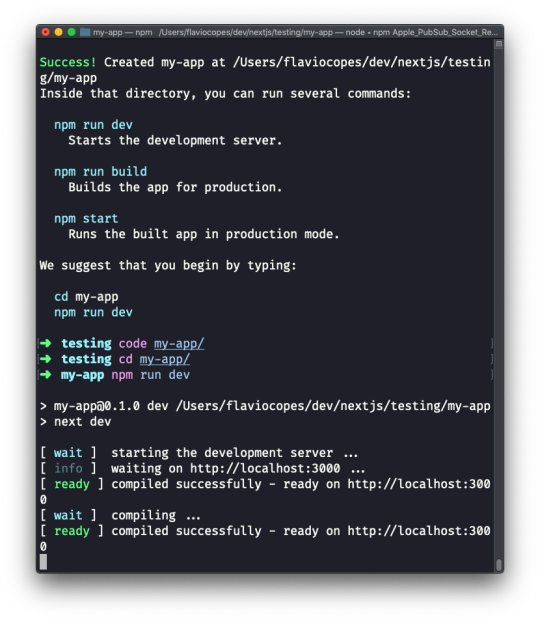
And here's the result on http://localhost:3000:
This is the recommended way to start a Next.js application, as it gives you structure and sample code to play with. There's more than just that default sample application; you can use any of the examples stored at https://github.com/zeit/next.js/tree/canary/examples using the --example option. For example try:
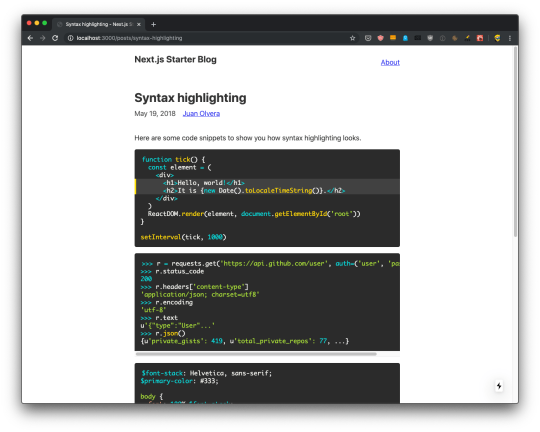
npx create-next-app --example blog-starter
Which gives you an immediately usable blog instance with syntax highlighting too:
Manually create a Next.js app
You can avoid create-next-app if you feel like creating a Next app from scratch. Here's how: create an empty folder anywhere you like, for example in your home folder, and go into it:
mkdir nextjs cd nextjs
and create your first Next project directory:
mkdir firstproject cd firstproject
Now use the npm command to initialize it as a Node project:
npm init -y
The -y option tells npm to use the default settings for a project, populating a sample package.json file.

Now install Next and React:
npm install next react react-dom
Your project folder should now have 2 files:
and the node_modules folder.
Open the project folder using your favorite editor. My favorite editor is VS Code. If you have that installed, you can run code . in your terminal to open the current folder in the editor (if the command does not work for you, see this)
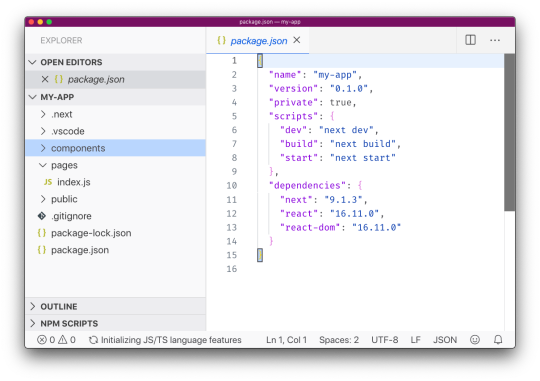
Open package.json, which now has this content:
{ "name": "firstproject", "version": "1.0.0", "description": "", "main": "index.js", "scripts": { "test": "echo \"Error: no test specified\" && exit 1" }, "keywords": [], "author": "", "license": "ISC", "dependencies": { "next": "^9.1.2", "react": "^16.11.0", "react-dom": "^16.11.0" } }
and replace the scripts section with:
"scripts": { "dev": "next", "build": "next build", "start": "next start" }
to add the Next.js build commands, which we're going to use soon.
Tip: use "dev": "next -p 3001", to change the port and run, in this example, on port 3001.

Now create a pages folder, and add an index.js file.
In this file, let's create our first React component.
We're going to use it as the default export:
const Index = () => ( <div> <h1>Home page</h1> </div> ) export default Index
Now using the terminal, run npm run dev to start the Next development server.
This will make the app available on port 3000, on localhost.
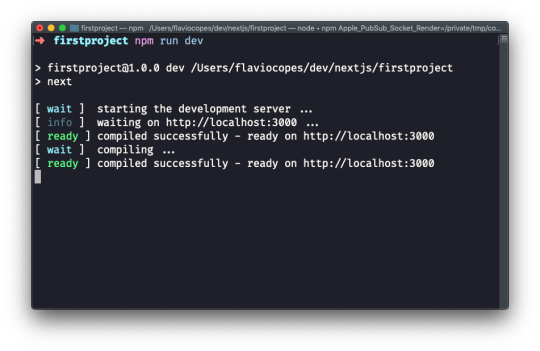
Open http://localhost:3000 in your browser to see it.

View source to confirm SSR is working
Let's now check the application is working as we expect it to work. It's a Next.js app, so it should be server side rendered.
It's one of the main selling points of Next.js: if we create a site using Next.js, the site pages are rendered on the server, which delivers HTML to the browser.
This has 3 major benefits:
The client does not need to instantiate React to render, which makes the site faster to your users.
Search engines will index the pages without needing to run the client-side JavaScript. Something Google started doing, but openly admitted to be a slower process (and you should help Google as much as possible, if you want to rank well).
You can have social media meta tags, useful to add preview images, customize title and description for any of your pages shared on Facebook, Twitter and so on.
Let's view the source of the app. Using Chrome you can right-click anywhere in the page, and press View Page Source.

If you view the source of the page, you'll see the <div><h1>Home page</h1></div> snippet in the HTML body, along with a bunch of JavaScript files - the app bundles.
We don't need to set up anything, SSR (server-side rendering) is already working for us.
The React app will be launched on the client, and will be the one powering interactions like clicking a link, using client-side rendering. But reloading a page will re-load it from the server. And using Next.js there should be no difference in the result inside the browser - a server-rendered page should look exactly like a client-rendered page.
The app bundles
When we viewed the page source, we saw a bunch of JavaScript files being loaded:

Let's start by putting the code in an HTML formatter to get it formatted better, so we humans can get a better chance at understanding it:
<!DOCTYPE html> <html> <head> <meta charSet="utf-8" /> <meta name="viewport" content="width=device-width,minimum-scale=1,initial-scale=1" /> <meta name="next-head-count" content="2" /> <link rel="preload" href="/_next/static/development/pages/index.js?ts=1572863116051" as="script" /> <link rel="preload" href="/_next/static/development/pages/_app.js?ts=1572863116051" as="script" /> <link rel="preload" href="/_next/static/runtime/webpack.js?ts=1572863116051" as="script" /> <link rel="preload" href="/_next/static/runtime/main.js?ts=1572863116051" as="script" /> </head> <body> <div id="__next"> <div> <h1>Home page</h1></div> </div> <script src="/_next/static/development/dll/dll_01ec57fc9b90d43b98a8.js?ts=1572863116051"></script> <script id="__NEXT_DATA__" type="application/json">{"dataManager":"[]","props":{"pageProps":{}},"page":"/","query":{},"buildId":"development","nextExport":true,"autoExport":true}</script> <script async="" data-next-page="/" src="/_next/static/development/pages/index.js?ts=1572863116051"></script> <script async="" data-next-page="/_app" src="/_next/static/development/pages/_app.js?ts=1572863116051"></script> <script src="/_next/static/runtime/webpack.js?ts=1572863116051" async=""></script> <script src="/_next/static/runtime/main.js?ts=1572863116051" async=""></script> </body> </html>
We have 4 JavaScript files being declared to be preloaded in the head, using rel="preload" as="script":
/_next/static/development/pages/index.js (96 LOC)
/_next/static/development/pages/_app.js (5900 LOC)
/_next/static/runtime/webpack.js (939 LOC)
/_next/static/runtime/main.js (12k LOC)
This tells the browser to start loading those files as soon as possible, before the normal rendering flow starts. Without those, scripts would be loaded with an additional delay, and this improves the page loading performance.
Then those 4 files are loaded at the end of the body, along with /_next/static/development/dll/dll_01ec57fc9b90d43b98a8.js (31k LOC), and a JSON snippet that sets some defaults for the page data:
<script id="__NEXT_DATA__" type="application/json"> { "dataManager": "[]", "props": { "pageProps": {} }, "page": "/", "query": {}, "buildId": "development", "nextExport": true, "autoExport": true } </script>
The 4 bundle files loaded are already implementing one feature called code splitting. The index.js file provides the code needed for the index component, which serves the / route, and if we had more pages we'd have more bundles for each page, which will then only be loaded if needed - to provide a more performant load time for the page.
What's that icon on the bottom right?
Did you see that little icon at the bottom right of the page, which looks like a lightning?

If you hover it, it's going to say "Prerendered Page":

This icon, which is only visible in development mode of course, tells you the page qualifies for automatic static optimization, which basically means that it does not depend on data that needs to be fetched at invokation time, and it can be prerendered and built as a static HTML file at build time (when we run npm run build).
Next can determine this by the absence of the getInitialProps() method attached to the page component.
When this is the case, our page can be even faster because it will be served statically as an HTML file rather than going through the Node.js server that generates the HTML output.
Another useful icon that might appear next to it, or instead of it on non-prerendered pages, is a little animated triangle:

This is a compilation indicator, and appears when you save a page and Next.js is compiling the application before hot code reloading kicks in to reload the code in the application automatically.
It's a really nice way to immediately determine if the app has already been compiled and you can test a part of it you're working on.
Next.js is based on React, so one very useful tool we absolutely need to install (if you haven't already) is the React Developer Tools.
Available for both Chrome and Firefox, the React Developer Tools are an essential instrument you can use to inspect a React application.
Now, the React Developer Tools are not specific to Next.js but I want to introduce them because you might not be 100% familiar with all the tools React provides. It's best to go a little into debugging tooling than assuming you already know them.
They provide an inspector that reveals the React components tree that builds your page, and for each component you can go and check the props, the state, hooks, and lots more.
Once you have installed the React Developer Tools, you can open the regular browser devtools (in Chrome, it's right-click in the page, then click Inspect) and you'll find 2 new panels: Components and Profiler.
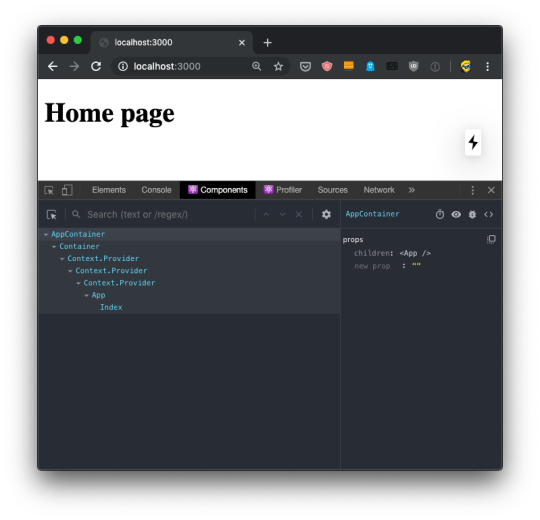
If you move the mouse over the components, you'll see that in the page, the browser will select the parts that are rendered by that component.
If you select any component in the tree, the right panel will show you a reference to the parent component, and the props passed to it:

You can easily navigate by clicking around the component names.
You can click the eye icon in the Developer Tools toolbar to inspect the DOM element, and also if you use the first icon, the one with the mouse icon (which conveniently sits under the similar regular DevTools icon), you can hover an element in the browser UI to directly select the React component that renders it.
You can use the bug icon to log a component data to the console.
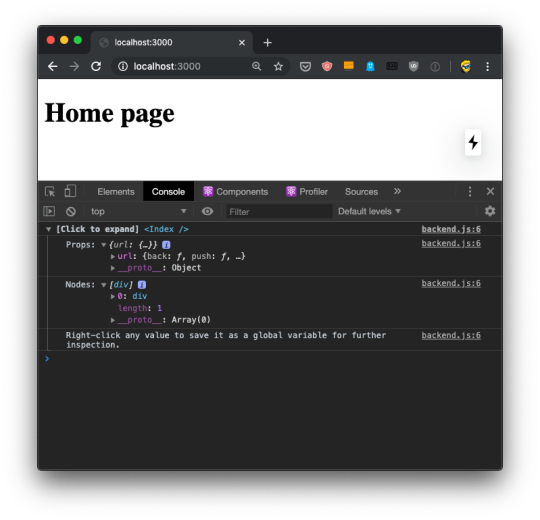
This is pretty awesome because once you have the data printed there, you can right-click any element and press "Store as a global variable". For example here I did it with the url prop, and I was able to inspect it in the console using the temporary variable assigned to it, temp1:

Using Source Maps, which are loaded by Next.js automatically in development mode, from the Components panel we can click the <> code and the DevTools will switch to the Source panel, showing us the component source code:

The Profiler tab is even more awesome, if possible. It allows us to record an interaction in the app, and see what happens. I cannot show an example yet, because it needs at least 2 components to create an interaction, and we have just one now. I'll talk about this later.

I showed all screenshots using Chrome, but the React Developer Tools works in the same way in Firefox:

Other debugging techniques you can use
In addition to the React Developer Tools, which are essential to building a Next.js application, I want to emphasize 2 ways to debug Next.js apps.
The first is obviously console.log() and all the other Console API tools. The way Next apps work will make a log statement work in the browser console OR in the terminal where you started Next using npm run dev.
In particular, if the page loads from the server, when you point the URL to it, or you hit the refresh button / cmd/ctrl-R, any console logging happens in the terminal.
Subsequent page transitions that happen by clicking the mouse will make all console logging happen inside the browser.
Just remember if you are surprised by missing logging.
Another tool that is essential is the debugger statement. Adding this statement to a component will pause the browser rendering the page:
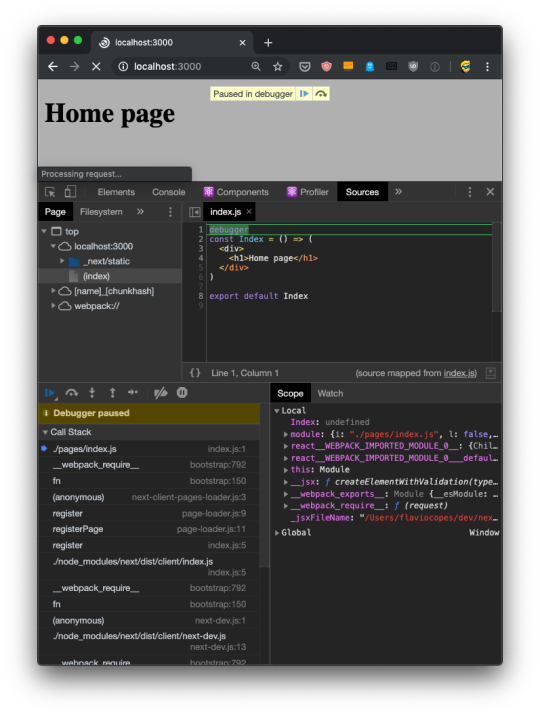
Really awesome because now you can use the browser debugger to inspect values and run your app one line at a time.
You can also use the VS Code debugger to debug server-side code. I mention this technique and this tutorial to set this up.
Adding a second page to the site
Now that we have a good grasp of the tools we can use to help us develop Next.js apps, let's continue from where we left our first app:
I want to add a second page to this website, a blog. It's going to be served into /blog, and for the time being it will just contain a simple static page, just like our first index.js component:

After saving the new file, the npm run dev process already running is already capable of rendering the page, without the need to restart it.
When we hit the URL http://localhost:3000/blog we have the new page:

and here's what the terminal told us:

Now the fact that the URL is /blog depends on just the filename, and its position under the pages folder.
You can create a pages/hey/ho page, and that page will show up on the URL http://localhost:3000/hey/ho.
What does not matter, for the URL purposes, is the component name inside the file.
Try going and viewing the source of the page, when loaded from the server it will list /_next/static/development/pages/blog.js as one of the bundles loaded, and not /_next/static/development/pages/index.js like in the home page. This is because thanks to automatic code splitting we don't need the bundle that serves the home page. Just the bundle that serves the blog page.

We can also just export an anonymous function from blog.js:
export default () => ( <div> <h1>Blog</h1> </div> )
or if you prefer the non-arrow function syntax:
export default function() { return ( <div> <h1>Blog</h1> </div> ) }
Linking the two pages
Now that we have 2 pages, defined by index.js and blog.js, we can introduce links.
Normal HTML links within pages are done using the a tag:
<a href="/blog">Blog</a>
We can't do do that in Next.js.
Why? We technically can, of course, because this is the Web and on the Web things never break (that's why we can still use the <marquee> tag. But one of the main benefits of using Next is that once a page is loaded, transitions to other page are very fast thanks to client-side rendering.
If you use a plain a link:
const Index = () => ( <div> <h1>Home page</h1> <a href='/blog'>Blog</a> </div> ) export default Index
Now open the DevTools, and the Network panel in particular. The first time we load http://localhost:3000/ we get all the page bundles loaded:

Now if you click the "Preserve log" button (to avoid clearing the Network panel), and click the "Blog" link, this is what happens:

We got all that JavaScript from the server, again! But.. we don't need all that JavaScript if we already got it. We'd just need the blog.js page bundle, the only one that's new to the page.
To fix this problem, we use a component provided by Next, called Link.
We import it:
import Link from 'next/link'
and then we use it to wrap our link, like this:
import Link from 'next/link' const Index = () => ( <div> <h1>Home page</h1> <Link href='/blog'> <a>Blog</a> </Link> </div> ) export default Index
Now if you retry the thing we did previously, you'll be able to see that only the blog.js bundle is loaded when we move to the blog page:

and the page loaded so faster than before, the browser usual spinner on the tab didn't even appear. Yet the URL changed, as you can see. This is working seamlessly with the browser History API.
This is client-side rendering in action.
What if you now press the back button? Nothing is being loaded, because the browser still has the old index.js bundle in place, ready to load the /index route. It's all automatic!
Dynamic content with the router
In the previous chapter we saw how to link the home to the blog page.
A blog is a great use case for Next.js, one we'll continue to explore in this chapter by adding blog posts.
Blog posts have a dynamic URL. For example a post titled "Hello World" might have the URL /blog/hello-world. A post titled "My second post" might have the URL /blog/my-second-post.
This content is dynamic, and might be taken from a database, markdown files or more.
Next.js can serve dynamic content based on a dynamic URL.
We create a dynamic URL by creating a dynamic page with the [] syntax.
How? We add a pages/blog/[id].js file. This file will handle all the dynamic URLs under the /blog/ route, like the ones we mentioned above: /blog/hello-world, /blog/my-second-post and more.
In the file name, [id] inside the square brackets means that anything that's dynamic will be put inside the id parameter of the query property of the router.
Ok, that's a bit too many things at once.
What's the router?
The router is a library provided by Next.js.
We import it from next/router:
import { useRouter } from 'next/router'
and once we have useRouter, we instantiate the router object using:
const router = useRouter()
Once we have this router object, we can extract information from it.
In particular we can get the dynamic part of the URL in the [id].js file by accessing router.query.id.
The dynamic part can also just be a portion of the URL, like post-[id].js.
So let's go on and apply all those things in practice.
Create the file pages/blog/[id].js:
import { useRouter } from 'next/router' export default () => { const router = useRouter() return ( <> <h1>Blog post</h1> <p>Post id: {router.query.id}</p> </> ) }
Now if you go to the http://localhost:3000/blog/test router, you should see this:

We can use this id parameter to gather the post from a list of posts. From a database, for example. To keep things simple we'll add a posts.json file in the project root folder:
{ "test": { "title": "test post", "content": "Hey some post content" }, "second": { "title": "second post", "content": "Hey this is the second post content" } }
Now we can import it and lookup the post from the id key:
import { useRouter } from 'next/router' import posts from '../../posts.json' export default () => { const router = useRouter() const post = posts[router.query.id] return ( <> <h1>{post.title}</h1> <p>{post.content}</p> </> ) }
Reloading the page should show us this result:

But it's not! Instead, we get an error in the console, and an error in the browser, too:

Why? Because.. during rendering, when the component is initialized, the data is not there yet. We'll see how to provide the data to the component with getInitialProps in the next lesson.
For now, add a little if (!post) return <p></p> check before returning the JSX:
import { useRouter } from 'next/router' import posts from '../../posts.json' export default () => { const router = useRouter() const post = posts[router.query.id] if (!post) return <p></p> return ( <> <h1>{post.title}</h1> <p>{post.content}</p> </> ) }
Now things should work. Initially the component is rendered without the dynamic router.query.id information. After rendering, Next.js triggers an update with the query value and the page displays the correct information.
And if you view source, there is that empty <p> tag in the HTML:

We'll soon fix this issue that fails to implement SSR and this harms both loading times for our users, SEO and social sharing as we already discussed.
We can complete the blog example by listing those posts in pages/blog.js:
import posts from '../posts.json' const Blog = () => ( <div> <h1>Blog</h1> <ul> {Object.entries(posts).map((value, index) => { return <li key={index}>{value[1].title}</li> })} </ul> </div> ) export default Blog
And we can link them to the individual post pages, by importing Link from next/link and using it inside the posts loop:
import Link from 'next/link' import posts from '../posts.json' const Blog = () => ( <div> <h1>Blog</h1> <ul> {Object.entries(posts).map((value, index) => { return ( <li key={index}> <Link href='/blog/[id]' as={'/blog/' + value[0]}> <a>{value[1].title}</a> </Link> </li> ) })} </ul> </div> ) export default Blog
Prefetching
I mentioned previously how the Link Next.js component can be used to create links between 2 pages, and when you use it, Next.js transparently handles frontend routing for us, so when a user clicks a link, frontend takes care of showing the new page without triggering a new client/server request and response cycle, as it normally happens with web pages.
There's another thing that Next.js does for you when you use Link.
As soon as an element wrapped within <Link> appears in the viewport (which means it's visible to the website user), Next.js prefetches the URL it points to, as long as it's a local link (on your website), making the application super fast to the viewer.
This behavior is only being triggered in production mode (we'll talk about this in-depth later), which means you have to stop the application if you are running it with npm run dev, compile your production bundle with npm run build and run it with npm run start instead.
Using the Network inspector in the DevTools you'll notice that any links above the fold, at page load, start the prefetching as soon as the load event has been fired on your page (triggered when the page is fully loaded, and happens after the DOMContentLoaded event).
Any other Link tag not in the viewport will be prefetched when the user scrolls and it
Prefetching is automatic on high speed connections (Wifi and 3g+ connections, unless the browser sends the Save-Data HTTP Header.
You can opt out from prefetching individual Link instances by setting the prefetch prop to false:
<Link href="/a-link" prefetch={false}> <a>A link</a> </Link>
Using the router to detect the active link
One very important feature when working with links is determining what is the current URL, and in particular assigning a class to the active link, so we can style it differently from the other ones.
This is especially useful in your site header, for example.
The Next.js default Link component offered in next/link does not do this automatically for us.
We can create a Link component ourselves, and we store it in a file Link.js in the Components folder, and import that instead of the default next/link.
In this component, we'll first import React from react, Link from next/link and the useRouter hook from next/router.
Inside the component we determine if the current path name matches the href prop of the component, and if so we append the selected class to the children.
We finally return this children with the updated class, using React.cloneElement():
import React from 'react' import Link from 'next/link' import { useRouter } from 'next/router' export default ({ href, children }) => { const router = useRouter() let className = children.props.className || '' if (router.pathname === href) { className = `${className} selected` } return <Link href={href}>{React.cloneElement(children, { className })}</Link> }
Using next/router
We already saw how to use the Link component to declaratively handle routing in Next.js apps.
It's really handy to manage routing in JSX, but sometimes you need to trigger a routing change programmatically.
In this case, you can access the Next.js Router directly, provided in the next/router package, and call its push() method.
Here's an example of accessing the router:
import { useRouter } from 'next/router' export default () => { const router = useRouter() //... }
Once we get the router object by invoking useRouter(), we can use its methods.
This is the client side router, so methods should only be used in frontend facing code. The easiest way to ensure this is to wrap calls in the useEffect() React hook, or inside componentDidMount() in React stateful components.
The ones you'll likely use the most are push() and prefetch().
push() allows us to programmatically trigger a URL change, in the frontend:
router.push('/login')
prefetch() allows us to programmatically prefetch a URL, useful when we don't have a Link tag which automatically handles prefetching for us:
router.prefetch('/login')
Full example:
import { useRouter } from 'next/router' export default () => { const router = useRouter() useEffect(() => { router.prefetch('/login') }) }
You can also use the router to listen for route change events.
Feed data to the components using getInitialProps
In the previous chapter we had an issue with dynamically generating the post page, because the component required some data up front, and when we tried to get the data from the JSON file:
import { useRouter } from 'next/router' import posts from '../../posts.json' export default () => { const router = useRouter() const post = posts[router.query.id] return ( <> <h1>{post.title}</h1> <p>{post.content}</p> </> ) }
we got this error:
How do we solve this? And how do we make SSR work for dynamic routes?
We must provide the component with props, using a special function called getInitialProps() which is attached to the component.
To do so, first we name the component:
const Post = () => { //... } export default Post
then we add the function to it:
const Post = () => { //... } Post.getInitialProps = () => { //... } export default Post
This function gets an object as its argument, which contains several properties. In particular, the thing we are interested into now is that we get the query object, the one we used previously to get the post id.
So we can get it using the object destructuring syntax:
Post.getInitialProps = ({ query }) => { //... }
Now we can return the post from this function:
Post.getInitialProps = ({ query }) => { return { post: posts[query.id] } }
And we can also remove the import of useRouter, and we get the post from the props property passed to the Post component:
import posts from '../../posts.json' const Post = props => { return ( <div> <h1>{props.post.title}</h1> <p>{props.post.content}</p> </div> ) } Post.getInitialProps = ({ query }) => { return { post: posts[query.id] } } export default Post
Now there will be no error, and SSR will be working as expected, as you can see checking view source:
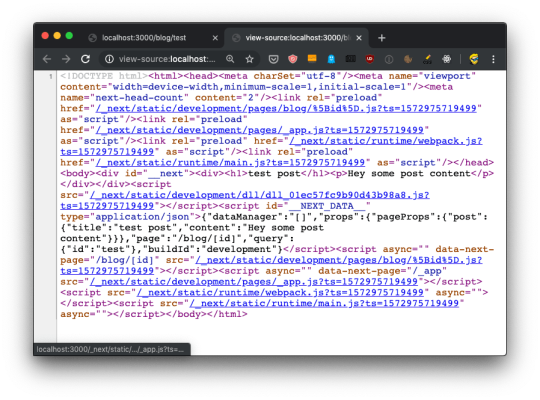
The getInitialProps function will be executed on the server side, but also on the client side, when we navigate to a new page using the Link component as we did.
It's important to note that getInitialProps gets, in the context object it receives, in addition to the query object these other properties:
pathname: the path section of URL
asPath - String of the actual path (including the query) shows in the browser
which in the case of calling http://localhost:3000/blog/test will respectively result to:
And in the case of server side rendering, it will also receive:
req: the HTTP request object
res: the HTTP response object
err: an error object
req and res will be familiar to you if you've done any Node.js coding.
CSS
How do we style React components in Next.js?
We have a lot of freedom, because we can use whatever library we prefer.
But Next.js comes with styled-jsx built-in, because that's a library built by the same people working on Next.js.
And it's a pretty cool library that provides us scoped CSS, which is great for maintainability because the CSS is only affecting the component it's applied to.
I think this is a great approach at writing CSS, without the need to apply additional libraries or preprocessors that add complexity.
To add CSS to a React component in Next.js we insert it inside a snippet in the JSX, which start with
<style jsx>{`
and ends with
`}</style>
Inside this weird blocks we write plain CSS, as we'd do in a .css file:
<style jsx>{` h1 { font-size: 3rem; } `}</style>
You write it inside the JSX, like this:
const Index = () => ( <div> <h1>Home page</h1> <style jsx>{` h1 { font-size: 3rem; } `}</style> </div> ) export default Index
Inside the block we can use interpolation to dynamically change the values. For example here we assume a size prop is being passed by the parent component, and we use it in the styled-jsx block:
const Index = props => ( <div> <h1>Home page</h1> <style jsx>{` h1 { font-size: ${props.size}rem; } `}</style> </div> )
If you want to apply some CSS globally, not scoped to a component, you add the global keyword to the style tag:
<style jsx global>{` body { margin: 0; } `}</style>
If you want to import an external CSS file in a Next.js component, you have to first install @zeit/next-css:
npm install @zeit/next-css
and then create a configuration file in the root of the project, called next.config.js, with this content:
const withCSS = require('@zeit/next-css') module.exports = withCSS()
After restarting the Next app, you can now import CSS like you normally do with JavaScript libraries or components:
import '../style.css'
You can also import a SASS file directly, using the @zeit/next-sass library instead.
From any Next.js page component, you can add information to the page header.
This is handy when:
you want to customize the page title
you want to change a meta tag
How can you do so?
Inside every component you can import the Head component from next/head and include it in your component JSX output:
import Head from 'next/head' const House = props => ( <div> <Head> <title>The page title</title> </Head> {/* the rest of the JSX */} </div> ) export default House
You can add any HTML tag you'd like to appear in the <head> section of the page.
When mounting the component, Next.js will make sure the tags inside Head are added to the heading of the page. Same when unmounting the component, Next.js will take care of removing those tags.
Adding a wrapper component
All the pages on your site look more or less the same. There's a chrome window, a common base layer, and you just want to change what's inside.
There's a nav bar, a sidebar, and then the actual content.
How do you build such system in Next.js?
There are 2 ways. One is using a Higher Order Component, by creating a components/Layout.js component:
export default Page => { return () => ( <div> <nav> <ul>....</ul> </hav> <main> <Page /> </main> </div> ) }
In there we can import separate components for heading and/or sidebar, and we can also add all the CSS we need.
And you use it in every page like this:
import withLayout from '../components/Layout.js' const Page = () => <p>Here's a page!</p> export default withLayout(Page)
But I found this works only for simple cases, where you don't need to call getInitialProps() on a page.
Why?
Because getInitialProps() gets only called on the page component. But if we export the Higher Order Component withLayout() from a page, Page.getInitialProps() is not called. withLayout.getInitialProps() would.
To avoid unnecessarily complicating our codebase, the alternative approach is to use props:
export default props => ( <div> <nav> <ul>....</ul> </hav> <main> {props.content} </main> </div> )
and in our pages now we use it like this:
import Layout from '../components/Layout.js' const Page = () => ( <Layout content={( <p>Here's a page!</p> )} /> )
This approach lets us use getInitialProps() from within our page component, with the only downside of having to write the component JSX inside the content prop:
import Layout from '../components/Layout.js' const Page = () => ( <Layout content={( <p>Here's a page!</p> )} /> ) Page.getInitialProps = ({ query }) => { //... }
API Routes
In addition to creating page routes, which means pages are served to the browser as Web pages, Next.js can create API routes.
This is a very interesting feature because it means that Next.js can be used to create a frontend for data that is stored and retrieved by Next.js itself, transferring JSON via fetch requests.
API routes live under the /pages/api/ folder and are mapped to the /api endpoint.
This feature is very useful when creating applications.
In those routes, we write Node.js code (rather than React code). It's a paradigm shift, you move from the frontend to the backend, but very seamlessly.
Say you have a /pages/api/comments.js file, whose goal is to return the comments of a blog post as JSON.
Say you have a list of comments stored in a comments.json file:
[ { "comment": "First" }, { "comment": "Nice post" } ]
Here's a sample code, which returns to the client the list of comments:
import comments from './comments.json' export default (req, res) => { res.status(200).json(comments) }
It will listen on the /api/comments URL for GET requests, and you can try calling it using your browser:

API routes can also use dynamic routing like pages, use the [] syntax to create a dynamic API route, like /pages/api/comments/[id].js which will retrieve the comments specific to a post id.
Inside the [id].js you can retrieve the id value by looking it up inside the req.query object:
import comments from '../comments.json' export default (req, res) => { res.status(200).json({ post: req.query.id, comments }) }
Heres you can see the above code in action:
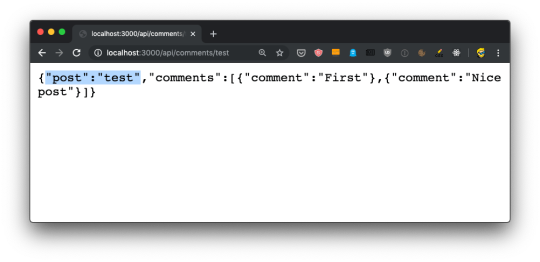
In dynamic pages, you'd need to import useRouter from next/router, then get the router object using const router = useRouter(), and then we'd be able to get the id value using router.query.id.
In the server-side it's all easier, as the query is attached to the request object.
If you do a POST request, all works in the same way - it all goes through that default export.
To separate POST from GET and other HTTP methods (PUT, DELETE), lookup the req.method value:
export default (req, res) => { switch (req.method) { case 'GET': //... break case 'POST': //... break default: res.status(405).end() //Method Not Allowed break } }
In addition to req.query and req.method we already saw, we have access to cookies by referencing req.cookies, the request body in req.body.
Under the hoods, this is all powered by Micro, a library that powers asynchronous HTTP microservices, made by the same team that built Next.js.
You can make use of any Micro middleware in our API routes to add more functionality.
Run code only on the server side or client side
In your page components, you can execute code only in the server-side or on the client-side, by checking the window property.
This property is only existing inside the browser, so you can check
if (typeof window === 'undefined') { }
and add the server-side code in that block.
Similarly, you can execute client-side code only by checking
if (typeof window !== 'undefined') { }
JS Tip: We use the typeof operator here because we can't detect a value to be undefined in other ways. We can't do if (window === undefined) because we'd get a "window is not defined" runtime error
Next.js, as a build-time optimization, also removes the code that uses those checks from bundles. A client-side bundle will not include the content wrapped into a if (typeof window === 'undefined') {} block.
Deploying the production version
Deploying an app is always left last in tutorials.
Here I want to introduce it early, just because it's so easy to deploy a Next.js app that we can dive into it now, and then move on to other more complex topics later on.
Remember in the "How to install Next.js" chapter I told you to add those 3 lines to the package.json script section:
"scripts": { "dev": "next", "build": "next build", "start": "next start" }
We used npm run dev up to now, to call the next command installed locally in node_modules/next/dist/bin/next. This started the development server, which provided us source maps and hot code reloading, two very useful features while debugging.
The same command can be invoked to build the website passing the build flag, by running npm run build. Then, the same command can be used to start the production app passing the start flag, by running npm run start.
Those 2 commands are the ones we must invoke to successfully deploy the production version of our site locally. The production version is highly optimized and does not come with source maps and other things like hot code reloading that would not be beneficial to our end users.
So, let's create a production deploy of our app. Build it using:
npm run build

The output of the command tells us that some routes (/ and /blog are now prerendered as static HTML, while /blog/[id] will be served by the Node.js backend.
Then you can run npm run start to start the production server locally:
npm run start
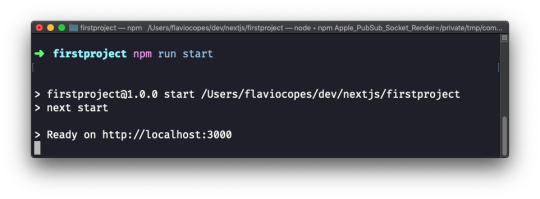
Visiting http://localhost:3000 will show us the production version of the app, locally.
Deploying on Now
In the previous chapter we deployed the Next.js application locally.
How do we deploy it to a real web server, so other people can access it?
One of the most simple ways to deploy a Next application is through the Now platform created by Zeit, the same company that created the Open Source project Next.js. You can use Now to deploy Node.js apps, Static Websites, and much more.
Now makes the deployment and distribution step of an app very, very simple and fast, and in addition to Node.js apps, they also support deploying Go, PHP, Python and other languages.
You can think of it as the "cloud", as you don't really know where your app will be deployed, but you know that you will have a URL where you can reach it.
Now is free to start using, with generous free plan that currently includes 100GB of hosting, 1000 serverless functions invocations per day, 1000 builds per month, 100GB of bandwidth per month, and one CDN location. The pricing page helps get an idea of the costs if you need more.
The best way to start using Now is by using the official Now CLI:
npm install -g now
Once the command is available, run
now login
and the app will ask you for your email.
If you haven't registered already, create an account on https://zeit.co/signup before continuing, then add your email to the CLI client.
Once this is done, from the Next.js project root folder run
now
and the app will be instantly deployed to the Now cloud, and you'll be given the unique app URL:
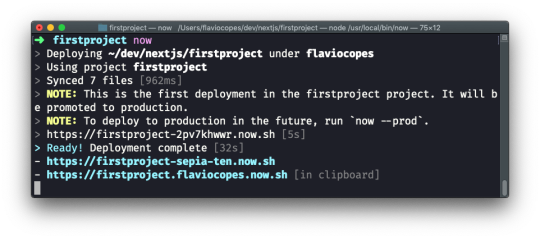
Once you run the now program, the app is deployed to a random URL under the now.sh domain.
We can see 3 different URLs in the output given in the image:
Why so many?
The first is the URL identifying the deploy. Every time we deploy the app, this URL will change.
You can test immediately by changing something in the project code, and running now again:
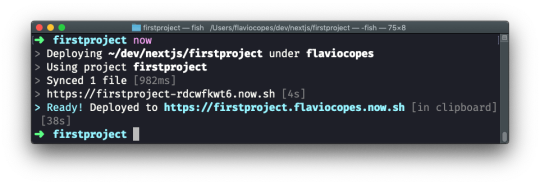
The other 2 URLs will not change. The first is a random one, the second is your project name (which defaults to the current project folder, your account name and then now.sh.
If you visit the URL, you will see the app deployed to production.
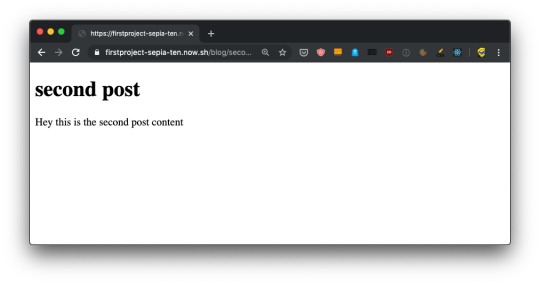
You can configure Now to serve the site to your own custom domain or subdomain, but I will not dive into that right now.
The now.sh subdomain is enough for our testing purposes.
Analyzing the app bundles
Next provides us a way to analyze the code bundles that are generated.
Open the package.json file of the app and in the scripts section add those 3 new commands:
"analyze": "cross-env ANALYZE=true next build", "analyze:server": "cross-env BUNDLE_ANALYZE=server next build", "analyze:browser": "cross-env BUNDLE_ANALYZE=browser next build"
Like this:
{ "name": "firstproject", "version": "1.0.0", "description": "", "main": "index.js", "scripts": { "dev": "next", "build": "next build", "start": "next start", "analyze": "cross-env ANALYZE=true next build", "analyze:server": "cross-env BUNDLE_ANALYZE=server next build", "analyze:browser": "cross-env BUNDLE_ANALYZE=browser next build" }, "keywords": [], "author": "", "license": "ISC", "dependencies": { "next": "^9.1.2", "react": "^16.11.0", "react-dom": "^16.11.0" } }
then install those 2 packages:
npm install --dev cross-env @next/bundle-analyzer
Create a next.config.js file in the project root, with this content:
const withBundleAnalyzer = require('@next/bundle-analyzer')({ enabled: process.env.ANALYZE === 'true' }) module.exports = withBundleAnalyzer({})
Now run the command
npm run analyze

This should open 2 pages in the browser. One for the client bundles, and one for the server bundles:
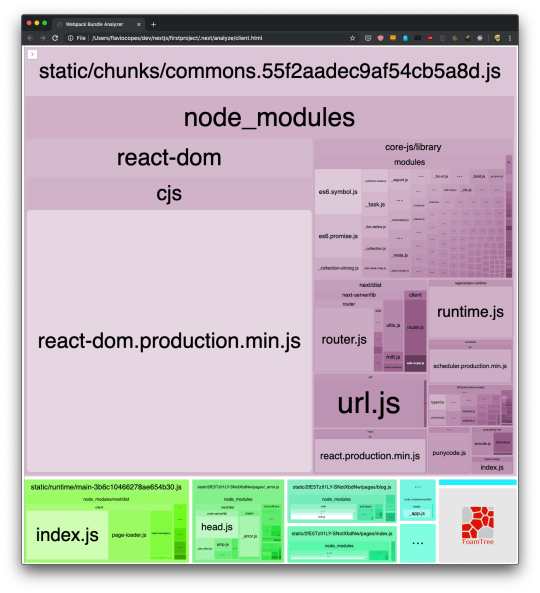

This is incredibly useful. You can inspect what's taking the most space in the bundles, and you can also use the sidebar to exclude bundles, for an easier visualization of the smaller ones:

Lazy loading modules
Being able to visually analyze a bundle is great because we can optimize our application very easily.
Say we need to load the Moment library in our blog posts. Run:
npm install moment
to include it in the project.
Now let's simulate the fact we need it on two different routes: /blog and /blog/[id].
We import it in pages/blog/[id].js:
import moment from 'moment' ... const Post = props => { return ( <div> <h1>{props.post.title}</h1> <p>Published on {moment().format('dddd D MMMM YYYY')}</p> <p>{props.post.content}</p> </div> ) }
I'm just adding today's date, as an example.
This will include Moment.js in the blog post page bundle, as you can see by running npm run analyze:

See that we now have a red entry in /blog/[id], the route that we added Moment.js to!
It went from ~1kB to 350kB, quite a big deal. And this is because the Moment.js library itself is 349kB.
The client bundles visualization now shows us that the bigger bundle is the page one, which before was very little. And 99% of its code is Moment.js.

Every time we load a blog post we are going to have all this code transferred to the client. Which is not ideal.
One fix would be to look for a library with a smaller size, as Moment.js is not known for being lightweight (especially out of the box with all the locales included), but let's assume for the sake of the example that we must use it.
What we can do instead is separating all the Moment code in a separate bundle.
How? Instead of importing Moment at the component level, we perform an async import inside getInitialProps, and we calculate the value to send to the component. Remember that we can't return complex objects inside the getInitialProps() returned object, so we calculate the date inside it:
import posts from '../../posts.json' const Post = props => { return ( <div> <h1>{props.post.title}</h1> <p>Published on {props.date}</p> <p>{props.post.content}</p> </div> ) } Post.getInitialProps = async ({ query }) => { const moment = (await import('moment')).default() return { date: moment.format('dddd D MMMM YYYY'), post: posts[query.id] } } export default Post
See that special call to .default() after await import? It's needed to reference the default export in a dynamic import (see https://v8.dev/features/dynamic-import)
Now if we run npm run analyze again, we can see this:

Our /blog/[id] bundle is again very small, as Moment has been moved to its own bundle file, loaded separately by the browser.
Where to go from here
There is a lot more to know about Next.js. I didn't talk about managing user sessions with login, serverless, managing databases, and so on.
The goal of this Handbook is not to teach you everything, but instead it aims to introduce you, gradually, to all the power of Next.js.
The next step I recommend is to take a good read at the Next.js official documentation to find out more about all the features and functionality I didn't talk about, and take a look at all the additional functionalities introduced by Next.js plugins, some of which are pretty amazing.
You can reach me on Twitter @flaviocopes.
Also check out my website, flaviocopes.com.
Note: you can download a PDF / ePub / Mobi version of this tutorial so you can read it offline!
via freeCodeCamp.org https://ift.tt/2CUTAfk
0 notes
Link
Angular vs React in 2020
Before we dive in, it’s worth taking a moment to check on what our mighty warriors have been up to these past 12 months. Have they been slacking? Or training non-stop to be the best in the JavaScript frontend arena?
Angular 9 and beyond
Released in February 2020, Angular 9.0.0 has been long awaited by Angular devs. Angular 9.0.0 introduces a bundle of additions and fixes to Angular. Among other improvements, Angular 9 replaces the ViewEngine (VE) compiler with Ivy, Angular’s next-generation compilation and rendering pipeline.
First, Ivy offers significantly improved performance. Second, Ivy includes a streamlined toolset for debugging, testing, and building large and complex web applications. It also helps reduce bundle sizes, especially for larger applications.
With Angular 10 just around the corner performance remains one of the top priorities for framework developers.
React 16+
So, on one side of the ring, Angular is focusing on improved performance and reduced package size. On the other side of the ring, the latest React updates are focused on bug fixes and plugging potential security vulnerabilities. In addition, React 16+ attempts to improve asynchronous programming capabilities.
Released in February 2020, React 16.13.0 includes numerous deprecation warnings for unsafe methods and components, as well as bug fixes, naturally. In terms of new features, the latest additions were already introduced in React 16.9.0, released in August 2019. The new features were focused on improved testing of asynchronous code and measuring performance.
Now that we’re all up to speed on the latest developments, we can take a deep breath, and dive in.
Library vs Framework
The first and main difference between Angular and React is in standalone capabilities and scope. Angular is a full-featured MVC (Model-View-Controller) framework while React is a lightweight JavaScript UI component library.
In this sense, pitting Angular against React in the arena is akin to a Judoka facing a Sumo wrestler. Each has advantages over the other. But with each bringing a different approach and technique the winner is anyone’s guess.
What this means for you, as a web app developer, is that you need to consider the components and features you will need to have out of the box. Angular packs most of what an average web app needs on-install, and includes capabilities React does not, like built-in routing and dependency injection. React, on the other hand, is not as demanding in terms of structure and approach. Though it lets you offload less-critical functionality to other libraries, it also means adding dependencies and complexity to the project code.
Language
Angular was the first major framework to fully adopt TypeScript – a superset of JavaScript and statically typed language. You can write Angular applications in both JavaScript and TypeScript, but TypeScript is often the choice of programmers looking to make their code more compact and easier to debug than pure JavaScript.
React is based on JavaScript ES6+ and JavaScript XML (JSX) – a template language running on top of JavaScript. What makes JSX (supported also in Vue.js) unique is that it stores markup and logic in a single file. While some may find issues with this approach, JSX has a strong typing system to statically analyze code. This makes it especially friendly to new developers and those of us prone to typos (read: everyone).
It’s worth noting that while you can use TypeScript in React, it is not natively supported.
Real vs Virtual DOM (vs Iterative DOM)
One of the most significant technical differences between React and Angular is how each manages changes in document contents, layout, and structure. While Angular makes use of a Real (HTML) DOM (Document Object Model), React uses a Virtual DOM.
This difference in approach is perhaps one of the reasons why so many frontend developers prefer React over Angular. The virtualization of the DOM makes for significantly better runtime performance.
(Source: https://illustrated.dev/react-vdom)
With a real DOM, like in Angular, the entire tree structure of HTML tags needs to be updated whenever there are any changes. React instead creates a new virtual DOM whenever change is detected, and compares it to the “real” DOM. If the two differ, only then is the real DOM modified where the alterations were made.
The developers managing the Angular open-source project had no choice but to take note of this issue. More and more developers were switching to React to improve app performance. So action was taken. In the recently made official Angular compilation and rendering pipeline Ivy, you can implement an iterative DOM. This approach, while quite different from React’s DOM virtualization, can potentially save up to 30% runtime memory, especially with large Angular applications.
Unidirectional (Downward) vs Bidirectional Data Binding
Data binding is a technique to synchronize UI and logic. React uses one-way data binding (sometimes called Downward Binding) and Angular uses two-way data binding.
The comparison between React and Angular in UI and business logic synchronization and data binding makes for a perfect representation of just how different the approaches are.
In Angular, changes to input in the UI can make changes to the model / component state and vice versa. In React, when you update the model /component state, the change will be rendered in the UI element. Modifying the UI element, however, will not affect the model / component state. You can change this functionality in React by using callbacks or state management libraries like Redux.
Bidirectional data binding may mean less code and less complexity in data flows. On the other hand, Angular can force the developer to be extremely careful and keep two-way data binding within a component. Without such care, you may find yourself with components in undesirable states and multiple sources of truth. These have a tendency to turn into long nights of bugchasing.
(Source: https://www.cleveroad.com/blog/angular-vs-react)
This is just one of the many ways Angular tends to push developers into designing and coding their applications in a certain way. In contrast, React provides flexibility, but also depends on other libraries to enable added functionality. This dependency can, in turn, turn cumbersome with a growing stack of technologies, libraries and components that require constant upkeep.
Community & Documentation
This is not a popularity contest. Sure, when you compare frontend libraries, frameworks or even toothbrushes, odds are you will opt for the most popular and highly rated one. Toothbrushes and herd psychology aside, there are good reasons to consider the availability (and relevance) of both community support and official documentation. It helps if the documentation is good, or at the very least complimented by well-written tutorials and an active community on topical forums.
In this sense popularity does count and React is by far the more popular than Angular no matter what metrics you use. It has more stars and followers on GitHub, more downloads, and is listed as more beloved than Angular/Angularjs in stackoverflow’s 2019 developer survey by quite a margin. 74.5% of developers surveyed loved React, while only 57.6% expressed their affection for Angular/Angularjs.
Why is this significant? As you well know, pretty much all developers of all proficiency levels turn to Google and community forums with questions. This is in fact true for most professions today: when you’re not sure how to do something, Google it and/or ask in the right places online.
With more users asking questions and answering them on the Internet, you have a better chance of Googling up a solution to your problem. In that sense, React has an edge over Angular. Having a larger user-base is not the only advantage React has. Being a Facebook project, it is frequently updated and documentation is available quickly.
Angular is managed by Google, which adds credibility to its reputation. However, since it is less favored by developers you may find yourself relying on available documentation that is insufficient for most.
For a developer considering which of the two they should learn there is an endless list of comparisons and discussion. If those aren’t enough, you can always add to them and ask the community what the right solution is for your specific requirements. We don’t need to tell you that at the end of the day, what matters is what you prefer as a developer, and what each project requires.
The Knockout
At this point, the Judoka and Sumo fighters in our metaphorical arena are giving us weird looks. Of course they are. The real battle here is not in the ring. It is between the frontend developers around the ring.
It’s worth noting that the differences we listed are only a handful of the properties that differentiate React from Angular. From licensing to backward compatibility and approaches to native app development – there are more differences than similarities, really. Especially when you consider that both are essentially used for the same goal – web application development. Very different means to an end.
If we had to pick a winner, it would be you, the web developer. Why? Because understanding the most significant points of distinctions between Angular and React puts you in a perfect position to select the fighter you want at your side as you tackle your next project.
0 notes
Photo

React with TypeScript: Best Practices
React and TypeScript are two awesome technologies used by a lot of developers these days. Knowing how to do things can get tricky, and sometimes it's hard to find the right answer. Not to worry. We've put together the best practices along with examples to clarify any doubts you may have.
Let's dive in!
How React and TypeScript Work Together
Before we begin, let's revisit how React and TypeScript work together. React is a "JavaScript library for building user interfaces", while TypeScript is a "typed superset of JavaScript that compiles to plain JavaScript." By using them together, we essentially build our UIs using a typed version of JavaScript.
The reason you might use them together would be to get the benefits of a statically typed language (TypeScript) for your UI. This means more safety and fewer bugs shipping to the front end.
Does TypeScript Compile My React Code?
A common question that’s always good to review is whether TypeScript compiles your React code. The way TypeScript works is similar to this interaction:
TS: "Hey, is this all your UI code?" React: "Yup!" TS: "Cool! I'm going to compile it and make sure you didn't miss anything." React: "Sounds good to me!"
So the answer is yes, it does! But later, when we cover the tsconfig.json settings, most of the time you'll want to use "noEmit": true. What this means is TypeScript will not emit JavaScript out after compilation. This is because typically, we're just utilizing TS to do our TypeScript.
The output is handled, in a CRA setting, by react-scripts. We run yarn build and react-scripts bundles the output for production.
To recap, TypeScript compiles your React code to type-check your code. It doesn’t emit any JavaScript output (in most scenarios). The output is still similar to a non-TypeScript React project.
Can TypeScript Work with React and webpack?
Yes, TypeScript can work with React and webpack. Lucky for you, the official TypeScript Handbook has a guide on that.
Hopefully, that gives you a gentle refresher on how the two work together. Now, on to best practices!
Best Practices
We've researched the most common questions and put together this handy list of the most common use cases for React with TypeScript. This way, you can follow best practices in your projects by using this article as a reference.
Configuration
One of the least fun, yet most important parts of development is configuration. How can we set things up in the shortest amount of time that will provide maximum efficiency and productivity? We'll discuss project setup including:
tsconfig.json
ESLint
Prettier
VS Code extensions and settings.
Project Setup
The quickest way to start a React/TypeScript app is by using create-react-app with the TypeScript template. You can do this by running:
npx create-react-app my-app --template typescript
This will get you the bare minimum to start writing React with TypeScript. A few noticeable differences are:
the .tsx file extension
the tsconfig.json
the react-app-env.d.ts
The tsx is for "TypeScript JSX". The tsconfig.json is the TypeScript configuration file, which has some defaults set. The react-app-env.d.ts references the types of react-scripts, and helps with things like allowing for SVG imports.
tsconfig.json
Lucky for us, the latest React/TypeScript template generates tsconfig.json for us. However, they add the bare minimum to get started. We suggest you modify yours to match the one below. We've added comments to explain the purpose of each option as well:
{ "compilerOptions": { "target": "es5", // Specify ECMAScript target version "lib": [ "dom", "dom.iterable", "esnext" ], // List of library files to be included in the compilation "allowJs": true, // Allow JavaScript files to be compiled "skipLibCheck": true, // Skip type checking of all declaration files "esModuleInterop": true, // Disbles namespace imports (import * as fs from "fs") and enables CJS/AMD/UMD style imports (import fs from "fs") "allowSyntheticDefaultImports": true, // Allow default imports from modules with no default export "strict": true, // Enable all strict type checking options "forceConsistentCasingInFileNames": true, // Disallow inconsistently-cased references to the same file. "module": "esnext", // Specify module code generation "moduleResolution": "node", // Resolve modules using Node.js style "resolveJsonModule": true, // Include modules imported with .json extension "isolatedModules": true, // Transpile each file as a separate module "noEmit": true, // Do not emit output (meaning do not compile code, only perform type checking) "jsx": "react" // Support JSX in .tsx files "sourceMap": true, // *** Generate corrresponding .map file *** "declaration": true, // *** Generate corresponding .d.ts file *** "noUnusedLocals": true, // *** Report errors on unused locals *** "noUnusedParameters": true, // *** Report errors on unused parameters *** "experimentalDecorators": true // *** Enables experimental support for ES decorators *** "incremental": true // *** Enable incremental compilation by reading/writing information from prior compilations to a file on disk *** "noFallthroughCasesInSwitch": true // *** Report errors for fallthrough cases in switch statement *** }, "include": [ "src/**/*" // *** The files TypeScript should type check *** ], "exclude": ["node_modules", "build"] // *** The files to not type check *** }
The additional recommendations come from the [react-typescript-cheatsheet community](https://ift.tt/2ZxLWl2) and the explanations come from the Compiler Options docs in the Official TypeScript Handbook. This is a wonderful resource if you want to learn about other options and what they do.
ESLint/Prettier
In order to ensure that your code follows the rules of the project or your team, and the style is consistent, it's recommended you set up ESLint and Prettier. To get them to play nicely, follow these steps to set it up.
Install the required dev dependencies:
yarn add eslint @typescript-eslint/parser @typescript-eslint/eslint-plugin eslint-plugin-react --dev
Create a .eslintrc.js file at the root and add the following:
module.exports = { parser: '@typescript-eslint/parser', // Specifies the ESLint parser extends: [ 'plugin:react/recommended', // Uses the recommended rules from @eslint-plugin-react 'plugin:@typescript-eslint/recommended', // Uses the recommended rules from @typescript-eslint/eslint-plugin ], parserOptions: { ecmaVersion: 2018, // Allows for the parsing of modern ECMAScript features sourceType: 'module', // Allows for the use of imports ecmaFeatures: { jsx: true, // Allows for the parsing of JSX }, }, rules: { // Place to specify ESLint rules. Can be used to overwrite rules specified from the extended configs // e.g. "@typescript-eslint/explicit-function-return-type": "off", }, settings: { react: { version: 'detect', // Tells eslint-plugin-react to automatically detect the version of React to use }, }, };
Add Prettier dependencies:
yarn add prettier eslint-config-prettier eslint-plugin-prettier --dev
Create a .prettierrc.js file at the root and add the following:
module.exports = { semi: true, trailingComma: 'all', singleQuote: true, printWidth: 120, tabWidth: 4, };
Update the .eslintrc.js file:
module.exports = { parser: '@typescript-eslint/parser', // Specifies the ESLint parser extends: [ 'plugin:react/recommended', // Uses the recommended rules from @eslint-plugin-react 'plugin:@typescript-eslint/recommended', // Uses the recommended rules from the @typescript-eslint/eslint-plugin + 'prettier/@typescript-eslint', // Uses eslint-config-prettier to disable ESLint rules from @typescript-eslint/eslint-plugin that would conflict with prettier + 'plugin:prettier/recommended', // Enables eslint-plugin-prettier and displays prettier errors as ESLint errors. Make sure this is always the last configuration in the extends array. ], parserOptions: { ecmaVersion: 2018, // Allows for the parsing of modern ECMAScript features sourceType: 'module', // Allows for the use of imports ecmaFeatures: { jsx: true, // Allows for the parsing of JSX }, }, rules: { // Place to specify ESLint rules. Can be used to overwrite rules specified from the extended configs // e.g. "@typescript-eslint/explicit-function-return-type": "off", }, settings: { react: { version: 'detect', // Tells eslint-plugin-react to automatically detect the version of React to use }, }, };
These recommendations come from a community resource written called "Using ESLint and Prettier in a TypeScript Project" by Robert Cooper. If you visit his blog, you can read more about the "why" behind these rules and configurations.
VSCode Extensions and Settings
We've added ESLint and Prettier and the next step to improve our DX is to automatically fix/prettify our code on save.
First, install the ESLint extension for VSCode. This will allow ESLint to integrate with your editor seamlessly.
Next, update your Workspace settings by adding the following to your .vscode/settings.json:
This will allow VS Code to work its magic and fix your code when you save. It's beautiful!
These suggestions also come from the previously linked article "Using ESLint and Prettier in a TypeScript Project" by Robert Cooper.
The post React with TypeScript: Best Practices appeared first on SitePoint.
by JavaScript Joe via SitePoint https://ift.tt/3aaCBVQ
0 notes
Photo

The most popular JavaScript links of 2019
#469 — January 3, 2020
Read on the Web
JavaScript Weekly

The holiday season is rapidly coming to a close and we're looking forward to not only a new year but the entirety of the Roaring Twenties. Rest assured, the JavaScript world is not going to look the same when 2030 turns up so watch this space! 😄
We'll be back as usual next week, but this week we're taking a look back at 2019 and the most popular things you clicked on. If you didn't read every issue in 2019 (we wouldn't expect you to!) you'll hopefully find a few things worth revisiting here.
Thanks for supporting us — we look forward to keeping you up-to-date in the years to come.
— Peter Cooper and the Cooperpress team
📈 Our most popular links of 2019:
1. The TypeScript Tax: A Cost vs Benefit Analysis — As much as we love JavaScript, this was really a strong year for TypeScript, with it seeming to become the de facto way to bring strong typing to JavaScript. Back in January, Eric Elliott asked "is it worth it?" and presented some critical, data-driven analysis to establish its viability. It was your most clicked link of 2019.
Eric Elliott
2. New ES2018 Features Every JavaScript Developer Should Know — We're now looking forward to ES2020 and we've had ES2019 in 2019 too, but this post remains packed with interesting examples of spread properties within object literals, asynchronous iterators and asynchronous iterables, Promise.prototype.finally, and other features that are still not exactly common to see in the wild.
Faraz Kelhini
The Complete ⚛️ React Learning Path — Take your React to the next level to find out what it is fully capable of with this comprehensive learning path.
Frontend Masters sponsor
3. 43 JavaScript Questions, With Their Answers Explained — Whether for fun or a job interview, this remains an interesting set of JavaScript-related questions, complete with explanations of the answers.
Lydia Hallie
4. I Don't Hate Arrow Functions (But..) — Arrow functions (=>), as introduced in ES6, have generally been a much welcomed addition to JavaScript but Kyle Simpson reminded us they’re not suitable in every scenario and created an ESLint plugin to help you keep a handle on their use.
Kyle Simpson
5. Responsible JavaScript: A Three Part Series — We originally only linked to part one of this great series where Jeremy Wagner plotted a course to avoid the unnecessary bloat and inaccessible patterns of modern JavaScript trends.. but now you can enjoy part 2 and part 3 too, where he went into more technical depth on bundling and handling third-party scripts.
Jeremy Wagner
6. What’s New in JavaScript — At this year’s Google I/O ’19, Mathias Bynens and Sathya Gunasekaran of the V8 team gave a fantastic 30 minute ‘state of the union’ talk on the state of JavaScript as a language and what new features are being baked in.
Google I/O video
💻 Jobs
JavaScript Developer at X-Team (Remote) — Work with the world's leading brands, from anywhere. Travel the world while being part of the most energizing community of developers.
X-Team
Senior Software Engineer, Frontend — Use the latest tech to mold an innovative, empathy-centric experience for creators to order fast, high-quality parts (forging space robots to animatronics).
Fictiv
Find a Job Through Vettery — Vettery is completely free for job seekers. Make a profile, name your salary, and connect with hiring managers from top employers.
Vettery
📘 The most popular articles & tutorials of 2019

The Cost of JavaScript in 2019 — Addy Osmani presented a 2019 update to his Cost of JavaScript in 2018 article in both video and article forms. If you still want to get a feel for where the true bottlenecks are with JavaScript, this is a must read.
Addy Osmani
Should We Rebrand 'JavaScript'? — This thoughpiece provoked quite a bit of discussion in the community over the problems (or not) with ‘JavaScript’ as a name. I think we'll see more on this front in 2020.
Kieran Potts
First Online Mentored Software Bootcamp w/ Job Guarantee — Get a job or your money back with Springboard’s online bootcamp. Benefit from 1:1 mentorship, our exclusive curriculum, and top career coaching.
Springboard (Software Engineering Career Track) sponsor
When Should You Be Using Web Workers? — Web Workers provide a way to run JavaScript in background threads in the browser and you’d think using them as much as possible would be a good thing.. right? Current frameworks make this tough, says Surma, who shows us why we should be working to change this ASAP.
Surma
Practical Ways to Write Better JavaScript — You’re not necessarily going to agree with all of them (e.g. “Use TypeScript”!) but this is a reasonably solid batch of points to think about overall.
Ryland Goldstein
JavaScript Symbols: But Why? — Not played with symbols (a new data type introduced with ES6) yet? This is a gentle way to get up to speed with not only what they are but why you might use them.
Thomas Hunter II
Make 2020 the Year to Master MongoDB. Try Studio 3T Today — Generate driver code for JavaScript, Python, Ruby and more? Build queries fast with our drag & drop editor? Of course.
Studio 3T sponsor
Using Native JavaScript Modules in Production Today — “now, thanks to some recent advances in bundler technology, it’s possible to deploy your production code as ES2015 modules—with both static and dynamic imports—and get better performance than all non-module options currently available.”
Philip Walton
7 Tricks with Resting and Spreading JavaScript Objects — Using modern JS features to merge objects, organize properties, and more.
Joel Thoms
📺 The most popular videos of 2019
▶ Why I Was Wrong About TypeScript — Smells like an opinion-driven talk, but actually covers the history behind compile-to-JS languages, how we got to a point where interest in TypeScript is growing strongly, and why it’s worth taking seriously.
TJ VanToll
▶ Why 0.1 + 0.2 === 0.30000000000000004: Implementing IEEE 754 in JS — Head to your node CLI right now and type in 0.1 + 0.2. If the answer confuses you, this is the video for you. And even if you know why, working with the building blocks behind floating point representations is just cool anyway.
Low Level JavaScript
Video Developer Report - Top Trends in Video Technology 2019
Bitmovin sponsor
▶ Keep Betting on JavaScript — Kyle Simpson presents a history lesson of JavaScript, looks at how a variety of features were (or weren’t) introduced, and compels us to think about the future of the Web and JavaScript as we contribute and ‘place bets’ on technologies.
Kyle Simpson

▶ A Look at Deno: A New(ish!) JavaScript Runtime — Ryan originally created Node about ten years ago but over the past couple of years he’s been working on Deno, a non-Node compatible, TypeScript-focused runtime with some interesting features. (Note: Poor audio until a few minutes in.) I suspect we'll hear a lot more about this in 2020.
Ryan Dahl
🔧 The most popular code & tool releases of 2019
Svelte 3 Released: Rethinking Reactivity — Svelte is one of the most interesting UI frameworks out there as it’s not scared of taking a unique approach. Rather than running in the browser, Svelte runs at build time, compiling your app into more efficient runtime JavaScript. Svelte 3 took some major steps forward, particularly in helping you write less code.
Rich Harris
Mithril.js 2: A JavaScript Framework for Building Brilliant Applications — Mithril is a really neat alternative to things like Vue, React or Angular. It’s very compact and fast (so ideal for mobile), runs a bit closer to vanilla JS than the alternatives, and is great for tying together vanilla JS libraries rather than needing its own alternatives.
Mithril
RunJS: A JavaScript 'Scratchpad' Tool for the Desktop — Write and run JavaScript instantly. Useful for learning, experimenting, or perhaps even creating screencasts, tweets, or similar educational content. Originally macOS only but now supports Windows and Linux too.
Luke Haas
Pixi.js 5: Create Beautiful 2D Web Experiences — Boasts the ‘fastest, most flexible 2D WebGL renderer’ to let you take advantage of hardware acceleration without getting involved in WebGL or 3D concerns. Check out demos for what the code looks like and what you’d use it for. There’s also a Pixi Playground for quickly crafting your own experiments.
PixiJS
Babylon.js 4.0: The (Very) Powerful WebGL Graphics Engine — Such a significant release that they released a 2 minute video trailer for it! Want to play? Enjoy this editable live demo.
Microsoft
Postwoman: An API Request Builder and Tester — A free alternative to Postman, a popular app for debugging and testing HTTP APIs. Postwoman works in the browser and supports HTTP and WebSocket requests as well as GraphQL. Insomnia is a similar tool if you want to run something as a desktop app.
Liyas Thomas
FlexSearch.js: A Full Text Search Library — Claims to outperform all of the alternatives while supporting features like multi-word matching and phonetic transformations. Happy in both the browser and Node.js.
Nextapps GmbH
Just: A JavaScript Task Library from Microsoft — If you’re familiar with Ruby’s rake, it’s a bit like that. Define tasks in JavaScript, run them with just (which works fine without installation using npx) and you get a bunch of nice features like logging and task composition.
Microsoft
Node-RED 1.0 Released — Node RED is a flow-based, visual programming tool (aimed primarily at hardware automation) that’s built on top of Node.js. Despite only reaching 1.0 in 2019, it’s a mature project used in numerous real world IoT projects.
Nick O'Leary
by via JavaScript Weekly https://ift.tt/2QHifL3
0 notes
Quote
Motivations Monaco Editor is the open source editor used in VS Code, which itself is open source. I used to write my blogposts in VS Code, and as I make my own Dev.to CMS, I wanted to have all the familiar trappings of Monaco to help me out while I write. Problems However there are some issues we have to deal with: Monaco is framework agnostic, so it requires writing some React bindings. You could do it yourself, but also you could just skip that and use https://github.com/react-monaco-editor/react-monaco-editor Monaco is written for a desktop Electron app, not for a server-side rendered web app. This is solved by using import dynamic from "next/dynamic" and making Monaco a dynamic import. Monaco also wants to offload syntax highlighting to web workers, and we need to figure that out Next.js doesn't want any dependencies importing CSS from within node_modules, as this assumes a bundler and loader setup (e.g. webpack) and can have unintentional global CSS side effects (all global CSS is intended to be in _app.js). we can re-enable this with @zeit/next-css and next-transpile-modules We can solve this with a solution worked out by Elliot Hesp on GitHub and a config from Joe Haddad of the Next.js team. Solution The solution I use is informed by my usage of Tailwind CSS, which requires a recent version of PostCSS, which @zeit/next-css only has at 3.0 (because it is deprecated and not maintained). I also use TypeScript, which introduces a small wrinkle, because Monaco Editor attaches a MonacoEnvironment global on the window object - I just @ts-ignore it. // next.config.js const MonacoWebpackPlugin = require("monaco-editor-webpack-plugin"); const withTM = require("next-transpile-modules")([ // `monaco-editor` isn't published to npm correctly: it includes both CSS // imports and non-Node friendly syntax, so it needs to be compiled. "monaco-editor" ]); module.exports = withTM({ webpack: config => { const rule = config.module.rules .find(rule => rule.oneOf) .oneOf.find( r => // Find the global CSS loader r.issuer && r.issuer.include && r.issuer.include.includes("_app") ); if (rule) { rule.issuer.include = [ rule.issuer.include, // Allow `monaco-editor` to import global CSS: /[\\/]node_modules[\\/]monaco-editor[\\/]/ ]; } config.plugins.push( new MonacoWebpackPlugin({ languages: [ "json", "markdown", "css", "typescript", "javascript", "html", "graphql", "python", "scss", "yaml" ], filename: "static/[name].worker.js" }) ); return config; } }); and then in your Next.js app code: import React from "react"; // etc import dynamic from "next/dynamic"; const MonacoEditor = dynamic(import("react-monaco-editor"), { ssr: false }); function App() { const [postBody, setPostBody] = React.useState(""); // etc return ( {/* etc */} { // @ts-ignore window.MonacoEnvironment.getWorkerUrl = ( _moduleId: string, label: string ) => { if (label === "json") return "_next/static/json.worker.js"; if (label === "css") return "_next/static/css.worker.js"; if (label === "html") return "_next/static/html.worker.js"; if ( label === "typescript" || label === "javascript" ) return "_next/static/ts.worker.js"; return "_next/static/editor.worker.js"; }; }} width="800" height="600" language="markdown" theme="vs-dark" value={postBody} options={{ minimap: {
enabled: false
}
}} onChange={setPostBody} /> ) }
http://damianfallon.blogspot.com/2020/03/how-to-add-monaco-editor-to-nextjs-app.html
0 notes
Photo

Make Your JavaScript Code Robust With Flow
JavaScript was always a significant programming language, being the only language that runs reliably in the browser. Recent trends in front-end development as well as Node.js based back-end development have pushed the scale and complexity of JavaScript applications.
Large applications developed by large teams can benefit from static type checking, which vanilla JavaScript lacks. Flow was developed by Facebook to address this issue. It is a static type checker that integrates into your development process, catches a lot of problems early, and helps you move fast.
What Is Flow?
Flow is a tool that checks your annotated JavaScript code and detects various issues that without it would be discovered only at runtime (or worse, not discovered and corrupt your data). Here is a quick example.
// @flow function getGreeting(name: string): string { return `Hi, ${name}`; } const http = require("http"); const greeting = getGreeting("Gigi") const port = 8888 console.log(`Listening on port ${port}...`) http.createServer(function(request, response) { response.writeHead(200, {"Content-Type": "text/plain"}); response.write(greeting); response.end(); }).listen(port);
Flow vs. TypeScript
Before diving into the nitty-gritty details of Flow, it's worthwhile to compare it against other alternatives, and in particular TypeScript. TypeScript is a strict superset of JavaScript developed by Microsoft. Any JavaScript program is also a TypeScript program.
TypeScript adds optional type annotations and overall serves the same purpose as Flow. However, there are some important differences. TypeScript is a separate programming language that compiles to JavaScript, whereas Flow annotations must be removed to get back to valid JavaScript.
TypeScript has great tool and IDE support. Flow is catching up (e.g. JetBrains WebStorm has native Flow integration).
The most important philosophical difference is that Flow puts an emphasis on soundness. TypeScript 1.0 didn't catch null errors; TypeScript 2.0 with strict null checks measured up to Flow in this regard. But in other aspects such as generic containers or typing, TypeScript is more permissive and lets various categories of errors through (only structural typing is checked, not nominal typing).
TypeScript as its own language adds concepts and language features such as classes, interfaces, visibility indicators (public, private, readonly), and decorators. Those features make it easier to understand and use for people coming from mainstream object-oriented languages like C++, Java, and C#.
Installation
Since Flow annotations are not standard JavaScript, they need to be removed before deploying your application. Here is how to install flow and flow-remove-types via yarn: yarn add --dev flow-bin flow-remove-types
You can add a couple of scripts to your package.json file to automate the process:
"scripts": { "build": "flow-remove-types src/ -d lib/", "prepublish": "yarn run build" }
You should run the prepublish script before publishing your code to the npm registry.
For other installation options (e.g. using npm or babel), check out the Flow installation guide.
To finish the installation, type: yarn run flow init
This will create the required .flowconfig file.
Type System
Flow has two important goals: precision and speed. Its type system was designed to support these goals.
Precision
Precision is achieved by analyzing how the code interacts with types, either annotated or inferred. Any mismatch raises a type error. Annotated types support nominal typing, which means that two different types with the same attributes are distinguished from each other and can't be substituted. The type of a variable is defined as the set of runtime values the variable may receive.
Speed
Flow is fast due to a combination of modularity and distributed processing. Files are analyzed in parallel, and the results are merged later via efficient shared memory to accomplish full-program type checking.
Supported Types
Flow supports many types. In addition to primitive types, it also supports the following:
Object
Array
Any
Maybe
Variable
Tuple
Class
Interface
Generic
Type Annotations
Flow allows you to declare types as well as restrict variables and parameters to selected values:
type Two2Four = 2 | 3 | 4 function doubleIt(number: Two2Four) { return number * 2 } console.log(doubleIt(3)) Output: 6
If you exceed the valid range, you'll get an error:
console.log(doubleIt(3)) Output: Error: src/main.js:30 30: console.log(doubleIt(5)) // error ^ number. This type is incompatible with the expected param type of 24: function doubleIt(number: Two2Four) { ^^^^^^^^ number enum Found 1 error
You can also define complex types, including subtyping. In the following code example, the Warrior type is a subtype of Person. This means it is OK to return a Warrior as a Person from the fight() function. However, returning null is forbidden.
type Person = { name: string, age: number } type Warrior = { name: string, age: number, strength: number } let redWolf : Warrior = { name: "Red Wolf", age: 24, strength: 10 } let skullCrusher : Warrior = { name: "Skull Crusher", age: 27, strength: 11 } function fight(w1: Warrior, w2: Warrior): Person { if (w1.strength > w2.strength) { return w1 } if (w2.strength > w1.strength) { return w2 } return null } Output: Found 1 error $ flow Error: src/main.js:47 47: return null ^^^^ null. This type is incompatible with the expected return type of 39: function fight(w1: Warrior, w2: Warrior): Person { ^^^^^^ object type Found 1 error
To fix it, let's return the younger warrior if both warriors have the same strength:
function fight(w1: Warrior, w2: Warrior): Person { if (w1.strength > w2.strength) { return w1 } if (w2.strength > w1.strength) { return w2 } return (w1.age < w2.age ? w1 : w2) } let winner = fight(redWolf, skullCrusher) console.log(winner.name) Output: Skull Crusher
Flow allows even more precise control via class extension, invariance, co-variance, and contra-variance. Check out the Flow documentation on variance.
Configuration
Flow uses the .flowconfig configuration file in the root directory of your projects. This file contains several sections that let you configure what files Flow should check and the many aspects of its operation.
Include
The [include] section controls what directories and files should be checked. The root directory is always included by default. The paths in the [include] sections are relative. A single star is a wild-card for any filename, extension, or directory name. Two stars are a wild-card for any depth of directory. Here is a sample [include] section:
[include] ../externalFile.js ../externalDir/ ../otherProject/*.js ../otherProject/**/coolStuff/
Ignore
The [ignore] section is the complement to [include]. Files and directories you specify here will not be checked by flow. Strangely, it uses a different syntax (OCaml regular expressions) and requires absolute paths. Changing this is on the roadmap of the Flow team.
Until then, remember that the include section is processed first, followed by the ignore section. If you include and ignore the same directory and/or file, it will be ignored. To address the absolute path issue, it is common to prefix every line with .*. If you want to ignore directories or files under the root, you can use the <PROJECT_ROOT> placeholder instead of .*. Here is a sample [ignore] section:
[ignore] .*/__tests__/.* .*/src/\(foo\|bar\)/.* .*\.ignore\.js <PROJECT_ROOT>/ignore_me.js
Libs
Any non-trivial JavaScript application uses lots of third-party libraries. Flow can check how your application is using these libraries if you provide special libdef files that contain type information about these libraries.
Flow automatically scans the "flow-typed" sub-directory of your project for libdef files, but you may also provide the path of libdef files in the [libs] section. This is useful if you maintain a central repository of libdef files used by multiple projects.
Importing existing type definitions and creating your own if the target library doesn't provide its own type definitions is pretty simple. See:
Flow Documentation: Library Definitions
Flow Documentation: Creating Library Definitions
GitHub: Importing and Using Library Definitions
Lints
Flow has several lint rules you can control and determine how to treat them. You can configure the rules from the command line, in code comments, or in the [lints] section of your config file. I'll discuss linting in the next section, but here is how to configure it using the [lints] section:
[lints] all=warn untyped-type-import=error sketchy-null-bool=off
Options
The [options] section is where you get to tell Flow how to behave in a variety of cases that don't deserve their own section, so they are all grouped together.
There are too many options to list them all here. Some of the more interesting ones are:
all: set to true to check all files, not just those with @flow
emoji: set to true to add emojis to status messages
module.use_strict: set to true if you use a transpiler that adds "use strict;"
suppress_comment: a regex that defines a comment to suppress any flow errors on the following line (useful for in-progress code)
Check out all the options in the Flow guide to configuring options.
Version
Flow and its configuration file format evolve. The [version] section lets you specify which version of Flow the config file is designed for to avoid confusing errors.
If the version of Flow doesn't match the configured version, Flow will display an error message.
Here are a few ways to specify the supported versions:
[version] 0.22.0 [version] >=0.13.0 <0.14.0 [version] ^1.2.3
The caret version keeps the first non-zero component of the version fixed. So ^1.2.3 expands to the range >=1.2.3 < 2.0.0, and ^0.4.5 expands to the range >= 0.4.5 < 0.5.0.
Using Flow From the Command Line
Flow is a client-server program. A Flow server must be running, and the client connects to it (or starts it if it's not running). The Flow CLI has many commands and options that are useful for maintenance and introspection purposes as well as for temporarily overriding configuration from .flowconfig.
Typing flow --help shows all the commands and options. To get help on a specific command, type flow <command> --help. For example:
$ flow ast --help Usage: flow ast [OPTION]... [FILE] e.g. flow ast foo.js or flow ast < foo.js --from Specify client (for use by editor plugins) --help This list of options --pretty Pretty-print JSON output --tokens Include a list of syntax tokens in the output --type Type of input file (js or json)
Important commands are:
init: generate an empty .flowconfig file
check: do a full Flow check and print the results
ls: display files visible to Flow
status (default): show current Flow errors from the Flow server
suggest: suggest types for the target file
Linting With Flow
Flow has a linting framework that can be configured via the .flowconfig file as you saw earlier, through command-line arguments, or in code files using flowlint comments. All configuration methods consist of a list of key-value pairs where the key is a rule and the value is the severity.
Rules
There are currently three rules: all, untyped-type-import, and sketchy-null. The "All" rule is really the default handling for any errors that don't have a more specific rule. The "untyped-type-import" rule is invoked when you import a type from an untyped file. The "sketchy-null" rule is invoked when you do existence check on a value that can be false or null/undefined. There are more granular rules for:
sketchy-null-bool
sketchy-null-number
sketchy-null-string
sketchy-null-mixed
Severity Levels
There are also three severity levels: off, warning, and error. As you can imagine, "off" skips the type check, "warn" produces warnings, which don't cause the type check to exit and don't show up by default in the CLI output (you can see them with --include-warnings), and "error" is handled just like flow errors and causes the type check to exit and display an error message.
Linting With Command-Line Arguments
Use the --lints command-line argument to specify multiple lint rules. For example:
flow --lints "all=warn, untyped-type-import=error, sketchy-null-bool=off"
Linting With flowlint Comments
There are three types of comments: flowlint, flowlint-line, and flowlint-next-line.
The "flowlint" comment applies a set of rules in a block until overridden by a matching comment:
import type { // flowlint untyped-type-import:off Foo, Bar, Baz, // flowlint untyped-type-import:error } from './untyped.js';
If there is no matching comment, the settings simply apply until the end of the file.
The "flowlint-line" applies just to the current line:
function (x: ?boolean) { if (x) { // flowlint-line sketchy-null-bool:off ... } else { ... } }
The "flowlint-next-line" applies to the line following the comment:
function (x: ?boolean) { // flowlint-next-line sketchy-null-bool:off if (x) { ... } else { ... } }
Conclusion
Large JavaScript projects developed by large teams can benefit a lot from static type checking. There are several solutions for introducing static type checking into a JavaScript codebase.
JavaScript continues to grow in a variety of ways across the web. It’s not without its learning curves, and there are plenty of frameworks and libraries to keep you busy, as you can see. If you’re looking for additional resources to study or to use in your work, check out what we have available in the Envato marketplace.
Facebook's Flow is a recent and robust solution with excellent coverage, tooling, and documentation. Give it a try if you have a large JavaScript codebase.
by Gigi Sayfan via Envato Tuts+ Code http://ift.tt/2jl5jwU
0 notes