#textalign
Explore tagged Tumblr posts
Visit Tumblr Blog
Explore Tumblr blogs with no restrictions, modern design and the best experience.
Last Seen Tumblr Blogs


Fun Fact
The Tumblr app for Google Glass was released on May 16, 2013.
Text
The Pros and Cons of Text Alignment Options in PowerPoint
1.What is text alignment in PowerPoint?
Text alignment in PowerPoint refers to the positioning of text within a text box or placeholder. This feature allows users to control the placement of text in relation to the margins of the slide. There are four main types of text alignment options available in PowerPoint: left alignment, right alignment, centre alignment, and justified alignment.
Left alignment positions text along the left margin, right alignment positions text along the right margin, centre alignment centres the text within the text box, and justified alignment aligns text along both the left and right margins. Proper text alignment enhances the readability and visual appeal of PowerPoint presentations.
2.What are the pros and cons of using PowerPoint?
PowerPoint presentations are a popular tool in business and academic settings for their ability to visually communicate information in a clear and organized manner. One of the main benefits of using PowerPoint is its ability to enhance audience engagement using multimedia elements such as images, videos, and animations. Additionally, PowerPoint allows for easy customization with various design templates and layouts. However, there are also drawbacks to consider.
PowerPoint presentations can sometimes be overly reliant on visual aids, leading to a lack of focus on the speaker and their message. Furthermore, poorly designed slides can be distracting and detract from the overall effectiveness of the presentation. In conclusion, while PowerPoint can be a valuable tool for communication, it is important to use it judiciously and thoughtfully to ensure its effectiveness.
3.Why is alignment important in PowerPoint?
Alignment is crucial in PowerPoint presentations as it enhances the overall visual appeal and professionalism of the slides. Consistent alignment ensures that all elements on the slide are positioned correctly, creating a clean and organized layout that is easy for the audience to follow.
Proper alignment also helps to convey information effectively, guiding the viewer's eye to key points and maintaining a sense of order and coherence throughout the presentation. By aligning text, images, and other elements, presenters can create a polished and cohesive design that enhances the impact and credibility of their message. Overall, alignment plays a vital role in creating visually appealing and effective PowerPoint presentations.
4.What is the basic purpose of alignment?
Alignment in the context of business refers to the process of ensuring that all aspects of an organization are working towards the same goals and objectives. The basic purpose of alignment is to ensure that every team, department, and individual within the organization is focused on achieving the overall strategic vision. By aligning all efforts towards a common goal, organizations can maximize efficiency, minimize conflicts, and ultimately drive better results. Alignment helps to streamline processes, improve communication, and foster a sense of unity and purpose among employees.
5.What is the difference between text align and text indent?
Text align and text indent are both commonly used formatting options in word processing and design software, but they serve different purposes. Text align refers to the horizontal alignment of text within a document or text box, such as left align, right align, center align, or justify align. This allows the user to control the visual appearance of the text and make it easier to read and understand. On the other hand, text indent refers to the spacing at the beginning of a paragraph, where a specific amount of space is added before the first line of text. This can be used to create a more structured and organized layout in a document. In summary, text align controls the horizontal placement of text, while text indent controls the spacing at the beginning of a paragraph.
0 notes
Text
Start Coding Today: Learn React JS for Beginners

Start Coding Today: Learn React JS for Beginners”—will give you a solid foundation and guide you step by step toward becoming a confident React developer.
React JS, developed by Facebook, is an open-source JavaScript library used to build user interfaces, especially for single-page applications (SPAs). Unlike traditional JavaScript or jQuery, React follows a component-based architecture, making the code easier to manage, scale, and debug. With React, you can break complex UIs into small, reusable pieces called components.
Why Learn React JS?
Before diving into the how-to, let’s understand why learning React JS is a smart choice for beginners:
High Demand: React developers are in high demand in tech companies worldwide.
Easy to Learn: If you know basic HTML, CSS, and JavaScript, you can quickly get started with React.
Reusable Components: Build and reuse UI blocks easily across your project.
Strong Community Support: Tons of tutorials, open-source tools, and documentation are available.
Backed by Facebook: React is regularly updated and widely used in real-world applications (Facebook, Instagram, Netflix, Airbnb).
Prerequisites Before You Start
React is based on JavaScript, so a beginner should have:
Basic knowledge of HTML and CSS
Familiarity with JavaScript fundamentals such as variables, functions, arrays, and objects
Understanding of ES6+ features like let, const, arrow functions, destructuring, and modules
Don’t worry if you’re not perfect at JavaScript yet. You can still start learning React and improve your skills as you go.
Setting Up the React Development Environment
There are a few ways to set up your React project, but the easiest way for beginners is using Create React App, a boilerplate provided by the React team.
Step 1: Install Node.js and npm
Download and install Node.js from https://nodejs.org. npm (Node Package Manager) comes bundled with it.
Step 2: Install Create React App
Open your terminal or command prompt and run:
create-react-app my-first-react-app
This command creates a new folder with all the necessary files and dependencies.
Step 3: Start the Development Server
Navigate to your app folder:
my-first-react-app
Then start the app:
Your first React application will launch in your browser at http://localhost:3000.
Understanding the Basics of React
Now that you have your environment set up, let’s understand key React concepts:
1. Components
React apps are made up of components. Each component is a JavaScript function or class that returns HTML (JSX).
function Welcome() { return <h1>Hello, React Beginner!</h1>; }
2. JSX (JavaScript XML)
JSX lets you write HTML inside JavaScript. It’s not mandatory, but it makes code easier to write and understand.
const element = <h1>Hello, World!</h1>;
3. Props
Props (short for properties) allow you to pass data from one component to another.
function Welcome(props) { return <h1>Hello, {props.name}</h1>; }
4. State
State lets you track and manage data within a component.
import React, { useState } from 'react'; function Counter() { const [count, setCount] = useState(0); return ( <div> <p>You clicked {count} times.</p> <button onClick={() => setCount(count + 1)}>Click me</button> </div> ); }
Building Your First React App
Let’s create a simple React app — a counter.
Open the App.js file.
Replace the existing code with the following:
import React, { useState } from 'react'; function App() { const [count, setCount] = useState(0); return ( <div style={{ textAlign: 'center', marginTop: '50px' }}> <h1>Simple Counter App</h1> <p>You clicked {count} times</p> <button onClick={() => setCount(count + 1)}>Click Me</button> </div> ); } export default App;
Save the file, and see your app live on the browser.
Congratulations—you’ve just built your first interactive React app!
Where to Go Next?
After mastering the basics, explore the following:
React Router: For navigation between pages
useEffect Hook: For side effects like API calls
Forms and Input Handling
API Integration using fetch or axios
Styling (CSS Modules, Styled Components, Tailwind CSS)
Context API or Redux for state management
Deploying your app on platforms like Netlify or Vercel
Practice Projects for Beginners
Here are some simple projects to strengthen your skills:
Todo App
Weather App using an API
Digital Clock
Calculator
Random Quote Generator
These will help you apply the concepts you've learned and build your portfolio.
Final Thoughts
This “Start Coding Today: Learn React JS for Beginners” guide is your entry point into the world of modern web development. React is beginner-friendly yet powerful enough to build complex applications. With practice, patience, and curiosity, you'll move from writing your first “Hello, World!” to deploying full-featured web apps.
Remember, the best way to learn is by doing. Start small, build projects, read documentation, and keep experimenting. The world of React is vast and exciting—start coding today, and you’ll be amazed by what you can create!
0 notes
Text
let osc; let currentNoteName = ""; // Nom de la note jouée à afficher let libs = ['https://cdn.jsdelivr.net/gh/ffd8/p5.glitch/p5.glitch.js']; let glitch, img, myNote, playing = false, toggle = true; let sample;
let notesFreq = {}; let noteNames = {};
const noteLabels = ["C", "C#", "D", "D#", "E", "F", "F#", "G", "G#", "A", "A#", "B"];
function highlightBlueAreas(threshold = 200, replaceColorR = 255, replaceColorG = 255, replaceColorB = 255) { glitch.image.loadPixels();for (let y = 0; y < glitch.image.height; y++) { for (let x = 0; x < glitch.image.width; x++) { let i = 4 * (y * glitch.image.width + x); let r = glitch.image.pixels[i]; let g = glitch.image.pixels[i + 1]; let b = glitch.image.pixels[i + 2]; if (b > threshold && b > g && b > r) { glitch.image.pixels[i] = replaceColorR; glitch.image.pixels[i + 1] = replaceColorG; glitch.image.pixels[i + 2] = replaceColorB; } } } glitch.image.updatePixels();
}
function preload() { // you can load custom images, ie: unsplash.com img = loadImage('https://tse3.mm.bing.net/th?id=OIP.yJszwQSyU7LdFADrFbM3fwHaEV&pid=Api'); // sample = loadSound('https://samplelib.com/lib/preview/mp3/sample-3s.mp3'); } e function mouseClicked() { print("ftsio"); toggle = !toggle; // sample.play(); }
function setup() { createCanvas(windowWidth, windowHeight);glitch = new Glitch(this); // initialize p5.glitch ('this' needed in P5LIVE...) glitch.loadImage(img); // grab image to glitch imageMode(CENTER); // draw center out frameRate(128); // slow things down background(0); // Setup oscillator osc = new p5.Oscillator('sine'); osc.start(); osc.amp(0); // Setup MIDI setupMidi(0, 0, true); //midi5.debug = ['note', "controlchange"]; /* midi5.noteOn = (note) => { myNote = note let freq = notesFreq[note.number]; if (freq) { osc.freq(freq); osc.amp(note.velocity / 127, 0.05); currentNoteName = noteNames[note.number] || ""; // afficher le nom si connu } }; midi5.noteOff = (note) => { myNote = note let freq = notesFreq[note.number]; if (freq) { osc.amp(0, 0.3); currentNoteName = ""; // efface l’affichage après relâchement } }; */ for (let midi = 12; midi <= 36; midi++) { const freq = +(440 * Math.pow(2, (midi - 69) / 12)).toFixed(2) * 18; const name = noteLabels[midi % 12] + (Math.floor(midi / 12) - 1); notesFreq[midi] = freq; noteNames[midi] = name; }
}
function draw() { updateMidi()if(note.on && !playing) { let freq = notesFreq[note.number]; if(freq) { osc.freq(freq); //osc.amp(note.velocity / 127, 0.05); osc.amp(note.velocity / 127, .1); currentNoteName = noteNames[note.number] || ""; // afficher le nom si connu playing = true } }else{ let freq = notesFreq[note.number]; if (freq) { osc.amp(0, .1); //osc.amp(0, 0.3); currentNoteName = ""; // efface l’affichage après relâchement playing = false } } background(220); textAlign(CENTER, CENTER); textSize(32); glitch.resetBytes(); //glitch.randomBytes(1); // change # bytes if(currentNoteName == 'F3') { background(random(255), 0, 0) } // cycle allll notes /* for(let n of notes) { // n is each number // only use ones with on if(n.on) { // filter certain numbers if(n.number >= 48 && n.number <= 72) { glitch.randomByte(499 + n.number - 48, n.velocity); //print(n.velocity) } } } */ /*if(myNote != undefined && myNote.type == "noteon") { glitch.randomByte(499 + myNote.number - 48); // jump to quan table //glitch.buildImage(); // compile image } */ if(currentNoteName == 'D3') { glitch.replaceByte(123, 17); } if(currentNoteName == 'E3') { textAlign(CENTER, CENTER) textSize(32) text('hello', width / 2, height / 2) } //glitch.pixelate(ccs[1].value / 127) //glitch.replaceBytes(ccs[2].val / 50, ccs[3].val / 50); //glitch.replaceBytes(random(ccs[2].val/10), ccs[3].val / 50); highlightBlueAreas(ccs[1].val + 128, ccs[2].val * 2, ccs[3].val * 2 , ccs[4].val * 2) //print(img.get(10, 20)) // print(mouseX) // 640 = wrap //glitch.replaceByte(ccs[8].val / 10, 55); glitch.pixelate(ccs[7].val / 127) print(note.number) // 640 = wrap if (note.number >= 12 && note.number <= 24 && (playing || toggle)) { glitch.replaceBytes(note.number * ccs[5].val / 50 + 10, note.number % 255); } else if ((playing || toggle) && note.number > 24) { glitch.randomBytes(ccs[6].val * 2, 0); } /* if (note.number == 47) { sample.play(); } */ glitch.buildImage(); image(glitch.image, width / 2, height / 2, glitch.width, glitch.height); // display glitched image tint(255-notes[73].velocity*2, 255-notes[74].velocity*2, 255-notes[75].velocity*2)
}
function mousePressed() { glitch.resetBytes(); // reset glitch glitch.buildImage(); // compile image }
0 notes
Text
HarmonyOS NEXT Practical: Pattern Password
Objective: Set a pattern password.
PatternLock pattern password lock component, used for password verification scenarios by inputting passwords in a nine grid pattern. When the finger is pressed in the PatternLock component area, it enters the input state, and when the finger leaves the screen, it ends the input state to complete password input.
interface [code] PatternLock(controller?: PatternLockController) [/code] controller: Set the PatternLock component controller, which can be used to control component state reset. PatternLockController: The controller of the PatternLock component, which can be used to reset the component state.
Component Properties [code] .sideLength(value: Length) //Set the width and height of the component (with the same width and height). When set to 0 or negative, the component does not display. .circleRadius(value: Length) //Set the radius of the circular dots in the grid. When set to 0 or negative, take the default value. .backgroundColor(value: ResourceColor) //Set the background color. .regularColor(value: ResourceColor) //Set the fill color of the grid dots in the "unselected" state. .selectedColor(value: ResourceColor) //Set the fill color of the grid dots in the "selected" state. .activeColor(value: ResourceColor) //Set the fill color of the grid dot in the "activated" state, where the finger passes through the dot but has not yet been selected. [/code]
Component Events [code] .onPatternComplete(callback: (input: Array) => void)//This callback is triggered when the password input is completed. [/code] input:An array of numbers in the same order as the selected grid dots, with the numbers being the index values of the selected grid dots (the first row of dots from left to right are 0, 1, and 2, the second row of dots is 3, 4, and 5, and the third row of dots is 6, 7, and 8). [code] .onDotConnect(callback: Callback) //When the password is entered and the grid dot is selected, this callback is triggered. [/code] The callback parameter is the number in the order of the selected grid dots, which is the index value of the selected grid dots (the first row of dots from left to right are 0, 1, 2, the second row of dots is 3, 4, 5, and the third row of dots is 6, 7, 8).
Actual combat: PatternLockPage [code] import { LengthUnit } from '@kit.ArkUI'
@Entry @Component struct PatternLockPage { @State passwords: Number[] = [] @State message: string = '请设置图案密码' private patternLockController: PatternLockController = new PatternLockController()
build() { Column() { Text('PatternLock实战练习') Text(this.message).textAlign(TextAlign.Center).margin(20).fontSize(20) PatternLock(this.patternLockController) .sideLength(200) .circleRadius(9) .pathStrokeWidth(5) .activeColor('#707070') .selectedColor('#707070') .pathColor('#707070') .backgroundColor('#F5F5F5') .autoReset(true) .activateCircleStyle({ color: '#707070', radius: { value: 16, unit: LengthUnit.VP }, enableWaveEffect: true }) .onDotConnect((index: number) => { console.log("onDotConnect index: " + index) }) .onPatternComplete((input: Array) => { // 输入的密码长度小于5时,提示重新输入 if (input.length < 5) { this.message = '至少要连接五个点' return } // 判断密码长度是否大于0 if (this.passwords.length > 0) { // 判断两次输入的密码是否相同,相同则提示密码设置成功,否则提示重新输入 if (this.passwords.toString() === input.toString()) { this.passwords = input this.message = '设置密码成功:' + this.passwords.toString() this.patternLockController.setChallengeResult(PatternLockChallengeResult.CORRECT) } else { this.message = '两次密码不一致,请重试' this.patternLockController.setChallengeResult(PatternLockChallengeResult.WRONG) } } else { // 提示第二次输入密码 this.passwords = input this.message = "请再次设置密码" } }) Button('重置密码').margin(30).onClick(() => { // 重置密码锁 this.patternLockController.reset() this.passwords = [] this.message = '请设置密码' }) }.width('100%').height('100%') } } [/code]
0 notes
Text


Sketching out particles and testing some positive affirmations.
```javascript let particles = []; let messages = [<br> "Believe in yourself!",<br> "You are amazing!",<br> "Keep shining!",<br> "Dream big!",<br> "You can do it!",<br> "Stay positive!",<br> "Embrace the journey!",<br> "Big up to you!",<br> "You're doing great"<br> ]; let explosions = []; function setup() {<br> createCanvas(800, 800);<br> noStroke();<br> } ``` function draw() {<br> background(0, 0, 1, 60); // Fading trail effect // Continuously spawn explosions at random intervals<br> if (frameCount % 60 === 0) {<br> // Constraining the space for the explosions<br> createExplosion(random(width - 50), random(height - 50));<br> } // Update and display particles<br> for (let i = particles.length - 1; i >= 0; i--) {<br> particles[i].update();<br> particles[i].show();<br> if (particles[i].finished()) {<br> particles.splice(i, 1);<br> }<br> } // Update and display messages<br> for (let i = explosions.length - 1; i >= 0; i--) {<br> explosions[i].update();<br> explosions[i].show();<br> if (explosions[i].finished()) {<br> explosions.splice(i, 1);<br> }<br> }<br> } function createExplosion(x, y) {<br> let numParticles = random(50, 200);<br> let colors = [random(255), random(255), random(255)];<br> let message = random(messages); // Select a random life-affirming message // Create particles<br> for (let i = 0; i < numParticles; i++) {<br> particles.push(new Particle(x, y, colors));<br> } // Create the message<br> explosions.push(new ExplosionMessage(x, y, message, colors));<br> } class Particle {<br> constructor(x, y, colors) {<br> this.x = x;<br> this.y = y;<br> this.vx = random(-3, 3);<br> this.vy = random(-3, 3);<br> this.alpha = 255;<br> this.colors = colors;<br> } update() {<br> this.x += this.vx;<br> this.y += this.vy;<br> this.alpha -= 5; // Fade out over time<br> } finished() {<br> return this.alpha <= 0;<br> } show() {<br> fill(this.colors[0], this.colors[1], this.colors[2], this.alpha);<br> ellipse(this.x, this.y, 8);<br> rect(this.x + random(2, 5), this.y + random(2, 10), 8);<br> }<br> } class ExplosionMessage {<br> constructor(x, y, message, colors) {<br> this.x = x;<br> this.y = y;<br> this.message = message;<br> this.colors = colors;<br> this.alpha = 255;<br> } update() {<br> this.alpha -= 5; // Fade out over time<br> } finished() {<br> return this.alpha <= 0;<br> } show() {<br> textAlign(CENTER, CENTER);<br> textSize(20);<br> fill(this.colors[0], this.colors[1], this.colors[2], this.alpha);<br> text(this.message, this.x, this.y);<br> }<br> }
0 notes
Text
// Az aranymetszés aránya final float PHI = 1.618; int saveCount = 0; // Mentések számlálója String savePath = "C:\Users\hp\Desktop\sketch_220317a\ixek\"; // Mentési mappa ArrayList positions = new ArrayList<>(); // Tárolja az X-ek helyét void setup() { size(400, 570); // Ablak mérete background(255); // Fehér háttér textSize(32); // Az "X" mérete textAlign(CENTER, CENTER); // Középre igazítás fill(10); // X szín noLoop(); // Csak egyszer fut le, kivéve ha újraindítjuk generateImage(); } void draw() { // A kép generálása a setup() vagy a space lenyomásakor történik } void generateImage() { background(255); // Új háttér, hogy ne rajzoljon egymásra positions.clear(); // Töröljük az előző pozíciókat for (int i = 0; i < 6; i++) { PVector pos; do { float x = generateGoldenRatio(width); float y = generateGoldenRatio(height); pos = new PVector(x, y); } while (isOverlapping(pos)); // Ha fedésben van másik X-szel, új helyet keres positions.add(pos); // Hozzáadjuk a listához text("X", pos.x, pos.y); // Kirajzoljuk az X-et // A távolság kiírása úgy, hogy ne lógjon ki a képből String distanceText = "(" + int(pos.x) + " px, " + int(pos.y) + " px)"; PVector textPos = adjustTextPosition(pos); textSize(16); // Kisebb betűméret a távolság kiírásához text(distanceText, textPos.x, textPos.y); positions.add(textPos); // A szöveg pozícióját is mentjük, hogy ne legyen fedés textSize(32); // Visszaállítjuk az X méretét } } void keyPressed() { if (key == ' ') { // Space lenyomására újragenerálja a képet generateImage(); } else if (key == ENTER || key == RETURN) { // Enter lenyomására menti a képet saveImage(); } } // Generál egy pozíciót az aranymetszés szabályai szerint float generateGoldenRatio(float max) { float goldenSection = max / PHI; return random(1) > 0.5 ? random(goldenSection, max) : random(0, goldenSection); } // Ellenőrzi, hogy egy adott pozíció túl közel van-e másik X-hez vagy szöveghez boolean isOverlapping(PVector newPos) { float minDist = 40; // Minimum távolság az X-ek és szövegek között for (PVector pos : positions) { if (newPos.dist(pos) < minDist) { return true; // Fedés van } } return false; } // Beállítja a távolság szöveg helyét úgy, hogy ne lógjon ki a képből PVector adjustTextPosition(PVector pos) { float textOffsetY = 30; // Alapból az X alá írjuk float textX = pos.x; float textY = pos.y + textOffsetY; // Ha túl közel van az alsó széléhez, akkor fölé írjuk if (textY > height - 10) { textY = pos.y - textOffsetY; } // Ha túl közel van a bal oldalhoz, jobbra toljuk if (textX < 40) { textX += 20; } // Ha túl közel van a jobb oldalhoz, balra toljuk if (textX > width - 40) { textX -= 20; } return new PVector(textX, textY); } // Kép mentése megadott könyvtárba void saveImage() { String filename = savePath + "generated_image_" + saveCount + ".jpg"; save(filename); println("Kép elmentve ide: " + filename); saveCount++; }
0 notes
Text
Canvas 入門 その8
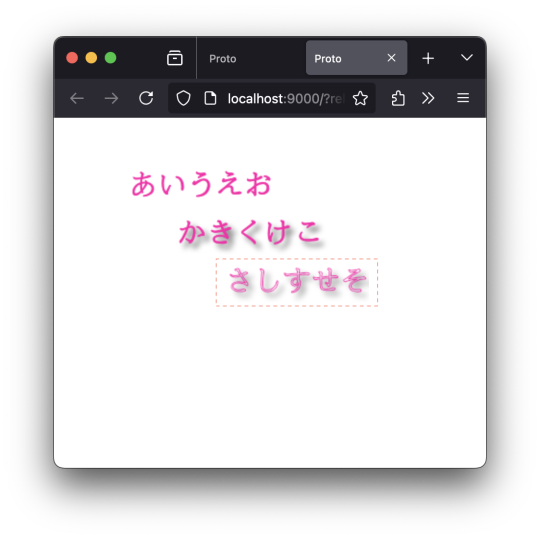
なんで、指定していないのに「さしすせそ」にまで影がついてくるんだろう?「かきくけこ」もフォント指定していないけどなぁ、と首をかしげてたんだけど。 …なるほど。 Canvas のコンテストオブジェクトのうち、「Canvas2D コンテキスト」は、1つだけということなのか、と。 以下のように、(ctx、ctx2 などなどと)変数をボコボコ作ってみたところで、見ているオブジェクト(Canvas2D コンテキスト)は同じモノ、ということだったのか、と。 ;;=================== (defn drawText [ctx text x y color w] (do (set! (.-fillStyle ctx) color) (.fillText ctx text x y w))) (defn drawText2 [ctx text x y color w] (do (set! (.-strokeStyle ctx) color) (.strokeText ctx text x y w))) ;;=================== (defn render7 [name] (let [canvas (.querySelector js/document.body name) ctx (.getContext canvas "2d") ctx2 (.getContext canvas "2d")] (set! (.-font ctx) "bold 30px cursive") (set! (.-textBaseline ctx) "alphabetic") (set! (.-textAlign ctx) "start") ;; 描画1 (drawText ctx "あいう��お" 50 50 "#ff00aa" 150) ;; 「影」についての情報 (set! (.-shadowBlur ctx2) 5) (set! (.-shadowColor ctx2) "#666666") (set! (.-shadowOffsetX ctx2) 5) (set! (.-shadowOffsetY ctx2) 5) ;; 描画2 (drawText ctx2 "かきくけこ" 100 100 "#ff00aa" 150) ;; 明示的に初期化しないと、前に設定した値が引き継がれる ;; (set! (.-shadowBlur ctx) 0) ;; (set! (.-shadowOffsetX ctx) 0) ;; (set! (.-shadowOffsetY ctx) 0) ;; 描画3 (drawText2 ctx "さしすせそ" 150 150 "#ff00aa" 150) ))
;;===================
0 notes
Video
youtube
How to align text in comment text boxes using Adobe Acrobat Pro DC Hello everyone, Today I will present you, How to align text in comment text boxes using Adobe Acrobat Pro DC. If this video is useful to you please give it a Thumbs-Up and Subscribe to this channel so that you will notified as soon as we release another tutorial. If you have any special tutorial requests, please post them below this video. Facebook Page: https://www.facebook.com/Eot89 Twitter: https://twitter.com/RehanaDhaka1216 Please, Subscribe to My Channel: https://www.youtube.com/channel/UC-pus296zbGdNpffiuaVDvg #Adobe_Acrobat_Pro_DC #Aligning_text #TextAlignment #Align_text_boxes_in_Adobe_Acrobat_Pro #How_to_align_text_in_comment_text_boxes_using_Adobe_Acrobat_Pro_DC
0 notes
Text
PImage backgroundImg; PImage bottomLeftImage; PImage bottomRightImage; int[] colors = { color(255, 0, 0), // Red color(255, 127, 0), // Orange color(255, 255, 0), // Yellow color(0, 255, 0), // Green color(0, 0, 255), // Blue color(139, 0, 255) // Purple }; int currentColorIndex = 0; String line1 = "HYDRATE"; String line2 = "YOURSELF"; float textSizeBase = 100; // Base size of the text float textSizeMultiplier = 1.0; // Multiplier to scale text size with canvas size float textY1, textY2; // Y-coordinates of the text lines
int numDroplets = 100; // Number of droplets Droplet[] droplets = new Droplet[numDroplets]; // Array to hold droplets float poolThreshold; // Y-coordinate threshold where droplets start pooling
void setup() { size(720, 600); // Set canvas size backgroundImg = loadImage("Background.jpg"); // Load background image bottomLeftImage = loadImage("Vaso.png"); // Load bottom left image bottomRightImage = loadImage("Garrafon.png"); // Load bottom right image
// Resize images to half their original height float scale = 0.5; bottomLeftImage.resize(int(bottomLeftImage.width * scale), int(bottomLeftImage.height * scale)); bottomRightImage.resize(int(bottomRightImage.width * scale), int(bottomRightImage.height * scale));
// Calculate text size based on canvas size textSize(textSizeBase * textSizeMultiplier);
// Calculate Y-coordinates for text lines textY1 = height / 2 - textSizeBase * textSizeMultiplier / 2; // Above the center textY2 = height / 2 + textSizeBase * textSizeMultiplier / 2; // Below the center
// Set text to bold PFont myFont = createFont("Arial", 48, true); // Create a bold Arial font with size 48 textFont(myFont);
// Initialize droplets for (int i = 0; i < numDroplets; i++) { droplets[i] = new Droplet(); }
// Set the pooling threshold to the bottom of the canvas poolThreshold = height; }
void draw() { // Display background image image(backgroundImg, 0, 0, width, height);
// Add gray-tinted overlay fill(50,100); // Semi-transparent gray fill rect(0, 0, width, height); // Draw a gray-tinted overlay
// Update and display droplets for (int i = 0; i < numDroplets; i++) { droplets[i].fall(); droplets[i].display(); }
// Display bottom left image image(bottomLeftImage, 20, height - bottomLeftImage.height - 20); // Adjust position as needed
// Display bottom right image image(bottomRightImage, width - bottomRightImage.width - 20, height - bottomRightImage.height - 20); // Adjust position as needed
// Blinking and cycling text color if (frameCount % 30 == 0) { // Change color every 30 frames (approximately every half second) currentColorIndex = (currentColorIndex + 1) % colors.length; }
// Display text with thick black outline and cycling colors textAlign(CENTER, CENTER); textSize(textSizeBase * textSizeMultiplier);
// Draw black outline stroke(0); strokeWeight(5); fill(colors[currentColorIndex]); text(line1, width / 2, textY1); text(line2, width / 2, textY2);
// Reset stroke for droplets noStroke(); }
// Class to represent a droplet class Droplet { float x, y; // Position of the droplet float speed; // Speed of the droplet boolean pooling; // Flag to indicate if droplet is pooling
Droplet() { reset(); // Initialize droplet position and speed }
// Method to update position void fall() { if (!pooling) { y += speed; if (y > poolThreshold) { // Start pooling at the threshold y = poolThreshold; // Set y to the threshold pooling = true; // Set pooling flag } } else { // If pooling, reset droplet above canvas after reaching the bottom y = random(-height, 0); pooling = false; // Reset pooling flag to restart falling } }
// Method to display the droplet void display() { fill(150, 200, 255); // Light blue color for water droplets ellipse(x, y, 5, 5); // Draw a small ellipse as the droplet }
// Method to reset droplet position and speed void reset() { x = random(width); // Random horizontal position y = random(-height, 0); // Start above the canvas speed = random(2, 6); // Random falling speed (double the previous speed range) pooling = false; // Initially not pooling } }
0 notes
Text
كوبون خصم نون فيصل السيف 10% من قيمة الطلبية
كوبون خصم نون فيصل السيف 10% من قيمة الطلبية

كوبون خصم noon فيصل السيف 10% من قيمة الطلبية
هدا الكوبون يوفر المؤثر على مواقع التواصل الأجتماعي فيصل السيف
وهو مذيع و مقدم برنامج على القناة السعودية للمتابعين الخاصين به على هده الحسابات
وبهدا يتمكنون من خصم مايصل الى 10% من قيمة الطلبية و على جميع المنتجات و بسعرها الأصلي , بحد أقصى
50 ريال سعودي بالأضافة الى الشحن المجاني و الدفع عند الأستلام
0 notes
Text


0 notes
Text

Today's postcard uses one of Jenny Holzer's Truisms. I love Holzer's work and frequently turn to her list of truisms when in need of some short but striking text.
This is not my first project to use her work! I used her text in the propaganda poster maker in XCOM 2 to create some silly rhetoric.
With Inktober coming to a close, this felt like a good time to start getting back to some of my other creative code pursuits, so I made a little tweet-length Processing sketch using another Holzer Truism.
https://twitter.com/Andy_Makes/status/1454099668611313670
Full source of the OPACITY IS AN IRRESISTIBLE CHALLENGE sketch:
//Jenny Holzer Truisms t=0 draw=_=>{ t+=.03 createCanvas(w=700,350) textSize(80) o=sin(t)*5 noStroke() fill(0) textAlign(CENTER) text("OPACITY IS AN\nIRRESISTIBLE\nCHALLENGE",w/2,100) for(x=0;x<w;x+=10){ fill(w) rect(x+o,0,5,w) fill(0) rect(x,0,5,w) } }//#p5t #つぶやきProcessing
If you want one of my inktober postcards, you still have 2 days to join my patreon at any level!
https://www.patreon.com/andymakes
2 notes
·
View notes
Text
let osc; let currentNoteName = ""; // Nom de la note jouée à afficher let libs = ['https://cdn.jsdelivr.net/gh/ffd8/p5.glitch/p5.glitch.js']; let glitch, img, myNote, playing = false;
let notesFreq = { 48: 130.81, // C3 49: 138.59, 50: 146.83, 51: 155.56, 52: 164.81, 53: 174.61, 54: 185.00, 55: 196.00, 56: 207.65, 57: 220.00, 58: 233.58, 59: 246.94, 60: 261.63, // C4 61: 277.18, 62: 293.66, 63: 311.13, 64: 329.63, 65: 349.23, 66: 369.99, 67: 392.00, 68: 415.30, 69: 440.00, 70: 466.16, 71: 493.88, 72: 523.25 // C5 };
let noteNames = { 48: "C3", 49: "C#3", 50: "D3", 51: "D#3", 52: "E3", 53: "F3", 54: "F#3", 55: "G3", 56: "G#3", 57: "A3", 58: "A#3", 59: "B3", 60: "C4", 61: "C#4", 62: "D4", 63: "D#4", 64: "E4", 65: "F4", 66: "F#4", 67: "G4", 68: "G#4", 69: "A4", 70: "A#4", 71: "B4", 72: "C5" };
function preload() { // you can load custom images, ie: unsplash.com img = loadImage('https://tse3.mm.bing.net/th?id=OIP.yJszwQSyU7LdFADrFbM3fwHaEV&pid=Api'); }
function setup() { createCanvas(windowWidth, windowHeight);glitch = new Glitch(this); // initialize p5.glitch ('this' needed in P5LIVE...) glitch.loadImage(img); // grab image to glitch imageMode(CENTER); // draw center out frameRate(128); // slow things down background(0); // Setup oscillator osc = new p5.Oscillator('sine'); osc.start(); osc.amp(0); // Setup MIDI setupMidi(0, 0, true); //midi5.debug = ['note']; /* midi5.noteOn = (note) => { myNote = note let freq = notesFreq[note.number]; if (freq) { osc.freq(freq); osc.amp(note.velocity / 127, 0.05); currentNoteName = noteNames[note.number] || ""; // afficher le nom si connu } }; midi5.noteOff = (note) => { myNote = note let freq = notesFreq[note.number]; if (freq) { osc.amp(0, 0.3); currentNoteName = ""; // efface l’affichage après relâchement } }; */
}
function draw() { updateMidi()if(note.on && !playing) { let freq = notesFreq[note.number]; if(freq) { osc.freq(freq); //osc.amp(note.velocity / 127, 0.05); osc.amp(note.velocity / 127, .1); currentNoteName = noteNames[note.number] || ""; // afficher le nom si connu playing = true } }else{ let freq = notesFreq[note.number]; if (freq) { osc.amp(0, .1); //osc.amp(0, 0.3); currentNoteName = ""; // efface l’affichage après relâchement playing = false } } background(220); textAlign(CENTER, CENTER); textSize(32); glitch.resetBytes(); //glitch.randomBytes(1); // change # bytes if(currentNoteName == 'F3') { background(random(255), 0, 0) } // cycle allll notes for(let n of notes) { // n is each number // only use ones with on if(n.on) { // filter certain numbers if(n.number >= 48 && n.number <= 72) { glitch.randomByte(499 + n.number - 48); } } } if(myNote != undefined && myNote.type == "noteon") { glitch.randomByte(499 + myNote.number - 48); // jump to quan table //glitch.buildImage(); // compile image } if(currentNoteName == 'D3') { glitch.replaceByte(123, 17); } if(currentNoteName == 'E3') { textAlign(CENTER, CENTER) textSize(32) text('hello', width / 2, height / 2) } glitch.pixelate(ccs[1].value / 127) glitch.replaceBytes(45, 127); glitch.buildImage(); image(glitch.image, width / 2, height / 2); // display glitched image
}
function mousePressed() { glitch.resetBytes(); // reset glitch glitch.buildImage(); // compile image }
/* P5LIVE - Midi If using outside P5LIVE, include p5live-midi.js https://cdn.jsdelivr.net/gh/ffd8/P5LIVE/includes/utils/p5live-midi.js */

0 notes
Text
How to use HarmonyOS NEXT - List Layout?
A list is a complex container that automatically provides scrolling functionality when the number of items in the list reaches a certain level and the content exceeds the screen size. It is suitable for presenting similar data types or datasets, such as images and text. Displaying a dataset in a list is a common requirement in many applications, such as contacts, music lists, shopping lists, etc.
Using lists can easily and efficiently display structured and scrollable information. By linearly arranging the sub components ListItemGroup or ListItem vertically or horizontally in the List component, a single view is provided for the rows or columns in the list, or a loop rendering is used to iterate a set of rows or columns, or any number of individual views and ForEach structures are mixed to construct a list. The List component supports generating sub components using rendering control methods such as conditional rendering, loop rendering, lazy loading, etc.
interface [code] List(value?:{space?: number | string, initialIndex?: number, scroller?: Scroller}) [/code]
List contains ListItem and ListItemGroup sub components. The sub components of List must be ListItemGroup or ListItem, and ListItem and ListItemGroup must be used in conjunction with List.
Rendering list data through ForEach loop Code Examples [code] @Entry @Component struct ListPage { @State message: string = 'List Layout';
cities:Array=[ '北京市','上海市','广州市','杭州市','东莞市' ]
@Builder groupHeader(text: string) { Text(text) .fontWeight(FontWeight.Bold) .backgroundColor(Color.Orange) .width('100%') .padding(4) .textAlign(TextAlign.Center) }
build() { Column() { Text(this.message) .fontSize(30) .fontWeight(FontWeight.Bold) List() { ListItem() { Text('北京') } ListItem() { Text('上海') } ListItem() { Text('广州') } ListItemGroup({ header: this.groupHeader('一线城市')}){ ListItem() { Text('北京') } ListItem() { Text('上海') } ListItem() { Text('广州') } } ListItemGroup({header:this.groupHeader('循环遍历')}){ ForEach(this.cities,(item:string)=>{ ListItem(){ Text(item) } }) } } .backgroundColor('#EEEEEE') .alignListItem(ListItemAlign.Center) } .height('100%') .width('100%')
} } [/code]
Add a dividing line ·List provides a divider attribute to add separators between list items. When setting the divider property, the thickness and color of the separator can be set through the strokeWidth and color properties. ·The startMargin and endMargin properties are used to set the distance between the separation line and the starting end of the side of the list, and the distance from the end of the side of the list, respectively.
Code Examples [code] class DividerTmp { strokeWidth: Length = 1 startMargin: Length = 60 endMargin: Length = 10 color: ResourceColor = '#ffe9f0f0'
constructor(strokeWidth: Length, startMargin: Length, endMargin: Length, color: ResourceColor) { this.strokeWidth = strokeWidth this.startMargin = startMargin this.endMargin = endMargin this.color = color } } @Entry @Component struct EgDivider { @State egDivider: DividerTmp = new DividerTmp(1, 60, 10, '#ffe9f0f0') build() { List() { // … } .divider(this.egDivider) } } [/code]
scroll bar When using the List component, the display of the list scrollbar can be controlled through the scrollBar property. The value type of scrollBar is BarState. When the value is BarState Auto means to display scrollbars as needed. At this point, when touching the scrollbar area, the control is displayed. You can drag the scrollbar up and down to quickly browse the content, and it will become thicker when dragged. If no action is taken, the scrollbar will automatically disappear after 2 seconds. [code] List() { // … } .scrollBar(BarState.Auto) [/code]
0 notes
Text
<!-- wp:paragraph {"align":"center"} -->
<p class="has-text-align-center"><strong><span class="has-inline-color has-primary-color">कुछ अच्छी बाते</span></strong> </p>
<!-- /wp:paragraph -->
<!-- wp:paragraph {"align":"center"} -->
<p class="has-text-align-center"><em><span class="has-inline-color has-secondary-color">खुश नशीब वो नहीं होते, जिनके ��ाता पिता होते हैं<br>खुश नसीब वो होते हैं, जो अपने माता के होते हैं</span></em></p>
<!-- /wp:paragraph -->
<!-- wp:gallery {"ids":[565],"linkTo":"none"} -->
<figure class="wp-block-gallery columns-1 is-cropped"><ul class="blocks-gallery-grid"><li class="blocks-gallery-item"><figure><img src="https://satishsme.files.wordpress.com/2020/05/download-4.jpg?w=225" alt="" data-id="565" data-link="https://satishsme.wordpress.com/download-4/" class="wp-image-565"/></figure></li></ul><figcaption class="blocks-gallery-caption">ये जरूरी नहीं हर इमेज रंगीन हो - कुछ चीजे बेरंग ही अच्छी लगती हैं </figcaption></figure>
<!-- /wp:gallery -->
<!-- wp:paragraph {"align":"center"} -->
<p class="has-text-align-center"><strong>माता पिता</strong> </p>
<!-- /wp:paragraph -->
<!-- wp:paragraph {"align":"center"} -->
<p class="has-text-align-center">पिता अगर चाँद हैं, तो माँ उनकी किरणे हैं,<br>पिता अगर जंगल हैं, तो माँ उसकी रौनक हैं,<br>पिता अगर पेड़ है, तो माँ उसकी छाव हैं,<br>पिता अगर देश हैं, तो माँ उसकी गाव हैं,</p>
<!-- /wp:paragraph -->
<!-- wp:paragraph {"align":"center"} -->
<p class="has-text-align-center">माँ हमे प्रेम करती हैं, पिता हमारे रक्ष्क्षक हैं,<br>माँ हमे प्रेणा देती है, पिता हमारे सिक्ष्क्ष्क हैं,<br>माँ हमसे खुश होती हैं, पिता हमारे जीवन से,<br>माँ हमे राह दिखाती हैं, पिता हमे ले जाते हैं,</p>
<!-- /wp:paragraph -->
<!-- wp:heading {"textAlign":"center","level":6} -->
<h6 class="has-text-align-center"><strong>भाई बहन </strong></h6>
<!-- /wp:heading -->
<!-- wp:paragraph {"align":"center"} -->
<p class="has-text-align-center">भाई अगर राग हैं , तो बहन उसकी गीत हैं,<br>भाई अगर भविष्य हैं, तो बहन उसकी अतीत हैं,<br>भाई अगर हंसी हैं, बहन उसकी खुसी हैं,<br>भाई अगर कलाई है, तो बहन उसकी राखी हैं,</p>
<!-- /wp:paragraph -->
<!-- wp:paragraph {"align":"center"} -->
<p class="has-text-align-center">बहन अगर प्रेणा हैं, तो भाई उसका विसवाश हैं,<br>बहन अगर आसक्ति है, तो भाई उसका ताकत हैं,<br>बहन अगर मजबूर हैं, तो भाई उसका हिम्मत हैं,<br>बहन अगर राखी हैं, तो भाई उसकी कलाई हैं,</p>
<!-- /wp:paragraph -->
<!-- wp:paragraph {"align":"center"} -->
<p class="has-text-align-center"><strong>मोशी बुआ</strong> </p>
<!-- /wp:paragraph -->
<!-- wp:paragraph {"align":"center"} -->
<p class="has-text-align-center">मोशी हमे प्रेम करती हैं, बुआ सिक्षक जैसी हैं,<br>मोशी हमे रोज खेलाती हैं, बुआ हमे पढ़ाती हैं,<br>मोशी माया जैसी हैं, बुआ साया जैसी हैं,<br>मोशी से हम खुश रहते हैं, बुआ हमे घुमाती हैं,</p>
<!-- /wp:paragraph -->
<!-- wp:paragraph {"align":"center"} -->
<p class="has-text-align-center">बुआ हमारी भविष्य चिंतन हैं, मोशी चिंतन हारी हैं,<br>बुआ हमारी कर्मकुंडली, मोशी सबसे प्यारी हैं,<br>बुआ जब हमपर हाथ उठाए, मोशी हमे बचाए,<br>बुआ जब जब हमे रुलाये, मोशी हमे हँसाये,</p>
<!-- /wp:paragraph -->
<!-- wp:paragraph {"align":"center"} -->
<p class="has-text-align-center"><strong>चाचा चाची</strong> </p>
<!-- /wp:paragraph -->
<!-- wp:paragraph {"align":"center"} -->
<p class="has-text-align-center">चाचा जब गुस्सा करते हैं, चाची हमे बचाए,<br>चाचा जब हँसते हैं हमसे, चाची भी खिल जाए,<br>चाचा जब सिकायत करते हैं, चाची भी आ जाए,<br>चाचा जब रुलाते हैं हमको, चाची हमे हँसाये,</p>
<!-- /wp:paragraph -->
<!-- wp:paragraph {"align":"center"} -->
<p class="has-text-align-center">चाची अच्छी, चाचा भी अच्छे,<br>चाची का जवाब नहीं, चाचा हमे पढ़ने को कहते हैं,<br>चाची से कोई, दबाव नहीं,<br>चाची चाचा दोनों अच्छे, दोनों का सावभाव सही</p>
<!-- /wp:paragraph -->
<!-- wp:heading {"textAlign":"center","level":6} -->
<h6 class="has-text-align-center"><em>दोस्तों मुझे पता हैं जो आर्टिकल मैंने लिखा हैं वो बहुत कम </em><br><em>लोगों को पसंद आएगा क्युकी सच हमेशा से कड़वी रही हैं </em></h6>
<!-- /wp:heading -->
1 note
·
View note
Text
Dragvs7′s Level 27/OCT/2020
// This source code is subject to the terms of the Mozilla Public License 2.0 at https://mozilla.org/MPL/2.0/ // © badgeek //@version=4 study("PK TRADE LEVEL NQ_LEVEL", overlay=true) createLabel(price,text) => var label lb1 = na lb1 := label.new(bar_index, price, text, color=color.black, textcolor=color.white, textalign=text.align_center) label.delete(lb1[1]) lb1 lb = createLabel(close+100,"PK TRADING LEVEL") label.delete(lb[1]) var adjust_to_cash = 0 L0_1 = hline(11365 + adjust_to_cash, title="L0_1", color=color.red, linestyle=hline.style_solid) L0_2 = hline(11337 + adjust_to_cash, title="L0_2", color=color.red, linestyle=hline.style_solid) fill(L0_1,L0_2, color.red, title="ZONE") L1_1 = hline(11384.2 + adjust_to_cash, title="L1_1", color=color.red, linestyle=hline.style_solid) L1_2 = hline(11379.1 + adjust_to_cash, title="L1_2", color=color.red, linestyle=hline.style_solid) fill(L1_1,L1_2, color.red, title="ZONE") L2_1 = hline(11435 + adjust_to_cash, title="L2_1", color=color.red, linestyle=hline.style_solid) L2_2 = hline(11423 + adjust_to_cash, title="L2_2", color=color.red, linestyle=hline.style_solid) fill(L2_1,L2_2, color.red, title="ZONE") L3_1 = hline(11524.9 + adjust_to_cash, title="L3_1", color=color.red, linestyle=hline.style_solid) L3_2 = hline(11509.5 + adjust_to_cash, title="L3_2", color=color.red, linestyle=hline.style_solid) fill(L3_1,L3_2, color.red, title="ZONE") createLabel(11524.9 + adjust_to_cash, "DV7 PV" ) L4_1 = hline(11570.5 + adjust_to_cash, title="L4_1", color=color.red, linestyle=hline.style_solid) L4_2 = hline(11554 + adjust_to_cash, title="L4_2", color=color.red, linestyle=hline.style_solid) fill(L4_1,L4_2, color.red, title="ZONE") L5_1 = hline(11619 + adjust_to_cash, title="L5_1", color=color.red, linestyle=hline.style_solid)
1 note
·
View note